To insert multiple rows in Google Sheets, select as many row numbers as the blank rows you want, right-click one of the selected numbers and choose Insert [number] rows above or Insert [number] rows below. With three rows selected, the menu reads Insert 3 rows above and Insert 3 rows below. To make the sheet itself longer, scroll to the last row, type a number beside more rows at the bottom and click Add.
We inserted rows three at a time into our weekly expenses sheet and found three things the menu does not tell you. When we right-clicked one cell, its menu offered one row, and only above. For rows that are not next to each other, the right-click menu showed no insert entry. And in our sheet, new rows arrived with no formula even inside a column of formulas.
The short version
- Several rows: select that many row numbers, right-click and choose Insert [number] rows above or below.
- From the menu bar: select the rows, then choose Insert > Rows.
- Shortcut for rows above: Command + Option + = on a Mac, or Ctrl + Alt + = on Windows and ChromeOS.
- 100 or more at the end: scroll to the last row, type the number beside more rows at the bottom and click Add.
- On a phone: select a row in the Google Sheets app, tap Insert and choose an option.
Ways to insert rows at a glance
| Method | Select first | Then | Where the new rows go |
|---|---|---|---|
| Right-click a row number | As many row numbers as new rows, next to each other | Insert 3 rows above or Insert 3 rows below | Above or below the selection |
| Insert menu | The same row numbers | Insert > Rows, then above or below | Above or below the selection |
| Command + Option + = on a Mac, Ctrl + Alt + = on Windows and ChromeOS | Whole rows | Nothing else, the rows go in at once | Above the selection |
| Control + Option + I on a Mac, Alt + I in Chrome on Windows | Whole rows | R, then R for above or B for below | Above or below the selection |
| Add more rows at the bottom | Nothing, scroll to the last row | Type a number and click Add | After the last row of the sheet |
| Google Sheets app | A row | Tap Insert and choose an option | Next to the selected row |
The four computer methods for several rows all need adjacent row numbers selected first, and the number you select is the number you get. The bottom control is the exception, because it needs no selection and always adds rows after the last one.
Select the rows first
Click the row number where the new rows should start, then hold Shift and click the row number of the last one. We clicked 7 and Shift-clicked 9, which selected Oranges, Pasta and Rice, and the Name box at the left of the formula bar read 7:9.
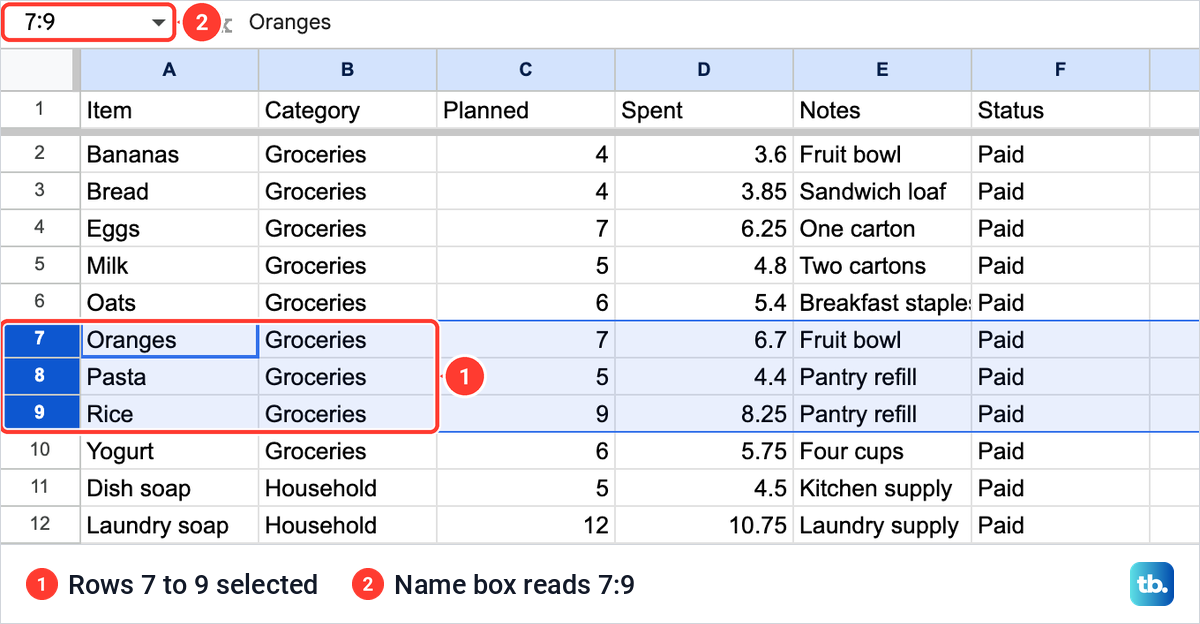
Use the numbers at the left edge, not cells in the grid. A row number gives you a menu that names the count and offers both directions, while the single cell we right-clicked gave a shorter one. From the keyboard, Shift + Space selects the whole row of the cell you are in.
Insert several rows above
Right-click any of the selected row numbers. In our sheet the menu showed Insert 3 rows above and Insert 3 rows below at the top of its second group. The entries under them named the selection as well, from Delete rows 7 - 9 to Resize rows 7 - 9, which is a quick way to check you picked the rows you meant.
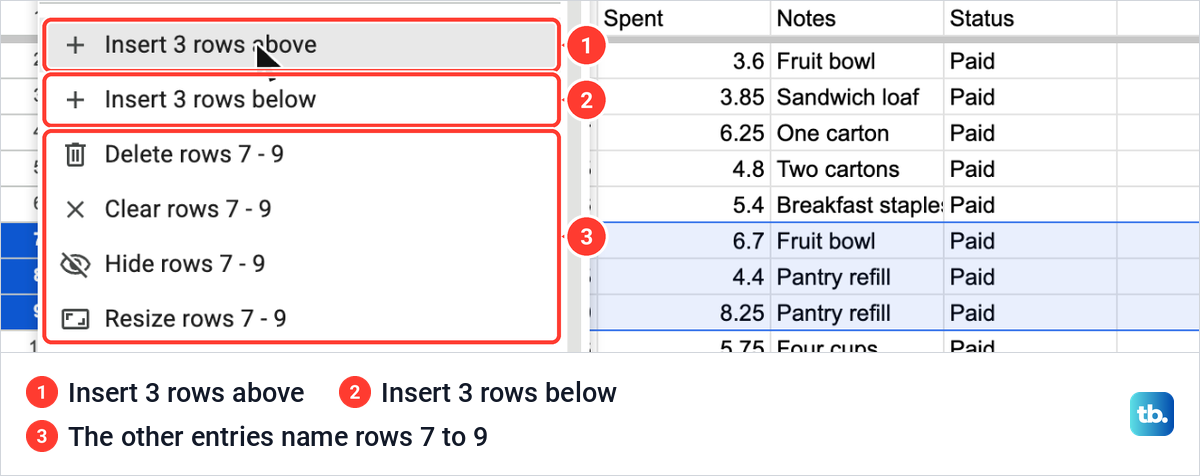
Choose Insert 3 rows above. Three empty rows took the place of the selection, rows 7 to 9, and Oranges, Pasta and Rice moved down to rows 10 to 12. Nothing else in the sheet changed, and the empty rows stayed selected, ready for typing.
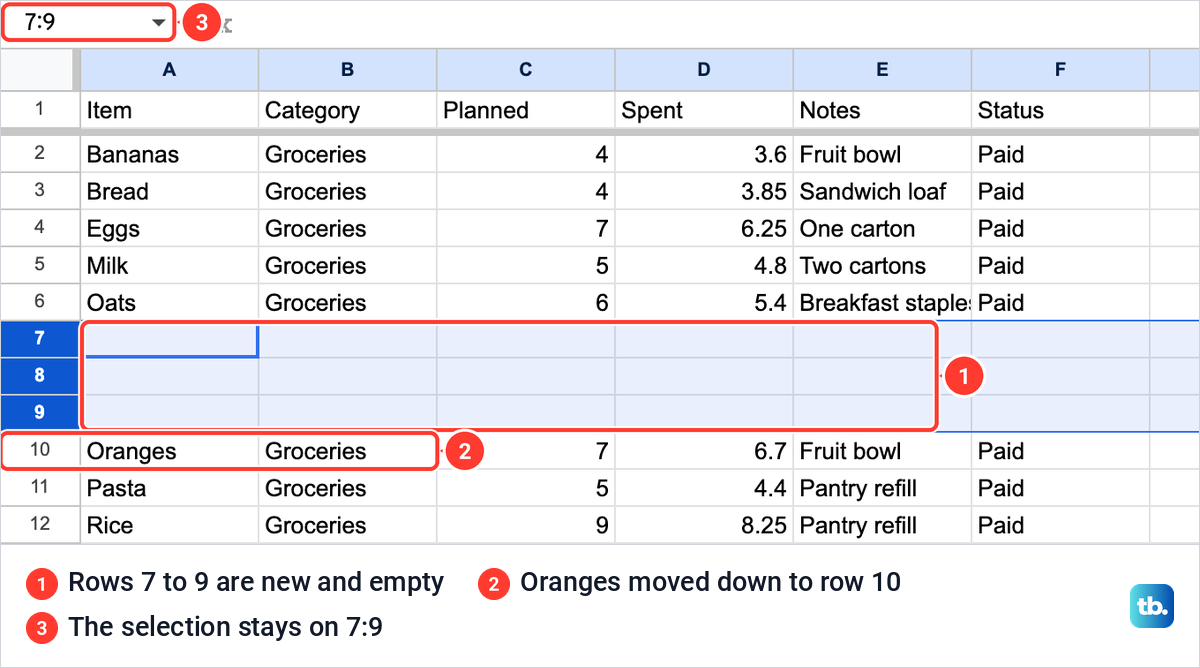
So to open a gap of three rows between two entries, select three rows starting at the lower entry and choose above. In our sheet that meant selecting from Oranges down, and the gap opened between Oats and Oranges.
Insert several rows below
Below works from the other end of the selection. We pressed Command + Z to take the three new rows away, which removed all three in one step, then selected rows 7 to 9 again and chose Insert 3 rows below from the same menu. On Windows and ChromeOS, undo is Ctrl + Z.
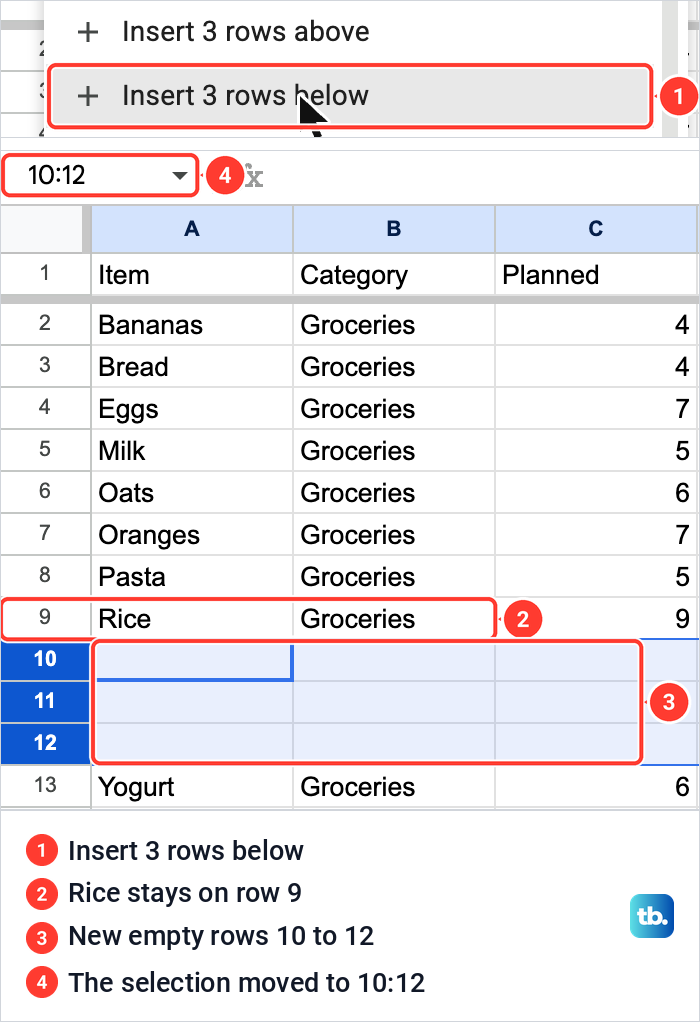
The new rows came in as rows 10 to 12, right after Rice, which stayed on row 9, and Yogurt moved down to row 13. The selection moved onto the new empty rows as well, so the Name box read 10:12 and you can start typing in row 10 straight away.
Use the Insert menu at the top
The menu bar has the same two commands. With the rows selected, open Insert, point to Rows and choose Insert 3 rows above or Insert 3 rows below. The count is printed in bold in that submenu, so a wrong selection is easy to spot before you click.
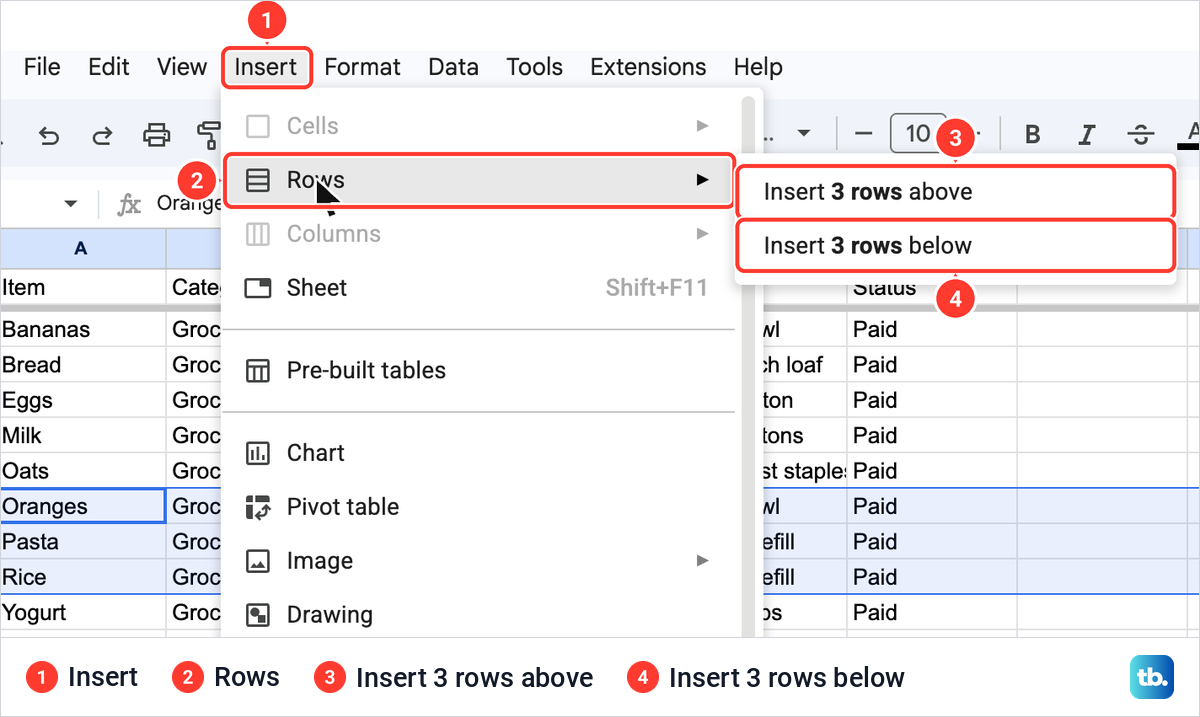
While whole rows were selected, Cells and Columns were greyed out in that menu. It works the other way round too: with a column letter selected, as you do to add columns in Google Sheets, Cells and Rows were the greyed ones. So if Rows will not open, click a row number and try again.
Insert rows with a keyboard shortcut
Select the whole rows first, then press Command + Option + = on a Mac or Ctrl + Alt + = on Windows and ChromeOS. With rows 7 to 9 selected, the Mac keys put three empty rows above them at once, with no menu in between. This shortcut inserts above, so use the menu keys below when you want the rows after your selection.
The menu keys reach both directions. On a Mac, press Control + Option + I and the Insert menu opens with one letter underlined in each entry. Press R for Rows, then R again for above or B for below. We pressed R and then B, and three rows went in below the selection, exactly as they did from the right-click menu.
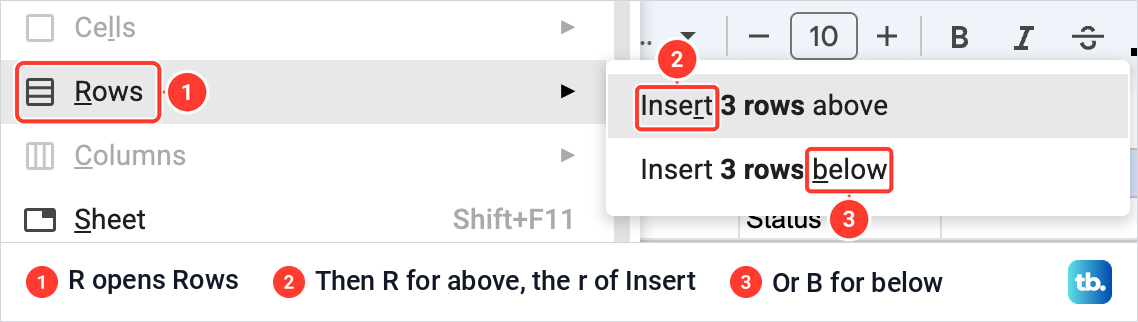
In Chrome on Windows the Insert menu opens with Alt + I, in other Windows browsers with Alt + Shift + I, and on ChromeOS with Alt + I. The letters after it are the same. Some shortcuts do not work with every keyboard language, so if nothing happens, press Ctrl + /, or Command + / on a Mac, to open the full shortcut list in Sheets.
Why the menu only offers one row
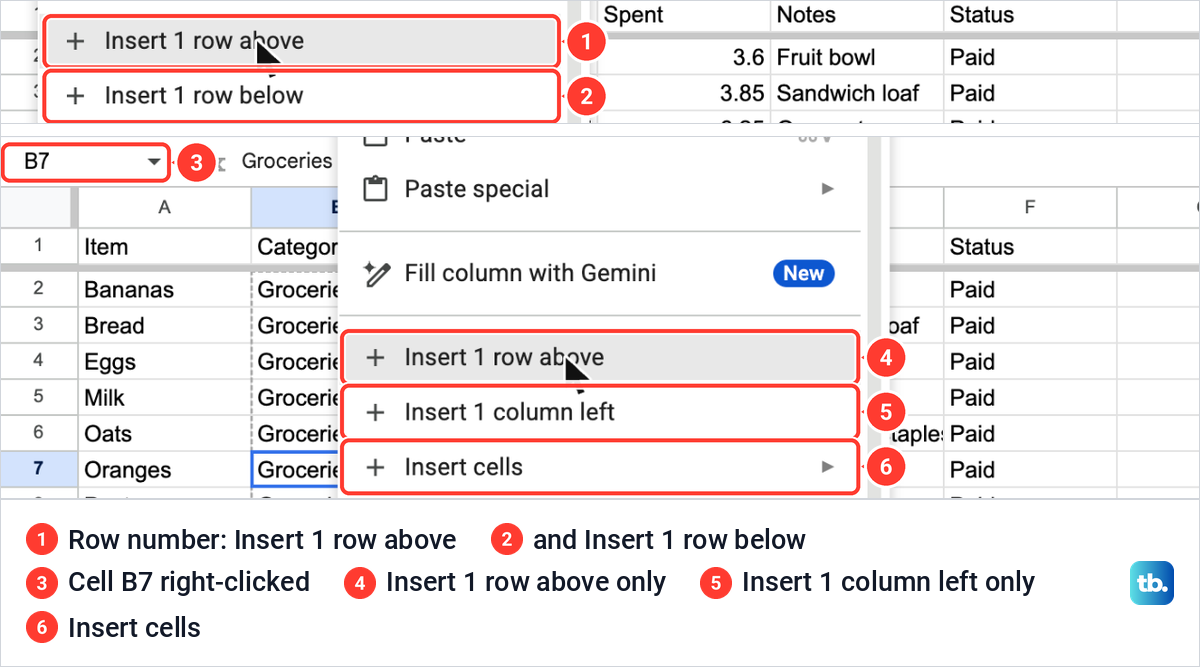
If the menu says Insert 1 row above, Sheets is counting one selected row. That is what we got with only row 7 selected: Insert 1 row above and Insert 1 row below. Close the menu, select the whole block of row numbers and right-click again.
A right-click on a single cell gave us even less. When we right-clicked cell B7, the menu offered Insert 1 row above and Insert 1 column left, with no option for below or right, plus Insert cells. So go to the row numbers whenever you want rows below a line.
Insert cells is a different tool. Its two choices, Insert cells and shift right and Insert cells and shift down, make room by moving cells along rather than by adding whole rows.
When the insert option is missing
Rows that are not next to each other got no insert entry when we right-clicked them. We Command-clicked row numbers 5 and 8, which is how you pick separate rows on a Mac, and Ctrl-click does the same on Windows. The right-click menu then offered Delete selected rows, Clear selected rows, Hide rows and Resize selected rows, but no insert entry among them.
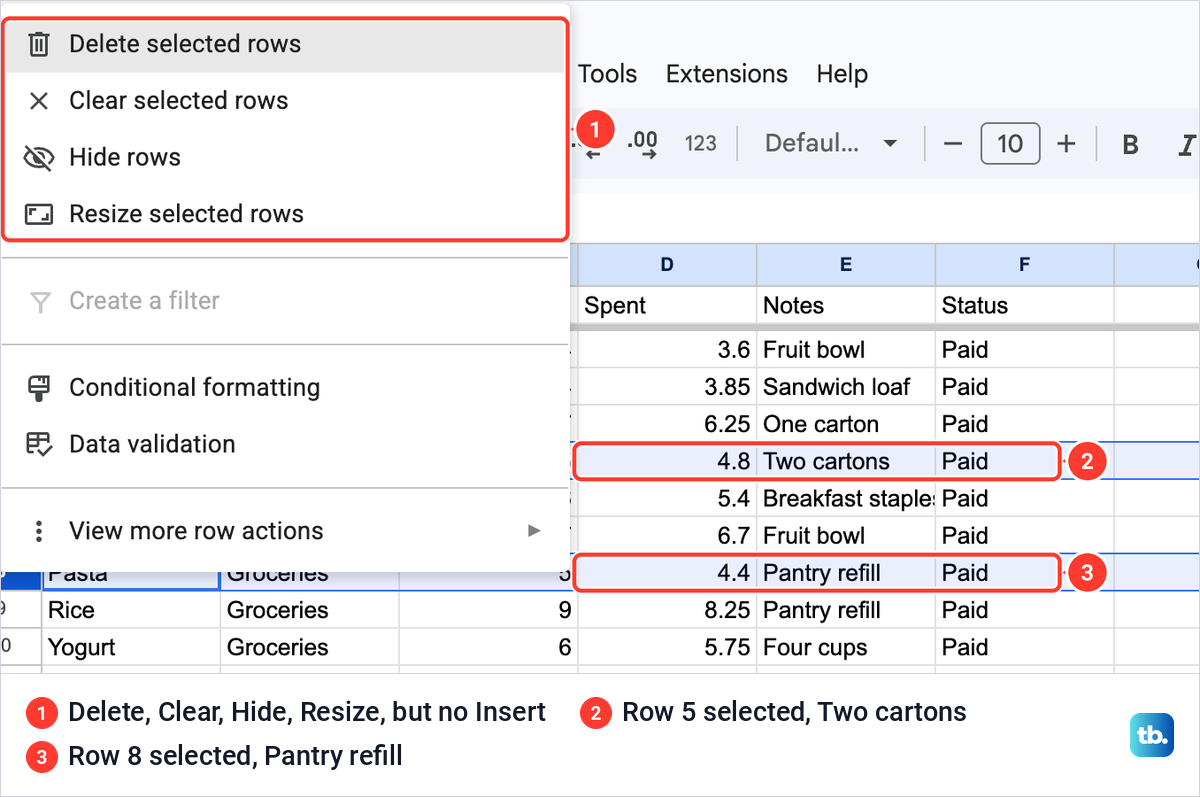
To add rows in two places, do one block at a time. Select the rows at the first spot and insert them, then select the rows at the second spot and insert again. Work from the bottom of the sheet up if you are going by row numbers, because every insert moves the rows under it down.
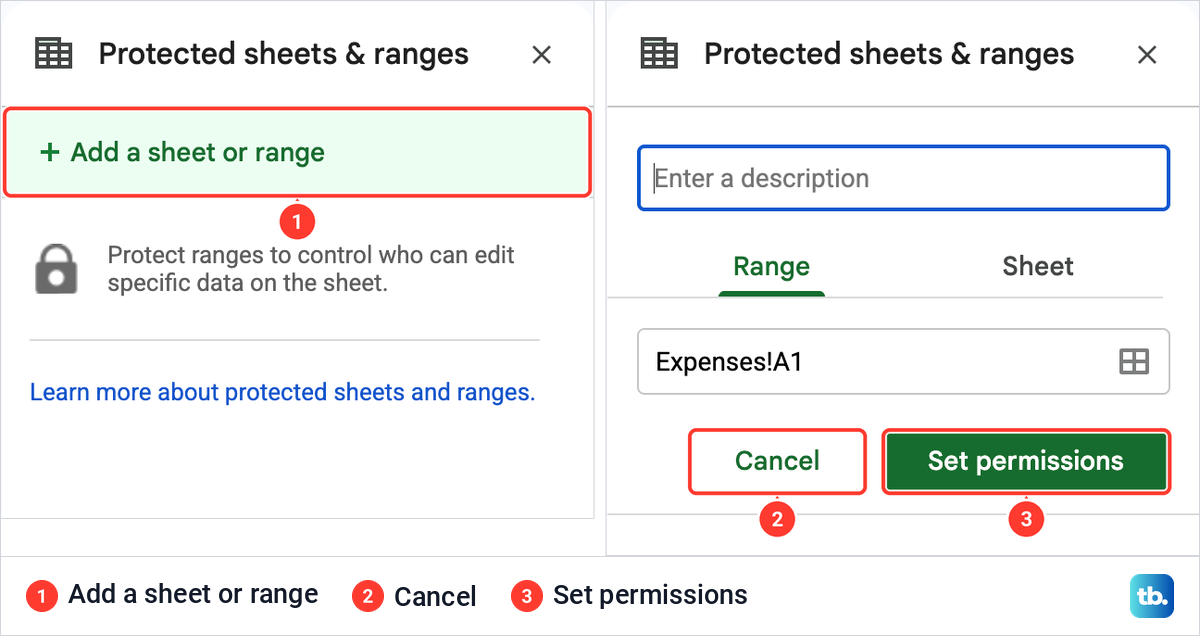
If you cannot insert rows at all, check that you can edit the file. Anyone with view or comment access cannot change the sheet, and an owner can protect a sheet or a range so only some people may edit it. To see the protections on a sheet you can edit, open Data > Protect sheets and ranges.
That opens a side panel named Protected sheets & ranges. In our sheet it showed only Add a sheet or range, because nothing was protected. Choosing it opens a form with a description, Range and Sheet tabs and Set permissions, so close it with Cancel unless you mean to add a protection. If a protection is what blocks you, ask the owner to change it.
Add 100 or more rows at the bottom
The commands above add rows inside your data. To make the sheet itself longer, scroll down past the last row, where you find Add, a number field and the words more rows at the bottom. Our sheet ended at row 1000, and the field already read 1000 when we got there.
We typed 100 and clicked Add. The last row became 1100 and the view stayed at the new bottom of the sheet. Command + Z took the 100 rows away again.
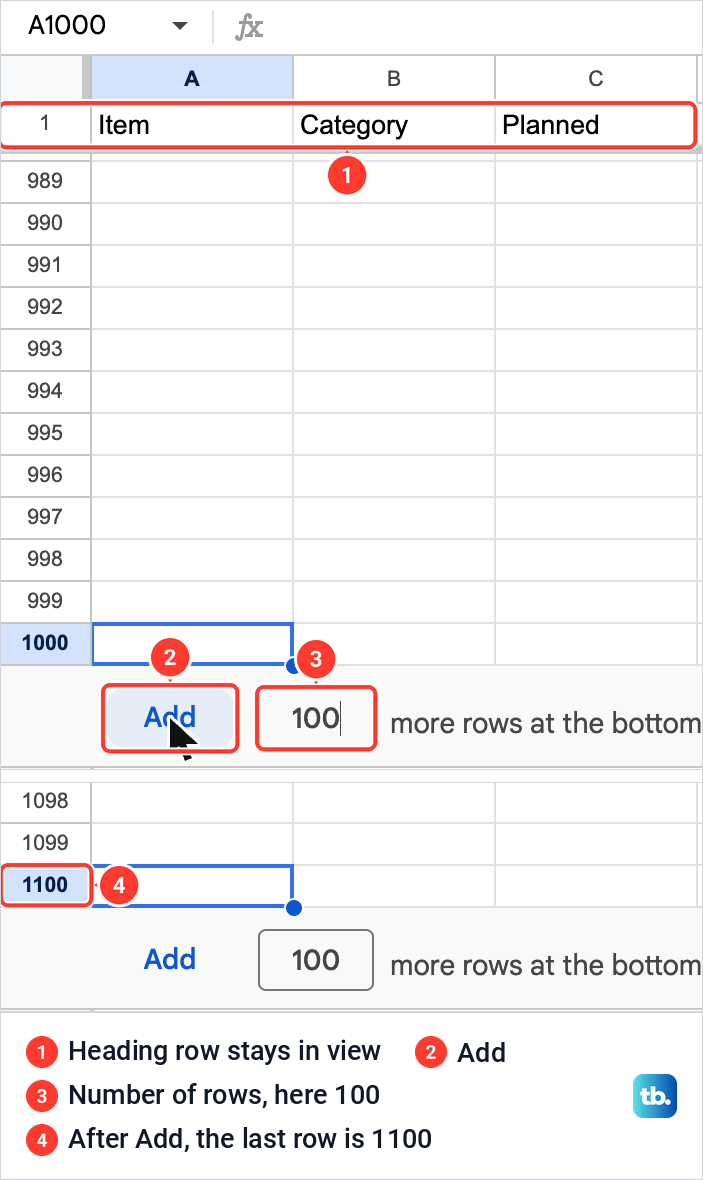
The headings stayed in view all the way down, even at row 1000, because row 1 of our sheet is frozen. If yours scroll out of sight, you can freeze a row in Google Sheets so they stay at the top.
The limit is on cells, not rows. A Google spreadsheet can hold up to 20 million cells, so a wide file reaches it in fewer rows than a narrow one.
Check formulas in the new rows
Check any formula column after you insert rows, along with any cell where you total a column in Google Sheets. For this check our sheet had an extra column, E, headed Difference, which subtracts Spent from Planned and was filled down to row 19. We inserted three rows above row 7, and the new rows 7 to 9 had no formula in that column.
The formulas below them were not broken. They moved down with their rows and adjusted themselves, so the Oranges row, now row 10, read =C10-D10 in E10. Only the new rows needed filling.
A list of choices kept in a range fared better. When we inserted a row inside the source range of a drop-down list in Google Sheets, the new cell joined the list by itself, and the rule's range grew by one row without being opened.
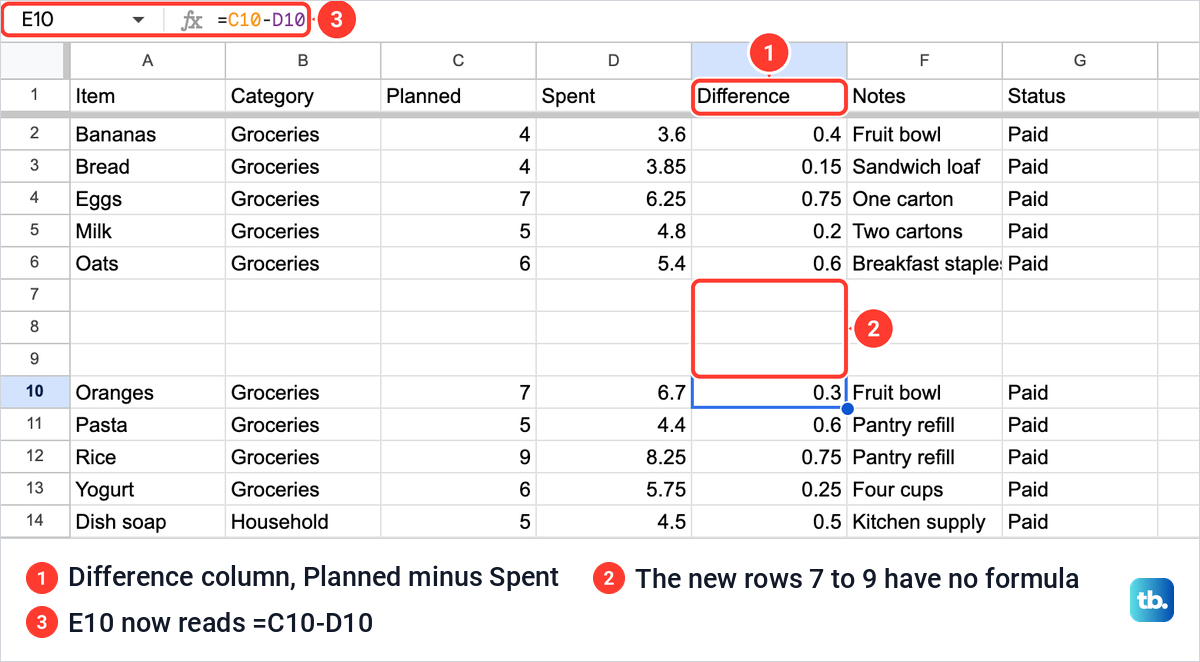
If your new rows are missing a formula, type your new entries, then select the formula cell above the new rows together with the empty cells under it. Press Command + D on a Mac, or Ctrl + D on Windows and ChromeOS, to fill the formula down.
If your list is kept in order, you do not have to insert rows in the right place at all. Type the new entries under the last one, then sort the table in Google Sheets by item or category. If an entry went in twice, remove duplicates in Google Sheets, and once the new rows are filled you can make a graph in Google Sheets from the Planned and Spent columns.
Insert rows on Android, iPhone and iPad
In the Google Sheets app on an Android phone or tablet, open the spreadsheet and select a row. Tap Insert, then choose an option from the menu that appears. To add more than one row, repeat the step.
On an iPhone or iPad the steps are the same. Open the spreadsheet in the Google Sheets app, select a row, tap Insert and choose an option, then repeat to add more.
How we tested this guide
We tested this in Google Sheets on the web in Chrome on a Mac, inserting rows inside an 18-row expenses sheet and 100 more at the bottom.
Frequently Asked Questions
How do I insert multiple rows between existing rows in Google Sheets?
Select as many row numbers as the new rows you want, starting at the row that should end up below the gap. Right-click the selection and choose Insert [number] rows above. For three rows between Oats and Oranges, we selected rows 7 to 9 and chose Insert 3 rows above.
Why does Google Sheets only offer to insert one row?
The menu counts the rows you select. With one row selected it offered one row, and so did the single cell we right-clicked. Select the full block of row numbers on the left, then right-click one of them.
What is the shortcut to insert rows in Google Sheets?
Select whole rows and press Command + Option + = on a Mac or Ctrl + Alt + = on Windows and ChromeOS to insert the same number above. For rows below, press Control + Option + I on a Mac or Alt + I in Chrome on Windows, then R and B.
How do I add 100 rows at the bottom of a Google Sheet?
Scroll past the last row, type 100 in the field beside more rows at the bottom and click Add. The new rows go at the end of the sheet, not between your entries.
Can I insert rows in two places at once?
Not from the right-click menu. When we selected two rows that were not next to each other, it showed no insert entry. Insert one block, then the other, starting from the lower one.
Do new rows copy the formulas from the rows around them?
They did not in our sheet. Rows inserted inside a filled-down formula column had no formula, while the formulas below moved down and kept working. Check the new cells, and where a formula is missing, select the formula above together with the new cells and press Command + D or Ctrl + D to fill it down.
How do I add more than one row in the Google Sheets app?
In the Google Sheets app on Android, iPhone or iPad, select a row, tap Insert and choose an option from the menu. To add more, repeat the step.