
To take a screenshot on Windows, press Windows logo key + Shift + S, choose Rectangle from the Snipping area menu if it is not already selected, then drag across the part of the screen you want and let go. The picture is now on your clipboard, so press Ctrl + V to paste it into an email, chat or document. On Windows 11, Snipping Tool also saves a copy in Pictures > Screenshots unless that setting has been turned off.
We tested the main capture methods on Windows 11. Two results surprised us: what the Print Screen key does now, and what happens to an open menu when you press the shortcut.
The short version
- Part of the screen: press Windows + Shift + S, pick Rectangle if needed, and drag.
- The whole screen, saved as a file: press Windows + PrtSc.
- One window: click it, press Alt + PrtSc, then paste.
- No keyboard shortcut: open Start, type Snipping Tool, open the app and select New.
- A full web page: press Ctrl + Shift + S in Microsoft Edge and choose Capture full page.
Windows 11 screenshot methods at a glance
| Method | What it captures | Where it goes by default | Best for |
|---|---|---|---|
| Windows + Shift + S | An area, one window, the full screen or a freehand shape | Clipboard, plus a file in Pictures > Screenshots | Almost everything |
| PrtSc | By default, opens the same capture bar | Same as Windows + Shift + S | Starting a capture with one key |
| Windows + PrtSc | The whole screen, instantly | A PNG in Pictures > Screenshots, plus the clipboard | Getting a file with no clicks |
| Alt + PrtSc | The active window only | Clipboard only | Pasting one window into a chat or document |
| Snipping Tool app | The area, window or screen you choose, with an optional 3, 5 or 10 second delay | Clipboard, plus a file in Pictures > Screenshots | Working without shortcuts, timed captures |
| Ctrl + Shift + S in Edge | Part of a web page or the full page | Copy puts it on the clipboard, Save writes a JPEG to Downloads | Long web pages |
| Windows + Alt + PrtSc | A supported game or app window | A PNG in Videos > Captures | Games |
| Hold Power, then press Volume Up | The whole screen on a Surface tablet or 2-in-1, but not a Surface Laptop | Pictures > Screenshots | Tablets with no keyboard attached |
This table describes Windows 11 with its default settings. We completed captures with the first seven methods, although Game Bar needed one extra step that is covered below. The Surface row follows Microsoft's instructions.
Capture part of your screen with Windows + Shift + S
This is the shortcut to learn first. It works over almost any app, it does not need a Print Screen key, and it offers four capture shapes.
Press Windows logo key + Shift + S together. The screen dims and a capture bar appears at the top center. Press Esc if you change your mind.
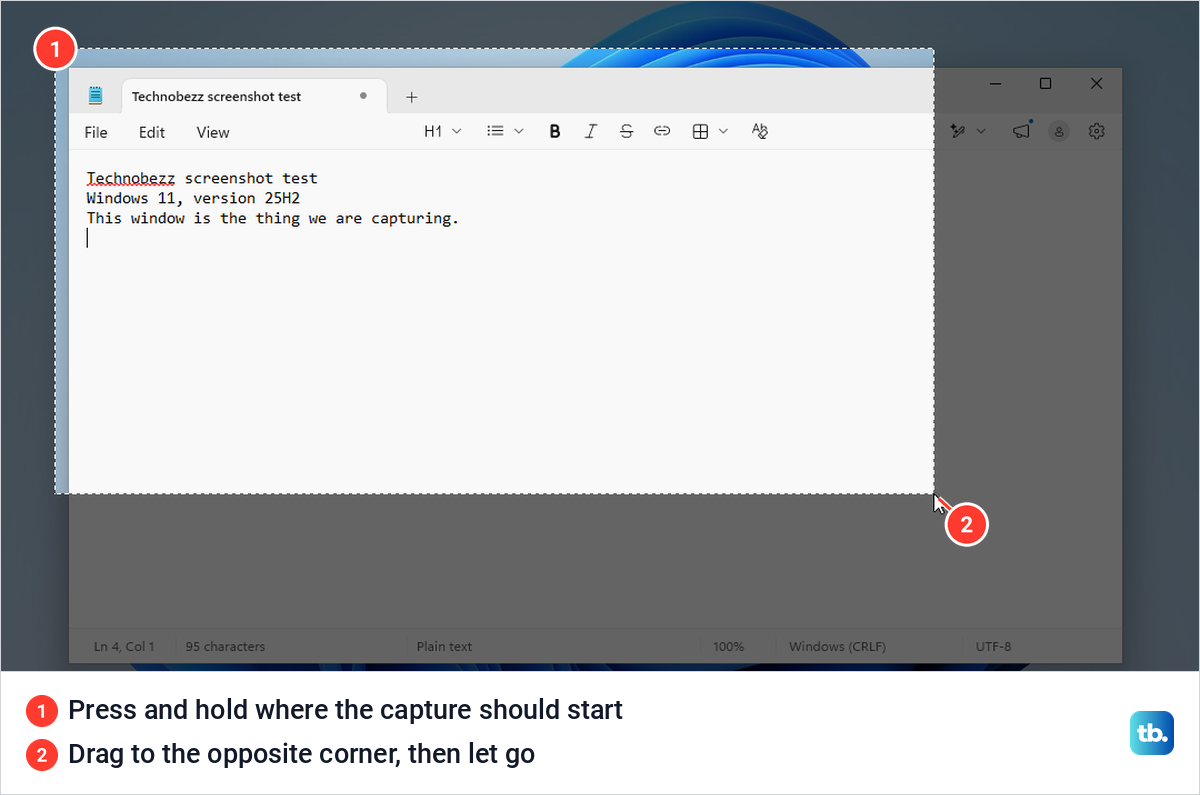
The first time you use it, the bar is set to Snip with a rectangle. Click where the capture should start, hold the mouse button, drag to the opposite corner and let go. The capture is taken the moment you release.
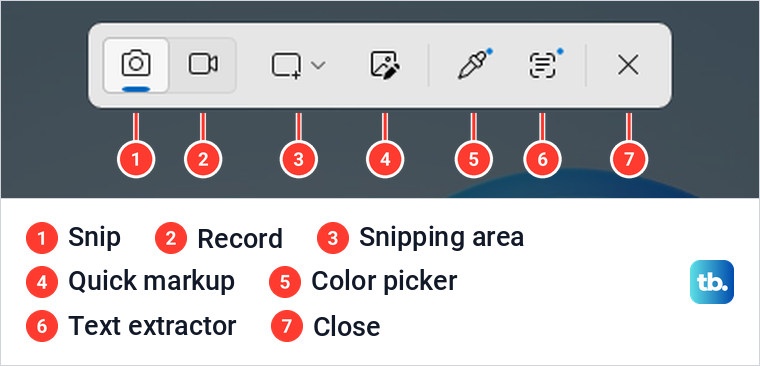
The Snipping area menu, third from the left, changes the shape. Rectangle is the default. Window captures a single window with one click, Full screen takes everything at once, and Freeform lets you draw around an odd shape.
The remaining buttons are newer additions. Quick markup lets you draw on the capture before it is saved, Color picker reads the color under your pointer, and Text extractor copies words straight off the screen. All three were on the bar when we tried it. Microsoft says Copilot+ PCs get one more button, Perfect screenshot.
Window mode has one catch that we found while testing. It captures the window's rectangle exactly as it looks on screen, so anything overlapping that window ends up in the picture too. Bring the window to the front before you click it.
Each of those tools has keys of its own. Our guide to Snipping Tool shortcut keys lists them, from Quick markup to Text extractor.
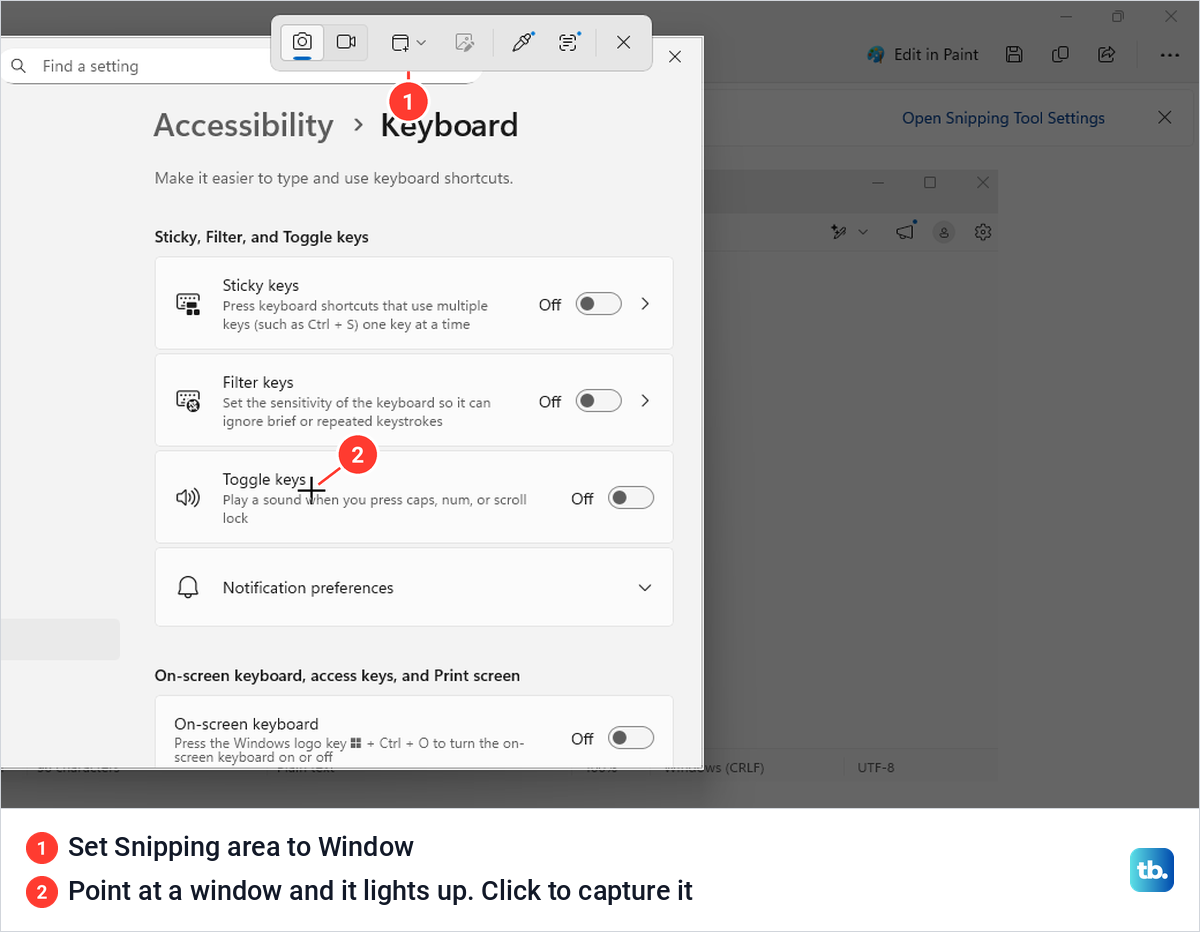
The bar also remembers the last shape you used. After we switched to Window, it opened in Window mode the next time. If dragging does nothing, check the Snipping area button and switch back to Rectangle.
After each snip, a notification appeared at the bottom right of our screen. It reads Screenshot copied to clipboard, and the line under it says the picture was automatically saved to the screenshots folder.
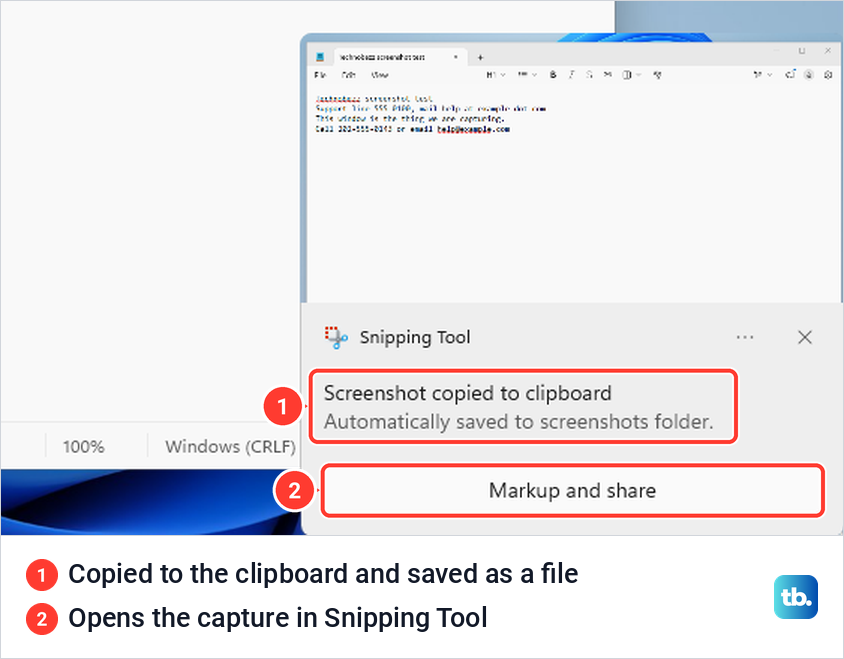
From here you have three choices. Paste it with Ctrl + V wherever you need it, open the saved file from Pictures > Screenshots, or select Markup and share on the notification to open it in Snipping Tool.
Prefer not to use a shortcut at all? Select Start, type snipping tool, open the app and select New. You get the same bar and the same result. If the shortcut itself does nothing, work through our guide to fixing Windows + Shift + S when it stops working.
What the Print Screen key does now
For decades, pressing Print Screen quietly copied the whole screen to the clipboard. On Windows 11 that changed in mid-2023, when update KB5028185 made the key open Snipping Tool instead.
We saw exactly that on Windows 11, version 25H2, before we changed any setting. One press of PrtSc dimmed the screen and brought up the same capture bar. A capture taken this way was copied and saved just like one started with Windows + Shift + S.
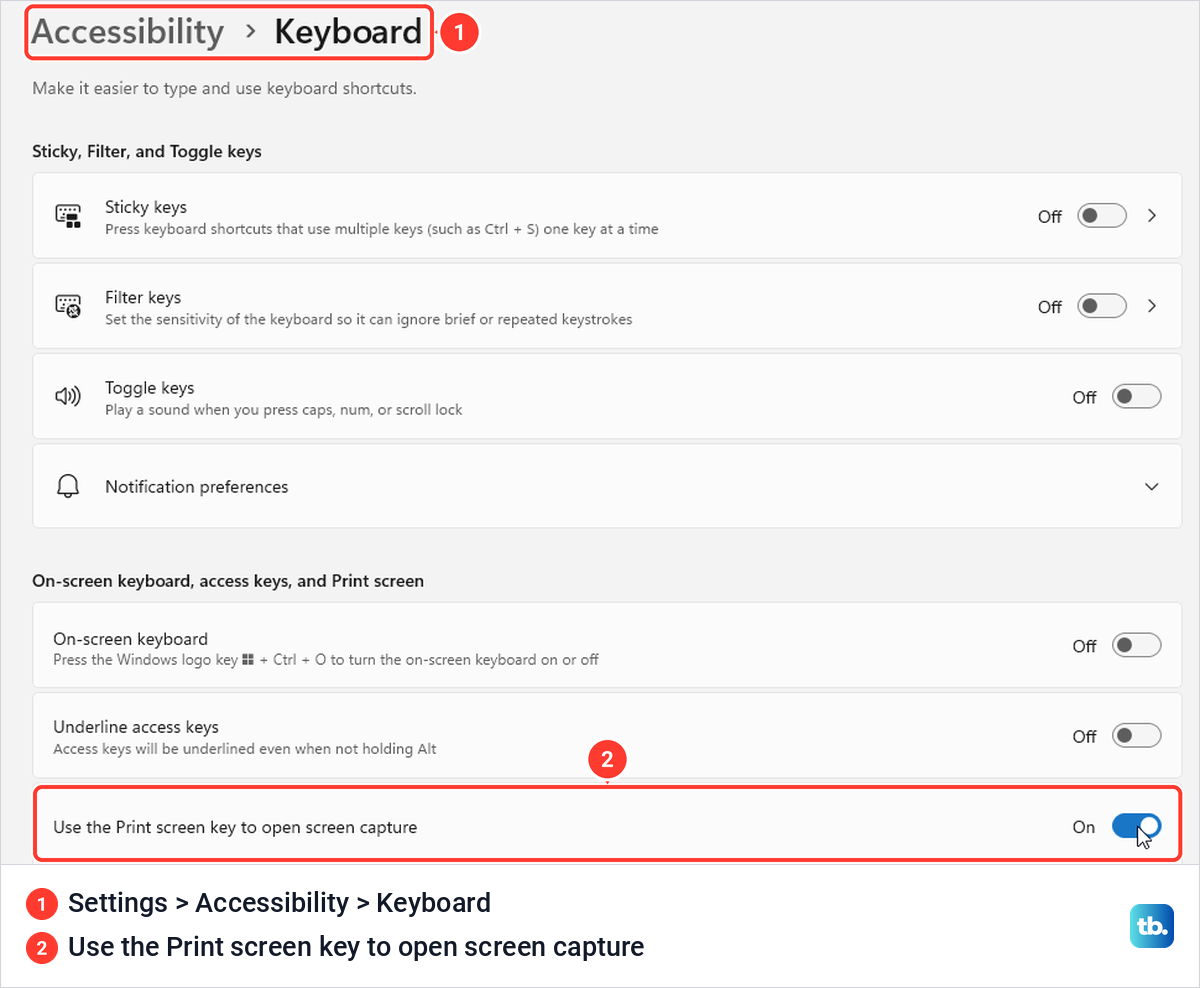
To get the old behavior back, turn off the switch named Use the Print screen key to open screen capture. Try these three routes to find it.
On Windows 11, version 25H2, it sits under Settings > Accessibility > Keyboard, in the section named On-screen keyboard, access keys, and Print screen. Typing print screen into the search box at the top of Settings also brought it up, as the only suggestion.
The third route starts in Snipping Tool. Open the app's three-dot menu, choose Settings, scroll to Shortcuts and select Change in Windows settings. On our PC that link opened the same Settings page. If the switch is not where we found it on your PC, the search box is the quickest way to track it down.
With the switch off, PrtSc went back to copying the entire screen with no sign that anything happened. We pasted the result into Paint and got the whole desktop. Nothing was saved in the Screenshots folder, so paste it somewhere before you copy anything else.
A key that does nothing at all, with the switch on or off, is a different problem. Our fixes for Print Screen not working in Windows cover that case.
Save the whole screen as a file with Windows + PrtSc
To save the whole screen immediately, hold the Windows logo key and press PrtSc. Windows captures everything on screen and writes it to disk without asking anything.
The file lands in Pictures > Screenshots. Open File Explorer, select Pictures in the left pane and open the Screenshots folder.
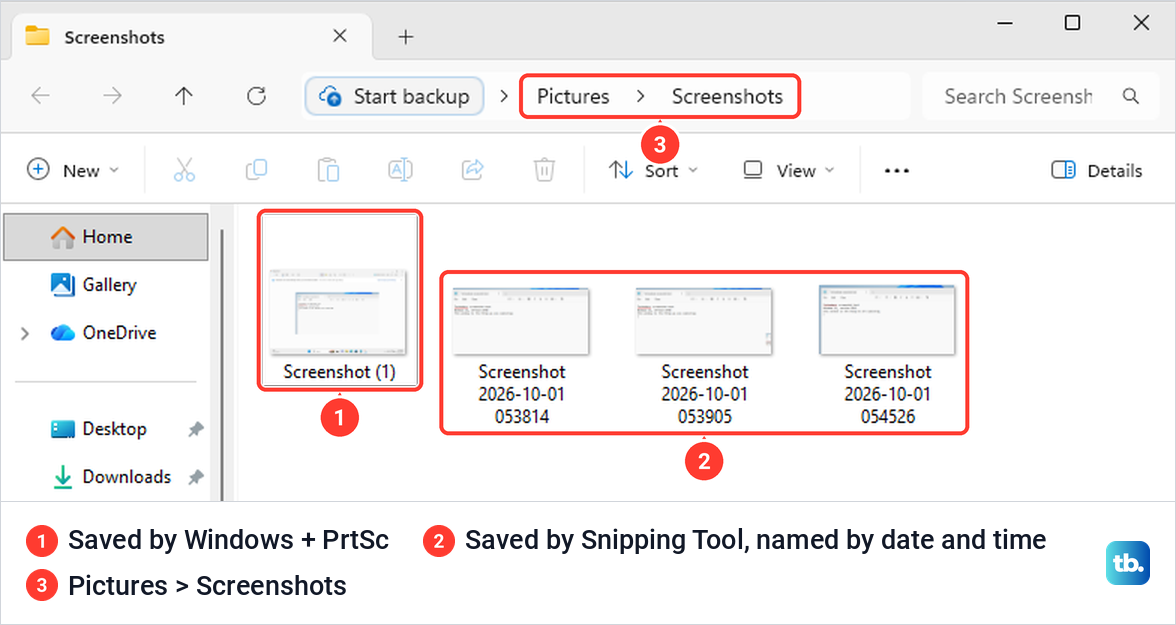
Windows + PrtSc uses numbered file names such as Screenshot (1).png, while Snipping Tool names its files with the date and time. The same press also copies the picture to the clipboard, so you can paste it straight away and still have the file.
The mouse pointer is not captured. It was on screen when we pressed the keys, and the saved file showed that spot without it. Snips taken from the capture bar left the pointer out as well.
To capture one monitor only, press Windows + Shift + S, choose Rectangle if needed, and drag across that screen. Alt + PrtSc is the quicker route when one window on that monitor is all you need.
Copy just one window with Alt + PrtSc
Click the window you want so that it is the active one, then hold Alt and press PrtSc. Nothing is saved as a file this time.
The window is now on the clipboard. Open the email, chat or document where it belongs and press Ctrl + V. When we pasted a Notepad window into Paint, the image was exactly the size of that window and showed nothing else.
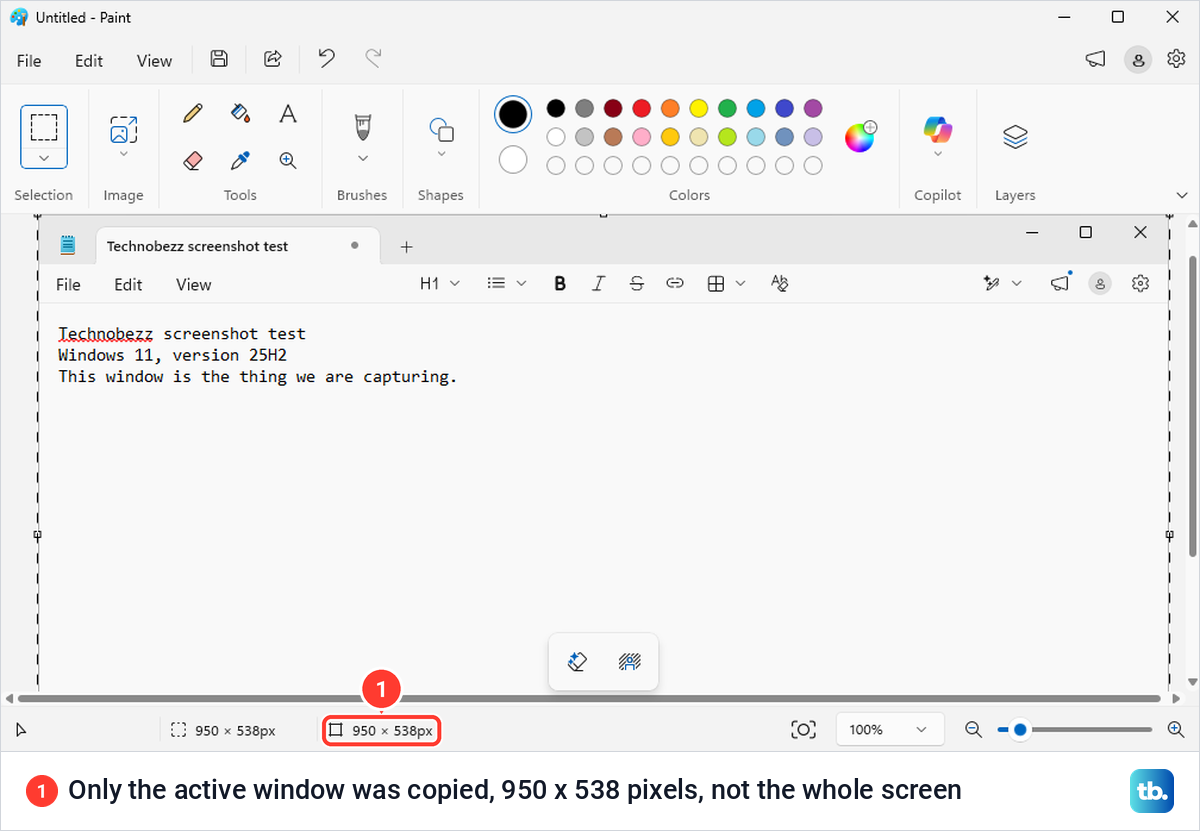
This is the quickest way to share one app without cropping. If you also want that window saved as a file, use Window mode on the capture bar instead.
Where your screenshots are saved
Captures from Windows + Shift + S, the Print Screen bar and Windows + PrtSc are in Pictures > Screenshots by default. Game Bar captures go to Videos > Captures, and Edge saves full-page captures to Downloads. Alt + PrtSc, and PrtSc with its switch turned off, leave the picture on the clipboard only.
Snipping Tool shows you its own folder. In the app, open the three-dot menu, choose Settings and look under Snipping.
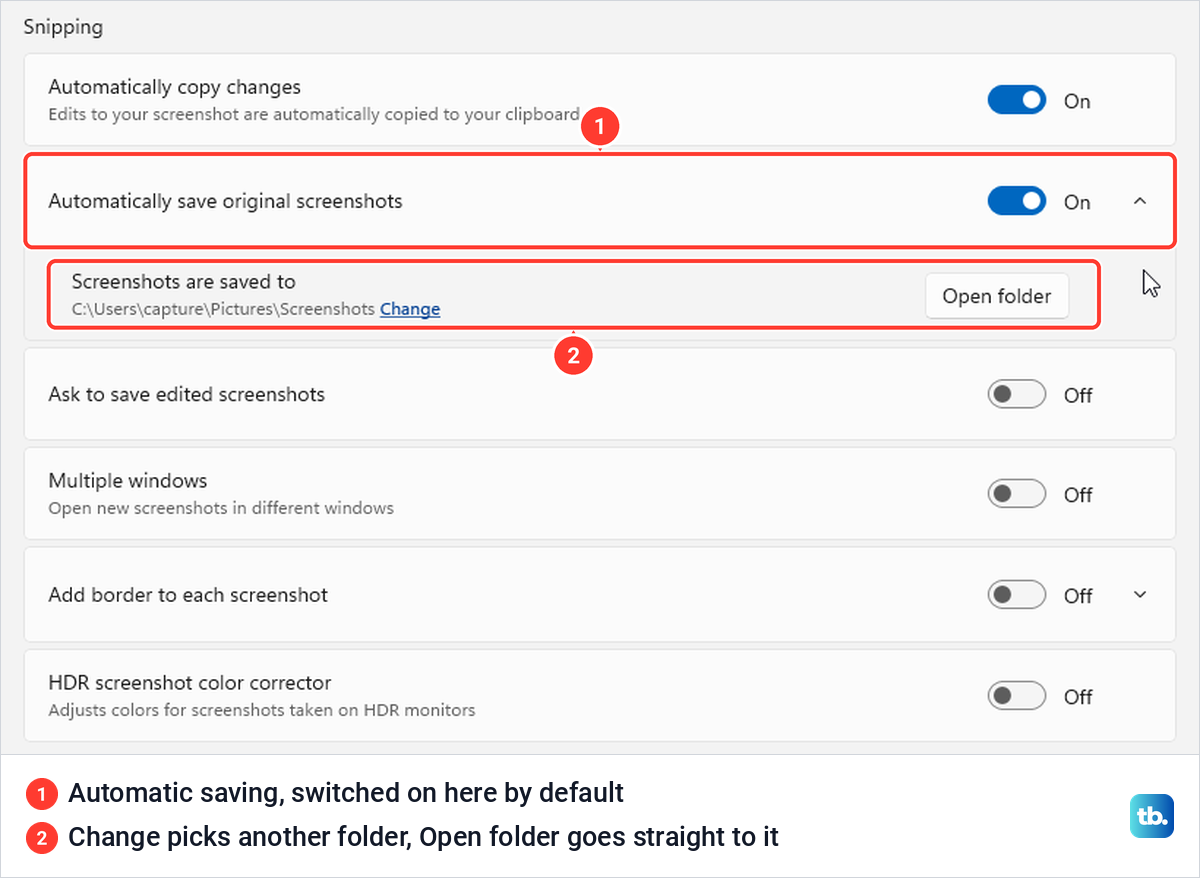
Automatically save original screenshots was already on the first time we opened the app. Directly under it, Screenshots are saved to shows the current folder. Change picks a new one, and Open folder takes you straight there, which is the surest way to find your snips if the folder has been moved or is synced by OneDrive.
Windows + PrtSc ignores that setting. When we pointed Snipping Tool at a different folder, Windows + PrtSc kept saving to Pictures > Screenshots.
You can also move the Screenshots folder itself from the Location tab of its Properties window, and Windows + PrtSc followed the move on our PC. Snipping Tool did not follow it in our test: it stopped saving snips and its notification read Screenshot wasn't automatically saved. If you see that message, pick the folder again in Snipping Tool's settings.
OneDrive no longer has its own Save screenshots switch. Microsoft's advice now is to include the Pictures folder in OneDrive's backup, and the Screenshots folder goes with it. Our guide to where screenshots go on Windows covers every save location and how to find a missing capture.
Copied a capture and then copied something else? Clipboard history can bring it back, but only if it was already switched on. Press Windows logo key + V to check. If Windows offers to turn the feature on, it was off, and it will only remember what you copy from now on.
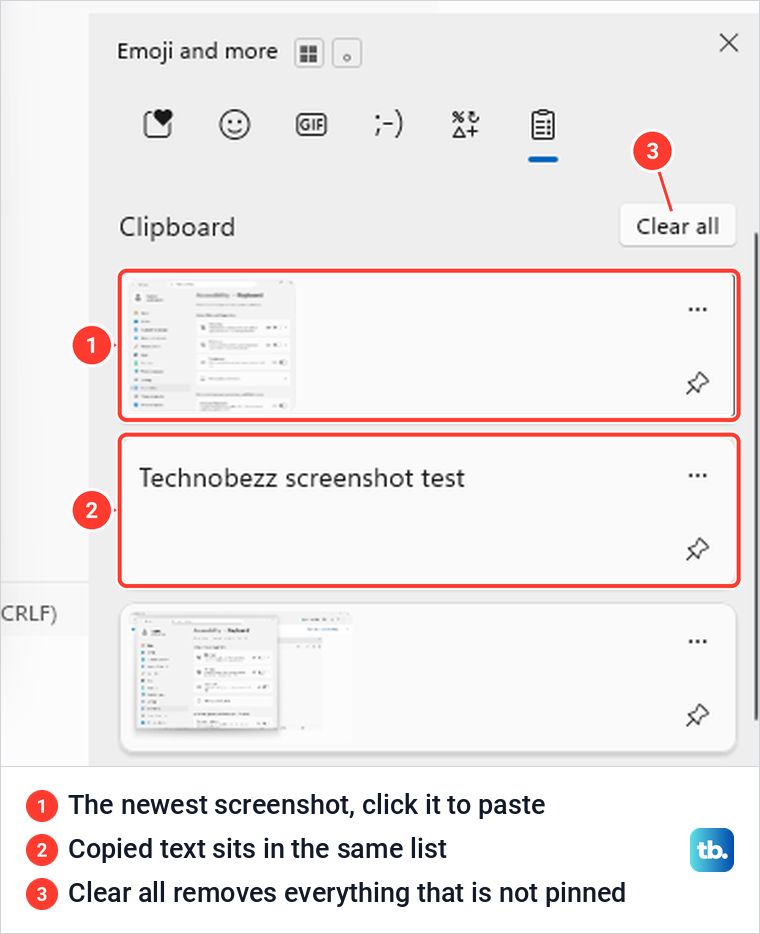
Microsoft's limits are 25 items of up to 4 MB each. Restarting the PC clears everything except the items you have pinned. There is more in our guide to using clipboard history in Windows 11.
Find the Print Screen key on a laptop
On a full-size keyboard the key sits in the top row, just to the right of F12. It can be labeled PrtSc, PrtScn, PrtScr or Print Screen, and it often shares its cap with SysRq.
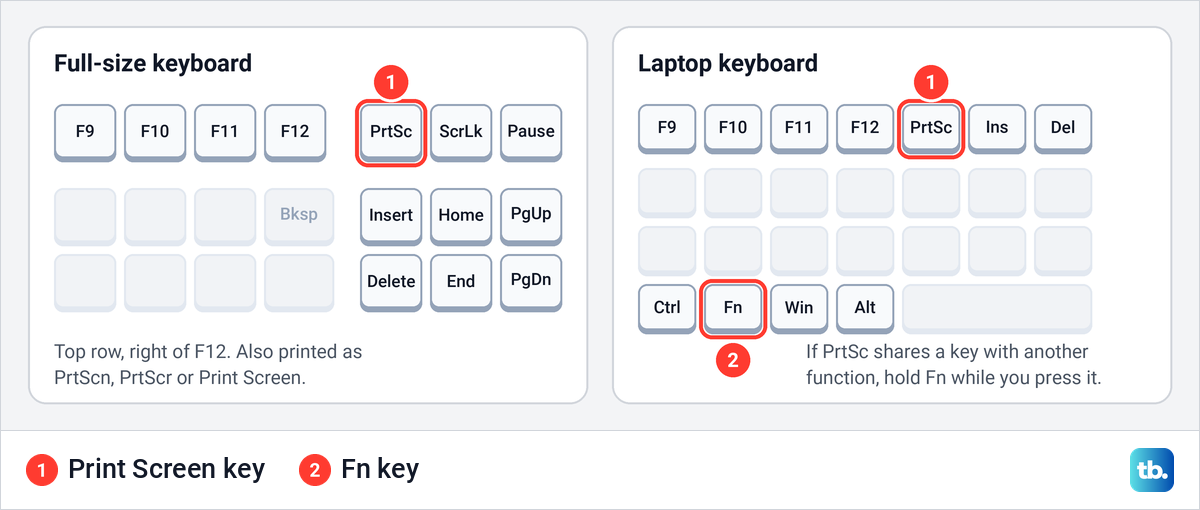
Laptops are less consistent. If PrtSc shares a key with another function, try holding Fn while you press it. Fn Lock, or your laptop's hotkey mode, can change which of the two functions runs.
The laptop makers' own help pages suggest the combinations below. Check the labels on your keyboard before trusting any of them, because layouts differ from model to model.
| Laptop | What the maker's help page suggests |
|---|---|
| HP | A key marked prt sc near the top right, with fn if it does nothing alone. On newer ENVY, Spectre and OmniBook keyboards prt sc is printed on the right Shift key, used with fn |
| Dell | Print Screen is on F10 on many models. Press F10 alone or Fn + F10, depending on the Fn Lock mode. Touch-sensitive function rows may need the function layer switched on first |
| Lenovo | PrtSc sits between Insert and Delete on models such as the IdeaPad Slim 5 and Yoga 7, and beside the right Alt key or on F9 on ThinkPads such as the T14 |
| ASUS | A function-row key marked for screen capture. It differs by model, so check your keyboard diagram |
| Microsoft Surface | On Surface keyboards that have them, Fn + Spacebar or a dedicated Snipping key |
We have separate walk-throughs for how to screenshot on an HP laptop, on a Dell laptop and on a Lenovo computer. If your keyboard has no Print Screen key at all, you do not need one. Windows + Shift + S does not use that key, which also makes it the answer for compact 60 percent keyboards.
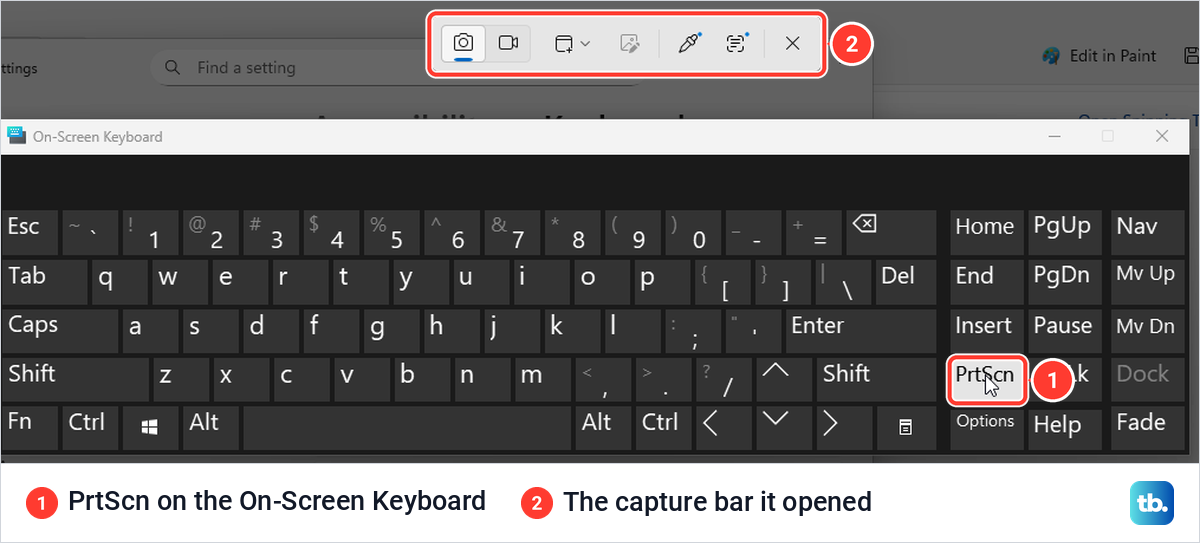
Windows also has a full keyboard tucked away on screen. Press Windows logo key + Ctrl + O to open the On-Screen Keyboard, then click its PrtScn key. When we did, the capture bar opened exactly as if we had pressed a real key. There are a few more routes in our guide to taking a screenshot on Windows without Print Screen.
Capture a menu, a tooltip or the Start menu
You may not need a timer for this. We opened a right-click menu in Notepad and pressed Windows + Shift + S. The menu stayed exactly where it was, frozen under the capture bar and ready to be selected. A tooltip and the open Start menu behaved the same way.
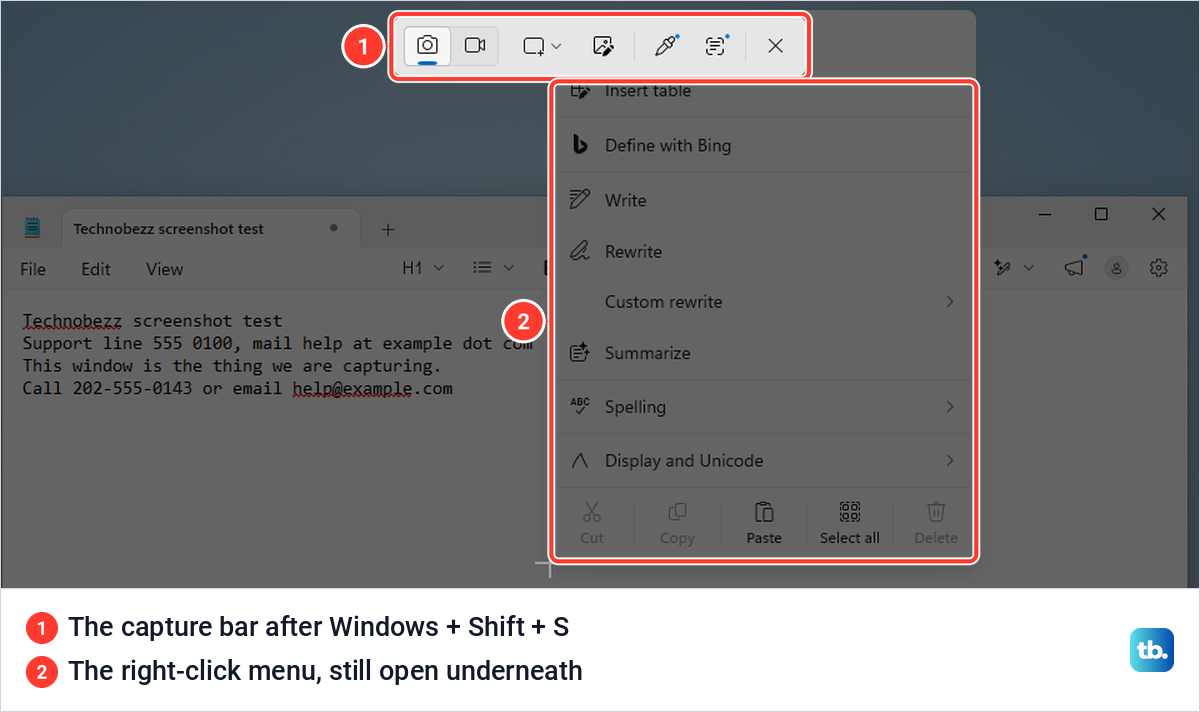
So try the shortcut first. Keep the timer for the cases where pressing keys does disturb what you want to show, or where you need a few seconds to set something up.
The timer lives in the Snipping Tool app, not on the capture bar. Open the app, select the clock button, pick a 3, 5 or 10 second delay, then select New. When the time is up the screen freezes, and with Rectangle selected you drag as usual.
We set 10 seconds, opened the File menu in Notepad and waited. The menu was still open under the bar when the time ran out.
Mark up a capture, copy its text or hide private details
Select the notification after a snip, or open a saved screenshot in Snipping Tool, and you land in the editor. The tools run along the top.
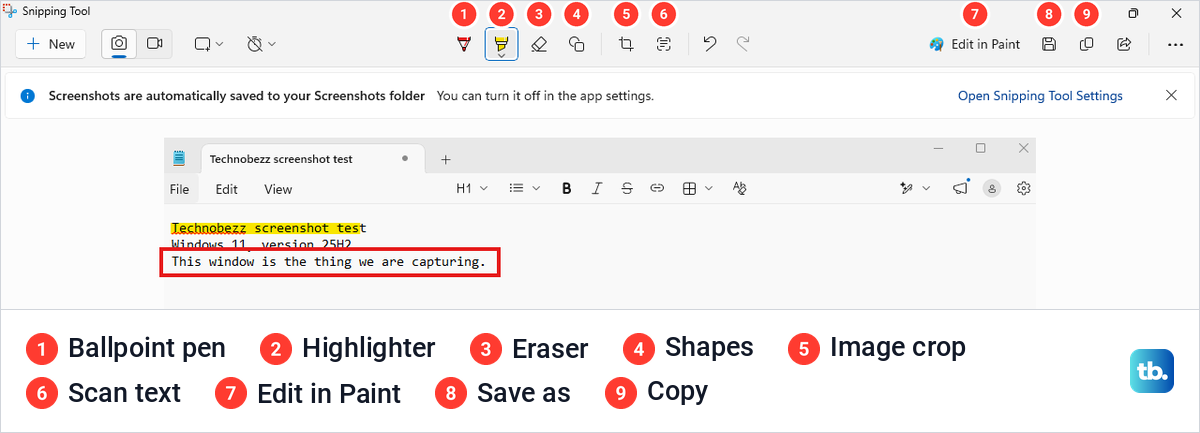
The pen and highlighter draw freehand. Shapes adds clean rectangles, ovals, lines and arrows, which is what you want for pointing at something. We boxed one line of our test note and highlighted another.
Image crop trims the edges, Edit in Paint hands the picture to Paint for heavier work, and Copy puts the edited version back on the clipboard. Save as, or Ctrl + S, stores a separate copy wherever you like. The dialog on our machine offered PNG, JPG and GIF, and PNG is the one to choose for anything with text in it.
The button that looks like lines of text in a frame is Scan text. Microsoft's help pages call the same feature Text actions and say the recognition runs on your own PC. Select it and the words in the capture become selectable text.
Drag across the words you want and press Ctrl + C to copy them. We copied a line that way and checked the clipboard, which held the exact text we had selected. Right-clicking shows the same commands as a menu, along with Select all.
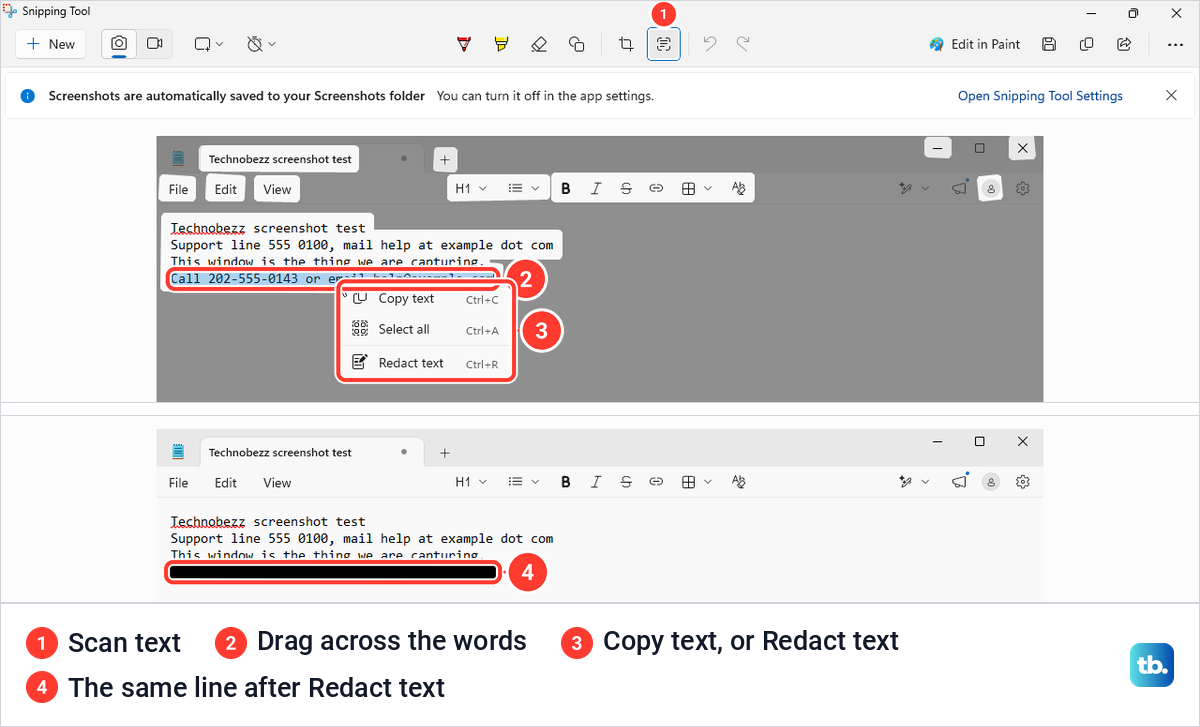
The same menu hides private details. Select the text and choose Redact text, or press Ctrl + R, and it is replaced with a solid black bar. We used it on a phone number and an email address in our test note.
Do not use the highlighter for this, because it is see-through. Use Save as to store the redacted picture and share that file. When we opened ours, the bar was part of the picture. The automatically saved original in the Screenshots folder still showed everything, so remove that file if it holds something private.
Capture a full web page
Snipping Tool cannot scroll, so a long web page is a job for the browser. In Microsoft Edge, press Ctrl + Shift + S. A bar drops down with Capture area, Capture screen area and Capture full page. Choose the last one and Edge opens a preview of the whole page, including the part you would have to scroll to see.
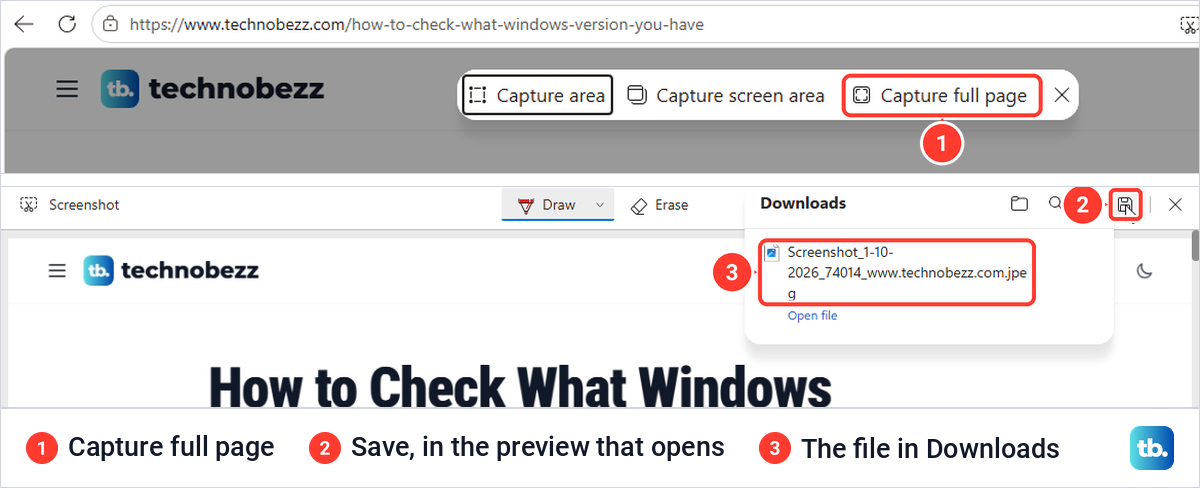
The preview has Draw and Erase tools, a copy button and a Save button. When we selected Save, Edge wrote a JPEG to the Downloads folder, named with the date, the time and the site.
In Firefox, right-click an empty part of the page, choose Take Screenshot, select Save full page, then choose Download or Copy. In Chrome, press Ctrl + Shift + I to open the developer tools, then Ctrl + Shift + P, type screenshot and choose Capture full size screenshot.
Screenshot a game or record a video of your screen
For games, the Xbox Game Bar has its own shortcut, Windows logo key + Alt + PrtSc. It behaved differently from the others when we tried it over an ordinary app. Game Bar opened with a notice that gaming features were not available, and nothing was saved.
Ticking Enable gaming features for this app to record gameplay fixed that. After that, both the shortcut and the Take screenshot button captured the app window only, not the whole desktop, and saved it in Videos > Captures with the window's name and the date in the file name. If Game Bar will not appear, start with how to open Xbox Game Bar on Windows.
For motion instead of a still picture, press Windows logo key + Shift + R. Microsoft's instructions are to drag over the area you want, select Start, and select Stop when you are done. The recording opens in Snipping Tool and is saved as an MP4 in Videos > Screen Recordings by default.
Our guide to the screen recorder in Windows 11 covers screen recording in full, including sound.
When a screenshot will not work
Start by pressing Windows + Shift + S. If the capture bar appears but the PrtSc key does nothing, look at the key itself: hold Fn while you press it, check Fn Lock, and check the switch described earlier. If the capture works but Ctrl + V pastes nothing, see our fixes for copy and paste not working in Windows 11.
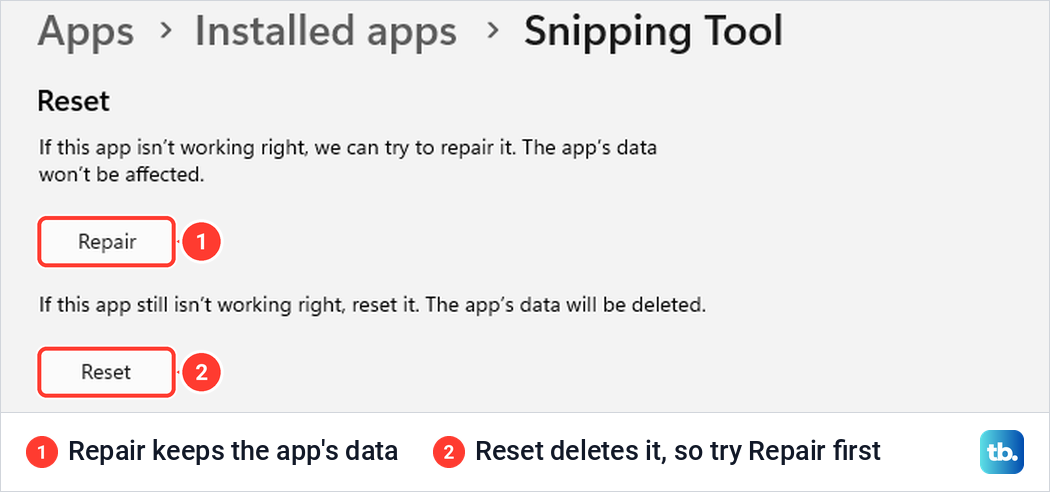
If no shortcut brings up the bar, repair the app. Open Settings > Apps > Installed apps, search for Snipping Tool, open its three-dot menu and choose Advanced options. Select Repair first, which keeps the app's data, and Reset only if that does not help. Our guide to Snipping Tool not working in Windows 11 goes further if neither button fixes it.
If a video or one particular app appears black or blank, capture protection may be responsible. Apps can mark their windows as protected, and Windows then leaves that content out of screenshots.
Washed-out colors on an HDR display have a dedicated setting. Snipping Tool's settings include a switch called HDR screenshot color corrector, described as adjusting colors for screenshots taken on HDR monitors. It was off when we first opened the settings, so turn it on and take the screenshot again.
On a work or school PC, screenshots may simply be blocked. Administrators can turn off screen capture and Edge's screenshot feature by policy, and only they can turn it back on.
Finally, be careful what you install. Snipping Tool comes with Windows 11 and is published by Microsoft Corporation. The Microsoft Store also lists at least one app from another publisher with a nearly identical name, and you do not need it.
Taking screenshots on Windows 10
Windows 10 reached the end of support on October 14, 2025, and Microsoft's consumer Extended Security Updates program runs until October 12, 2027. The PC still works, and so do most of these shortcuts.
Windows + PrtSc still saves to Pictures > Screenshots, and Alt + PrtSc still copies the active window. Windows + Shift + S opens an older bar from Snip & Sketch, and the capture goes to the clipboard. PrtSc copies the whole screen unless you turn on the Print Screen shortcut under Settings > Ease of Access > Keyboard.
Snipping Tool has no screen recorder on Windows 10. If you are not sure which version you are running, check that first. If your PC qualifies, here is how to upgrade from Windows 10 to Windows 11 for free.
How we tested this guide
We tested these screenshot methods on Windows 11, version 25H2, using the built-in Snipping Tool on a single display.
Frequently Asked Questions
What is the fastest way to take a screenshot on Windows?
Press Windows logo key + Shift + S, choose Rectangle if it is not already selected, drag across the area you want and let go. The capture is on your clipboard straight away, ready to paste with Ctrl + V, and Windows 11 also saves a copy in Pictures > Screenshots by default.
Where do screenshots go on Windows 11?
By default, captures made with Windows + Shift + S, the Print Screen bar and Windows + PrtSc are saved in Pictures > Screenshots. Game Bar screenshots go to Videos > Captures, Edge saves full-page captures to Downloads, and Alt + PrtSc only copies to the clipboard.
How do I print screen on Windows?
Press the PrtSc key. On Windows 11 it opens the Snipping Tool bar by default, so drag across the area you want and let go. To save the whole screen as a file in one step, press Windows logo key + PrtSc, and to copy only the active window, press Alt + PrtSc.
Why does Print Screen open Snipping Tool?
Microsoft changed the key's default behavior on Windows 11 in 2023. To make it copy the whole screen again, turn off Use the Print screen key to open screen capture. Start by searching for print screen in Settings.
How do I take a screenshot without a Print Screen key?
Use Windows logo key + Shift + S, which needs no Print Screen key. You can also press Windows logo key + Ctrl + O to open the On-Screen Keyboard and click its PrtScn key.
How do I take a scrolling screenshot on Windows?
Snipping Tool cannot capture a scrolling page. For a web page, open it in Microsoft Edge, press Ctrl + Shift + S, choose Capture full page and save it from the preview.
Does the mouse pointer show up in a Windows screenshot?
Not with Windows + PrtSc or the Snipping Tool bar. In our tests both left the pointer out of the picture.
How do I screenshot only one monitor?
Press Windows + Shift + S, choose Rectangle if needed, then drag across the monitor you want. If you only need one window on that monitor, click it and press Alt + PrtSc.