
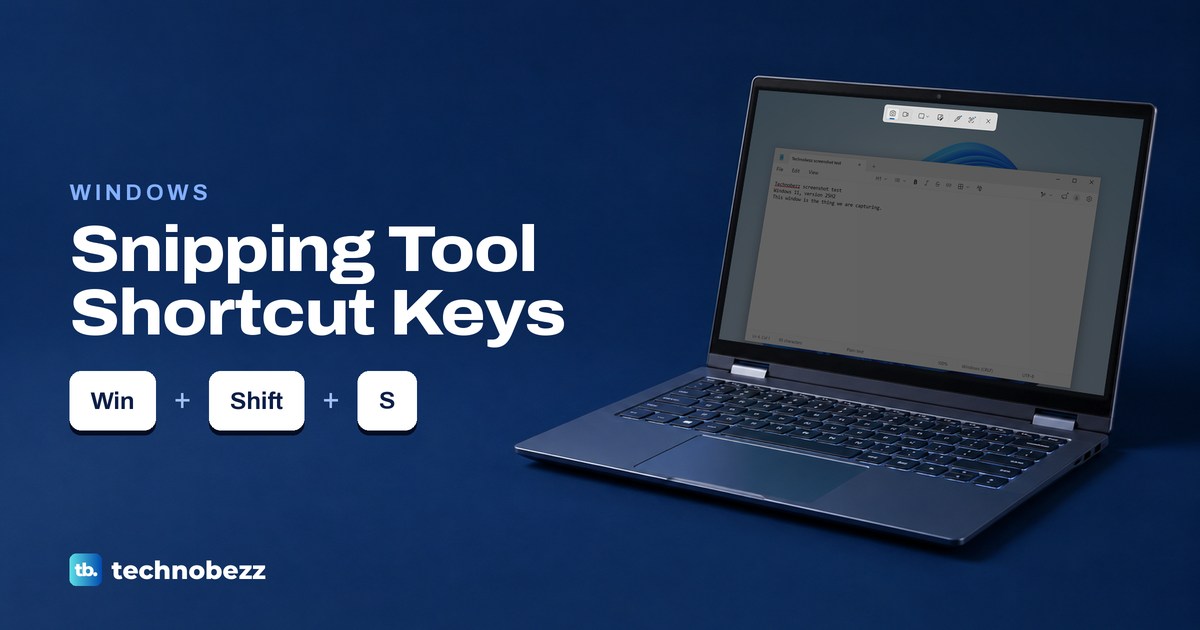
To snip on Windows, press Windows + Shift + S, choose Rectangle if needed, drag across the area you want and let go. This Snipping Tool shortcut copies the picture to your clipboard, ready to paste with Ctrl + V. On Windows 11 it also saves a PNG in Pictures > Screenshots by default. If drawing tools appear after you let go, select Capture to finish.
The short version
- Take a snip: press Windows + Shift + S, choose Rectangle and drag.
- One key instead: on Windows 11, PrtSc opens the same capture bar by default.
- Mark it up first: on the capture bar, press Ctrl + E if the Quick markup button is not already blue.
- Copy words: press Windows + Shift + T over an app to open Text extractor.
- Record video: press Windows + Shift + R, select an area and choose Start.
Beyond the screen snip shortcut, we went through Snipping Tool's capture controls, editor keys and save settings on Windows 11, version 25H2, and several shortcuts do different things depending on what is open. For other ways to capture, including full web pages, see how to take a screenshot on Windows.
Snipping Tool shortcuts in Windows 11
These are Snipping Tool's keys on Windows 11. Newer ones, such as the Text extractor shortcut, arrive with Windows and app updates, so your PC may not have every one yet. Where you press a shortcut matters. The middle column tells you whether a key works over another app, on the capture bar or inside the editor.
| Shortcut | Where to use it | What happens |
|---|---|---|
| Windows + Shift + S | Over the screen you want | Opens the screenshot capture bar |
| PrtSc | Over the screen you want | Opens the same bar by default |
| Windows + Shift + R | Over the screen you want | Opens the recording controls |
| Windows + Shift + T | Over an app with text in it | Opens Text extractor |
| Esc | Capture bar | Cancels the capture |
| Ctrl + E | Capture bar in Rectangle mode | Switches Quick markup on or off |
| Ctrl + N or Alt + N | Snipping Tool app | Starts a new snip |
| Alt + A | Snipping Tool app | Opens the Snipping area menu |
| Alt + D | Snipping Tool app | Opens the delay choices |
| Alt + M | Snipping Tool app | Opens the three-dot menu |
| Ctrl + O | Snipping Tool app | Opens an existing image |
| Ctrl + S or Ctrl + C | Screenshot editor | Opens Save as, or copies the picture |
| Ctrl + Z or Ctrl + Y | Screenshot editor | Undoes or redoes an edit |
| Ctrl + P | Screenshot editor | Opens the print dialog |
| Ctrl + A, then Ctrl + C | Editor with Scan text on | Selects and copies all the recognized text |
| Ctrl + R | Screenshot editor | Shows or hides the ruler with Scan text off, and redacts selected words with Scan text on |
Choose what the capture bar snips
Press Windows + Shift + S and the screen dims under a small bar. The camera and video icons switch between a picture and a recording. For a screenshot, select the camera, then open Snipping area next to it.
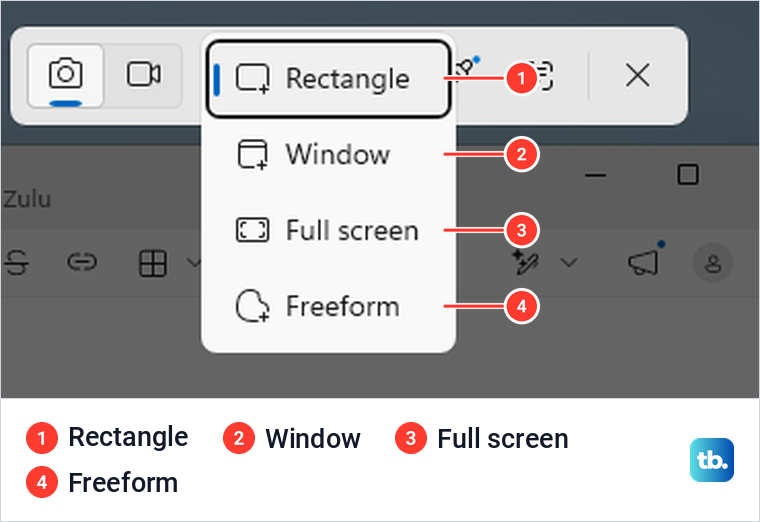
Rectangle lets you drag a box, and Freeform lets you draw around an odd shape. Window captures the window you click, and Full screen takes the picture the moment you choose it. In Window mode, bring your window to the front first: an overlapping window ended up in our snip too.
To switch modes from the keyboard, press Tab until Snipping area is outlined, press Enter, use the arrow keys and press Enter again. On our PC, pressing R, F, W or S on its own changed nothing. After a full-screen capture, the bar reopened in Rectangle mode.
You can even draw a rectangle without the mouse. The arrow keys moved the crosshair one pixel per press, Enter started the selection, more arrow presses made it bigger, and a second Enter took the snip. That is slow for a large area but handy for a small, exact one.
After a snip, select Markup and share on the notification to open the editor, or paste the picture into any app that takes images. If no notification appears, open Snipping Tool, press Ctrl + O and pick the saved snip, which is in Pictures > Screenshots by default. Copied something else since? If it was already switched on, clipboard history in Windows 11 can bring back the earlier snip.
Open Snipping Tool and use its keyboard shortcuts
Select Start, type snipping tool, open Snipping Tool and select New. Or press Windows + R, type snippingtool and press Enter. Once the app is open, Ctrl + N and Alt + N both brought up the capture bar for us.
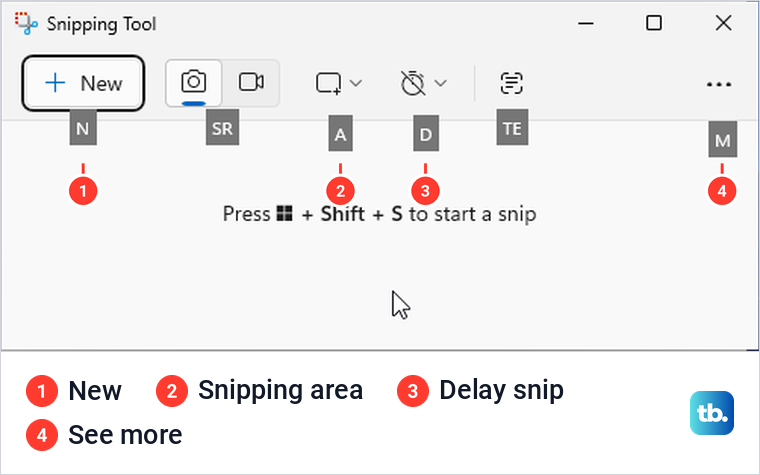
Press Alt alone to show the app's letter hints. On our PC, Alt + A opened Snipping area and Alt + M opened See more, the three-dot menu. So if a shortcut list tells you Alt + M changes the capture shape, use Alt + A instead.
PrtSc also opens the capture bar by default. To change that, go to See more > Settings > Shortcuts > Change in Windows settings, which opened Accessibility > Keyboard for us. Turn off Use the Print screen key to open screen capture there. If you would rather start with a click, pin Snipping Tool to your taskbar and select New after opening it.
Set a delay to capture menus and popups
The timer is in the app window. Press Alt + D or select the clock button, then choose No delay, 3-second delay, 5-second delay or 10-second delay. Select New and set up the screen before the capture bar appears.
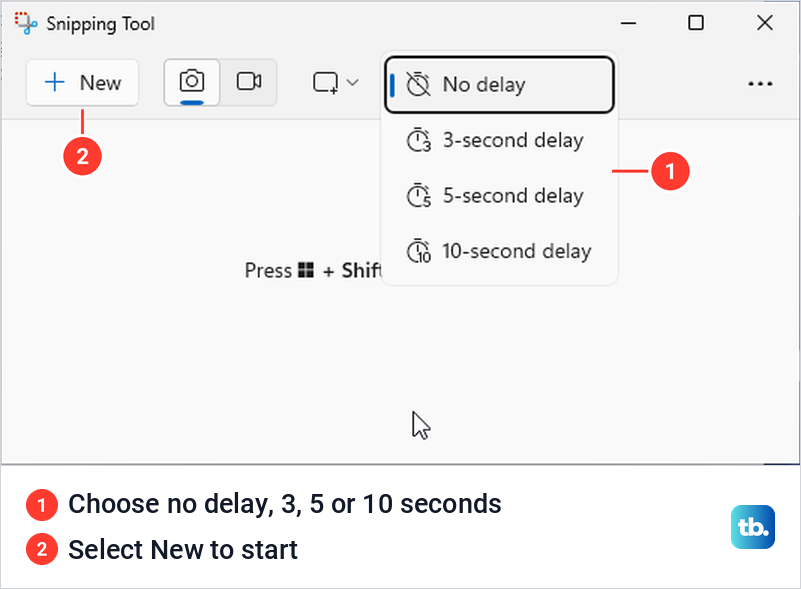
With three seconds set, the app window disappeared while we waited, with no countdown, and then the bar appeared as usual. The choices are three, five and ten seconds, with no one-second option.
To capture a menu, try the normal shortcut first. A right-click menu, a toolbar tooltip and the Start menu all stayed open under the capture bar when we pressed Windows + Shift + S. Save the delay for when you need time to set something up.
Draw before saving with Quick markup
Open the capture bar, select Rectangle and look at the Quick markup button. If it is not blue, press Ctrl + E to turn it on. Drag a selection and it stays on screen with drawing tools under it, for a pen stroke, highlight or shape.
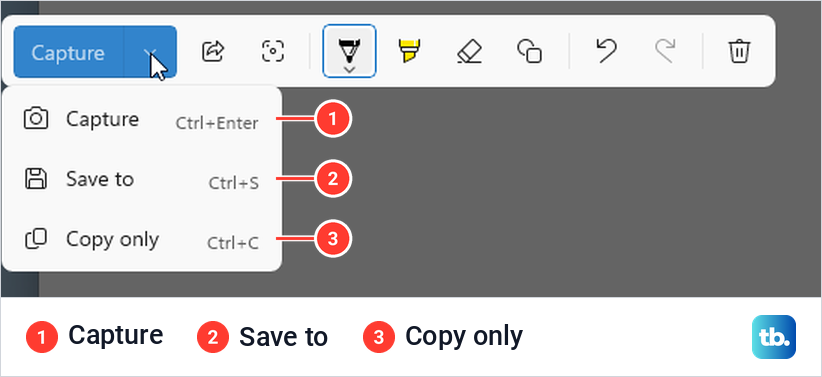
Select Capture when you are done; its menu lists Ctrl + Enter for the same thing. The arrow next to it also offers Save to and Copy only, listed with Ctrl + S and Ctrl + C. We drew a pen line, selected Capture and opened the automatically saved file, and the line was in it.
The bar remembered that Quick markup was on the next time we opened it. If your selection just waits after you let go of the mouse, check this button and press Ctrl + E to turn it off. It was not available in Window and Freeform modes on our PC.
Copy words off the screen with Windows + Shift + T
Bring the app with your text to the front and press Windows + Shift + T. Drag around the words, then select Copy all text. We copied four lines this way, and the clipboard held the same words with the same line breaks.
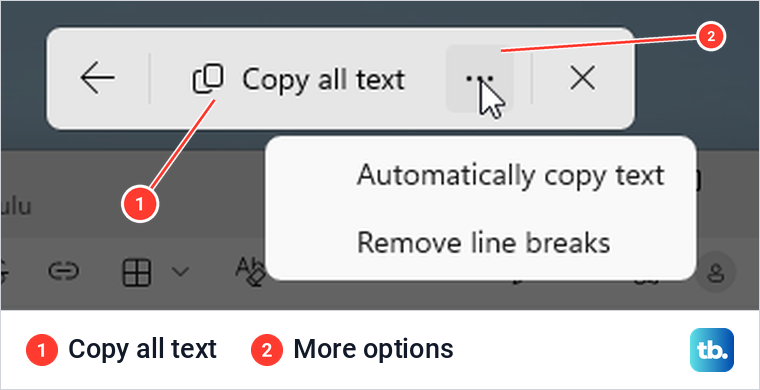
The three dots, More options, hold Automatically copy text and Remove line breaks, and both were unchecked when we opened the menu. The back arrow takes you to the main capture controls, and Esc cancels.
If the shortcut just moves the focus around the taskbar, click the app with the text and press it again. That happened to us once, when the taskbar had focus. You can also open the screenshot bar and click Text extractor, which copied the same words for us, though Tab skipped its button.
Press Ctrl + V to paste the words into your document or message. You get editable text, not a picture, so the paste shortcut on Windows works as it does for any copied text.
Pick a color from the screen
Open the capture bar and select Color picker, the eyedropper next to Quick markup. Point at a color and click to copy its value as text. The arrow next to the readout switches between HEX, RGB and HSL.
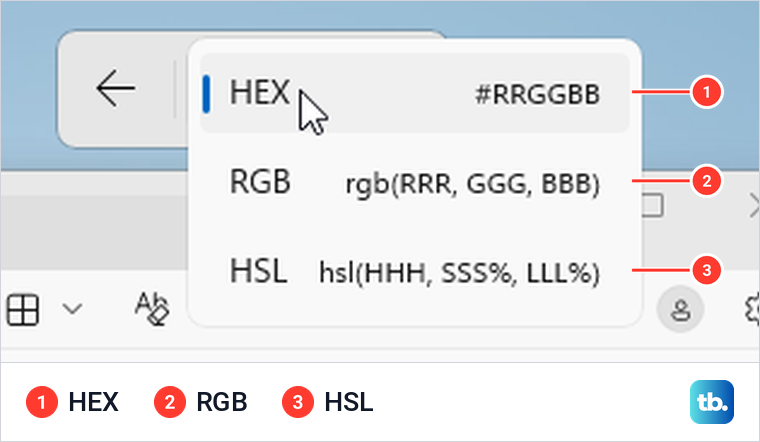
To zoom in on a small patch of color, use the mouse wheel. On our PC, scrolling brought up a magnifier and changed its size, while Ctrl + Shift + = for plus and Ctrl + - for minus did nothing we could see.
Edit a snip and save a separate copy
In the editor, Ctrl + S opens Save as and Ctrl + C copies the picture with your edits. Ctrl + O opens an older image, so you can edit older screenshots too. Our Save as dialog offered PNG, JPG and GIF.
Ctrl + Z removed our last pen line and Ctrl + Y put it back. Alt + B opened the pen colors and Alt + H picked the highlighter. For boxes and arrows, use Shapes, which also has an oval, a line, and fill and outline controls.
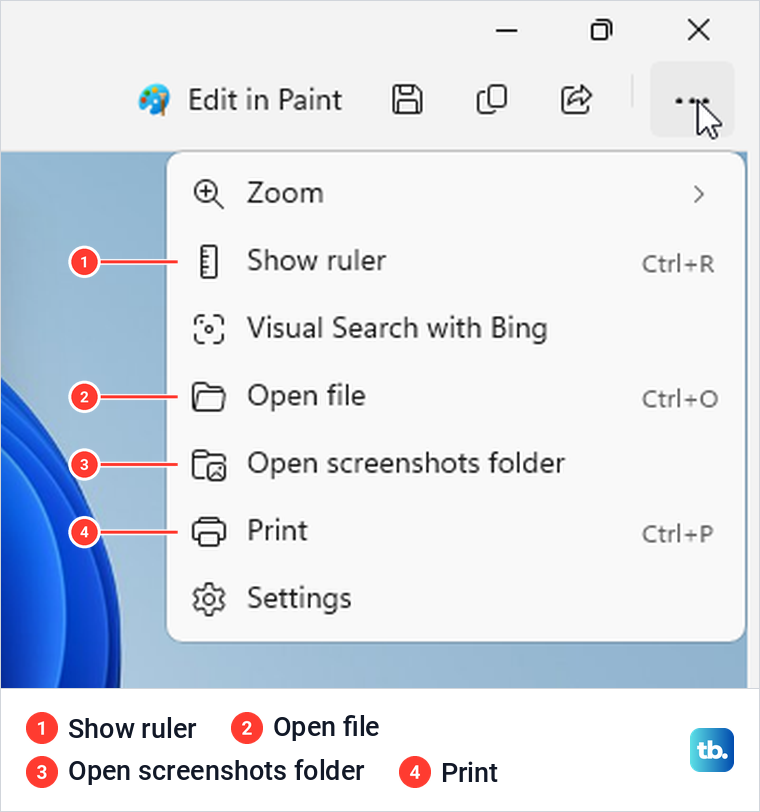
Image crop trims the picture, and Edit in Paint hands it to Paint for heavier work. The three-dot menu includes Zoom, Show ruler, Open file, Open screenshots folder, Print and Settings. Ctrl + P opened a print dialog where you choose the printer, paper and orientation.
Copy or hide text inside a screenshot
In the editor, select Scan text, drag across the words and press Ctrl + C. To copy all the text it found, press Ctrl + A first. Right-click selected text for Copy text, Select all and Redact text.
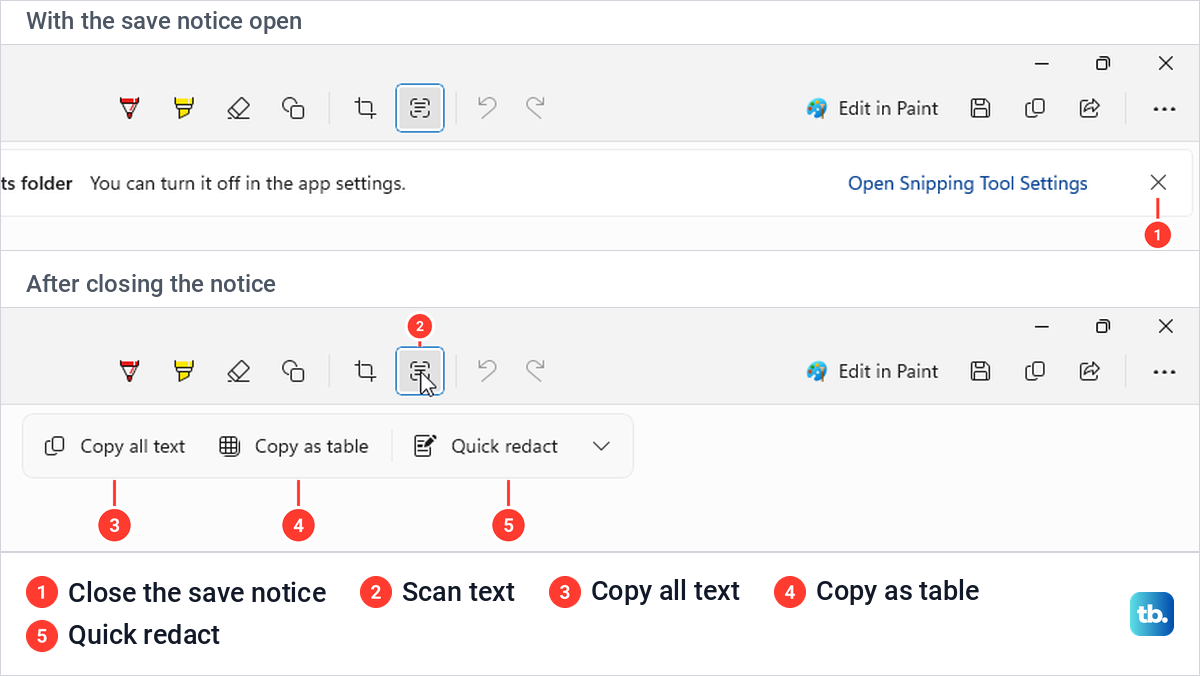
If Copy all text, Copy as table and Quick redact seem to be missing, close the blue automatic-save notice with its X. On our new snip, that notice covered the whole row, and closing it uncovered the buttons without changing any setting.
Copy as table copied the table as formatted content rather than plain text, while Copy all text gave us each cell on its own line, reading down one column before the next. The arrow next to Quick redact has options for email addresses and phone numbers. To hide one particular line, select it and press Ctrl + R, and it turns into a solid black bar. With Scan text off, the same keys show or hide the ruler instead.
Use Save as to keep the redacted picture, and share that copy. When we opened the saved file, the black bar was part of the image, but the automatically saved original still showed the words. Check which file you attach, and delete the original if you do not want those details kept.
Record your screen with Windows + Shift + R
The Snipping Tool screen record shortcut is Windows + Shift + R. These steps follow Microsoft's instructions: select an area, choose Start, and choose Stop when you are done. By default, recordings are saved as MP4 files in Videos > Screen Recordings.
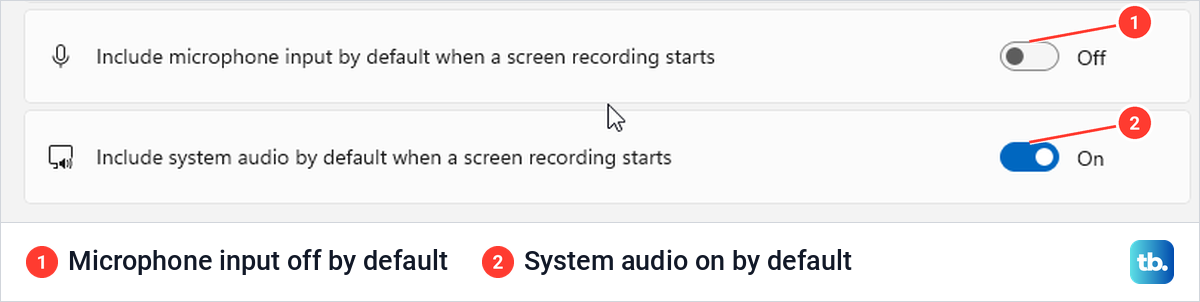
You can pause and record sound from your microphone or PC. In Snipping Tool's Settings > Screen recording, microphone input was off by default on our PC and system audio was on. Before recording a voiceover, test your microphone in Windows 11 and turn microphone input on.
If Recording area offers Window, you can pick one window before you start. The area does not move once recording begins, so keep that window where it is. In the preview, Trim lets you shorten the clip and apply the change.
If your preview has Export GIF, it offers low or high quality for clips up to 30 seconds, and the first 30 seconds of a longer clip. For more editing, select Edit in Clipchamp. Our guide to recording your screen in Windows 11 covers the rest of the recorder's options.
Find your saved snips and change the folder
In Snipping Tool, open See more > Settings and look under Automatically save original screenshots. The Screenshots are saved to row shows the current folder. Open folder takes you there, and Change lets you pick a different one.
We pointed it at a folder named Snips inside Pictures and took another snip, and the new PNG landed there, named with the date and time. Windows + PrtSc kept saving to Pictures > Screenshots, so that shortcut ignores this setting.
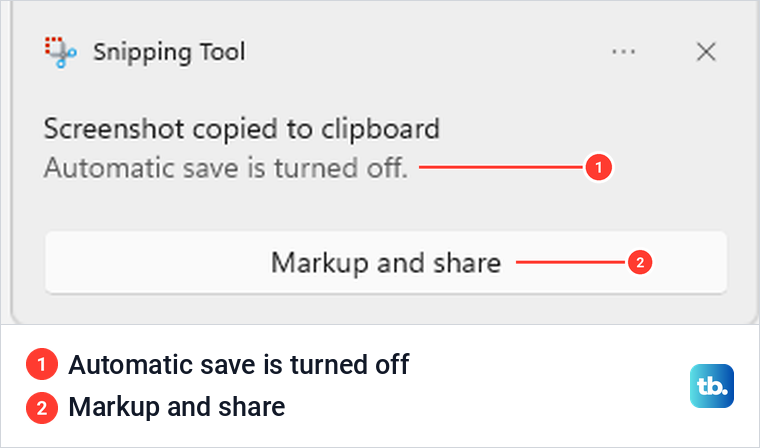
When we turned automatic saving off, our next snip still went to the clipboard, but no file was written. The notification said Automatic save is turned off. Paste the picture where you need it, or open it in Snipping Tool and use Save as to keep a file.
Recordings have their own automatic-save switch and folder row under Screen recording. On our PC, automatic saving was on by default for both screenshots and recordings. If one kind of capture turns up somewhere unexpected, check its own row.
Change how Snipping Tool handles your edits
Automatically copy changes was on by default, so our edits went straight to the clipboard. With it off, the clipboard kept what we had copied before until we pressed Ctrl + C in the editor. It has nothing to do with saving the original.
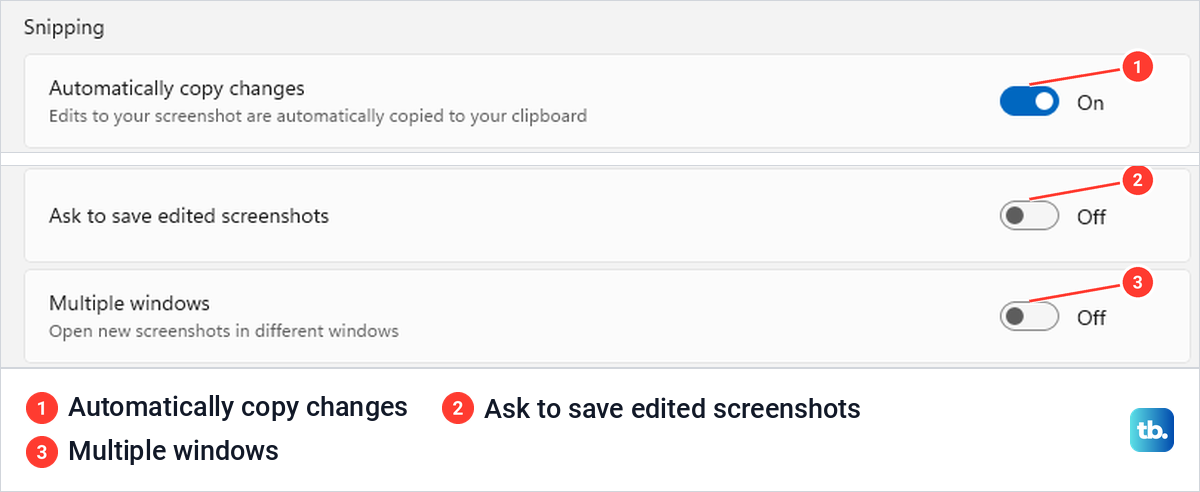
Ask to save edited screenshots was off by default. With it on, closing an edited snip brought up Save, Don't save and Cancel. Multiple windows was off too, and turning it on opened our next snip in a second Snipping Tool window.
Add border to each screenshot has color and thickness controls. We turned on a red border and saw it in the editor and in our Ctrl + C copy, but the automatically saved original had no red edge. If the border matters, share the edited copy, not the original.
The border and HDR screenshot color corrector were both off by default, and the HDR switch says it adjusts colors for screenshots taken on HDR monitors. App theme sets how the app looks. Recording has its own switches for copying changes and asking to save edited recordings, both on by default.
When a shortcut or button is missing
First, open Snipping Tool from Start and select New. If that works but the shortcut does nothing, follow our steps for Windows + Shift + S not working. If the app itself will not open or keeps failing, see our guide to repairing or resetting Snipping Tool.
If several shortcuts fail, see our guide to keyboard shortcuts not working in Windows. If a feature is missing, check which Windows version you have, then check for updates in Windows Update and in the Microsoft Store. The Text extractor shortcut needs both a Windows update and a Snipping Tool update, so updating the app alone may not be enough.
How we tested this guide
We tested on Windows 11, version 25H2, with the built-in Snipping Tool and a single display. We pressed the capture and editor shortcuts, copied text and checked what reached the clipboard, saved files, changed the save folder and compared edited pictures with their originals. The recording steps follow Microsoft's instructions.
Frequently Asked Questions
What is the shortcut for Snipping Tool?
Press Windows + Shift + S to open the screenshot capture bar. On Windows 11, PrtSc opens the same bar by default.
How do I snip part of my screen on Windows?
Press Windows + Shift + S, select Rectangle and drag across the area you want. Let go of the mouse button to take the snip, then press Ctrl + V in any app that takes images. If drawing tools appear when you let go, select Capture before pasting.
Why does Print Screen open Snipping Tool?
That is the default on Windows 11. To change it, open Snipping Tool's Settings > Shortcuts > Change in Windows settings and turn off Use the Print screen key to open screen capture.
Where do snips go?
Snips go to the clipboard and, by default, to Pictures > Screenshots. To find the current folder, open Snipping Tool's settings and select Open folder under the screenshot save setting.
Is there a Snipping Tool shortcut to record the screen?
Press Windows + Shift + R, select an area and choose Start. Choose Stop to finish, and the MP4 goes to Videos > Screen Recordings by default.
How do I copy text from a snip?
Open the picture in Snipping Tool, select Scan text, drag across the words and press Ctrl + C. To copy words straight from another app's screen, press Windows + Shift + T and use Text extractor.