To use OneNote, create a notebook on OneDrive from File > New, add a section for each topic and a page for each note, then click anywhere on the page and start typing. OneNote saves as you go, so the habits that matter are tagging the lines you need to act on, searching with Ctrl + E, and checking where a notebook lives before you share it.
Keep the structure shallow at first and let it grow when a section gets crowded. The steps below follow the desktop app, OneNote for Microsoft 365 on Windows 11, version 25H2, and note where OneNote for the web differs, with Microsoft's Mac shortcuts. If you are still choosing a notes app, our comparison of Google Keep and OneNote for notes sets out what each app does best.
The short version
- Start: File > New > OneDrive, pick a folder, name the notebook and select Create.
- Organize: one section per topic with Ctrl + T, and one titled page per note with Ctrl + N.
- Write: click anywhere on the page and type. There is no Save button.
- Follow up: press Ctrl + 1 for a To Do tag, then use Find Tags with Search set to All notebooks to list tags from every notebook.
- Find: press Ctrl + E and pick All Notebooks in its scope menu if it is not already set, or press Ctrl + F for the page in front of you.
- Share: Share > Share Entire Notebook, and switch Can edit to Can view before Send if people should only read.
Where everything is in OneNote
| What you want | Where to go | What you get |
|---|---|---|
| A notebook you can open on other devices | File > New > OneDrive, then a folder | A cloud notebook with one section and one blank page |
| A notebook kept on this PC only | File > New > This PC | A local notebook you must upload before you can share it |
| A new topic | Right-click a section > New Section, or Ctrl + T | A section with its name ready to type |
| A line to follow up | Home > Tags > To Do, or Ctrl + 1 | A To Do circle in front of the line |
| Tagged lines in one list | Home > More (the three dots) > Find Tags, then pick the Search scope | The Tags Summary pane for that scope |
| A note you cannot find | Ctrl + E, then All Notebooks in the scope menu | A search across all your notebooks |
| Proof that a notebook is syncing | File > Info > View Sync Status | Each cloud notebook's state and a Sync Now button |
| A copy for someone outside OneNote | File > Export > PDF | A PDF of the page, section or notebook |
Choose the OneNote app and where your notes live
On Windows, use the current desktop app, named OneNote, which Microsoft says you can get from the Microsoft Store or as part of Microsoft 365. Microsoft also says OneNote for Windows 10 reached end of support on October 14, 2025, and became read-only the same day, so older guides written for that app may not match what you see.
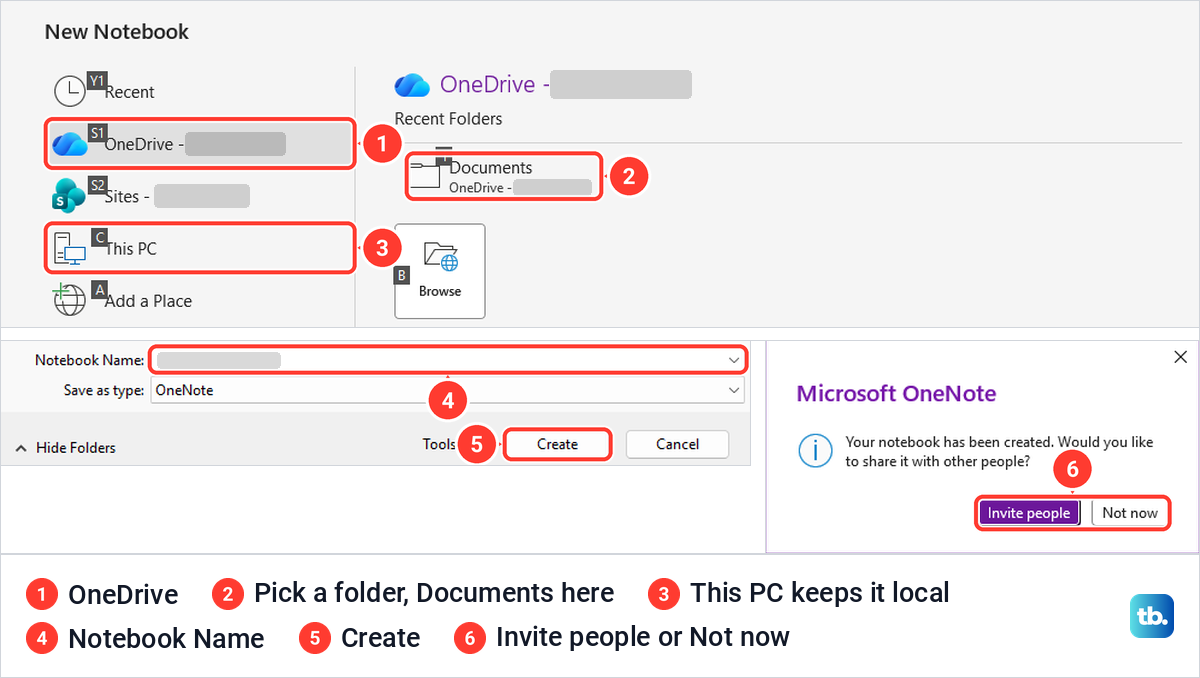
The first real choice is where the notebook lives. On the File > New screen, OneDrive and Sites put the notebook in the cloud, while This PC keeps it on your computer. Microsoft says a notebook in the cloud is still private unless you choose to share it, and that a notebook must be saved in OneDrive or a SharePoint site before you can share it.
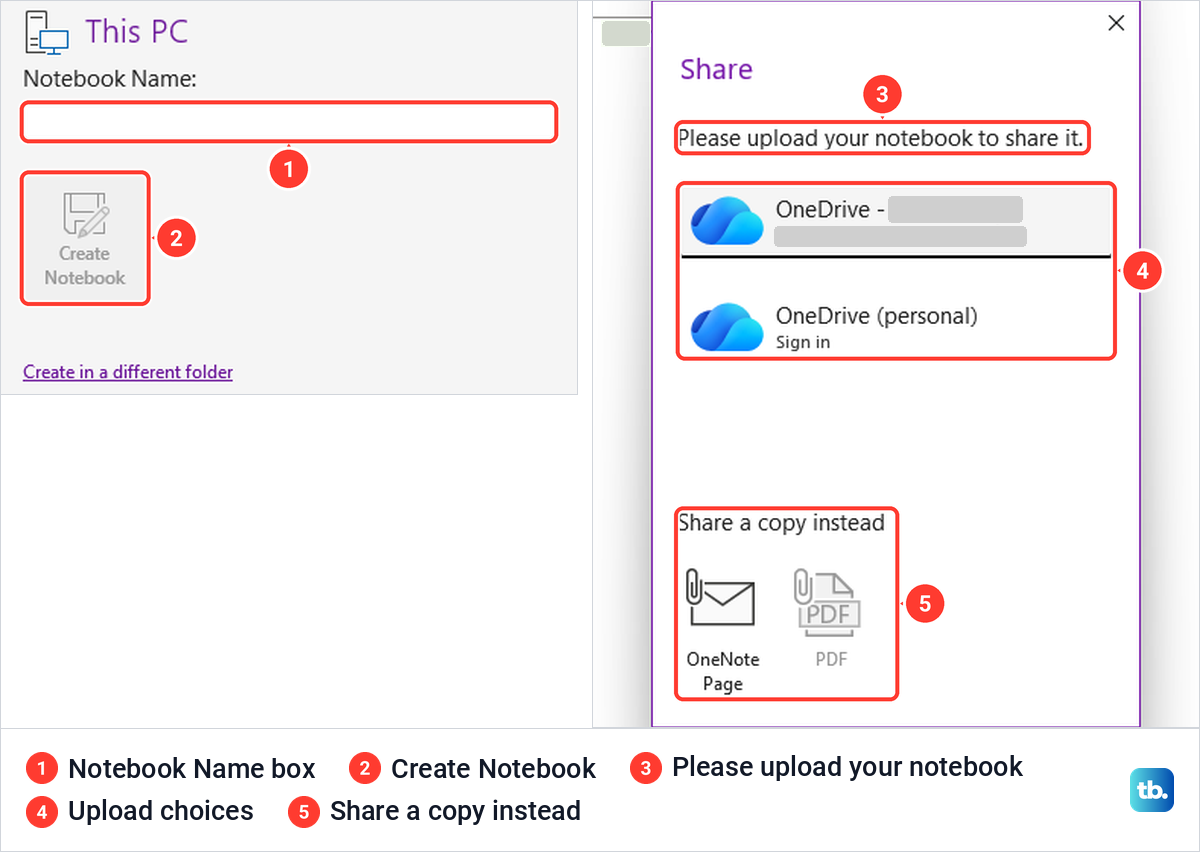
We made a This PC notebook to see what that means in practice. Its Share button opened a box reading Please upload your notebook to share it, with OneDrive accounts to upload to and a Share a copy instead option, and Manage Access was greyed out. Pick OneDrive unless the notes must stay on one computer.
Sites, the choice with the SharePoint logo, is for notebooks kept on a SharePoint site rather than in your own OneDrive. If your team already works from one, use SharePoint for a shared workspace and keep the team notebook next to its files.
Create a notebook on OneDrive
Select File > New. The screen is titled New Notebook and lists Recent, OneDrive, Sites, This PC, Add a Place and Browse, and with a work account ours showed OneDrive followed by the organization's name. Select OneDrive, then pick a folder under Recent Folders, such as Documents, or select Browse to choose another.
Unlike This PC, the OneDrive page has no name box of its own. After we picked Documents, OneNote opened a Create New Notebook window with a Notebook Name box, so type the name there and select Create. The window looks like an ordinary save dialog, which makes it easy to mistake for a wrong turn.
About 20 seconds later OneNote asked whether we wanted to share the new notebook with other people, with Invite people and Not now. Choose Not now if the notebook is just for you, since the Share button does the same job later.
The new notebook opened with one section, New Section 1, and one blank page called Untitled page, which matches Microsoft's note that each new notebook contains one section with one blank page. It also appeared in the Notebooks list in the left panel, where each notebook you have open sits with its sections underneath.
Add sections and pages that are easy to find
A notebook holds sections, and each section holds pages. On our PC the sections were a vertical list under the notebook's name in the left panel, and the pages of the selected section formed a second column with Add Page at the top. Microsoft's help pages still call them section tabs, so look for the list on the left if you cannot see any tabs.
To rename the first section, right-click New Section 1, choose Rename and type a name such as Meetings. Add more with New Section on the same menu, the New Section link under the list, or Ctrl + T, and each one appears with its name selected, ready to type over.
For a new page, select Add Page or press Ctrl + N, type a title on the line at the top and press Enter. Name pages for what is in them, because the title is what you see in the page list and in search results. On a Mac, Microsoft lists Command + N for a new page and Command + T for a new section.
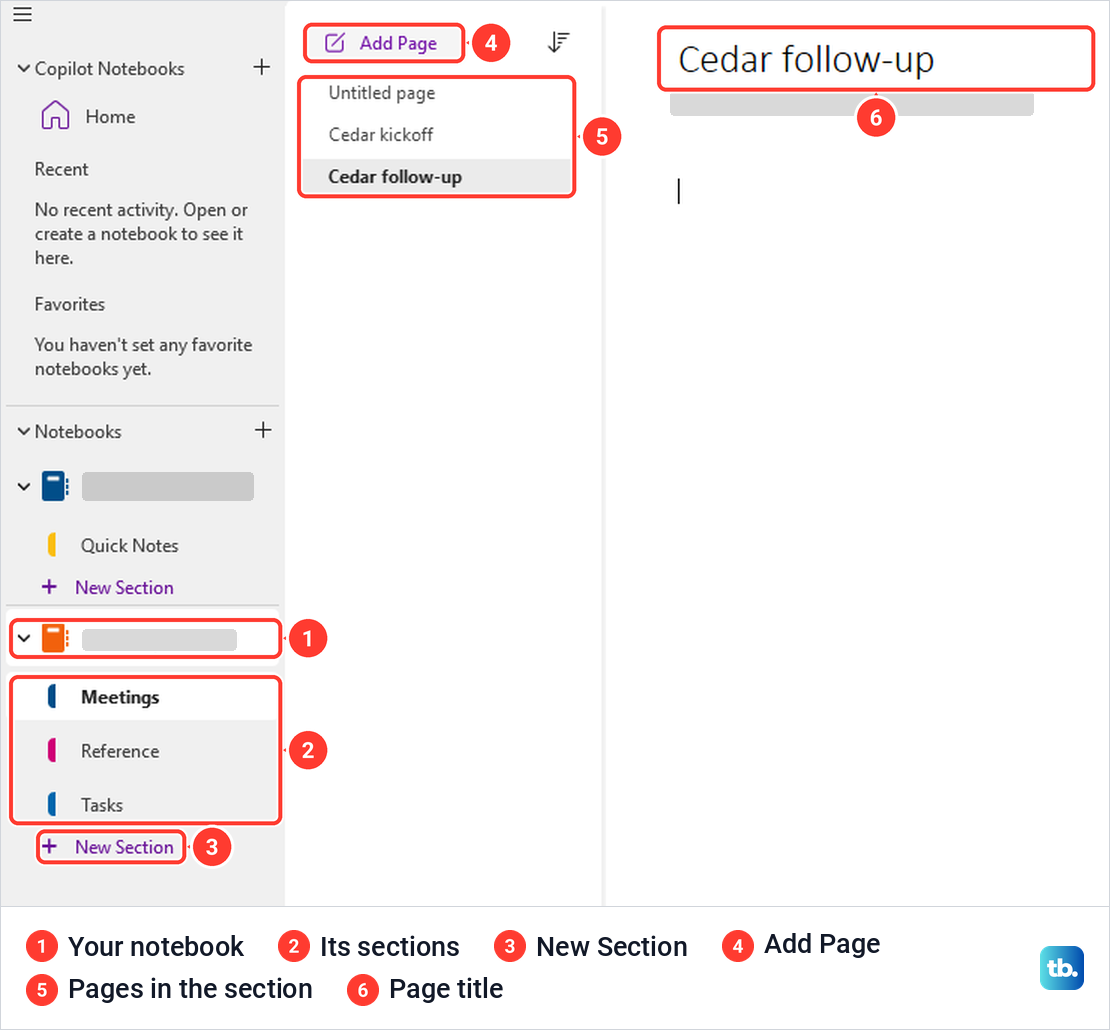
Our example ended with three sections, Meetings, Reference and Tasks, and two titled pages in Meetings. That is plenty to start with. Add a section when a topic keeps coming back, and a new notebook only when a set of notes needs a different group of people, because sharing works on whole notebooks.
Type and format a note
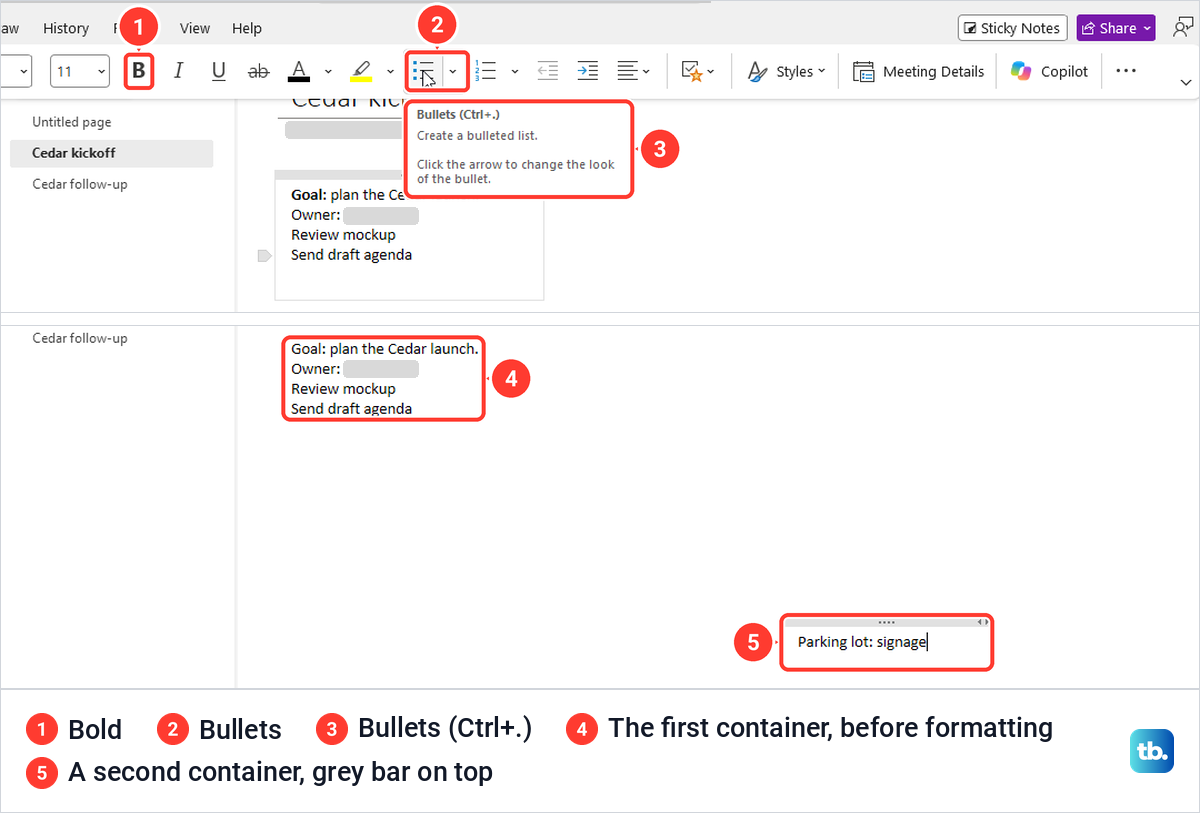
Click anywhere on the page and start typing. OneNote puts the text in a note container, and clicking somewhere else on the same page and typing starts a second container with its own grey bar along the top, which is the handle for moving it. Microsoft's instruction is the same: click where you want the notes to appear, then type.
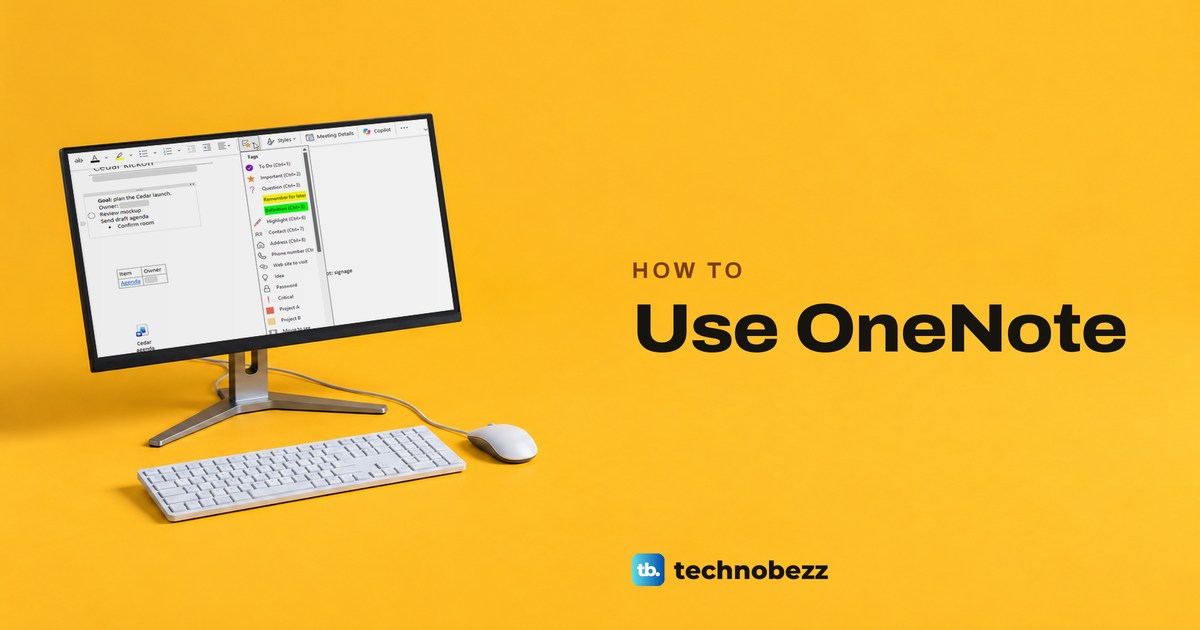
Formatting lives on the Home tab, which on our PC was a single-row ribbon with the font, Bold, Italic, Underline, Bullets, Numbering, a tags gallery, Styles, Meeting Details and Copilot. Select a word and press Ctrl + B for bold, and point at a button to see its shortcut. The Bullets tip read Bullets (Ctrl+.), so Ctrl + Period starts a bulleted list.
There is no Save button or command to remember. Microsoft says OneNote automatically and continuously saves your work while you work, and nothing we typed needed saving. Saving is not the same as syncing to your other devices, though, which the sync section below covers.
To put part of another window into a note, take a screenshot on Windows and paste it onto the page. If you copied several things before pasting, use clipboard history in Windows to pick the one you want.
Add a table, a link or a file
Open the Insert tab. Ours held Table, Insert Space, File Attachment, File Printout, Spreadsheet, Pictures, Page Templates, Link and Date & Time. Select Table and move across the grid, whose heading shows the size, 2x2 Table in our case, then click to place it. Press Tab to move from cell to cell as you type.
To link text, select Link. The Link window has Text to display and Address boxes, and under Or pick a location in OneNote it lists your notebooks and sections, so a link can open another note instead of a web page. Our Agenda link showed up blue and underlined inside the table.
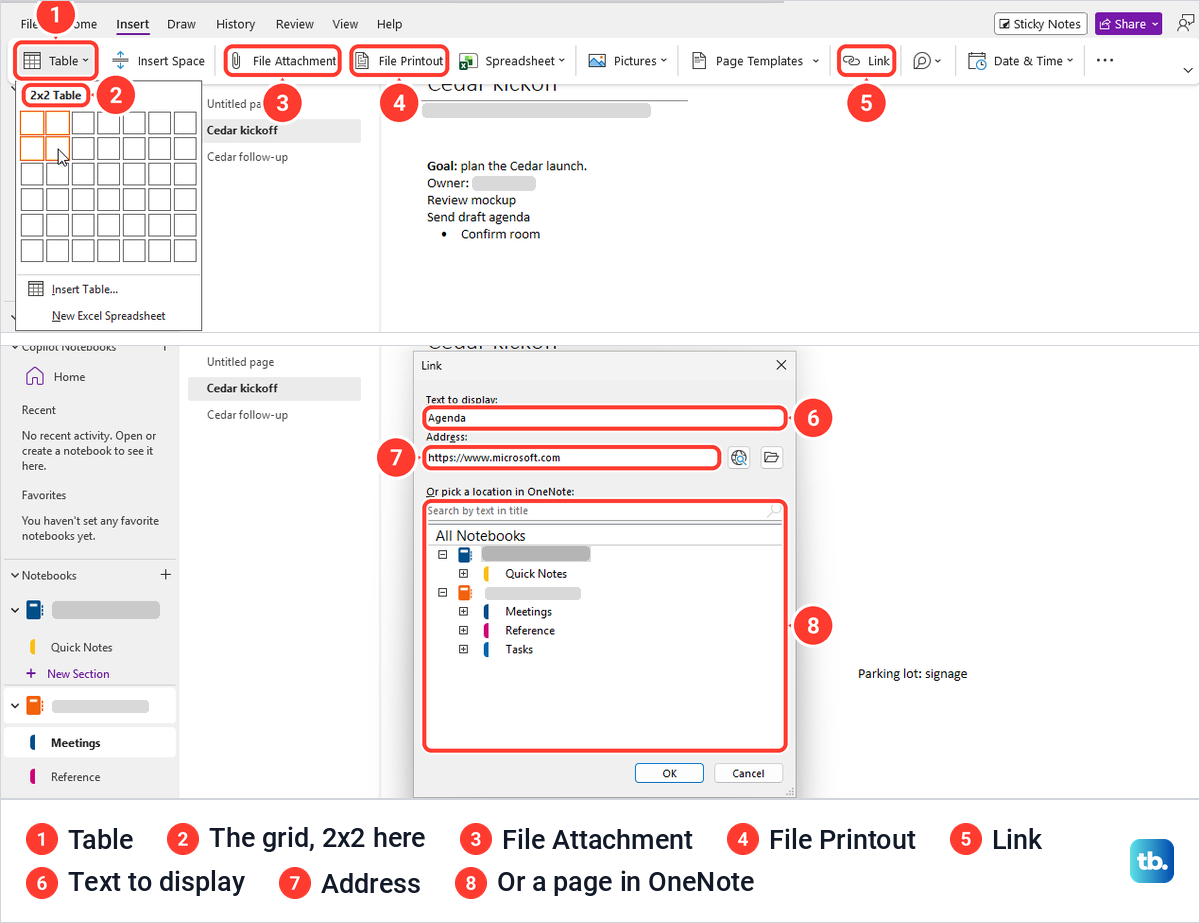
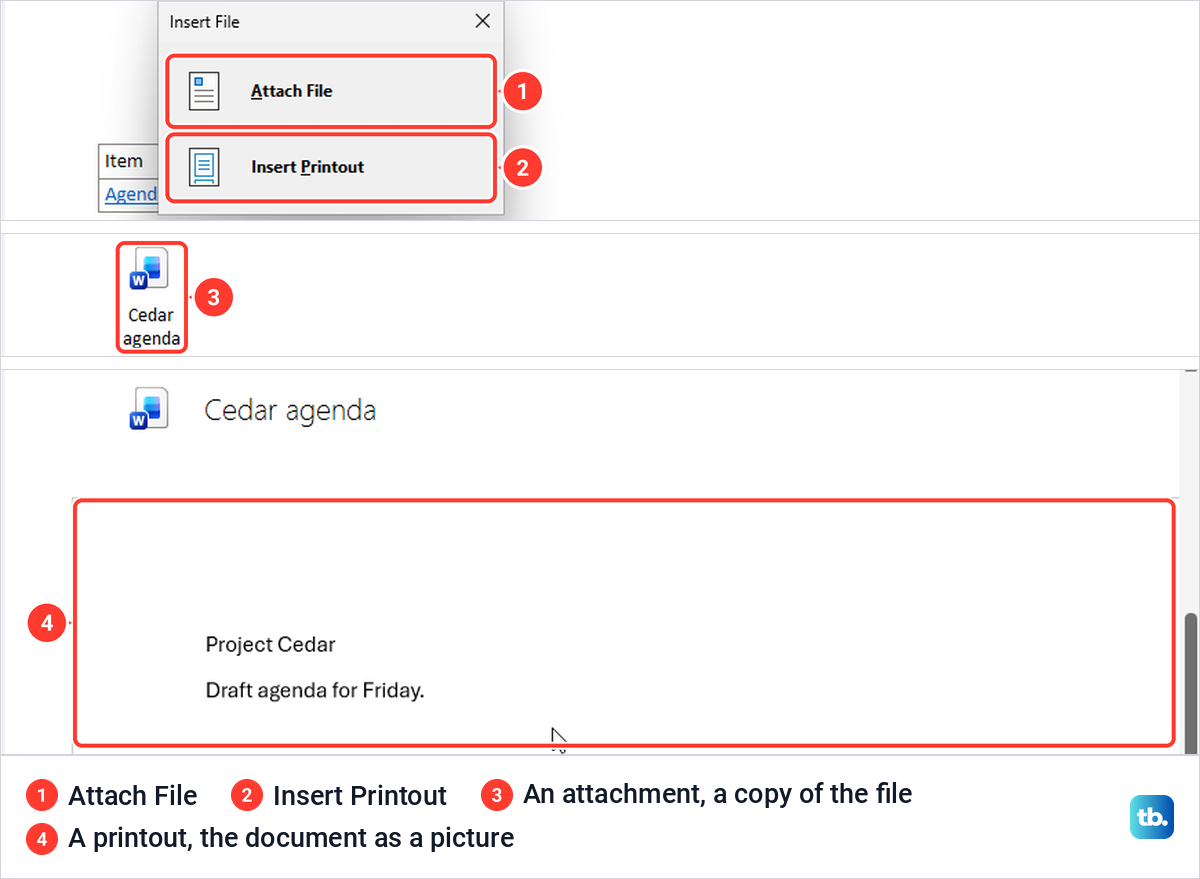
Files are where people get caught out, because OneNote adds them in two ways. Insert > File Attachment opened a file picker and then a second window, Insert File, with Attach File and Insert Printout, so that button can end in either result. File Printout skips the choice and goes straight to its own picker, Choose Document to Insert.
Attach File left a Word icon labelled with the file name, and Microsoft says attaching places a copy of that file in your notes. A printout took about 15 seconds and put the file's icon and a picture of the Word page on the note, so its text could be read without opening anything. Use Attach File when the file is all you need, and a printout when the content should also be readable on the page.
If the people reading your notes may not have Word, save a Word document as a PDF and attach the PDF instead. Photos and screenshots saved as files go in through Pictures on the same tab.
Mark action items with tags
Tags turn a line into something you can find again. Click in a line and press Ctrl + 1, and a round To Do circle appears in front of it, while Ctrl + 2 adds the orange Important star. The tags gallery on the Home tab lists To Do (Ctrl+1) first, then Important (Ctrl+2), Question (Ctrl+3) and more, with Customize Tags and Remove Tag at the bottom.

Microsoft says a tag has to be attached to typed or handwritten notes to appear in a search. A tag on an empty line has nothing to find, so type the action first and tag it afterwards.
To list tagged lines in one place, use Find Tags. Microsoft gives its place as Home > Find Tags, but at our window width it was hidden under the three dots at the end of the Home tab, in a Tags group next to Outlook Tasks, which is a separate command from the To Do tag. If you cannot see it, widen the window or open those dots.
Find Tags opens the Tags Summary pane, which groups tagged lines by tag name and links each one back to its page. At the bottom, Search was set to This notebook by default, with Refresh Results and Create Summary Page under it. The Search list also offers This section, This section group, All notebooks and date ranges such as This week's notes, so choose All notebooks and select Refresh Results when you need tags from every notebook.
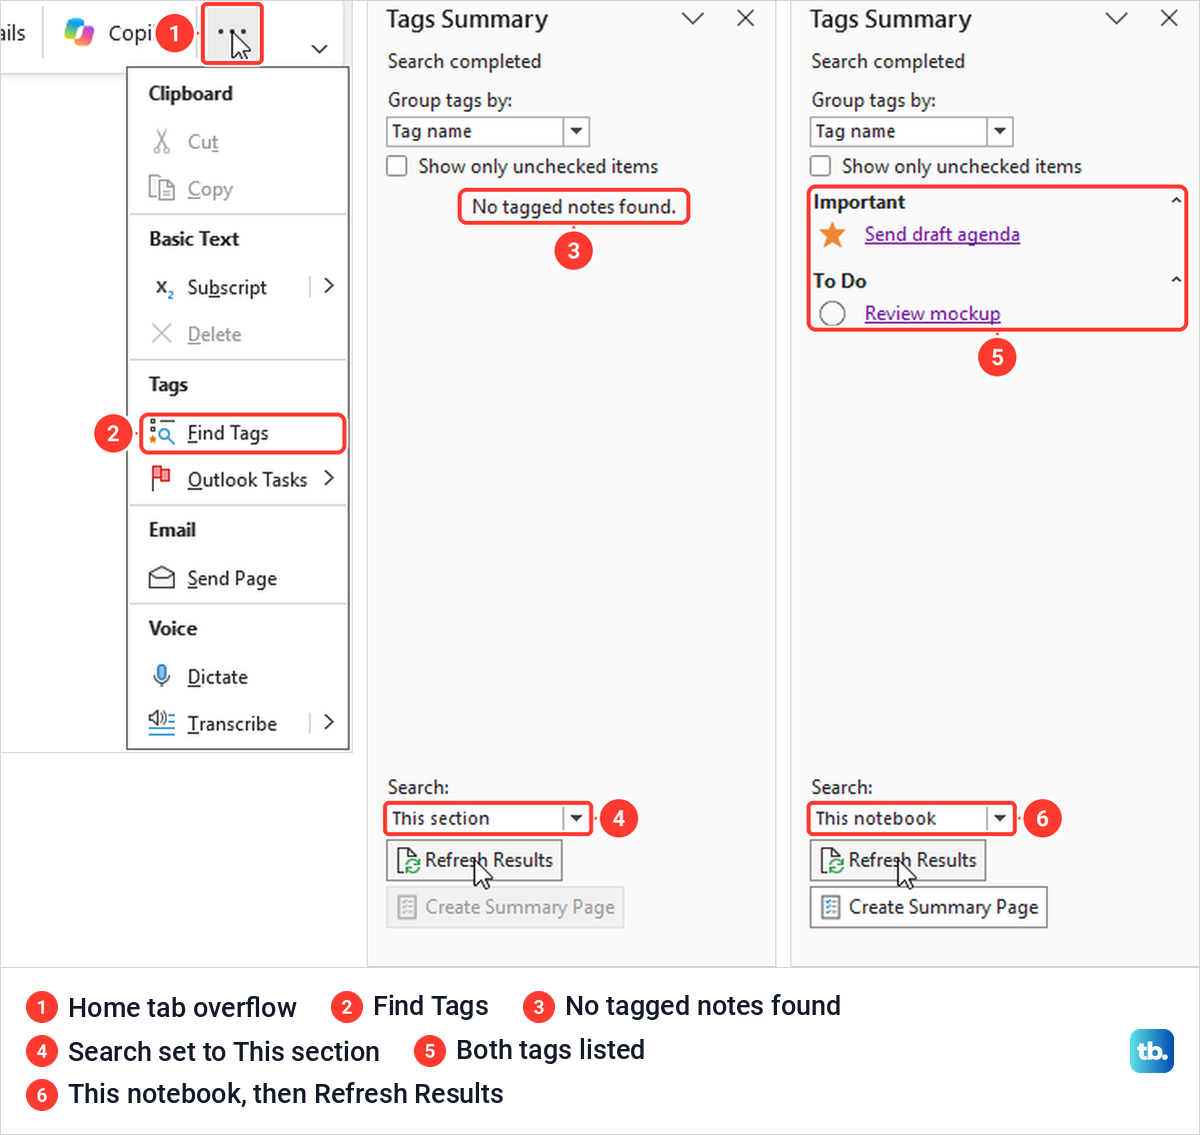
That Search setting can hide tags you know are there. When we set it to This section while a section with no tags was open and selected Refresh Results, the pane said No tagged notes found, even though two tagged lines sat in another section. Switching back to This notebook and refreshing listed both again.
Search your notes
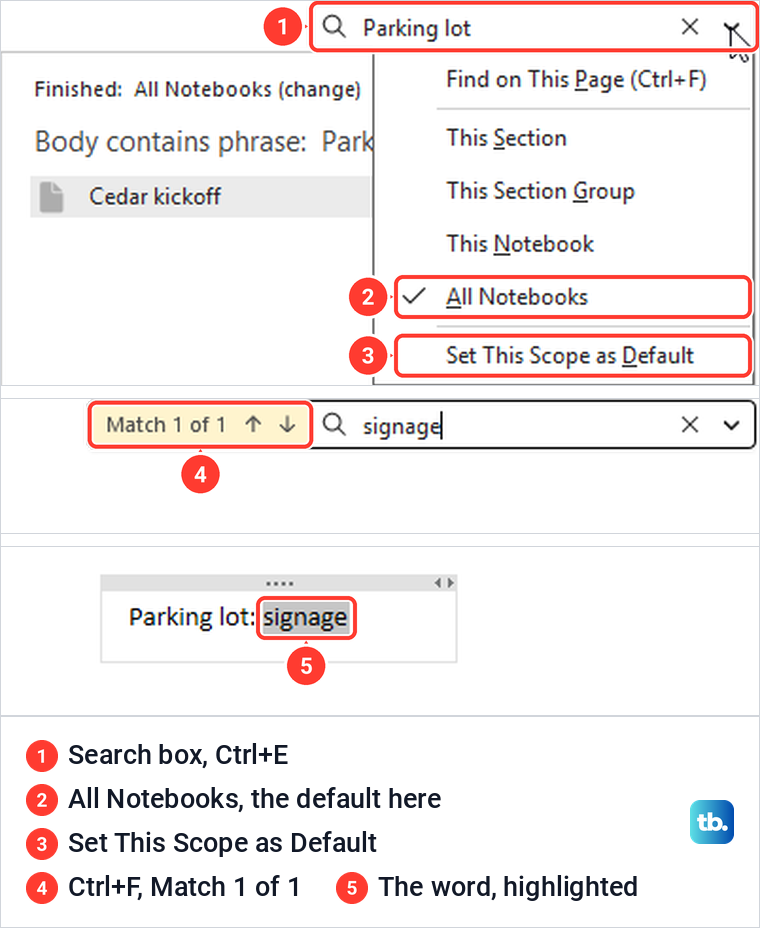
Press Ctrl + E and type. A search box opened at the top right of the page, and our search for Parking lot found the Cedar kickoff page, with the notebook and section shown beside it. The line above the results read Finished: All Notebooks, which was the default.
Open the arrow at the end of the box to change where it looks: Find on This Page, This Section, This Section Group, This Notebook or All Notebooks, plus Set This Scope as Default. For a word on the page already open, Ctrl + F is quicker, and ours reported Match 1 of 1 and highlighted the word in its container.
OneNote for the web searches less widely. Microsoft says you can search the current notebook, section or page there, and that OneNote for the web can't currently search across all notebooks, so use the desktop app when you do not know which notebook a note is in.
If the word you need is inside a PDF or a web page rather than your notes, search for keywords on a page or document in the app that has it open. Keep the Ctrl + E box for anything you wrote in OneNote itself.
Make subpages and group sections
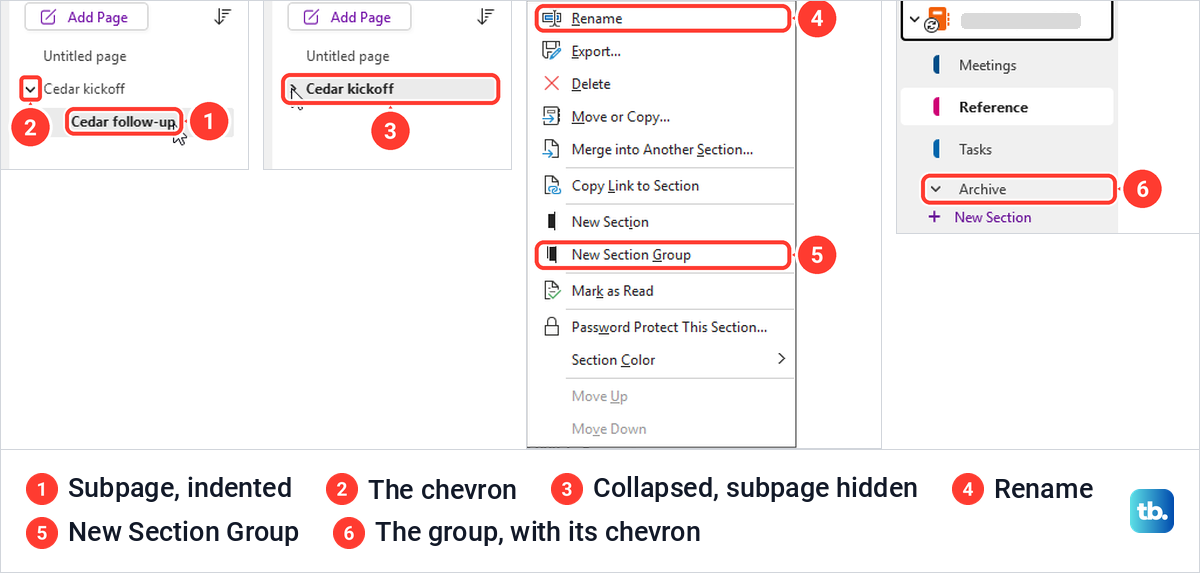
When a section fills up, indent related pages under a parent page instead of making another section. Drag a page in the page list to the right until its title is indented, as Microsoft describes, and it becomes a subpage, while the page above gets a small chevron that collapses and expands it. Right-clicking a page also offers Make Subpage.
For sections, the equivalent is a section group. Right-click any section, choose New Section Group and type a name, and our Archive group appeared at the end of the section list with its own chevron. The same menu holds Rename, Move or Copy, Merge into Another Section, Password Protect This Section and Section Color.
Check that a notebook is syncing
OneNote syncs cloud notebooks in the background, and the setting was on by default: File > Options > Sync had Sync notebooks automatically ticked, with Download all files and images left off. Leave it ticked unless you have a reason to sync by hand.
To check a notebook, select File > Info. Each open notebook is listed with its location, a web address for one on OneDrive, and View Sync Status sits on the right. It opens Shared Notebook Synchronization, with Sync automatically whenever there are changes or Sync manually at the top and one line per cloud notebook.
Our notebook read Up to date with its last sync time, and Sync Now beside it ran a sync straight away and updated the time. If a notebook shows an error or an old time, select Sync Now and watch whether the time changes. Microsoft's own sync fixes give the same two checks, the Options setting and View Sync Status.
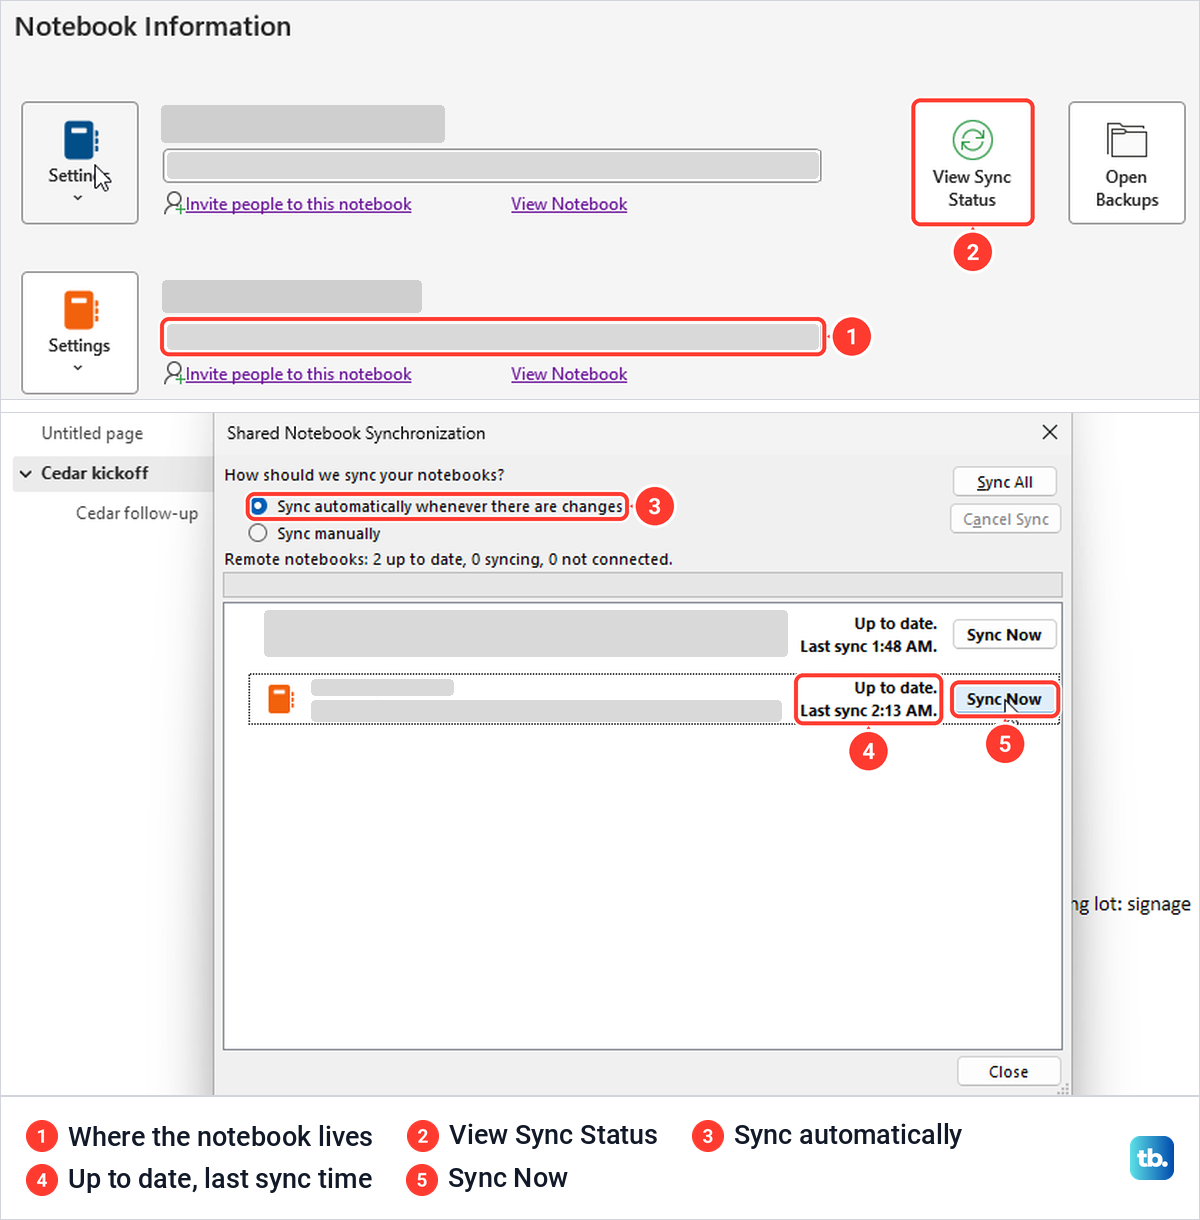
If a notebook is missing from that list, check where it lives in File > Info. Our This PC notebook never appeared there, and the list said Remote notebooks: 2, counting only the two cloud notebooks. Microsoft says storing a notebook in the cloud is what lets you get to it from your computer, phone or any web-connected device. If other files in your OneDrive folder are not updating either, fix OneDrive syncing on Windows as well.
Share a notebook with view or edit access
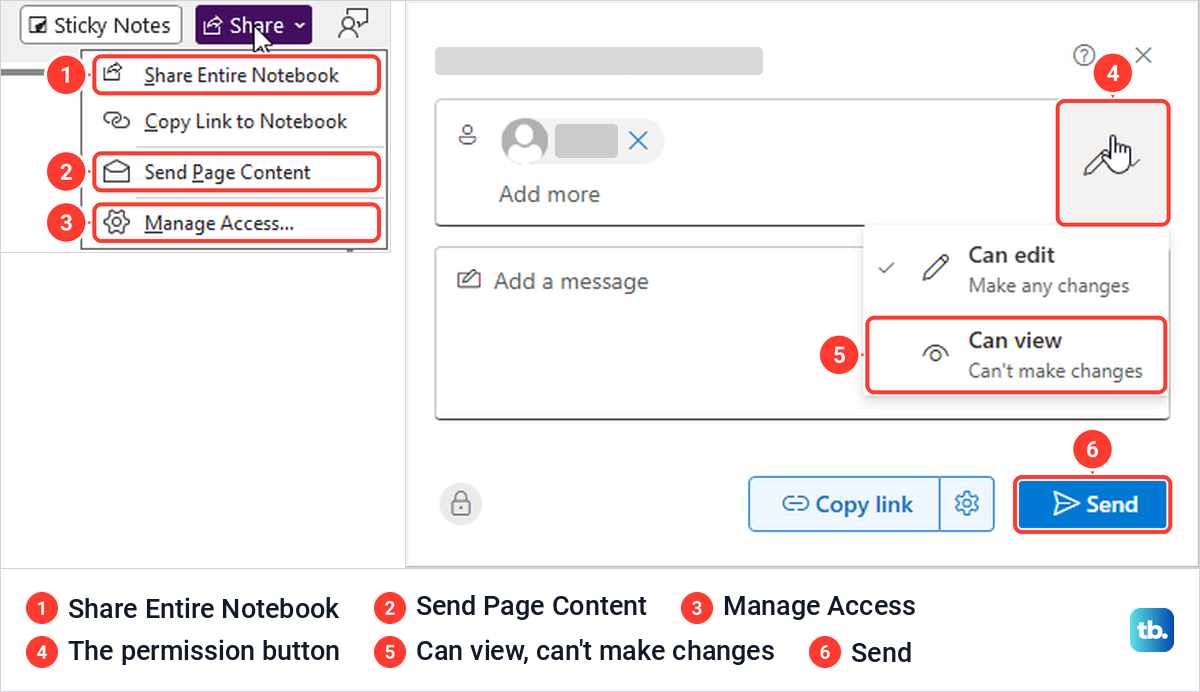
Select Share at the top right. It is a menu with Share Entire Notebook, Copy Link to Notebook, Send Page Content and Manage Access. Choose Share Entire Notebook, type a name, group or email address, and add a message if you like.
Check the permission before you select Send. The button at the right of the name box was set to Can edit, Make any changes, when the dialog opened, so we switched it to Can view, Can't make changes, and OneNote confirmed it had invited the person to view the notebook. For a link instead of an email invitation, Microsoft's steps use Copy Link to Notebook, where Link settings control who the link works for.
There is no way to give someone live access to just one page. Microsoft says it has removed the ability to share single pages of notes, and the page menu we opened had Copy Link to Page and Move or Copy but no share command. Microsoft also warns that sharing a link to a section means people you have shared with will be able to see your entire notebook.
To share one page, Microsoft suggests creating a new notebook just for sharing, moving or copying the page into it and sharing that notebook. For a copy that will not change, export the page as a PDF, which the next section covers.
We then opened the invitation as the person we had shared with, and the notebook loaded in OneNote for the web with every section and page. With Can view, a Viewing button sat at the top right, and selecting it showed a Read-Only Notebook notice saying the author had set the notebook to open as read-only and that no content could be edited. On the web, the To Do tag showed as a square box and Important as an outline star.
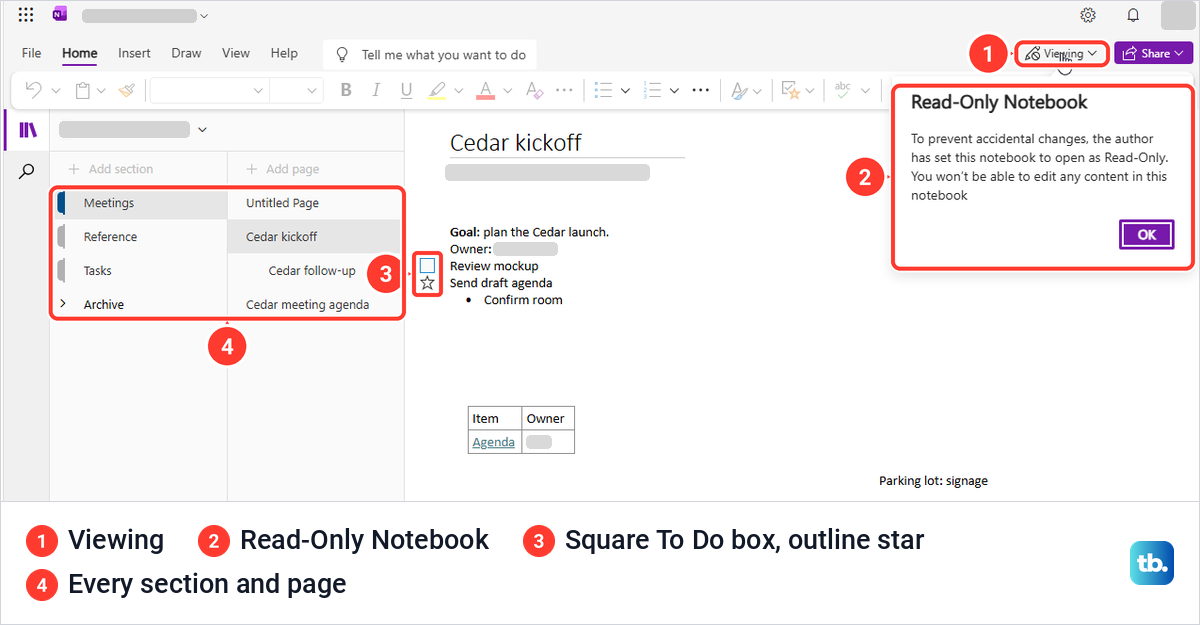
The notice talks about the author setting the notebook to open as read-only. For us, the only setting behind it was the Can view permission chosen in the Share dialog. To give someone edit rights later, Microsoft says to change the notebook's permissions to Can Edit, and Manage Access on the Share menu is where those permissions live.
Send a copy as a PDF or from Outlook
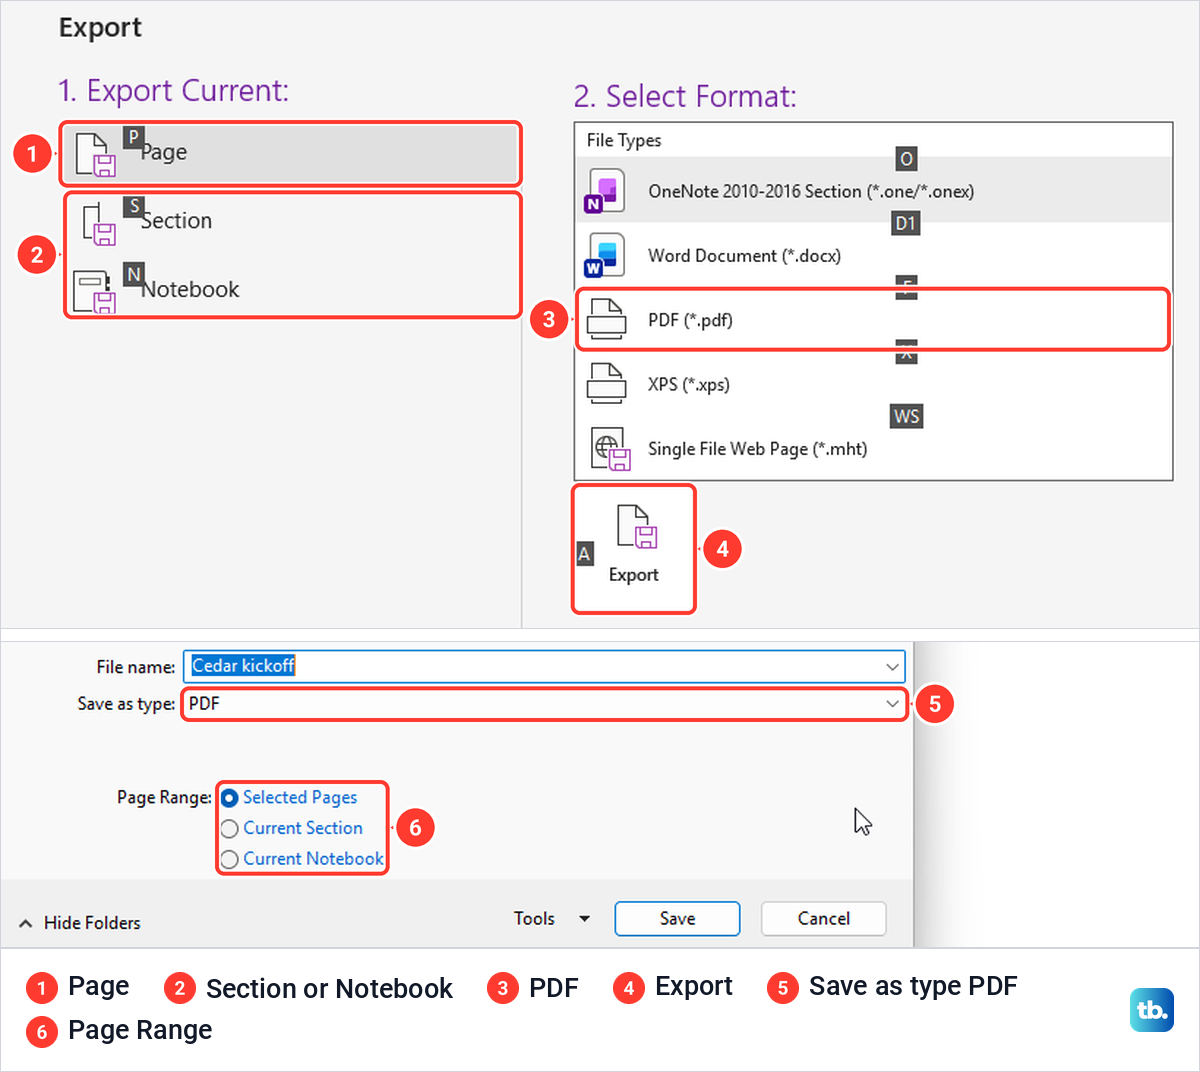
When someone outside the notebook needs your notes, export them. Select File > Export, choose Page, Section or Notebook under Export Current, pick PDF (*.pdf) under Select Format and select Export. The Save As window that followed had a Page Range choice of Selected Pages, Current Section or Current Notebook, and the saved PDF opened showing that page.
Microsoft says a PDF is a static snapshot of your notes, so changes you make later in OneNote won't reach it. With Page selected, the format list also offered a Word document, an XPS file, a single file web page or a OneNote 2010-2016 section. In OneNote for the web, Microsoft says you can't export a whole notebook or section to PDF and can print only one page at a time.
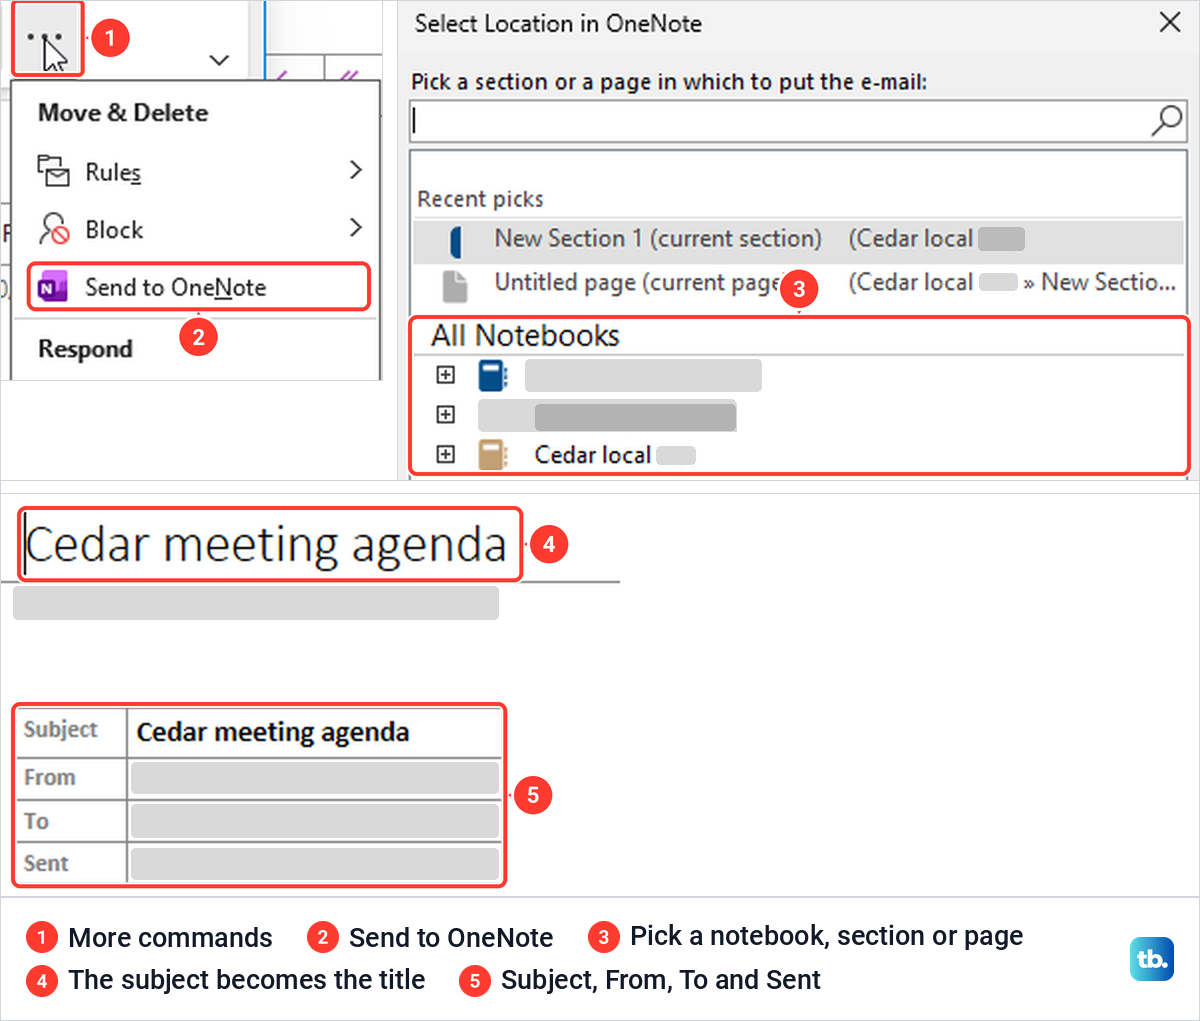
Mail can travel the other way too. In classic Outlook, open a message, select the three dots at the end of the ribbon and choose Send to OneNote under Move & Delete. A Select Location in OneNote window asks for a section or page, with Recent picks and All Notebooks, and you confirm with OK.
The message arrived as a new page titled with the email's subject, with a small table of Subject, From, To and Sent above the body. Pick the section that holds your meeting notes, and the email lands there as its own page beside them.
Fix the first problems you hit
If a tagged line or a search result is missing, widen the scope first: This notebook or All notebooks in Tags Summary, then Refresh Results, or All Notebooks in the Ctrl + E box. If Find Tags itself is missing, look under the three dots at the end of the Home tab.
If Share says Please upload your notebook to share it, check the notebook's location in File > Info, then pick an account to share from in that box, as Microsoft advises. Microsoft also says a notebook you have already created on your computer can be moved to OneDrive.
If someone can read your notebook but not edit it, check their permission under Manage Access before you change anything. For us the person could not edit because we had chosen Can view.
How we tested this guide
We tested this in OneNote for Microsoft 365 on Windows 11, version 25H2, building a three-section notebook and sharing it view only.
Frequently Asked Questions
How do I start using OneNote?
Select File > New > OneDrive, pick a folder and name the notebook. Then rename the first section, add a titled page and click anywhere on it to type.
Do I have to save my notes in OneNote?
No. Microsoft says OneNote saves your work automatically and continuously, and there is no Save step. Cloud notebooks also sync, which you can check in File > Info > View Sync Status.
Can I share only one page in OneNote?
Not with live access, because Microsoft has removed single-page sharing. Move or copy the page into a new notebook and share that notebook, or export the page as a PDF.
Why is my OneNote notebook not showing on another device?
Check File > Info first to see where the notebook lives. Our This PC notebook was missing from the sync status list, and Microsoft says storing a notebook in the cloud is what lets you reach it from any web-connected device. Microsoft also says a notebook created on your computer can be moved to OneDrive. For a notebook on OneDrive, open View Sync Status and select Sync Now.
Where did my tagged notes go?
Open Find Tags, set Search at the bottom of the Tags Summary pane to This notebook or All notebooks, and select Refresh Results. A narrower scope showed No tagged notes found for us, even though tagged lines existed in another section.
Can I use OneNote in a browser?
Yes. OneNote for the web opens notebooks stored on OneDrive, and our shared notebook opened there from its invitation. Microsoft says it can't search across all notebooks, and its PDF export works one page at a time.