

To use SharePoint, sign in to Microsoft 365 with your work or school account, open the app launcher and select SharePoint, then open your team's site. Files live in the site's Documents library: use Create or upload to add a file or folder, click a file's name to edit it in Word for the web, and select one file and choose Share to give someone access. Then check Manage access, because the permission you pick is not always the access a person ends up with.
A site is your team's shared space. Its document library holds files and folders, a list holds rows of information such as tasks, and a page presents news or instructions to readers. Microsoft says the files you store on a site are usually available to everyone with permissions to the site, which matters more than anything else when you share.
We saved, uploaded, shared, edited and restored library files in SharePoint in Microsoft Edge and in Word for Microsoft 365 on Windows 11, version 25H2. Three results surprised us: Word's Save As list did not offer our team site, a Can view invitation still left a site member with Can edit, and restoring an old version kept every newer one.
The short version
- Open it: app launcher > SharePoint, then pick the site from Recent sites, or search and press Enter.
- Add files: in Documents, select Create or upload, then Files upload, Folder or Word document.
- Edit: click the file name for Word for the web, or right-click it and choose Open > Open in app for desktop Word.
- Share: select one file, choose Share and a permission, then confirm who has access in Manage access.
- Undo: Version history restores an earlier copy, and the site's Recycle bin brings back a deleted file.
SharePoint at a glance
| What you want | Where to go | What to select |
|---|---|---|
| Find a team site | SharePoint start page | Recent sites, or search and press Enter |
| Add a file from your PC | Site > Documents | Create or upload > Files upload |
| Start a new document | Site > Documents | Create or upload > Word document |
| Save from desktop Word | Word > File > Save As | Browse, then the library address |
| Edit in desktop Word | Right-click the file name | Open > Open in app |
| Share with one person | One selected file | Share, a permission, then Send |
| See who can open a file | Right-click the file name | Manage access |
| Get an earlier copy back | Right-click the file name | Version history, then Restore |
| Recover a deleted file | Site navigation | Recycle bin, select the file, Restore |
| Add a list or a page | Site home page | + New > List or Page |
These are the labels on the site we used. Microsoft's help pages still print + New and Upload for the library buttons, and Microsoft says the file types you can create depend on the templates your site owner or administrator has set up for the library. So a menu on your site can be shorter or worded a little differently.
If your team has no site yet, first create a SharePoint site, then come back here to work in its Documents library. Everything below assumes the site exists and that you can edit it.
Open SharePoint and find your site
Sign in to Microsoft 365 with your work or school account, select the app launcher (the grid of dots at the top left) and choose SharePoint. SharePoint opened on its start page, called Discover, with a Recent sites row and a search box at the top.
Select a site card to open it. To keep a site within easy reach, select the star at the top right of its header, which Microsoft describes as following the site.
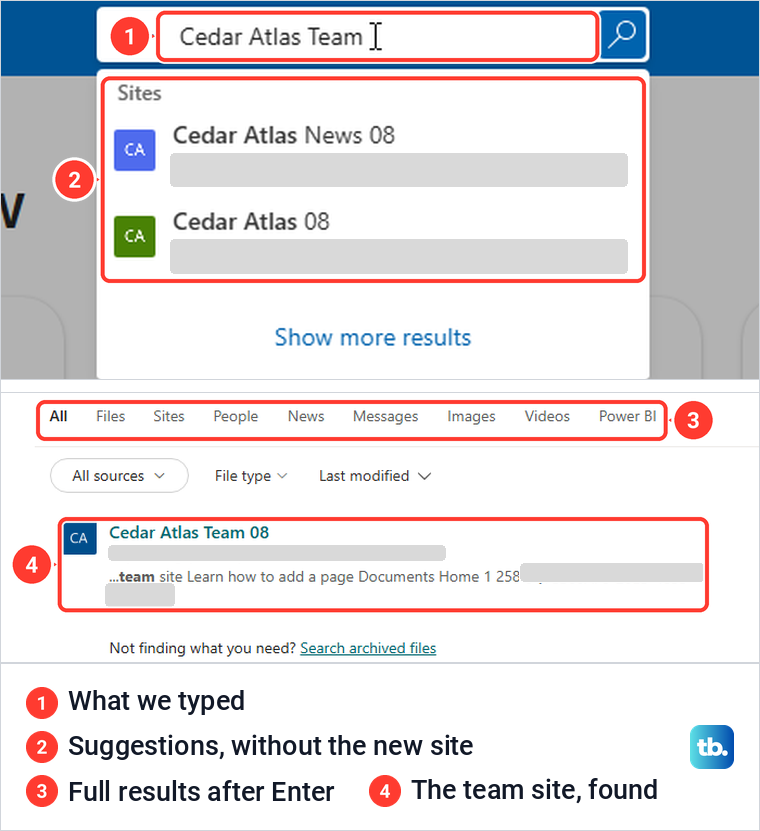
We typed the name of a team site created about 40 minutes earlier into Search in SharePoint, and the suggestion list showed two other sites but not that one. Pressing Enter opened the full results page, with tabs for All, Files, Sites, People and News, and the site was there.
Inside a library, the search box changes to Search this library. Our search for a file name filtered the Documents library in place and offered Expand search to all items in this site at the bottom, so look for that link when a file seems to be missing. Microsoft adds that search only shows results you already have access to.
Save a Word document to a SharePoint library
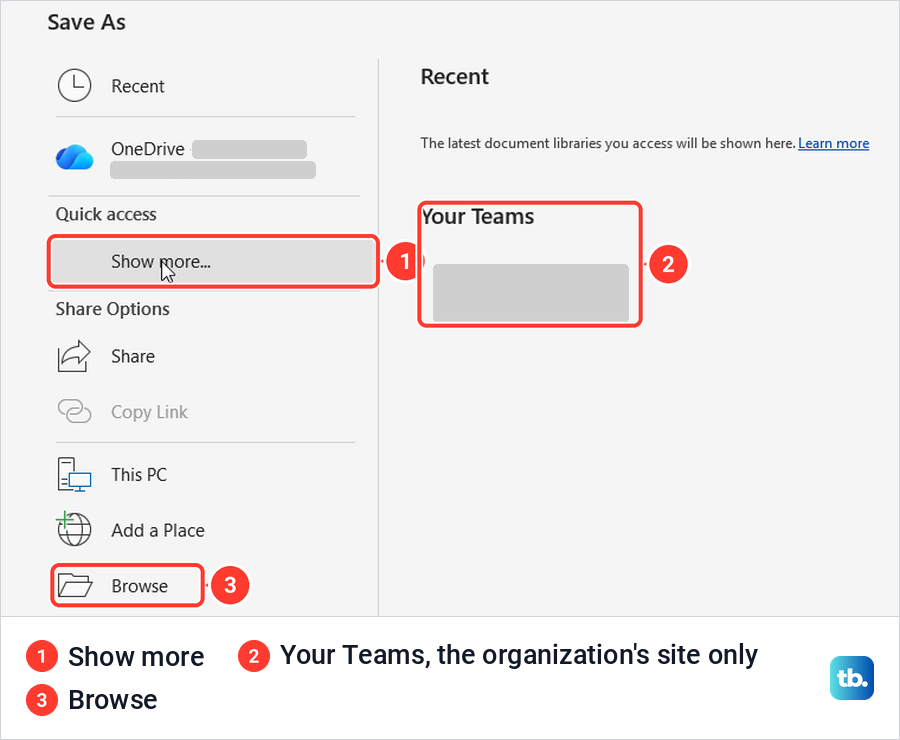
In Word for Microsoft 365, press F12 or open File > Save As. On our PC, F12 went straight to the classic Save As window, while the File > Save As page listed Recent, OneDrive, Quick access, This PC, Add a Place and Browse. There was no Sites entry for SharePoint, even though Word's Account page listed the organization's sites as a connected service.
Show more under Quick access listed a Your Teams tile for the organization-wide site and an empty Recent list. The team site we had been added to about half an hour earlier was not offered, so we used Browse instead.
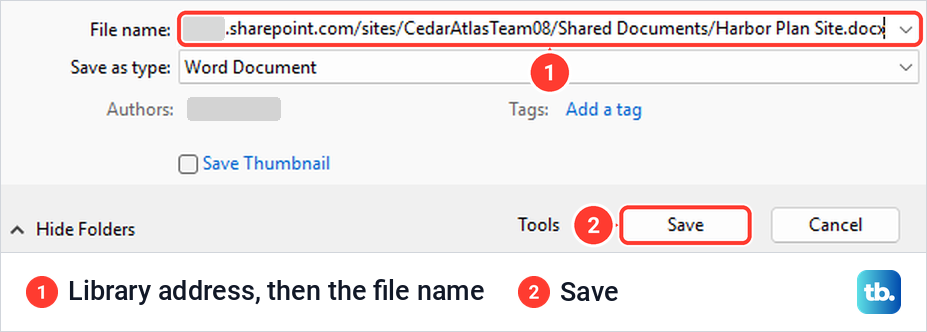
In the Save As window, we typed the library's address followed by the file name into the File name box and pressed Enter. Word showed a box that read Getting list of available content types and properties, then reopened the document from the library.
To build that address, start with your organization's SharePoint address and the site part, ending in /sites/YourSite, and cut anything the browser shows after the site name. Then add /Shared Documents/ for the Documents library and the file name, or use another library's own address in place of /Shared Documents/. Type it in full, starting with https://, as in https://yourcompany.sharepoint.com/sites/YourSite/Shared Documents/Plan.docx.
When it finished, the title bar showed AutoSave switched On, the word Saved and a notice that read AutoSave is On. Microsoft says saving a file to OneDrive or SharePoint enables features such as AutoSave and Version History, which is the main reason to keep team files there.
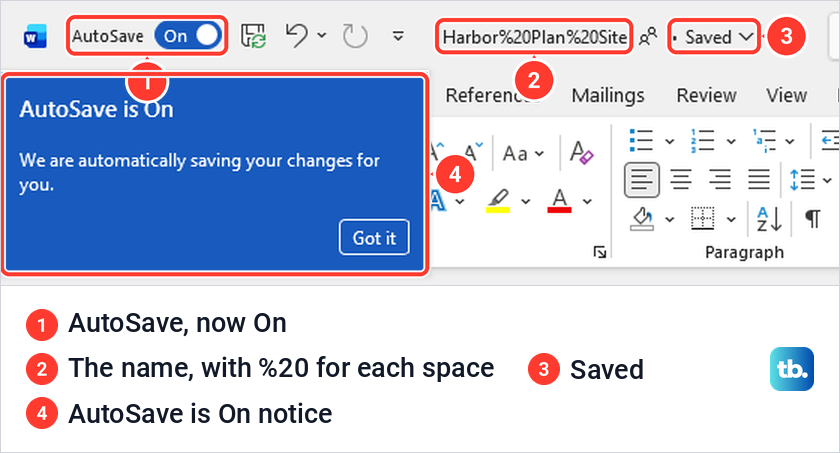
There is one catch. Word turned each space we typed in the file name into %20, and the file came out as Harbor%20Plan%20Site.docx, so leave spaces out of the name on this route. Rename it in the library afterwards, as shown in the next section, or skip the address route and upload the file from your browser instead.
If Word closed before that first save to the library, recover an unsaved Word document first. SharePoint's Version history cannot help with work that never reached the library.
Create a folder or a new document
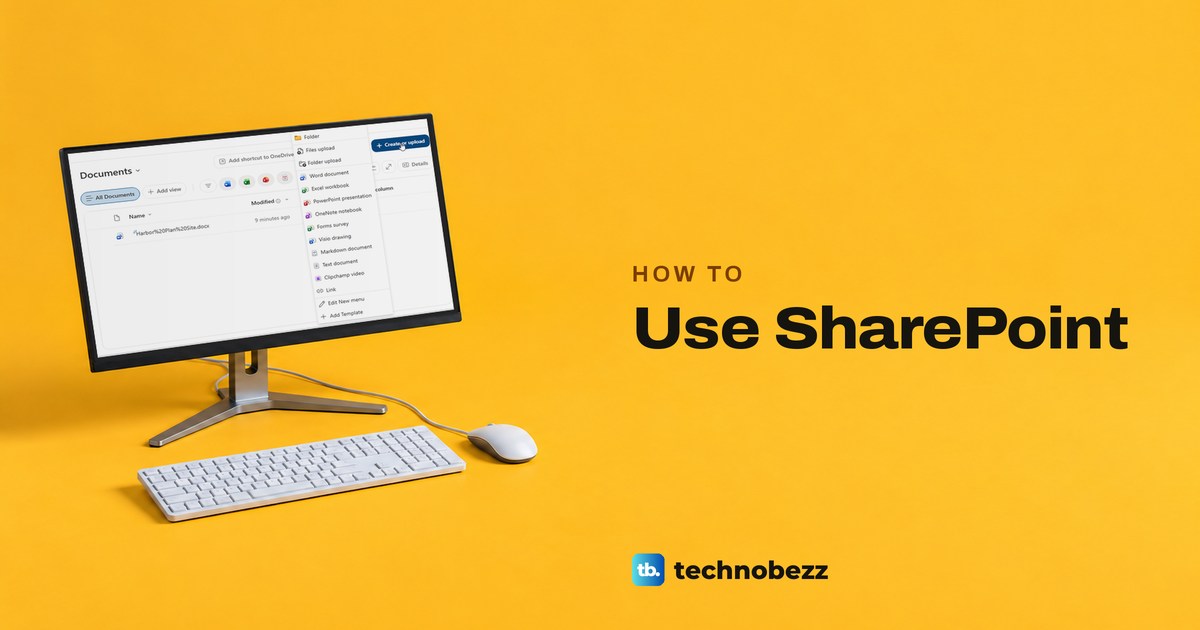
Open Documents in the site's navigation. Our library had no + New or Upload button, because both jobs sat under one Create or upload button at the top right. Its menu starts with Folder, Files upload, Folder upload and Word document, then other file types down to Link.
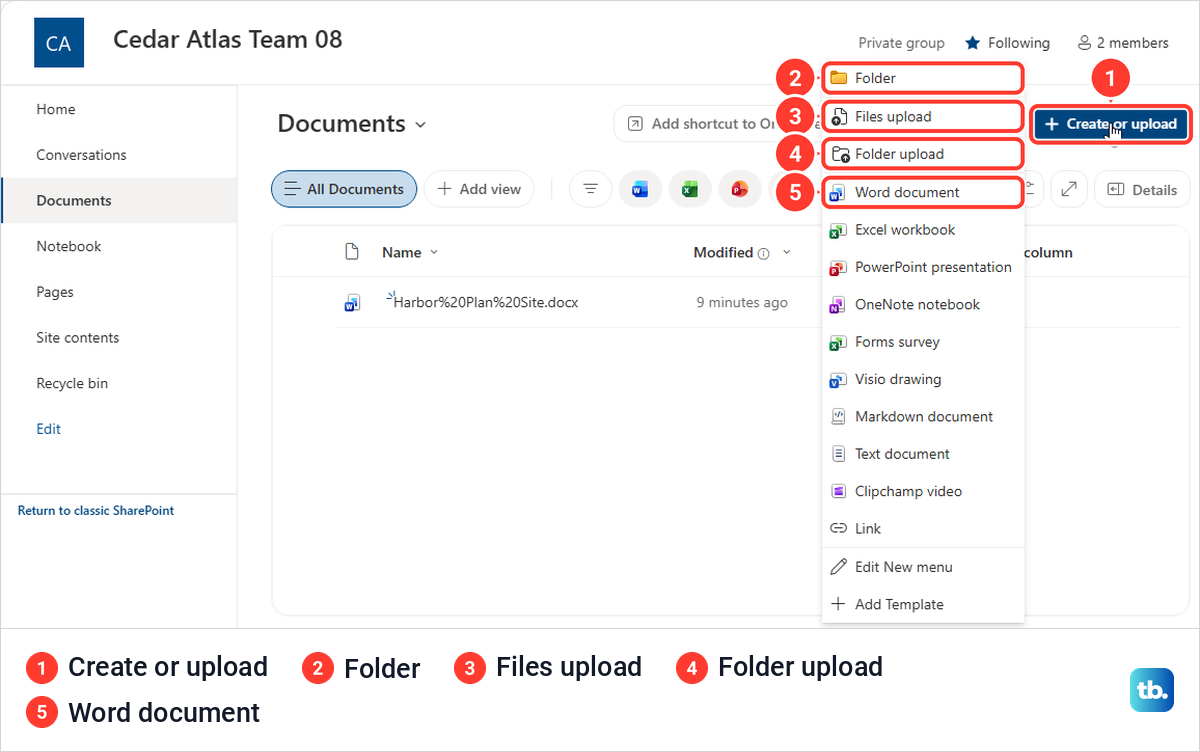
Choose Folder, type a name and select Create. The Create a folder box also offered a Folder color, with yellow selected when it opened. Microsoft notes that if Folder is missing from the menu, it might be turned off for that library.
Choose Word document and a blank document opens in Word for the web in a new tab, named Document. We typed a line and the header showed Saved within seconds, without pressing any save button. Microsoft says a new file is automatically saved to the document library and appears in its list of files.
To give it a proper name, open the file's menu with a right-click on its name, or with the three dots beside it, and choose Rename. The box keeps .docx fixed beside the name, so type only the name and select Update. SharePoint confirmed it with Renamed 1 item.
The same menu starts Excel workbooks and PowerPoint presentations, and our Excel guide for beginners takes over once a workbook opens. For a OneNote notebook, our guide on how to use OneNote for notes and organization covers working in one.
Upload files from your PC
Select Create or upload > Files upload, pick the file in the Windows Open window and select Open. Our upload had finished within about three seconds, and SharePoint confirmed it with a message that begins "Uploaded" and names the file and the library. Folder upload, in the same menu, is the choice for a whole folder.
Microsoft says you need contributor permissions to the library to create and upload files and folders. So if Create or upload is missing, ask the site owner about your permissions for that library.
Uploading a file whose name is already in the folder does not overwrite it silently. We uploaded the same file twice, and SharePoint stopped with A file with this name already exists so we couldn't upload Harbor Notes.docx, followed by Replace and Keep both.
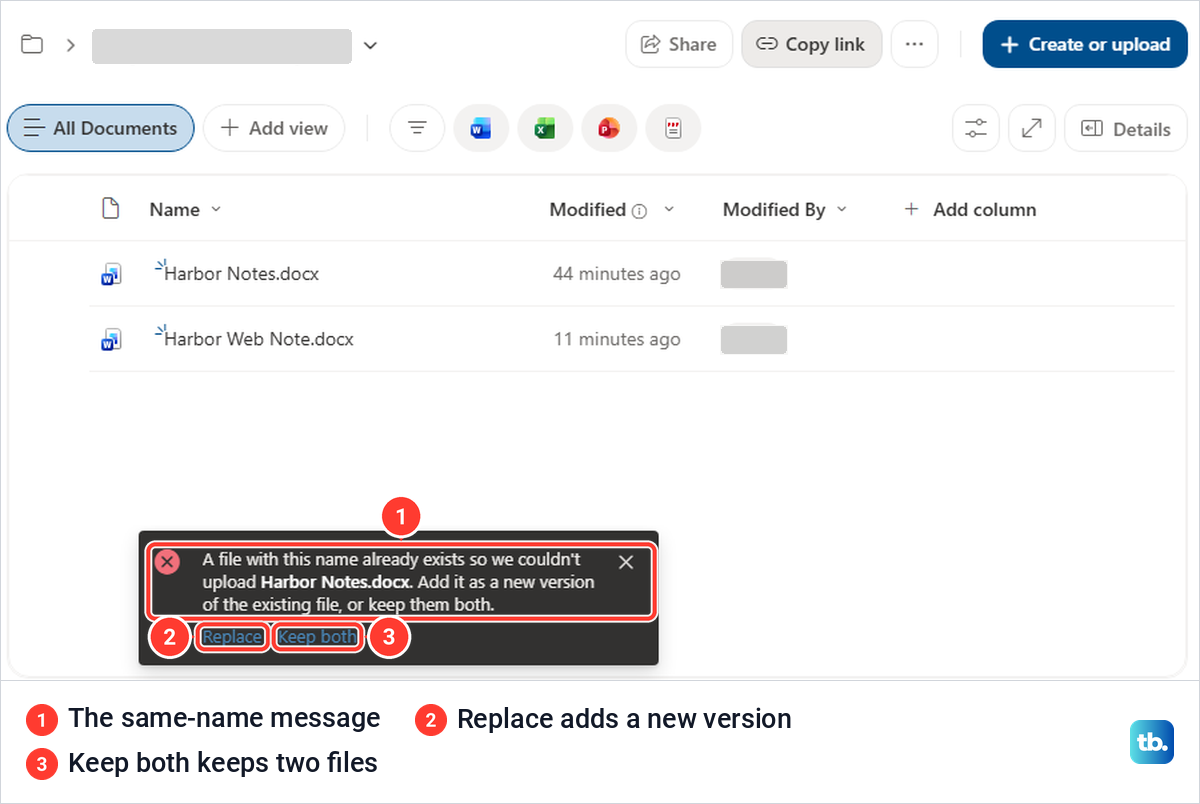
Replace uploads your copy as a new version of the existing file, and for us the file's Version history then showed version 2.0 above version 1.0. Keep both, in the message's own words, keeps them both instead. Replace is usually the right call for a newer draft, because the older copy stays in Version history.
Open and edit a file in the browser or in Word
Click a file's name and it opens in Word for the web in a new tab, ready to edit. Microsoft says files edited online in Microsoft 365 are saved automatically, and we waited for the saved icon in the header before closing the tab.
For desktop Word, right-click the file's name and choose Open > Open in app. Right-click the name itself, because for us a right-click on the empty right side of the row opened the library's menu instead. The three dots beside the name were also hidden behind a hover card twice, and the right-click still worked.
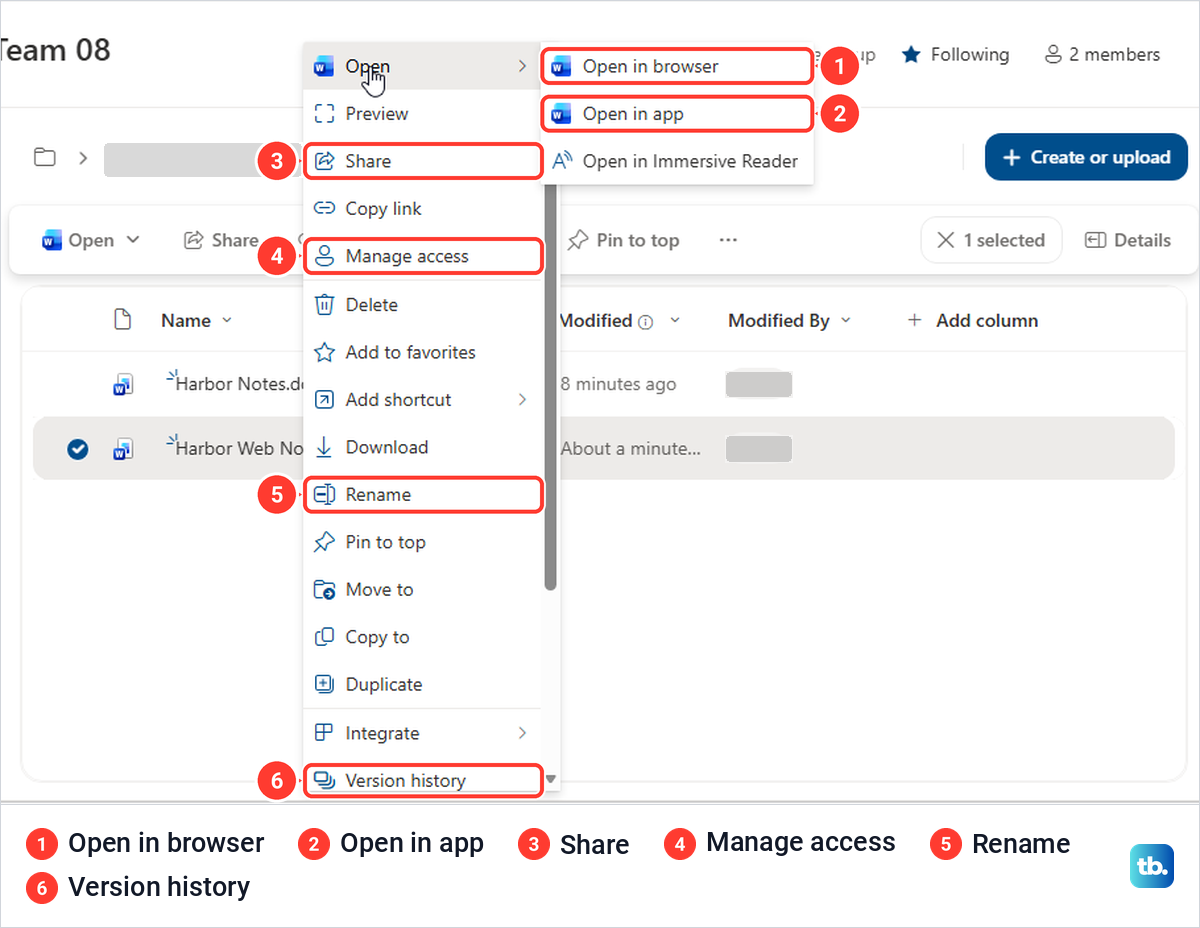
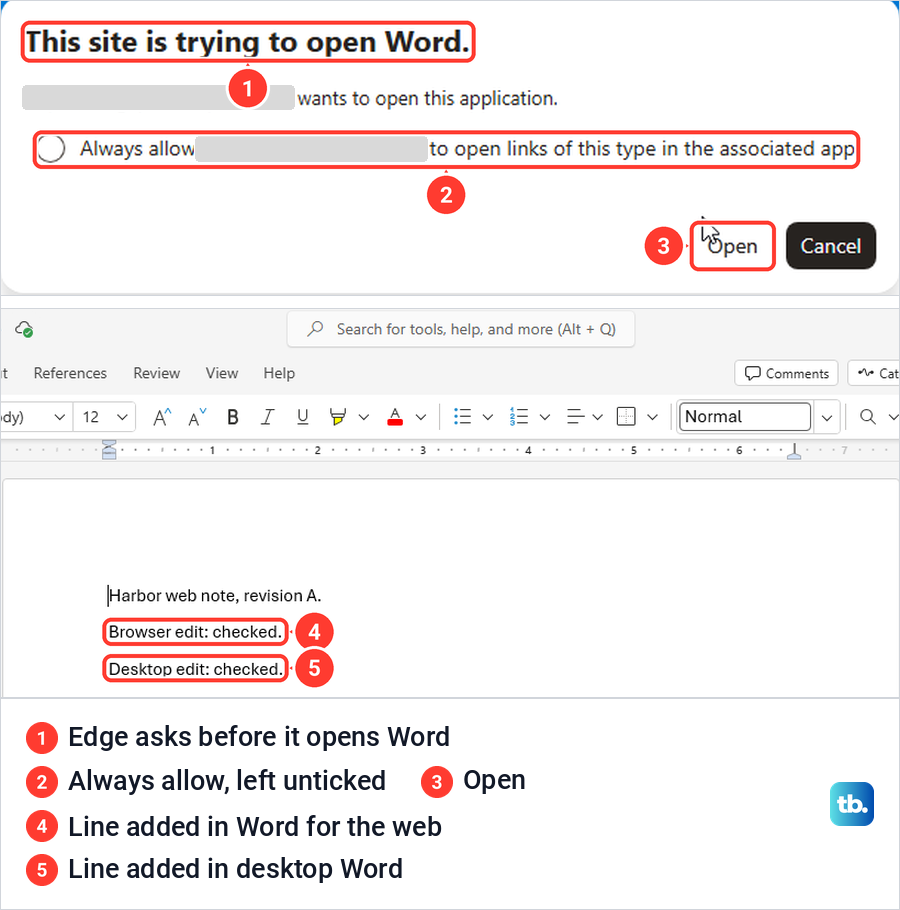
Edge then asked This site is trying to open Word, with an Always allow box that we left unticked. After Open, desktop Word opened the library file with AutoSave on and no further prompt.
We added one line in the browser and one in desktop Word, saved, and reopened the file in the browser. Both lines were there, each once, in the single file in the library. If several people will edit the document, track changes in Word once it is open, so every edit stays visible for review.
Share a file with one person
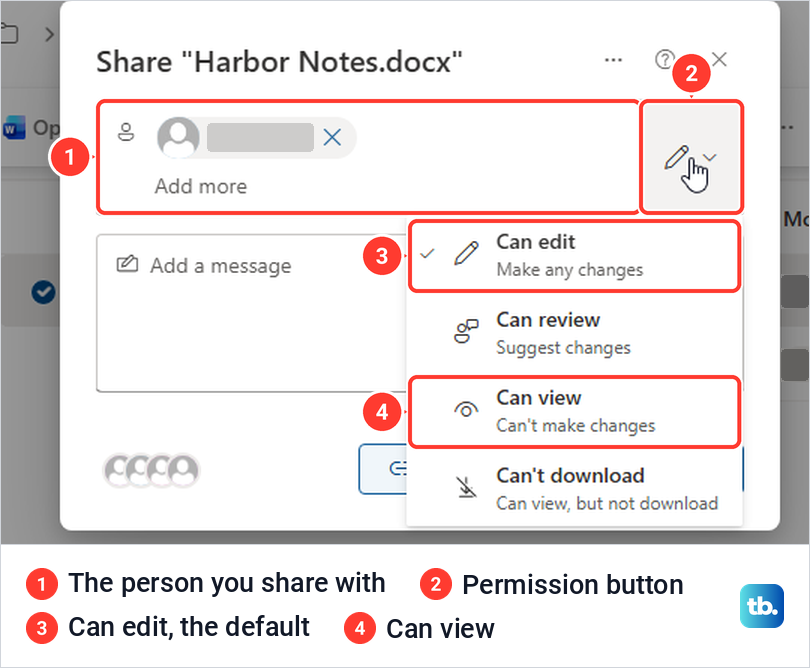
In the library, tick one file's circle so the command bar reads 1 selected, then choose Share. Type a name, pick a permission from the button at the right of the name box, add a message if you like and select Send.
The permission list we saw offered Can edit, Can review, Can view and Can't download, with Can edit ticked by default. Change it before you send, because the default lets the person make any changes.
After Send, a line at the top of the box confirmed that we had invited the person to view the file. Then check Manage access, as shown under Check who really has access.
Desktop Word has the same box. Its Share button at the top right opens a menu with Share, Copy Link and Manage Access, and its Share window offered the same four permissions. The invitation we sent from desktop Word arrived as an email that read invited you to view a file, and its button opened the file in Word for the web.
Sharing several files at once
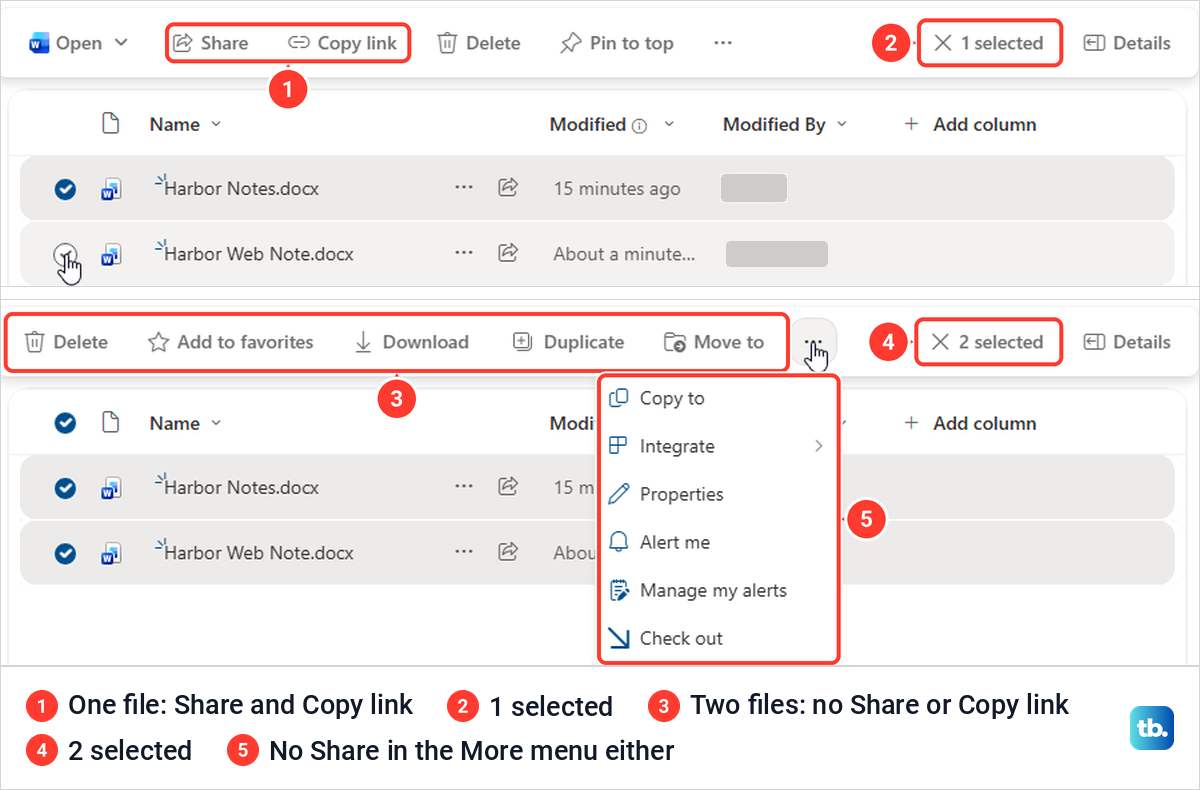
Selecting two files removed Share and Copy link from the command bar, and the More menu had no Share either. Nothing on screen said why. Microsoft's answer is that sharing several items at the same time is not available, and that you can put them in a folder and share the folder instead.
Check who really has access
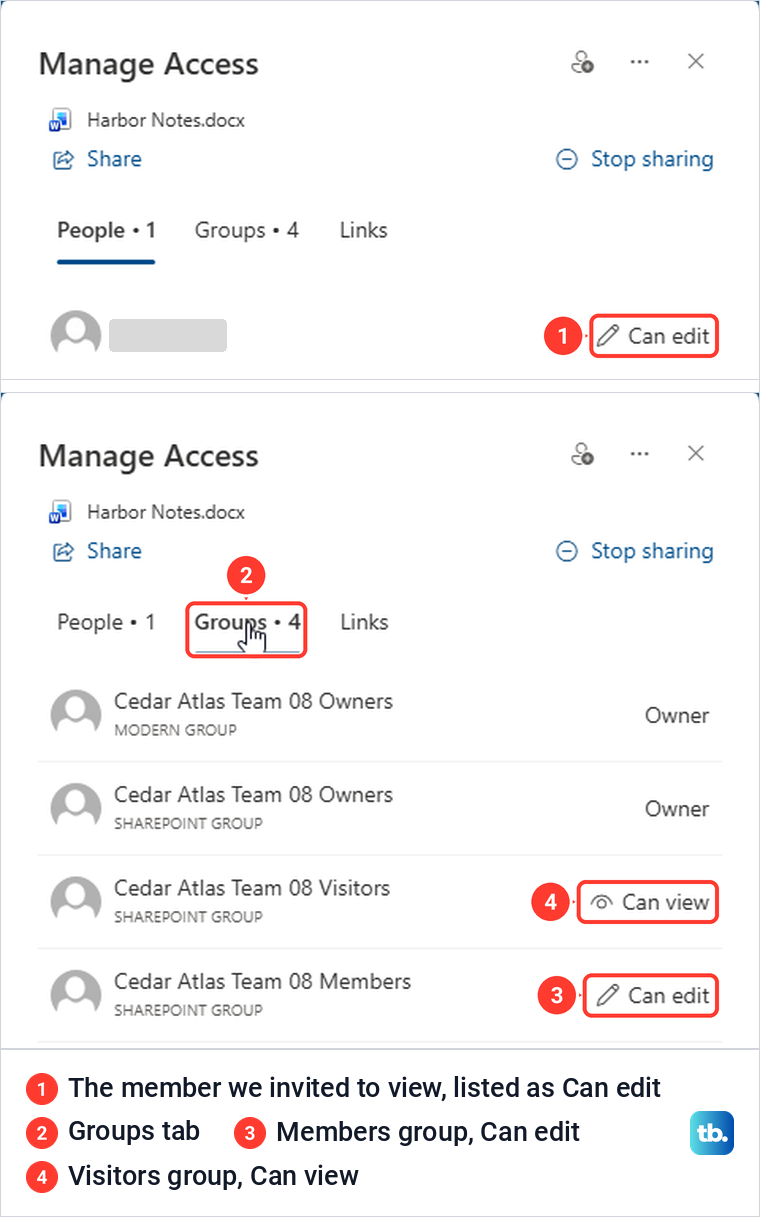
This is the trap. We shared a file with Can view with a person who was already a member of the site, then opened the file's menu and chose Manage access. It listed that person with Can edit, not Can view.
The Groups tab explained it. The site's Members group had Can edit, the Visitors group Can view and the Owners group Owner, and the member's existing edit access outranked the view-only invitation. Microsoft says the Members group has the Edit permission level by default.
It worked the same way in the other direction. A view invitation sent from desktop Word to the person who owned the site opened the file in Editing mode when they clicked it in the email. For us, a Can view invitation added nothing for people who already had edit access through the site.
So if a file must stay read only for someone who belongs to the site, sharing it with Can view is not enough. Microsoft explains that items given unique permissions stop inheriting them from the site, so ask the site owner about that rather than relying on the Share box. Manage access is where to confirm the result.
Choose who a sharing link works for
A link is the other way to share, and its settings are easy to miss. In the Share box, the gear button beside Copy link opens Link settings, headed The link works for.
Our site offered three choices. People in your organization, with an organization account required, was selected by default, followed by Only people with existing access and People you choose, for specific people inside or outside the organization. Under More settings the link was preset to Can edit, with a box to set an expiration date.
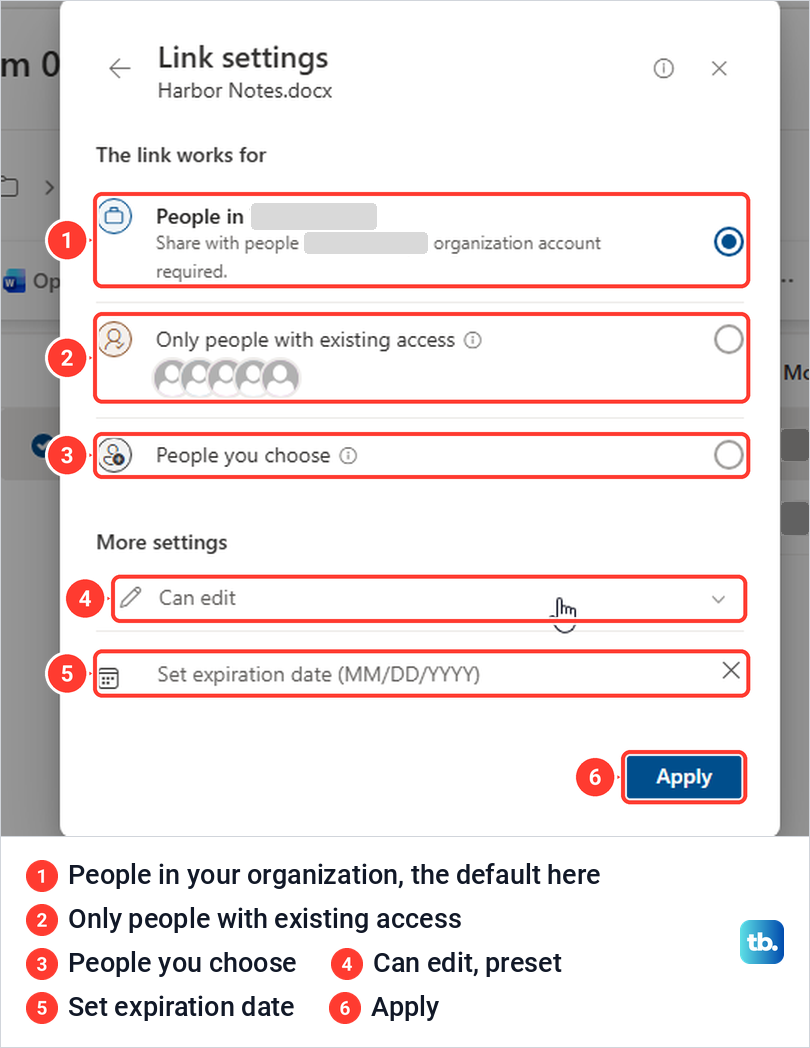
We chose People you choose, selected Apply, added one person and selected Copy link. The green bar read Link copied. People you specify can edit, because the permission had stayed at Can edit, and Manage access then listed the link under Links in the same words.
So set the permission before you copy, not after. Microsoft says a link for people with existing access does not change any permissions, which makes it the safe choice for sending a link to someone who can already open the file. Our site showed no Anyone choice, so read the list on yours before you copy a link.
Restore an earlier version of a file
Right-click the file's name and choose Version history, the last item in the menu. Our table listed each version with its number, date, author, size and comments. Five quick changes, from creating and typing to renaming and one edit each in the browser and in desktop Word, had already made five versions.
Point at a version's date and select the arrow beside it for View, Restore and Delete. View did not show the document's text for us, only the version's details and a Restore Item Version button, so pick the version by its date and author.
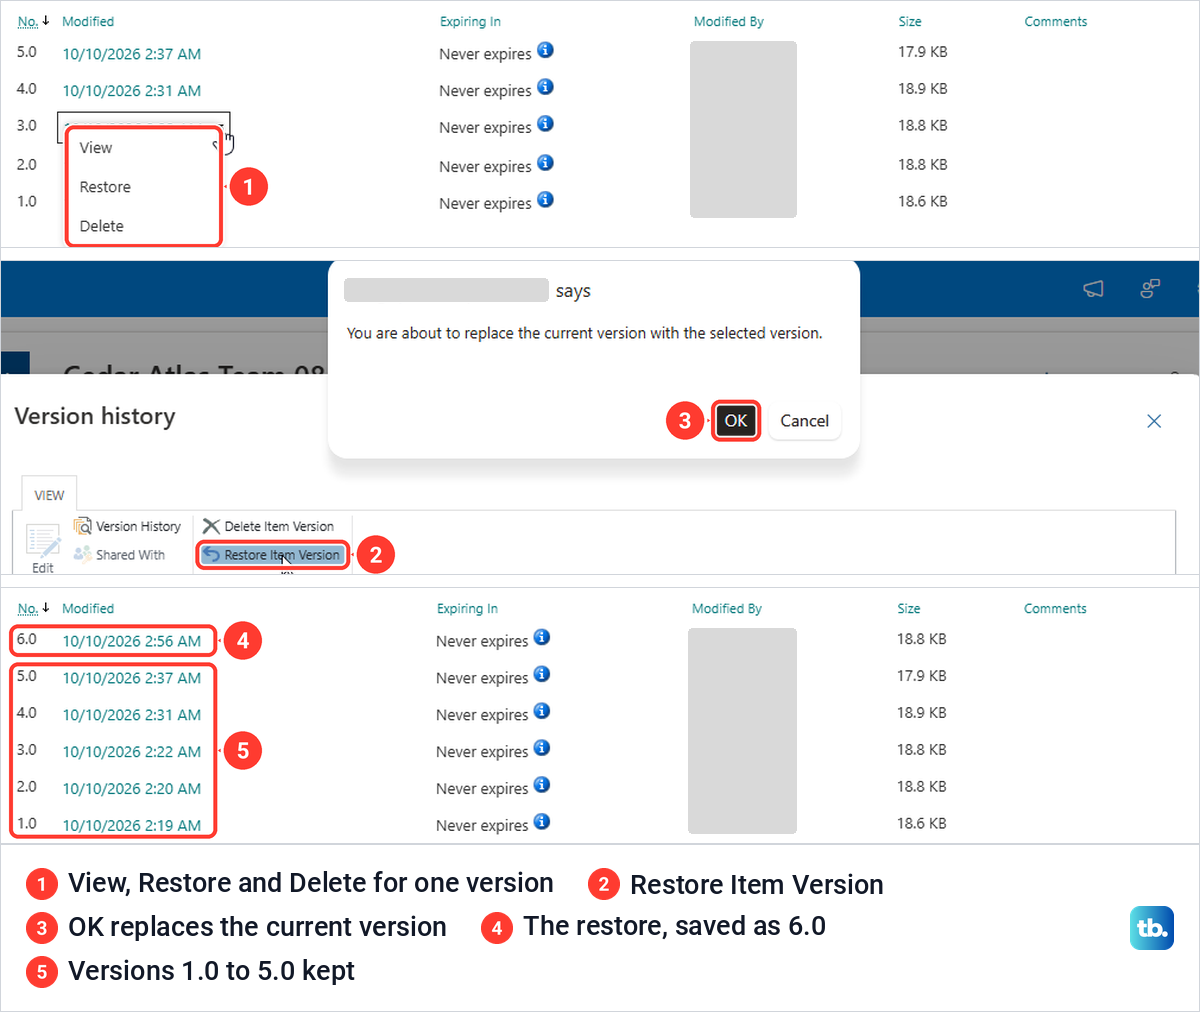
Restore Item Version brought up a browser box that said You are about to replace the current version with the selected version. After OK, the table gained a new version 6.0 at the top, versions 1.0 to 5.0 were all still listed, and the file opened with the older text.
So a restore did not remove any version for us, and Microsoft's version history overview says the restored version becomes the new current version. The text you replaced stays in the list as the previous version, 5.0 for us. If you want both open side by side, make a copy of the Word document first, or use Duplicate in the file menu, and then compare two Word documents to see exactly what changed.
Restore a deleted file from the Recycle bin
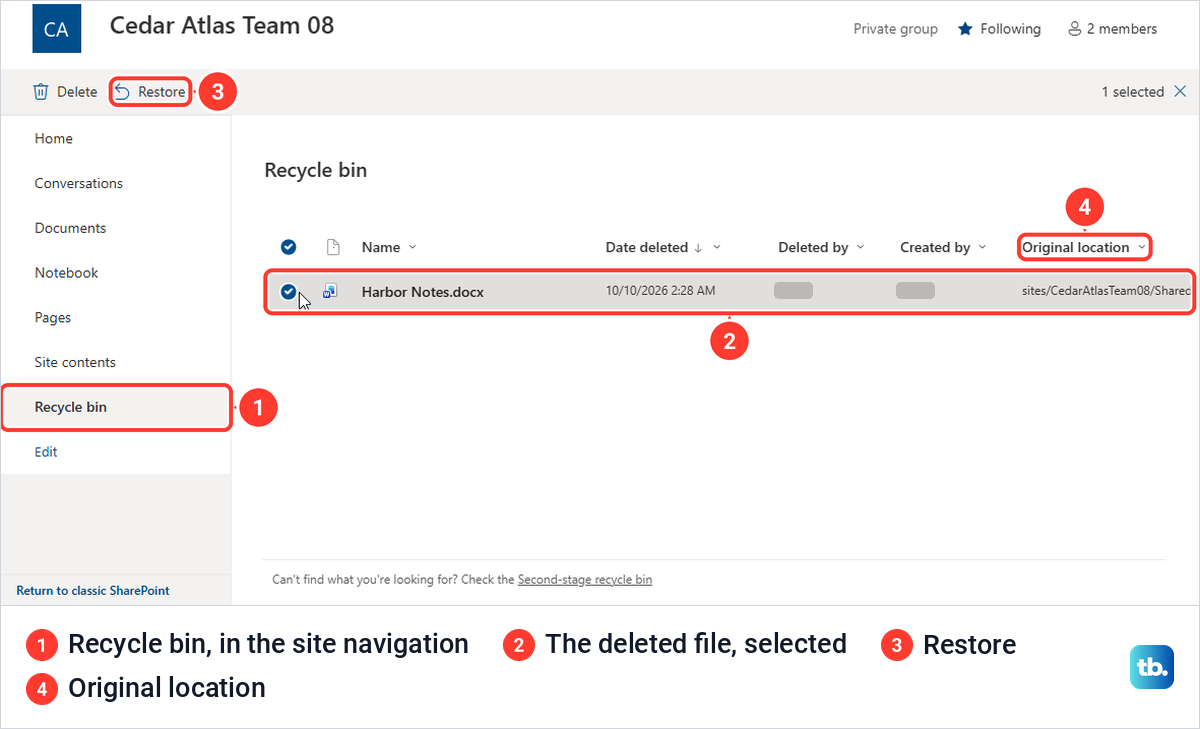
Deleting a file first asks Delete? and explains that the item goes to the site recycle bin, so a deleted file is not gone straight away. To bring it back, open Recycle bin in the site's navigation, tick the file and select Restore.
Our Recycle bin listed the file with the date it was deleted, who deleted it, who created it and its original location. Restore asked nothing more and showed Restored 1 item, and the file was back in its folder.
The page did not say how long deleted files stay. Microsoft gives the retention time for SharePoint as 93 days, counted from when the file was first deleted. It also says that if an item is missing from the site's Recycle bin, a site collection administrator might be able to restore it from the site collection recycle bin.
Make a list or a page
Go to the site's home page and open + New. Ours offered Page, News post, App, Dashboard, Document library, List, News link and Plan from the same menu.
For a list, choose List. The next screen asked How would you like to start, and the blank option was the card named List under Create from blank, beside Form, Gallery, Calendar, Board and imports from Excel or CSV. We typed a name, left Show list in site navigation ticked and selected Create.
The new list opened with a Welcome to your new list message, and a link to it appeared in the site navigation. Selecting + New opened a New item form with a Title box, and after Save the item showed as the list's first row.
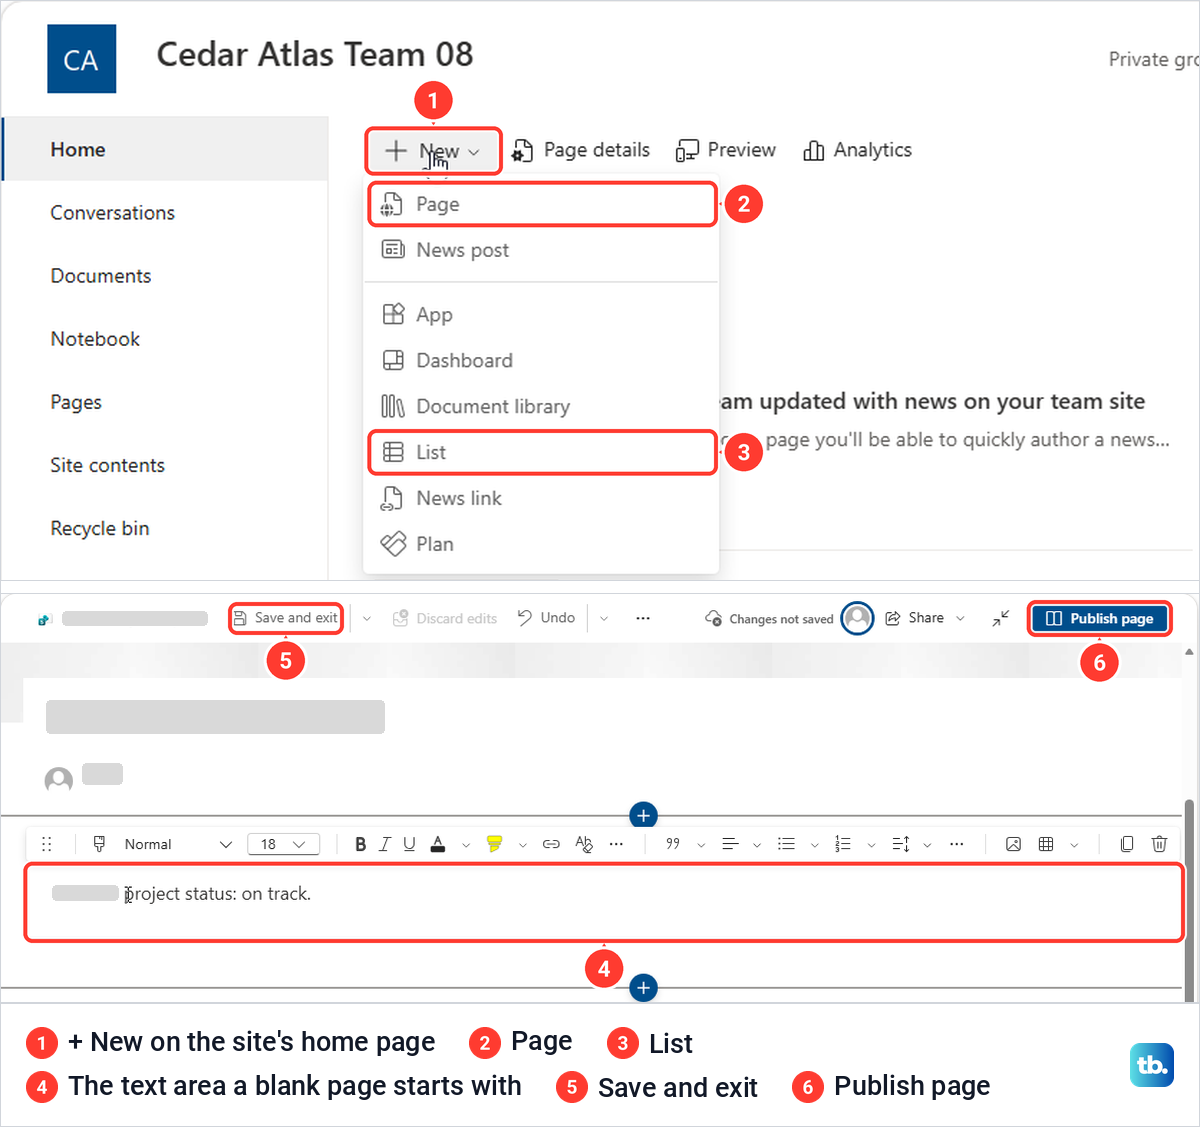
For a page, choose Page. It opened a full Template gallery rather than a small dialog, and Create blank gave us an editor with an Add a title box, a text area already on the page and the Toolbox of web parts open at the side.
Type a title and your text in those two places. Publish page published ours at once with Page published, and a Promote pane offering email, Teams and Engage opened by itself, which we closed without using. Save and exit is there for a page you want to finish later, and Microsoft says your audience can't view the page until you publish it.
Open library files in File Explorer
The library also connects to File Explorer, through OneDrive. Its header has an Add shortcut to OneDrive button, and the library's More menu (the three dots) holds Sync.
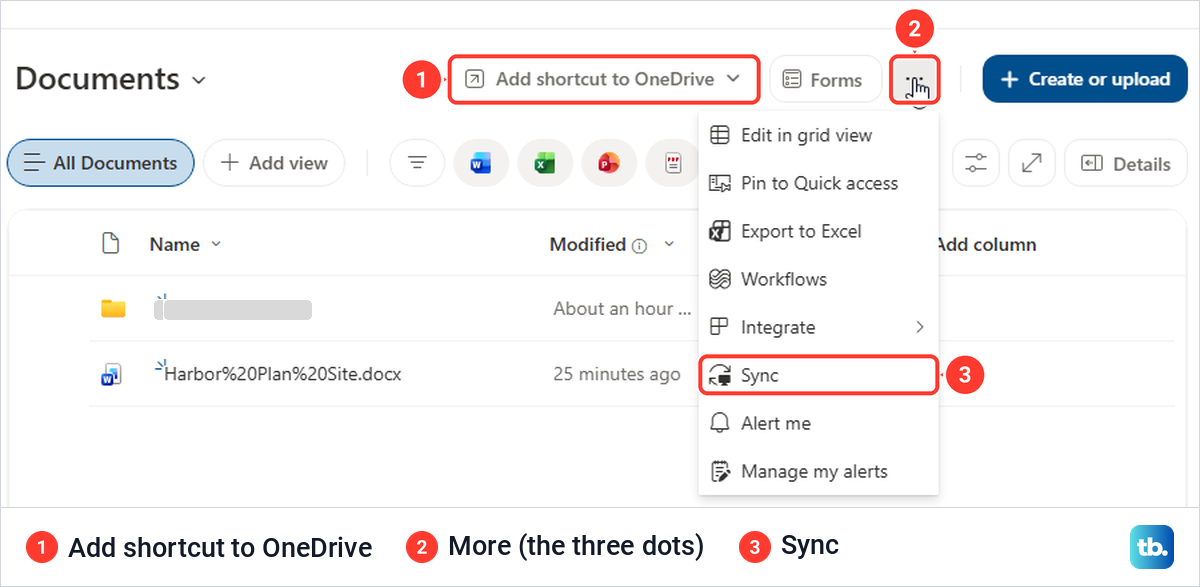
Microsoft explains the difference: a OneDrive shortcut makes the library available on all your devices, while Sync is tied to one device, and it recommends shortcuts as the more versatile option when available. Either way, set up OneDrive on Windows first.
For a shortcut, Microsoft's steps are to open the library and select Add shortcut to OneDrive. A message appears once the shortcut is created, and My files in OneDrive then lists it. On a Windows PC, Microsoft says to look in File Explorer for the OneDrive folder with your organization's name after it.
For Sync, select the three dots in the library's header and choose Sync. Microsoft says to confirm if your browser asks for permission to use OneDrive, then sign in to OneDrive to finish setup. After that, the synced library appears in File Explorer under your organization's name, in its own subfolder.
If Sync asks for the desktop app, install the OneDrive app for desktop and select Sync again. If File Explorer and the site start to show different files, fix OneDrive when it stops syncing before you edit another local copy.
How we tested this guide
We tested this in SharePoint in Microsoft Edge and Word for Microsoft 365 on Windows 11, version 25H2, working with files in a team site library.
Frequently Asked Questions
How do I get into SharePoint?
Sign in to Microsoft 365 with your work or school account, open the app launcher at the top left and select SharePoint. Its start page lists your recent sites, or you can search for a site by name and press Enter.
Why is there no Upload button in my SharePoint library?
In our library, uploading sat under Create or upload, as Files upload and Folder upload. If there is no Create or upload button either, Microsoft says you need contributor permissions to the library, so ask the site owner.
Why can't SharePoint search find my site or file?
Press Enter for the full results page, because a site made 40 minutes earlier was missing from our suggestion list but showed up after Enter. Also check whether you are searching just one library, and remember that search only shows items your account can open.
Does sharing with Can view stop someone from editing?
Not if they already have edit access through the site. Our Can view invitation left a site member listed as Can edit in Manage access, because the site's Members group has edit permission.
Can I share several SharePoint files at once?
Not by selecting them together, because Share disappeared when we selected two files. Microsoft suggests putting the files in a folder and sharing the folder.
How do I get back an old or deleted SharePoint file?
For an earlier state, open the file's Version history and restore the version you want, which becomes a new current version while the newer ones stay listed. For a deleted file, open the site's Recycle bin, select it and choose Restore.