
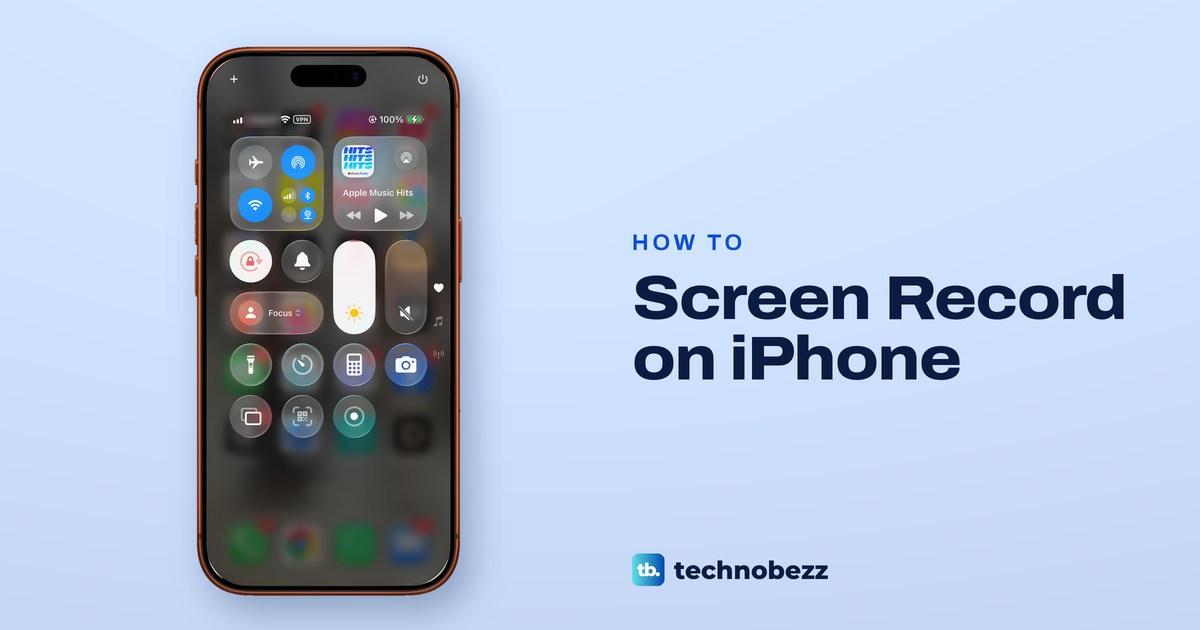
To record your screen on an iPhone, swipe down from the top-right corner to open Control Center, tap the Screen Recording button and wait for the 3-second countdown. To stop, tap the red circle or the red timer at the top of the screen, then tap Stop. The video is saved to the Photos app. Your iPhone can screen record without any extra app, with or without your voice.
Two things trip people up. On our iPhone 17 Pro with iOS 26.6, the Screen Recording button was not in Control Center until we added it from the controls gallery. Your voice also goes into the video only when Microphone is on, and you see the Microphone button only when you touch and hold Screen Recording, where ours read Microphone Off.
The short version
- Start: open Control Center, tap Screen Recording and wait for the 3-second countdown.
- Not there: tap + at the top left of Control Center, then Add a Control, then Screen Recording.
- With your voice: touch and hold Screen Recording, tap Microphone, then Start Recording.
- Stop: tap the red circle or red timer at the top of the screen, then Stop. The video goes to Photos.
- Greyed out: check the Screen Recording setting in Screen Time, or ask whoever manages the iPhone.
Screen recording on iPhone at a glance
Only two things change from one device to the next: how you open Control Center, and where the red indicator sits when you want to stop. The table follows Apple's instructions for each kind of iPhone and for iPad.
| What you have | Open Control Center | Start | Stop |
|---|---|---|---|
| iPhone with a Dynamic Island | Swipe down from the top-right corner | Tap Screen Recording, wait 3 seconds | Tap the red circle at the top, then Stop |
| Other iPhone with Face ID | Swipe down from the top-right corner | Tap Screen Recording, wait 3 seconds | Tap the red timer at the top left, then Stop |
| iPhone with a Home button | Swipe up from the bottom | Tap Screen Recording, wait 3 seconds | Tap the red timer at the top of the screen, then Stop |
| iPad | Swipe down from the top-right edge | Tap Screen Recording, wait 3 seconds | Tap the red circle at the top, then Stop |
| Any of them, with your voice | Same as above | Touch and hold Screen Recording, tap Microphone, then Start Recording | Same as above |
Add Screen Recording to Control Center
If you don't see Screen Recording when you open Control Center, add it once and it stays. Apple notes that after you add it, you don't need to add it again for future recordings. On our iPhone, Control Center held Flashlight, Timer, Calculator, Camera, Screen Mirroring and Scan Code, but no Screen Recording control until we added it.
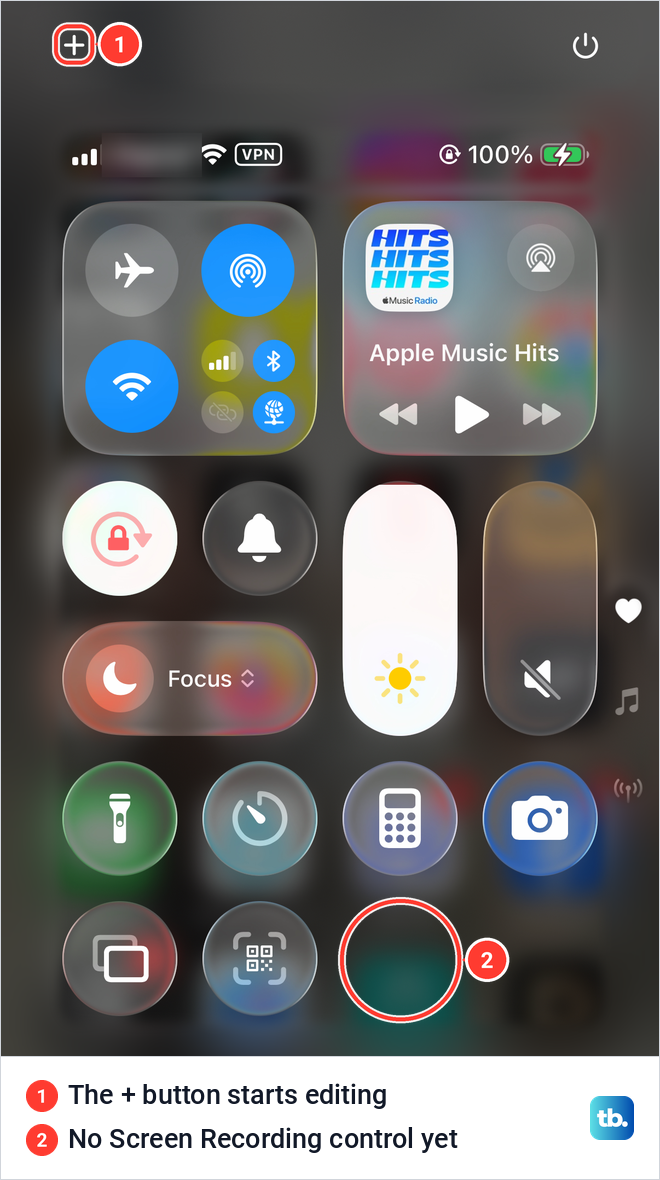
Open Control Center by swiping down from the top-right corner of the screen, then tap the + button at the top left. On our iPhone every control then showed a minus badge, and Add a Control appeared at the bottom of the screen. Apple's other way into the same editing mode is to touch and hold an empty part of the background.
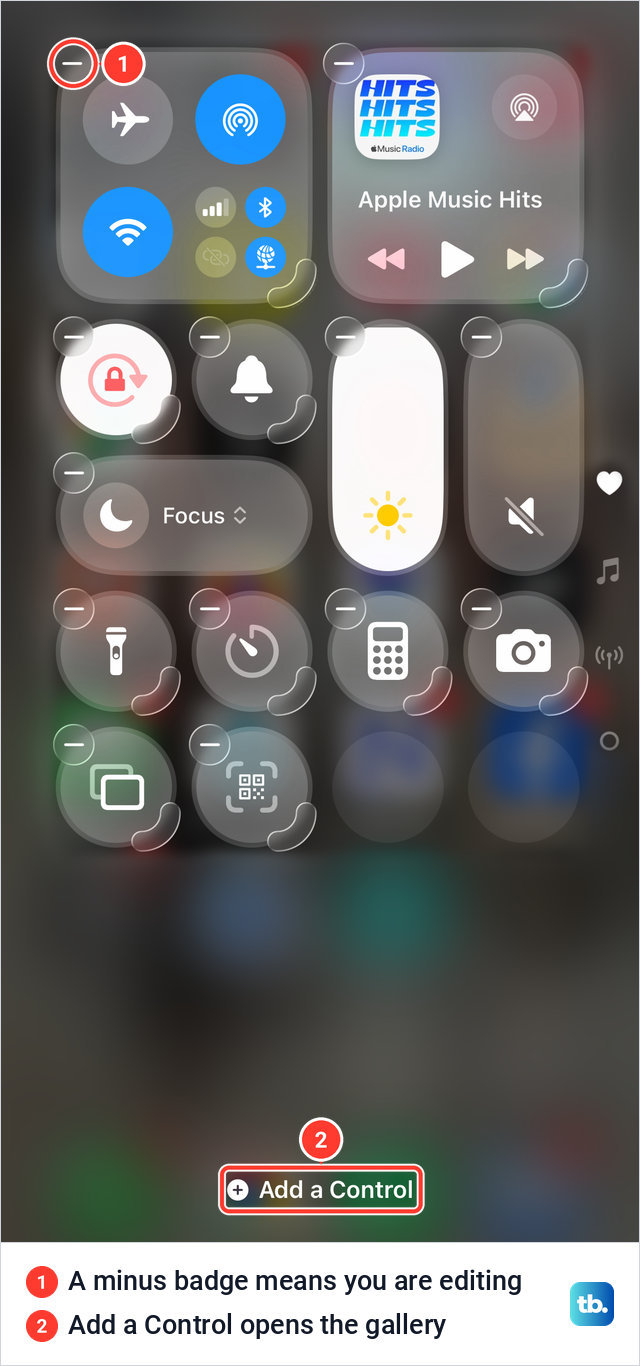
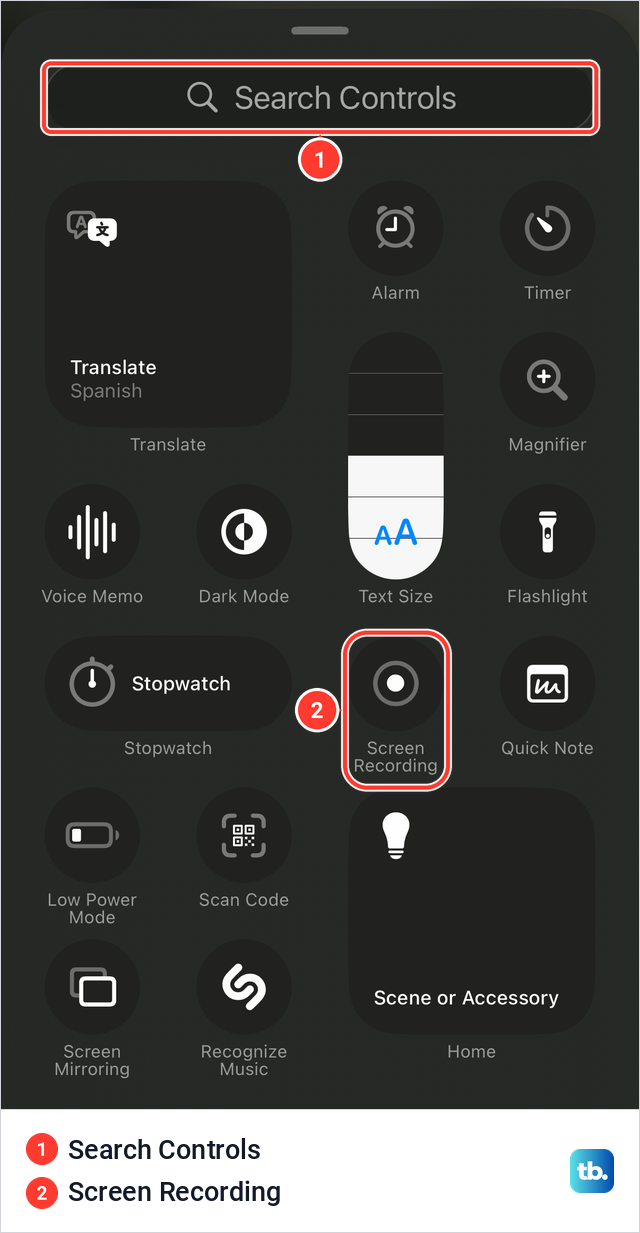
Tap Add a Control. The controls gallery opened with a Search Controls field at the top, and Screen Recording sat among the system controls next to Stopwatch and Quick Note. Tap the Screen Recording tile once, or type its name into the search field if your gallery is long.
One tap added it as the last control in our Control Center, a white dot inside a ring. Tap an empty part of the screen to leave editing mode, as Apple describes, and the button stays with your other controls. While the minus badges are showing, you can also drag it to a spot your thumb reaches more easily.
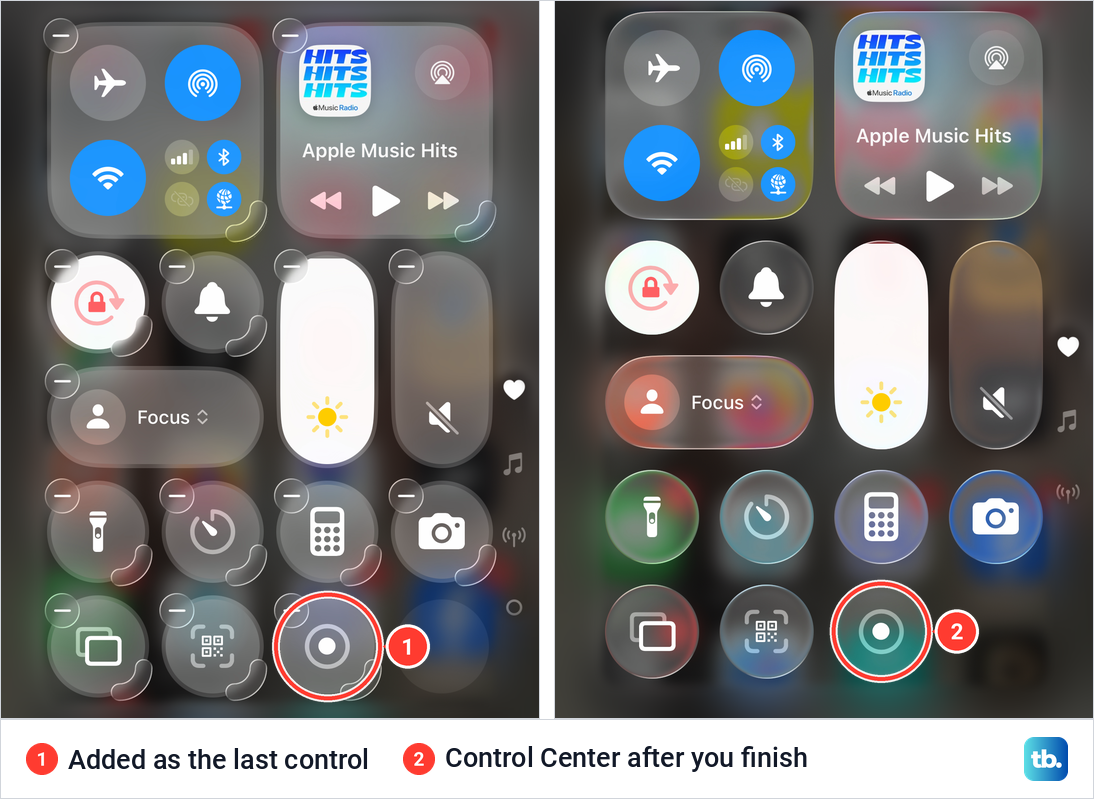
Many older guides send you to Settings > Control Center and a list of controls with green plus buttons. That list is how Apple's guide for iOS 17 described it. Since iOS 18 you add controls inside Control Center itself, as shown above, and Apple's iOS 26 guide documents only the Access Within Apps switch on that Settings page. Apple's guide for iOS 27 gives the same steps, so this works whether or not you have updated.
Start a screen recording
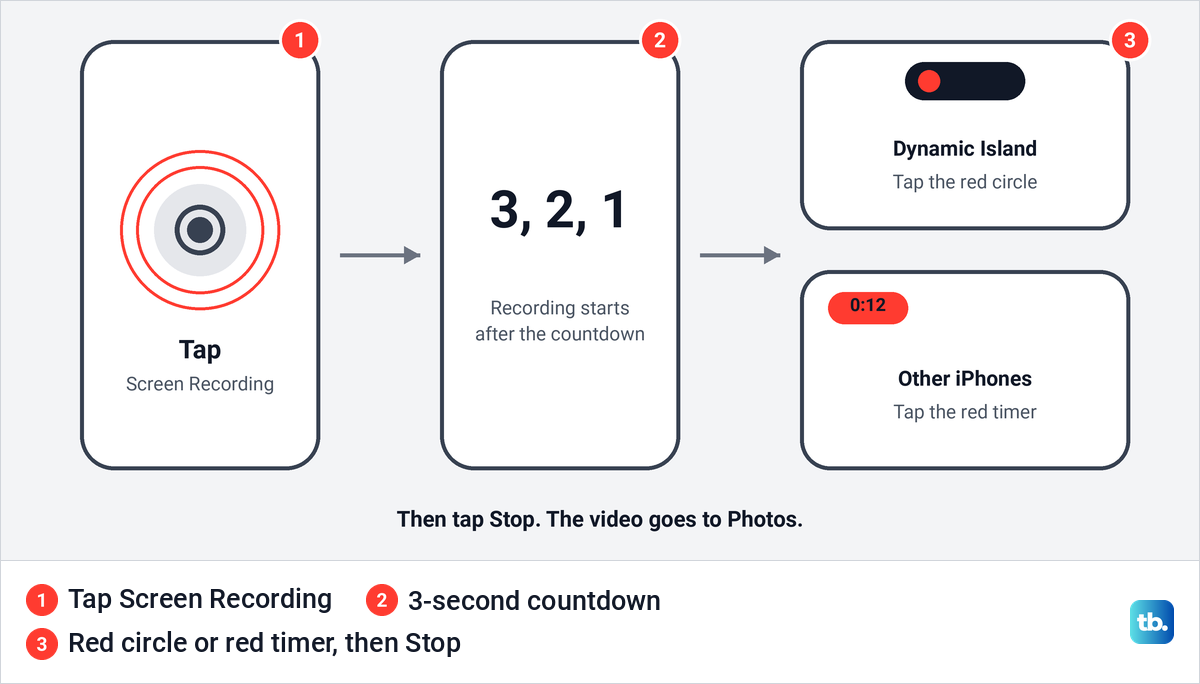
Open the app or screen you want to record first, so the video starts where you need it. Then open Control Center and tap Screen Recording. Apple says the recording begins after a 3-second countdown, and you then swipe up to close Control Center and do what you want to record.
Record your screen with sound
A plain tap goes straight to the countdown, with no options. To add your voice, touch and hold the Screen Recording button instead of tapping it. Apple's steps are to tap Microphone to turn it on, tap Start Recording, then wait for the 3-second countdown.
When we touched and held the button on our iPhone, a panel opened with a warning from iOS at the top, a list of places to send the recording with Photos ticked, the Start Recording button and a round Microphone button reading Microphone Off. Below Photos, the list also named some of the apps installed on that iPhone.
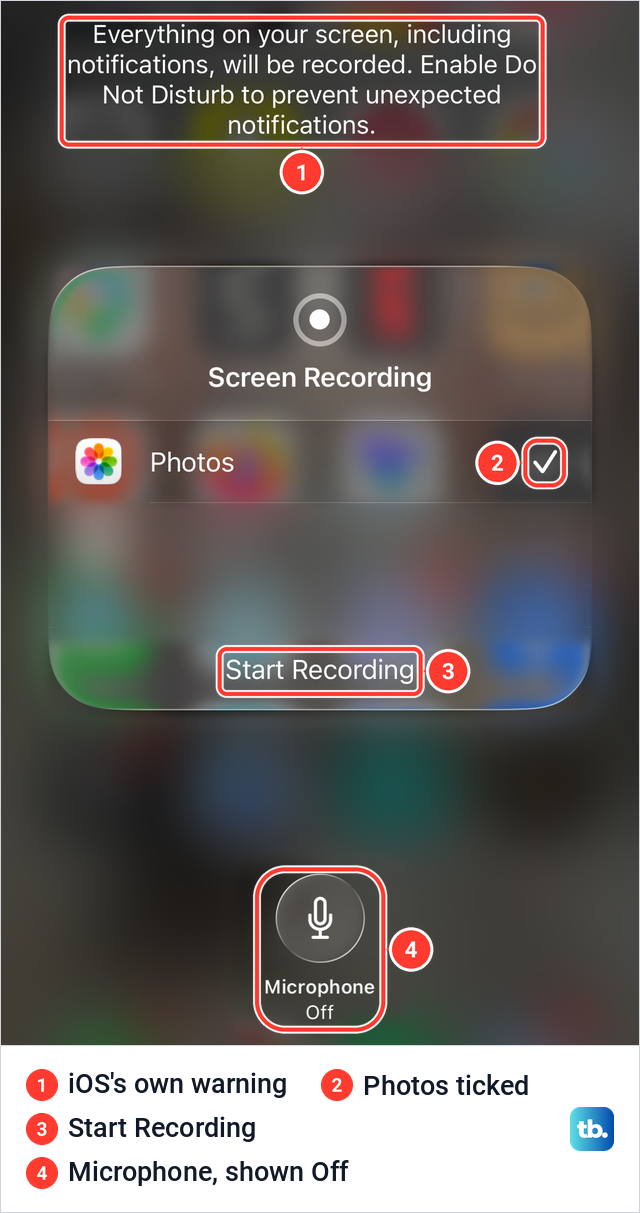
Leave Photos ticked for an ordinary recording that you can keep and edit. The panel offered no separate switch for app sound, only Microphone, which Apple describes as the way to add audio.
To record without your voice, touch and hold the button and make sure Microphone reads Off before you tap Start Recording. Turning Microphone off keeps your voice out, but sound played by the app on screen can still be in the video. For the audio of a phone call, iOS has a separate feature, explained in our guide on how to record a call on iPhone.
Stop a screen recording
Apple gives two ways to stop, and the first depends on your iPhone. On an iPhone with a Dynamic Island, tap the red circle at the top of the screen, then tap Stop. On other iPhones, tap the timer highlighted in red at the top of the screen, which Apple's guide places in the top left, then tap Stop.
The second way works on every model. Open Control Center and tap the Screen Recording button, which is red while a recording runs. Either way, a recording with Photos ticked goes straight to Photos.
Where screen recordings are saved
Screen recordings are saved automatically to the photo library in the Photos app, next to your other photos and videos. To see only recordings, Apple's steps are to open Photos, tap Collections, scroll down to Media Types and tap Screen Recordings.
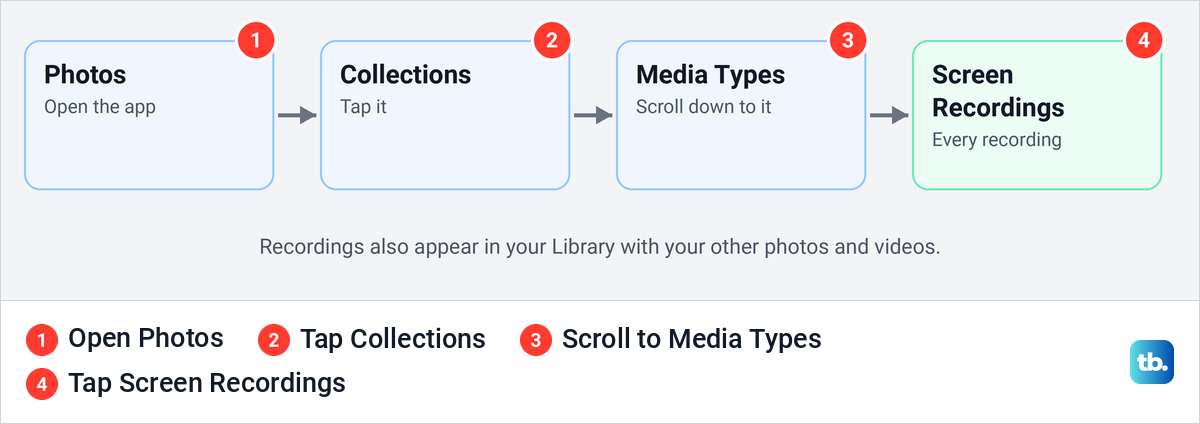
Older guides send you to an Albums tab and a Videos folder, while Apple's current path starts at Collections. If a recording will not play and Photos shows an error, work through our fixes for the Unable to Load Video error.
Trim or share a screen recording
Trimming removes the seconds before and after the part you need. Open the recording in Photos and tap Edit. Drag either end of the frame viewer below the video to set the start and end, then tap Done.
Apple says to tap Save Video to keep only the trimmed version, or Save Video as New Clip to keep both. A trim saved over the original can be undone later with Edit and Revert, but a video saved as a new clip can't be reverted to the original.
To send a recording, open it in Photos and share it like any other video. If you stopped and restarted along the way, you can combine several videos on your iPhone into one clip. Recordings sit in Photos with your pictures, so you can move them to a Windows PC the same way you copy photos.
Keep notifications out of your recording
iOS warns about this itself. The panel we opened by touching and holding Screen Recording read: "Everything on your screen, including notifications, will be recorded. Enable Do Not Disturb to prevent unexpected notifications."
Apple lists Do Not Disturb among the things Control Center gives you instant access to, and on our iPhone the Focus control sat on the left, below the Orientation Lock and Silent buttons. Turn Do Not Disturb on from that Focus control before you start recording.
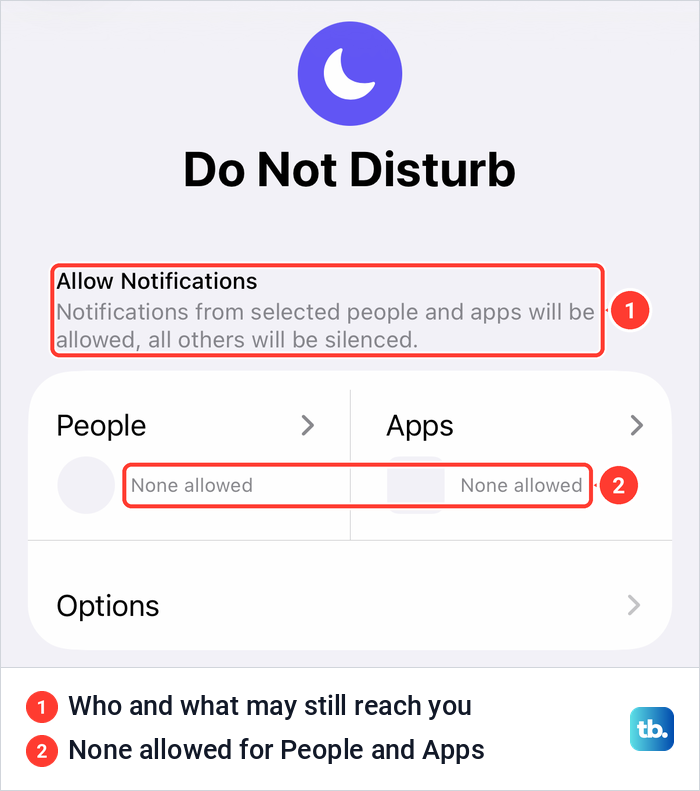
Do Not Disturb silences notifications except those from the people and apps you allow, and on our iPhone both lists read None allowed. When the video is done, turn Do Not Disturb off again so calls and messages reach you.
Our Focus list also held Personal, Sleep and Work, and our guide on how to turn off Focus on iPhone covers switching any of them off after you record. When one app keeps interrupting your recordings, turn off notification alerts for that app instead of silencing everything.
Why the Screen Recording button is missing
Apple's instructions say that if you don't see the Screen Recording control, add it to Control Center, so the steps in the adding section above are the first fix. If Control Center will not open at all while an app is on screen, open Settings > Control Center. Apple says turning off Access Within Apps there turns off access to Control Center in apps, so switch it back on.
Why screen recording is greyed out or blocked
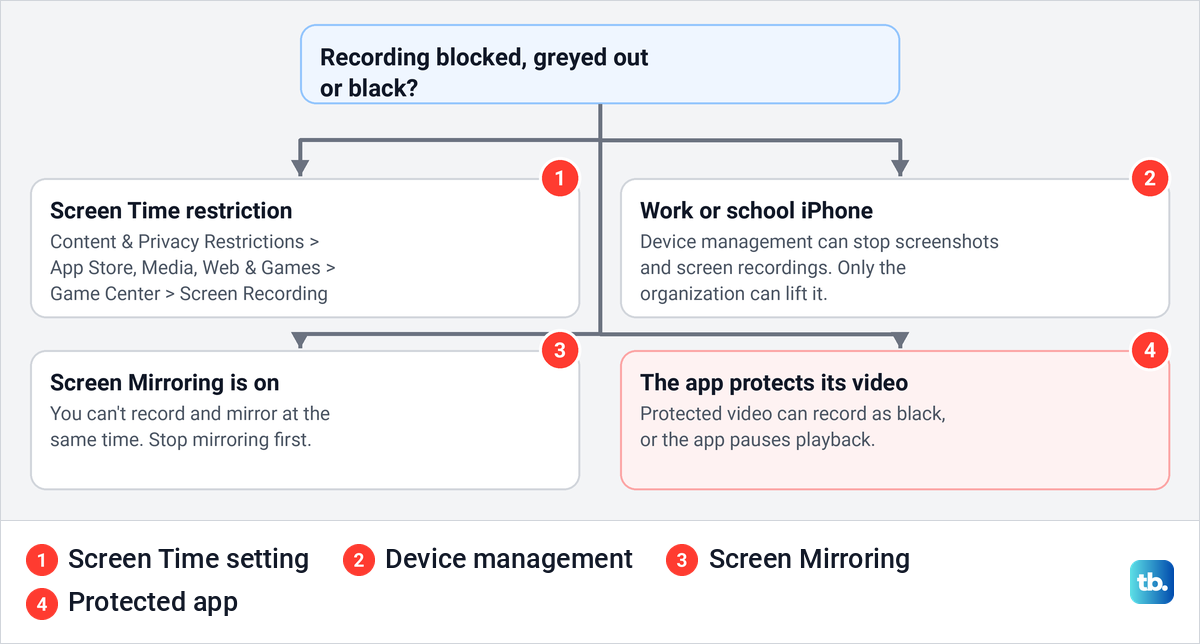
If the button is there but will not record, check these restrictions first. Apple documents two of them, one in Screen Time and one for iPhones managed by a school or employer. Screen Mirroring gets in the way too, because Apple says you can't record your screen and use screen mirroring at the same time.
Start with Screen Time. Open Settings > Screen Time, where iOS 26.5 lists Content & Privacy Restrictions under Restrictions. Apple's path from there is Content & Privacy Restrictions > App Store, Media, Web & Games, then down to the Game Center section, where one of the settings is Screen Recording. Make sure it allows screen recording.
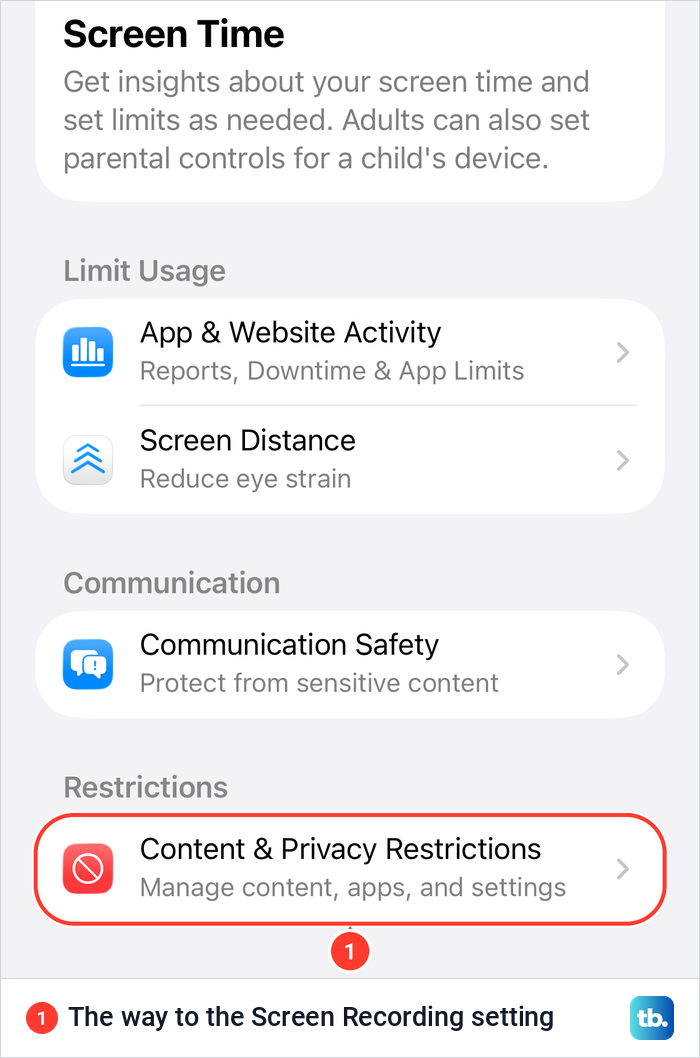
These restrictions only apply while Content & Privacy Restrictions is turned on. If your family uses the new parental controls in iOS 27, Apple says a parent changes it from their own iPhone: Settings, Family, the child's name, Apps & Websites, Restrictions, then the Game Center section, where Screen Recording is set to Allowed or Blocked. Otherwise, change it on the child's iPhone under Settings > Screen Time as above, and you may be asked for the Screen Time passcode.
A work or school iPhone can be blocked from above. Apple's device management documentation lists a restriction for screenshots and screen recordings, which means users can't save a screenshot or recording of the screen. Only the organization that manages the iPhone can lift it.
Why some apps record as a black screen
Apple notes that some apps might not allow you to record their content. Its developer documentation explains what happens with protected video: the system blacks out video encrypted with FairPlay Streaming while recording, but it still includes that content's audio. So a streaming show can come out as a black picture with its sound intact.
Apps can also tell when the screen is being recorded or mirrored. Apple gives the example of a media app that stops playback and shows a message explaining the pause. A black or paused video is the app's choice, not a fault in your recording.
Choose SDR or HDR for screen recordings
Apple's iOS 26 guide describes a format choice under Settings > General > Screen Capture. SDR captures less brightness and color and is standard for most computer displays and mobile devices, and SDR screen recordings use HEVC (H.265). HDR captures more brightness and color in an HDR container, and Apple notes that HDR recordings play back with slightly reduced quality on standard displays.
If your Screen Capture page offers the choice, pick SDR when the video is going to people on ordinary screens, and HDR when it will be watched on an HDR display. Apple's note on standard displays is the reason SDR is the safer pick for sharing.
Screen recording on iPad and iPhones with a Home button
On an iPhone with a Home button, Apple says to open Control Center by swiping up from the bottom of the screen, and to close it by pressing the Home button. The Screen Recording button and the microphone work the same way. To stop, tap the timer highlighted in red at the top of the screen, then Stop.
On iPad, Apple gives one way to open Control Center for every model: swipe down from the top-right edge. Add Screen Recording from the controls gallery if it is missing, and tap it to start. To stop, tap the red circle at the top of the screen, then Stop, and find the video in Photos under Media Types as on iPhone.
For a still picture instead of a video, see how to take a screenshot on iPad. Long recordings take up room in Photos, and we cover an iPad that is short on storage separately. If Microphone is on and your voice is still missing from an iPad recording, work through our fixes for an iPad microphone not working.
How we tested this guide
We tested on our iPhone 17 Pro with iOS 26.6. We added the Screen Recording control through the + button, the editing mode and the controls gallery, opened its options with a touch and hold, and read the Focus and Do Not Disturb settings. On iOS 26.5 we opened the Screen Time page.
The rest of the guide follows Apple's instructions. Labels can differ slightly between iOS versions.
Frequently Asked Questions
Why is screen recording greyed out on my iPhone?
Check Settings > Screen Time > Content & Privacy Restrictions > App Store, Media, Web & Games, then the Screen Recording setting under Game Center. On a work or school iPhone, device management can block recordings, and you also can't record while Screen Mirroring is on.
Why is there no sound in my screen recording?
Your voice is recorded only when Microphone is on, so touch and hold Screen Recording to check it before you start. If a streaming app's picture or sound is missing, that app may not allow recording, which Apple notes for some apps.
Where do screen recordings go on iPhone?
They are saved automatically to the Photos app. Tap Collections, scroll down to Media Types and tap Screen Recordings to see them all in one place.
Why is my screen recording of a streaming app black?
The app protects its video. Apple's developer documentation says the system blacks out protected video during a recording but includes its audio, and apps can detect a recording and pause playback.
How long can a screen recording be on iPhone?
Apple does not give a time limit for screen recordings. A long recording takes up space in Photos, so check your free storage before a long session.
Can I screen record while mirroring to a TV?
No. Apple says you can't record your screen and use screen mirroring at the same time, so stop mirroring first.
Can an app tell that I am recording the screen?
Yes. Apple's developer documentation describes how apps can detect that the screen is being recorded or mirrored, and some pause or hide what they show when that happens.