


To record a PowerPoint presentation, open it in the desktop app, select Record > From Beginning, turn on the studio's microphone and select the red Record button, then talk through your slides. The narration, ink and timings are saved in the deck; for a video file, choose File > Export > Create a Video. Keep Use Recorded Timings and Narrations selected there, or the video leaves your voice out.
To start partway through, select a slide and choose From Current Slide instead. The recording studio is only in the desktop app, because PowerPoint for the web has no Record tab. Two similar tools do other jobs: Insert > Audio > Record Audio puts one voice clip on one slide, and Insert > Screen Recording puts a video of your screen on a slide.
The short version
- Start with Record > From Beginning or From Current Slide, or with Slide Show > Record.
- In the studio, turn on the microphone (and the camera if you want to be seen), select the red Record button and wait for the countdown.
- To redo one slide, open it with From Current Slide, choose More options > Clear Recordings > On Current Slide and record it again. The other slides keep their takes.
- For an MP4, use File > Export > Create a Video with Use Recorded Timings and Narrations.
- If the slides stop moving on by themselves, tick Slide Show > Use Timings again.
- A screen clip stops with Windows + Shift + Q and lands on the current slide.
Ways to record in PowerPoint
PowerPoint has three recording tools, plus a retake and an export step for the main one. Pick the row that matches what you want to end up with, then jump to its section below.
| What you want | Where to start | What you get | Watch out for |
|---|---|---|---|
| Your voice and ink over the whole deck | Record > From Beginning | Narration, ink and a timing saved on each slide of the presentation | Speak after each slide transition has finished |
| A new take of one slide | Record > From Current Slide, then More options > Clear Recordings > On Current Slide | A fresh recording for that slide only | Clear Recordings > On All Slides clears every slide |
| A video file to share | File > Export > Create a Video | An MP4 or Windows Media Video file | Keep Use Recorded Timings and Narrations selected |
| A short voice clip on one slide | Insert > Audio > Record Audio | An audio icon on that slide | Needs a microphone that Windows and PowerPoint can use |
| A video of your screen on a slide | Insert > Screen Recording | A video clip embedded on the slide | Stop it with Windows + Shift + Q |
Recording the slide show is the main tool, and most of this page is about it. Microsoft is clear that it does not make a video on its own: in its words, "A video file is not created by this recording process." The recording lives inside the presentation until you export it.
Record a presentation from the beginning
Open the presentation in PowerPoint for Microsoft 365 on Windows and select the Record tab. On our PC it held From Beginning, From Current Slide, Screen Recording and Audio, plus Clear Recording, Reset to Cameo, Save as Show and Export to Video. Clear Recording and Reset to Cameo stayed greyed out until a slide had been recorded.
The same two starting points sit under Slide Show > Record, as From Current Slide and From Beginning, above a Clear submenu that is also greyed on a deck with nothing recorded. Microsoft's short guide mentions a Record button near the top right corner of the window, but our PowerPoint window had none, so use the tab.
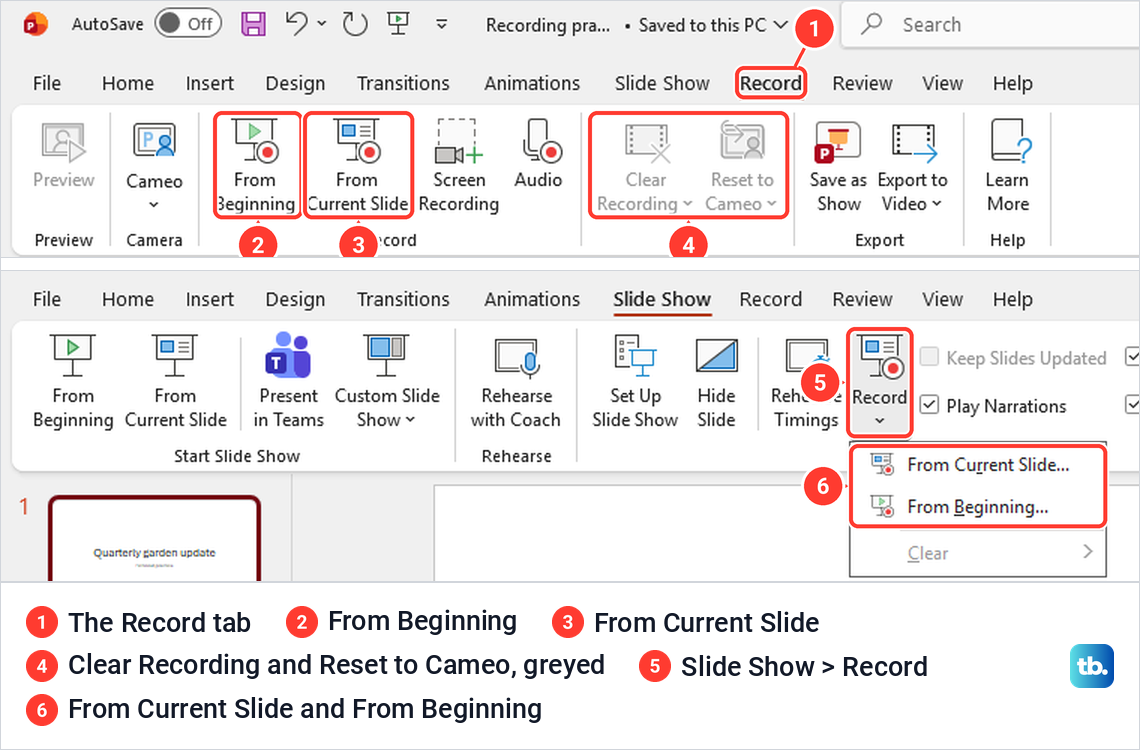
Select From Beginning, and PowerPoint opens a full-screen recording studio. The first time, ours showed a short tour titled "Deliver engaging presentations anytime", which closes with its X. The bar at the top holds Edit, a timer, a retake button, the round red Record button, Pause, the camera and microphone icons, a view button, More options (three dots) and Export.
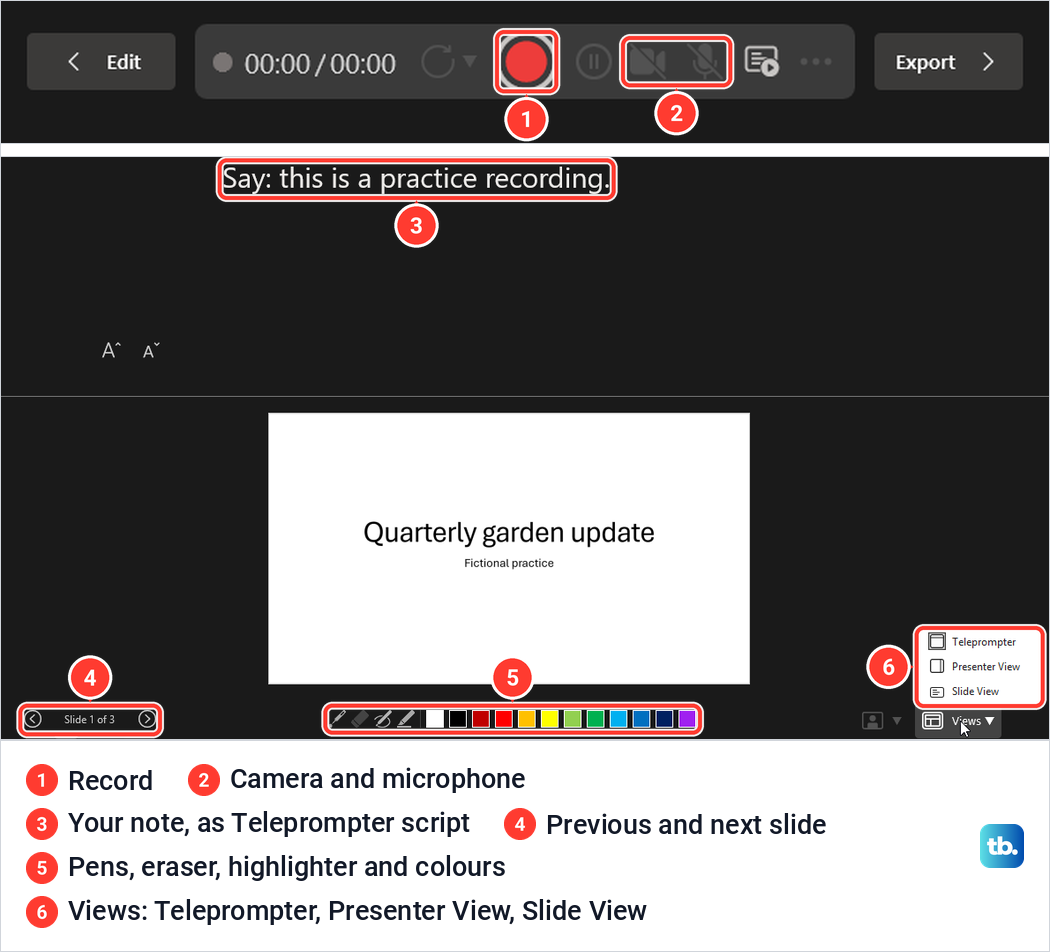
The current slide sits below that bar, with arrows for the previous and next slide on the left and a tray of pens, an eraser, a highlighter and colours underneath. The Views button at the bottom right switches the layout between Teleprompter, Presenter View and Slide View.
When you are ready, select the red Record button. A countdown ran over the slide first, then the timer started and the button turned into a square Stop button. The timer shows the time on the current slide and the total, so you can see how long each slide is taking as you go.
Use the arrow beside the slide to move on, and finish each slide's sentence before you do. Microsoft notes that narration won't record during slide transitions, so let a transition play before you start speaking. Pause the recording if you need a break, and select Stop when you reach the end.
Turn on your microphone and camera
The camera and microphone icons in the top bar switch each input on or off, in Microsoft's description. For a voice over without your face, leave the camera off and the microphone on. To choose a different microphone or camera, Microsoft points to the More options button, the three dots at the right of the bar.
If PowerPoint cannot find a device, the icons stay struck through. Hovering over them showed "No microphone available" and "No camera available", and the camera-mode button read "Cannot select camera mode when camera is disabled". A take made in that state still records the slide timings and ink, just without a voice.
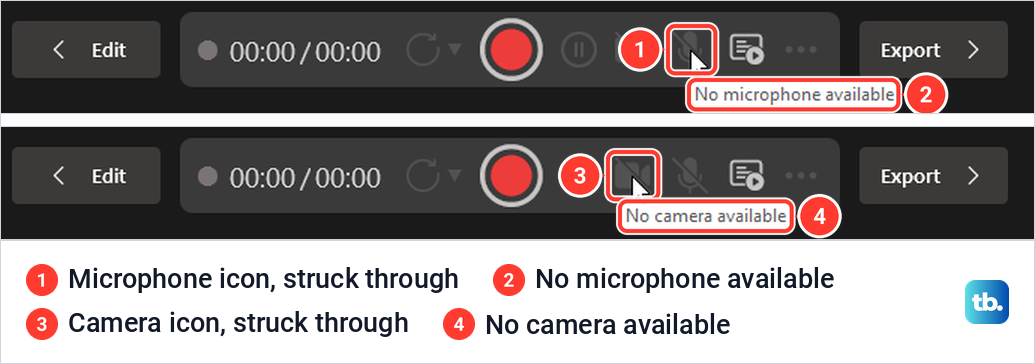
So before a long narration, test your microphone in Windows 11 and listen back to a short sample. If Windows lists no input at all, set up your microphone in Windows first, and if the camera icon stays struck through, test your webcam before recording another take.
To appear in a frame on the slide, Microsoft's Cameo feature adds a camera feed you can resize, move and format. In the studio, select Edit, then Cameo, style the frame, and select Record to go back; the Record tab also has a Cameo button for setting it up beforehand. Microsoft says the camera mode menu offers Show Background and Blur Background.
Use your notes and draw on slides while recording
Your speaker notes become the script. Our slide 1 note, "Say: this is a practice recording.", appeared in large type at the top of the studio in the Teleprompter layout, with two buttons to make the text bigger or smaller. A slide with no notes showed a placeholder tip instead, so add speaker notes in PowerPoint before you start.
To mark up a slide as you talk, pick a pen or the highlighter in the tray and draw. The first colour in the row is white, which does not show on a white slide, so choose a colour such as red before you draw. With red picked, our line appeared on the slide while the timer ran.
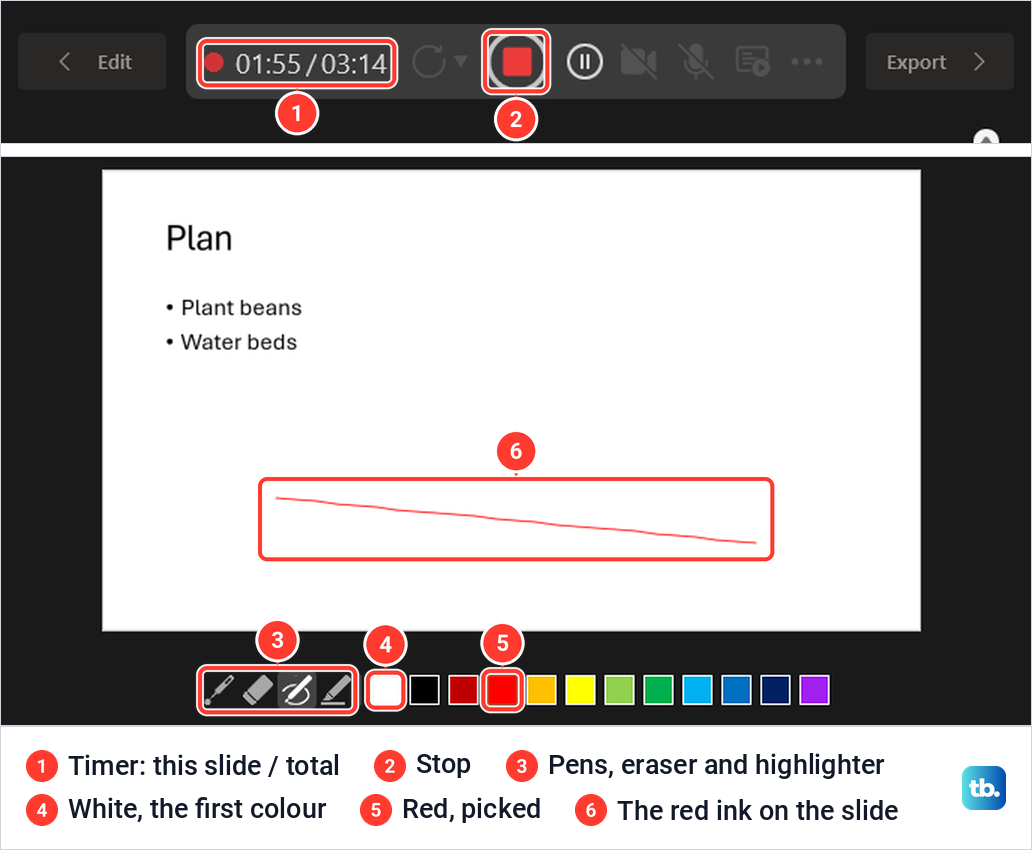
The ink stays with the recording. Back in Normal view the red line was still on slide 2, and the video export screen describes its recorded option as one that "includes ink and laser pointer gestures". Microsoft says the laser pointer, pens and highlighters are all recorded with the slide.
Record one slide again without starting over
After Stop, the retake button beside the timer becomes active. Its menu reads Retake Video, with On Current Slide and On All Slides. The More options menu opens now too, with Clear Recordings (On Current Slide or On All Slides) and Reset to Cameo, which Microsoft says replaces the recorded narration with the camera feed for a retake.
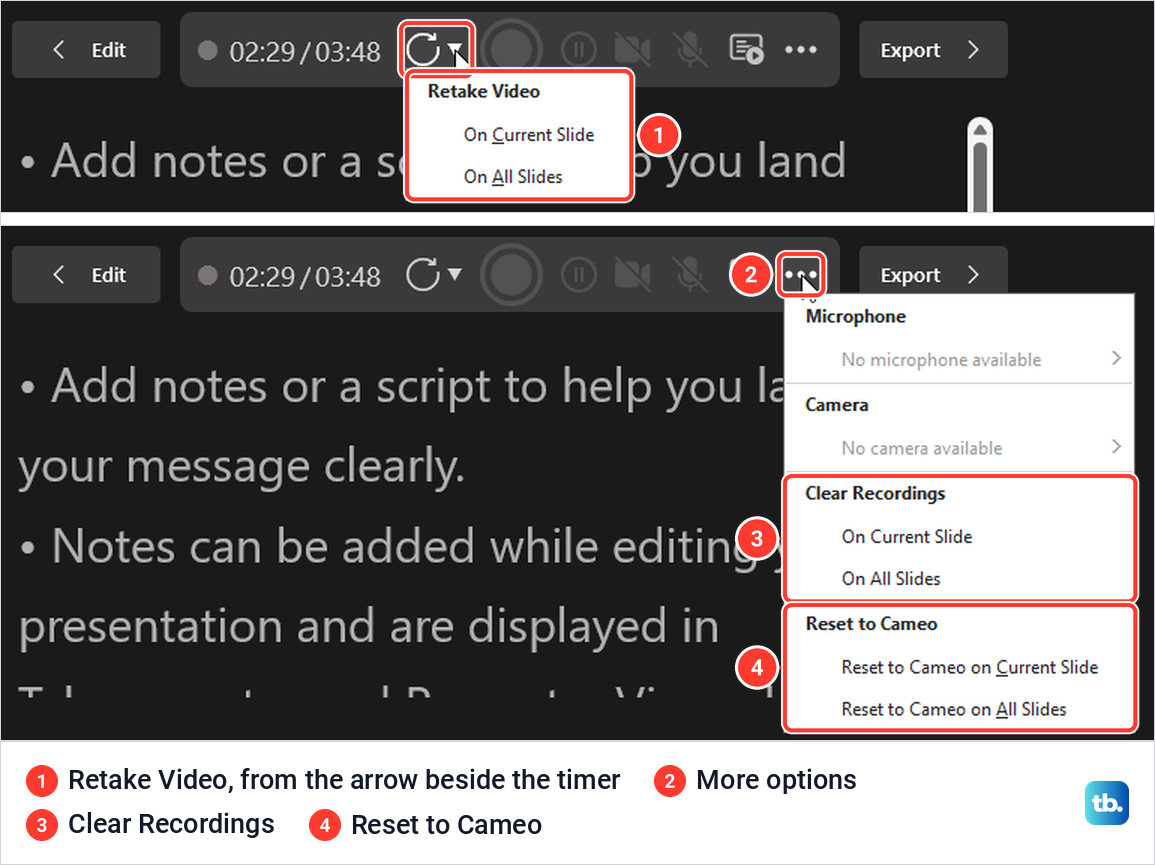
To redo one slide, select it in Normal view and choose Record > From Current Slide. In the studio, open More options and choose Clear Recordings > On Current Slide, then select Record and present that slide again. On our practice deck, slide 2's ink disappeared when it was cleared, and the new take replaced it while slide 1 kept its recording.
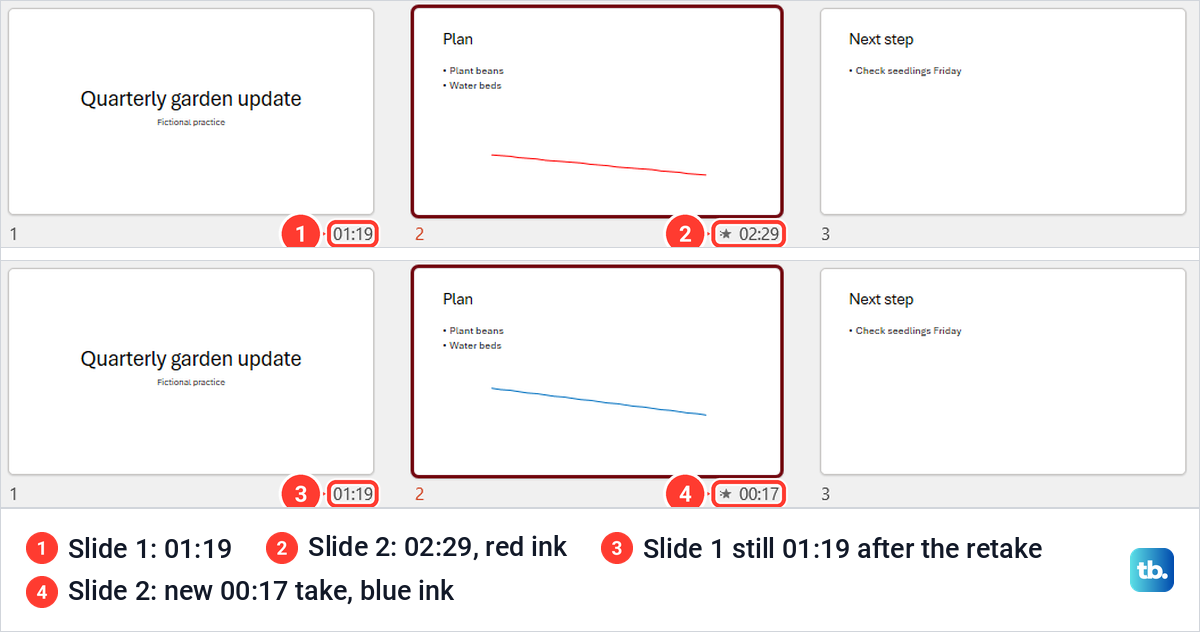
Slide Sorter shows the result. Before the retake, slide 1 read 01:19 and slide 2 read 02:29; afterwards slide 1 still read 01:19 and slide 2 read 00:17, with the new ink. Leave the On All Slides choices alone unless you want to start the whole recording again.
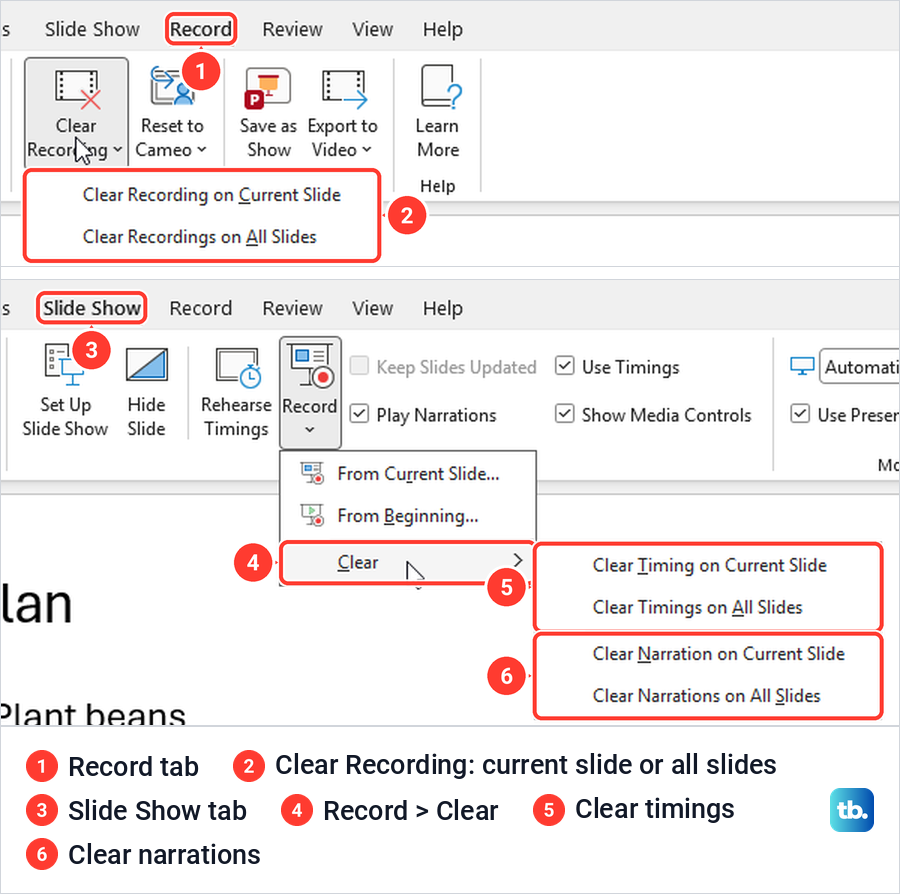
Microsoft's instructions mention a Delete button for this job. Our studio had Retake Video and Clear Recordings instead, so look for those two labels. Either way, nothing on the other slides needs to be recorded again. From the ribbon, Record > Clear Recording and Slide Show > Record > Clear do the same, and the second lists timings and narrations separately.
Play the recording and check the slide timings
Microsoft says the timings are saved automatically and that playing the show brings back the animations, ink, audio and video in sync. Use Slide Show > From Beginning, or select a slide and use From Current Slide to check just that part. View > Slide Sorter shows each recorded slide's time at the bottom right of its thumbnail.
Two boxes on the Slide Show tab decide what plays. After recording, both Use Timings and Play Narrations were ticked on our deck. Starting the show from slide 2 with Use Timings cleared, the slide was still on screen after 21 seconds although its take lasted 17; with the box ticked again, the show had moved on to slide 3 by then. Microsoft says clearing Play Narrations turns off the recorded narration and ink.
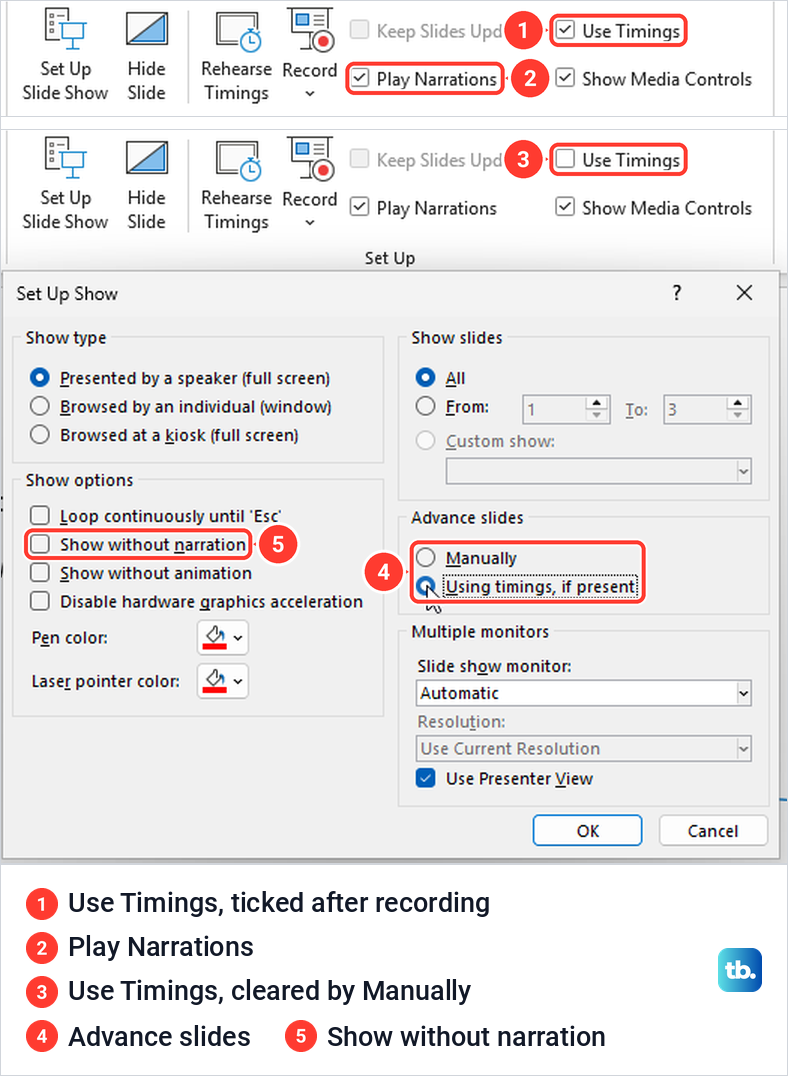
The Set Up Slide Show button holds a second switch that is easy to miss. Under Advance slides, choosing Manually stopped the timed advance and also cleared the Use Timings box on the ribbon, while Using timings, if present ticked it again. The same window has a Show without narration box, which should stay clear for a narrated show.
If you only want timed slides with no voice, Microsoft's route is Slide Show > Rehearse Timings. Click through the show at your own pace, and at the end choose Yes to keep the timings or No to discard them.
Export the recording as an MP4 video
Save the presentation first, then choose File > Export > Create a Video. On our recorded deck the page showed Full HD (1080p) and had already picked Use Recorded Timings and Narrations. Below it, "Seconds spent on each slide" read 05.00, the default time for slides without timings.
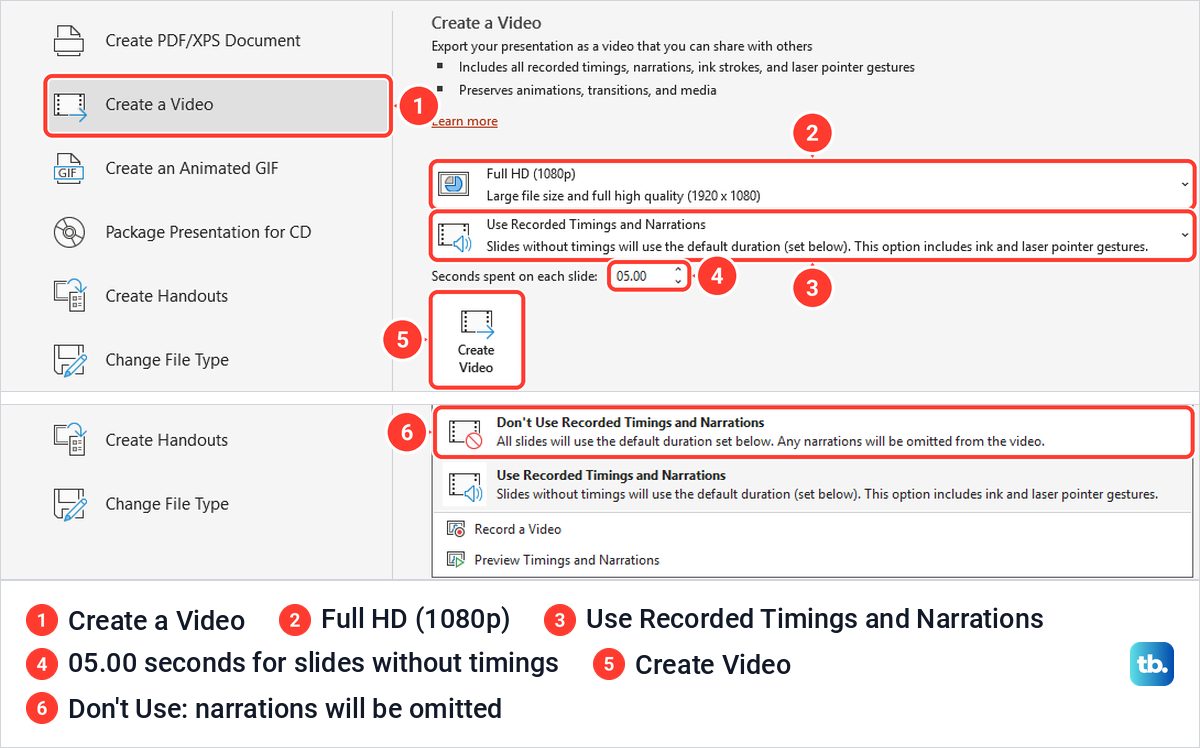
The other choice in that list, Don't Use Recorded Timings and Narrations, says outright that any narrations will be omitted from the video, so leave it alone for a narrated show. Microsoft says a higher quality makes a bigger file, and that creating a long video can take up to several hours.
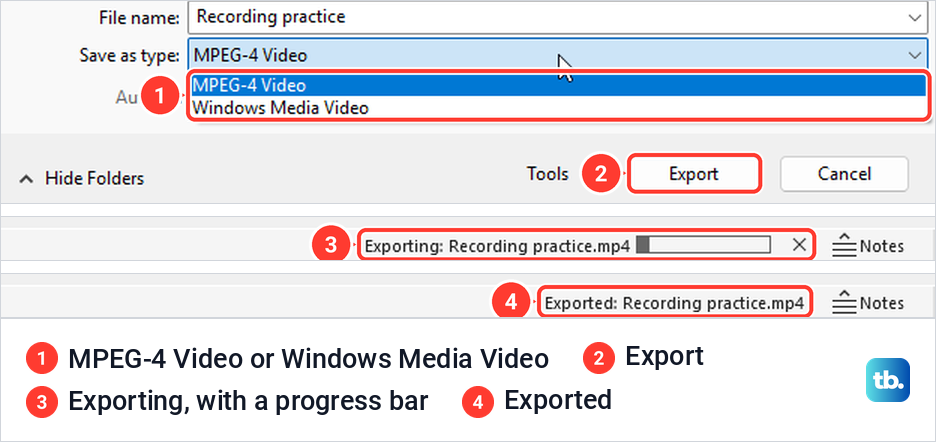
Select Create Video. The save window was titled Export Video, with MPEG-4 Video and Windows Media Video under Save as type and an Export button where Microsoft's steps say Save. While it worked, PowerPoint's status bar read "Exporting: Recording practice.mp4" with a progress bar, then "Exported: Recording practice.mp4".
Check the length of the finished file. Our MP4 ran 1 minute 41 seconds, which is slide 1's 01:19 plus slide 2's 00:17 plus five seconds for slide 3, which had no recording and no timing. If a slide without a timing flashes past or lingers, change the seconds box before you export.
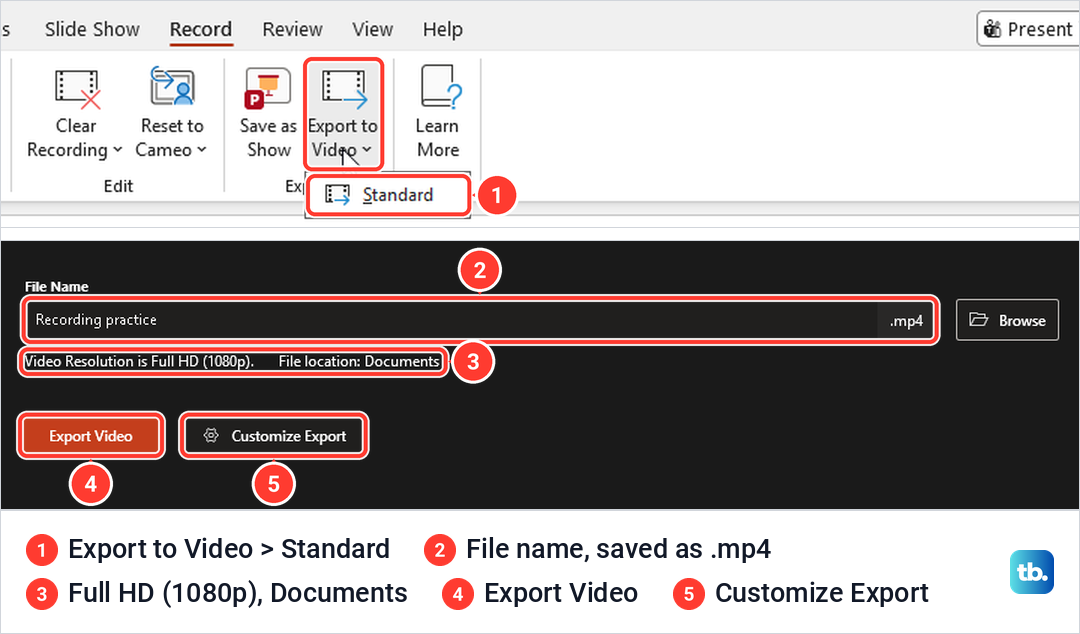
The Record tab has a second route, Export to Video > Standard, which opens the studio's own Export to video page. Ours showed the file name with .mp4, "Video Resolution is Full HD (1080p).", "File location: Documents", an Export Video button and Customize Export. Leaving that page without exporting asked "Export your video before exiting?".
If the viewer has PowerPoint, you may not need a video at all. Microsoft says a PowerPoint Show (.ppsx), saved from File > Save As, opens full-screen in Slide Show, ready to watch, and the Record tab has a Save as Show button too. A normal .pptx opens for editing, so the viewer has to start the show.
Add a voice over to one slide
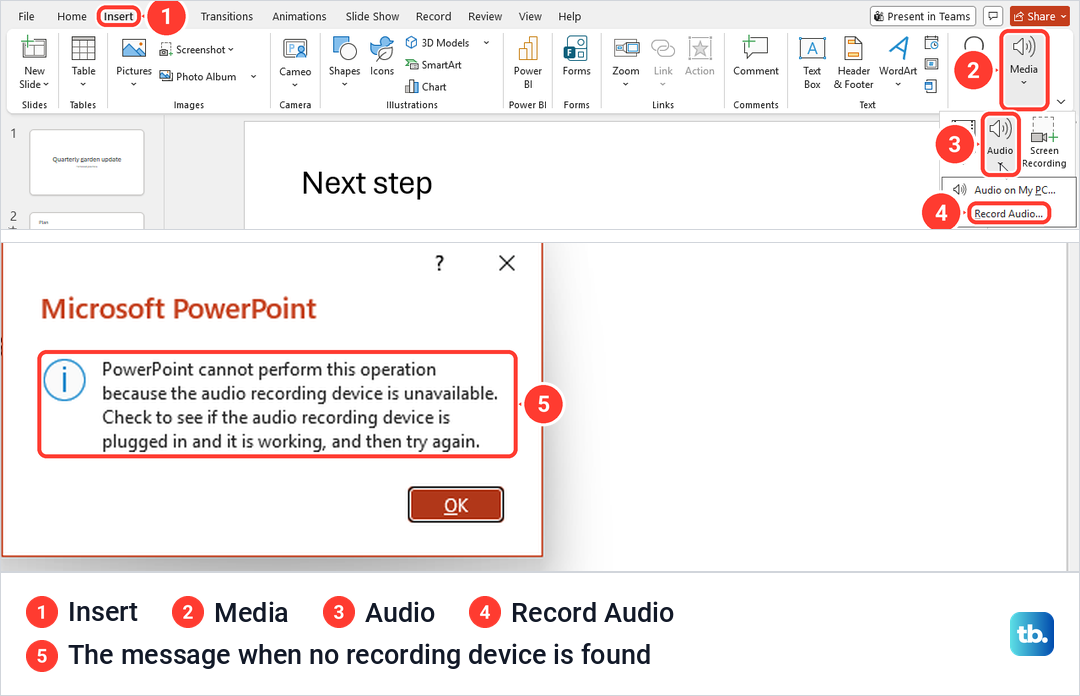
For a short voice over on a single slide, rather than a timed narration across the deck, use Insert > Audio > Record Audio. On our PC it sat under Insert > Media > Audio, next to Audio on My PC, and pressing Alt, N, O, R one after another reached the same command.
Microsoft's steps from there are to type a name for the clip, select Record and speak, then Stop and Play to check it, and OK to place an audio icon on the slide. Microsoft notes that the device must have a microphone enabled. Without one, PowerPoint did not open the recorder at all and showed a message that the audio recording device is unavailable.
A clip made this way is a separate audio object on its slide, not part of the slide show narration. To use music or a sound file you already have, add audio to PowerPoint with Audio on My PC instead, and only use music you have the right to use.
Record your screen into a slide
Insert > Screen Recording, also on the Record tab, records part of your screen and drops the video on the current slide. On our PC it sat under Insert > Media, next to Audio. PowerPoint minimised the presentation window and a small dock appeared at the top of the screen with Record, a timer, Select Area, Audio and Record Pointer, and Audio and Record Pointer were switched on at the start.
Any other open window stays behind the dock, and in our picture that is a second deck. Open the window you want to record before you begin, because it is what the dock sits over.
Choose Select Area and drag over the part to record, and the area gets a red dashed frame. Turn Audio off if the clip should be silent, then select Record. Press Windows + Shift + D to pause and Windows + Shift + Q to stop.
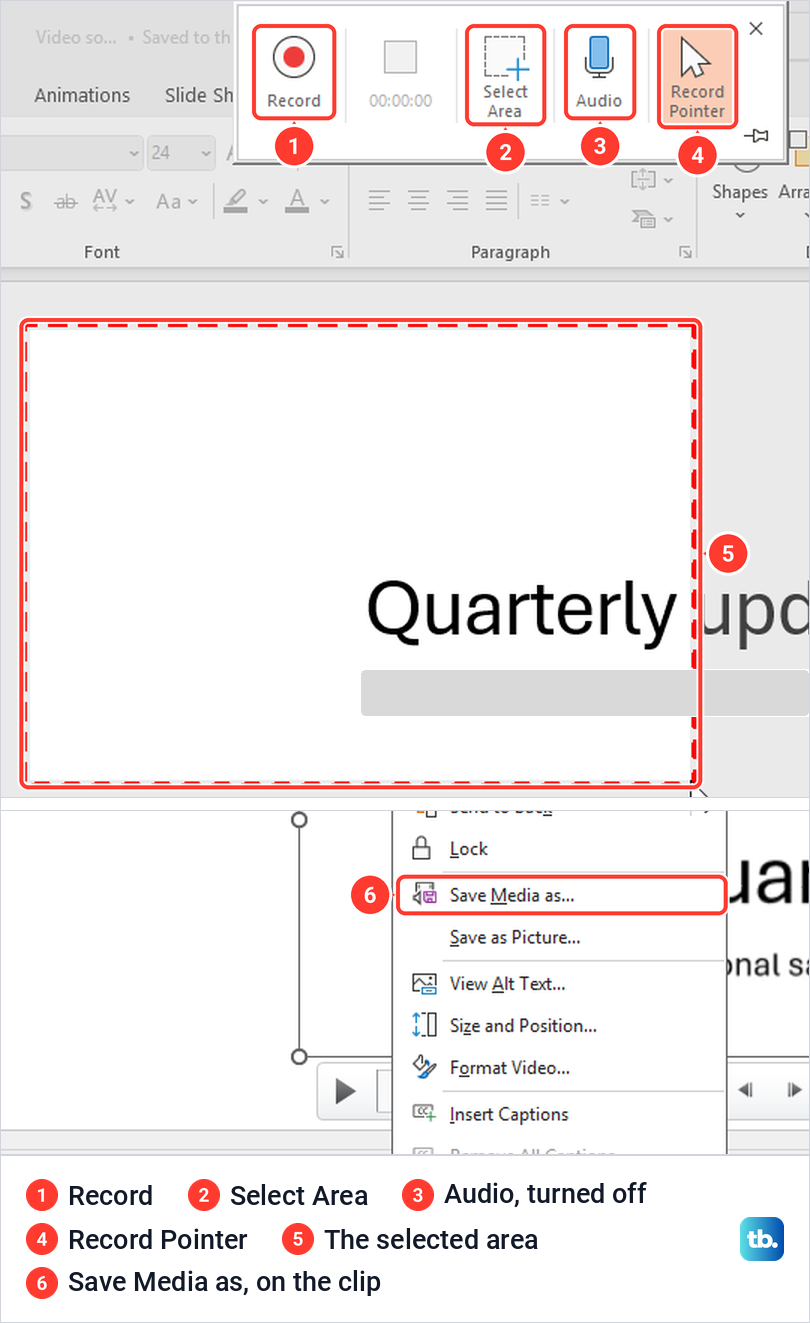
When we stopped, PowerPoint came back with the clip embedded on the slide and a play bar under it. To keep a separate copy, right-click the clip and choose Save Media as, and the Save Media As window saved ours as an MP4 file. If the clip already exists as a file, embed a video in PowerPoint instead of recording it again.
For a longer desktop video that does not belong on a slide, record the screen in Windows 11 with its own tools. To capture other kinds of audio or video, see how to record audio or video on a PC.
Find the Record tab when it is missing
If your ribbon has no Record tab, it may be switched off. Go to File > Options > Customize Ribbon, tick Record under Main Tabs and select OK. Clearing that box removed the tab from our ribbon, and ticking it again brought it back between Slide Show and Review.
The Slide Show tab has its own Record button with the same two starting points, so you can begin there as well. Microsoft's instructions for the older recording window call the tab Recording, so look for either name in the list.
Fix a silent recording or slides that will not advance
Start with the studio. If the microphone icon is struck through, select it to turn the microphone on. If hovering over it shows No microphone available, PowerPoint has no microphone it can use, and the take will hold timings and ink but no voice. Make sure the microphone is plugged in and works, then check Windows: Microsoft's path in Windows 11 is Start > Settings > Privacy & security > Microphone.
On that page, Microphone access, Let apps access your microphone and Let desktop apps access your microphone should all be on, and the last one matters because PowerPoint is a desktop app. You can check Windows microphone privacy settings step by step, and for a camera that stays unavailable, manage camera permissions in Windows before another take.
If the narration was recorded but you hear nothing in the show, look at the Slide Show tab: Play Narrations must be ticked, and Show without narration in Set Up Slide Show must be clear. If other apps are silent too, fix no sound on Windows 11 before you record again.
Slides that sit still are a timing problem. Tick Use Timings on the Slide Show tab and check that Set Up Slide Show uses Using timings, if present, since choosing Manually there clears Use Timings without a warning.
If the exported MP4 has no voice, play a recorded slide in PowerPoint first. If you hear your voice there, export again with Use Recorded Timings and Narrations, because the other choice omits narrations. If the slide is silent in PowerPoint too, the narration was never captured, so check the microphone and the studio's microphone icon, then record that slide again.
Record on a Mac or in PowerPoint for the web
In PowerPoint for Mac, Microsoft's steps start the same way: select the Record button at the top right, or Record > From Beginning or From Current Slide, and choose Teleprompter or Presenter view. For audio-only narration, Microsoft says to turn the camera off with the video button, then use the record, pause and resume buttons as you go.
To redo a slide on a Mac, Microsoft says to select the trash can to the left of the record button and record again. When you finish, Record > Export to video makes the video file.
PowerPoint for the web cannot record a slide show, and Microsoft says so plainly. Our web app had no Record tab, and its Slide Show tab held From Beginning, From Current Slide, Presenter View, Present in Teams, Custom Slideshow, Always Use Subtitles and Rehearse with Coach, with no recording command. Insert > Audio opened the browser's file picker to upload a file, not a recorder.

Open the file in the desktop app to record it, and save it back to the same place afterwards. If you present live in a meeting instead, record the Teams meeting rather than the slides.
How we tested this guide
We tested this in PowerPoint for Microsoft 365 on Windows 11, version 25H2, taking a practice deck from recorded timings and ink to an exported MP4.
Frequently Asked Questions
Can you record yourself on PowerPoint with your voice and camera?
Yes, in the desktop app. Choose Record > From Beginning, turn on the microphone and camera icons at the top of the studio, and select the red Record button. Microsoft says the recording captures your voice, ink and video presence on each slide.
Where is the Record button in PowerPoint?
It is on the Record tab, as From Beginning and From Current Slide, and on the Slide Show tab as Record. If the Record tab is missing, turn it on in File > Options > Customize Ribbon. PowerPoint for the web has no recording command.
Can I re-record just one slide?
Yes. Open that slide with Record > From Current Slide, choose More options > Clear Recordings > On Current Slide in the studio, and record it again. On our deck the other slide kept its original 01:19 timing.
Why is my PowerPoint recording silent?
The studio may not have a microphone to use, or Windows may be blocking desktop apps from it. Check that the microphone icon is turned on; if it reads No microphone available, turn on Let desktop apps access your microphone in Windows Settings. Also check that Play Narrations is ticked on the Slide Show tab.
How do I save a recorded PowerPoint as an MP4?
Choose File > Export > Create a Video, keep Use Recorded Timings and Narrations, and select Create Video. Pick MPEG-4 Video in the Export Video window and select Export.
Can PowerPoint for the web record a presentation?
No. Microsoft says PowerPoint for the web doesn't support recording a slide show, and the web Slide Show tab has no Record command. Open the file in the desktop app to record it.
Why does my recorded slide show not advance on its own?
Use Timings is probably cleared. Tick it on the Slide Show tab, and in Set Up Slide Show choose Using timings, if present, because choosing Manually there clears Use Timings.