
To record a Teams meeting, open More actions in the meeting controls, select Record and transcribe > Start recording, then select Confirm. Microsoft says everyone in the meeting is notified automatically when recording starts. To end it, select Record and transcribe > Stop recording, and the recording appears in the meeting chat, or in the channel for a channel meeting, after Teams processes it.
Those are Microsoft's steps for the Teams desktop app, and this guide covers Teams for work or school. In Teams for the web in Microsoft Edge on Windows 11, version 25H2, we recorded a meeting we organized through the same menu, under a toolbar button labelled More, then found, played and downloaded the saved video. The dialog that opened was called Start recording and transcription, and the transcript started with the recording.
Tell people before you record. Microsoft notes that depending on your region you may need everyone's permission before you record them, so follow your organization's policy as well.
The short version
- Start: More actions > Record and transcribe > Start recording, then Confirm.
- Sound only: set Choose what to record to Audio only in the same dialog before you confirm.
- Stop: Record and transcribe > Stop recording. Stop transcription alone keeps the recording going.
- Find it: the meeting chat's Shared or Recap tab, the channel for a channel meeting, or the past meeting in your Teams calendar.
- Who can record: the organizer and people in the same organization whose license and admin policy allow it. Guests can't.
Teams recording controls at a glance
| What you want | Where to find it | What happens |
|---|---|---|
| Record video and audio now | More actions > Record and transcribe > Start recording, then Confirm | A notice says recording and transcription started, and a red dot sits beside the timer |
| Record audio only | Start dialog, Choose what to record > Audio only, then Confirm | A microphone icon replaces the red dot, and Recap labels the part Audio only |
| Stop the transcript only | Record and transcribe > Stop transcription | The recording carries on without a transcript |
| Stop the recording | Record and transcribe > Stop recording, then Stop | Recording and transcription both stop |
| Record from the first minute | Meeting options > Recording & transcription > Record and transcribe automatically | Microsoft says recording starts when the meeting begins |
| Find the recording | Meeting chat, Shared or Recap tab, or the channel for a channel meeting | Lists the recording; Open in browser plays it in a browser player, and Recap has its own play button |
| Keep a copy | Download in the player's toolbar | Saves an .mp4 file, video only |
Before you record a Teams meeting
These steps are for Teams work or school meetings, where recording has a few gates. Microsoft says a person can start or stop a recording when the organizer's recording policy is on and that person has an eligible license, has recording enabled by an IT admin, and isn't a guest or from another organization. Its license list covers Office 365 E1, E3, E5, F3, A1, A3 and A5 and the Microsoft 365 Business plans, and the organizer needn't be present.
Microsoft says only one person can record at a time, and that the recording notice reaches participants in the Teams desktop, web and mobile apps. If there is no meeting yet, first set up a Microsoft Teams meeting and join it. Whoever starts the recording, Microsoft says the meeting organizer automatically owns it.
Microsoft says recordings capture audio, video and screen sharing activity. They won't capture whiteboards and annotations, shared notes, content shared by an app, videos or animations embedded in PowerPoint Live presentations, or more than four people's video streams at once. Live captions aren't recorded either, although you can turn captions on later while you play the recording.
Check your setup before anyone joins, because the recording keeps whatever the meeting sends. If others cannot hear you, fix the Teams microphone first, and if your picture is wrong or black, change the Teams camera settings. If you want a different backdrop on camera, change your Teams meeting background before you start recording.
Screen sharing goes into the recording too, so a share that fails also fails on the video. If people cannot see your window, fix Teams screen sharing before you rely on the recording.
Start recording a Teams meeting
In the Teams desktop app, Microsoft's steps are to start or join the meeting, select More actions in the meeting controls, then Record and transcribe > Start recording, and select Confirm. Teams for the web labels the toolbar button More, and its Record and transcribe item opened a short submenu to the left with Start recording and Start transcription.
Select Record and transcribe, and if its submenu does not open, press the Right arrow key, which opened it on our PC. Start transcription only produces a written transcript, so pick Start recording when you want the meeting saved as a video.
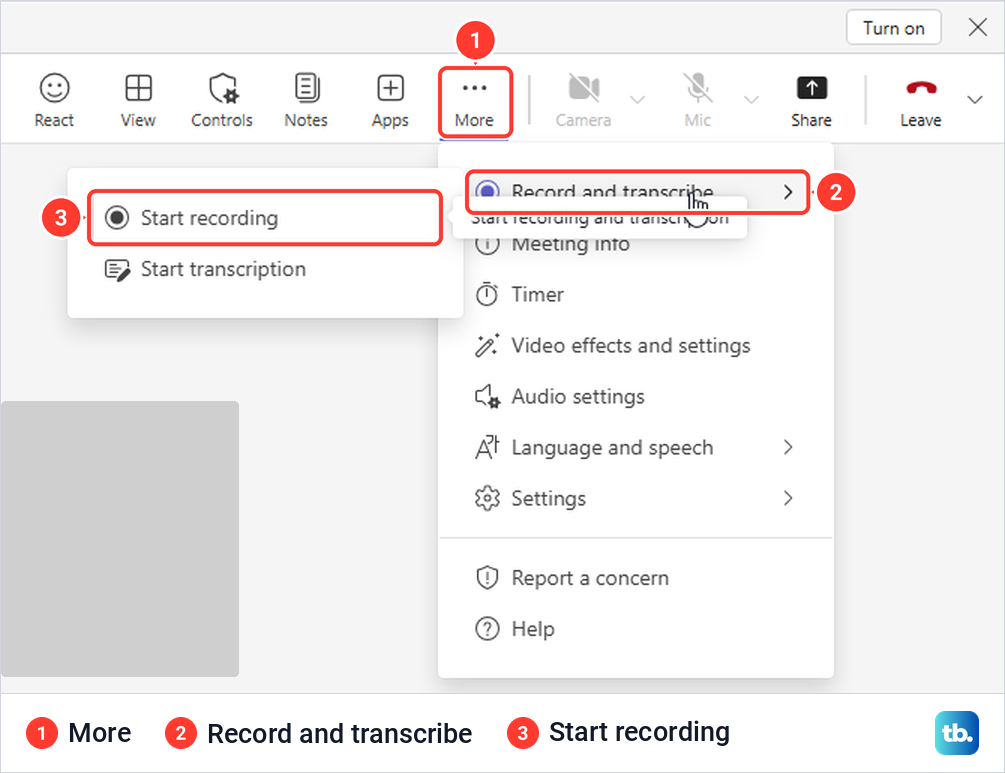
Start recording opens a dialog called Start recording and transcription. It asks for the Spoken language, which Teams uses for the features that process audio, and ours already had More options open with Choose what to record set to Video and audio.
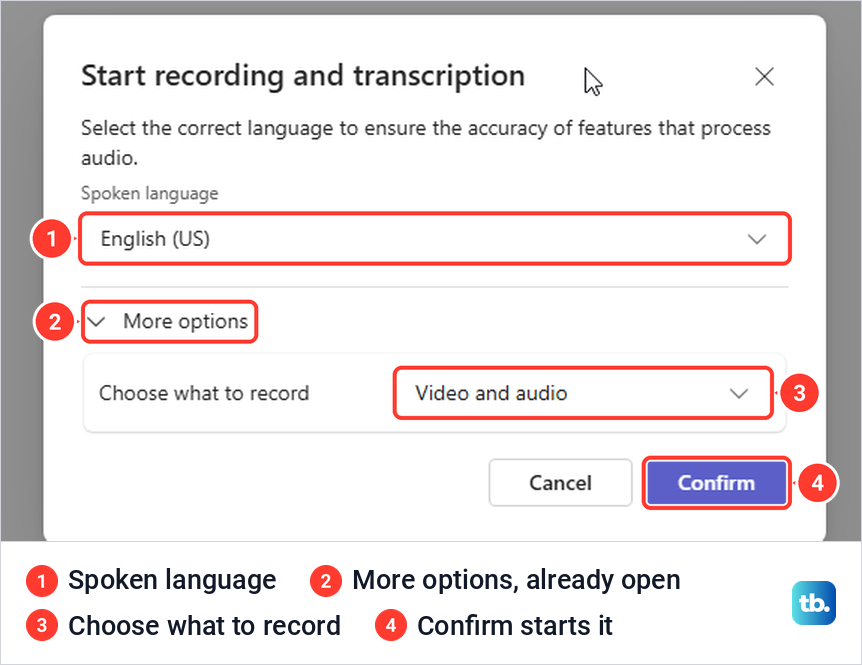
Nothing records until you select Confirm. Microsoft says the recording only starts once you do, and on our PC Cancel left no icon beside the timer, no notice and no line in the meeting chat.
Record a Teams meeting with audio only
To record only the sound, change Choose what to record in the start dialog from Video and audio to Audio only, then select Confirm. Microsoft's desktop steps put the same list under More options in that dialog.
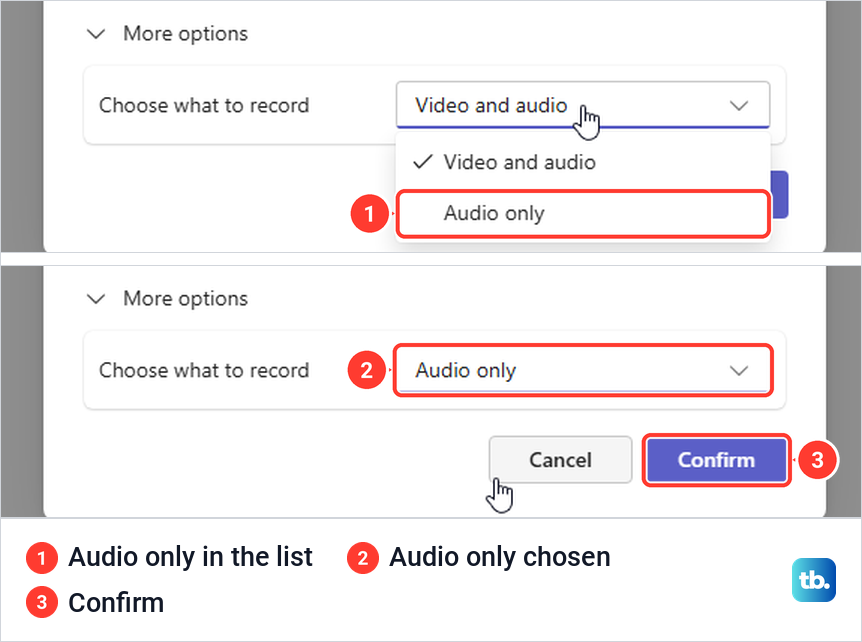
Our audio-only recording started with the notice Audio recording and transcription, and a microphone icon took the place of the usual red dot beside the meeting timer. The meeting's Recap later labelled that part Audio only. Teams did not remember the choice, though, and the next time we selected Start recording, the dialog was back on Video and audio.
Check that the recording started
Look at the left end of the meeting toolbar after you confirm. With Video and audio, we got a red dot beside the timer and a notice reading Recording and transcription, Started by you, with a reminder to let everyone know they're being included. The audio-only recording showed the microphone icon and Audio recording and transcription instead.
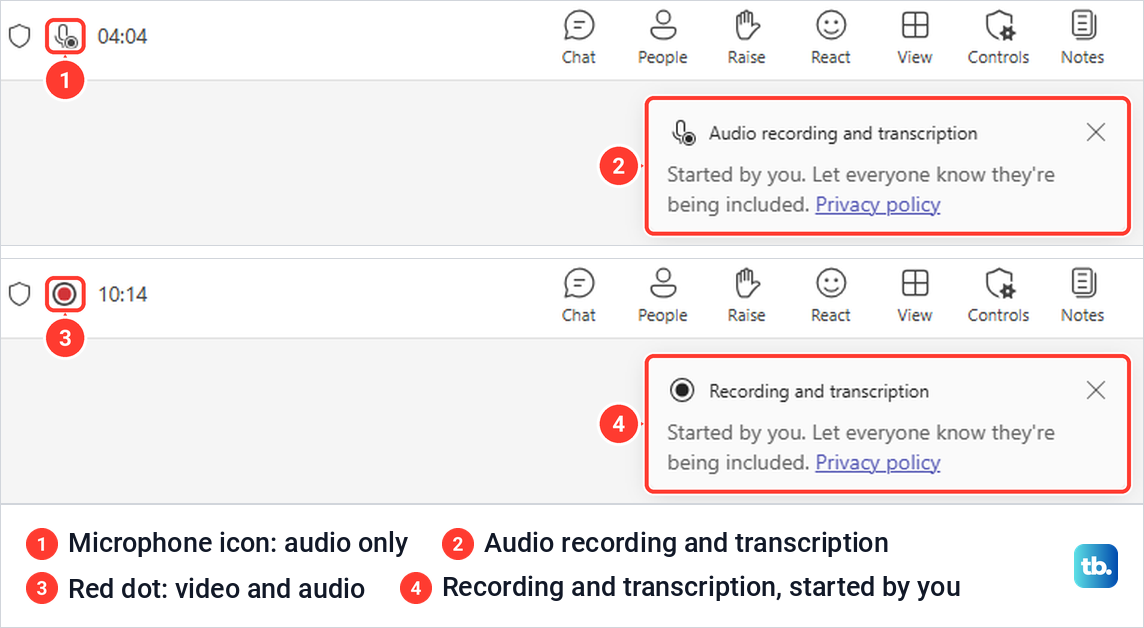
The meeting chat keeps a record as well, with a line saying who started recording and when. Microsoft's advice for a missing recording begins there, because if you can't find the message that recording started, the recording most likely didn't start and can't be recovered.
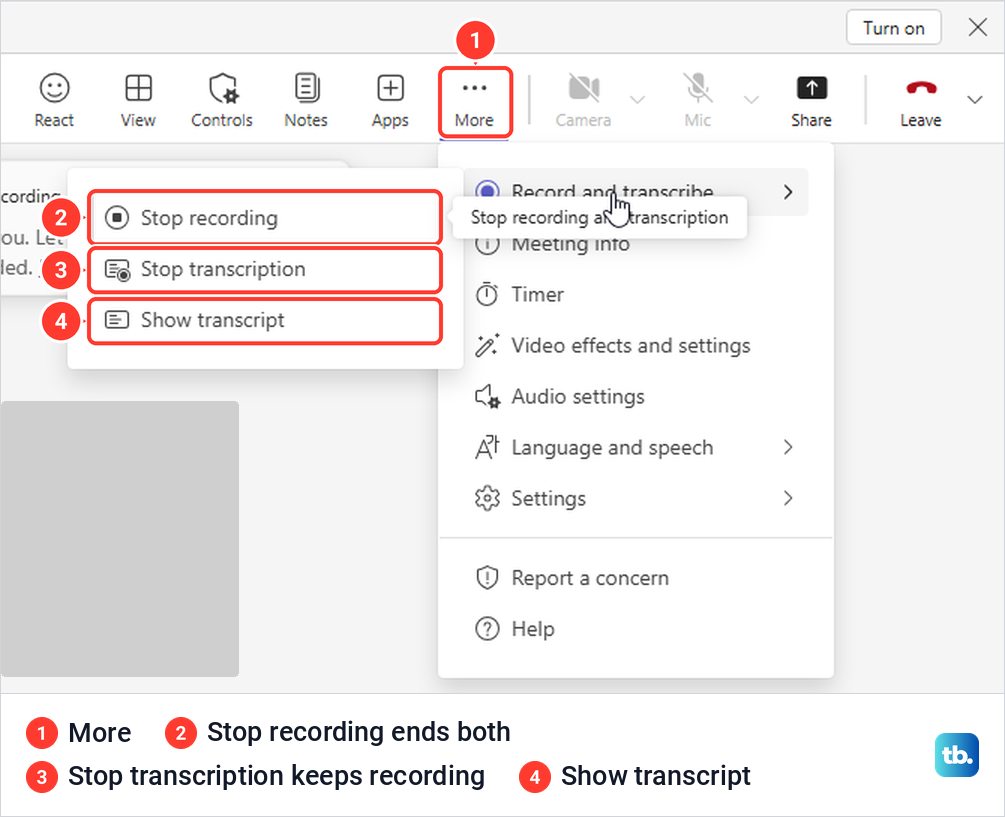
Once a recording is running, nobody can start a second one. While ours ran, the Record and transcribe submenu offered only Stop recording, Stop transcription and Show transcript, which fits Microsoft's rule that one person can record at a time.
Stop recording without losing the file
To end the recording, open More actions > Record and transcribe again and select Stop recording. Microsoft says this stops the recording and live transcription together, while Stop transcription stops only the transcription and the recording carries on until you select Stop recording.
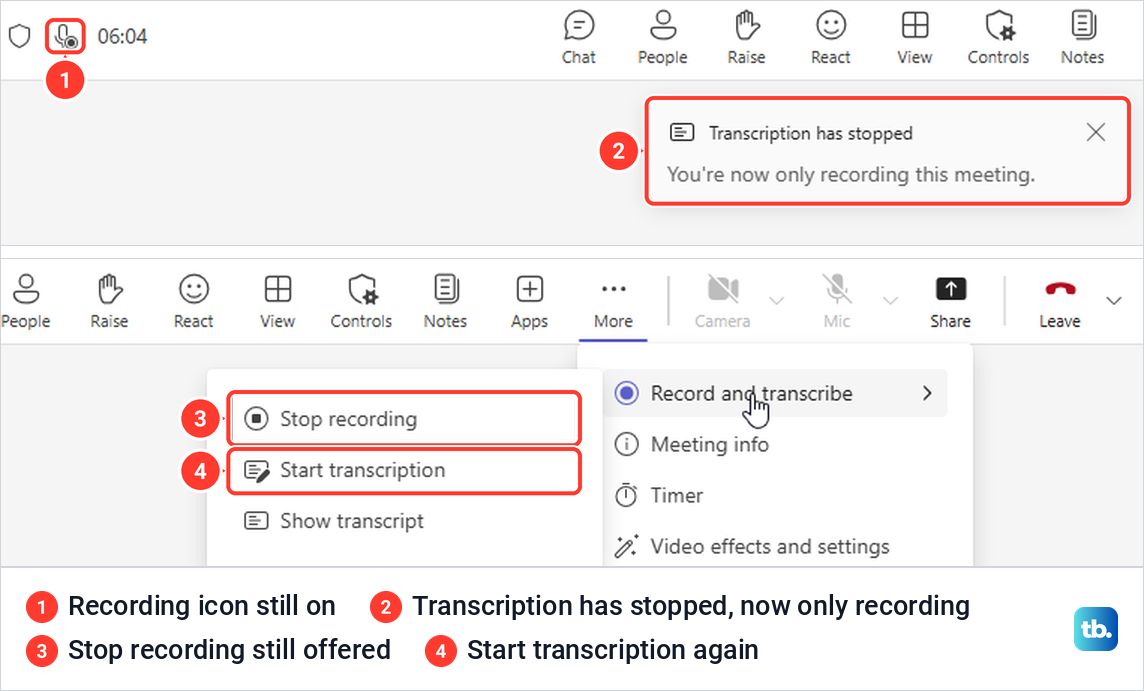
We tried Stop transcription first. Teams asked us to confirm, then said Transcription has stopped and You're now only recording this meeting, the recording icon stayed beside the timer, and the submenu offered Start transcription again.
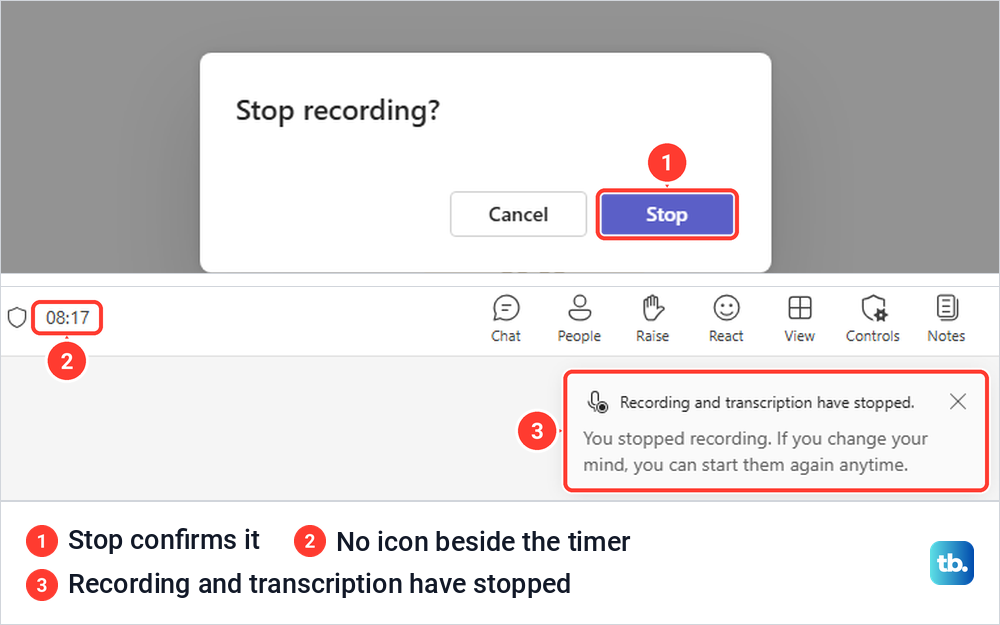
Stop recording also asks for confirmation, with Cancel and Stop buttons. After Stop, our notice read Recording and transcription have stopped, and the icon beside the timer disappeared.
Leaving the meeting is not the same as stopping. Microsoft says recording continues even if the person who started it leaves, and it stops automatically once everyone has left. If someone forgets to leave, Microsoft says the recording ends and restarts every four hours until the last person goes.
Record a scheduled meeting automatically
For a meeting you organize, you can have Teams record it from the start. Microsoft describes a Record and transcribe automatically setting in Meeting options that records and transcribes the meeting as soon as it starts, and it says default meeting options are set by your IT admin.
In Teams for the web we opened Calendar > New, turned on the Teams meeting switch and selected the Options button that appeared beside it. Under Recording & transcription, Record and transcribe automatically was a dropdown rather than the toggle Microsoft describes, with Record and transcribe, Transcribe only and Off, and it was Off by default.
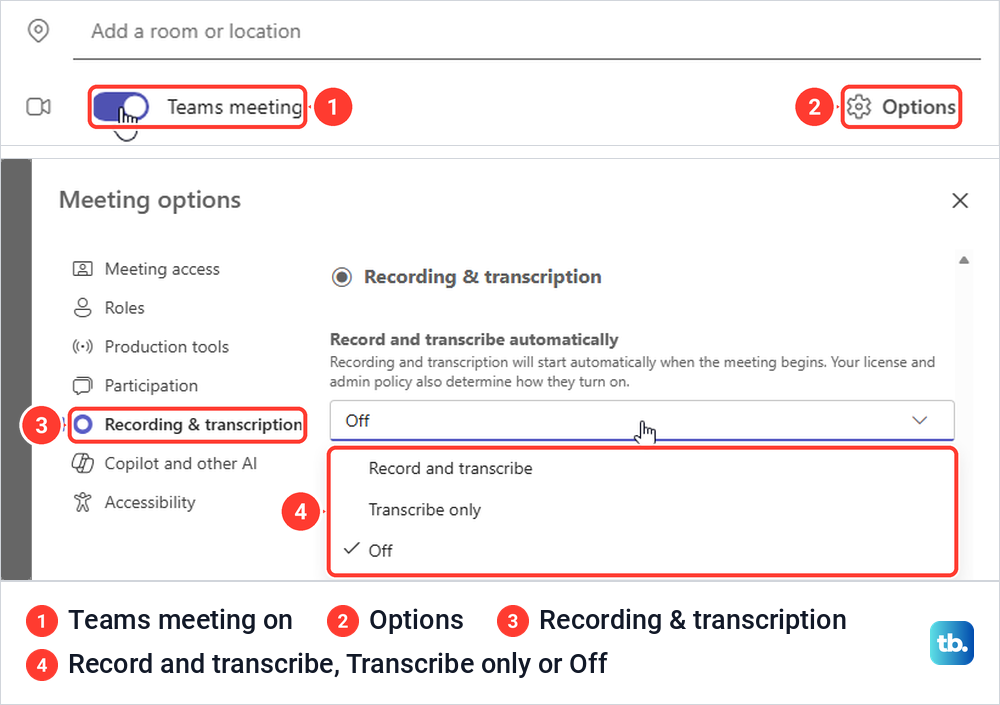
Choose Record and transcribe, select Apply, which was greyed on ours while the setting was still Off, then send or save the meeting. The pane's own note says your license and admin policy also determine how recording and transcription turn on, so check the option again before a meeting that matters.
Microsoft adds that meetings created from the town hall or webinar templates record and transcribe automatically by default. With Teams Premium or a Copilot license, organizers also get a Who can record and transcribe option, while our Recording & transcription section showed only the automatic setting.
Find a Teams meeting recording
Microsoft says that after a meeting ends you can find its recording in the meeting chat or calendar. Ours showed up as a line in the meeting chat saying the recording had been saved to the organizer's OneDrive and would expire in 120 days, with a Remove expiration link. Each of our two recordings got its own line within a few minutes of being stopped.
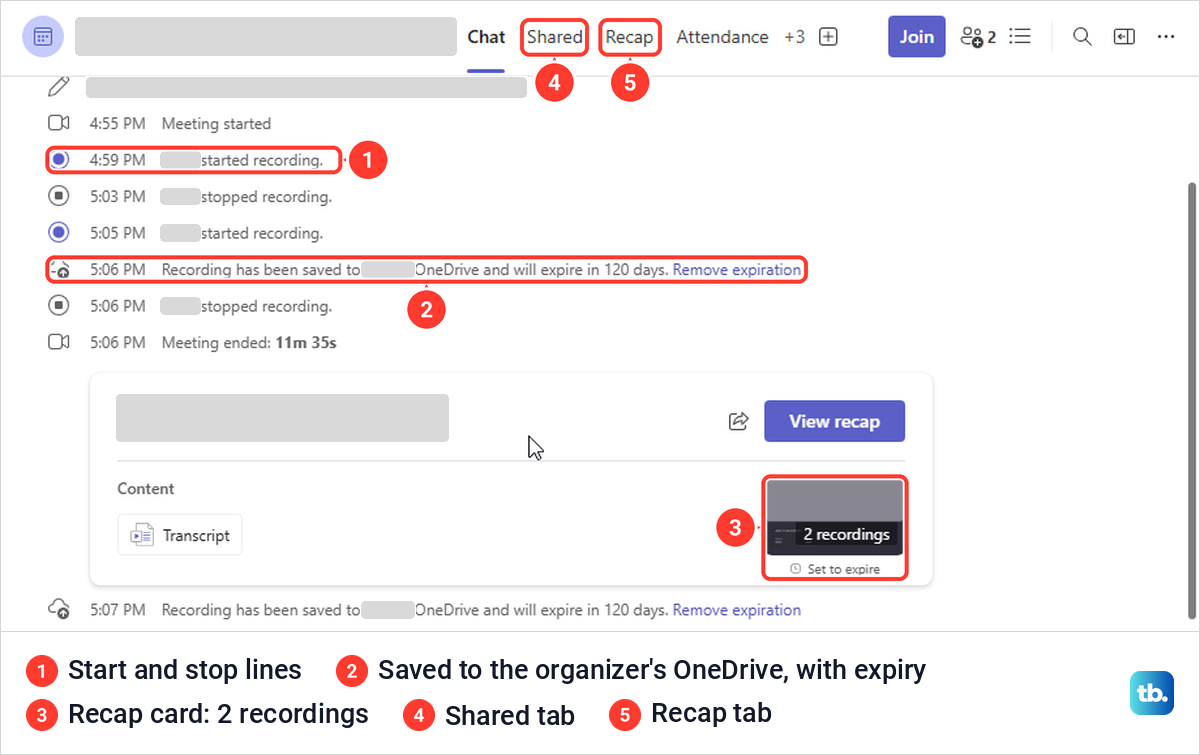
Below those lines, a recap card counted 2 recordings, with Set to expire under the thumbnail and a Transcript chip under Content. The 120 days was the setting on our meeting rather than a rule, because Microsoft says your admin settings determine a recording's expiration.
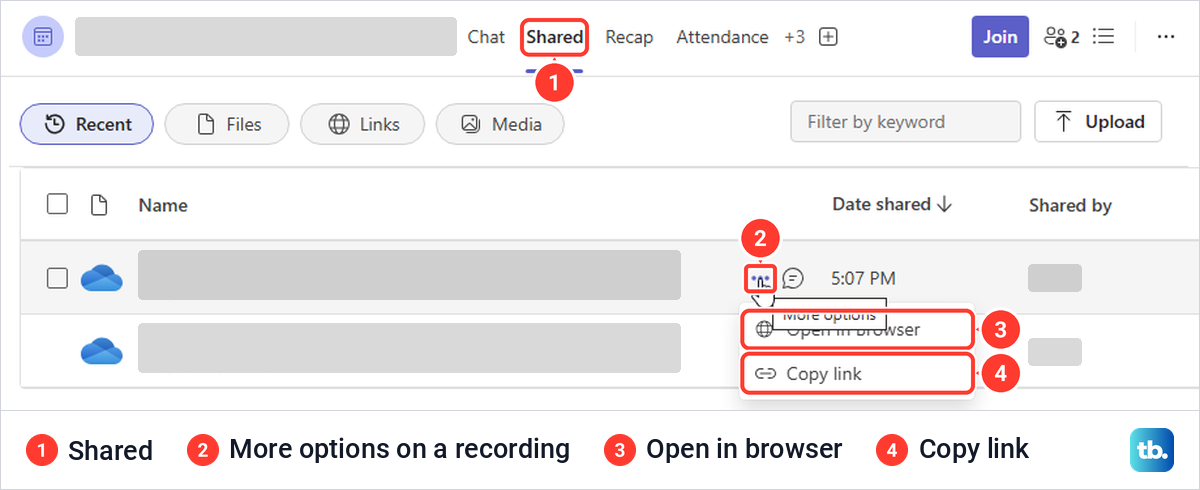
The Shared tab at the top of the meeting chat lists the recordings. Ours showed each one as a OneDrive link rather than an .mp4 file name, and the More options button on a row held just Open in browser and Copy link.
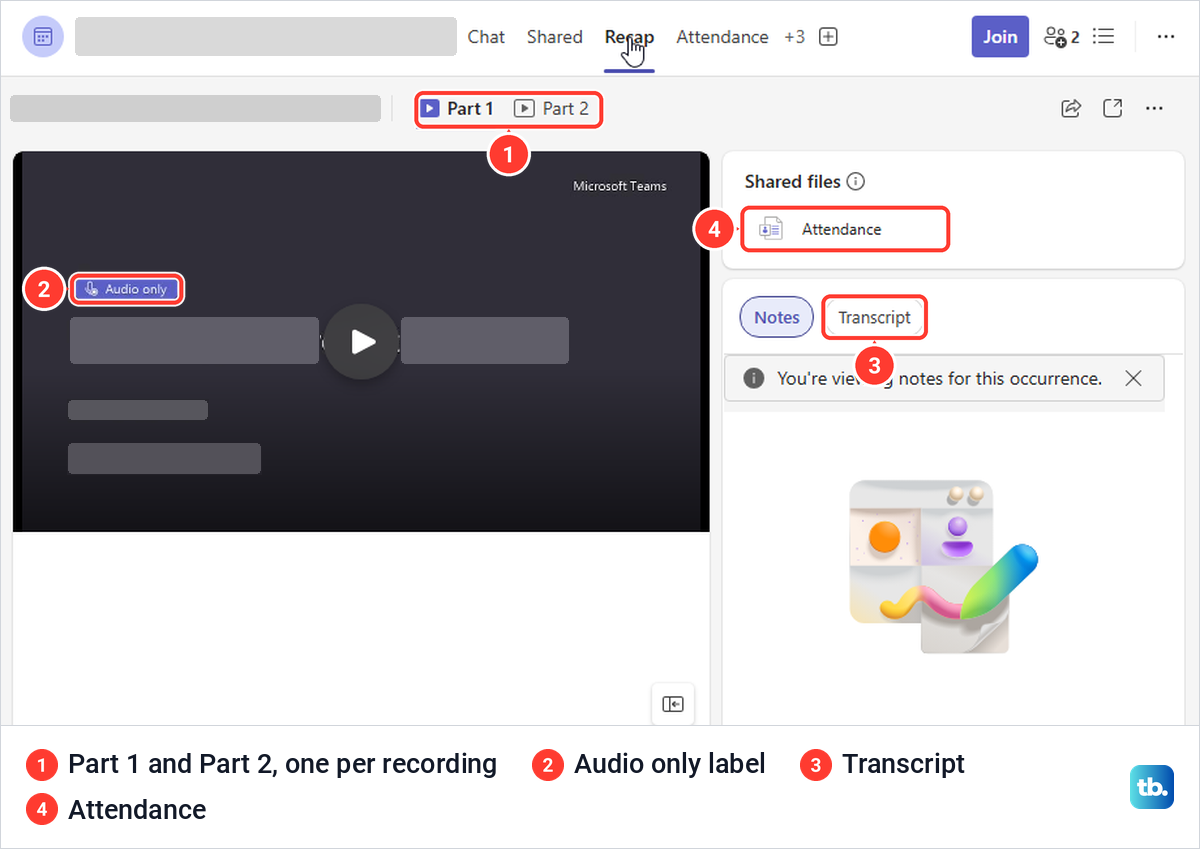
The Recap tab is the other way in, and Microsoft also gives a calendar route of Calendar, the past meeting, then Recap. Our Recap split the meeting into Part 1 and Part 2, one per recording, labelled the audio-only part Audio only, and offered a Transcript tab and an Attendance file.
Where the file lives depends on the meeting. Microsoft says recordings of ordinary meetings go to the Recordings folder in the organizer's OneDrive, while channel meeting recordings are stored in the channel's SharePoint site. Microsoft's playback steps find a channel recording on the channel's Shared tab and its storage notes name the Files tab, so open whichever of the two your Teams shows.
For a channel meeting, use SharePoint to find files if the channel's site is new to you. If the organizer wants the Recordings folder on their PC as well, set up OneDrive on Windows, and if the recording shows online but not in the synced folder, fix OneDrive syncing on Windows.
Play, share and download the recording
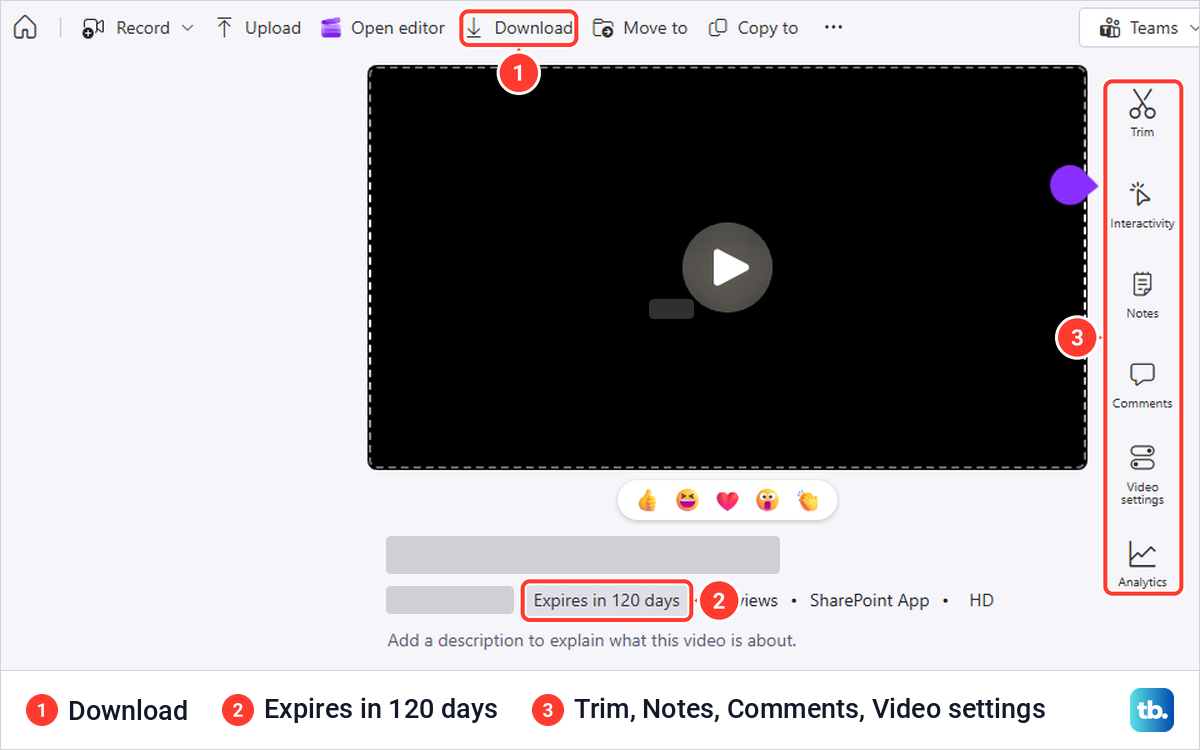
Select Open in browser on a recording, or open it from Recap, to play it. Ours opened in its own Edge tab with Download, Move to and Copy to in the toolbar, an Expires in 120 days label under the video, and a rail on the right with Trim, Notes, Comments, Video settings and Analytics.
Who can watch depends on the meeting. Microsoft says everyone invited to a meeting can view its recording, everyone in a channel can view and edit a channel recording, and guests and external attendees can view one only if they're sent a direct link.
To share it, Microsoft's steps are the Shared tab, More options on the recording, then Copy link, and you paste the link into a message. On our PC, Copy link put the link on the clipboard with a small Copied message and no dialog. For people who weren't invited, Microsoft says the organizer can share the recording the way they would share any other file.
Microsoft's download steps also start from the Shared tab, but our row menu had no Download item. Download sat in the player's toolbar instead, and it warned that the download is video only and won't include Clipchamp content such as the transcript, chapters or comments.
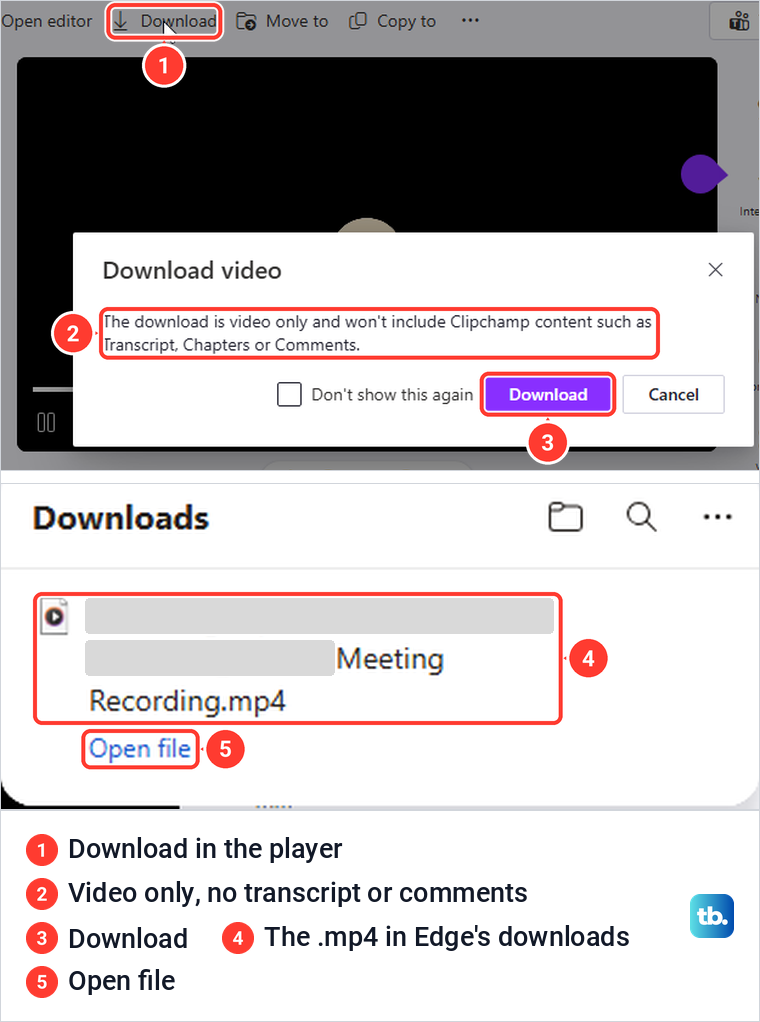
After we selected Download in that box, Edge saved an .mp4 file named after the meeting, with the date, the time and Meeting Recording in the name, to the Downloads folder. Microsoft says the meeting organizer owns the recording, and its permission table ties downloading to the access you have on the file, so if the button is missing, ask the organizer for access or a copy.
Change how long a recording is kept
Teams recordings can expire and be deleted. Microsoft says expiration comes from your admin settings, that you need edit permission to change it, and that the organizer and co-organizers generally get that permission automatically.
To change it, open the recording in the browser player, select the expiration countdown under the video, and pick a new timeframe or Remove expiration. The saved line in our meeting chat had its own Remove expiration link, and Microsoft says hovering over Set to expire on the recap card gives you a View or change link to the same player page.
When a recording expires, Microsoft says the owner gets an email and has up to 90 days to recover it from the recycle bin. Watching a recording doesn't reset its countdown.
Fix a missing Record button or recording
If Start recording shows a lock icon, hover over it. Microsoft's troubleshooting page says the tooltip explains why, and the reasons it lists include that you're a guest or from another organization, an admin policy blocks recording, or the organizer limited who can record in Meeting options.
The fix depends on the tooltip. Sign in with your work account if you joined anonymously, ask your IT admin when a policy blocks recording, and ask the organizer to make you a co-organizer or presenter when the meeting options limit it. Guests can't record at all, so Microsoft's advice is to ask a participant from the organizer's organization to start and share the recording.
Two other cases are less obvious. Microsoft says Start recording is briefly unavailable while a recording takes a few seconds to start, so wait, and that the recording button is unavailable to every attendee when the organizer sets Allow Copilot to Off.
If the recording is missing afterwards, check the meeting chat for the line saying recording started, because a canceled or closed confirmation dialog means it never began. If it did start but is gone from OneDrive, Microsoft suggests looking in the recycle bin and the second-stage recycle bin, since it may have been deleted, moved or expired.
A failed upload has its own message. If you can't find the recording in OneDrive but the meeting chat says it failed to upload to OneDrive, Microsoft says Teams keeps it temporarily for 21 days, and you can retry the upload or download it to your device in that time.
Record a Teams meeting on a phone
In the Teams mobile app, Microsoft's steps are to select More options > Start recording in the meeting controls, and More options > Stop recording to end it. Everyone in the meeting is notified that recording has started, just as on a computer.
The recording is then processed and saved to OneDrive or SharePoint. Microsoft says it shows up in the meeting chat, or in the channel for a channel meeting, and that you can also find it by opening the past meeting's details in your Teams calendar.
How we tested this guide
We tested this in Teams for the web in Microsoft Edge on Windows 11, version 25H2, recording a meeting we organized.
Frequently Asked Questions
Can I record a Teams meeting if I'm not the organizer?
Yes, if you're in the organizer's organization, have an eligible license and your admin allows recording. Microsoft says guests and people from other organizations can't, and an organizer can limit recording to organizers and co-organizers, or to presenters, in Meeting options.
Does Teams tell people when a meeting is being recorded?
Yes. Microsoft says every participant is notified in the Teams desktop, web or mobile app as soon as recording starts, and our own notice reminded us to let everyone know they're being included.
Can I record only the audio of a Teams meeting?
Yes. In the Start recording and transcription dialog, set Choose what to record to Audio only and select Confirm, and Recap labelled our audio-only part Audio only.
Does stopping transcription stop the recording?
No. Stop transcription ends only the transcript, and our meeting kept recording until we selected Stop recording.
Where are Teams meeting recordings saved?
Microsoft says ordinary meeting recordings go to the organizer's OneDrive and channel meeting recordings to the channel's SharePoint site. Open them from the meeting chat's Shared or Recap tab.
Why can I play a recording but not download it?
Download depends on your permission on the recording, which the meeting organizer owns. Look for Download in the video player's toolbar, where ours was, and if it is missing, ask the organizer for access or a copy.
How long do Teams recordings last?
Your admin's settings decide. Ours showed Expires in 120 days, and someone with edit permission can change or remove the expiration in the player.