
To use PowerPoint, open it and choose Blank Presentation, type a title on the first slide, add slides from Home > New Slide, pick a look on the Design tab, then select Slide Show > From Beginning to present. Save the file as a .pptx on your PC or in OneDrive, and use File > Export when someone needs a PDF instead.
We built a three-slide practice deck in PowerPoint for Microsoft 365 on Windows 11, version 25H2, and repeated the main steps in PowerPoint for the web in Microsoft Edge. Two things caught us out along the way: the Bullets button can remove bullets you already have, and Copy Link can create an editable link before you choose who gets it.
The short version
- Start: choose Blank Presentation, or a template for a ready-made design, and click the title box to type.
- Add slides: select a thumbnail, open the New Slide arrow and pick a layout, or press Ctrl + M.
- Look: pick a theme on the Design tab, and every slide changes at once.
- Present: press F5 to start from the first slide, Spacebar to move on and Esc to stop.
- Save and share: save a desktop file yourself, let PowerPoint for the web save on its own, and make a PDF as a separate copy from File > Export.
PowerPoint basics at a glance
The table shows where each everyday control sits in the desktop app and in PowerPoint for the web, with the labels we saw on screen. Most steps match, but a few names differ between the two.
| What you want to do | Desktop PowerPoint | PowerPoint for the web |
|---|---|---|
| Start a presentation | Blank Presentation on the start screen | Create blank presentation on the start page |
| Add a slide | Home > New Slide arrow, or Ctrl + M | Home > New Slide arrow, or Ctrl + M |
| Change a slide's layout | Home > Layout | Design > Slide Layout |
| Change the look | Design > Themes, then Variants | Design > Themes |
| Add speaker notes | Notes pane under the slide | View > Notes |
| Present | Slide Show > From Beginning, or F5 | Slide Show > From Beginning, or Ctrl + F5 |
| Save | File > Save, then Ctrl + S, or AutoSave in OneDrive | Saves by itself |
| Make a PDF | File > Export > Create PDF/XPS | File > Export > Download as PDF |
| Share | Share > Share once the file is in OneDrive, or attach a copy | Share > Share |
Keep the two file types apart. The .pptx file is the one you edit, present and share, while a PDF is a separate copy that keeps the slide layout for reading or printing.
Start a blank presentation
Open PowerPoint from the Start menu. The start screen offers Blank Presentation first, a row of templates beside it and a More themes link for more designs. Microsoft describes a template as a prepared design, so pick one if you want colours and fonts chosen for you, or Blank Presentation to start from scratch as we did.
A blank deck opens on one Title Slide with two dotted boxes, Click to add title and Click to add subtitle. These boxes are placeholders, so click inside one and type, and the text takes on the slide's formatting. The thumbnails on the left show every slide in order, and the Notes pane under the slide holds your talking points.
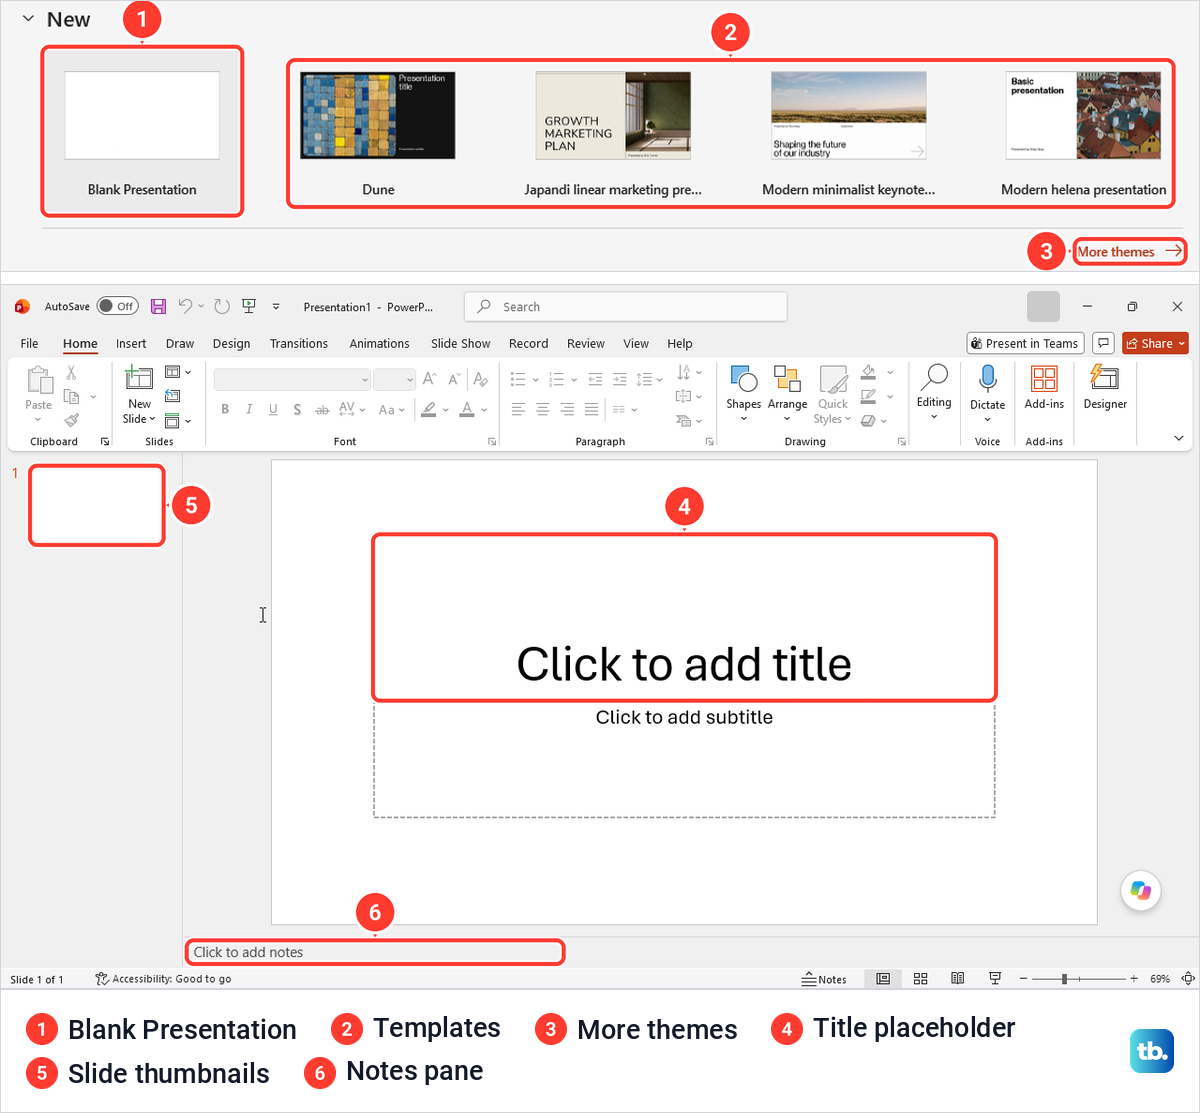
We typed Cedar Park Project Brief as the title and a meeting line as the subtitle, and the thumbnail updated at once. The AutoSave switch at the top left read Off, and the save section below shows when that changes.
Add slides and choose a layout
Microsoft's instruction is to select the thumbnail you want the new slide to follow, then select New Slide on the Home tab. Click the lower half of the button, the part with the arrow, and our blank deck showed the Office Theme gallery with nine layouts: Title Slide, Title and Content, Section Header, Two Content, Comparison, Title Only, Blank, Content with Caption and Picture with Caption.
A layout decides which boxes a slide has and where they sit, which is how Microsoft defines it. Title and Content is the everyday choice, with a title box and a body box that also holds small icons for adding things such as a table or a chart. Under the layouts sit Duplicate Selected Slides, Reuse Slides and Slides from Outline, which Microsoft's steps use to import a Word outline as new slides.
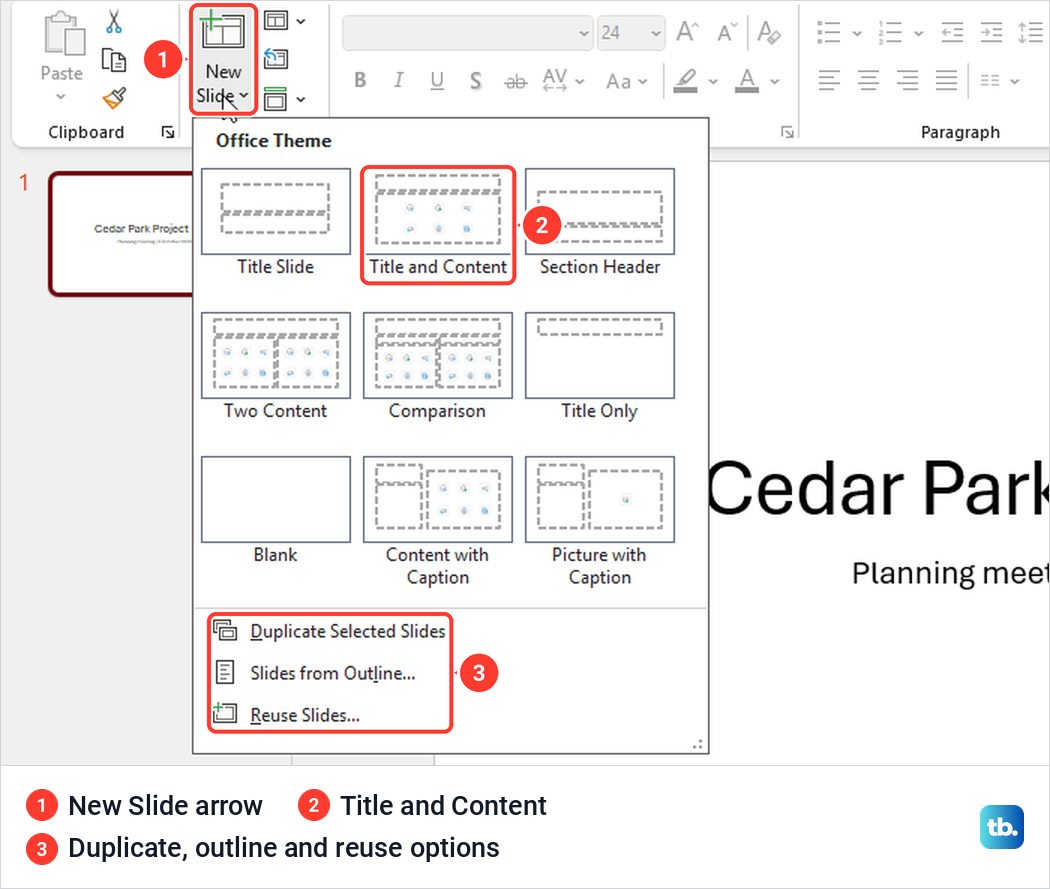
The keyboard is faster once you have a few slides. With slide 2 selected, Ctrl + M added slide 3 directly after it in the same Title and Content layout. To change the layout of a slide that already exists, select it and open Home > Layout, which showed the same gallery with the current layout highlighted.
Type your text and check the bullets first
Click in the body box and type, pressing Enter for each new line. On our Title and Content slide the body was a bulleted list before we typed anything, so our three goals came out as bullet points by themselves. With the lines selected, the Bullets button on the Home tab was already highlighted.
That is where the trap is. Microsoft's general instruction for a list is to select the text and then select Bullets, but doing that on our already bulleted lines removed the bullets, and a second click brought them back. Look at the slide before you press anything, and if the bullets are already there, leave the button alone.
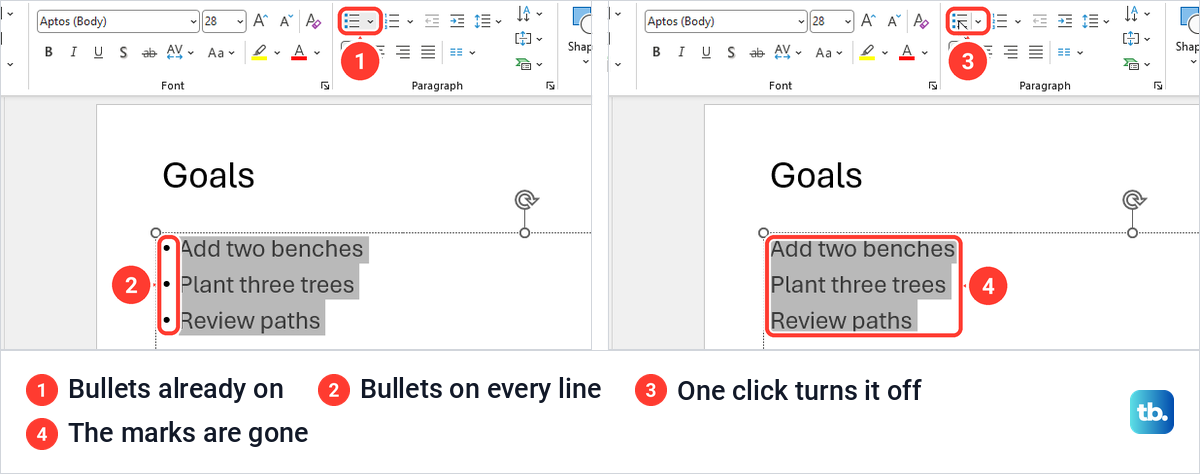
The Font group on the same tab sets the typeface and size, and our body text showed Aptos (Body) at 28 points. The small arrow beside Bullets changes the bullet mark itself, as the button's tooltip says. If a long bullet wraps onto a second line out of step with the first, our guide to fixing a hanging indent in PowerPoint explains how to line it up.
Add a shape, picture or video
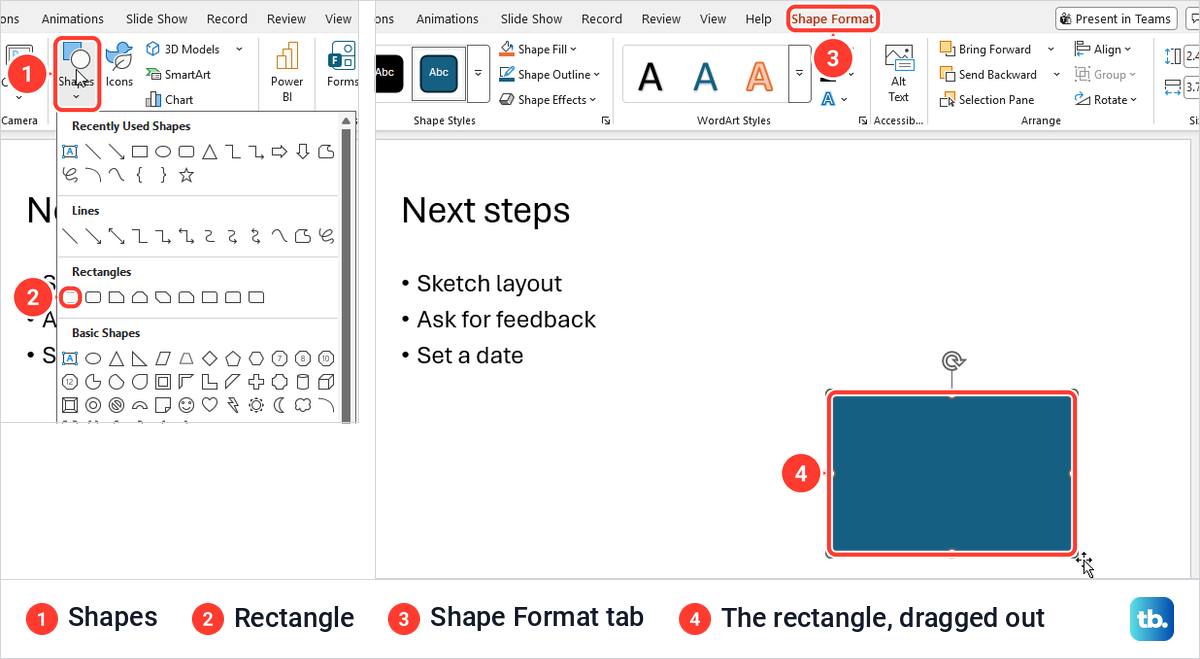
Pictures and shapes live on the Insert tab. We opened Insert > Shapes, and hovering the first item under Rectangles showed its name, Rectangle. After one click on it we dragged on the slide to draw it, and PowerPoint switched to a Shape Format tab with Shape Fill, Shape Outline and size boxes.
For a photo, open Insert > Pictures. Ours offered This Device, Stock Images, Brand Images and Online Pictures, and Microsoft's steps use This Device to pick a picture saved on your PC. Stock Images opened a picker of images, icons, stickers, videos and illustrations, which it says Microsoft 365 subscribers get in full.
Give each slide one job, and add media only where it helps. When a talk needs a clip, you can embed a YouTube video in PowerPoint, and for narration or a sound you can add audio to a PowerPoint slide. If a stray object gets in the way, remove the unwanted text box rather than deleting the whole slide.
Duplicate, move or delete slides
Right-click a thumbnail on the left to see what you can do with a slide. Our menu included Cut, Copy, New Slide, Duplicate Slide, Delete Slide, Add Section, Layout, Reset Slide, Format Background and Hide Slide. Duplicate Slide put the copy directly after the original, just as Microsoft's help says it will.
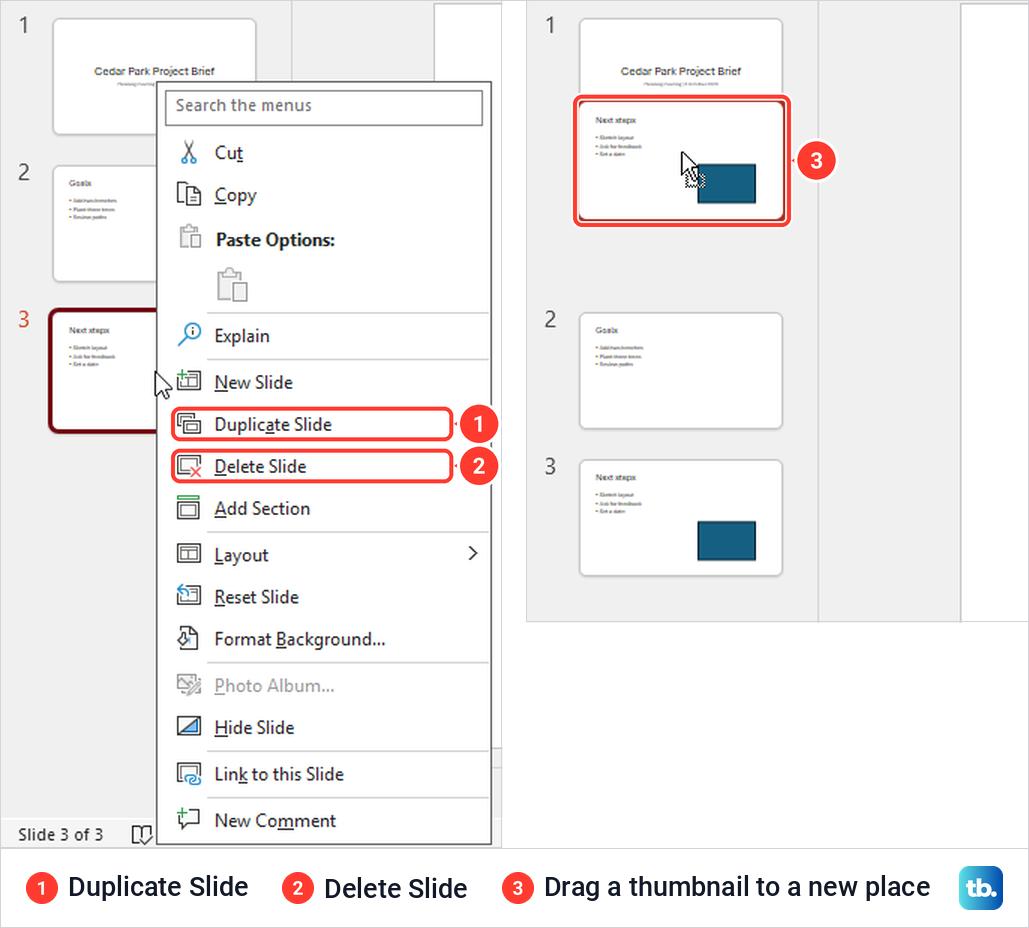
To move a slide, drag its thumbnail up or down. While we dragged, the pane opened a gap where the slide would land, and letting go there made our copy slide 2. Delete Slide then removed it straight away with no question asked, and the slide below moved up and was selected, so check which thumbnail you clicked before you delete.
Once a deck runs past a few slides, numbers help people ask about the right one. Before you present, add slide numbers in PowerPoint so each slide shows its place.
Apply a theme to every slide
A theme sets the colours, fonts and background for the whole deck, while a layout only arranges the boxes on one slide. Microsoft's steps are short: select the Design tab, select one of the Themes, then select one of the Variants. On our Design tab the themes sat in a row with a More arrow at its end, and Variants was a drop-down button.
Pointing at a theme showed its name and a live preview. We clicked Frame and all three slides changed together, and the orange colourway from its Variants list recoloured every slide, including the rectangle we had drawn.
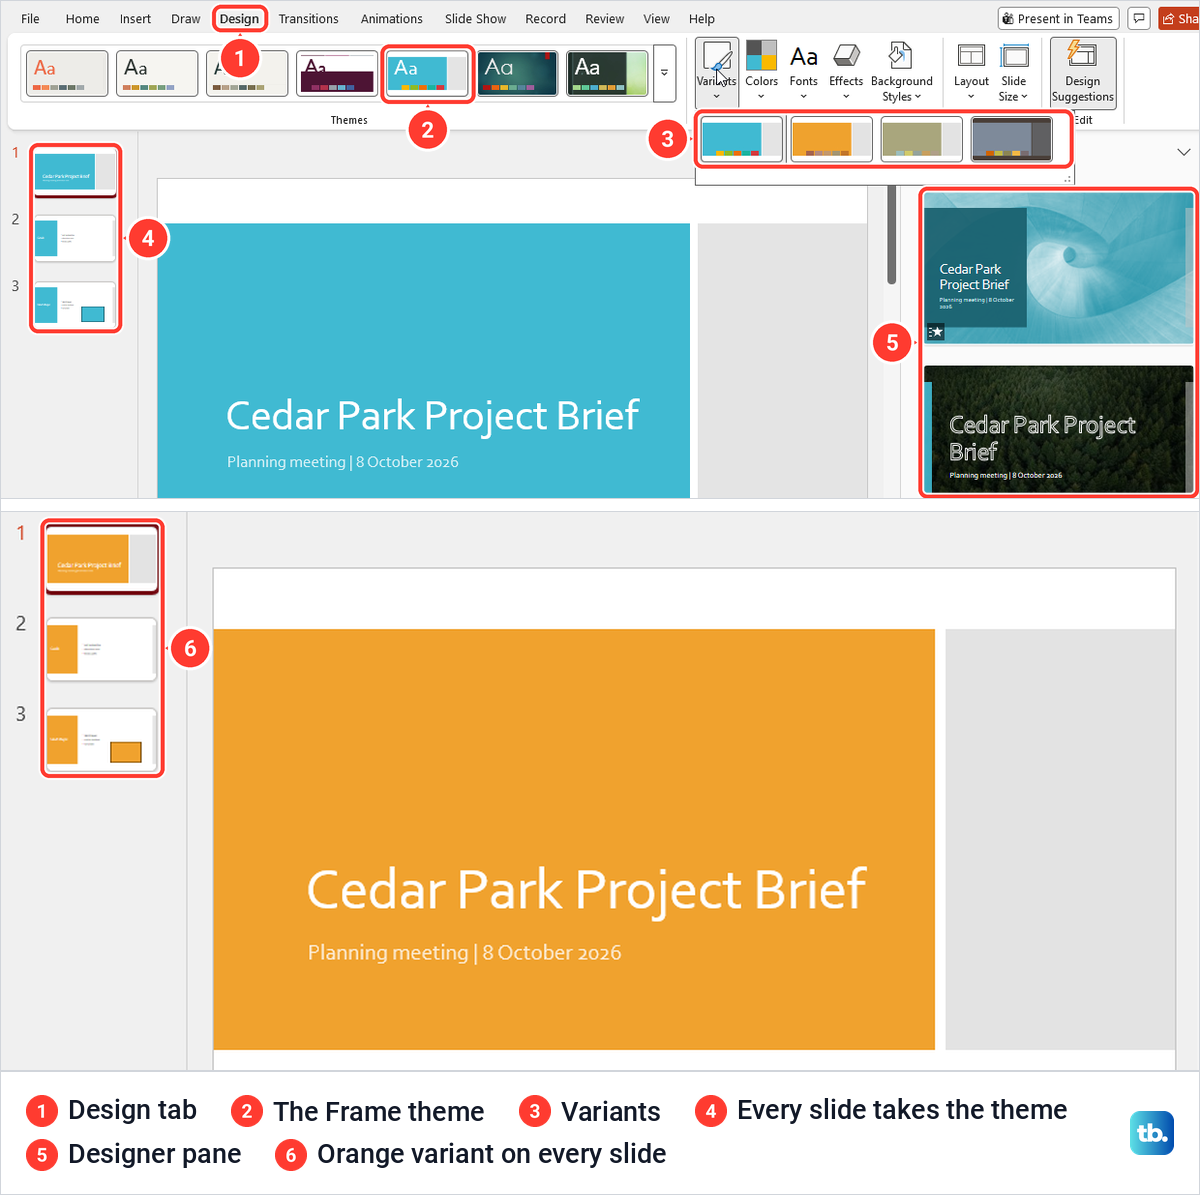
Applying the theme also opened the Designer pane by itself, with ready-made versions of the title slide, which you can pick from or close with its X, as we did. Designer is optional, and if it shows no ideas at all, follow our steps to fix PowerPoint Designer suggestions separately from choosing a theme.
Add transitions and animations
A transition is the effect you see when the show moves from one slide to the next. An animation works on one object or piece of text, and Microsoft says it can make it appear, disappear or move, or change its size or colour.
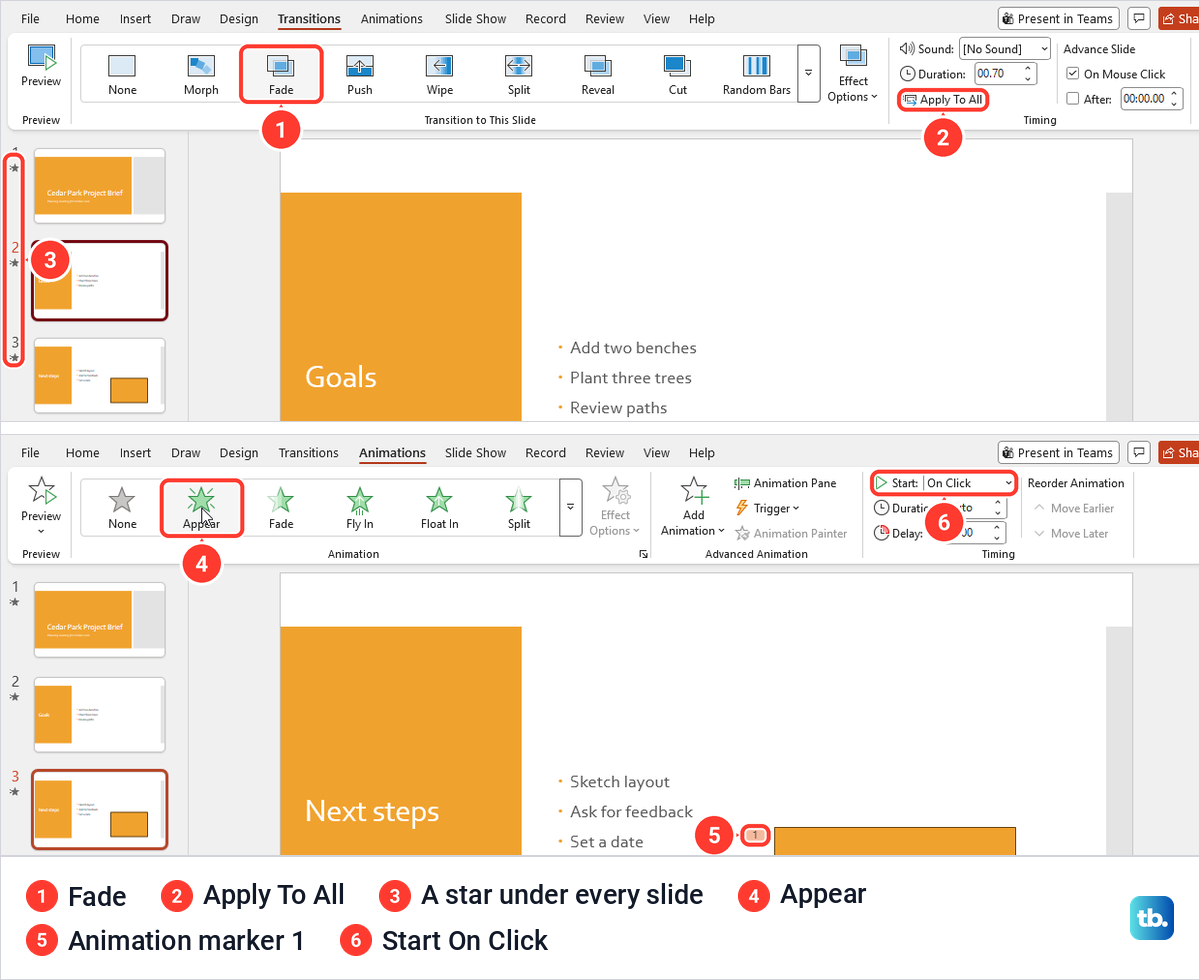
A transition belongs to the slide it moves to, so we selected slide 2 and chose Fade on the Transitions tab. The Duration box changed to 00.70, Effect Options offered Smoothly or Through Black, and a small star appeared under the slide number.
Select Apply To All to give every slide the same transition, and a star appears under each slide number to show it. With a slide selected, our gallery also listed Morph second, and its tooltip explains that it moves things from the previous slide to their new places and works best on a duplicated slide.
Animations work on whatever you select, so select the object first. With nothing selected on slide 3, every effect on the Animations tab was grey, and clicking our rectangle made them available. We chose Appear, and a small numbered marker, 1, appeared beside the shape, with Start set to On Click.
Microsoft's animation steps begin with selecting the object or text you want to animate, so click a text box first if you want words to move. Use effects sparingly, because a deck where every line flies in gets tiring to watch.
Add speaker notes and present your slides
Speaker notes are the lines you want in front of you while you talk. On our new deck the Notes pane was already open under the slide, where we typed a reminder for slide 2, and the Notes button on the status bar hid the pane and brought it back.
The Slide Show tab starts the show. From Beginning filled our screen with slide 1, the Spacebar moved to slide 2, P went back one slide and Esc returned us to the editor on the slide where we stopped. From Current Slide starts at the slide you have selected, and the From Beginning tooltip gives F5 as its shortcut.
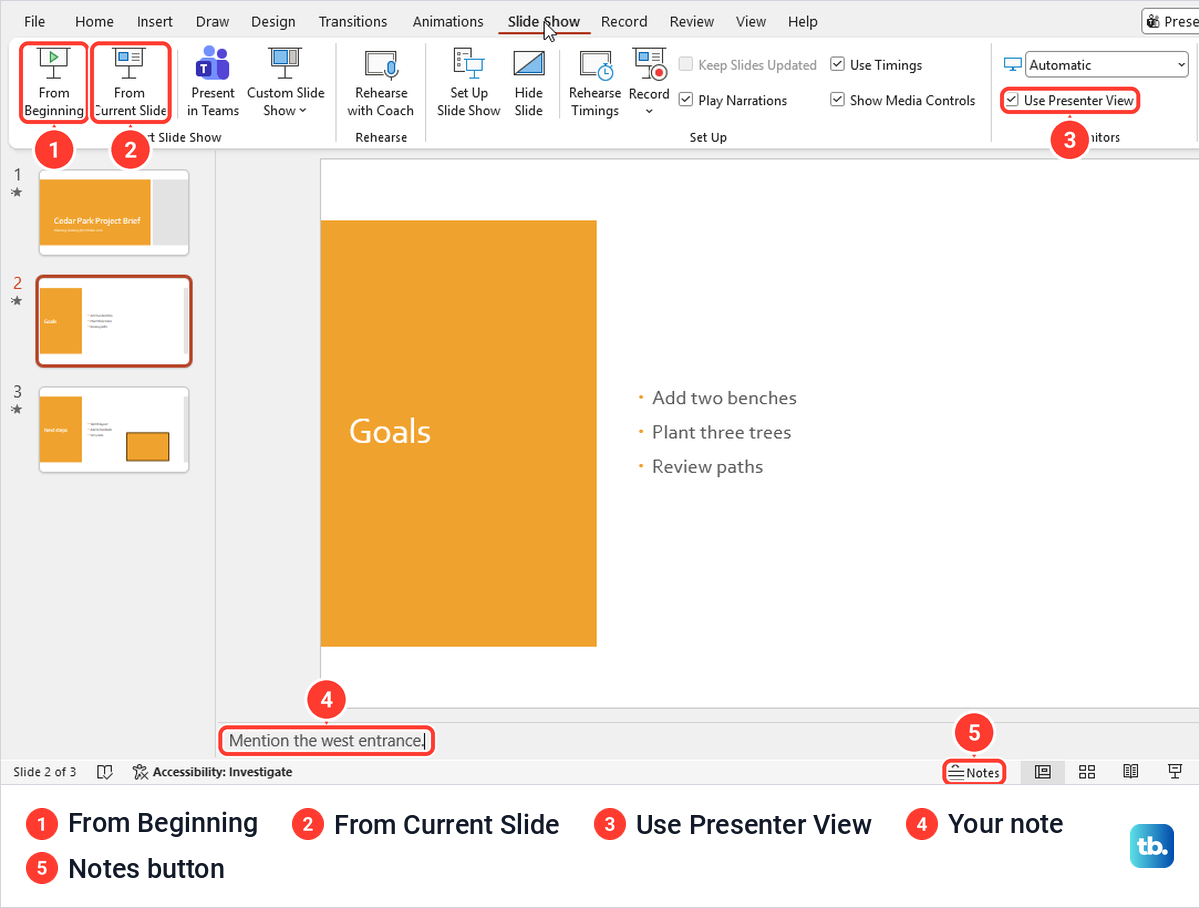
Presenter View is where your notes show up during the talk. Microsoft says that when your computer is connected to a projector, Presenter View appears on your computer's screen while only the slides appear on the projector. To rehearse on one screen, press Alt + F5, which on our single display opened Presenter View with a timer, the next slide and our note for slide 2.
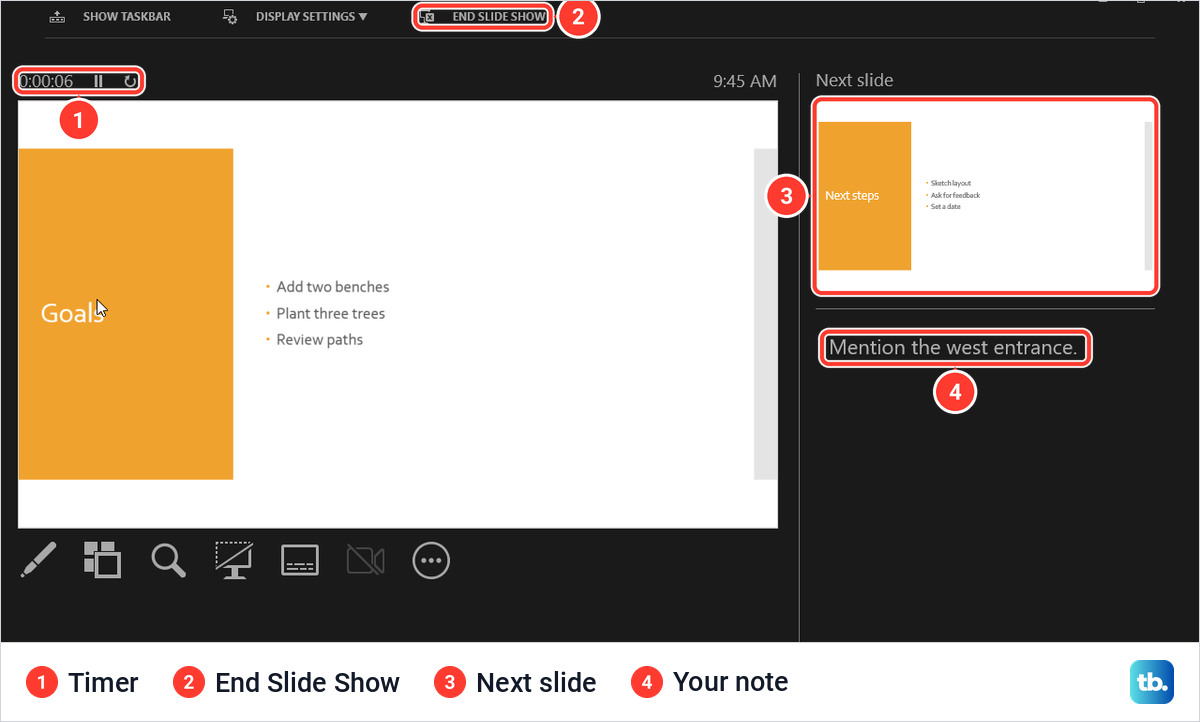
Before a real talk, connect the second screen and set up multiple displays in Windows ahead of time. For more on the Notes pane and Presenter View, our separate guide shows how to add speaker notes in PowerPoint step by step.
Save your presentation
A desktop presentation is not saved until you save it. When we chose File > Save on our new deck, PowerPoint opened the Save As page with OneDrive for our work account already selected, plus This PC, Add a Place and Browse under Other locations. Browse opened the Windows Save As box in Documents, with the file name already filled in from the slide title.
After we saved to Documents, the title bar read Saved to this PC and the AutoSave switch at the top left stayed Off. Hovering over it showed Click to turn on AutoSave for this file. So for a file on your PC, press Ctrl + S as you work, which is also Microsoft's advice.
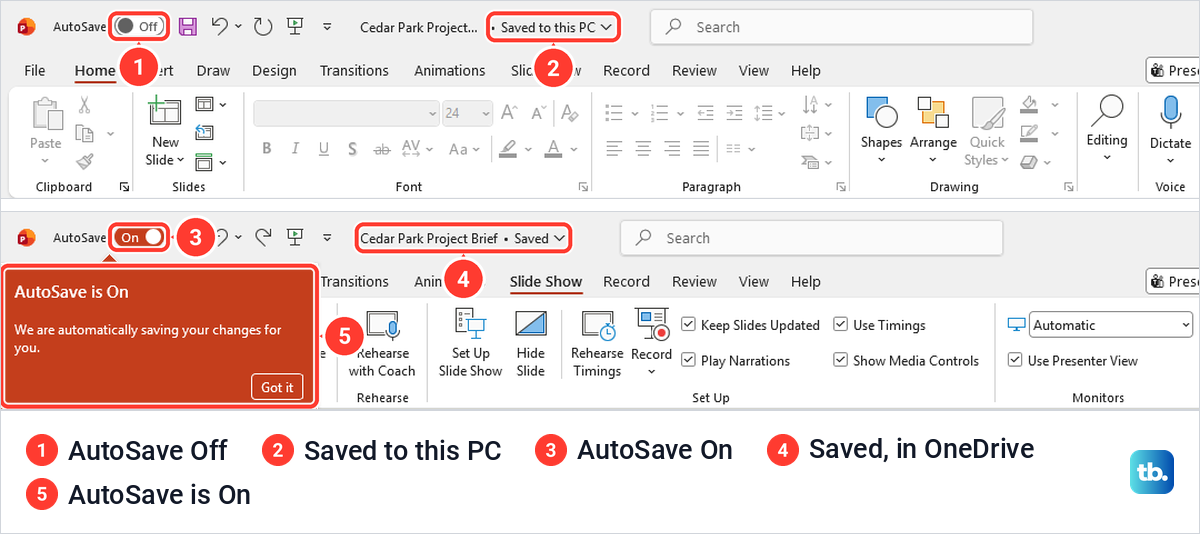
Saving to OneDrive changes that. We chose File > Save As, picked OneDrive and selected Save, and after a short progress box the title read Saved, AutoSave switched On and a callout said AutoSave is On. From then on the File menu offered Save a Copy in place of Save and Save As, since every change was being saved as we worked.
If OneDrive is missing from the Save As page, Microsoft's fix is to select Add a Place, choose OneDrive and sign in to your Microsoft account. To get the OneDrive folder in File Explorer as well, set up OneDrive on Windows, and if that folder stops updating, fix OneDrive syncing on Windows.
Turn your slides into a PDF
A PDF suits a handout or an attachment that should keep the slide layout you made. In the desktop app, open File > Export, keep Create PDF/XPS Document selected and select Create PDF/XPS. Our Publish as PDF or XPS box opened in Documents with the type set to PDF and Optimize for set to Standard, the choice for printing as well as reading online.
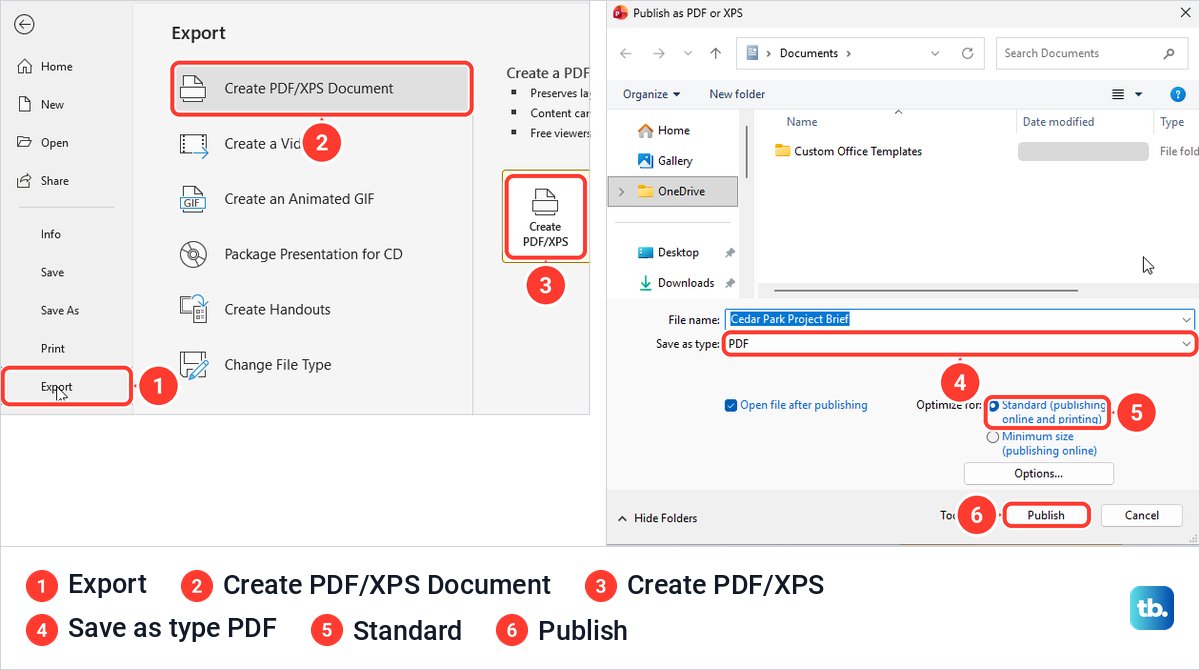
The Options button sets the range and what to publish, and ours was set to all slides. Choose a folder in the dialog, then select Publish. We kept Documents, where our .pptx was saved, and got a separate three-page PDF that opened in Edge while the .pptx stayed as it was.
A PDF does not play transitions or animations. On page 3 of ours, the rectangle we had set to Appear on a click was already on the page, so keep the .pptx for presenting. If the other person works in Google Slides, you can convert a PowerPoint to Google Slides and keep an editable version.
For paper, the desktop File > Print page lists Full Page Slides, Notes Pages, Outline and Handouts with 1, 2, 3, 4, 6 or 9 slides a page. Microsoft describes these as printing just the slides, just the speaker notes, an outline or handouts.
Share a presentation without giving away editing
Inviting people or sharing a link needs the file in the cloud, such as OneDrive, while a file kept on your PC can still go as an email attachment. On our PC-only file, the Share menu greyed out Copy Link and Manage Access, and Share said Please upload your presentation to share it, with Attach a copy instead offering a PowerPoint Presentation or a PDF. Once the deck was in OneDrive, the Share menu offered Share, Copy Link, Link to this Slide and Manage Access.
Share is the safer route because you choose people and permission before anything is sent. In the Share box, type a name, group or email, then open the permission button beside it. Ours listed Can edit, ticked by default, Can view and Can't download, so we chose Can view, added a short message and selected Send.
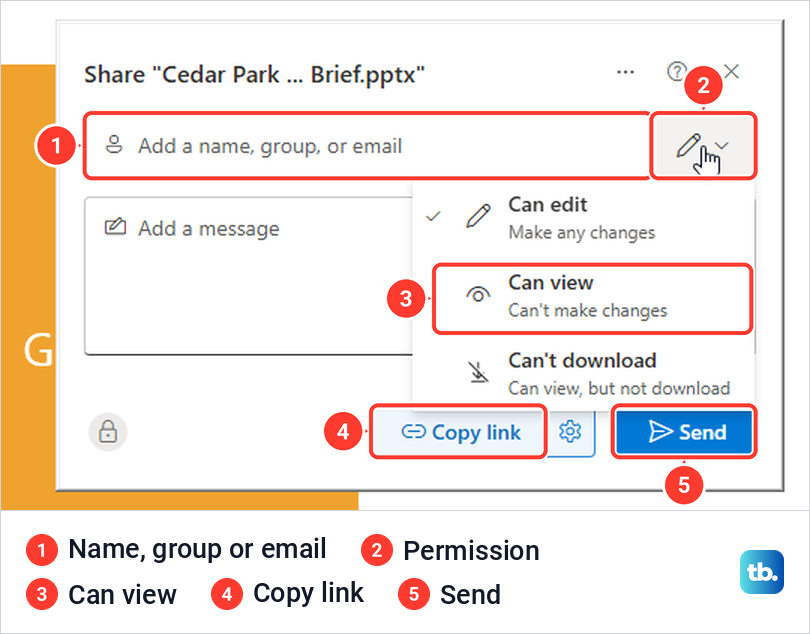
PowerPoint confirmed the invitation, and it reached the other person as an email with a button that opens the deck. Manage Access then listed the owner and that person with Can view.
Copy Link behaves differently, and this is the step to watch. Microsoft says it copies the link to your clipboard with the default sharing settings, and for us it created the link at once with the note Link copied, Anyone with the link can edit, before we could open any settings. The Link settings behind its Settings button were set to Anyone and Can edit.
Changing those settings afterwards did not undo it. We switched the link to Only people with existing access, yet Manage Access still listed the first link as Anyone with the link can edit. Removing it took the bin icon beside the link and a Delete link prompt warning that the link will not work for anyone anymore.
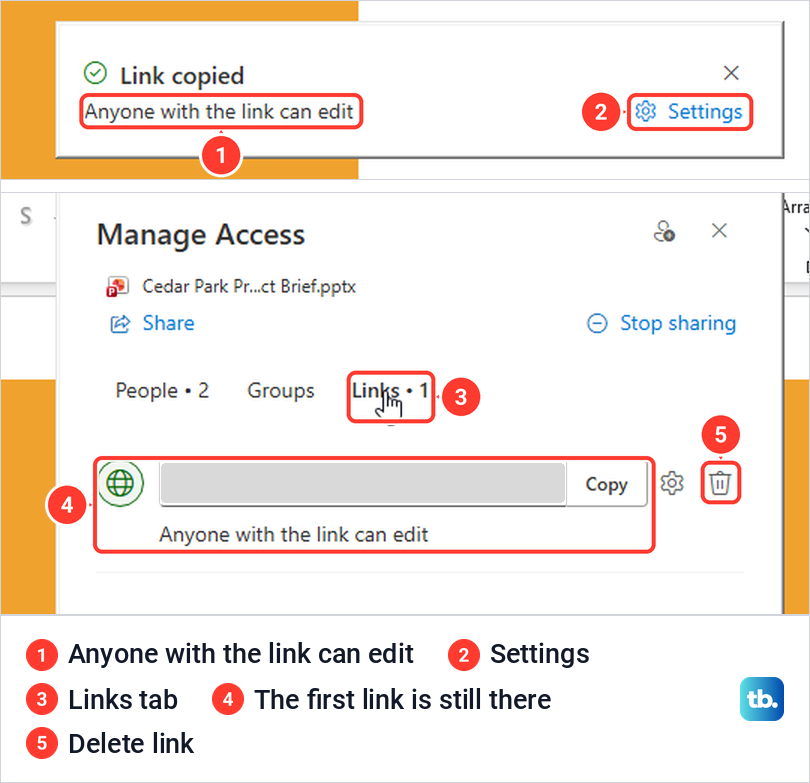
So share with named people, or open the link settings first with the gear beside Copy link in the Share box, as we did in PowerPoint for the web. Your organization may set a different default, so read the line under Link copied every time.
Use PowerPoint for the web
PowerPoint for the web runs in a browser, and Microsoft says you can get started with it for free. Microsoft's direct route is to go to powerpoint.cloud.microsoft, and its other route is the app launcher. We used the launcher, the grid of dots at the top left of Outlook on the web, with no new sign-in, and the start page offered Create blank presentation, Create with Copilot and Upload a file.
A new web deck is called Presentation, and clicking the name at the top opens a Rename file box. The Home tab is a single row of icons, where the first one, New Slide (Ctrl + M), has an arrow with the same layouts as the desktop.
A few controls have different names. The web Design tab holds Slide Layout, and the Transitions tab says Options where the desktop says Effect Options. Notes stayed hidden on our new web deck until we chose View > Notes, and Slide Show > From Beginning, whose tooltip gives Ctrl + F5, ran the show with Spacebar and Esc working as on the desktop.
Two things behaved differently. With both themes we tried, the Variants gallery showed four empty, crossed-out tiles and offered nothing to choose, and with one of them the body text lost its bullet mark. After the show the Notes pane was closed, but reopening it showed our note was still there.
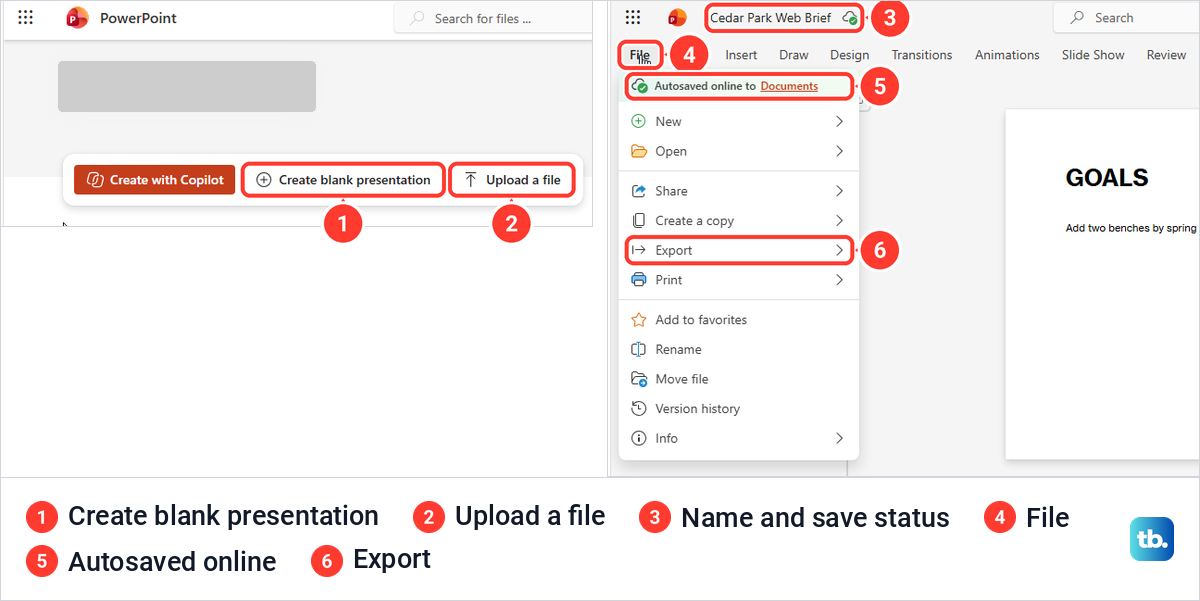
There is no Save button, which Microsoft confirms. The word Saved appears beside the file name after each change, hovering the cloud icon said Last saved: Just now, and the File menu opens with Autosaved online to Documents. Our edit was still there after we reloaded the page.
For a PDF, open File > Export > Download as PDF, in the same menu as Export to ODP and Export to images. A box said Your presentation is ready, and Download saved the PDF to the Downloads folder. The Share box matches the desktop one, and its link settings started at Anyone and Can edit here too, so we chose People you choose and Can view before inviting anyone.
When you cannot edit a presentation
A slide show or Protected View is in the way
Check whether a slide show is still running. When we clicked the title during a show, no text cursor appeared and PowerPoint moved to the next slide, while after Esc the same title was editable again. A file opened in Protected View is a different case, and Microsoft's fix there is File > Info > Protect Presentation > Enable Editing, which you should do only for a file you trust.
The person you shared with can only view
They were given Can view. In the browser our recipient saw a Viewing button and the message You don't have permission to edit this file, and typing in the title changed nothing. The Viewing menu offered Request more access, Viewing and Open in Desktop, with no way to switch to editing.
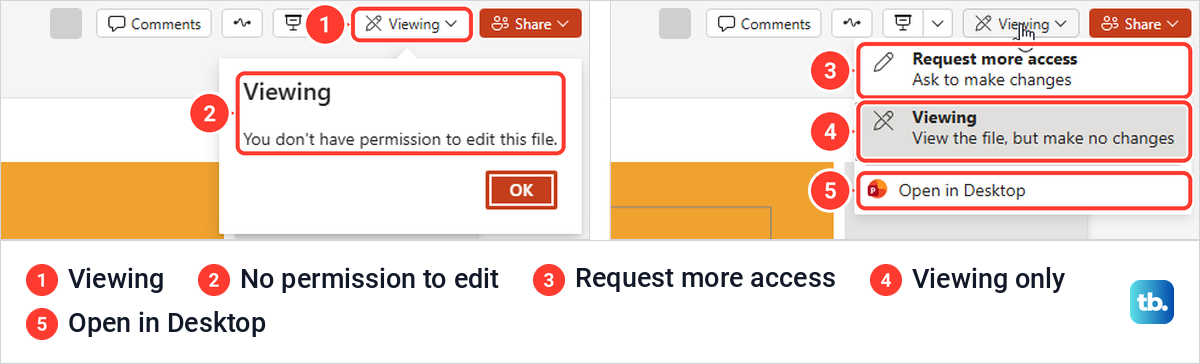
The fix is on the owner's side. Open Share > Manage Access, select the person's permission, expand Direct Access and choose Can edit, then Apply. After the other person reloaded the page, the button read Editing and the title could be changed.
How we tested this guide
We tested this in PowerPoint for Microsoft 365 on Windows 11, version 25H2, and in PowerPoint for the web in Microsoft Edge, building and sharing a three-slide practice deck.
Frequently Asked Questions
How do I make a PowerPoint presentation from scratch?
Open PowerPoint, choose Blank Presentation, or Create blank presentation in the web app, and type into the title box. Then add slides with Home > New Slide and pick a theme on the Design tab.
Why did my bullet points disappear?
The body box of a Title and Content slide is often bulleted already, so pressing Bullets turns the bullets off. Press it again to bring them back.
Can I see my speaker notes while presenting?
Yes, in Presenter View. Microsoft says it appears on your computer's screen while only the slides go to the projector, and Alt + F5 opened it on our single screen for practice.
Why is AutoSave off in PowerPoint?
On our deck it was off while the file was saved on the PC, and it turned on when we saved the deck to OneDrive. If your file is already in OneDrive, check the AutoSave switch at the top left, and press Ctrl + S whenever it reads Off.
How do I turn a PowerPoint into a PDF?
Use File > Export > Create PDF/XPS in the desktop app, or File > Export > Download as PDF in PowerPoint for the web. Either way the PDF is a separate copy, and the original stays editable.
Why can the person I shared with only view my slides?
They were given Can view, either by name or through a view-only link. The owner can change it to Can edit in Manage Access, and the other person saw Editing after reloading the deck.