

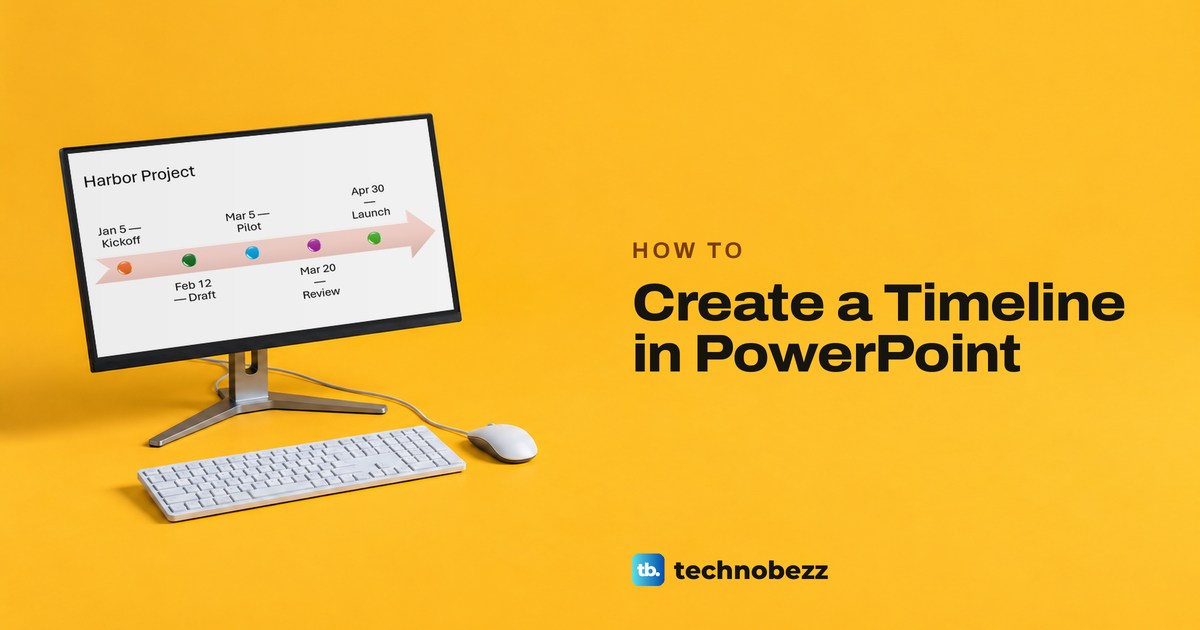
To create a timeline in PowerPoint, click the slide, go to Insert > SmartArt, choose Basic Timeline under Process or Timeline, click OK, and type a date and event into each [Text] placeholder. That gives you an editable arrow with one dot per milestone. To make a timeline in PowerPoint with more events, put the cursor in the Text Pane and press Enter for each new line.
SmartArt is the quickest route, but it is not the only one. A Microsoft template gives you a finished design to fill in, and a line with circles drawn from Insert > Shapes lets you place every date exactly where you want it. We built a made-up project timeline with SmartArt and with shapes in PowerPoint for Microsoft 365 on Windows 11, version 25H2, and with SmartArt in PowerPoint for the web.
The short version
- Insert > SmartArt, then Basic Timeline under Process or Timeline, starts an editable milestone graphic.
- Type dates and events into the [Text] placeholders or the Text Pane, where Enter adds a milestone.
- Add Shape Before or After inserts a milestone, and Move Before or After reorders it.
- A Microsoft template gives a ready-made look, while separate shapes give you control over spacing.
- In PowerPoint for the web, Basic Timeline is under Insert > SmartArt > List.
Ways to make a timeline in PowerPoint
Pick the row that matches the slide you need. SmartArt suits most milestone slides, a template suits a deck that should look designed from the start, and drawn shapes suit a timeline where the gaps between dates matter.
| Method | Best for | Where to start | What you edit |
|---|---|---|---|
| Basic Timeline SmartArt | A clear sequence of milestones | Insert > SmartArt > Process or Timeline, or Alt, N, M | One graphic, through its placeholders, the Text Pane and the SmartArt Design tab |
| Microsoft timeline template | A slide design that is already finished | File > New, then search for timeline | The template's sample dates, labels and shapes |
| Line and circle shapes | Dates placed by hand, with uneven gaps | Insert > Shapes | Each line, circle and label on its own |
| Designer suggestion | Turning a typed list of dates into a designed slide | Design > Design Suggestions | The suggested layout, then every date label in it |
| PowerPoint for the web | Building the slide in a browser | Insert > SmartArt > List | Basic Timeline through the text editor beside it |
One thing to know before you choose: on our Basic Timeline, milestones followed the Text Pane order and were spaced evenly whatever the dates. The 15 days between Mar 5 and Mar 20 took as much room as the 38 days between Jan 5 and Feb 12. If the gaps need to show real time, draw the timeline with shapes, or for task durations create a Gantt chart in Excel instead.
Create a timeline with SmartArt
Open the slide that should hold the timeline. A Title and Content slide works well, because the graphic fills the content box and your title stays where it is, so there is no need to delete anything first. If the deck itself is new to you, our guide to make your first PowerPoint presentation covers slides and layouts.
Click Insert, then SmartArt in the Illustrations group. In the Choose a SmartArt Graphic box, click Process in the list on the left, select Basic Timeline and click OK. The preview on the right describes it as a layout for sequential steps or timeline information that works with both Level 1 and Level 2 text.
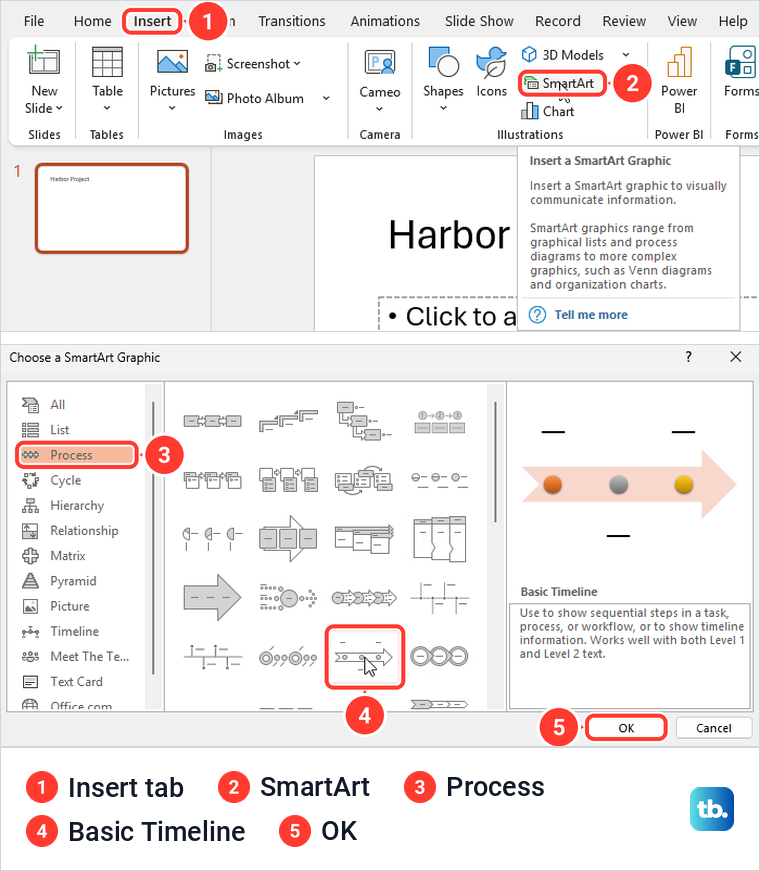
Our chooser also had its own Timeline category further down the list, which holds Basic Timeline and eight other timeline layouts. Microsoft's help page sends you to Process, and both routes lead to the same layout, so use whichever you find first.
Basic Timeline went in as a grey arrow with three dots and three [Text] placeholders, two above the arrow and one below. The Text Pane, headed Type your text here, opened beside it by itself, and two new tabs appeared on the ribbon, SmartArt Design and Format.
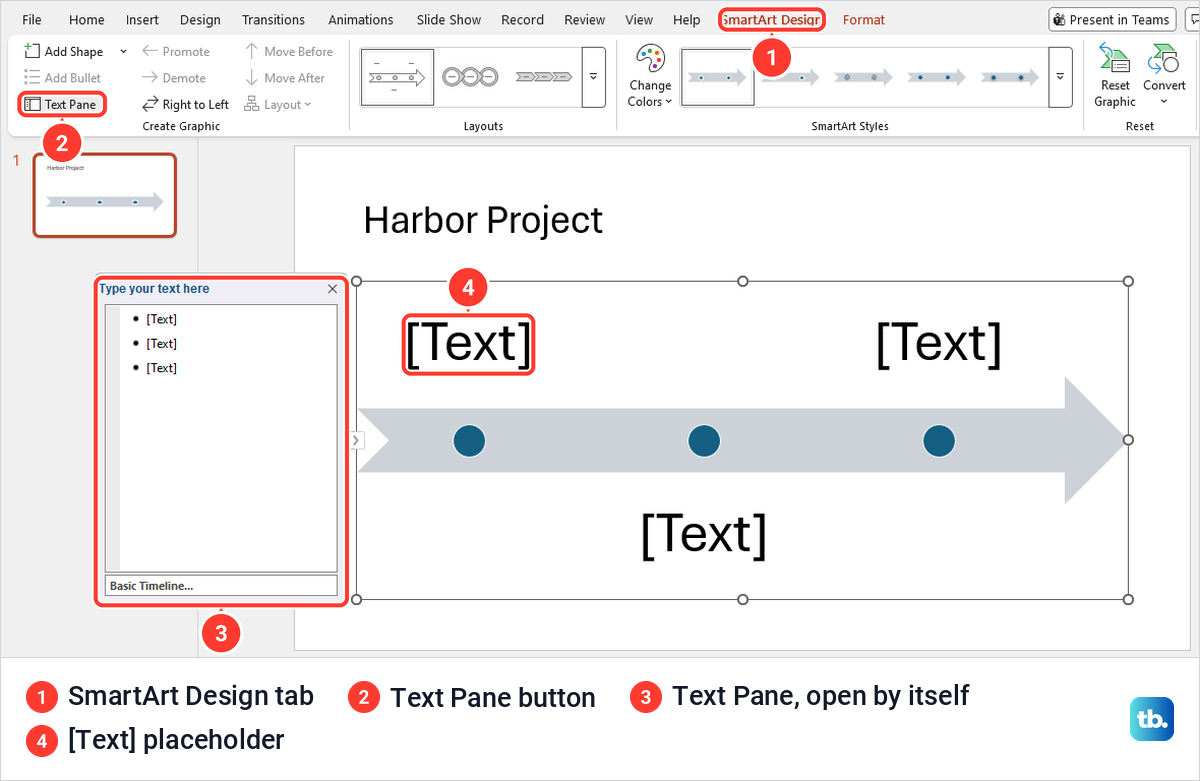
If you prefer the keyboard, press Alt, then N, then M, one after the other, which opened the chooser straight away for us. Press the Down arrow until Process is highlighted, Tab to move into the layouts, the arrow keys to highlight Basic Timeline and Enter to insert it.
Add dates and milestone names
Click a [Text] placeholder on the slide and type the first date and event. A milestone label can be as plain as a date and a word, such as Jan 5 and Kickoff, and short labels read better from the back of a room. We filled three placeholders with made-up dates for a project called Harbor Project, and the matching line in the Text Pane filled in at the same time.
For more than three milestones, the Text Pane is quicker. Click at the end of a line in the pane, press Enter and type the next event. Each new line became a new dot on the arrow for us, and the labels moved to make room. Click inside the pane line or the placeholder before you type or paste, so the text lands in the milestone you mean.
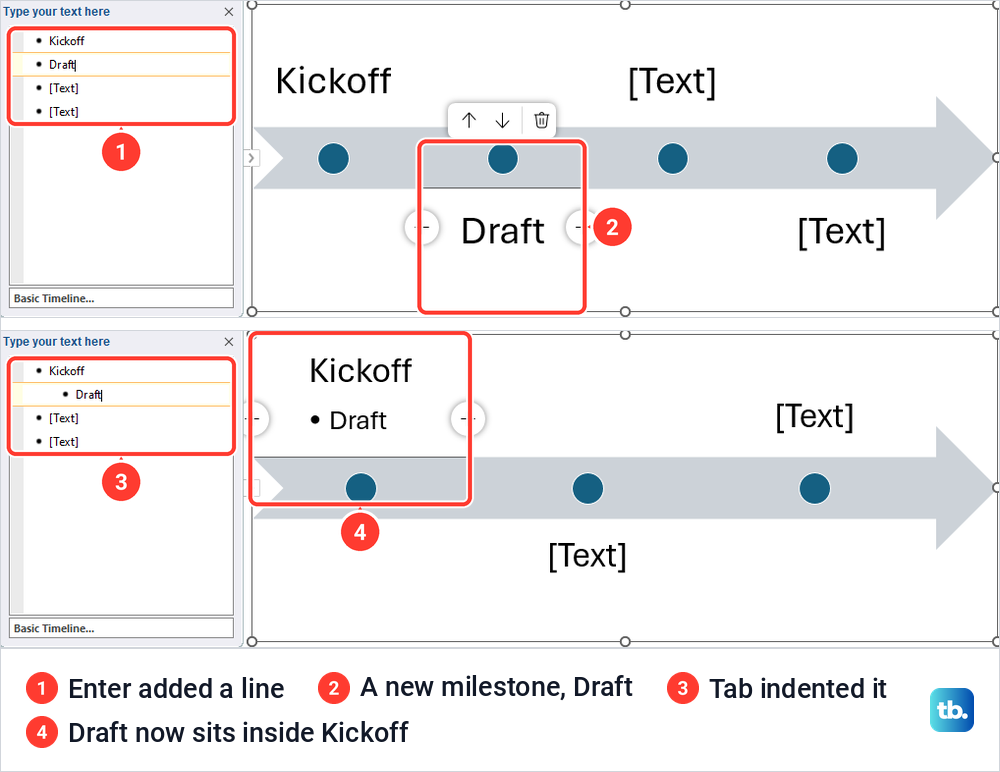
The Tab key does something different, and some guides get this wrong. Pressing Tab on our new Draft line did not add a milestone. It indented the line under Kickoff, and Draft moved inside the Kickoff milestone as a small bullet. Shift + Tab made it a milestone of its own again.
You can use that second level on purpose. Type the date on one line, press Enter, then press Tab and type a short description, and both sit together in one milestone.
The Text Pane button on the SmartArt Design tab is a switch. If the pane is already open, clicking the button hides it, so click it again if the pane vanishes. When neither the pane nor the tab is on screen, click once inside the timeline to select it.
Add more events and change their order
To add an event next to an existing one, click that milestone on the slide. On the SmartArt Design tab, click the arrow beside Add Shape, then choose Add Shape After for a later date or Add Shape Before for an earlier one. Both put an empty [Text] milestone in that spot on our slide and an empty line in the Text Pane, ready for the date.
We added Mar 20 Review after Draft with Add Shape After, then Mar 5 Pilot before Review with Add Shape Before. Basic Timeline showed all five milestones, with the longer labels wrapping onto extra lines. A selected milestone also shows two small plus buttons, one on each side, and a little bar above it with up and down arrows and a bin.
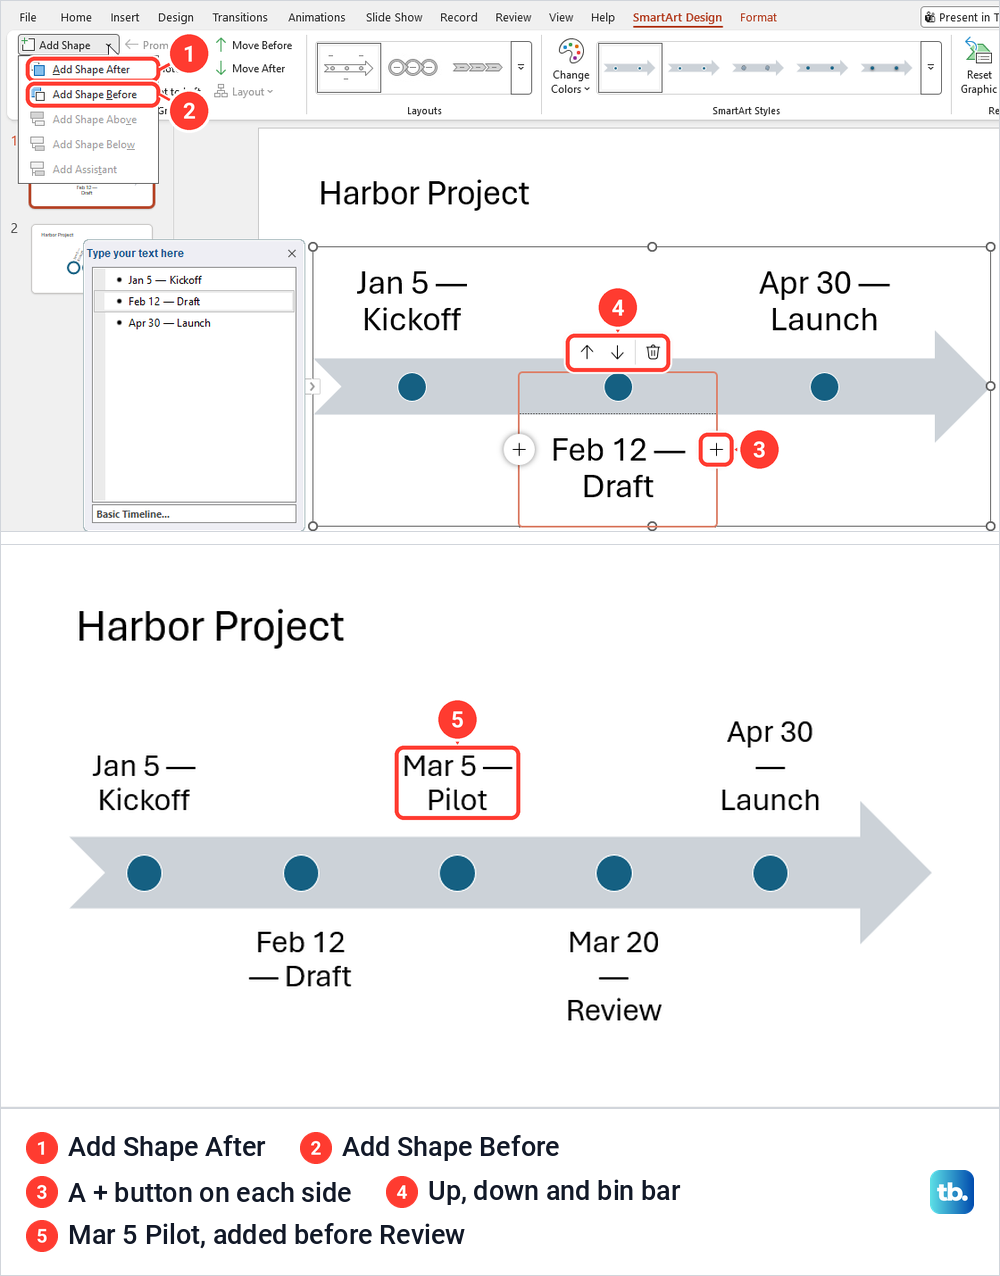
Basic Timeline does not sort events by date. It follows the order of the lines in the Text Pane, so a milestone added in the wrong place stays there until you move it.
To move one, select it and use the buttons in the Create Graphic group. On our PC they were labelled Move Before and Move After, and the Move After tooltip read Move the current selection to be later in the sequence. Microsoft's help page calls the same controls Move Up and Move Down, so look for those names if your ribbon shows them.
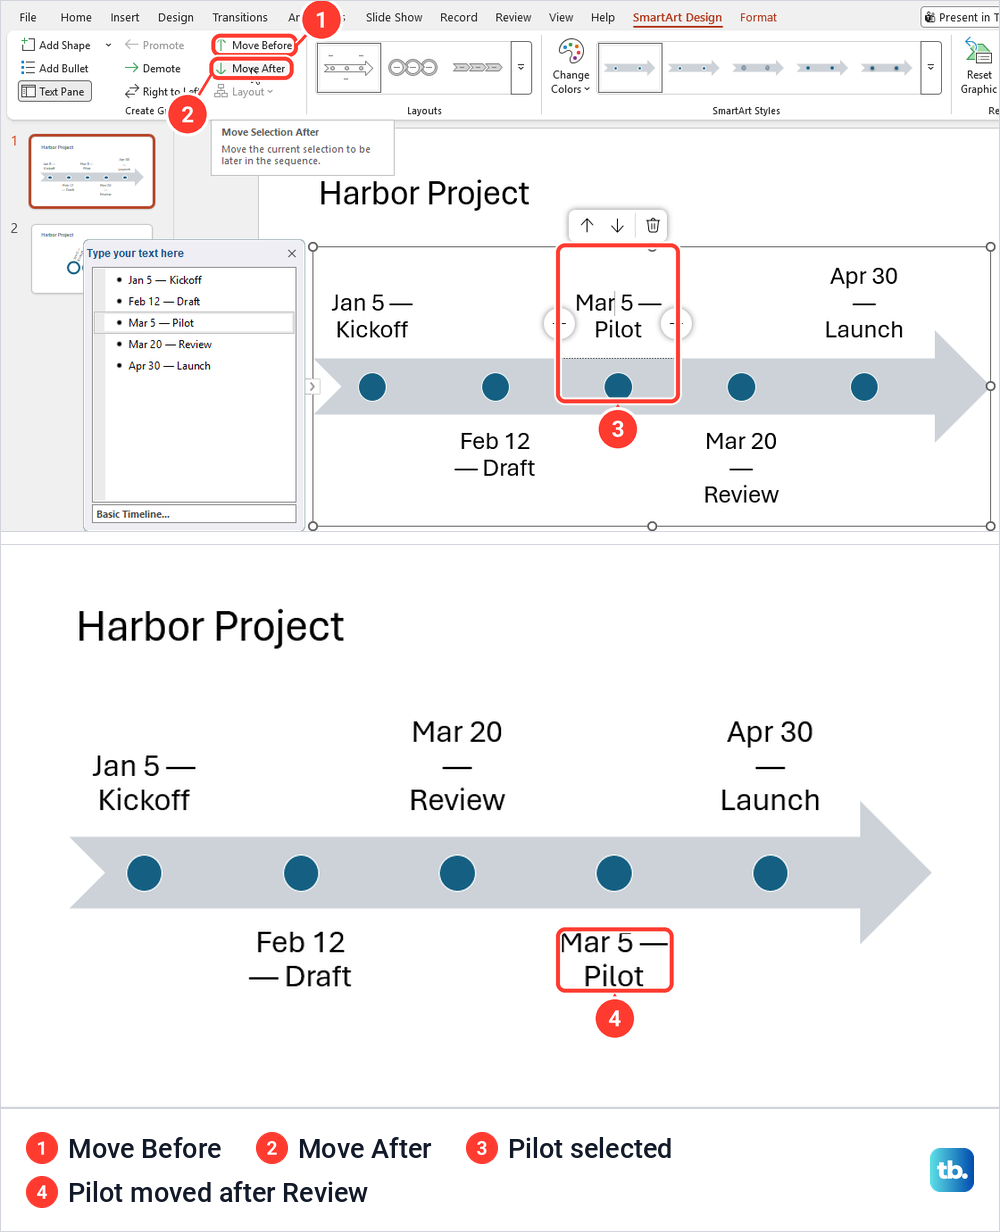
Move After put our Mar 5 Pilot milestone after Mar 20 Review, which shows how easily a timeline can fall out of date order. One click on Move Before put it back. So after adding or moving events, read the timeline from left to right once to check the dates still run in order. To remove a milestone, Microsoft says to select it and press Delete.
Change the timeline layout, colors and style
Basic Timeline is one of several timeline layouts. Microsoft's help names Basic Timeline and Circle Accent Timeline and says almost any process layout can work. In our chooser the Timeline category held Bullet Timeline, Bullet Timeline Inverted, Alternating Circle Process, Basic Timeline, Circle Accent Timeline, Numbered Dots Horizontal, Numbered Dots Vertical, Small Dots Horizontal and Small Dots Vertical.
We tried Circle Accent Timeline on a fresh slide. Its description says Level 1 text sits next to the larger circles and Level 2 text next to the smaller ones. Our three milestones each got a large ring, with the labels set at an angle above it, which suits short labels better than long ones.
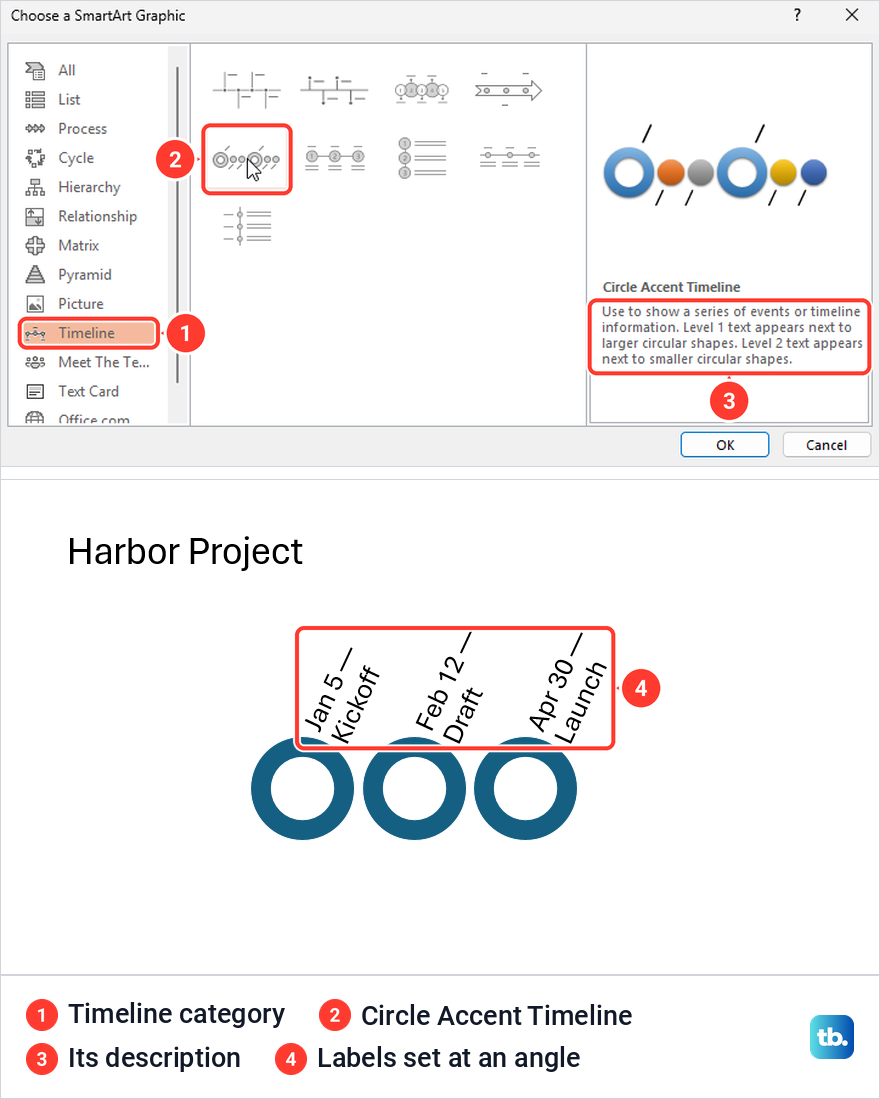
To switch an existing timeline, select it and open the Layouts gallery on the SmartArt Design tab. Click the More arrow, then More Layouts at the bottom for the full chooser. Microsoft suggests Accent Process to show progression, and on our slide it turned the five milestones into dark boxes joined by arrows, with the same text. Picking Basic Timeline again from the gallery brought the arrow back with nothing lost.
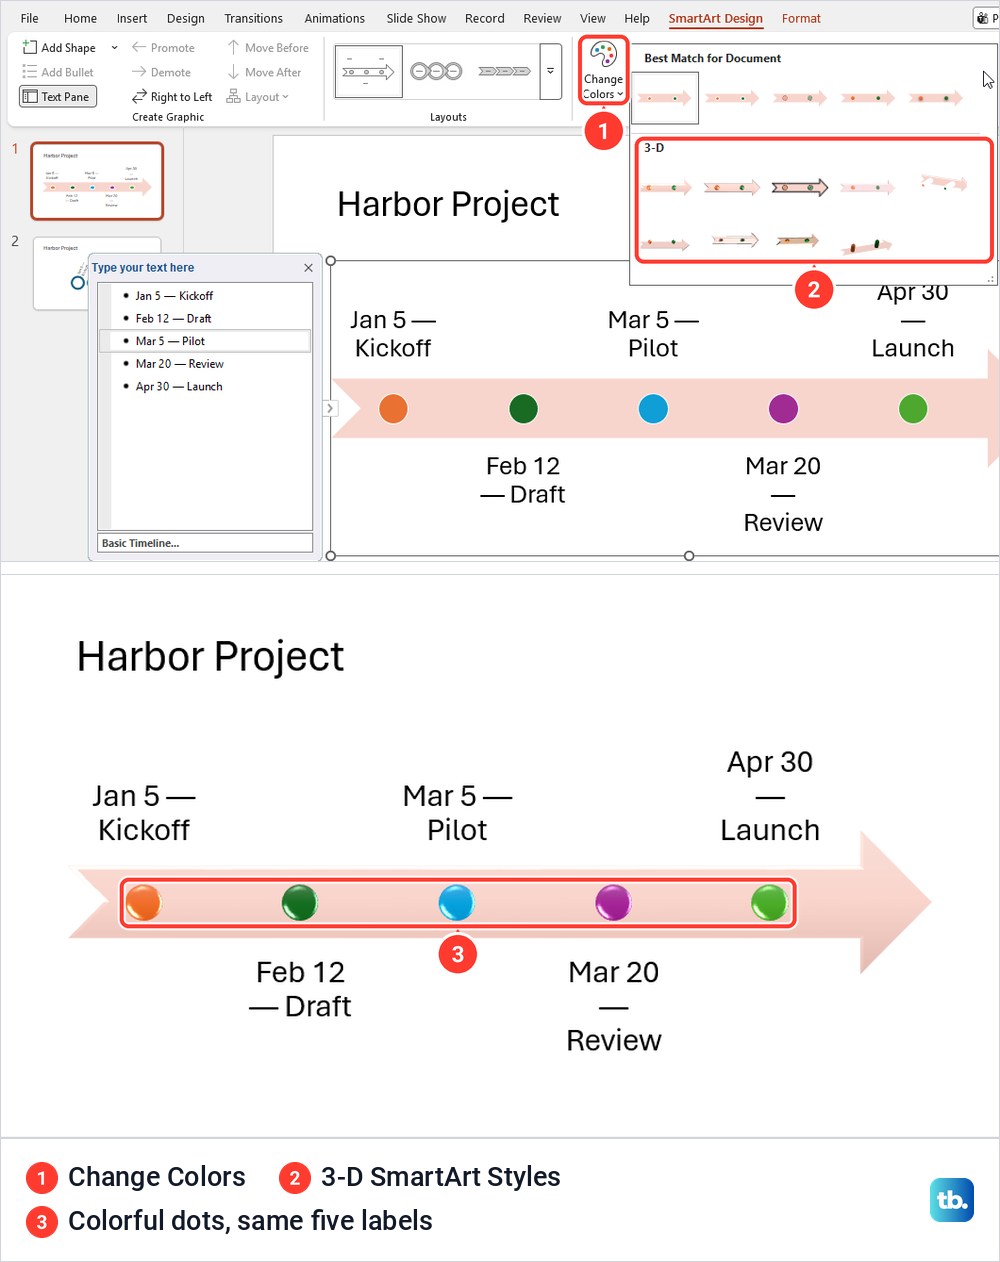
For color, click Change Colors on the SmartArt Design tab and pick a set. The SmartArt Styles gallery beside it adds effects, and Microsoft describes a style as a combination of effects such as line style, bevel or 3-D perspective. We chose a Colorful set and then the first 3-D style, which gave us glossy colored dots on a pink arrow. All five labels stayed exactly as typed.
Start from a Microsoft timeline template
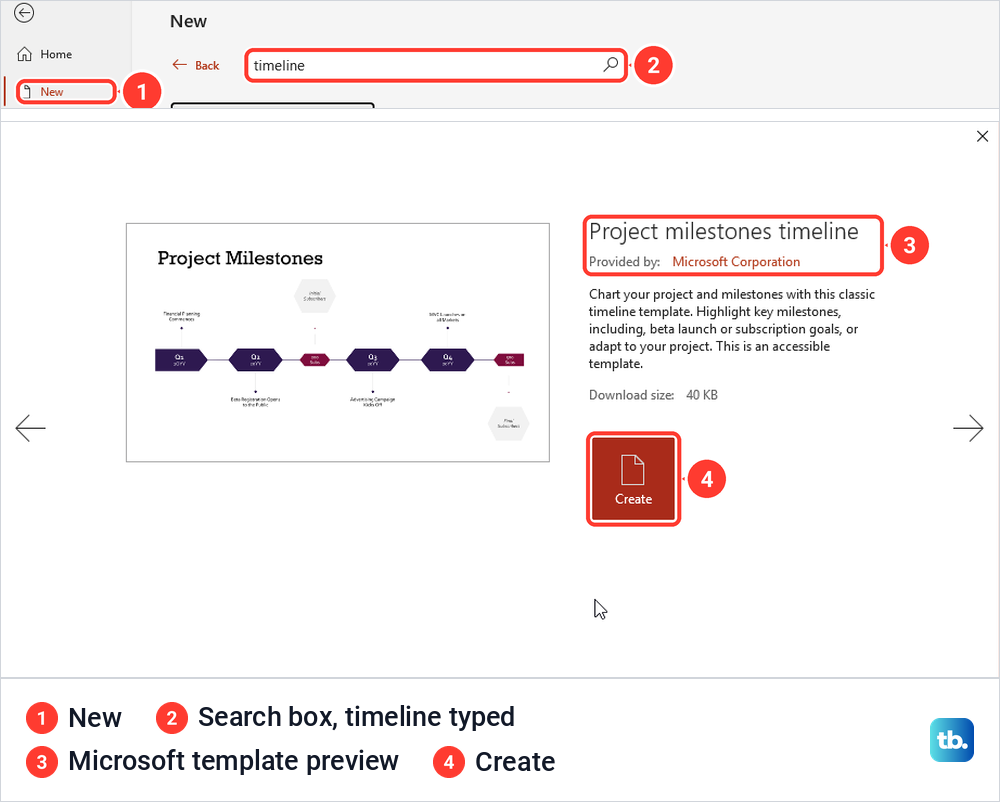
If you would rather fill in a finished design, start from a template. Click File > New, type timeline in the Search for online templates and themes box and click the magnifying glass. Our search returned Microsoft timeline designs such as Project milestones timeline, Project stage timeline and History timeline, mixed in with general presentation themes.
Click a result to see a preview. Ours showed Provided by Microsoft Corporation, a short description, a download size of 40 KB and a Create button. In Microsoft's steps you then click Create, and after that you replace the template's sample dates and labels with your own.
To reuse a timeline slide you built yourself, save it as a template. Click File > Save As (or Save a Copy) and pick PowerPoint Template in the Save as type list. Our dialog jumped to Documents > Custom Office Templates as soon as we chose that type, so browse elsewhere if you want the file in another folder. Microsoft says a saved template then appears under File > New > Personal.
Draw a timeline with shapes
A drawn timeline takes longer, but every piece goes exactly where you put it. That is the way to show uneven gaps between dates, or to copy a timeline design you have seen on someone else's slide. A Blank slide layout gives you the most room.
Click Insert > Shapes, pick the plain line under Lines and drag across the slide. Then pick the oval under Basic Shapes and drag on the line where the first date belongs. Microsoft's tip is to hold Shift while you drag to get a perfect circle. Repeat for each milestone, drawing the circles closer together or further apart to match the real dates.
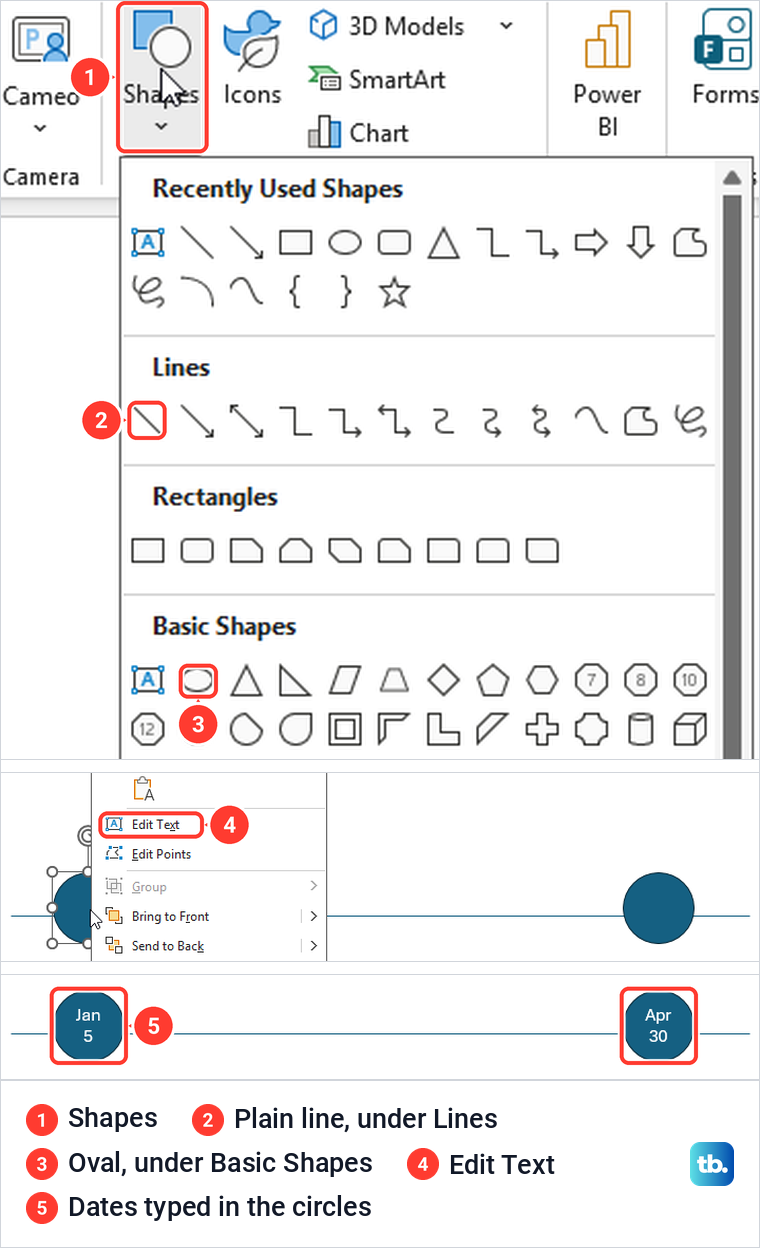
To put a date in a circle, right-click it and choose Edit Text, or click it and start typing. Microsoft's help mentions Add Text as well, but the menu on our PC only offered Edit Text. Our two circles read Jan 5 and Apr 30 in white, wrapped onto two lines, and each stayed a separate shape we could drag on its own.
Because even a short date wrapped inside our circles, event names fit better in text boxes above or below them. The Text Box button is on the same Insert tab, in the Text group. A drawn timeline stays exactly as you place it, so moving a date later means moving its circle and label by hand.
Let Designer suggest a timeline
Designer can turn a typed list into a graphic. Microsoft says it can do that for lists, processes or timelines. Type one dated event per line in the content box of a Title and Content slide, then click Design > Design Suggestions. On our Home tab the same feature was the Designer button.
We typed four dated lines, and after a few seconds the Designer pane opened with several ideas, the third of them a dated timeline. Clicking it gave us a dark title band and an orange line with four pins above and below it. It also rewrote our dates, so Jan 5 became 5 Jan. and the event names moved into small captions under each date.
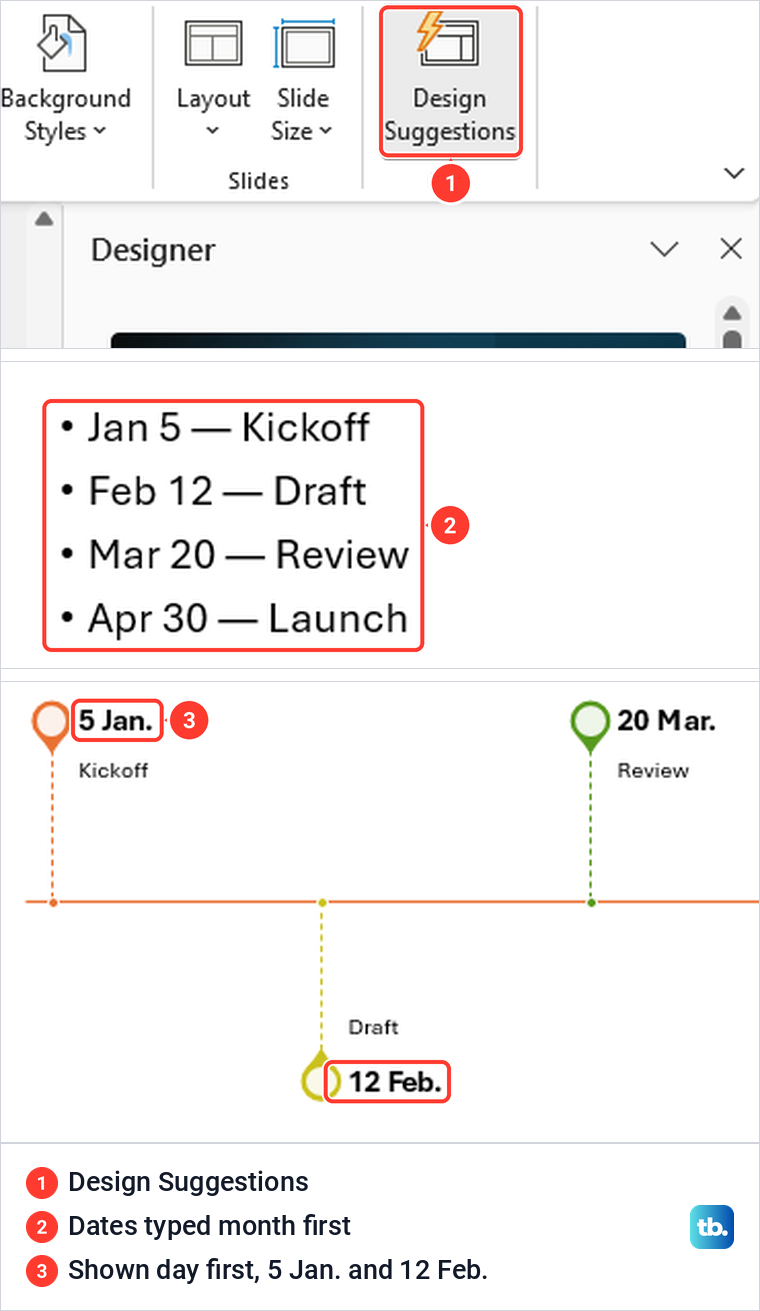
So read every date after you apply a suggestion, especially if your audience expects month first. Microsoft says Designer needs an internet connection and that Design Suggestions is on by default, though the first use can ask your permission. If the pane stays empty or the button is grey, use our guide to fix PowerPoint Design Suggestions.
Make a timeline in PowerPoint for the web
PowerPoint for the web has the same Basic Timeline, in a different place. Open the presentation, make sure it is in Editing mode, and click Insert. Microsoft's help calls it Smart Art, but the button on our ribbon read SmartArt. In the gallery that drops down, Basic Timeline is the second layout in the List section.
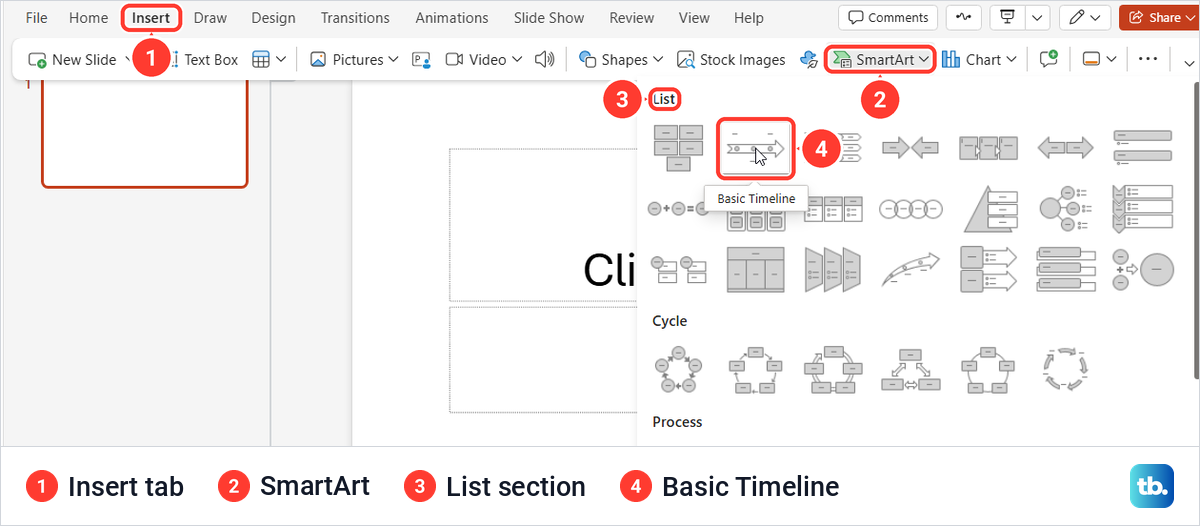
Click Basic Timeline to insert it. A text editor headed Type your text here opened beside the graphic for us, along with a SmartArt tab on the ribbon. Type the first date and event, press Enter for the next one, and repeat. Our four milestones each got a dot on the arrow, with their labels above and below it.
Pick a slide layout with room for the graphic first. We started from a brand new presentation, whose first slide uses the Title Slide layout, and the timeline landed on top of its empty title and subtitle boxes. So make room before you insert: remove an unwanted text box such as an empty title or subtitle, or use a slide with free space.
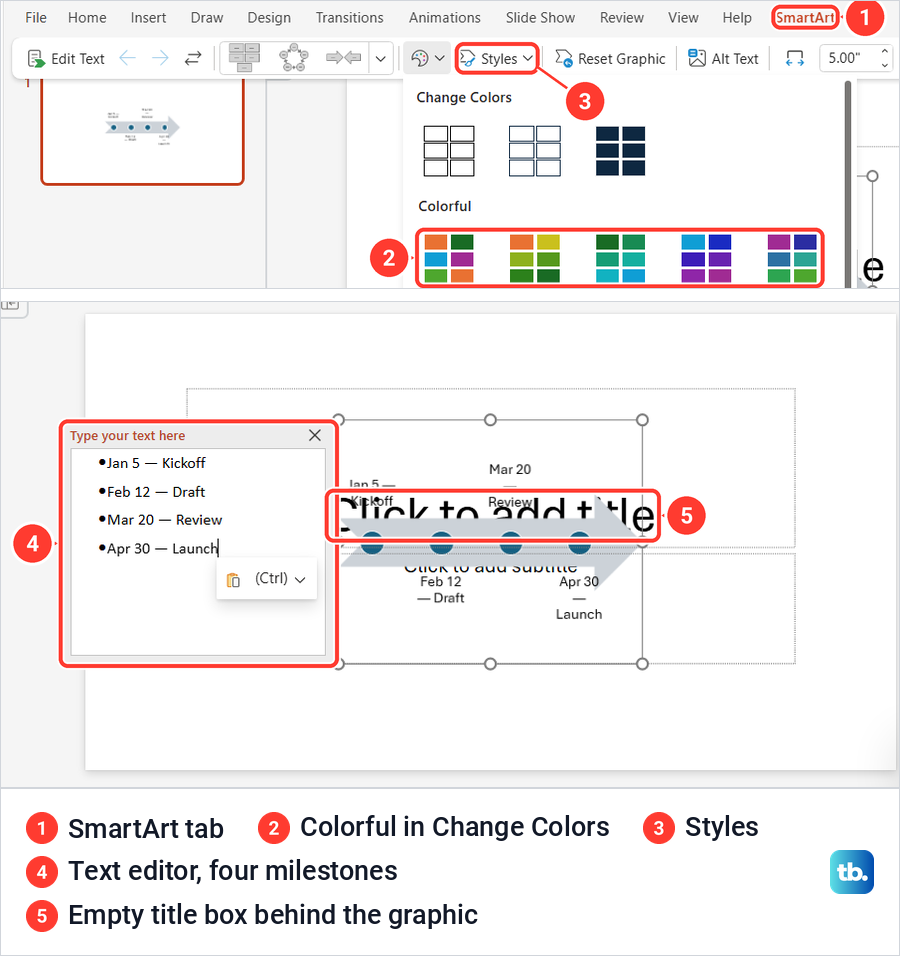
The SmartArt tab holds the color menu, a Styles gallery and the layouts. We chose a Colorful set and a style, then dragged a corner handle to make the graphic bigger, and the labels grew with it. If a corner handle is hard to grab, select the timeline first so the handles show around its edge.
Fix missing milestones and controls
If the SmartArt Design tab is missing on the desktop, the timeline is not selected. With the slide background clicked, our ribbon showed only the normal tabs. One click inside the graphic brought back SmartArt Design, Format and the Text Pane. Microsoft adds that you may need to double-click the graphic.
If milestones disappear after a layout change, look at the Text Pane for a red X. We switched a copy of our five-milestone timeline to Counterbalance Arrows, a layout built for two opposing ideas. Only Jan 5 and Feb 12 stayed on the slide, and the other three were greyed in the pane with a red X beside each one.
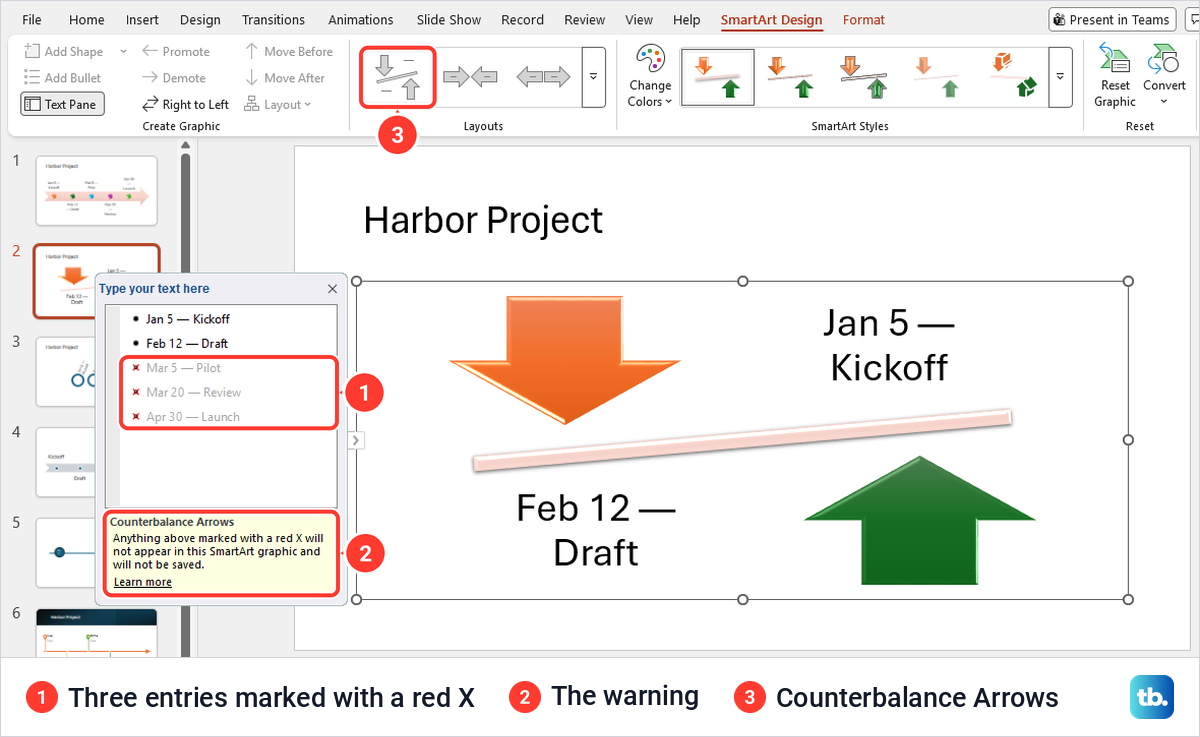
The pane's own warning reads: Anything above marked with a red X will not appear in this SmartArt graphic and will not be saved. Microsoft says that content is still there if you switch to another layout, but is lost if you keep that layout and close the file. Switching back to Basic Timeline brought all five milestones back for us, so pick a layout that shows everything before you save and close.
If the SmartArt button is grey in PowerPoint for the web, check the mode button near the top right. In Viewing, which reads View the file, but make no changes, our whole Insert ribbon was greyed. Choosing Editing brought it back, though our ribbon stayed grey for a short while, and SmartArt worked once we clicked Home and then Insert again.
A template file behaves differently. When we opened a .potx copy of our timeline in the browser, it showed a READ ONLY message that said This file format can't be edited in a browser and To edit it, use the app. The same deck saved as an ordinary .pptx opened in Editing, and its timeline could be selected and changed.
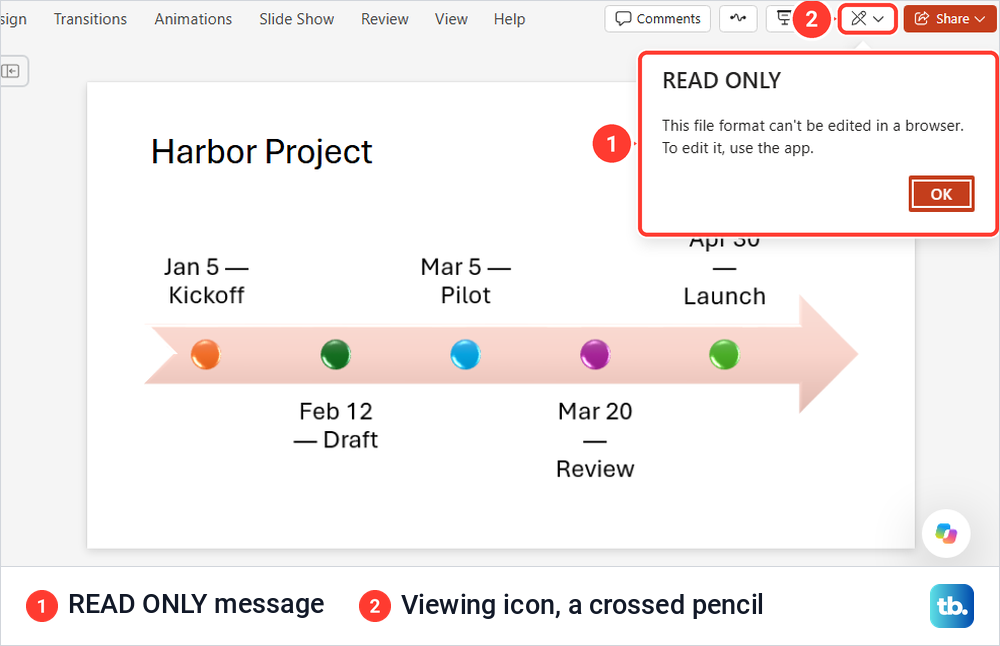
Microsoft's fix is to open the .potx in desktop PowerPoint, choose File > Save As, change the type to PowerPoint Presentation (.pptx) and save it. Store that copy in OneDrive, which our guide to set up OneDrive on Windows covers, then open it in PowerPoint for the web with File > Open.
Present and share the finished timeline
Keep the labels on the slide short and put the detail in your notes. A date and two or three words per milestone read well, and you can add speaker notes in PowerPoint for what you plan to say about each stage.
For a copy nobody can change by accident, check the dates one last time and save PowerPoint as a PDF. If a colleague works in Google's apps, you can convert PowerPoint to Google Slides once the timeline is finished, then check that the graphic came across as you expect.
How we tested this guide
We tested this in PowerPoint for Microsoft 365 on Windows 11, version 25H2, and PowerPoint for the web in Microsoft Edge, building a five-milestone timeline on a sample slide.
Frequently Asked Questions
How do I create a timeline in PowerPoint without an add-in?
Use SmartArt, which is built in. Go to Insert > SmartArt, choose Basic Timeline under Process or Timeline, click OK and type your dates into the placeholders or the Text Pane.
How do I add more dates to a PowerPoint timeline?
Select a milestone and use Add Shape After or Add Shape Before on the SmartArt Design tab. You can also click at the end of a line in the Text Pane and press Enter.
How do I change the order of milestones?
Select the milestone and click Move Before or Move After on the SmartArt Design tab, the labels on our ribbon. Microsoft's help calls them Move Up and Move Down, so look for either pair.
Why are some timeline events missing?
The layout has fewer spaces than you have milestones, and the Text Pane marks the hidden ones with a red X. Switch to a layout such as Basic Timeline that shows them all before you close the file, because Microsoft says hidden content is not saved otherwise.
Can a PowerPoint timeline space dates to scale or show today's date?
Not with Basic Timeline, which spaced our milestones evenly whatever the dates. For real gaps or a today marker, draw the line and circles with Insert > Shapes and move them by hand.
Can I edit a PowerPoint template timeline in a browser?
Not as a .potx file, which opened read-only in PowerPoint for the web for us. Open it in desktop PowerPoint, save a .pptx copy to OneDrive, then open that copy in the browser.