

To use Google Slides, open slides.google.com in your browser and start a blank presentation, click Untitled presentation to name it, and type into the title slide. Add slides from Slide > New slide, pick a look under Slide > Change theme, and click Slideshow to present. There is no Save button, because while you are online Slides saves to Google Drive as you work.
We built a six-slide garden presentation in Chrome, from a blank file to a theme, a chart from Google Sheets, speaker notes and a slideshow. Two things caught us out along the way: an imported chart landed at nearly the full size of the slide and covered its title, and a spreadsheet without a chart in it gives you nothing to import.
The short version
- Start: open slides.google.com, start a blank presentation, then click Untitled presentation and type a name.
- Add slides: choose Slide > New slide or press Ctrl + M, then use Layout to rearrange a slide.
- Design: Slide > Change theme restyles every slide at once.
- Content: the Insert menu adds text boxes, images, charts, tables, video and more.
- Present: click Slideshow, press Right arrow and Left arrow to move, and Esc to stop.
- Share or keep a copy: use Share for access, or File > Download for a PowerPoint or PDF copy.
Google Slides at a glance
| Method | When to use it | What happens |
|---|---|---|
| slides.google.com, or the File > New submenu in an open presentation | Starting a presentation | A new file with one title slide |
| Click Untitled presentation | Naming the file | Your name in its place, then Saved to Drive beside it |
| Ctrl + M, or Slide > New slide | Adding a slide | A new slide in the filmstrip, its boxes set by its layout |
| Layout in the toolbar | Rearranging the boxes on one slide | Eleven layouts, from Title slide to Blank |
| Slide > Change theme | Changing the look of the whole presentation | Every slide restyled at once |
| Insert > Chart > From Sheets | Showing figures from a spreadsheet | A chart that stays linked to the spreadsheet |
| Slideshow, then Right arrow, Left arrow and Esc | Presenting | The slides fill the browser tab, one key press per slide |
| Share, then General access | Letting other people open it | Restricted or Anyone with the link |
| File > Download | Keeping a copy outside Google Drive | PowerPoint, PDF and five other formats |
The editor has three parts. The filmstrip on the left lists your slides in order, the large slide in the middle is the one you are editing, and the field under it holds your speaker notes.
Create and name your presentation
The usual start is slides.google.com, where the blank presentation tile opens a new file. Inside a presentation that is already open, File > New, the first entry of the File menu, opens a submenu where you choose a new presentation. Ours opened as Untitled presentation, with one title slide reading Click to add title and Click to add subtitle.
A Templates panel also opened at the right, with ready-made presentations from Google such as Business proposal. Pick one if it fits your topic. We closed the panel with its X to start from the blank slide.
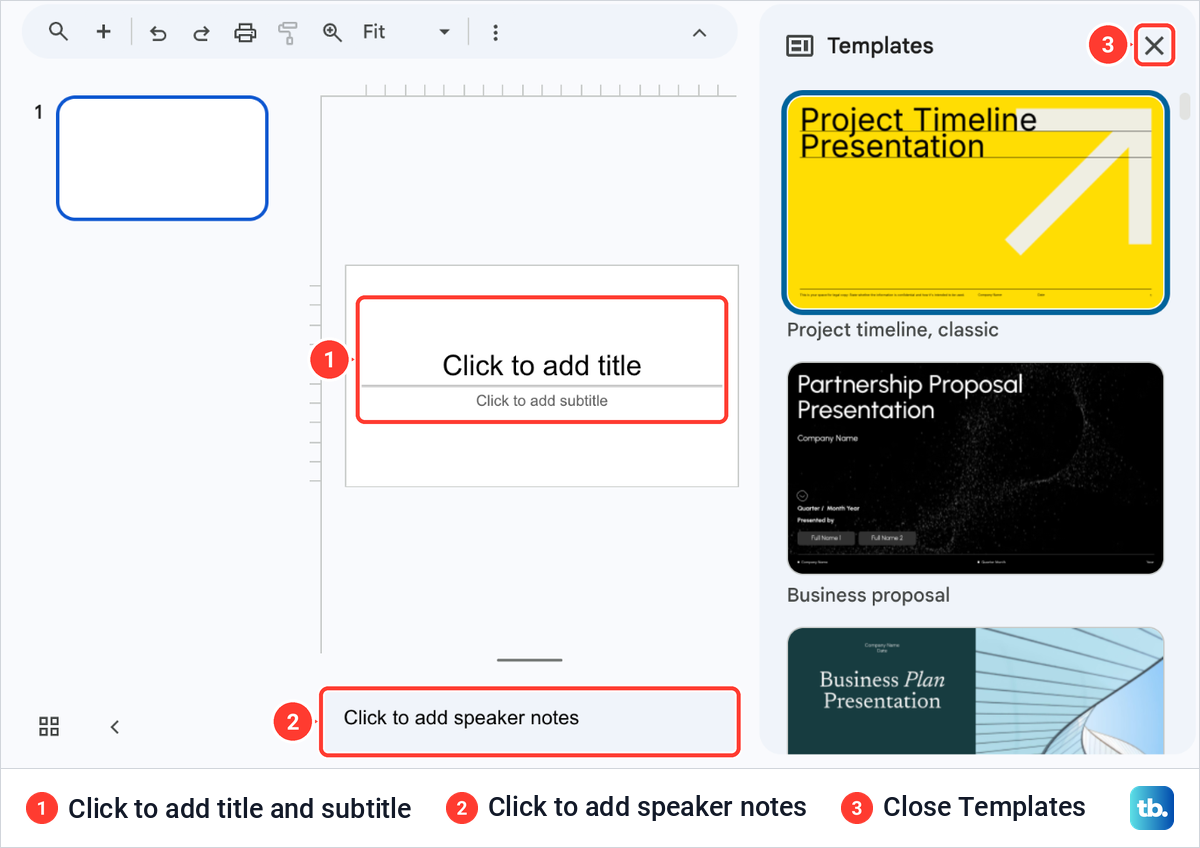
Click Untitled presentation at the top left, type a name and press Return on a Mac or Enter on Windows. We named ours Neighborhood Garden Season Plan, and a cloud icon with Saved to Drive appeared beside the name. While we typed on a slide, the same spot read "Saving..." for a moment.

Now click Click to add title on the slide and type the title, then click the subtitle box and type a line under it. The thumbnail in the filmstrip showed the same text. Online, Saved to Drive is all the saving there is. With offline access turned on, changes save to your computer and reach Drive once you reconnect.
Add slides and choose a layout
Open the Slide menu and choose New slide. Our slide 2, added after the title slide, arrived with a title box and a text box, ready to type in. The menu shows Ctrl + M beside New slide, and on our Mac that same Ctrl + M added the other four slides one by one.
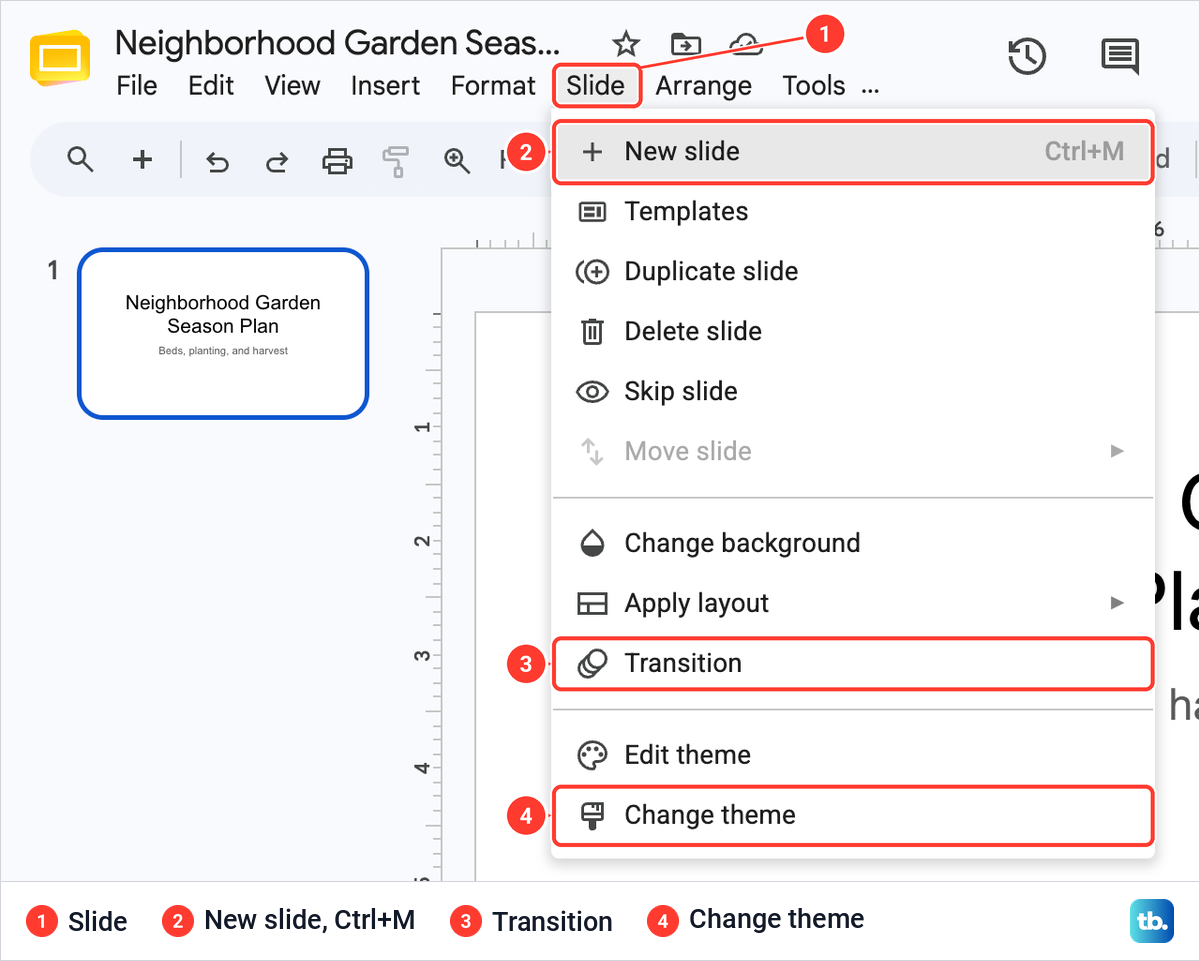
The Slide menu holds most slide jobs: Duplicate slide, Delete slide, Skip slide, Change background, Apply layout, Transition, Edit theme and Change theme. Move slide stays grey while a presentation has only one slide. The plus button near the left end of the toolbar is the New slide button. See our guides to duplicating a slide in Google Slides and hiding a slide.
Every slide has a layout, which is the arrangement of boxes on it. Click Layout in the toolbar to see eleven of them with small pictures, from Title slide and Section header to Big number and Blank. The layout the selected slide already uses is outlined, and ours was Title and body. The slide's own shape is a separate setting, covered in changing the slide size in Google Slides.
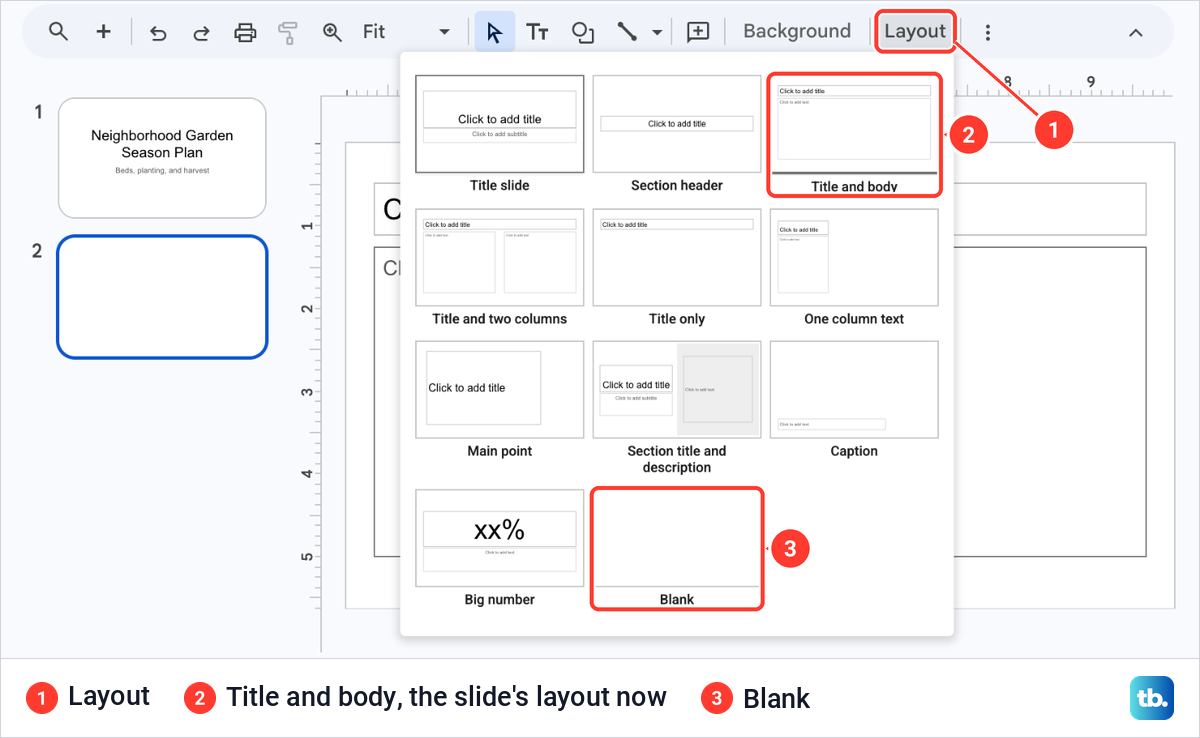
Click a different layout to rearrange the selected slide, or press Esc to close the list without a change. Title and body suited our lists of three short lines, so we kept it. For lists, see our guide to making bullet points in Google Slides.
Reorder slides and see them all at once
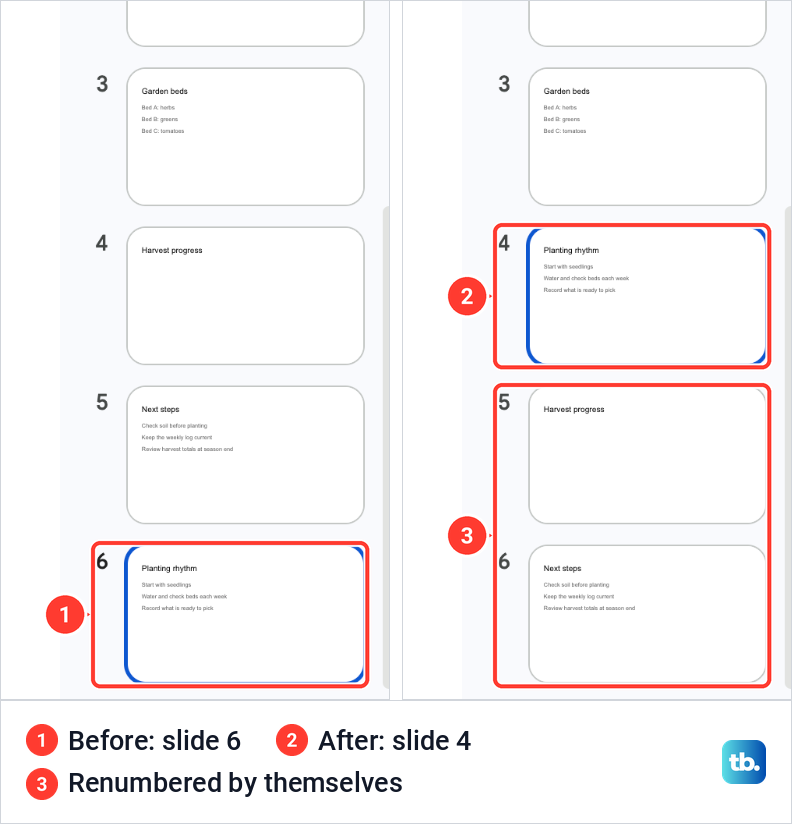
We made the Planting rhythm slide last, so it sat at number 6 when it belonged after Garden beds. We dragged its thumbnail up the filmstrip and let go in the gap under slide 3. It became slide 4, and Harvest progress and Next steps moved down to 5 and 6 by themselves.
For a longer presentation, the grid icon at the bottom left of the filmstrip switches to grid view. It showed all six of our slides on one screen in order, with minus and plus buttons to size the thumbnails. The icon at the bottom left of that view goes back to the filmstrip.
Choose a theme for every slide
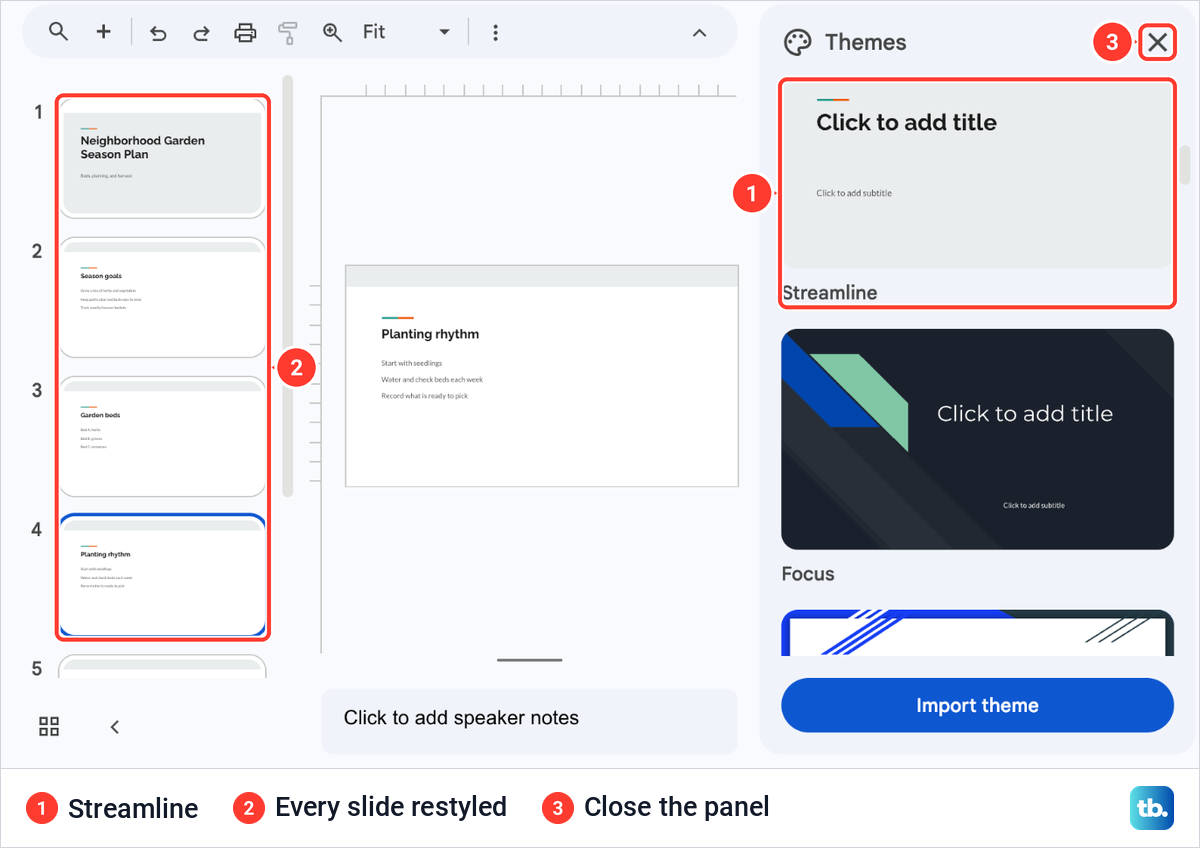
A theme sets the fonts, colours and background of the whole presentation, while a layout only arranges one slide. Open Slide > Change theme, and a Themes panel opens at the right with a small picture of each theme, among them Simple Light, Streamline and Focus, plus Import theme at the bottom.
We clicked Streamline once, and every slide changed at the same moment. The thumbnails and the slide on the canvas took its font, a grey band across the top and a short two-colour line over each title. The X at the top of the panel closes it, and the theme stays.
You can swap themes at any time. To change the background of one slide only, select it and open Slide > Change background, choose a colour or an image, and click Done. Add to theme in the same box puts that background on every slide.
Add text boxes, images and other objects
The boxes that come with a layout take most of your text: click Click to add title or Click to add text and type. For text anywhere else, choose Insert > Text box and drag on the slide where the box should go.
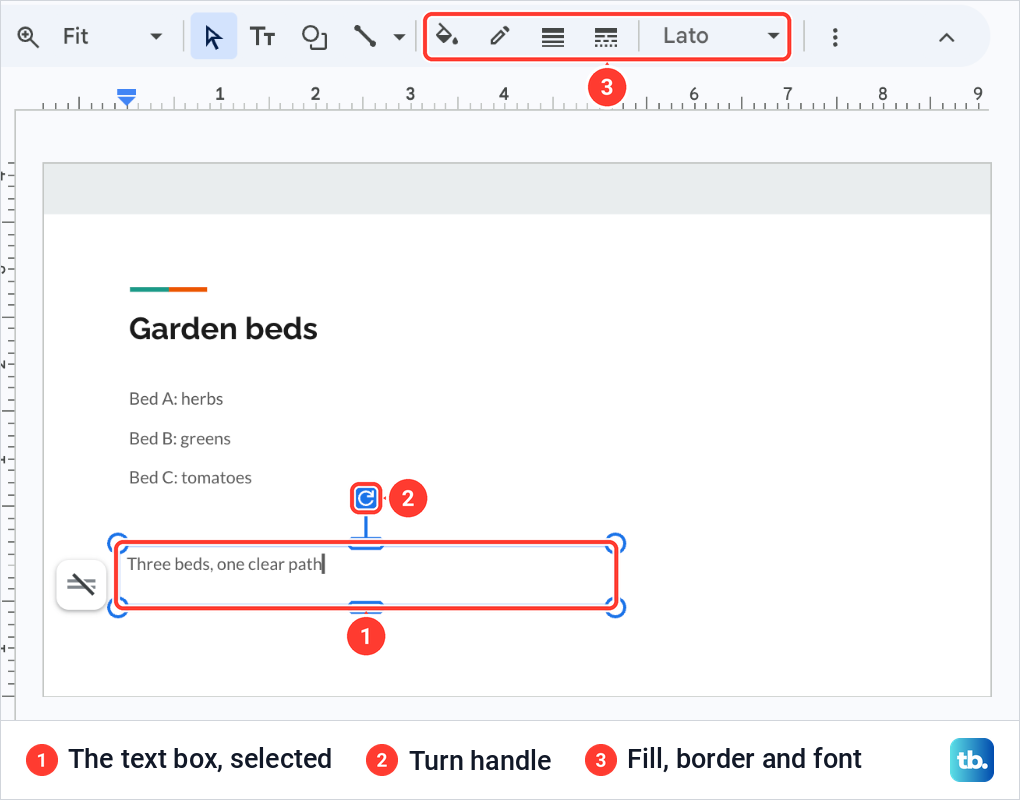
On slide 3 we drew a box under the list of beds and typed Three beds, one clear path. Selected, the box showed round handles at its corners and sides and a turn handle above it, and the toolbar gained fill, border and font controls. Dragging the box by its edge moved it and kept its size.
The Insert menu holds everything else: Image, Text box, Shape, Building blocks, Diagram, Table, Chart, Line, Word art, Video and Audio, then Special characters, Animation, Link and Comment. Special characters, Animation and Link were grey while only a slide thumbnail was selected.
To add a picture, choose Insert > Image and pick where it comes from: Upload from computer, Stock & web, Drive & Photos, Camera or By URL. Choose the picture and click Insert or Open.
Add a chart from Google Sheets
A chart from Google Sheets stays tied to the spreadsheet it came from. The chart has to exist in the spreadsheet first, so make the chart in Google Sheets before you start. Our spreadsheet, Garden Harvest Log, held twelve weeks of harvest counts and one chart, Harvest Baskets by Week.
That chart is a line chart, the right kind for a value that changes week by week, and the steps to make a line graph in Google Sheets cover it. Then go back to Slides, select the slide for the chart and open Insert > Chart.
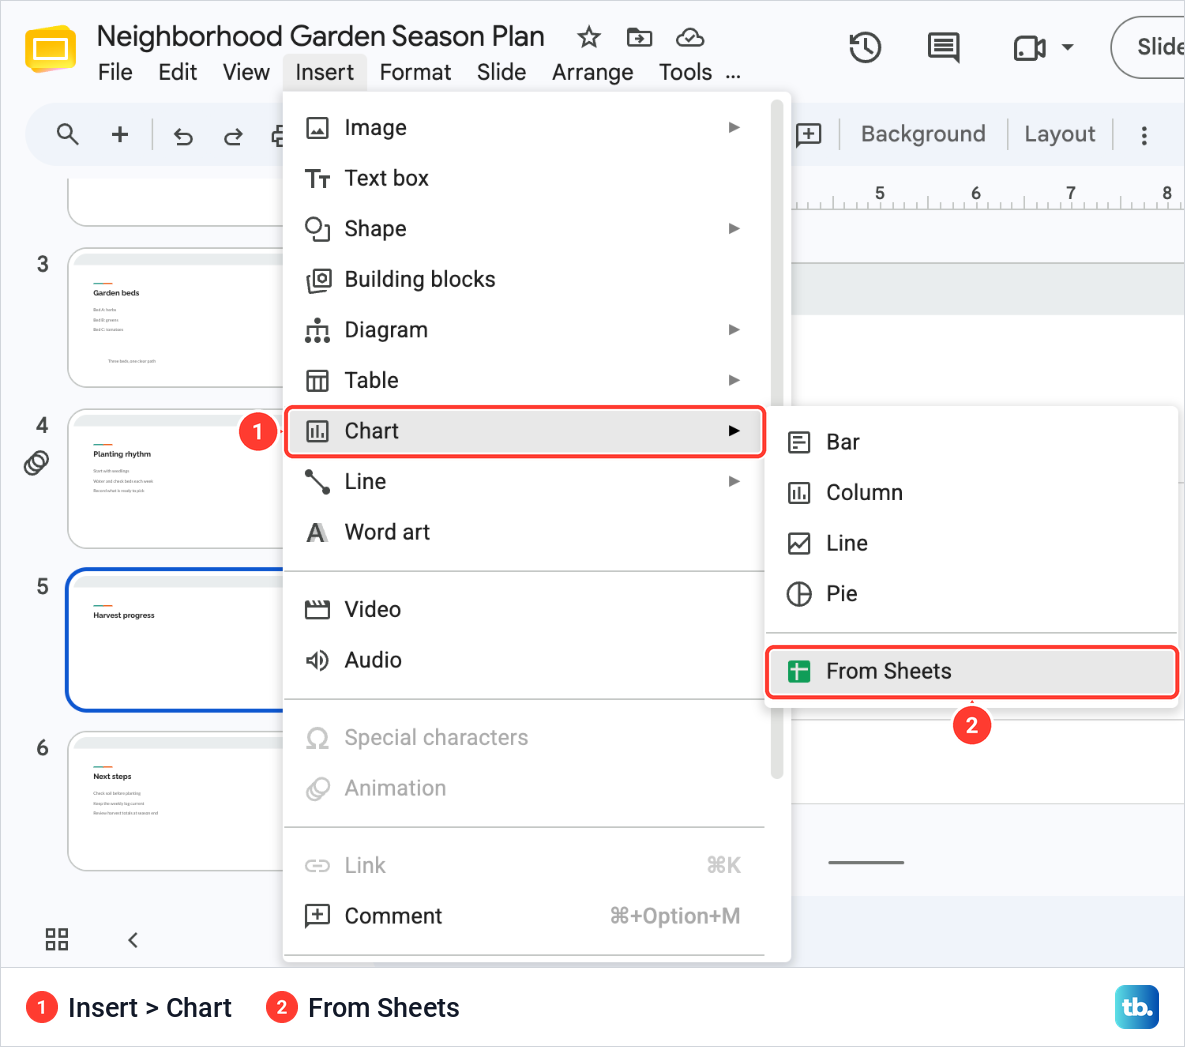
The Chart list offers Bar, Column, Line and Pie, then From Sheets. Choose From Sheets, and a file picker opens with Recent, My Drive, Shared with me and a search box. Click in the search box before you type. Our first letters went to the file grid instead, and we picked one of our other spreadsheets by mistake.
That spreadsheet had no chart, so Slides showed a box titled Import chart with the words "This spreadsheet has no charts." and a grey Import button. Back returned us to the picker. If you see that box, you picked the wrong file or the chart was never made in Sheets.
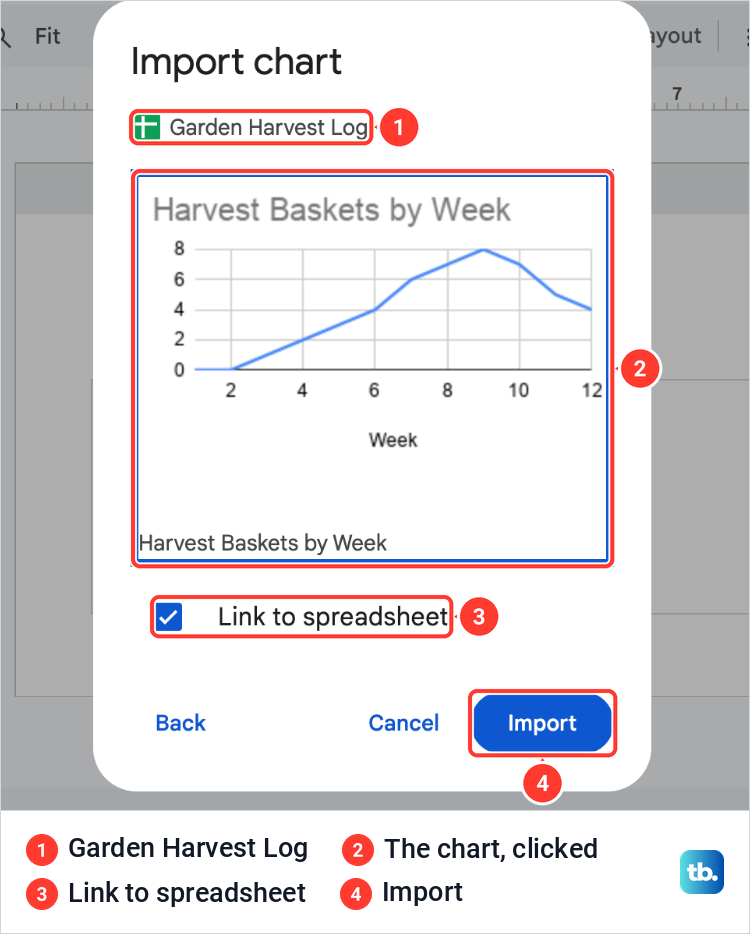
With Garden Harvest Log picked, the Import chart box showed the spreadsheet's name, its one chart and a ticked Link to spreadsheet box. Import stayed grey until we clicked the chart, which then got a blue frame. Untick Link to spreadsheet only if you want a fixed copy that ignores later changes.
After Import, the chart landed on slide 5 at nearly the full size of the slide, right over the slide's title, with a Linked chart label at its top right. We dragged its top left corner handle inward twice. The chart kept its proportions and ended under the title, at the right of the slide.
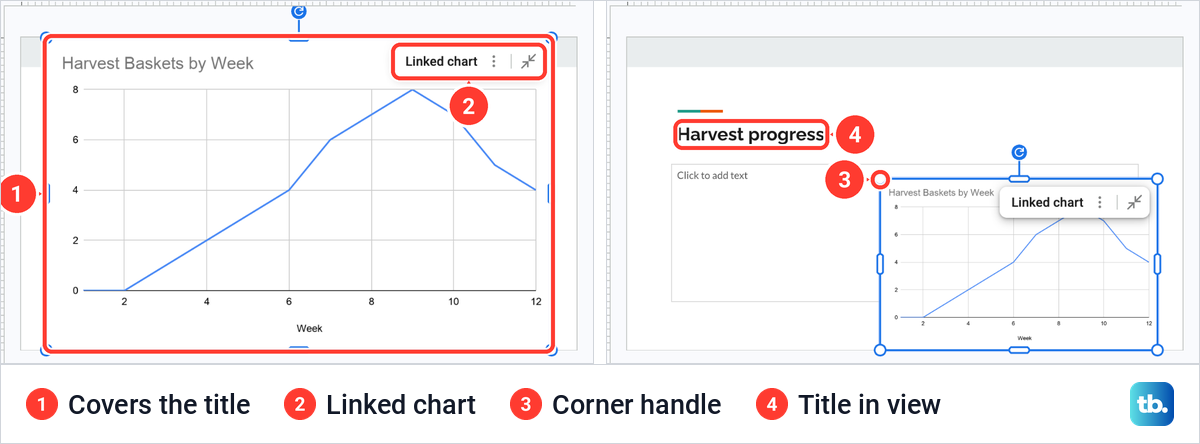
The three dots on the Linked chart label open Open source, Unlink and Linked objects. When the numbers in the spreadsheet change, click Update at the top right of the chart in Slides to bring the new figures onto the slide.
Add speaker notes
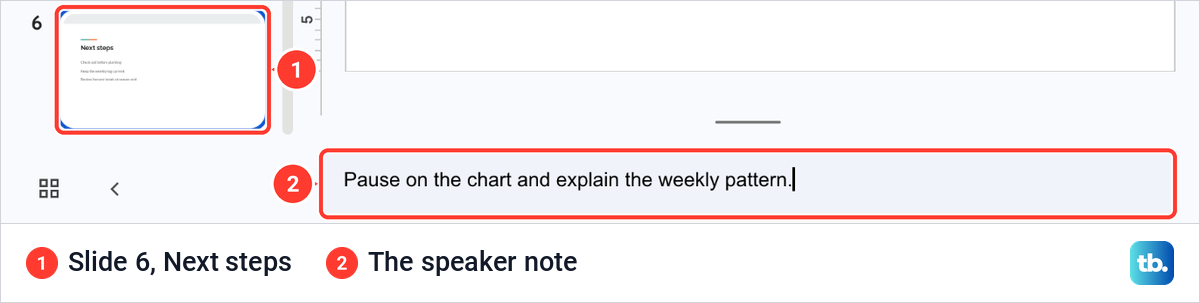
The field under the slide, Click to add speaker notes, holds what you want to remember while you present. Click it and type. On slide 6 we typed Pause on the chart and explain the weekly pattern, and the note stayed with that slide. Our guide to adding speaker notes in Google Slides goes further.
Notes do not appear on the slides your audience sees. Keep each one short enough to read at a glance.
Add a transition between slides
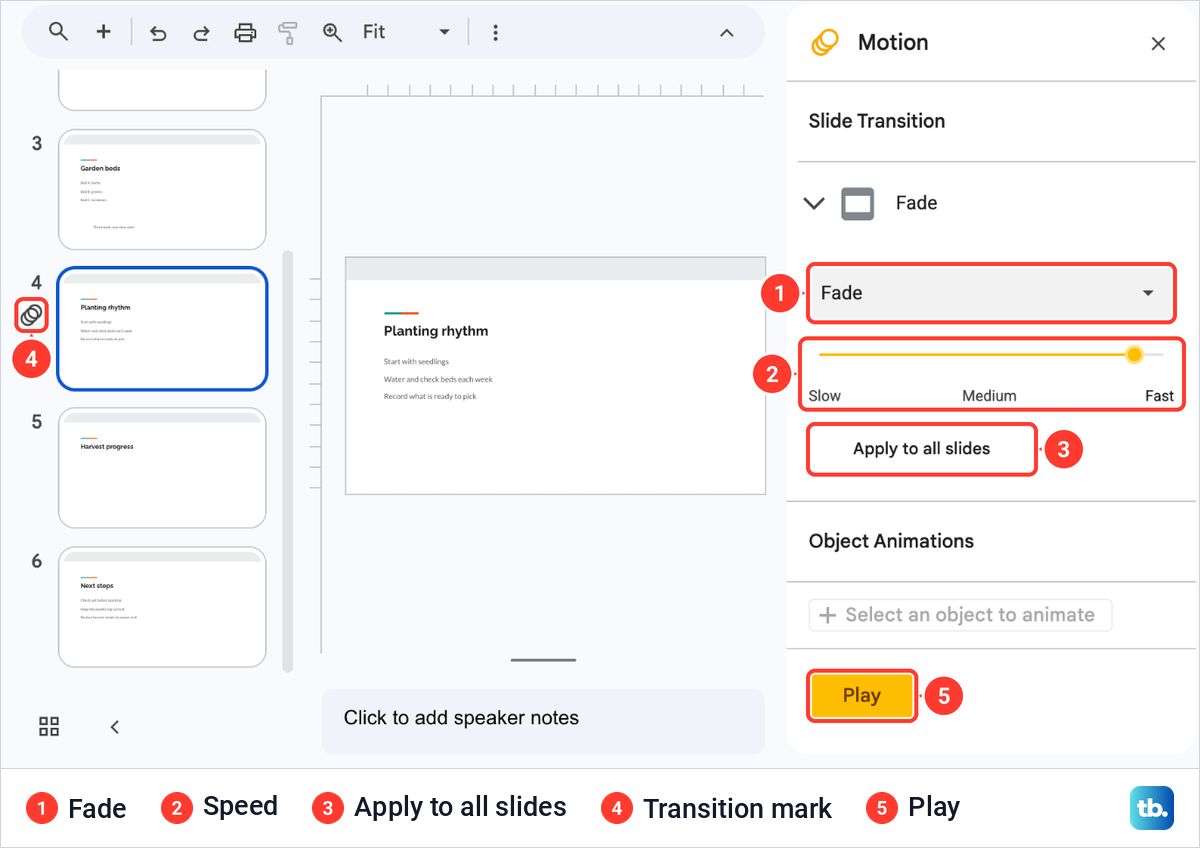
A transition is the effect between one slide and the next. Select the slide and open Slide > Transition, and a Motion panel opens at the right with None, Dissolve, Fade, Slide from right, Slide from left, Flip, Cube and Gallery.
We chose Fade for slide 4. The panel then showed a speed slider from Slow to Fast, an Apply to all slides button, an Object Animations part for single items on the slide, and Play for a preview. A small ring mark appeared under the number of slide 4 in the filmstrip, so you can see which slides carry an effect.
One quiet transition used throughout reads better than a different effect on every slide. Apply to all slides sets it in one go.
Present your slides
Select the slide to start from and click Slideshow at the top right. We started from slide 1, and it filled the browser tab. One press of the Right arrow key showed slide 2, the Left arrow key went back to slide 1, and Esc ended the show.
Move the pointer to the lower left during the show, and a small bar appears with previous, the slide number, next and three dots. The three dots open a menu with Open speaker notes (S), Turn on the laser pointer (L), Turn on the pen, Enter full screen, Exit slideshow (Esc), Auto-play, Captions preferences and More.
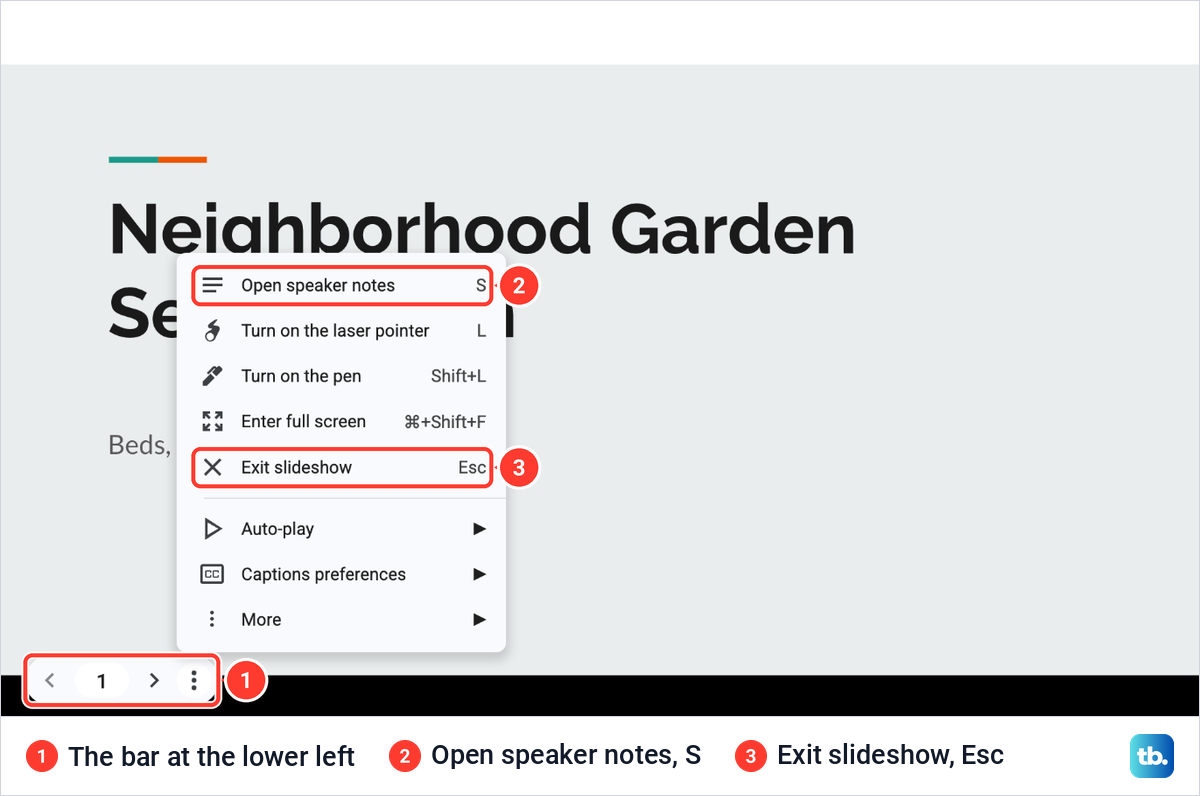
To keep your notes in view while you present, click the small arrow beside Slideshow and choose Presenter view, which the menu describes as Start slideshow with speaker notes and audience Q&A. The slideshow starts with your notes in a separate window, where Speaker notes shows them.
If that window never appears, turn off your browser's pop-up blocker for the site and try again. In a video call, such as when you share one window in a Teams meeting, share the slideshow window only, so your notes stay on your side.
Share the presentation
Click Share at the top right. The box that opens carries the presentation's name, a field to Add people, groups, spaces, and calendar events, and a General access part at the bottom with Copy link and Done.
Ours read Restricted, Only people with access can open with the link. Its list holds two choices, Restricted and Anyone with the link. We left it at Restricted and closed the box.
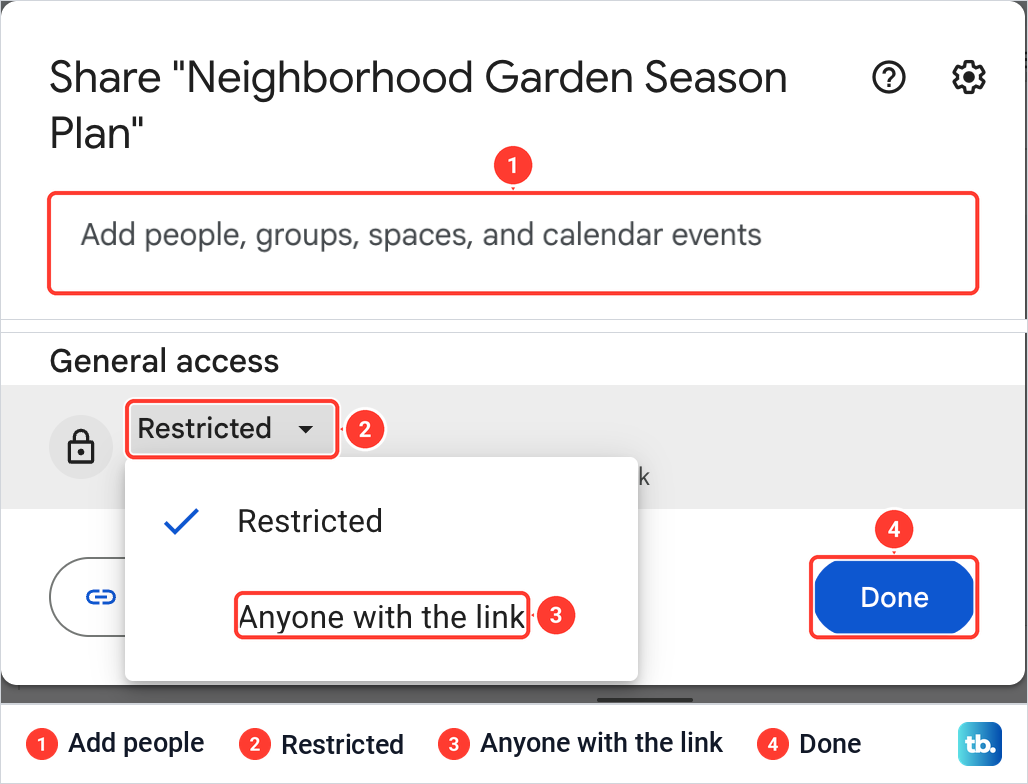
To share with one person, type their email address in the field, choose Viewer, Commenter or Editor, and click Send. Each address gets an email unless you uncheck the box to notify people. A viewer can open the presentation, a commenter can also leave comments, and only an editor can change the slides.
Anyone with the link lets anyone who has the link open the file, within your account's rules. Keep Restricted for anything private.
Download a copy, print or work offline
Your presentation lives in Google Drive, so a download is for when you need the file outside Slides, such as a PowerPoint or PDF copy for someone else. Open File > Download and choose a format: Microsoft PowerPoint (.pptx), ODP Document (.odp), PDF Document (.pdf), Plain Text (.txt), or a JPEG, PNG or Scalable Vector Graphics image of the current slide.
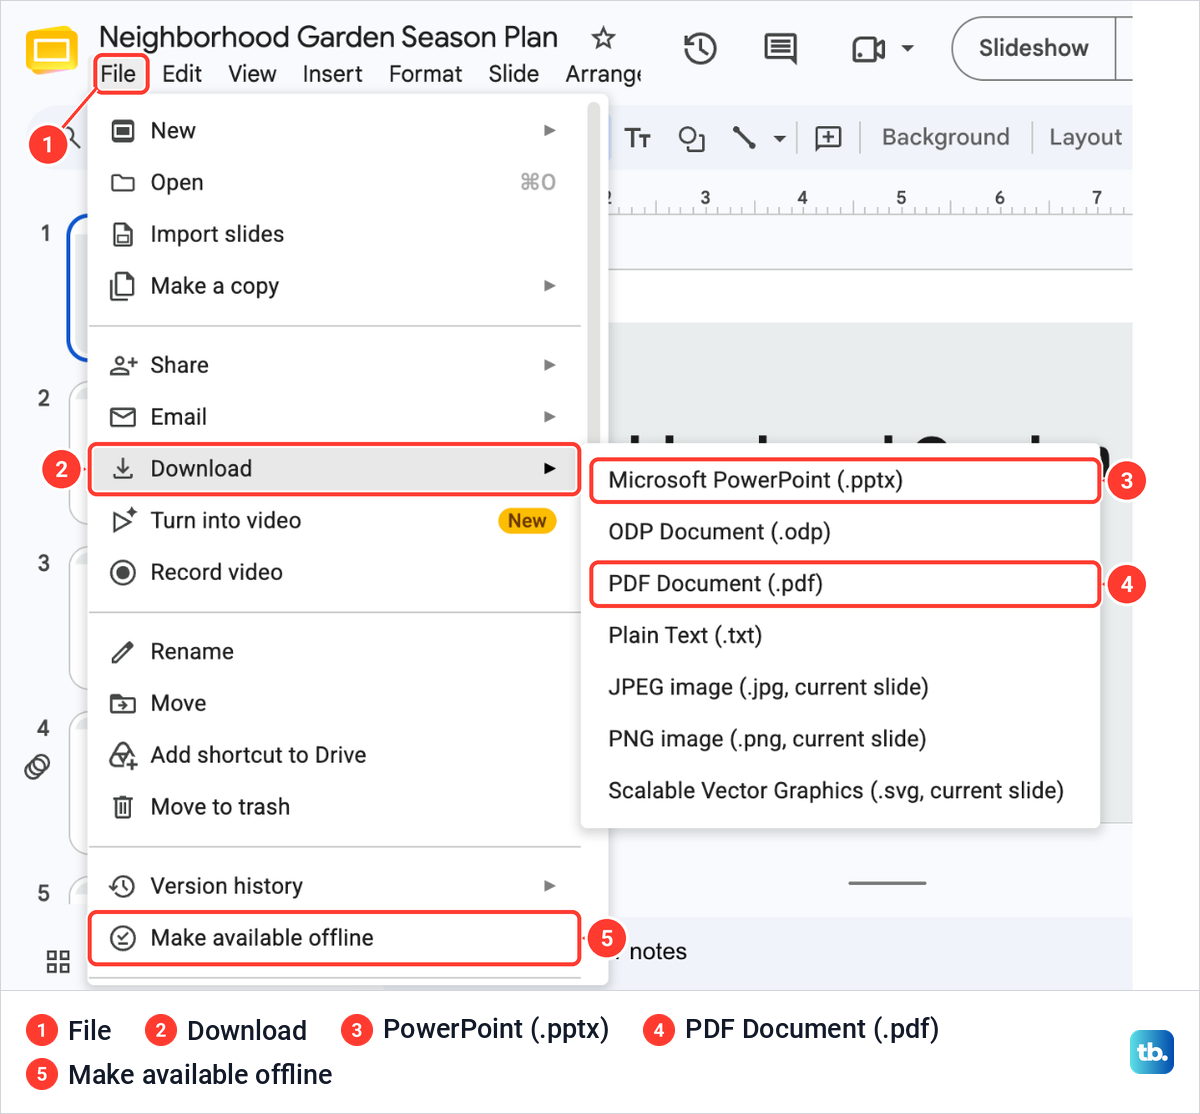
The copy downloads to your computer, and the presentation in Drive stays where it is. For paper, File > Print preview opens a preview whose layout list holds 1 slide without notes, 1 slide with notes and Handout layouts. Choose one and click Print in the preview's toolbar, or Close preview to go back. See how to print Google Slides with speaker notes for the notes layout.
Working without internet takes setting up while you are still online. Use Chrome or Microsoft Edge outside private browsing, install and turn on the Google Docs Offline extension, and turn on Offline in Google Drive's settings. File > Make available offline, near the end of the File menu, keeps a particular presentation ready.
Use Google Slides on Android and iPhone
The Google Slides app creates, edits and presents the same files on a phone. The Android and iPhone apps differ in a few places.
On Android
Open the Slides app and tap Create at the bottom right, then choose a template or a new presentation. Tap New slide at the bottom right and pick a layout, and use the Add button at the bottom for text, an image, a shape or a line. For a theme or layout, double-tap a slide, then tap More and Change theme or Change layout.
Slide backgrounds are changed on a computer. To present, tap Present, then Present on this device, swipe left or right to change slides, and tap the Back arrow to stop. The app exports PPTX, PDF, TXT and ODP files.
On iPhone
Tap Create at the bottom right, choose a new presentation or a template, type a name for a new file and tap Create. Add slides with New slide at the bottom right and content with the Add button. More > Change theme changes the theme. For a background, touch and hold the slide at the bottom, tap More > Change background and pick one, or tap Apply to theme for every slide.
To present, tap Present, then Present on this device, swipe to change slides, and double-tap the screen and tap Close to stop. The iPhone app exports PDF or PPTX files. Both apps can also present on a television over Google Cast, and the iPhone app over AirPlay.
How we tested this guide
We tested this in Google Slides in Chrome on a Mac, building a six-slide garden presentation with a theme, a linked chart and speaker notes, and running it as a slideshow.
Frequently Asked Questions
Does Google Slides save automatically?
Yes, while you are online. There is no Save button: Saved to Drive shows beside the name at the top, and "Saving..." while a change is being stored. Editing without internet needs offline access turned on first, in Chrome or Microsoft Edge with the Google Docs Offline extension.
Can I see my speaker notes while I present?
Yes. Click the arrow beside Slideshow and choose Presenter view, and your notes open in a separate window. In a slideshow that is already running, the three-dot menu at the lower left lists Open speaker notes, with S as its key.
Can someone with Viewer access change my slides?
No. A viewer can open the presentation, a commenter can also comment, and only an editor can change it. Choose the role in the Share box when you add the person.
Can I use Google Slides on my phone?
Yes. The Android and iPhone apps create, edit and present the same files you use on a computer. On Android, slide backgrounds are changed on a computer instead.
Can I get back a slide I deleted?
Choose Edit > Undo straight away, or press Command + Z on a Mac or Ctrl + Z on Windows. Later on, the clock icon at the top right, or File > Version history > See version history, lists earlier versions. Pick an older one that still holds the slide and click Restore this version at the top, or use More > Make a copy beside it to keep your current file as it is. Both need edit access.