

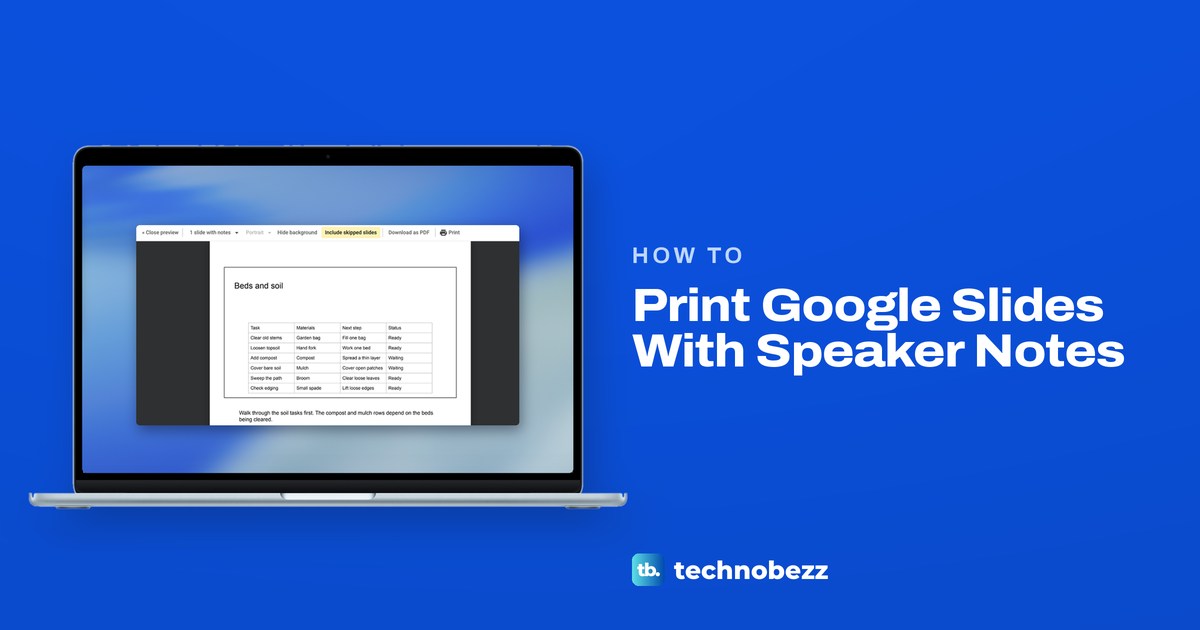
To print Google Slides with speaker notes, open the presentation on a computer and choose File > Print preview. Change the layout list at the top from 1 slide without notes to 1 slide with notes, then click Print. In that layout each slide sits on its own portrait page with its note underneath. The step most people miss is the layout list itself: our preview opened on the layout without notes, and no note showed on any page until we changed it.
We took our five-slide Autumn Garden Plans presentation through the print preview in Chrome, page by page. Three more things came out of it: the handout layout we tried shows empty ruled lines instead of your notes, text that sat past a slide's edge was cut off at the slide's frame, and a skipped slide stayed in the preview's pages until we switched off Include skipped slides.
The short version
- Print with notes: open File > Print preview, change the layout list to 1 slide with notes, and click Print.
- Check the layout each time: after we opened the presentation again, the preview was back on 1 slide without notes.
- Handouts are not notes: the handout we previewed had empty lines beside each slide, and no layout prints the notes alone.
- Skipped slides stay in by default: click Include skipped slides so it is no longer lit to leave them out of the preview's pages.
- Keep content inside the slide: on our notes page, text that sat past the slide's edge was cut off at the frame.
- For a PDF: choose 1 slide with notes first, click Download as PDF in the same toolbar, and open the file to check the notes are there.
Ways to print Google Slides with notes at a glance
| What you want | Where to go | What you get |
|---|---|---|
| Slides with their speaker notes | File > Print preview, layout list, 1 slide with notes, then Print | One slide per portrait page with its own note under it |
| A PDF instead of paper | 1 slide with notes first, then Download as PDF in the preview's toolbar | A PDF file of the presentation |
| A handout to write on | Layout list, Handout - 3 slides per page | Three slides a page with empty ruled lines beside them and no speaker notes |
| Skipped slides left out | Include skipped slides in the preview, clicked so it is no longer lit | The skipped slide's page drops out of the count |
| Ctrl + P, or Command + P on a Mac | File > Print, the entry under Print preview | Printing without changes, so use Print preview when you want notes |
| Printing from a phone | Slides app, More, Share & export, Print | Ordinary printing of the presentation |
Check the notes under each slide first
The printout can only carry notes that are already in the presentation. In the editor, click a slide in the filmstrip on the left and read the field under the slide. On our deck, slide 2, Beds and soil, showed its own note there: "Walk through the soil tasks first. The compost and mulch rows depend on the beds being cleared."
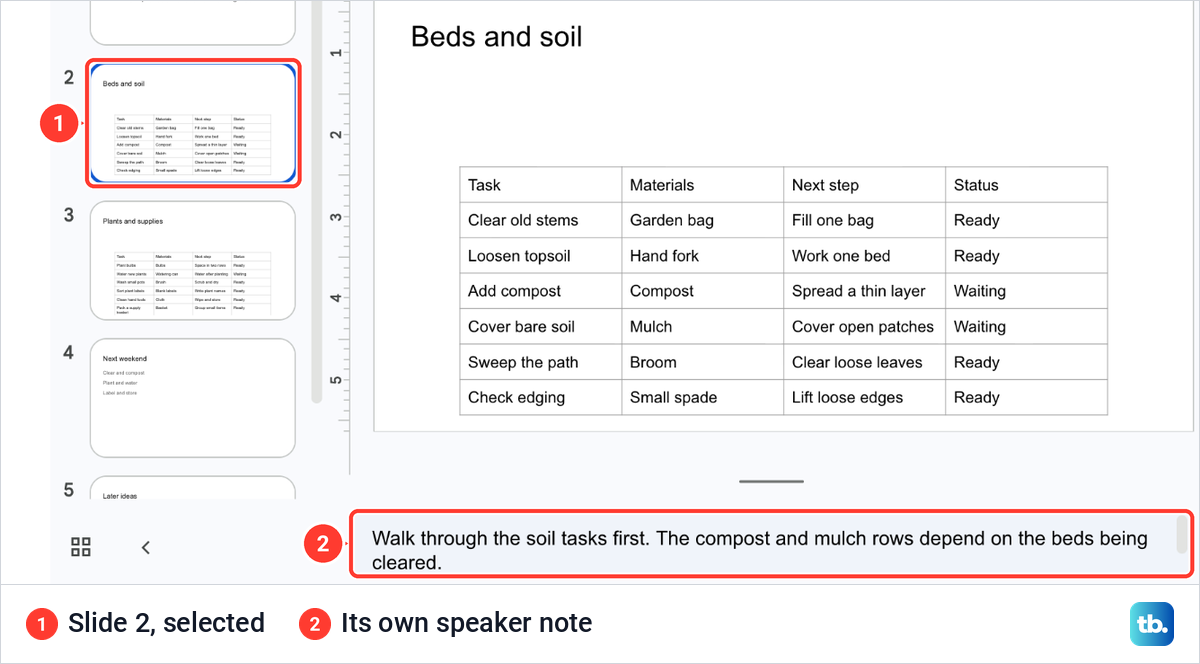
Each note belongs to the slide it was typed under, and that is the slide it will print with. If a slide still needs a note, click in the field under it and type the note there before you open the preview. Our guide on how to add speaker notes in Google Slides covers writing one and bringing back a notes field that has disappeared.
Open Print preview from the File menu
Click File and go to the end of the menu. The last three entries are Page setup, Print preview and Print, with Command + P beside Print on our Mac. Choose Print preview. If your menu shows Print settings and preview instead, that is the name Google's help uses for the same entry.
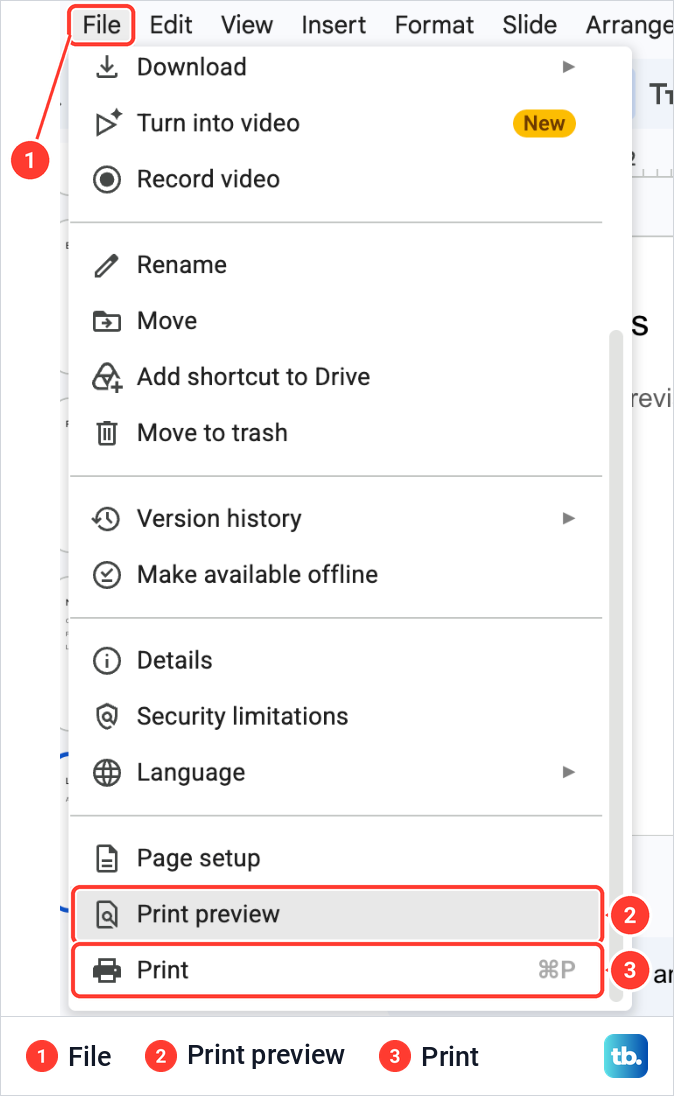
Print, just below Print preview, is the route Google describes as printing without changes. Google's steps for it include no notes layout, so it is not the one to use for notes.
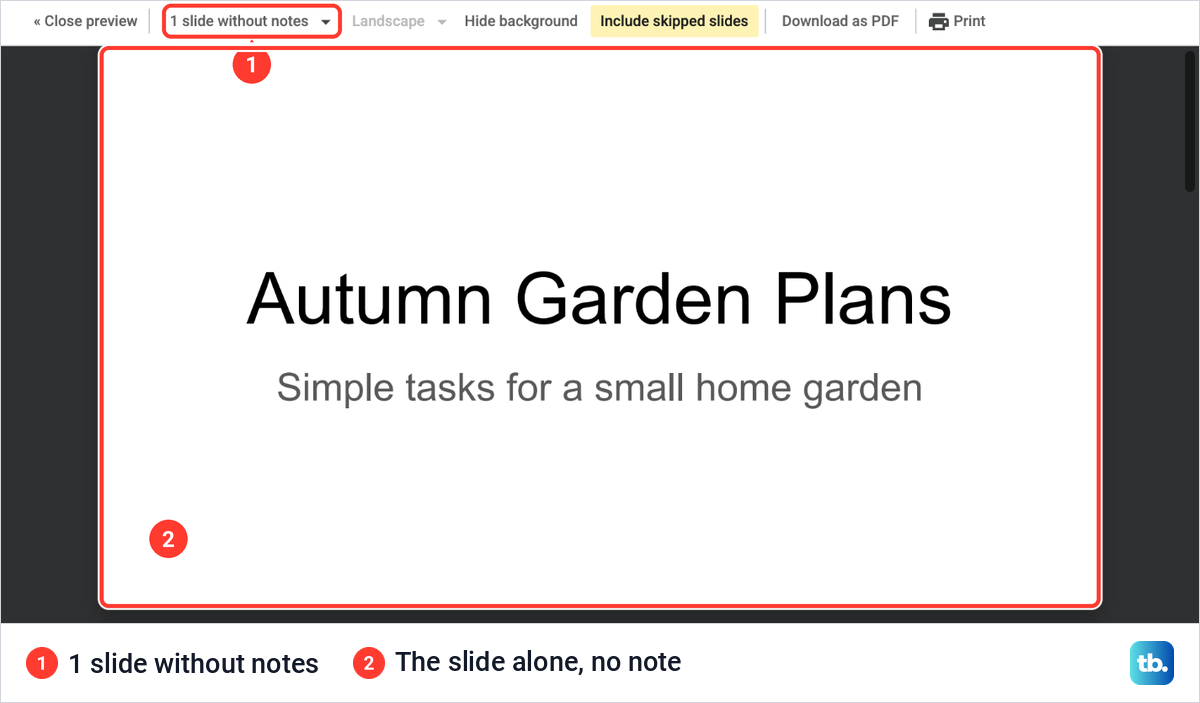
The preview opens inside the Slides tab with a toolbar of its own: Close preview, the layout list, an orientation list, Hide background, Include skipped slides, Download as PDF and Print. On our deck it opened on 1 slide without notes, with the title slide filling a landscape page and no note anywhere. It also started at page 1, although slide 5 was selected in the editor.
Choose 1 slide with notes
Click the layout list, the first control after Close preview. It holds eight choices: 1 slide without notes, ticked, then 1 slide with notes, then Handout layouts with 1, 2, 3, 4, 6 or 9 slides per page. None of them prints the notes on their own.
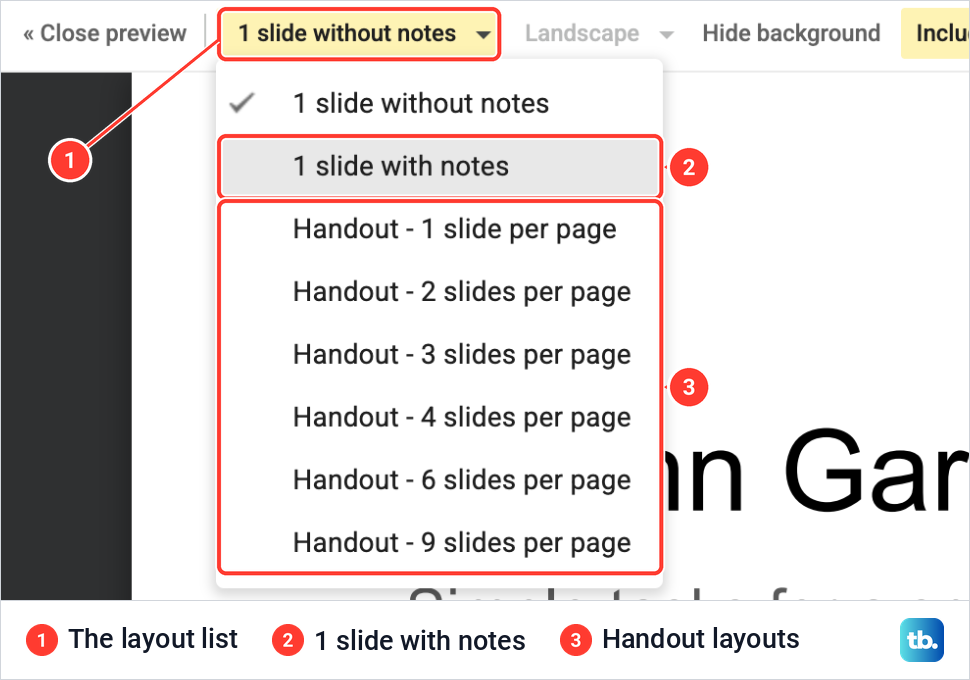
Choose 1 slide with notes. The orientation list beside it changed to Portrait and stayed grey, so the page direction cannot be changed in this layout. The slide sat in a thin frame at the top of the page, with its note in plain text under it.
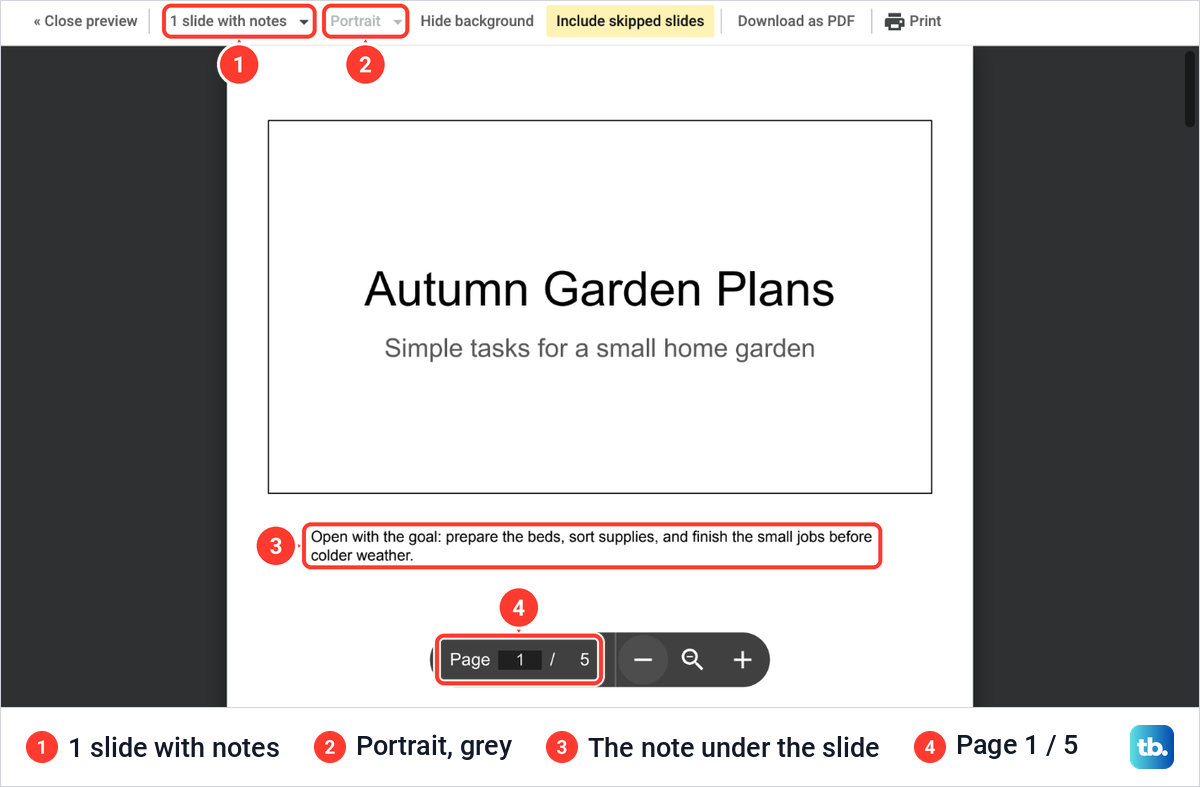
The counter at the bottom still read Page 1 / 5, one page for each of our five slides. The slide keeps its own landscape shape inside the frame, and only the page turns upright. That shape is set in File > Page setup, which our guide to changing the slide size in Google Slides goes through.
Check each page before you print
Go through the pages before you print anything. We clicked the page number in the bar at the bottom of the preview, typed the next number and pressed Return, which is Enter on Windows. A turn of the mouse wheel moved the whole browser page in our window instead of the preview, so the page box was the dependable way to move.
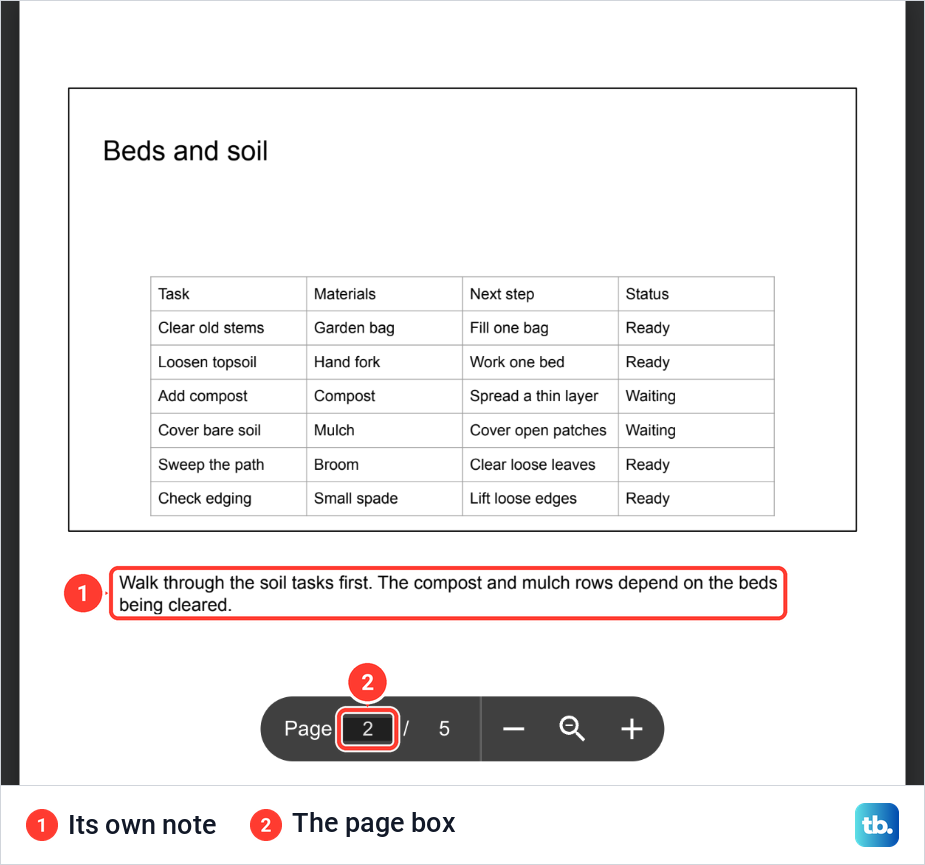
Every page paired one slide with that slide's own note. Page 2 held Beds and soil with its six-row table fully readable and its note under it, and pages 3 to 5 followed in the same order as the slides. The minus button beside the counter makes the page smaller, so the slide and its whole note fit in the window together.
Long notes wrap inside the page
Notes that run off the right side of the page are a problem people report with this layout. Our longest note, six sentences under the Next weekend slide, wrapped onto four lines inside the page's side margins. Nothing was cut at the right edge, no extra page was added, and the counter stayed at 5.
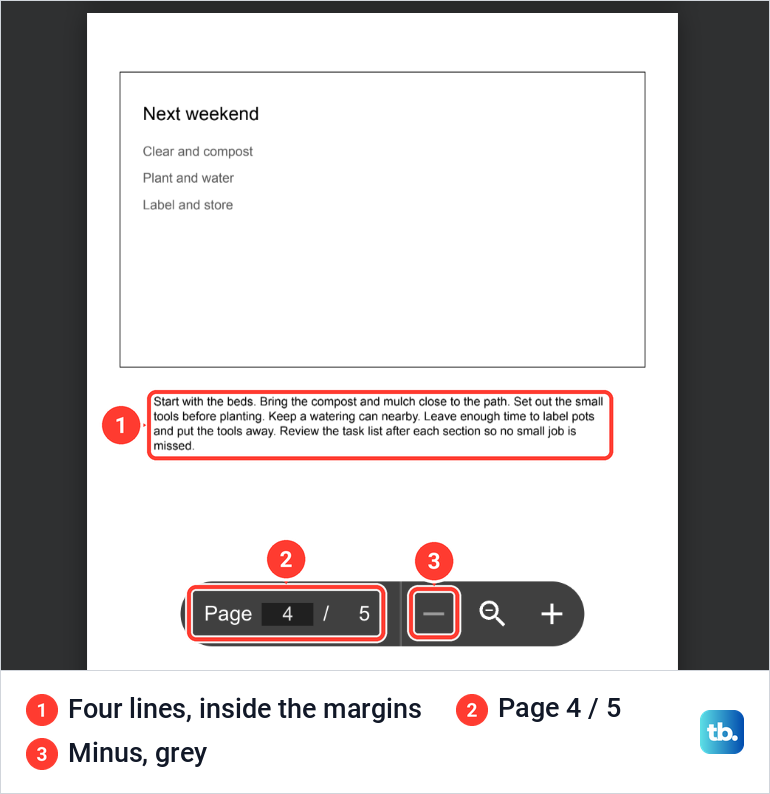
After four presses the minus button turned grey, at the smallest size, with the whole width of the portrait page in view. That is the quickest way to check the margins of a long note. If a note is still too long to read at a glance, shorten it in the notes field and open the preview again.
Keep tables and text inside the slide
The notes page draws each slide in a frame, and what sits past the slide's edge stays outside it. We drew a text box across the bottom edge of our Later ideas slide and typed two lines, which both sat below the edge in the editor.
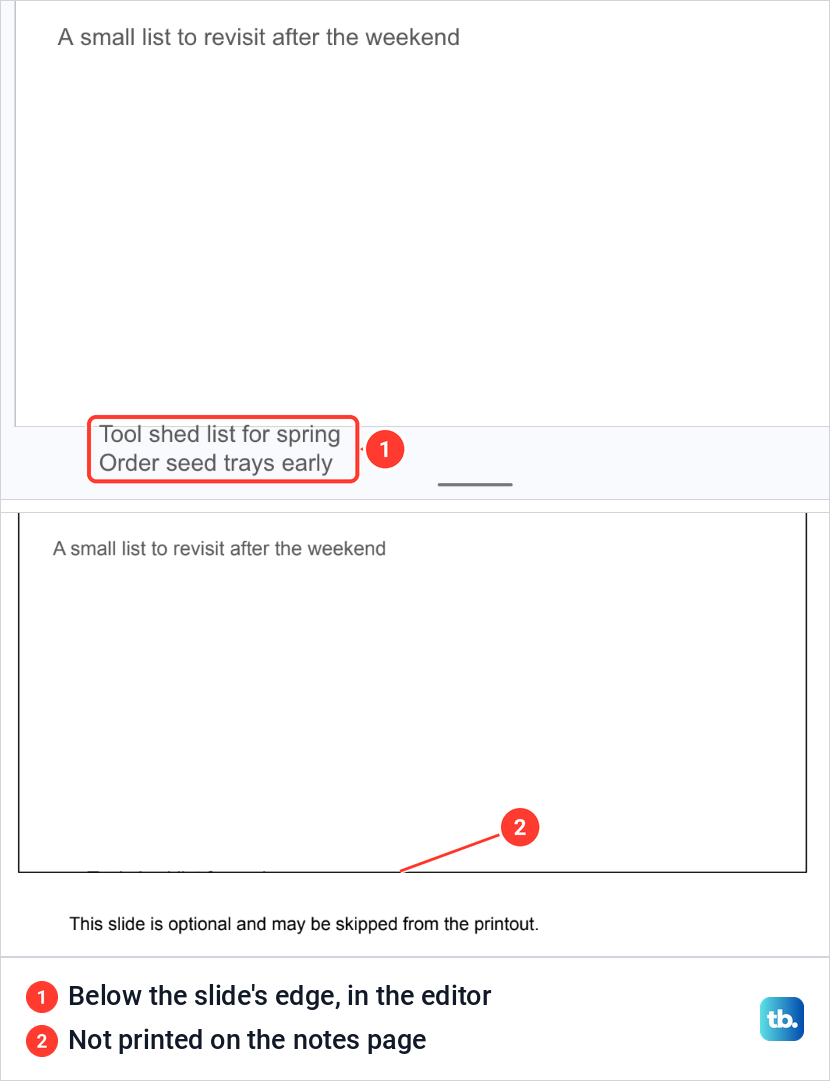
On the notes page those two lines were gone, cut off at the slide's frame, while the slide and its note printed as before. The same happened in a smaller way on our Plants and supplies slide, where a table's bottom border reached just past the edge and was missing on the page.
Before you print, click through the slides in the editor and look for anything that crosses the edge of a slide. Shorten the text or make the table smaller until it fits inside.
Print from the preview or download a PDF
Once the pages look right, click Print at the right end of the preview's toolbar. In the window that opens, choose your printer and print settings, then click Print again. Close preview, at the other end of the toolbar, takes you back to the editor without printing.
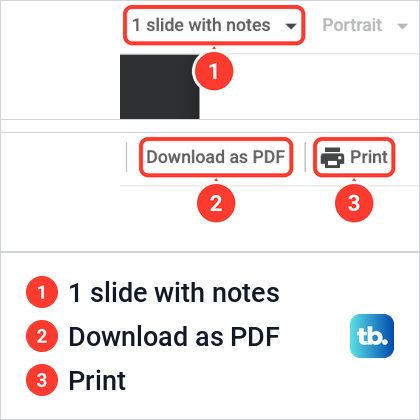
For a file instead of paper, the same toolbar holds Download as PDF, just left of Print. Choose 1 slide with notes before you click it, then open the PDF and check that the notes are under the slides before you send or print it.
Do not pick a handout for speaker notes
A Handout layout can look like the answer, but the one we tried is not. With Handout - 3 slides per page chosen, our five slides fit on two pages, the orientation list was no longer grey and could be changed, and each slide sat at the left with five empty ruled lines beside it. Our speaker notes were not on the page.
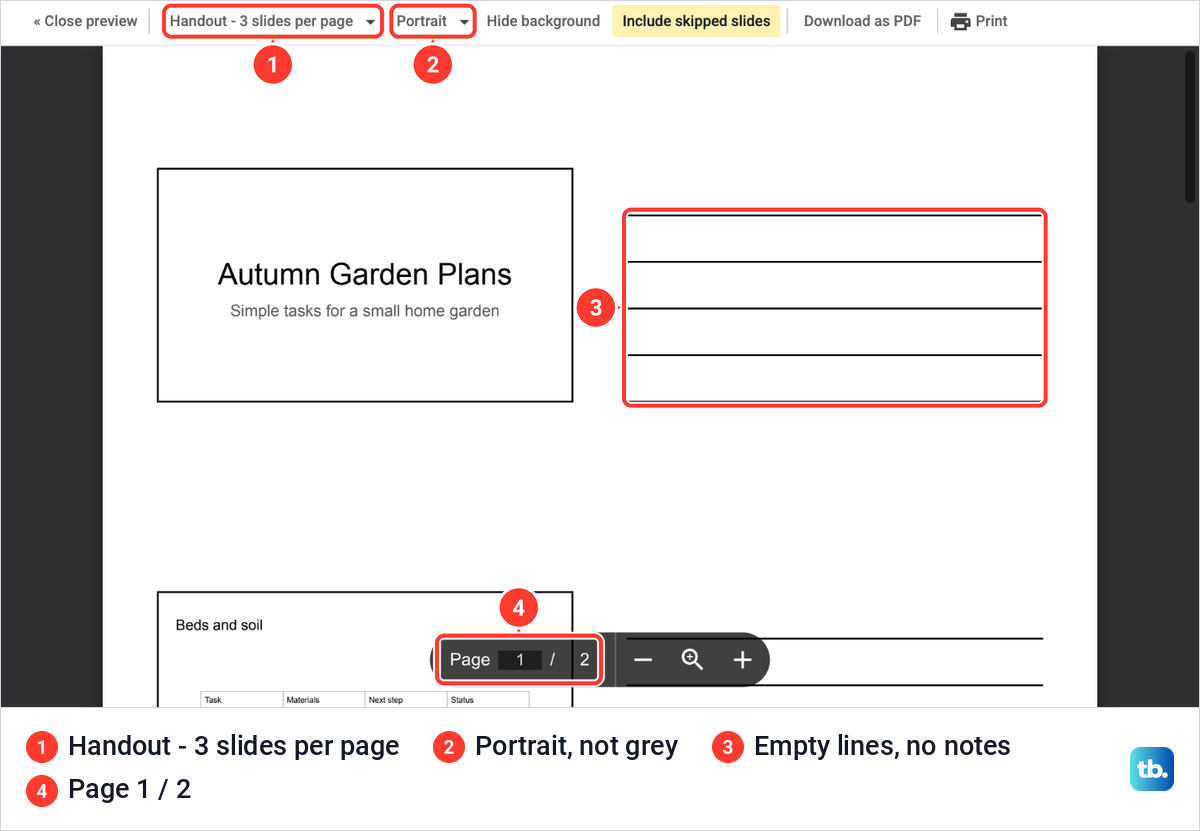
Those blank lines are space for writing by hand. When the paper is for you as the speaker, stay with 1 slide with notes, the only layout in the list named for notes, since none of the eight prints the notes alone without their slides.
Leave skipped slides out of the printout
A skipped slide stayed in our print preview until we told it not to. We right-clicked slide 5, Later ideas, in the filmstrip and chose Skip slide, and its thumbnail turned grey with a crossed-out eye. Skipping does not delete anything: the slide stayed in the filmstrip with its note under it. Our guide on how to hide a slide in Google Slides covers what skipping does during a slideshow.
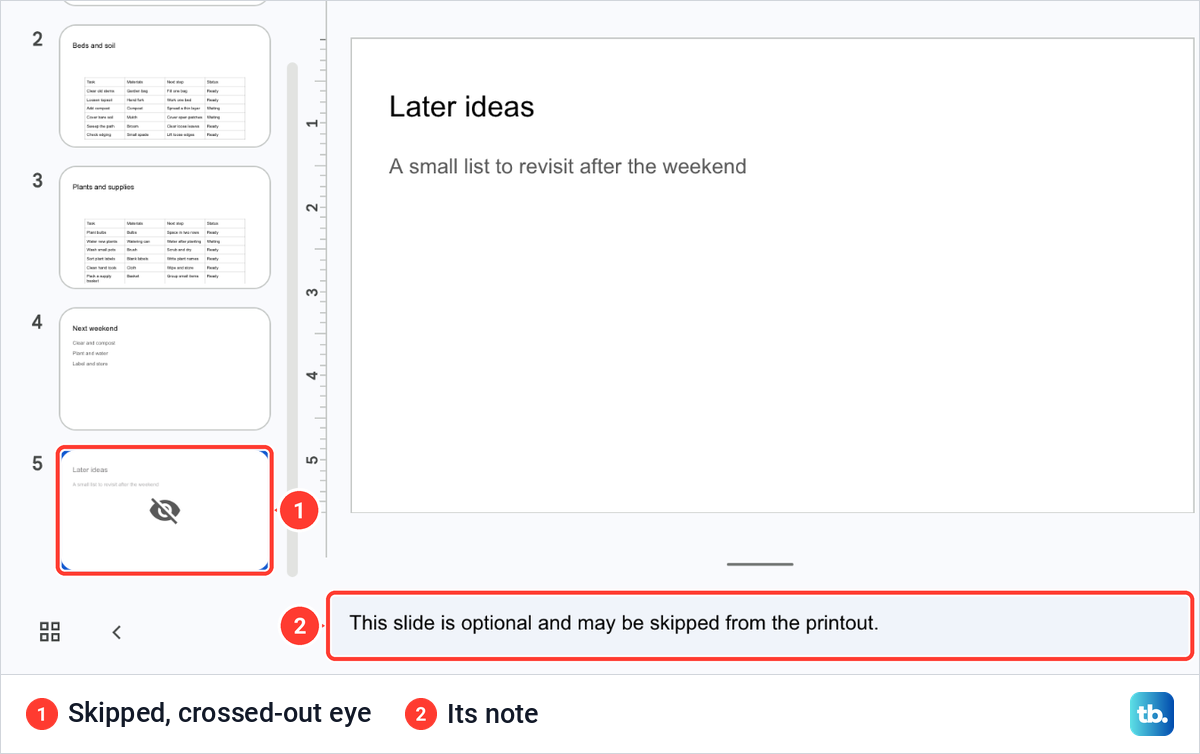
In the preview, set to 1 slide with notes, Include skipped slides was lit as it opened and the counter read Page 5 / 5, with Later ideas and its note on the last page. One click on the button turned it off, and the counter dropped to Page 4 / 4, ending on Next weekend. The preview also jumped back to its larger size, so use the minus button again to see whole pages.
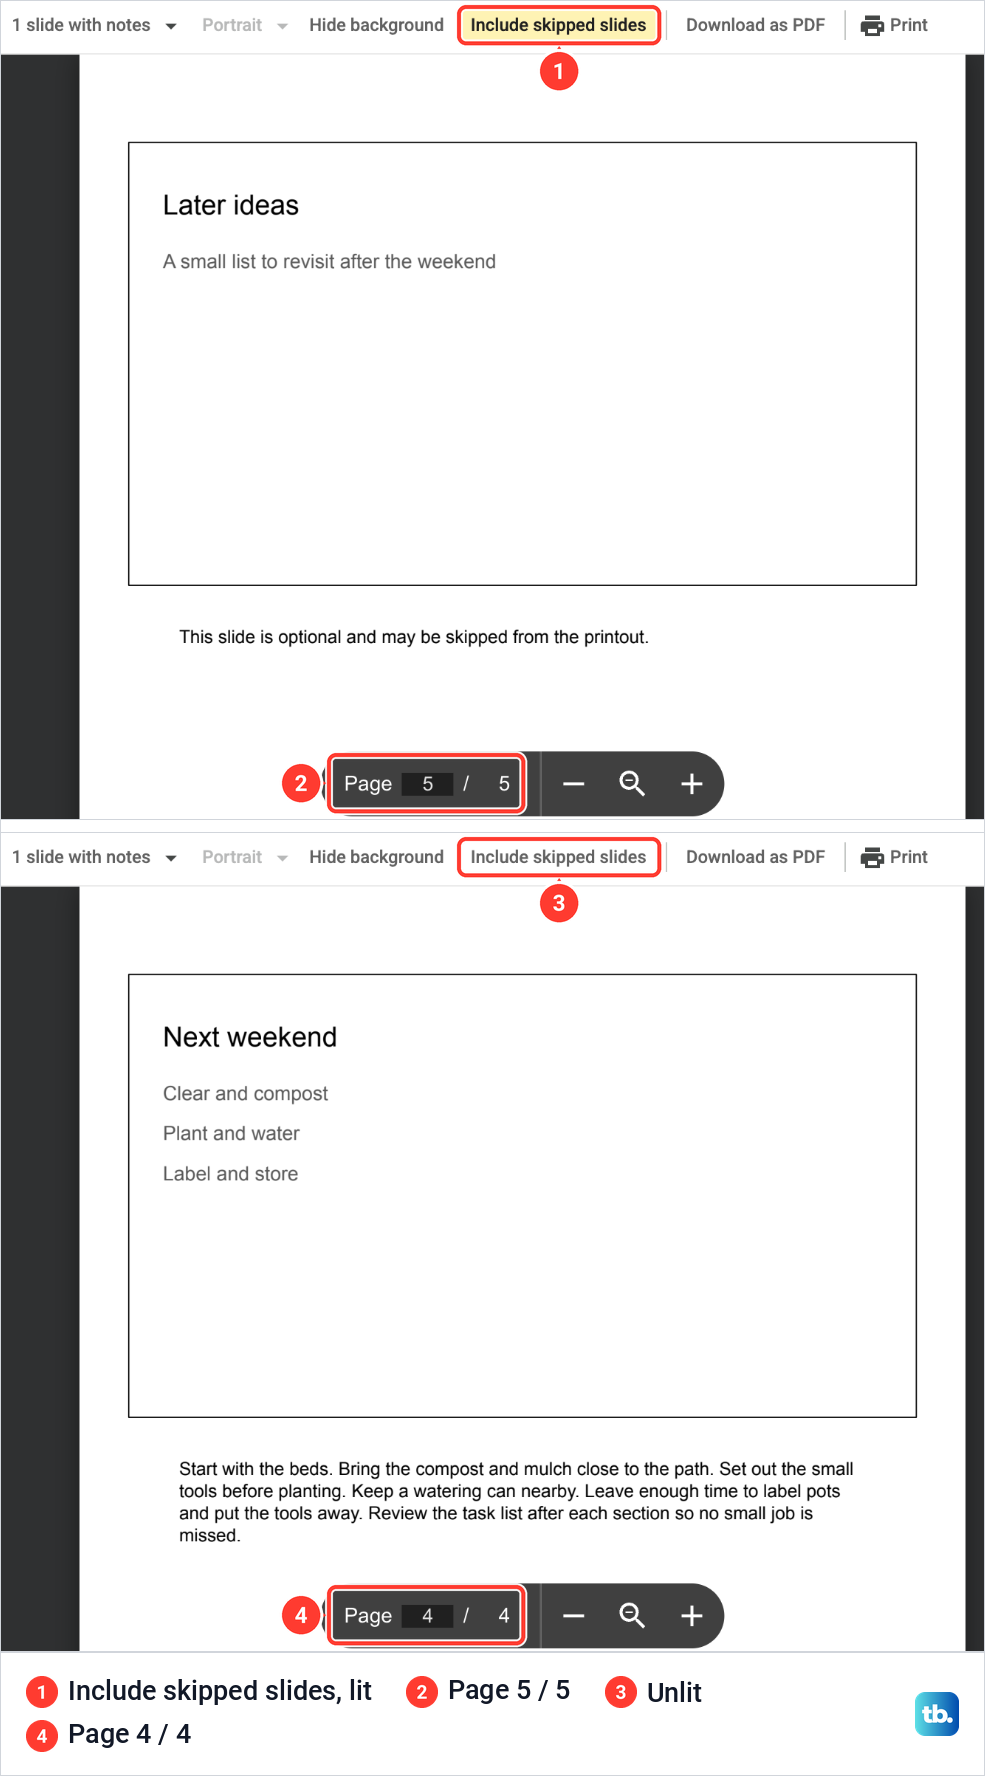
The same button on our six-slide Garden Open Day Plan presentation, with one slide skipped, gave 6 pages lit and 5 unlit. When we were done, we lit the button again, closed the preview and chose Unskip slide in the same right-click menu, which took the skip mark off slide 5.
Print Google Slides from an Android phone or iPhone
The Google Slides app on Android, iPhone and iPad can print a presentation. Open the app, tap More on the file you want to print, then tap Share & export and Print. Choose the printer and tap Print.
Google's steps for printing with notes are written for a computer, and its phone steps do not include a notes layout. For notes pages, use Print preview and 1 slide with notes on a computer, as above. If your iPhone cannot find the printer, our guide on how to print from an iPhone to a wireless printer walks through the connection.
If the notes still do not print
Start with the layout list. After we closed the preview on a handout layout and opened it again, it came back on that handout. After we reopened the presentation, our preview was back on 1 slide without notes, so check the list each time before you click Print.
Next, check the slide in the editor. A note typed under the wrong slide appears with that slide, because each page of the preview pairs a slide with its own note. If the printer itself will not take the job, the steps to fix a printer that shows offline come before another try from the preview.
How we tested this guide
We tested this in Google Slides in Chrome on a Mac, taking a five-slide presentation with speaker notes through the print preview's layouts, up to its Print and Download as PDF buttons.
Frequently Asked Questions
How do I print Google Slides with notes?
Open File > Print preview, change the layout list from 1 slide without notes to 1 slide with notes, and click Print. Check the pages first: each one should show a slide with its own note under it.
Why are my speaker notes not printing?
Our preview opened on 1 slide without notes, again after we reopened the presentation, and File > Print is the route for printing without changes. Choose 1 slide with notes in the preview's layout list, and check that the slide has a note in the editor.
Can I save Google Slides with notes as a PDF?
The print preview has a Download as PDF button just left of Print. Choose 1 slide with notes first, then open the saved PDF and check that the notes are under the slides.
Can I print only the speaker notes without the slides?
Not from the print preview. Its eight layouts are 1 slide without notes, 1 slide with notes and six Handout layouts, and none of them prints the notes alone. The closest is 1 slide with notes, which puts each note under its slide.
Can I print notes from my phone?
The Google Slides app prints from More, Share & export, Print, but Google's steps for printing with notes are for a computer. Make the notes pages in Print preview on a computer.
How do I print some slides with notes but not others?
Skip the slides you want to leave out, then click Include skipped slides in the preview so it is no longer lit. The page count drops by those slides. Skipping also applies when you present, so choose Unskip slide on them afterwards.
Why are my long speaker notes cut off?
Go to that page in the preview and press the minus button until the whole page width shows. If the note runs past the margin there, or in a PDF you downloaded, shorten it in the notes field and preview again. On our deck a six-sentence note wrapped inside the margins, and what got cut was text that sat past a slide's edge.