

To make bullet points in Google Slides, click the text on the slide, select the lines and click Bulleted list in the toolbar, or press Ctrl + Shift + 8 on Windows and ChromeOS or Command + Shift + 8 on a Mac. If the button is not in view, click the three dots at the end of the toolbar. Every selected line becomes its own bullet.
We built our lists in Google Slides in Chrome on a Mac, on a slide of our Home Projects deck. On our window the list buttons sat behind those three dots, and pressing Return on an empty bullet steps out of the list one level at a time.
The short version
- Bullets from the toolbar: click the words, select the lines and click Bulleted list. Look under the three dots if it is hidden.
- Keyboard: press Ctrl + Shift + 8, or Command + Shift + 8 on a Mac. The same keys again remove the bullet and keep the text.
- Sub-bullet: press Enter at the end of a bullet, then Tab.
- Back out: press Enter on an empty bullet to go up a level, and once more to end the list.
- Numbers instead: press Ctrl + Shift + 7, or Command + Shift + 7 on a Mac.
- Phone or tablet: select the text, tap Format, then Bulleted list. On an iPhone or iPad, tap Paragraph first.
Bullet point controls at a glance
| Control | Use it when | What you get |
|---|---|---|
| Bulleted list button | The lines are selected inside a text box | A bullet on every selected line |
| Ctrl + Shift + 8 | The cursor is in a line | A bullet, or no bullet if the line had one, with the text kept |
| Ctrl + Shift + 7 | The cursor is in a line | A numbered line instead of a bullet |
| Enter, then Tab | The cursor is at the end of a bullet | A sub-bullet, one level in, with the mark for that level |
| Enter on an empty bullet | Nothing is typed on the bullet yet | Up one level, then out of the list |
| The arrow beside Bulleted list | The list is selected | Six preset sets of marks for the whole list |
| Format > Bullets & numbering > List options | You want one mark, a custom symbol or new numbering | Single marks, number styles, More bullets and Restart numbering |
| Ctrl + ] and Ctrl + [ | A line sits at the wrong level | One indent level in or out |
The table gives the Windows and ChromeOS keys. On a Mac, press Command in place of Ctrl, as the tooltip on the Bulleted list button shows, and Return in place of Enter.
Turn lines into bullet points with the toolbar
Start inside the text, not on the box. On our slide a click on the words of a line put the cursor in the text, while a click on an empty part of the box selected the box itself. With the cursor in the text, Command + A selects all the text in that box on a Mac, or Ctrl + A on Windows and ChromeOS.
Our four lines were now highlighted and carried no bullets. In our deck's plain theme, the body box of the Title and body layout started with none, so every line needed one. On our slide, Command + A with the box selected rather than its text highlighted every object on the slide, so if that happens, click the words of a line and try again.
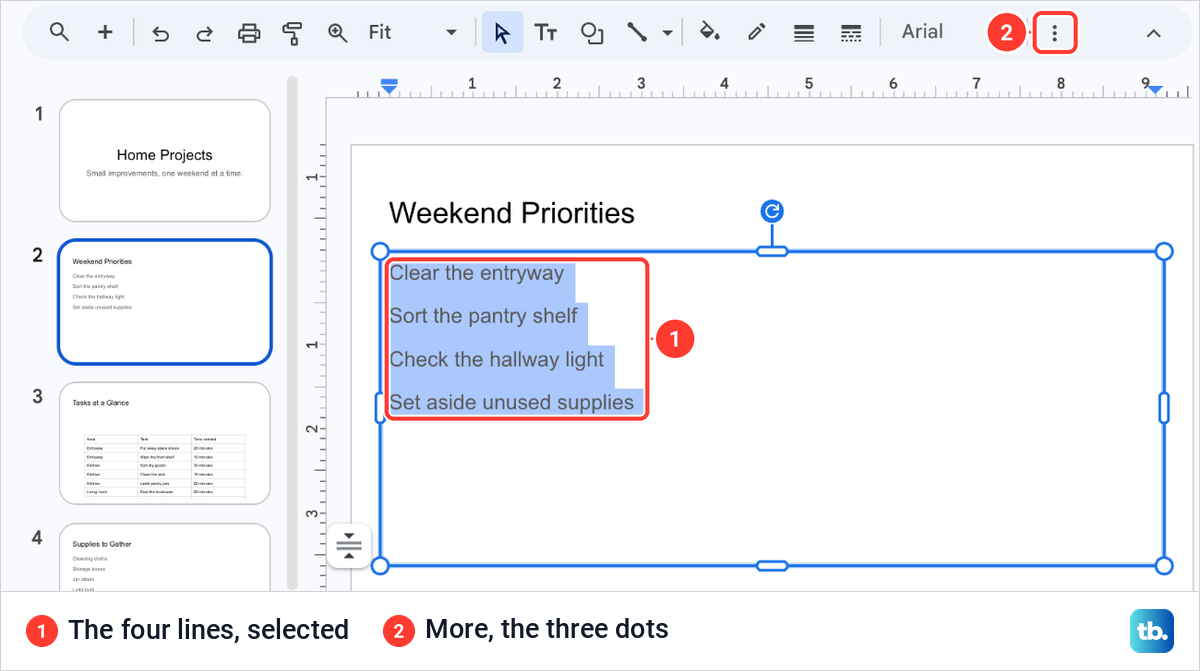
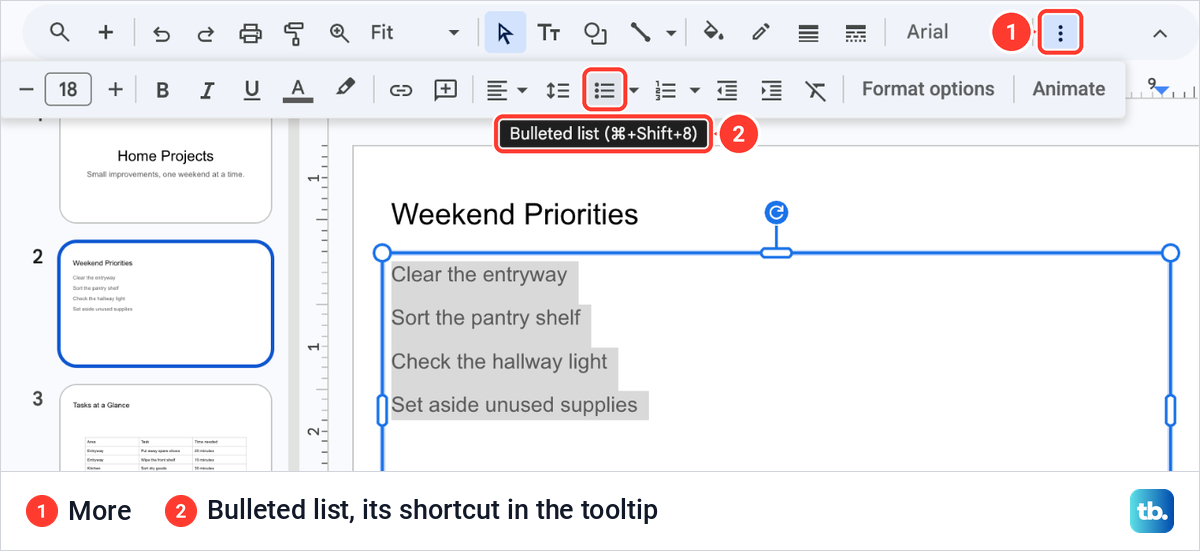
Next, find the list button. On our window the toolbar ended in a three-dot More button after the font name, and the list buttons were not on the first row. Clicking the dots opened an extra row with font size, bold, italic, text color, alignment, line spacing and the two list buttons.
Pointing at the first list button showed its name and its shortcut, Bulleted list (⌘+Shift+8). The one to its right is Numbered list, and each has a small arrow of its own.
One click on Bulleted list gave all four lines a round bullet. The lines also moved a little closer together. The button stayed lit while the cursor was in the list, so you can tell at a glance whether the line you are on is part of one, and the slide's thumbnail in the filmstrip showed the bullets as well.
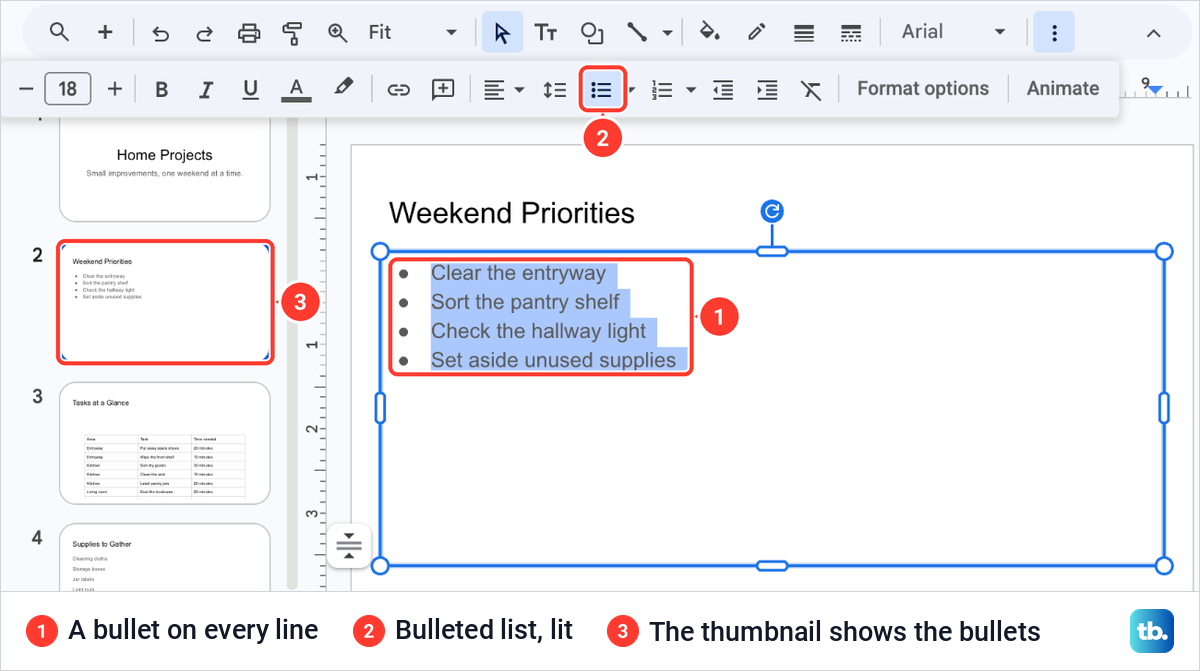
Bullets made this way are list formatting that Slides draws for you, not characters in the text. You never type the dots yourself, and the next line you start with Enter gets a bullet of its own.
Pick a different bullet style
The small arrow beside Bulleted list opens six presets. Each one is a set of marks for three levels of a list: the round disc with circles and squares under it, which was outlined as the one in use on our slide, then four diamonds, hollow boxes, arrows, stars and arrowheads.
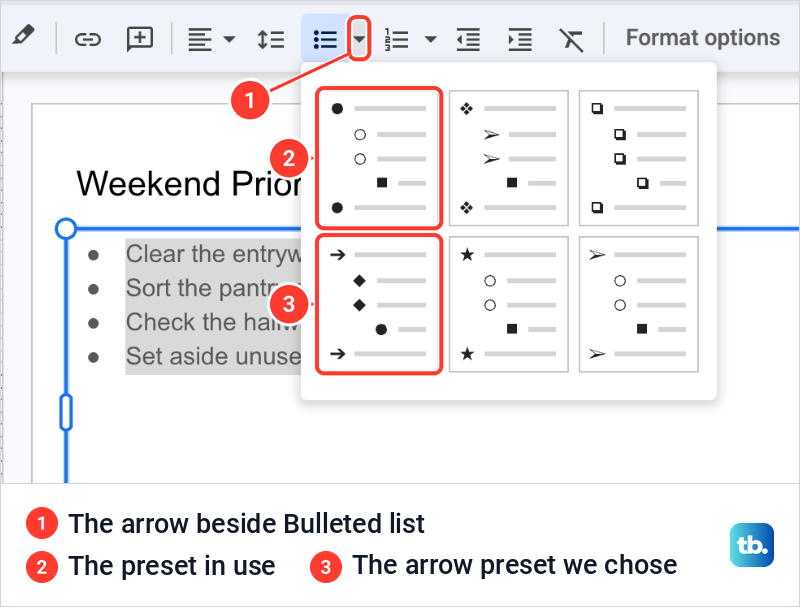
A preset restyles the list in one go. With our list selected we picked the arrow set, and every bullet on the slide turned into an arrow. Its sub-bullets use a different mark, which shows up in the next step.
Add a sub-bullet with Tab
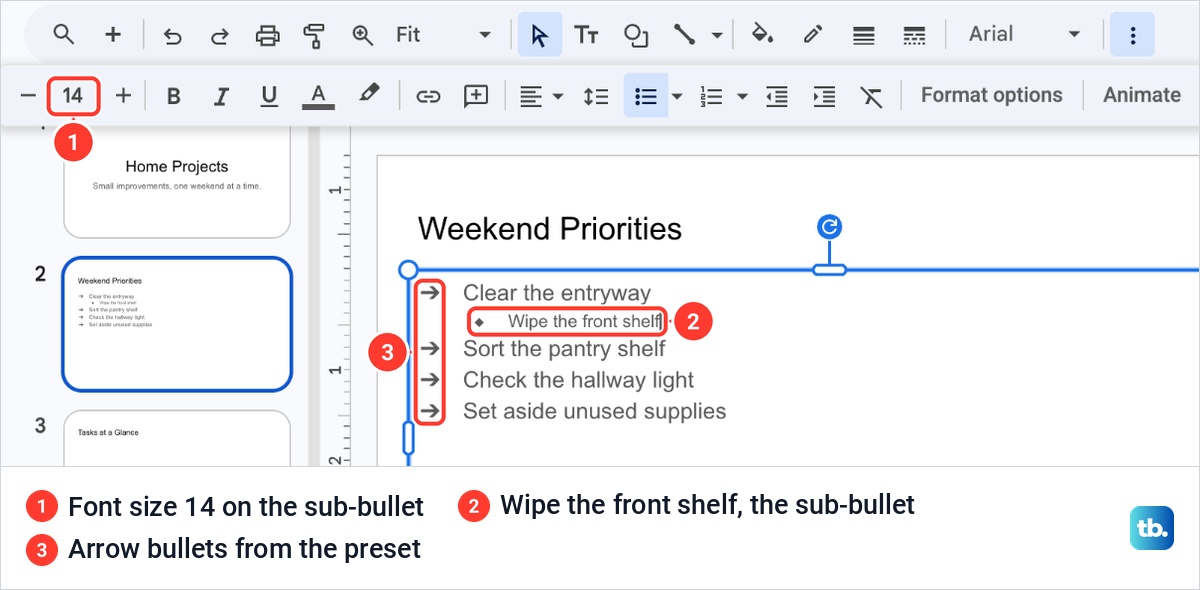
Put the cursor at the end of the line the new point belongs under and press Enter, or Return on a Mac, to start a new bullet. Then press Tab before you type. We did this under Clear the entryway and typed Wipe the front shelf.
The new line moved in one level, under its parent. It took its own mark, a small diamond in the arrow preset. In our deck its text was smaller too: the font size box read 14 for the sub-bullet against 18 for the line above it. The presets draw marks for three levels.
To move a line in or out without retyping it, use the two indent buttons on the same toolbar row. The keys are Ctrl + ] to indent and Ctrl + [ to move a line back out on Windows and ChromeOS, with Command in place of Ctrl on a Mac.
Get back to the main list or end it
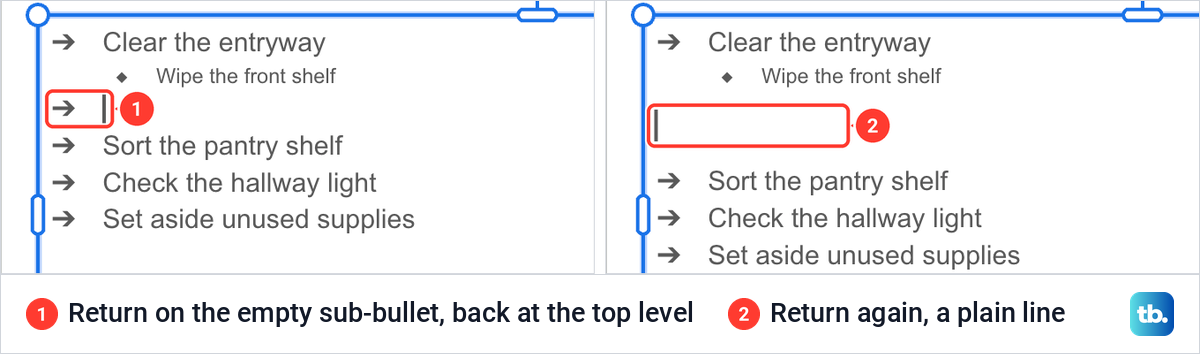
Enter on an empty bullet is how you step out. After we typed the sub-bullet, Return gave us another, empty sub-bullet. Return on that empty line moved it back to the top level, where it showed an arrow again.
One more Return on the empty top-level bullet removed the mark and left a plain line, and the bullets under it stayed as they were. So from the end of a sub-bullet, two presses take you back to the main list and a third ends the list for that line.
Switch a bullet on or off with the shortcut
The shortcut works on the line the cursor is in. We pressed Command + Shift + 8 on the plain line from the last step, and it became a bullet at once. It joined the sub-bullets above it, with a diamond. We typed Shake out the doormat on it.
The same keys pressed again took the bullet away. The mark disappeared and Shake out the doormat stayed on the slide as plain text, so the shortcut removes a bullet without deleting any words. On Windows and ChromeOS the keys are Ctrl + Shift + 8.
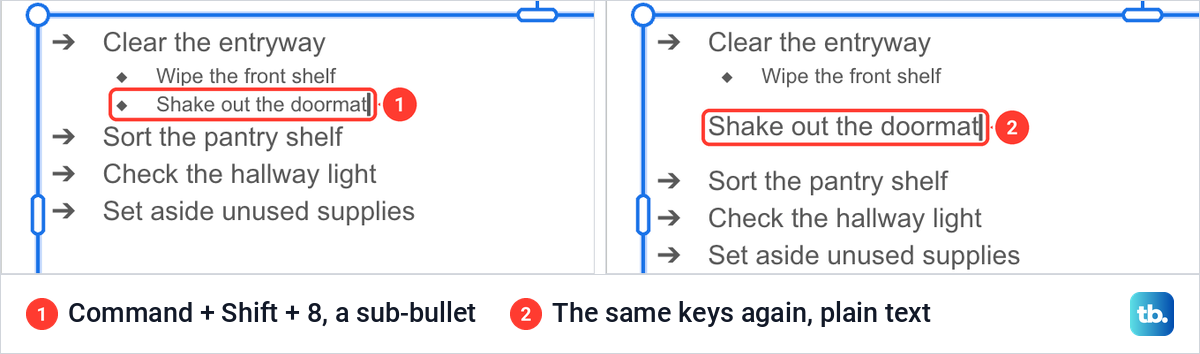
On our slide the new bullet joined the sub-bullets above it, so check where yours lands. If it joins a sub-list you did not want, move it out with the indent button or Ctrl + [, or Command + [ on a Mac.
Switch to a numbered list
Numbers work the same way. Press Ctrl + Shift + 7 on Windows and ChromeOS, or Command + Shift + 7 on a Mac, or click Numbered list beside the bullet button. On our slide the plain line became 1. Shake out the doormat, and the Numbered list button lit up.
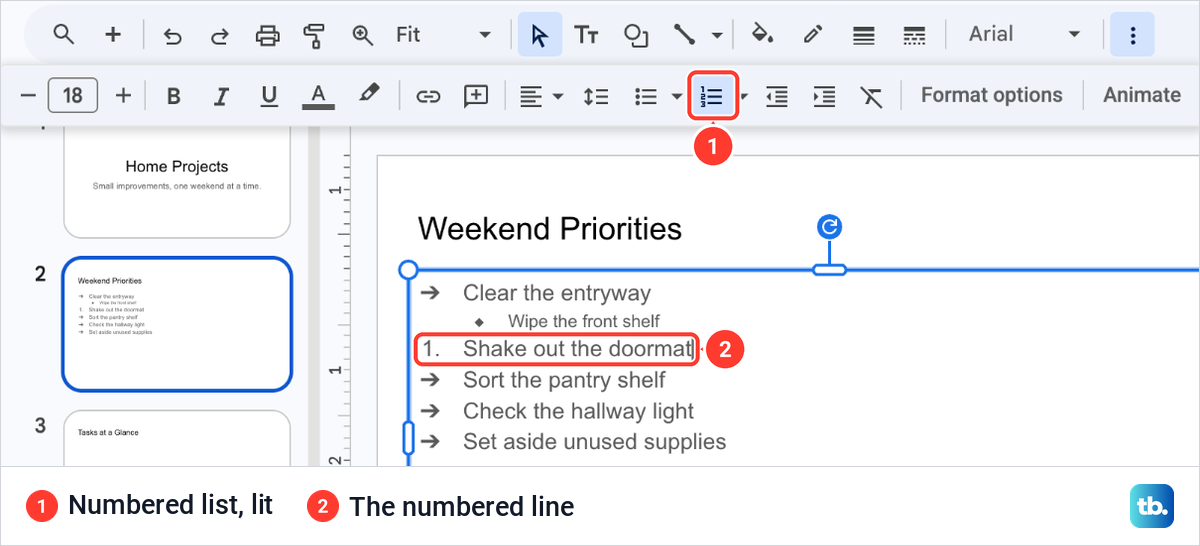
The arrow bullets above and below that line stayed as they were, so bullets and numbers can share one text box, a line at a time. To number a whole list, select all its lines first, then press the keys or click the button.
Change the bullet marks from the Format menu
The menu bar holds the same controls with a few more choices. Click a bullet in the list, then open Format > Bullets & numbering. It has three entries: Numbered list menu, Bulleted list menu and List options.
List options shows five number styles, from plain numbers to capital and small letters and Roman numerals, and five single marks: a disc, a circle, a square, an arrowhead and a tick. Under them are Restart numbering, More bullets and Edit prefix and suffix.
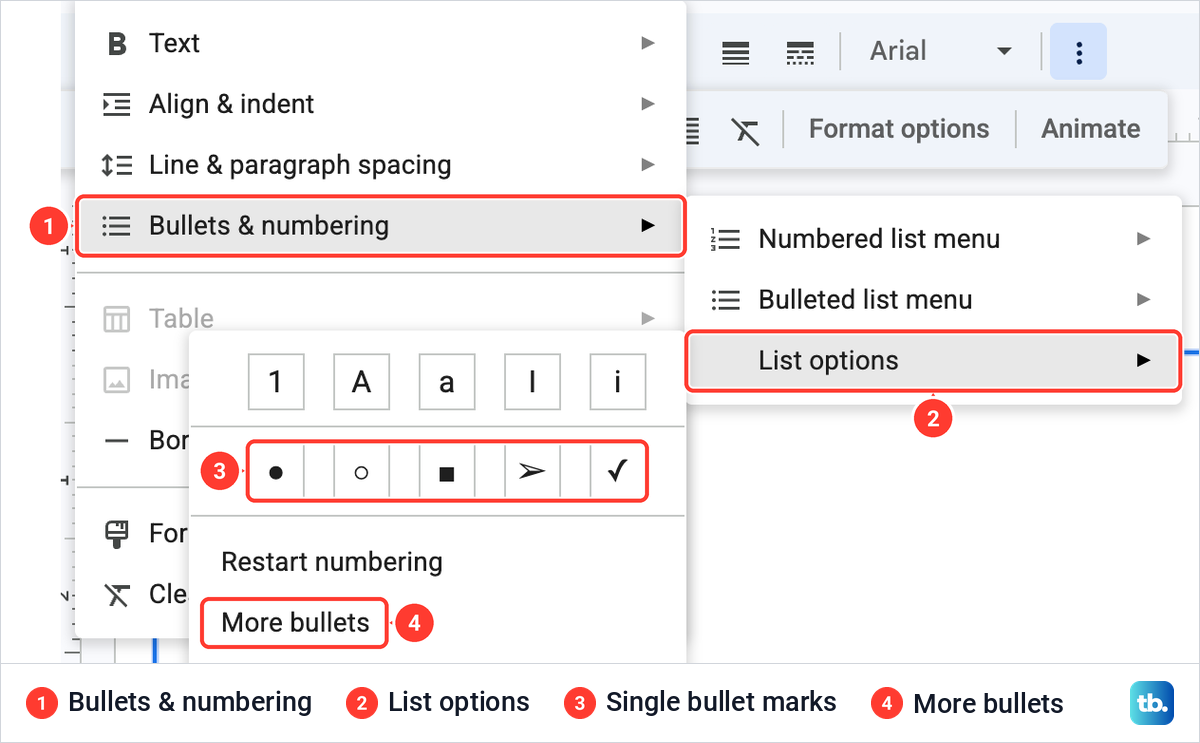
So Slides is not limited to the six preset sets. To make a custom bullet, click More bullets and choose the symbol you want. Restart numbering asks for a new start number for a numbered list, and Edit prefix and suffix adds text before or after each number or mark.
The tick in List options is a bullet mark, not a box to tick off. Slides has no checklist list type: the list buttons on our toolbar were Bulleted list and Numbered list, and checklists are a Google Docs feature.
Change the bullet color or line up wrapped lines
A bullet can have its own color. Click the bullet itself rather than the words after it, then click Text color on the toolbar and pick a color. On our window Text color was the underlined A on the extra row, beside bold, italic and underline.
Wrapped lines that start under the bullet rather than under the text need a hanging indent. Select the lines, open Format > Format options and choose Text fitting on the right. Set Special indent to Hanging and change the size under By.
Padding, in the same panel, moves the text away from the edge of the box. It does not change the gap between a bullet and its words, so leave it alone when that gap is the problem.
Add bullet points in the Google Slides app
On an Android phone or tablet, open the presentation in the Google Slides app. Tap a section of the slide or double-tap a word to select it, and move the blue markers to take in more text. Tap Format at the top, then tap Bulleted list or Numbered list.
On an iPhone or iPad the route has one more step. Select the text the same way, tap Format, tap Paragraph, then tap Bulleted list. The Right arrow there changes the list style.
Both apps put Increase indent and Decrease indent at the bottom of the screen. Use them to turn a line into a sub-bullet or bring it back to the main list.
When the Bulleted list button is missing
First look for the three dots at the end of the toolbar. On our window the toolbar ended in them, and the list buttons were on the row they opened. Put the cursor in the text as well. On our slide a click on the words of a line put it there.
If the slide has no text box to type in, add one. Open Insert > Text box, drag out the box on the slide and type your lines, one per line. Then select them and use Bulleted list or the shortcut as above.
If a list goes wrong, undo it. Command + Z on a Mac, or Ctrl + Z on Windows and ChromeOS, took back every change we made on our slide, one step at a time, until it showed its four plain lines again.
How we tested this guide
We tested this in Google Slides in Chrome on a Mac, adding bullets, sub-bullets and numbers to our Home Projects deck, up to List options.
Frequently Asked Questions
What is the shortcut for bullet points in Google Slides?
Press Ctrl + Shift + 8 on Windows and ChromeOS, or Command + Shift + 8 on a Mac, with the cursor in the line. Press the same keys again to remove the bullet and keep the text.
How do I make a sub-bullet in Google Slides?
Press Enter, or Return on a Mac, at the end of a bullet, then press Tab before you type. The new line moves in one level and takes the mark for that level.
How do I stop the bullet points on the next line?
Press Enter on the empty bullet. From a sub-bullet, the first press on an empty line takes you back to the main list and the next one leaves a plain line with no bullet.
How do I change the bullet symbol?
Click the small arrow beside Bulleted list for six preset styles. For a single mark or a custom symbol, open Format > Bullets & numbering > List options and choose a mark or More bullets.
Why can't I find the Bulleted list button?
It may be on the extra row behind the three dots at the end of the toolbar. Put the cursor in the text first. On our slide a click on the words of a line did that.
How do I change the color of bullet points?
Click the bullet itself, not the words after it, then click Text color on the toolbar and choose a color. On our window, Text color was on the extra row behind the three dots.
Can I make a checklist in Google Slides?
No. Slides offers bulleted and numbered lists, and checklists are a Google Docs feature. List options does have a tick among its marks, which you can use as a bullet.