
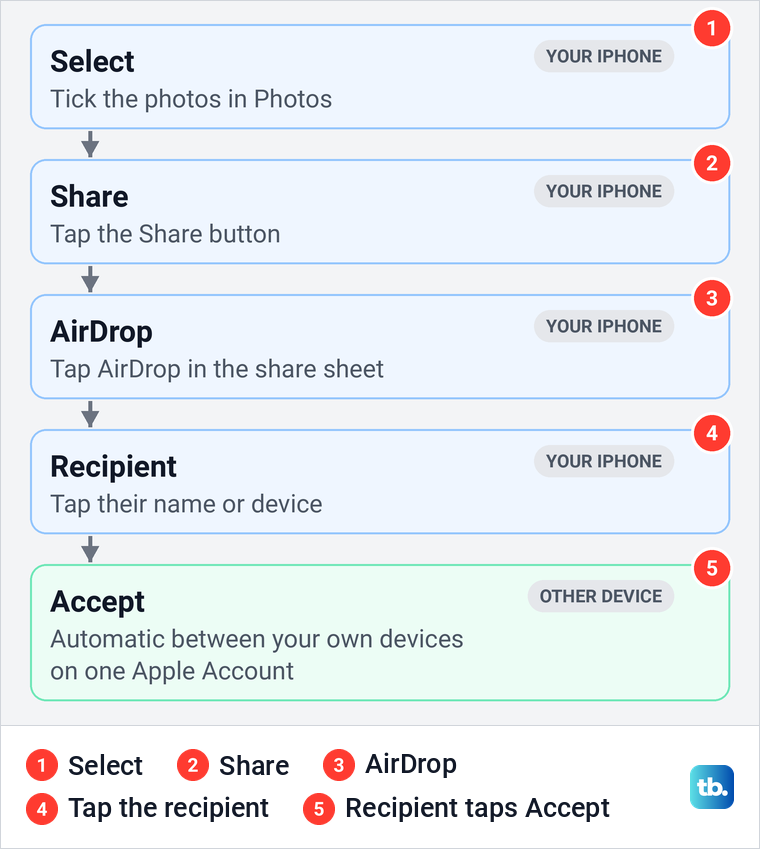
To AirDrop, turn on Wi-Fi and Bluetooth on both Apple devices and keep them close, set the receiving device to Contacts Only or Everyone for 10 Minutes, then open the photo or file, tap Share, tap AirDrop and choose the person. They tap Accept. Between your own devices on the same Apple Account this happens automatically. Most items are saved in the app they came from, such as Photos.
If the other person does not have you in their contacts, they may have to give you an AirDrop code first. The same steps send a photo from an iPhone to a Mac, and a Mac can send back through its Share button or Finder. Below are the Control Center and Settings screens from our iPhone 17 Pro with iOS 26.6, the Photos steps, the code exchange and the quick checks for a device that will not show up.
The short version
- Before you start: Wi-Fi and Bluetooth on for both devices, within about 30 feet, Personal Hotspot off.
- Turn it on: in Control Center, touch and hold the connectivity group, tap the line under AirDrop and pick Contacts Only or Everyone for 10 Minutes.
- Send: open the photo or file, tap Share, tap AirDrop, then tap the person or device.
- Receive: tap Accept (automatic between your own devices), or give the sender an AirDrop code if they are not in your contacts.
- Find it: most items are saved in the app they came from, some land in Files, and a Mac saves some to Downloads or offers Photos for a picture.
Which AirDrop route you need
AirDrop works between nearby iPhones, iPads and Macs, for photos, videos, documents and more. The route only changes with the app you start in and the device on the other end, so find your case in the table and jump to its section.
| What you want to send | On the sending device | On the receiving device | Where to look |
|---|---|---|---|
| Photos to another iPhone or iPad | Photos, Select, Share, AirDrop, the person | Contacts Only or Everyone for 10 Minutes, then Accept | Photos |
| Photos from an iPhone to a Mac | The same Photos steps, then the Mac's name | AirDrop on in the Mac's Control Center, then Accept | Downloads, or Photos if the Mac offers it |
| A document or PDF | Files, More, Select, Share, AirDrop | Accept | The matching app or Files, Downloads on a Mac |
| A file from a Mac to an iPhone | Share then AirDrop, or drag it onto the person in Finder's AirDrop window | Accept | The matching app or Files |
| Anything to someone who has not saved you as a contact | Tap them, then type their AirDrop code if one is asked for | Everyone for 10 Minutes, then Get AirDrop Code if prompted | As in the rows above |
| Anything between your own devices | Any route above | Nothing, it is accepted automatically on the same Apple Account | As in the rows above |
Contact details are the one exception. Swapping phone numbers with someone new is NameDrop, which Apple keeps separate from sending a photo or file, and it is covered further down.
Check these before you send anything
Apple's checklist is short. Both devices need Wi-Fi and Bluetooth turned on, and they should be within 30 feet (10 meters) of each other. They do not have to be connected to the same Wi-Fi network, or to any network at all, because Apple only asks for the two radios to be on.
Personal Hotspot can get in the way, and Apple's instruction is to disconnect it if either of you has it on. On the iPhone sharing its connection, open Settings > Personal Hotspot and turn off Allow Others to Join, the same switch our guide to set up Personal Hotspot turns on. A VPN can matter too: Apple says to make sure its configuration does not prevent local networking.
Turn on AirDrop on iPhone from Control Center
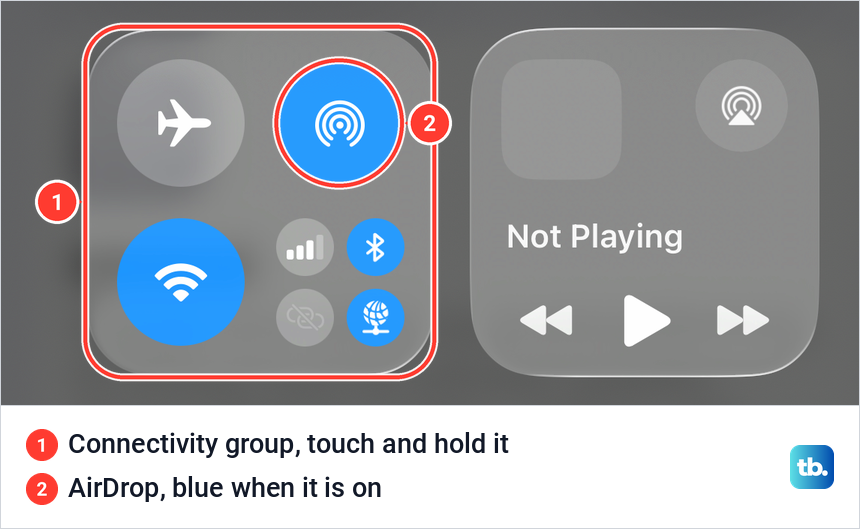
Open Control Center by swiping down from the top right corner of the screen. On our iPhone 17 Pro with iOS 26.6, the first page had the connectivity group in the top left square: Airplane Mode, AirDrop, Wi-Fi and smaller buttons for cellular data, Bluetooth, Personal Hotspot and VPN. The AirDrop button was blue, which meant it was on.
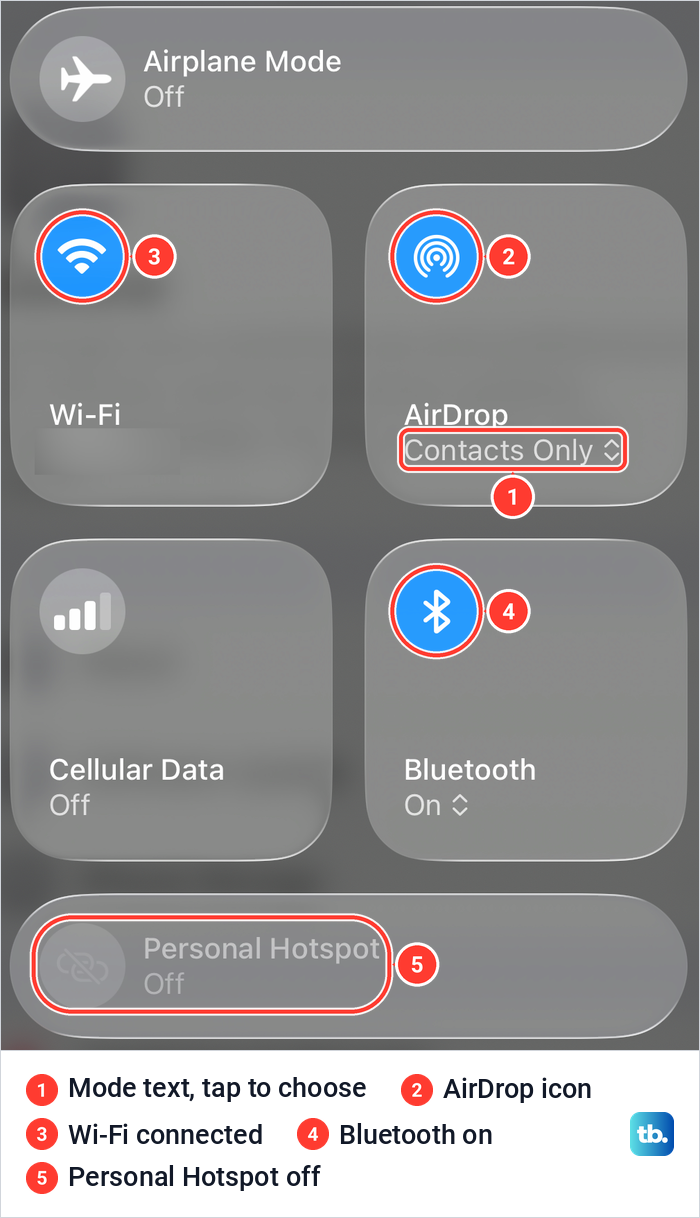
Touch and hold that group, as Apple's steps say, and it opens into full tiles with a name and a status line under each one. Ours showed Wi-Fi connected to a network, Bluetooth On, Personal Hotspot Off and AirDrop Contacts Only, so Wi-Fi on, Bluetooth on and Personal Hotspot off could all be checked at a glance.
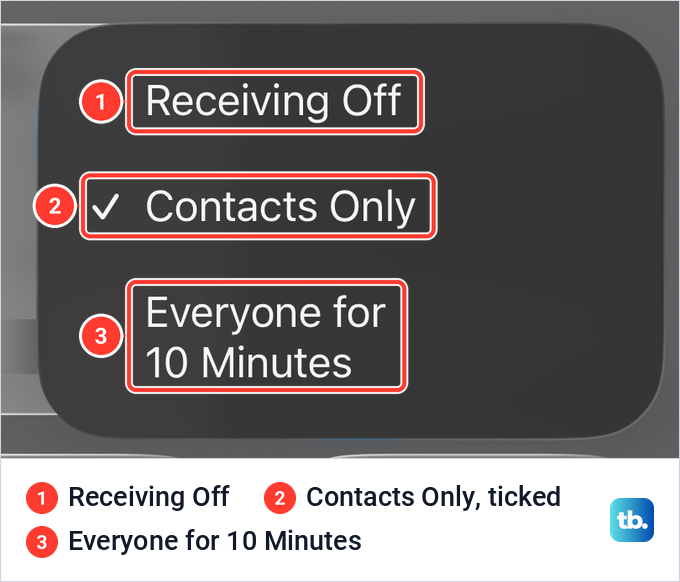
The line under the AirDrop label is the control that matters. When we tapped Contacts Only under the word AirDrop, a small menu opened with Receiving Off, Contacts Only and Everyone for 10 Minutes, with a tick beside the current choice. When we chose Contacts Only there, the tile showed it straight away.
The round AirDrop icon behaves differently. On our iPhone a press on that icon switched AirDrop straight to Receiving Off instead of opening the choices, and we used the menu under the label to set Contacts Only again. If AirDrop seems to turn itself off, check that you did not touch the icon.
Our iPhone also had a whole Control Center page of these connectivity tiles, the third page, and the same AirDrop menu opened from the status line there. Whichever page you use, the three choices are the same.
Choose who can AirDrop to you in Settings
The same choices live in Settings > General > AirDrop. On our iPhone the AirDrop row sat just under AppleCare & Warranty in General, and the AirDrop page opened with Receiving Off, Contacts Only and Everyone for 10 Minutes at the top, Contacts Only ticked.
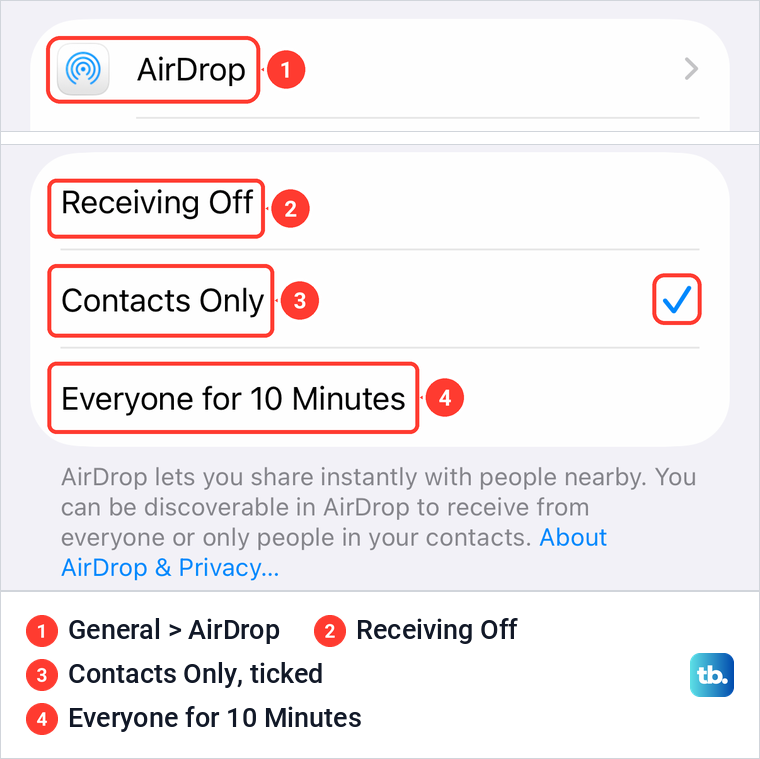
Receiving Off means nobody can send to you. Contacts Only lets people in your contacts see you, but only when your card for them matches their account: Apple says the sender must be in your contacts, with their Apple Account email address or phone number on the contact card you saved for them. A name alone, or a number they do not use for their Apple Account, does not count.
Everyone for 10 Minutes opens you to anyone nearby, then switches itself back. Apple says that after ten minutes it reverts to Contacts Only if you are signed in to your Apple Account, and to Receiving Off if you are not. That is why a setting you chose earlier can look changed when someone tries again.
AirDrop photos from an iPhone
Open Photos, tap Select and tap each photo or video you want to send. Then tap the Share button and tap AirDrop. On iOS 26.5, after we ticked two sample photos, the bar at the bottom read 2 Photos Selected, with the Share button on its left.
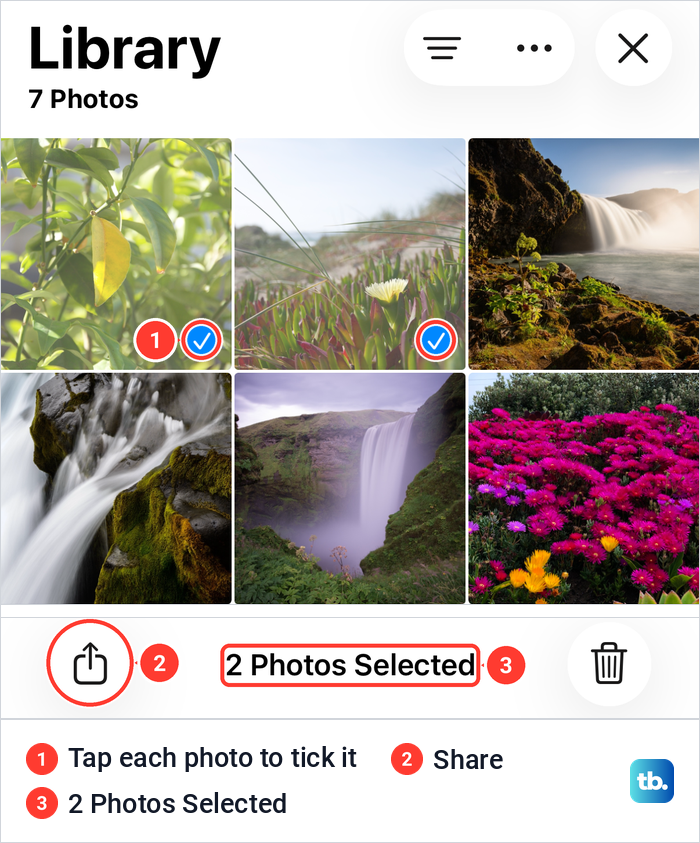
The AirDrop sheet lists who you can send to. Apple says people in your contacts who are nearby appear under People, and the list only shows devices that are close, have Wi-Fi and Bluetooth on and are able to accept from you. Tap the person or device, and they get a request to accept.
Look at the top of the share sheet before you send. When we tapped Share with two sample photos on iOS 26.5, it read 2 Photos Selected with Location Is Included underneath and an Options button below. Apple says sharing a photo includes its metadata, such as location, and its steps to leave that out are to tap Options and turn off Location before you send.
Videos follow the same steps. If what you want to send is a clip of your own screen, record your iPhone screen first, then select the recording in Photos like any other video. Apple describes AirDrop as best for a small selection of files, and for many files it points to a storage device or the cloud instead.
Send a document, PDF or link with AirDrop
In apps that offer AirDrop, the button that opens sharing can differ. Apple's instruction is to open the item, tap Share or the app's share button, then tap AirDrop and the recipient. In Safari on iOS 26.5 with the compact tab bar, we found Share inside the More menu at the bottom of the screen rather than on the bar itself.
For files, open the Files app, tap the More button, tap Select and tap the files you want. Tap Share, then AirDrop. Paper works too: scan a document on iPhone with Notes or Files, then send the finished PDF the same way.
Receive an AirDrop and find what arrived
When someone sends you something, an AirDrop notification appears, and you tap Accept to take it. Apple says transfers are encrypted, and you can accept or decline each one as it arrives. Between devices signed in to the same Apple Account there is no question at all, because the item is accepted and saved automatically.
Where it goes depends on what it is. Apple says most items are saved in the app they were sent from, so a photo sent from Photos is saved in Photos. On an iPhone or iPad some items may be saved in the Files app instead, and a Mac saves some items straight to the Downloads folder.
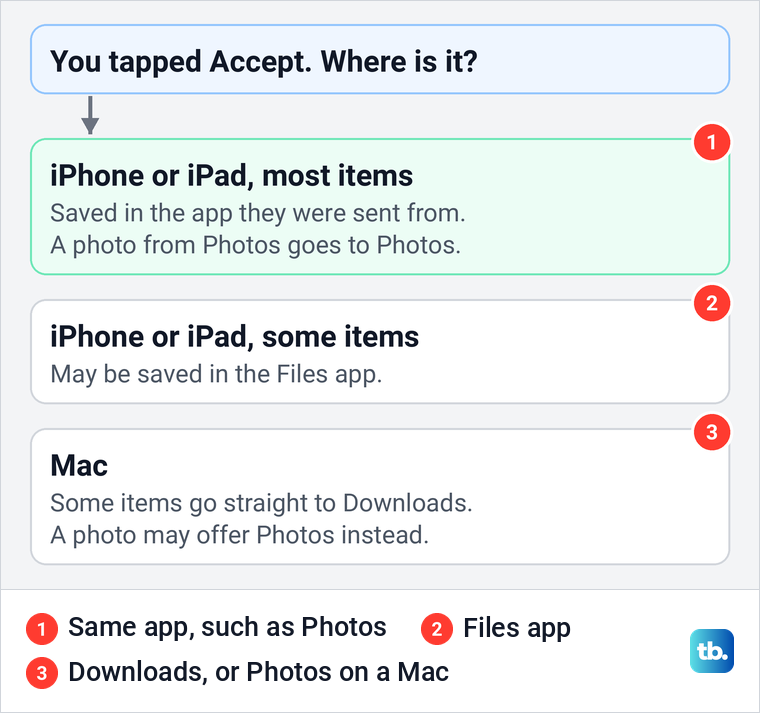
If you accepted something and cannot find it, check those three places in that order. Our guide to find a received AirDrop file goes through the app, Files and Downloads checks one by one.
AirDrop from iPhone to Mac
Turn on AirDrop on the Mac first. Apple's steps are to click Control Center in the menu bar and click AirDrop, which is on when it is blue. Click the arrow next to AirDrop to choose Contacts Only or Everyone. The same choice is in System Settings > General > AirDrop & Continuity.
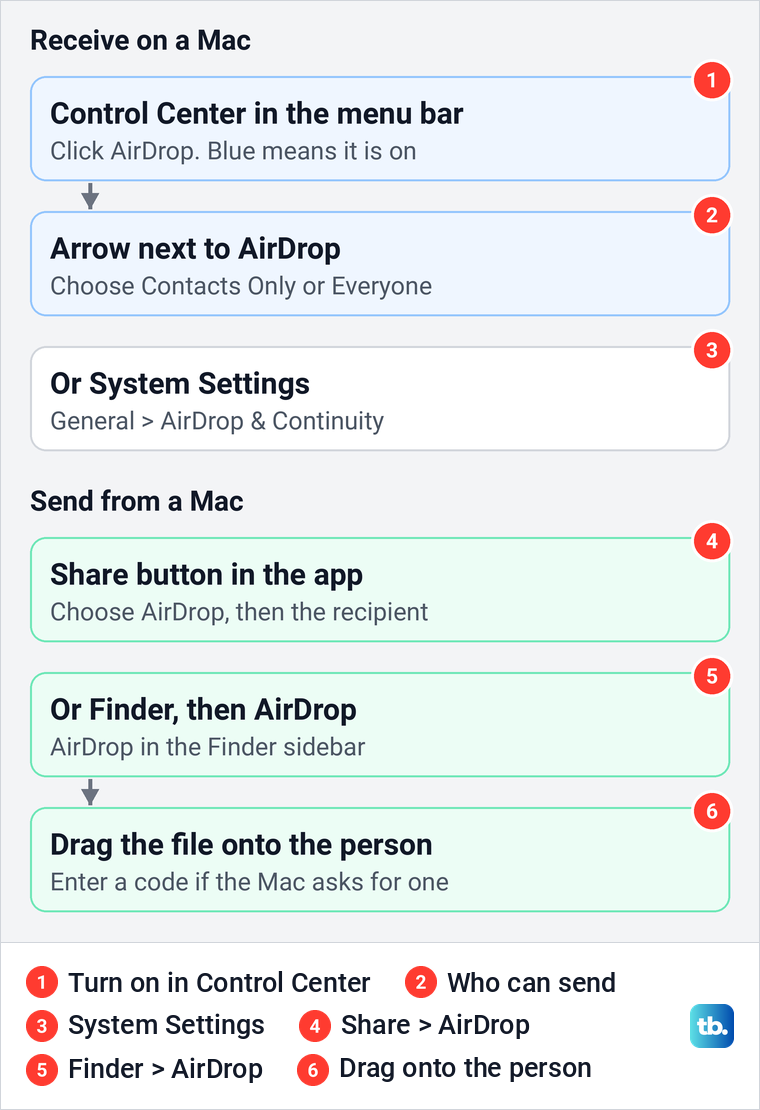
On the iPhone, select the photos or files and tap Share, then AirDrop, and tap the Mac in the list. If both are signed in to your Apple Account, the Mac takes the item without asking. Otherwise the Mac shows a notification to accept it.
Apple says a Mac saves some items straight to Downloads, and for a photo it may let you choose between Downloads and opening it in Photos. So when a photo is not in the Mac's Photos library, open Finder and look in Downloads.
AirDrop from Mac to iPhone
On the Mac, open the item, click the Share button in the window's toolbar and click AirDrop, then choose the iPhone. Finder is the other way: open a Finder window, click AirDrop in the sidebar and drag the file onto the person or device you want to send it to.
Apple notes one difference with Finder. If you opened AirDrop in Finder, the request to accept or decline appears in that window rather than in Notification Center. If you need to send what is on the Mac's display, take a screenshot on Mac, then drag the saved image onto the iPhone in that window.
AirDrop to someone who has not saved you as a contact
What counts is the other person's contact list, not yours. If they have saved you with your Apple Account email address or phone number, their Contacts Only setting already lets you send. If they have not, they open up first by choosing Everyone for 10 Minutes in Control Center, and you pick them on your AirDrop sheet.
With iOS 26.2, iPadOS 26.2, macOS 26.2 or later, Apple's guide says a sender who is not in the recipient's contacts must use an AirDrop code. When that prompt appears, the recipient taps Get AirDrop Code, or Continue, and a code appears on their screen. They tell it to you, you type it on your device, and the item is shared.
Older versions may not ask for a code. If a code prompt appears on either device, follow it, and if none appears, the recipient accepts as usual.
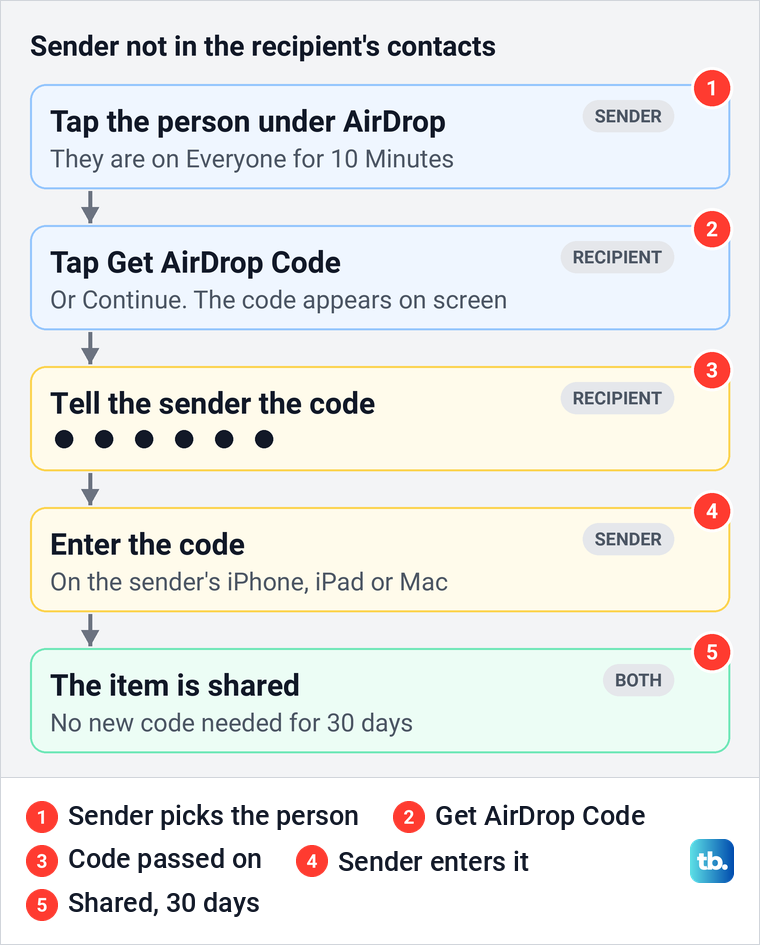
After that, Apple says you can share with each other for 30 days without another code. Our iPhone's AirDrop page showed this as Manage Known AirDrop Contacts, with the note "You will automatically appear for 30 days to people you have shared a one-time code with." Apple's guide gives the way to end it early: open Contacts, find the person in your Other Known list and tap Forget This Person.
Share by bringing two iPhones together
Apple's tip is that you can start an AirDrop with someone in your contacts by opening the photo or file, then holding your iPhone close to theirs. It works on supported models with iOS 17 or later. The setting behind it sits lower on the AirDrop page in Settings.
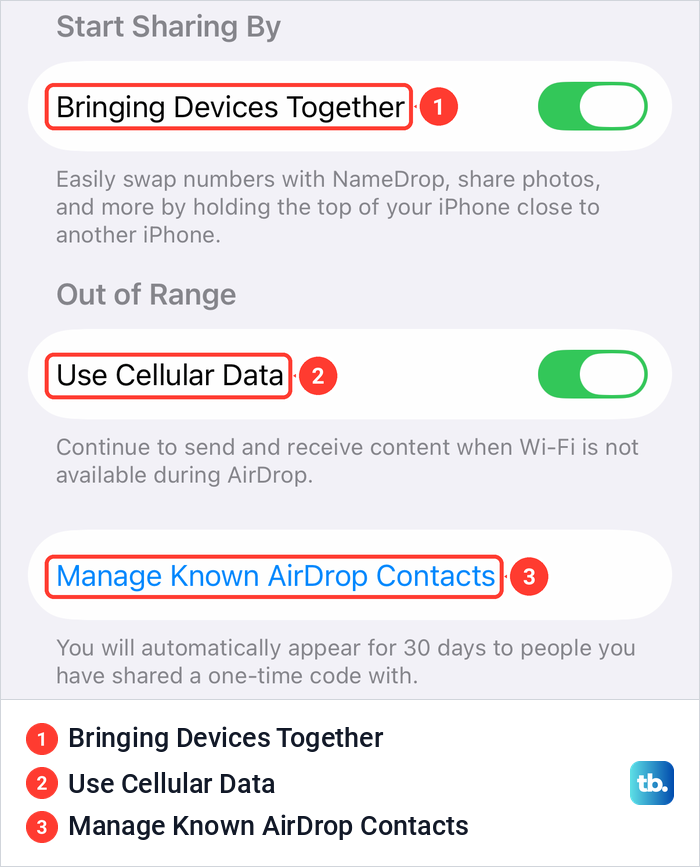
On our iPhone with iOS 26.6 the switch is called Bringing Devices Together, under a heading that reads Start Sharing By, and it was on. Its note reads "Easily swap numbers with NameDrop, share photos, and more by holding the top of your iPhone close to another iPhone." Apple's guide calls the same switch Bring Devices Together.
NameDrop is the contact part of that feature, and it is not how you send a photo. Apple says it only works for sending new contact information, not updating an existing contact. NameDrop is on by default, and turning off Bringing Devices Together turns it off along with the other hold-together features.
Finish an AirDrop after you walk out of range
An AirDrop has to start nearby, but it does not have to finish there. Apple says that if you leave Bluetooth or Wi-Fi range after a transfer has started, it continues over the internet. A large video can therefore keep going after one of you leaves the room.
On an iPhone that can mean cellular data. The Use Cellular Data switch sits under Out of Range on the same AirDrop page, and on our iPhone it was on, with the note "Continue to send and receive content when Wi-Fi is not available during AirDrop." Apple warns that cellular data charges may apply, so turn it off before you travel if roaming is expensive.
Fix AirDrop when the other device does not show up
Start with the receiving device, since Apple's own check is that the recipient is set to receive. Make sure its AirDrop is not on Receiving Off, and remember that Everyone for 10 Minutes switches itself back. If it is on Contacts Only, check that the contact card holds the sender's Apple Account email address or phone number, or use Everyone for 10 Minutes instead.
Then check both devices. Wi-Fi and Bluetooth must be on, Personal Hotspot off, and the devices within 30 feet. Apple says a VPN set up to block local networking may interfere too. If you see several devices with similar names, change your iPhone name so the right one is easy to pick.
If the person still does not appear, Apple's next step is to restart and try again. Restart your iPhone with the buttons or from Settings, and on the Mac side restart your Mac before you look further.
If your iPhone sees other devices but never your Mac, work through the Mac's own settings next. Our guide to fix AirDrop on a Mac covers making it discoverable, the sender's contact details, and VPN and firewall interference.
How we tested this guide
We tested this on an iPhone 17 Pro with iOS 26.6, going through the AirDrop menu in Control Center and the AirDrop page in Settings.
Frequently Asked Questions
Do both devices need to be on the same Wi-Fi network to AirDrop?
No. Apple asks for Wi-Fi and Bluetooth to be turned on and for the devices to be within 30 feet, not for a shared network. A transfer that has already started can even continue over the internet after you move apart.
Why can I not see the other person in AirDrop?
First check that their AirDrop is not on Receiving Off, and that Everyone for 10 Minutes has not already switched back. Then check both devices for Wi-Fi, Bluetooth and Personal Hotspot, and for Contacts Only, that their card for you holds your Apple Account email or phone number. Restart both devices if that fails.
Can I AirDrop to someone who is not in my contacts?
Yes. What matters is whether they have you in their contacts. If they do not, they set AirDrop to Everyone for 10 Minutes, you tap them, and on recent versions they tap Get AirDrop Code and tell you the code to type. Apple says you can then share with each other for 30 days without a new code.
Where do AirDropped photos and files go?
Most items are saved in the app they were sent from, so a photo from Photos ends up in Photos. On an iPhone or iPad some items go to the Files app. A Mac saves some items to Downloads and may offer to open a photo in Photos instead.
Why was my AirDrop accepted without asking me?
Both devices are signed in to the same Apple Account. Apple accepts and saves those transfers automatically, which is why sending from your iPhone to your own Mac or iPad never shows an Accept button.
Does AirDrop use cellular data?
It can. If you leave Wi-Fi or Bluetooth range after a transfer starts, Apple says it continues over the internet, and charges may apply. Turn off Use Cellular Data in Settings > General > AirDrop if you want to avoid that.
Is NameDrop the same as AirDrop?
No. NameDrop only shares new contact information, when you hold your iPhone near another iPhone or a supported Apple Watch. To send a photo, use Share and AirDrop in Photos, or open the photo and hold your iPhone close to a contact's iPhone, which Apple says works on supported models with iOS 17 or later.