
To take a screenshot on a Mac, press Shift + Command + 3 to capture the whole screen, or press Shift + Command + 4 and drag across the part you want. By default the picture is saved to your desktop as a PNG file whose name starts with Screenshot, followed by the date and time. Add Control to either shortcut and the picture goes to the clipboard instead, ready to paste with Command + V.
Shift + Command + 5 opens the Screenshot toolbar, with buttons for still pictures and screen recordings and an Options menu for the timer and the save folder. We ran the shortcuts on our MacBook Air with macOS Tahoe 26.5. Two results are worth knowing before you start: an open menu stays open for the shortcut, and a copy made with Control leaves no file behind.
The short version
- Whole screen: press Shift + Command + 3.
- Part of the screen: press Shift + Command + 4 and drag. Press Space after the shortcut to grab one window instead.
- Copy instead of save: add Control, then paste with Command + V.
- Timer, save folder or a video: press Shift + Command + 5, then use Options for the timer or folder, or a record button for video.
- Where it went: the desktop by default, named Screenshot with the date and time.
Mac screenshot shortcuts at a glance
| Press | What it captures | Where it goes by default |
|---|---|---|
| Shift + Command + 3 | The whole screen, at once | A PNG file on the desktop |
| Shift + Command + 4, then drag | Only the area you drag across | A PNG file on the desktop |
| Shift + Command + 4, then Space, then click | One window, with a shadow, or the menu bar. Hold Option as you click to leave the shadow out | A PNG file on the desktop |
| Open the menu, then Shift + Command + 4 and drag | An open menu, exactly as it looks | A PNG file on the desktop |
| Control added to any of the above | The same picture | The clipboard only, ready for Command + V |
| Shift + Command + 5 | Opens the Screenshot toolbar for pictures, recordings, a timer and other options | The place chosen under Options: a folder, Clipboard, Mail or Preview. The desktop until you change it |
| Shift + Command + 6 | The Touch Bar, on a MacBook Pro that has one. On macOS 27 with Siri AI turned on, Apple lists these keys for Siri | A PNG file on the desktop |
| File > Take Screenshot in Preview | A selection, one window or the entire screen, with no shortcut at all | A new Preview window named Untitled |
This table describes macOS Tahoe 26.5 with its default settings. We tried the whole-screen, selection and open-menu shortcuts, and Control with a selection, on our MacBook Air. The window, menu bar, toolbar, Touch Bar and Preview rows follow Apple's instructions.
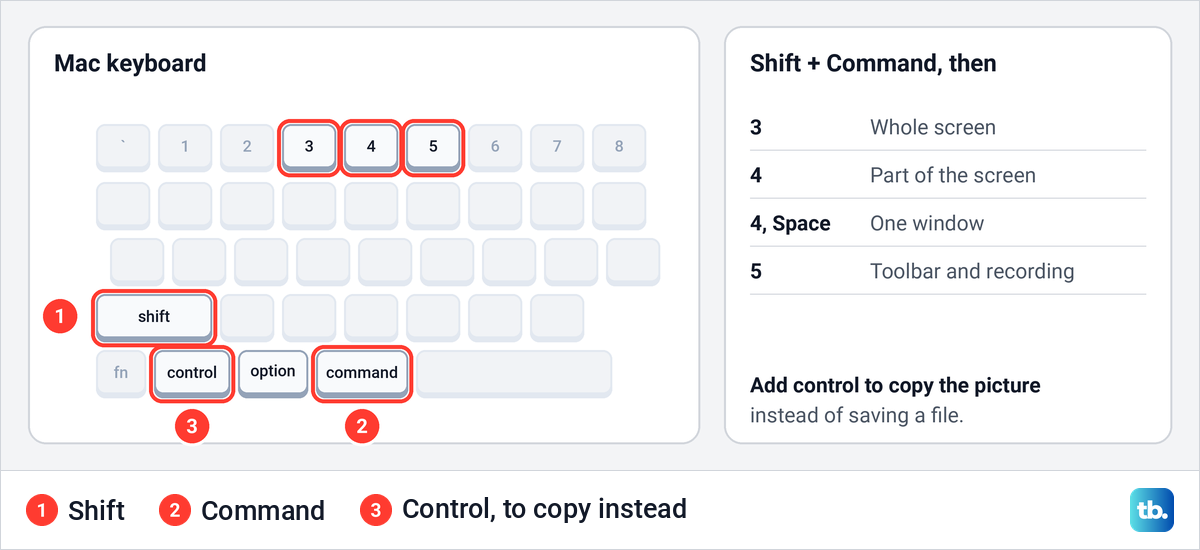
Capture the whole screen with Shift + Command + 3
Press and release Shift + Command + 3 together. When we pressed it, the Mac saved everything on the screen as a PNG file straight away, with no box to confirm and nothing to choose. By default that file lands on your desktop.
Apple says a thumbnail of the picture may appear in the corner of the screen for a few seconds. Click it if you want to edit the screenshot, or ignore it and the file is saved as soon as it goes away, so there is nothing else to do.
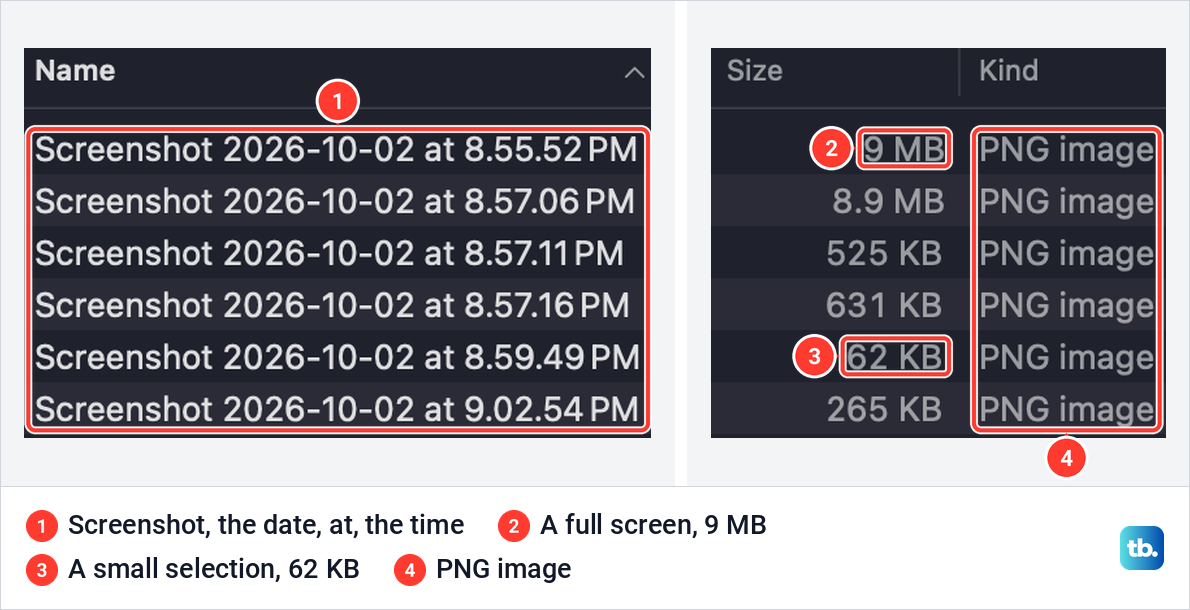
Full-screen pictures are large. On our MacBook Air a full-screen screenshot came to about 9 MB, while a small selection of three lines of text was 62 KB. A desktop full of old ones adds up quickly, and our guide to clearing disk space on Mac helps when storage runs low.
Capture part of the screen with Shift + Command + 4
Press and release Shift + Command + 4; you do not need to keep holding the keys while you drag. The pointer turns into a crosshair. Click where the picture should start, hold the mouse or trackpad button, drag to the opposite corner and let go, and the screenshot is taken the moment you release.
Two keys help while you drag. Press Esc to cancel without saving anything, and hold Space to move the box you have drawn without changing its size.
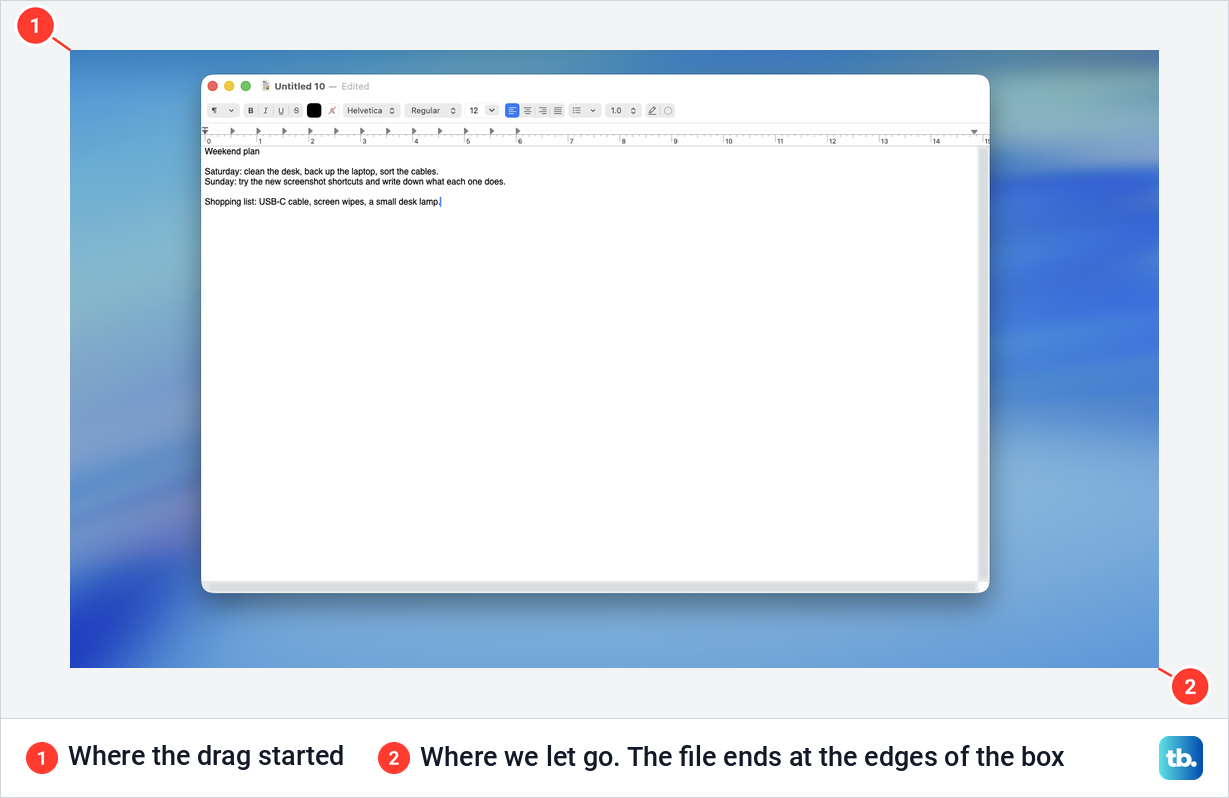
We dragged across a TextEdit window and the saved file held exactly that rectangle and nothing outside it. The crosshair did not show up in any of our pictures.
Capture one window, the menu bar or an open menu
For one window, press Shift + Command + 4, then press and release Space. The pointer changes to a camera. Move it over the window you want so that it is highlighted, then click.
Apple says the window is saved on its own, with a soft shadow around it. To leave the shadow out, hold Option while you click.
The menu bar works the same way. Press Shift + Command + 4, then Space, and move the camera over the menu bar at the top of the screen until it is highlighted, then click.
For an open menu, Apple's steps are to open the menu first, press Shift + Command + 4, and drag across it. We opened TextEdit's Format menu and did exactly that. The menu stayed open while we pressed the keys and dragged, and the saved file shows it complete, shortcuts and all.
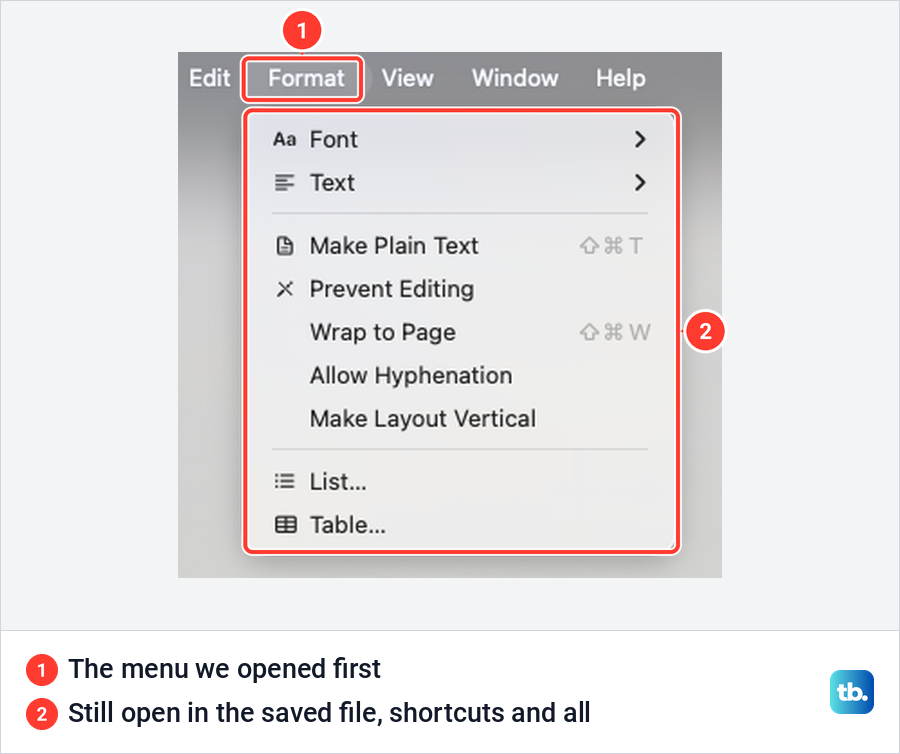
So you do not need a timer to capture a menu. Apple's window steps cover menus too: press Space instead of dragging, then click the open menu to save just the menu.
Open the Screenshot toolbar with Shift + Command + 5
On macOS Mojave and later, Shift + Command + 5 opens the Screenshot app as a small toolbar on screen. It has six buttons. Apple's guide lists them in this order: capture the entire screen, capture a window, capture a portion of the screen, record the entire screen, record a window and record a portion of the screen.
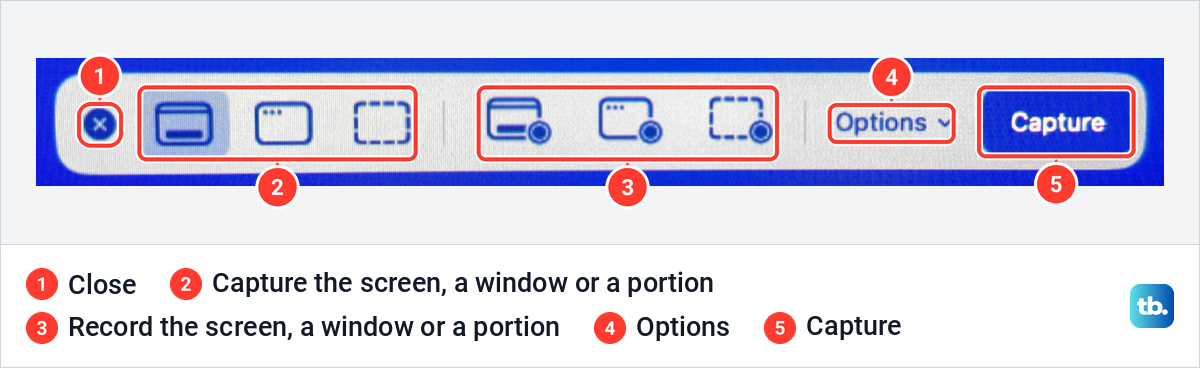
Record a window is new in macOS Tahoe 26, so earlier versions show five buttons. Next to them sit Options and a Capture or Record button. For the entire screen or a portion, click Capture; for a window, move the pointer over it and click the window.
For a portion, a frame appears on screen. Drag the frame to move it, or drag its edges to change its size, then click Capture. Click the close button at the left end of the toolbar to put it away without taking anything. In our captures, macOS left the toolbar and the floating thumbnail out of the saved picture.
If the keys do nothing, open Spotlight on your Mac, type Screenshot and press Return. The app also sits in the Utilities folder inside Applications. On macOS Tahoe, Launchpad has been replaced by Apps, so older advice to look in Launchpad no longer fits.
Set a timer, the save folder and other options
Click Options on the toolbar to open a menu of settings. Apple notes that the choices change depending on whether you have a capture button or a record button selected.
Save to decides where new screenshots go. Choose one of the preset places or select Other Location and pick any folder. Apple describes this as changing the default save location, so it is the setting to check first if screenshots stop appearing on the desktop. On our Mac the list included Desktop, Documents, Clipboard, Mail, Preview and Other Location.
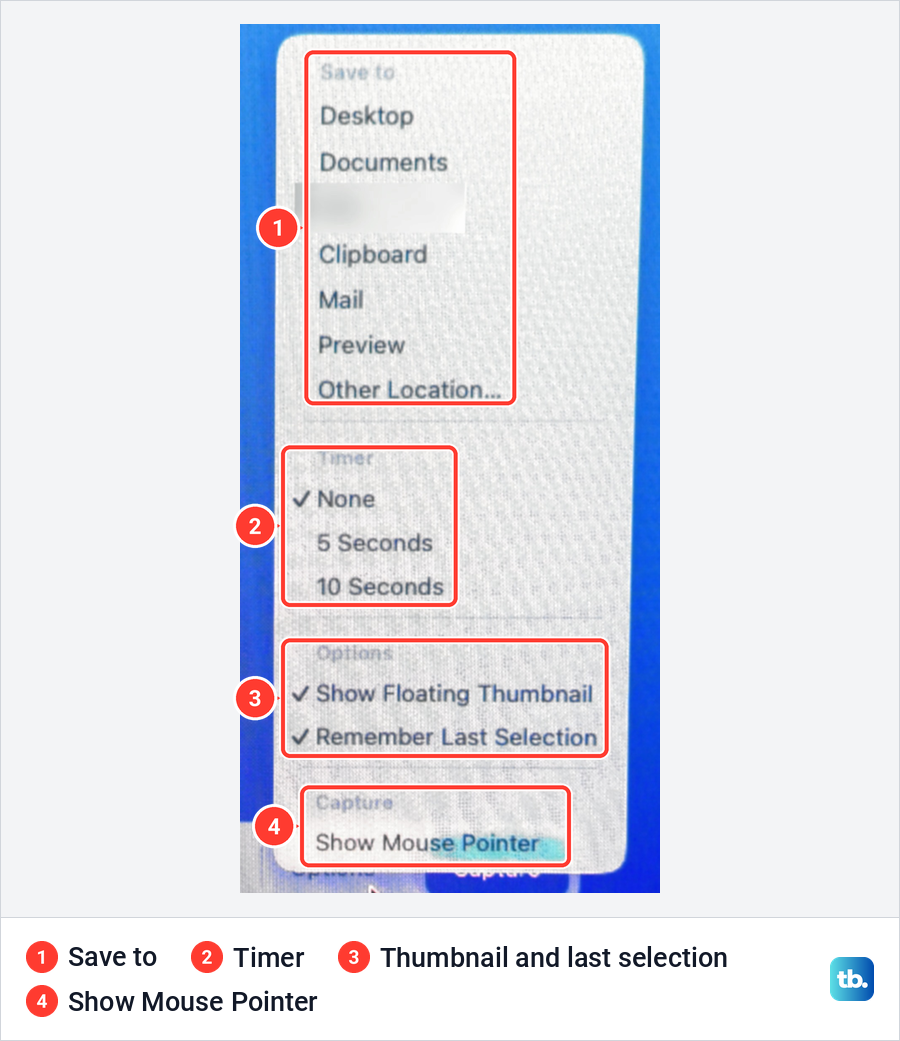
Timer waits before the capture starts. On our Mac the choices were None, 5 Seconds and 10 Seconds. It helps when you need a few seconds to hover over something or open a pop-up before the picture is taken.
Show Floating Thumbnail turns the preview in the corner on or off. Remember Last Selection keeps the box you drew last time, and Show Mouse Pointer includes the pointer in the picture when it is ticked.
On supported Macs with macOS Tahoe 26 or later, Capture Format offers SDR or HDR. Apple says SDR, labelled Most Compatible, saves a PNG, while HDR saves a HEIF file with more brightness and color. You need an HDR display to see the difference, so SDR is the safe choice for anything you plan to share. Capture Format was not in the Options menu on our MacBook Air.
Use the floating thumbnail and mark up a screenshot
After a capture, Apple says a thumbnail floats in the bottom-right corner of the screen for a few seconds before the file is saved. Swipe right on it to save the file at once and make it disappear. Drag it into a document, an email, a note or a Finder window to drop the picture straight there.
Hold the pointer over the thumbnail and it stays on screen until you act on it or move away. Control-click it, which is the same as a right-click on a Mac, and choose Save to Clipboard to keep the picture for pasting instead of as a file.
Click the thumbnail to open the Markup window. Its tools let you crop, draw, add shapes and type text, and the share button sends the result on. Apple warns that changes made in a Quick Look window cannot be undone after you close it, so keep a copy if you need the original. For more ways to trim a picture, see how to crop a screenshot on Mac.
Copy a screenshot instead of saving it
Hold Control as well as the other keys. Control + Shift + Command + 3 copies the whole screen, and Control + Shift + Command + 4 copies the area you drag. Then click where the picture should go and press Command + V.
When we used Control + Shift + Command + 4, no new file appeared, and the clipboard held a PNG image. That is the point of it, but it also explains many missing screenshots: hold Control by accident and no file is saved.
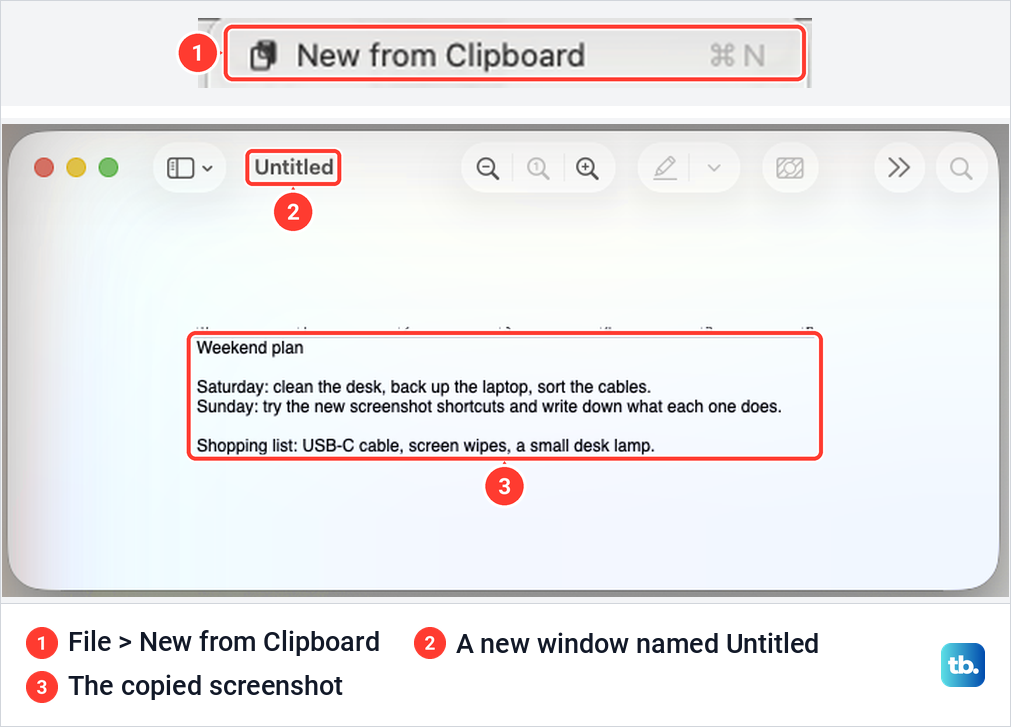
If you decide you want a file after all, open Preview and choose File > New from Clipboard, or press Command + N. On our Mac that opened a window named Untitled holding the capture. To keep it as a file, choose File > Save from the same menu.
Copying something else replaces the screenshot, so paste it first. Clipboard history may still hold it, and our guide shows how to see clipboard history on Mac.
Apple's Universal Clipboard can paste the copy on an iPhone or iPad. Both devices need Wi-Fi, Bluetooth and Handoff turned on, the same Apple Account, and to be within 30 feet of each other. Apple adds that the copy is only available for a short time.
Where screenshots are saved on a Mac
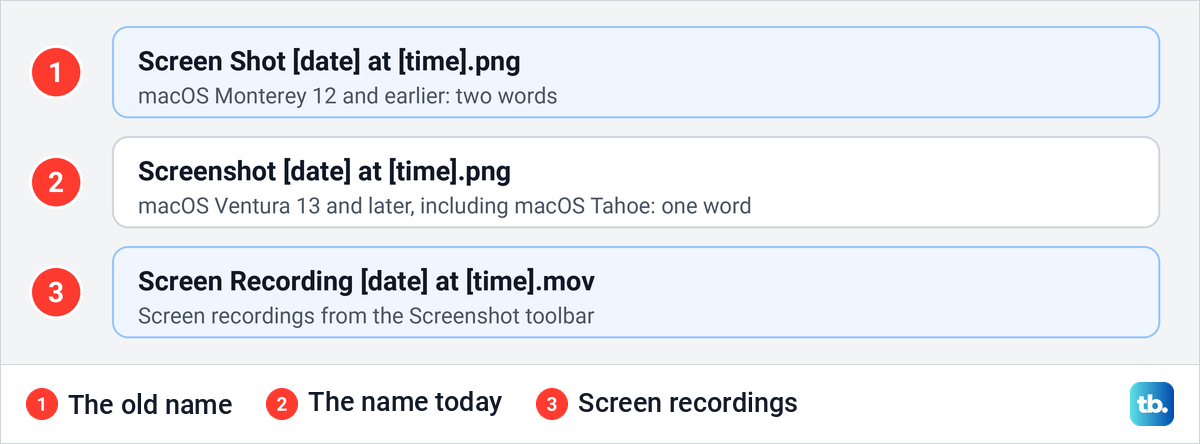
By default, screenshots go to the desktop as PNG files. Apple's guide says the names begin with Screenshot and include the date and time, and screen recordings are saved as MOV files named Screen Recording.
That matched our Mac. In Finder every file name read Screenshot, the date, the word at and the time, and the Kind column read PNG image. The sizes show how much a full-screen picture weighs next to a selection.
Older Macs used a different name. Up to macOS Monterey, files began with Screen Shot as two words, and macOS Ventura changed it to Screenshot. Some of Apple's own help pages still use the old name, so search Finder for both if you are hunting for an old capture.
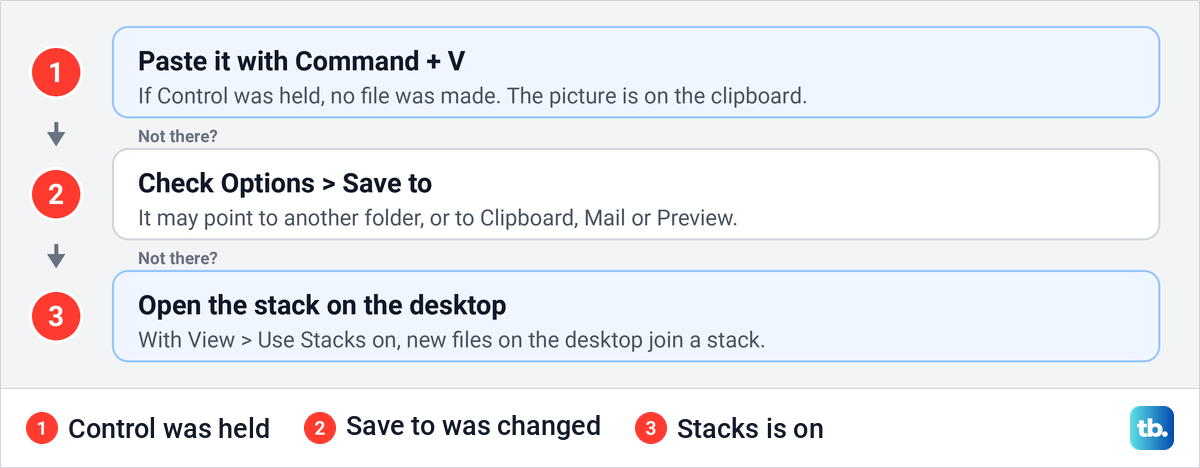
If a file is not on the desktop, check three things. Control may have been held, so it went to the clipboard; Save to may point to another folder, or to Clipboard, Mail or Preview instead of a folder; or Stacks may be on. Apple says that with Stacks on, new desktop files are added to a stack automatically, and View > Use Stacks switches it on or off.
If you store Desktop and Documents in iCloud Drive, Apple says you can also find the Desktop folder in iCloud Drive under Favorites in the Finder sidebar on macOS Tahoe, which is another way to browse it. If a capture is still missing, our guide on where to find screenshots on Mac covers more places to look.
Record your screen from the same toolbar
Press Shift + Command + 5 and choose one of the three record buttons: Record Entire Screen, Record Selected Window or Record Selected Portion. Apple says Record Selected Window needs macOS Tahoe 26 or later. Click Record, or click the window you chose, to start.
Before you start, the Options menu changes for video. You can choose a microphone, turn on Show Mouse Clicks to draw a black circle around each click, set a timer and pick the save folder. On macOS 27 and later, Apple adds Include System Audio to record the sound your Mac plays.
To stop, click the Stop button in the menu bar or press Command + Control + Esc. By default the video lands on the desktop as Screen Recording, then the date and time, with the .mov extension.
Apple says that if QuickTime Player's File > New Screen Recording shows these same onscreen controls, the Screenshot app is doing the recording and the same steps apply. Apple also notes that some apps, such as the Apple TV app, might not let you record their windows.
There is more on video in our guide on how to screen record on a Mac. Before macOS 27 the toolbar has no system audio choice, and our guide to recording internal audio on Mac covers the other ways.
Take a screenshot from Preview without the keyboard
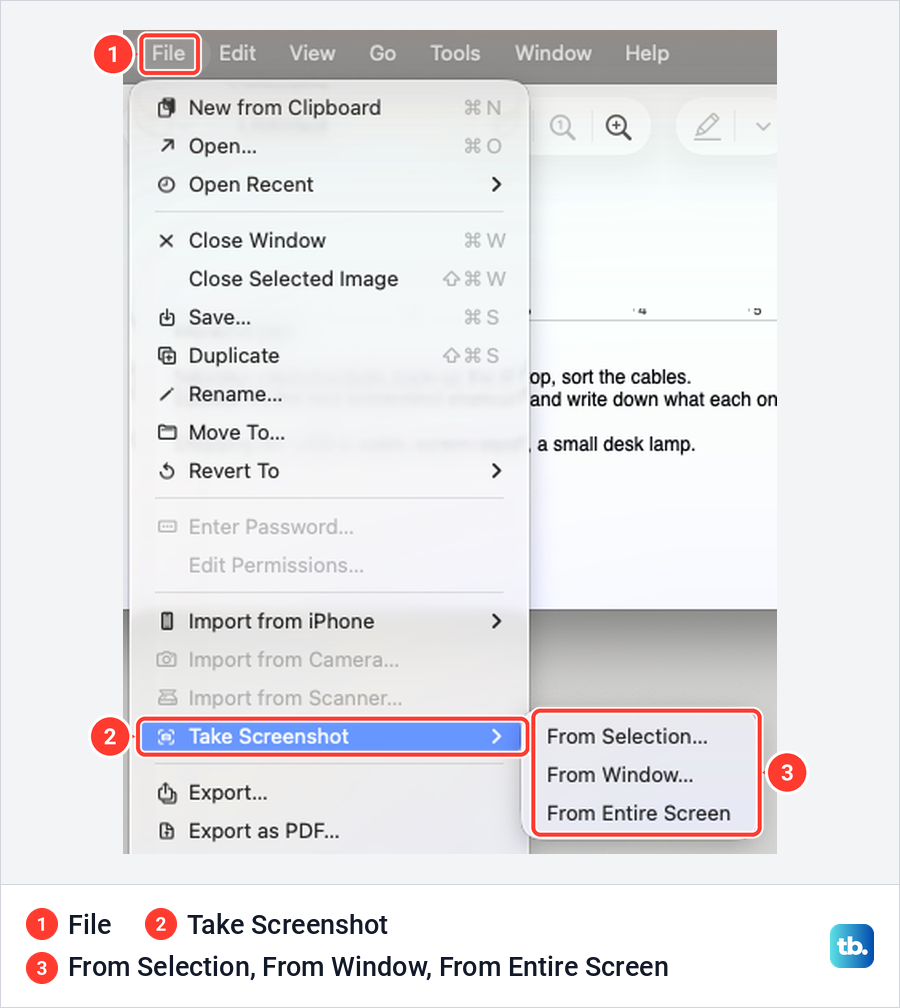
Preview has its own capture menu, handy when a shortcut is not an option. Apple's steps are to open an image or PDF in Preview, then choose File > Take Screenshot and pick From Selection, From Window or From Entire Screen.
On our Mac the File menu listed Take Screenshot with exactly those three choices. Apple says the picture opens in Preview as a new document named Untitled, so it is ready to edit or save wherever you like.
Shift + Command + 6 and the Touch Bar
On a MacBook Pro with a Touch Bar, Apple's guide for macOS Tahoe and macOS 27 lists Shift + Command + 6 as the way to capture the Touch Bar. The picture is saved like any other screenshot.
On macOS 27, Apple's list of shortcuts gives the same keys a second job. With Siri AI (Beta) turned on, Shift + Command + 6 lets you select an area and ask Siri about it, and Shift + Command + Space bar asks about the active window. Apple says Siri AI needs a MacBook Neo or a Mac with M1 or later, and starts in English.
Apple's macOS 27 list includes the 13-inch MacBook Pro models with M1 and M2, which have a Touch Bar. Apple's pages do not say which job the keys do there when Siri AI is on.
Print Screen on a Mac and Windows keyboards
Mac keyboards have no Print Screen key. Apple's table of Windows keys on a Mac says Print Screen is Shift + Command + 3 for the entire screen and Shift + Command + 4 for the part you select.
On a keyboard made for Windows PCs, Apple says to press the Ctrl key or the Windows logo key instead of Command, and Alt instead of Option. If the shortcuts still do nothing, open System Settings > Keyboard > Keyboard Shortcuts > Modifier Keys and use the pop-up menu next to each modifier to choose what it does.
When the screenshot shortcut does nothing
Start with the shortcuts themselves. Choose Apple menu > System Settings, click Keyboard in the sidebar, click Keyboard Shortcuts, then select Screenshots. On our Mac the list had five entries, each with a tick box and its keys.
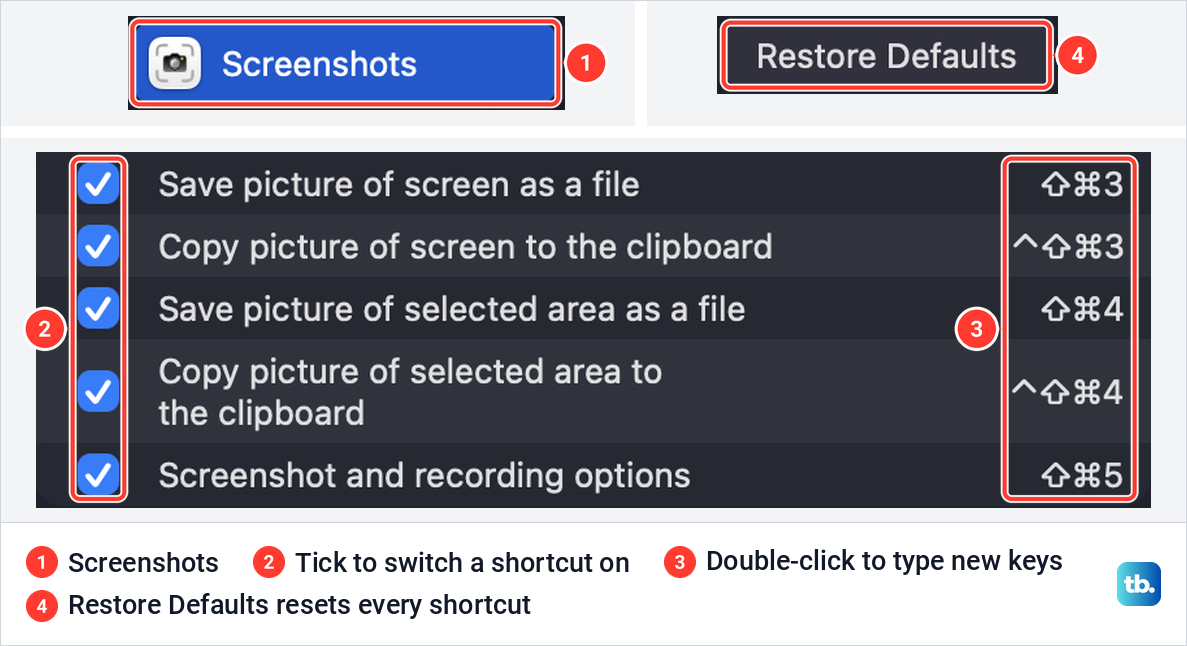
An unticked box means that shortcut is switched off, so tick it again. Apple says a warning icon next to a shortcut means another app is already using those keys. Double-click the key combination and type new keys to give one of them a different shortcut.
Restore Defaults at the bottom puts the shortcuts back to Apple's keys. Apple's instructions describe it as returning all shortcuts to their original combinations, so use it only if you do not mind losing other changes. Apple also suggests quitting and reopening apps after you change a shortcut.
Next, rule out the two quiet causes covered above, Control and the Save to setting. Some apps, such as the Apple TV app and DVD Player, might not let you capture their windows. On a work or school Mac, an administrator can turn on a restriction that stops anyone saving a screenshot or recording.
Third-party capture apps need permission. Open System Settings > Privacy & Security > Screen & System Audio Recording and turn the app on. If the keys still fail, open Screenshot from Spotlight to get your picture while you keep looking.
For deeper checks, work through our fixes for Mac screenshots that will not work. If no shortcut works anywhere, the keys themselves may be at fault, so try our Mac keyboard and touchpad fixes.
How we tested this guide
We tested this on a MacBook Air with macOS Tahoe 26.5, taking screenshots with Shift + Command + 3 and Shift + Command + 4.
Frequently Asked Questions
Where do screenshots go on a Mac?
They are saved to the desktop by default, as PNG files whose names start with Screenshot and include the date and time. To change it, press Shift + Command + 5, click Options and choose a place under Save to.
What is the Print Screen key on a Mac?
There is none. Apple lists Shift + Command + 3 for the whole screen and Shift + Command + 4 for the part you select as the Mac's equivalent of Print Screen.
Why is Shift + Command + 3 not working on my Mac?
Open System Settings > Keyboard > Keyboard Shortcuts > Screenshots and check that the box is ticked and no warning icon shows. If Control was held too, the picture went to the clipboard instead of a file. Some apps might not let you capture their windows, and a work or school Mac can block captures altogether.
How do I copy and paste a screenshot on a Mac?
Press Control + Shift + Command + 4, drag across the area, then press Command + V where you want the picture. You can also Control-click the floating thumbnail and choose Save to Clipboard.
How do I screenshot a drop-down menu on a Mac?
Open the menu, press Shift + Command + 4 and drag across it. The menu stayed open when we did this, so no timer is needed.
How do I take a screenshot of a whole web page on a Mac?
The Screenshot app captures what is on screen, so use the browser for a long page. In Chrome, Google's steps are to open the developer tools, click Toggle device toolbar in the action bar at the top, then choose More options > Capture a full size screenshot. Google says the device toolbar opens in Responsive mode, where you can drag the handles or type a width to get the page size you want. Here is how to open the developer tools on a Mac.
How do I change a Mac screenshot from PNG to JPG?
Open the file in Preview, choose File > Export and set Format to JPEG. Apple says a quality setting appears when you choose JPEG, so you can trade file size against sharpness. Type a new name or choose a folder, then click Save.