
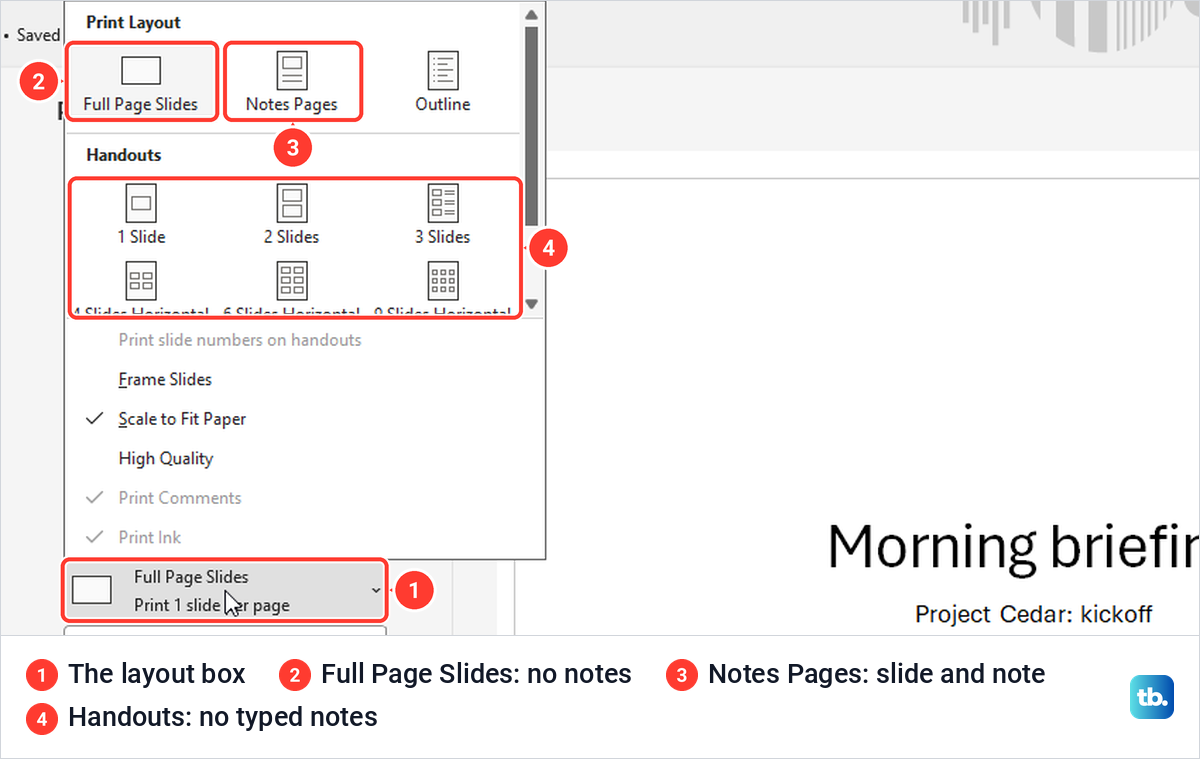
To print PowerPoint with notes, open File > Print or press Ctrl + P, click the layout box that reads Full Page Slides, choose Notes Pages and select Print. Each page then holds one slide with its speaker notes underneath. For a PDF instead of paper, pick Microsoft Print to PDF as the printer before you print.
Full Page Slides is the layout PowerPoint picks by default, and it leaves your notes out, so a printout made without changing it has no notes. Handouts layouts also leave out your typed notes, and the 3 Slides handout has blank lines for notes you write by hand. In PowerPoint for Microsoft 365 on Windows 11, version 25H2, one switch to Notes Pages put each slide's note on its own page for us.
The short version
- Press Ctrl + P and change Full Page Slides to Notes Pages to print each slide above its notes.
- Full Page Slides and every Handouts layout print the slides without your typed notes.
- For notes without slide pictures, delete the picture on each page in View > Notes Page on a copy, then print Notes Pages.
- For more than one slide and its notes on a page, use File > Export > Create Handouts and check Word's print preview.
- In PowerPoint for the web, choose File > Print > Print slides with notes.
Which print layout includes your notes
Only one desktop layout prints what you typed in the notes pane. Microsoft puts it in two lines: Notes Pages prints one slide per page, with speaker notes below, while the other Print Layout options and all of the Handouts options print only slides or slide content, not speaker notes.
| What you want | Where to choose it | What you get |
|---|---|---|
| Every slide with its notes, Ctrl + P | Notes Pages in the layout box | One slide per page with its note below |
| A few slides with their notes | Custom Range, the slide numbers, then Notes Pages | Only those slides, each with its note |
| A PDF of the notes pages | Notes Pages, then Microsoft Print to PDF as the printer | A PDF that matches the preview |
| Notes without the slide pictures | View > Notes Page, delete each slide picture, then Notes Pages | Notes pages without the slide pictures |
| More than one slide and its notes on a page | File > Export > Create Handouts, Notes next to slides | A Word table with each note beside its slide, as many to a page as fit |
| Notes from the web app, Alt + Windows, then F, P, N | File > Print > Print slides with notes | Edge's print dialog with each note under its slide |
The same layout has a different name in each app. PowerPoint for the web calls it Print slides with notes, and Microsoft's Mac steps call it Notes in the Layout menu.
Check that each slide has its notes
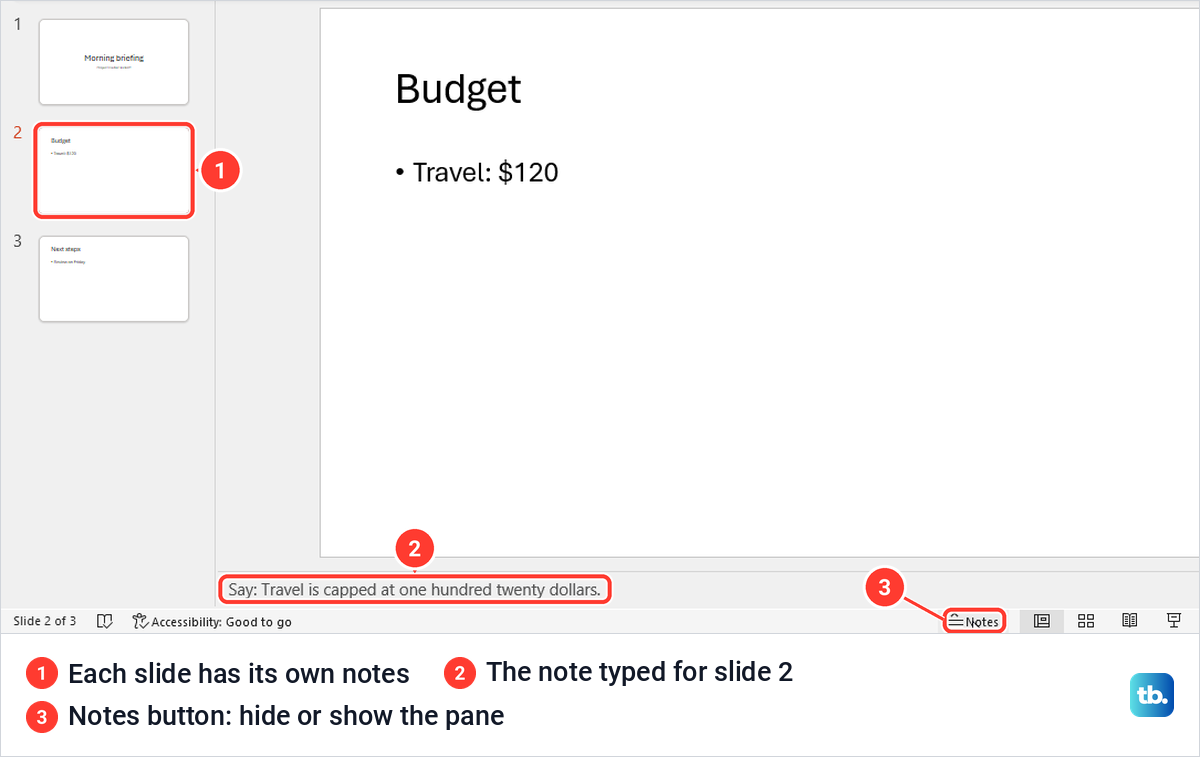
Speaker notes belong to one slide each. In Normal view they sit in the notes pane under the slide, and a slide without a note shows the grey prompt Click to add notes there. If that prompt is all you see, add speaker notes in PowerPoint first, because Notes Pages can only print what the pane holds.
No pane under the slide means it is hidden, not empty. The Notes button on the status bar at the bottom of the window hides and shows it, and when we hid the pane on slide 2 and clicked the button again, the note was still there.
Print slides with notes in PowerPoint for Windows
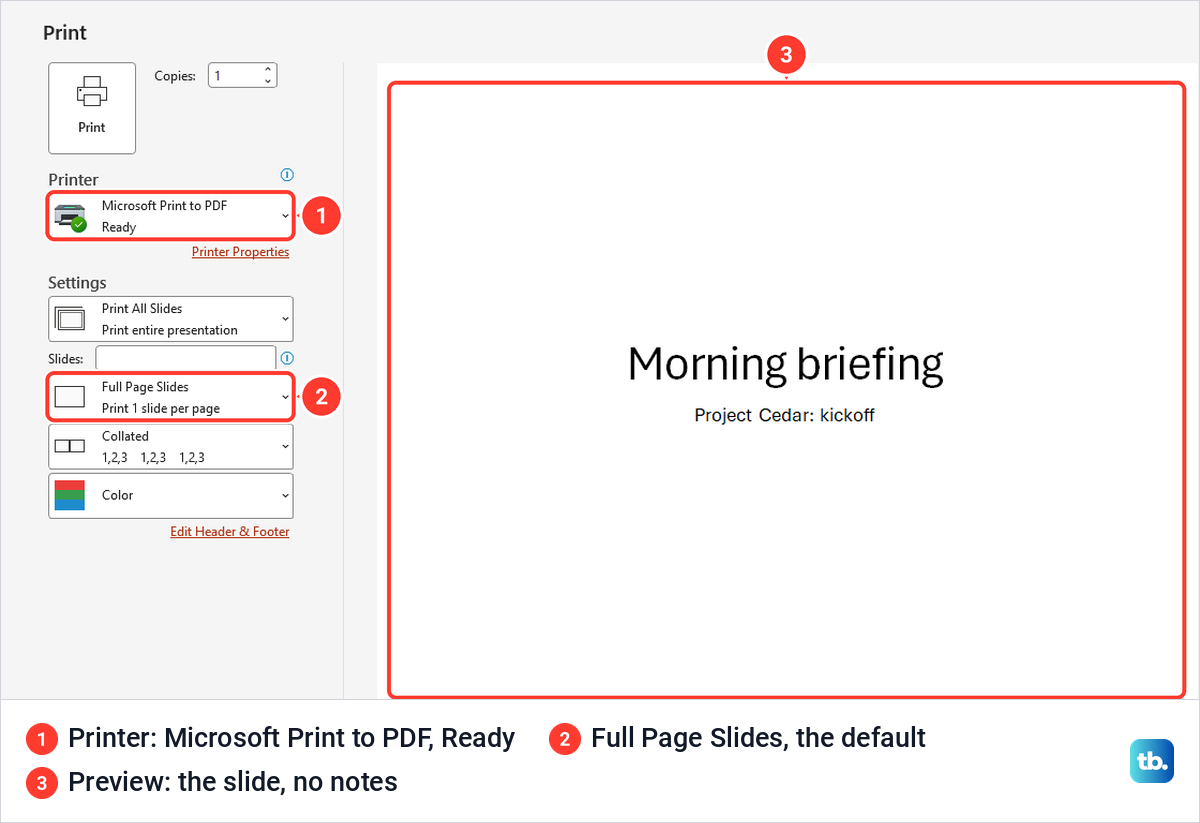
Open the presentation and press Ctrl + P, or select File and then Print. The Print page shows the printer at the top, a Settings column under it and a preview on the right. Ours opened with Microsoft Print to PDF as the printer, marked Ready, and the layout box on Full Page Slides, with a preview of the slide and no note.
Pick your printer in the Printer box first. If the one you want is missing from the list, add a printer in Windows 11 and then come back to this page.
Now select the second box under Settings, the one that reads Full Page Slides, and choose Notes Pages under Print Layout. The box changes to Notes Pages, Print slides with notes. The preview then shows the slide at the top of a portrait page, its note below and a page number at the bottom right.
A new box appears at the same moment. Portrait Orientation showed up between Collated and Color only after we chose Notes Pages, and with Full Page Slides there was no orientation box at all, so look for it after you switch. Page through the preview with the arrows under it, then select Print.
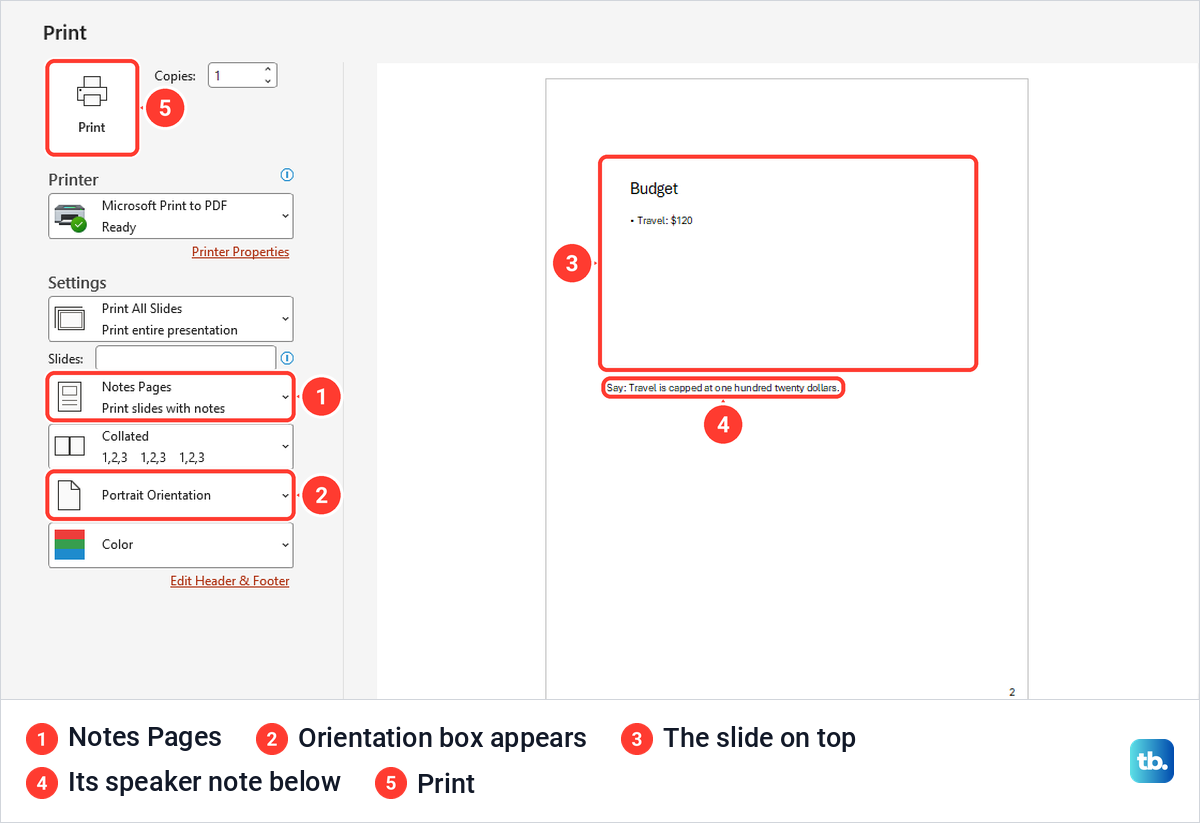
The keyboard route works too. After Ctrl + P, press Alt, then P and H one after another to open the layout menu, then Right arrow once and Enter to choose Notes Pages, which is the exact sequence we used.
With Notes Pages chosen, the orientation box offers Portrait Orientation and Landscape Orientation, and the color box offers Color, Grayscale and Pure Black and White. The preview followed each choice on our PC, so it is the quickest way to see how a black and white printout will look before any paper is used.
In our deck, Notes Pages stayed selected on the next Ctrl + P while the file was open. After we closed and reopened the file, Print started on Full Page Slides again, so check the layout box each time. Print also opens on the page of the selected slide, and ours read 2 of 3 with slide 2 selected.
Print only some slides with their notes
Open the first box under Settings, which reads Print All Slides by default. It also offers Print Selection for the slides selected in the thumbnail pane, Print Current Slide and Custom Range.
Choose Custom Range and type the slide numbers in the Slides box, with commas between slides and a hyphen for a run, as in Microsoft's example 1,3,5-12. We typed 1,3 with Notes Pages chosen, and the preview dropped from three pages to two, slide 1 with its note and then slide 3 with its note.
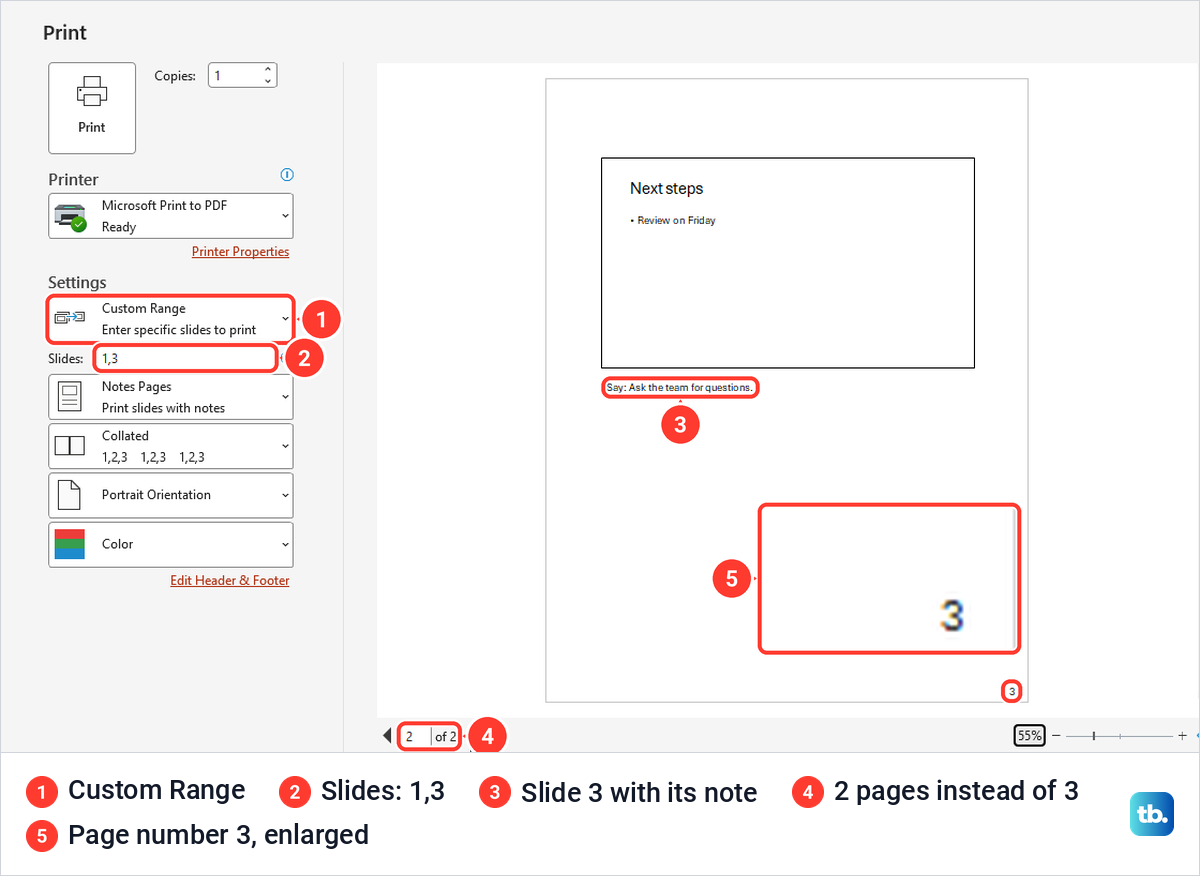
Pressing Enter in the Slides box starts the print at once, and with Microsoft Print to PDF the save window opened before we had seen a single page. While we typed the range the preview went blank and read 0 of 0. Esc cancelled the early save window, and the next Ctrl + P came back with 1,3 still in the box and the two pages in the preview.
In our 1,3 example, the second notes page showed 3 rather than 2 as its page number. The PDF it made had the same two pages with the same numbers.
Below the range choices sits Print Hidden Slides. It was listed but greyed out on our deck, which had no hidden slides, and Microsoft says the option is active when the presentation contains hidden slides.
Save PowerPoint notes as a PDF
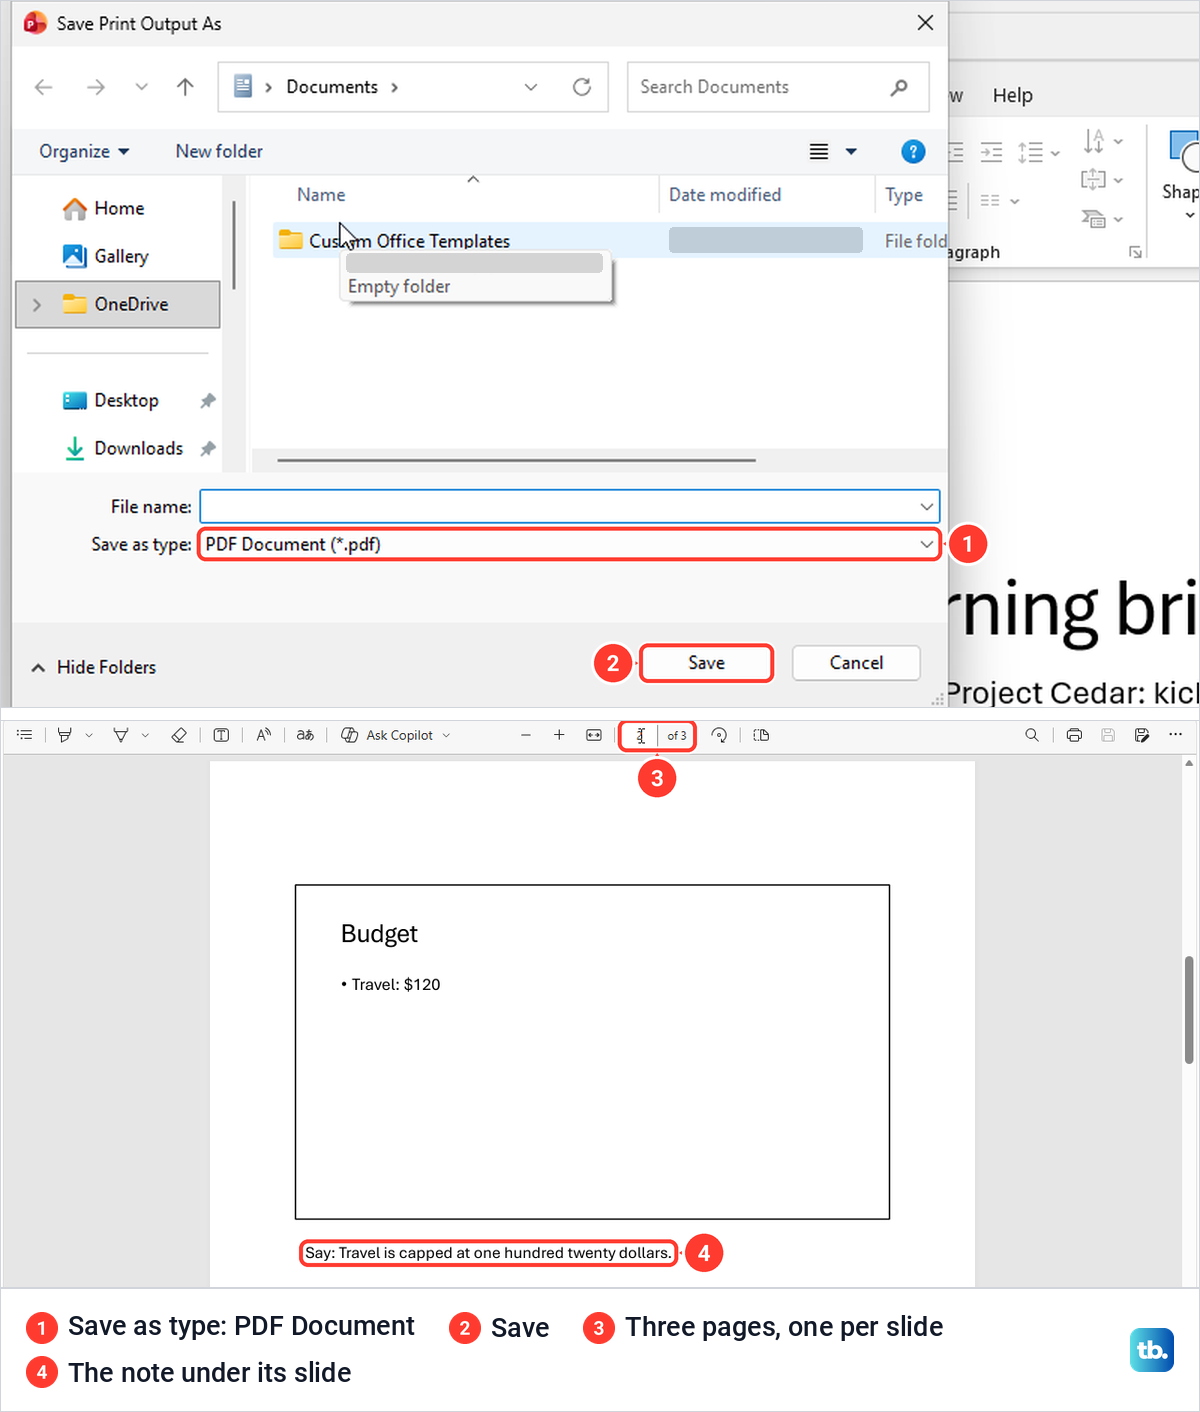
A PDF of the notes pages comes from the same Print page. Choose Notes Pages, set a range if you need one, open the Printer box and pick Microsoft Print to PDF, then select Print.
This printer writes a file instead of a sheet of paper. A Save Print Output As window opened with Save as type set to PDF Document (*.pdf), and after we typed a file name and selected Save, the PDF opened in Edge as three pages, each with the slide above its note. It matched the preview page for page. For PDFs of other files and from other devices, see our guide to make a PDF on any device.
Print notes without the slides
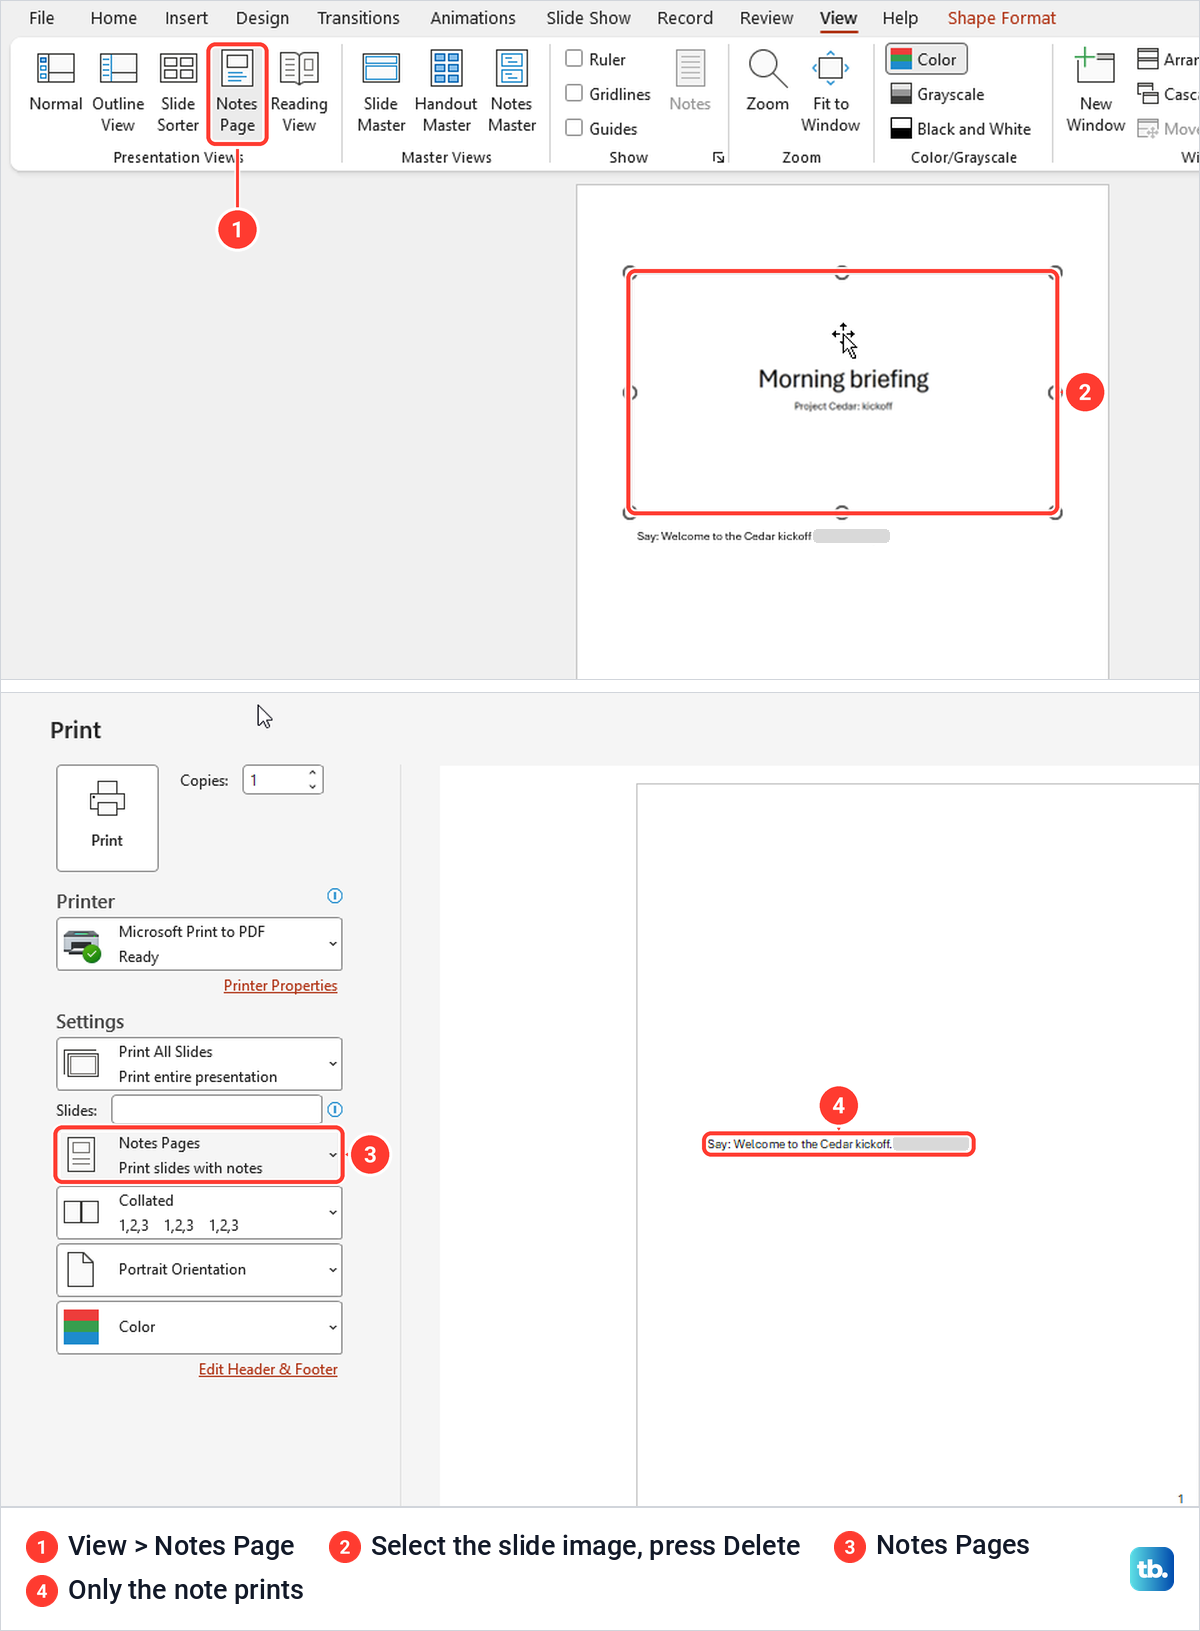
PowerPoint has no notes-only layout, so the slide picture has to come off each notes page first. Microsoft's instruction is to remove the slide thumbnails by hand, one notes page at a time, and it adds that this doesn't delete the slides from your presentation, only the thumbnails on the notes pages.
Work on a copy so the original keeps its normal notes pages, and save one with File > Save As before you start. Open View > Notes Page, click the slide picture at the top of the page so its handles appear, and press Delete. For us, the note and the page number stayed exactly where they were.
Repeat that on every notes page, using the status bar to see which page you are on, such as Notes 2 of 3. Back in File > Print with Notes Pages chosen, our preview and our PDF showed three pages holding only the notes and page numbers, and all three slides were still in the presentation in Normal view.
A notes page without its picture stays that way until you put it back. The steps to restore it, with the one setting that catches people out, are in the section on a missing slide image below.
Put slides and notes side by side in Word
Notes Pages always prints one slide per page, and Microsoft says so plainly, that you can only have one slide and accompanying notes per printed page. To get more than one slide and its notes on a page, send the presentation to Word and print it from there, checking Word's print preview first, because how many fit on a page depends on your slides and notes.
Select File > Export > Create Handouts, then the Create Handouts button under Create Handouts in Microsoft Word. The Send to Microsoft Word dialog offers five page layouts, and the two that carry your typed notes are Notes next to slides and Notes below slides. Leave Paste chosen under Add slides to Microsoft Word document and select OK.
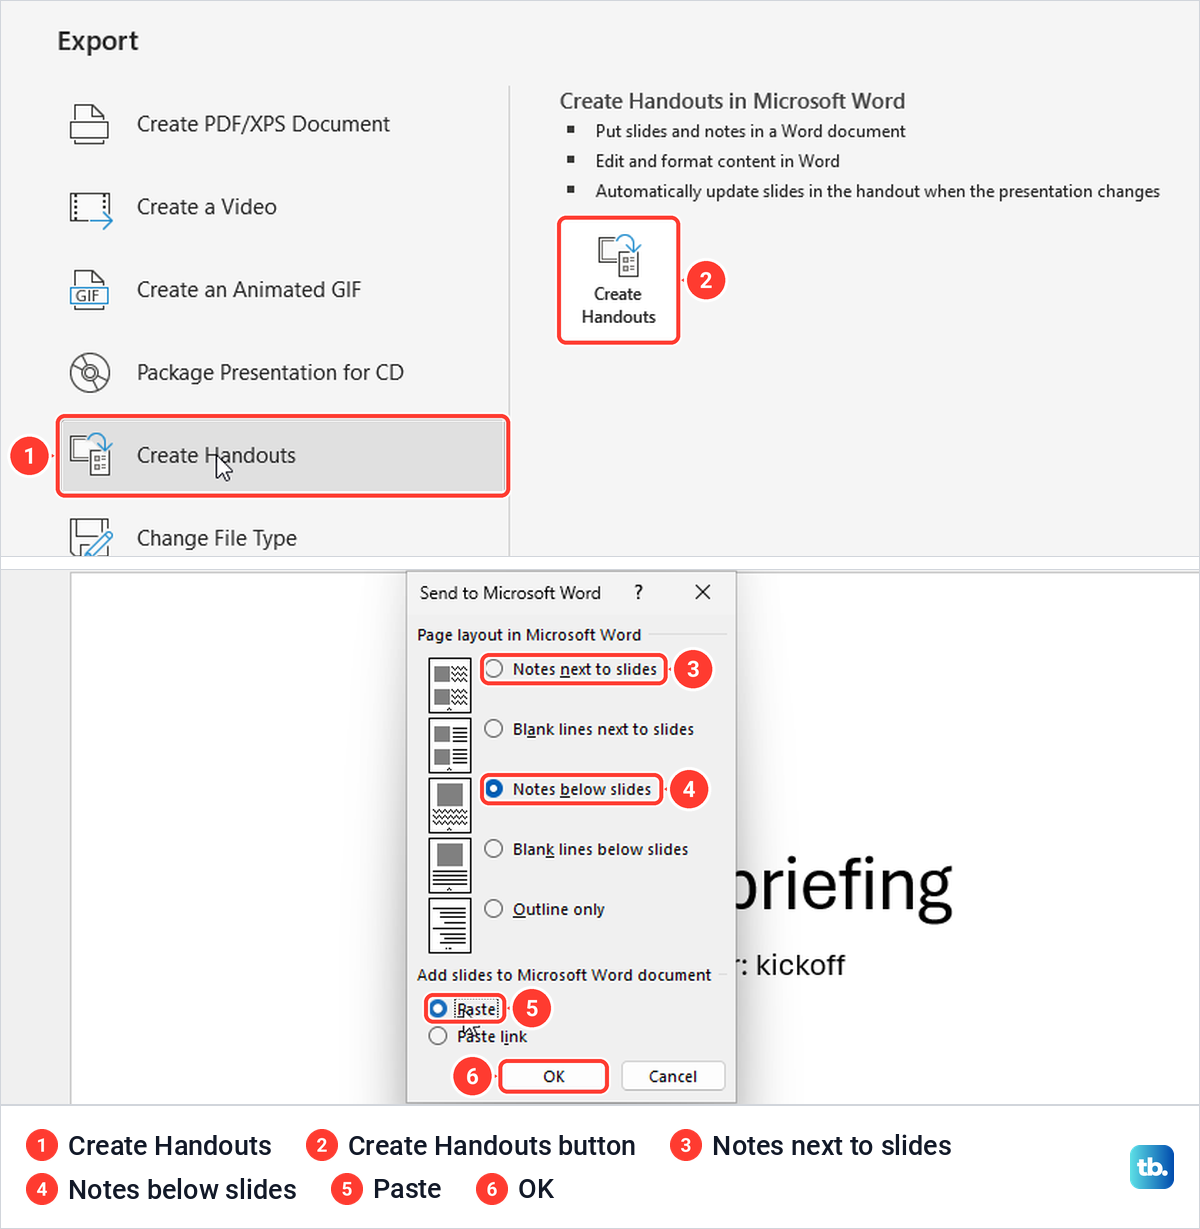
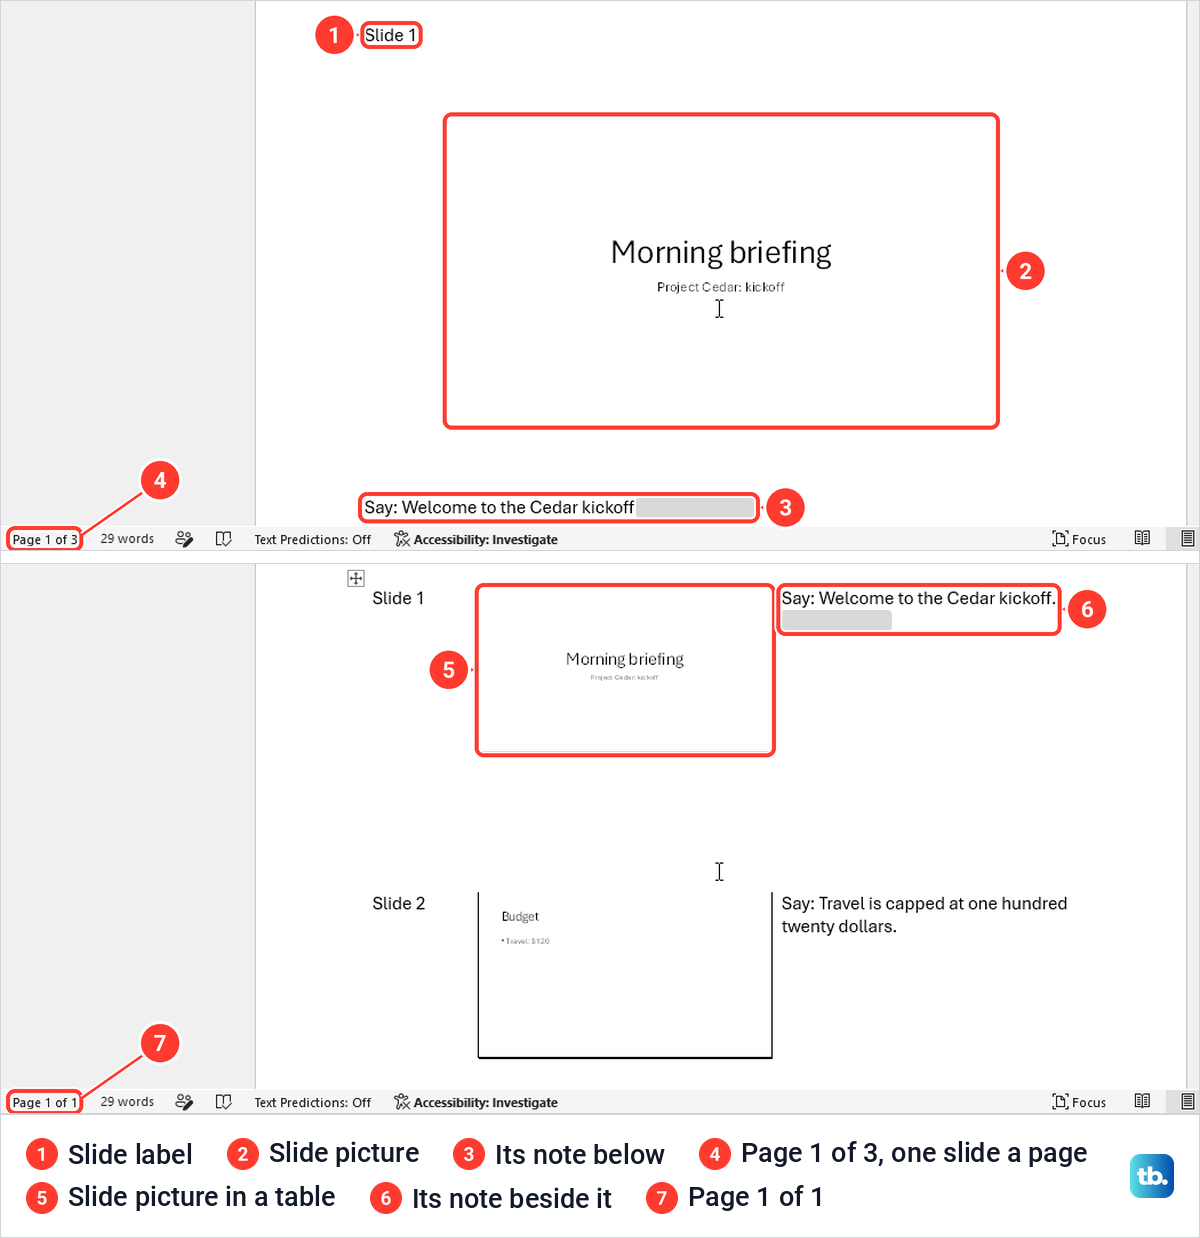
Word opened behind PowerPoint for us, with only its taskbar button lit up, so switch to Word yourself when the export finishes. Notes below slides gave a new document with one slide per page, a Slide 1 label, the slide picture and the note under it. Notes next to slides put each slide in a table row with its note in the next column, and all three of our slides fitted on one page.
The dialog went back to Notes next to slides each time we opened it, so check the choice before you select OK. Word's own File > Print previewed the notes-below version as three pages, and once the handout looks right you can save a Word document as a PDF to share it.
Print PowerPoint with notes on the web
PowerPoint for the web prints notes too, from a deck saved online. Microsoft says you can print slides, notes or handouts for files stored on OneDrive, OneDrive for work or school, or SharePoint in Microsoft 365, and our guide explains how to use SharePoint for your files. If the deck lives only on your PC, upload it to OneDrive, or set up OneDrive on Windows and move the file into its folder, then open the online copy once it has synced.
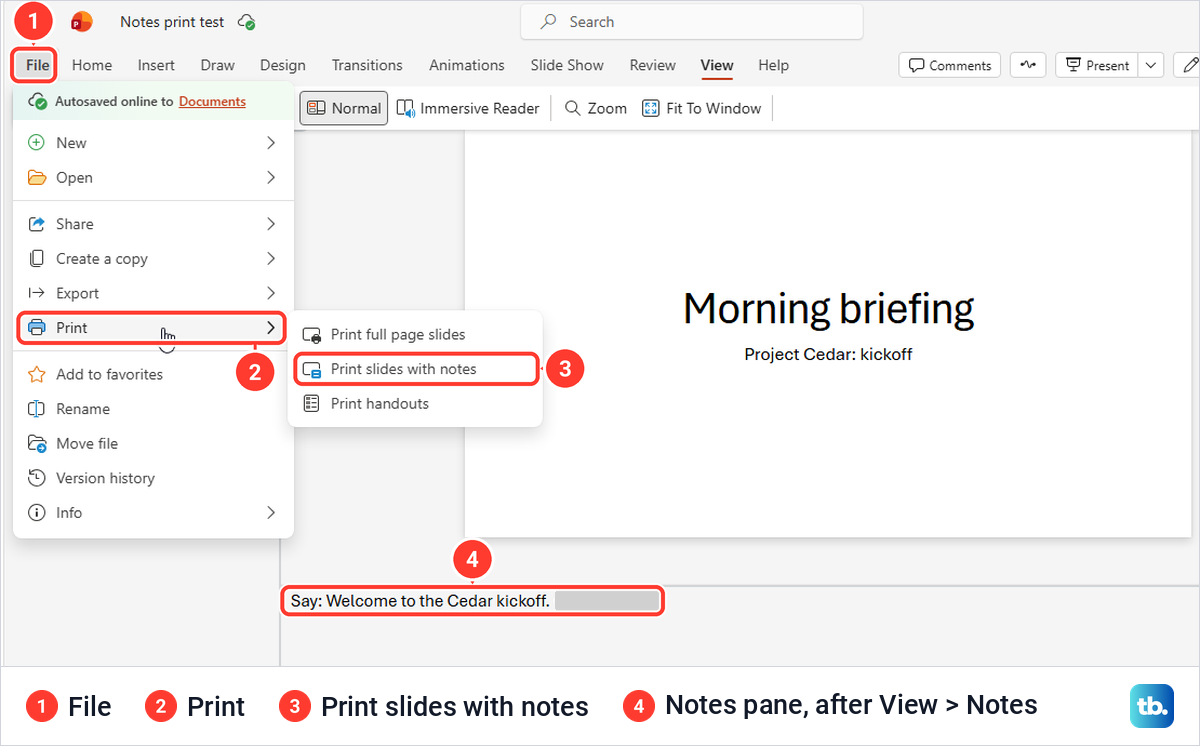
We uploaded our sample deck and opened it in PowerPoint for the web in Microsoft Edge. The notes pane was hidden by default there, unlike the desktop app, and View > Notes brought it back with the notes typed on the PC. Then select File > Print, which offers exactly three choices, and pick Print slides with notes.
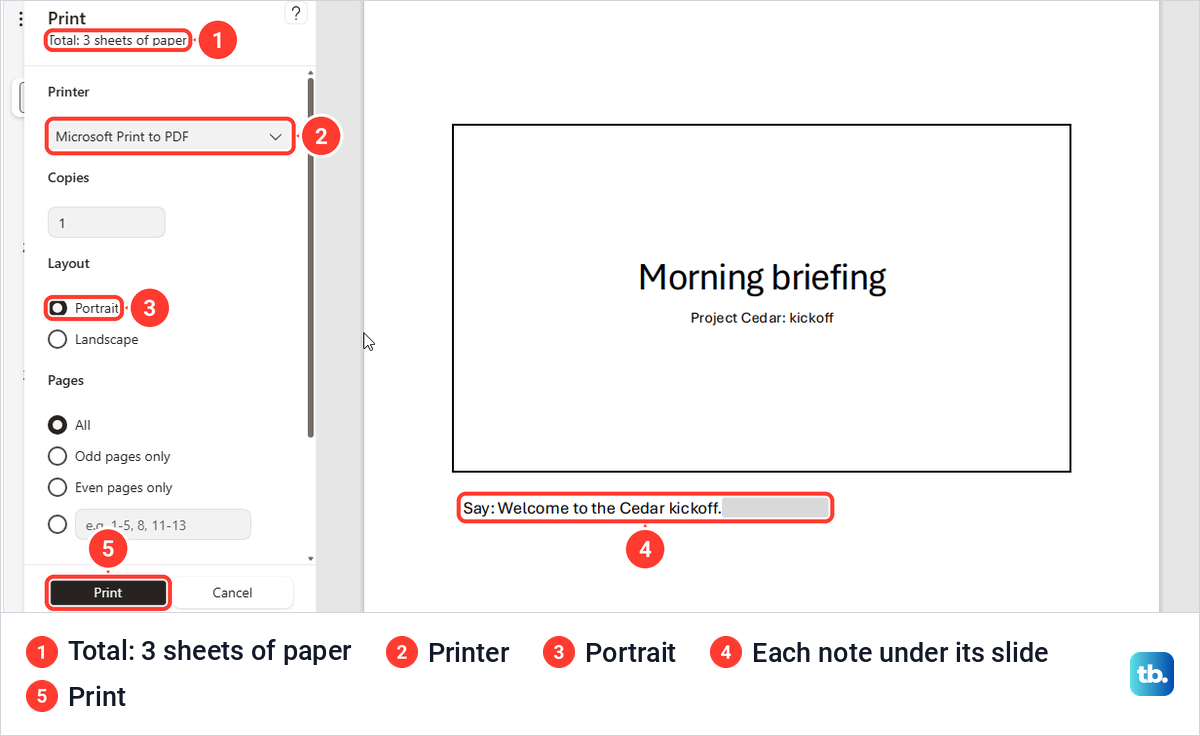
Edge's own print dialog opened straight away, with no extra PDF step in between. It read Total: 3 sheets of paper, chose Portrait by default, and previewed each slide with its note below. With Microsoft Print to PDF as the printer, Print saved a three-page PDF that matched it.
From the keyboard, press Alt + Windows to show the key tips, then F, P and N. That reached the same notes print dialog for us.
Pick the right one of the three. Print full page slides previewed landscape pages with the slide alone and no note, which looks as if the notes were lost. Microsoft adds that more advanced print layouts need a desktop version of PowerPoint.
Print PowerPoint with notes on a Mac
Microsoft's steps for PowerPoint for Mac follow the same idea with different names. On the File menu select Print, then under PowerPoint select Notes from the Layout drop down. Set the other printing options you want and select Print, and each page carries the slide on the upper half with its notes below.
Why your notes do not print
Check the layout box first. If it reads Full Page Slides or any Handouts layout, the notes are left out by design, and switching to Notes Pages fixes it. A 3 Slides handout is the easiest one to mistake for notes, because it prints lines beside each slide.
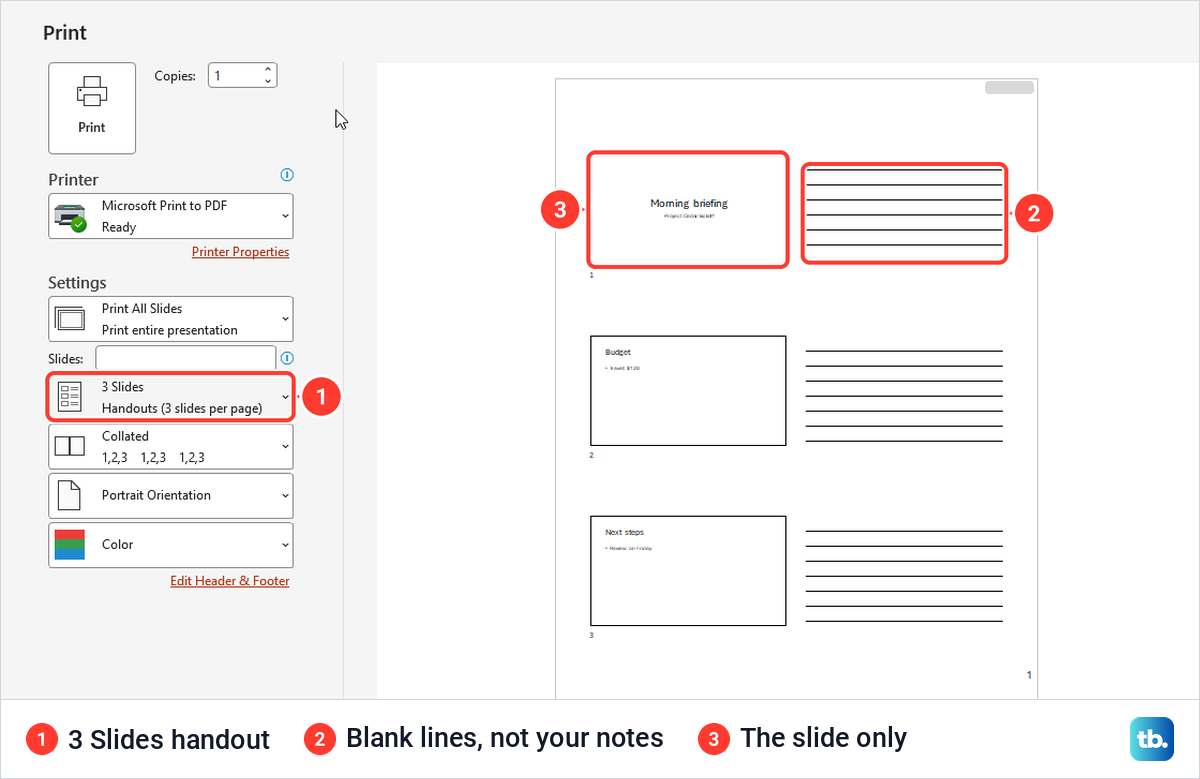
Those lines are empty space for writing. Microsoft describes the three-slide handout as one that includes lines for taking notes, and our preview showed the three slides, the blank lines, the date and a page number, with none of the notes we had typed.
If one page prints with no note, select that slide in Normal view and look at its notes pane, since each note belongs to a single slide. If a long note looks cramped or cut short in the preview, open View > Notes Page, which Microsoft says shows how your notes pages will print, and make the printed text smaller in the Notes Master described below.
In the web app, check that you chose Print slides with notes rather than Print full page slides. The full page choice previewed our slides alone, with no notes.
If the preview looks right but no paper comes out, check the printer and its print queue. See how to fix a printer that is not printing, or clear a stuck print queue if the job sits waiting. A notes PDF that opens in Acrobat and still refuses to print is covered in our guide to fix a PDF that will not print from Acrobat.
Bring back a missing slide image on a notes page
A notes page whose slide picture was deleted or damaged can be reset. Open View > Notes Page, go to the page, right-click an empty part of it and choose Notes Layout. The dialog lists three placeholders, Slide image, Body and Reapply master.
Microsoft's repair steps say to select Reapply master and leave Slide image and Body checked. When we tried it, though, Slide image was already unticked when the dialog opened, because the picture had been deleted, so tick Slide image yourself, keep Body ticked, tick Reapply master and select OK.
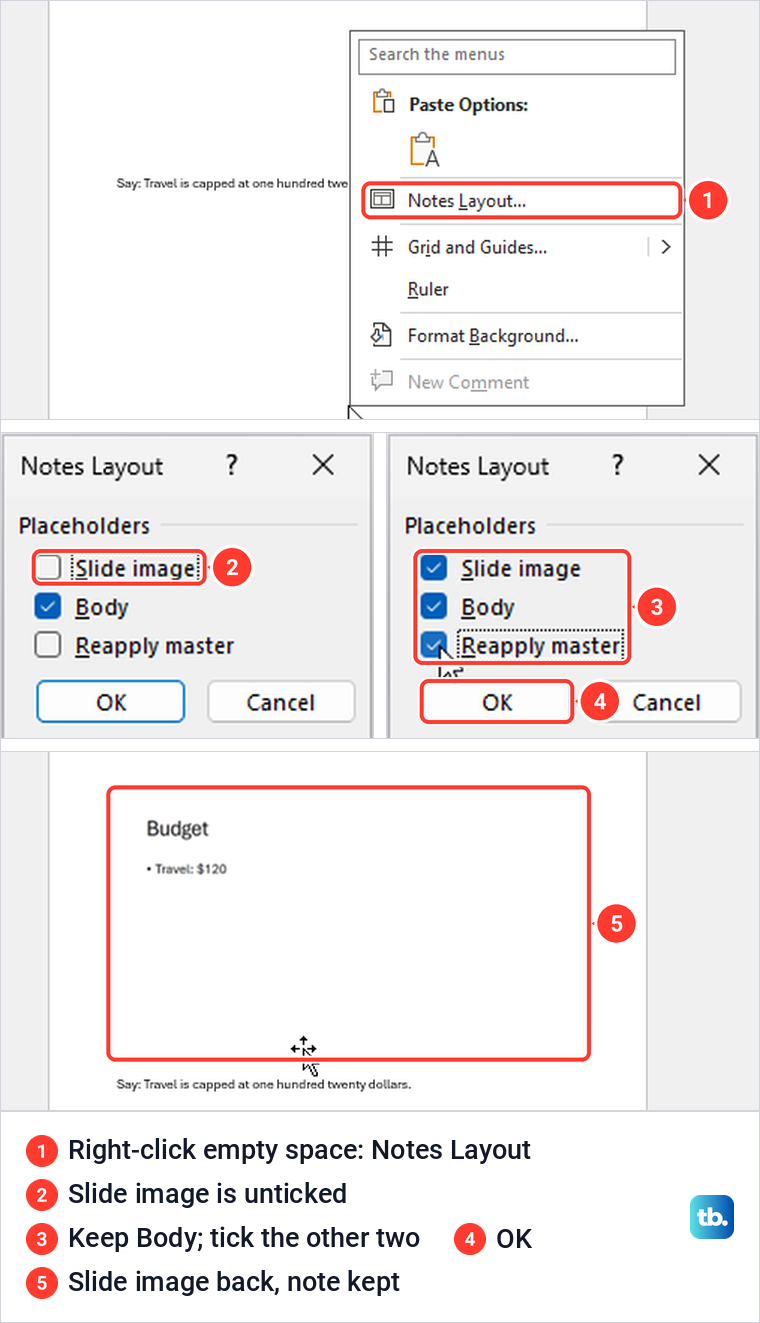
The slide picture came back above the note, and the note itself was untouched. Microsoft warns that if you uncheck Body and select OK, any notes on that slide will be lost, and that Undo (Ctrl + Z) can bring them back, so leave Body alone. Repeat the steps on each page that needs it.
Change how printed notes look
The look of every notes page comes from the Notes Master. Select View > Notes Master, select all the text in the large notes box, and set a size in the Home tab's Font group. The box showed Aptos (Body) at 12 for us, matching Microsoft's statement that the font size is 12 points by default.
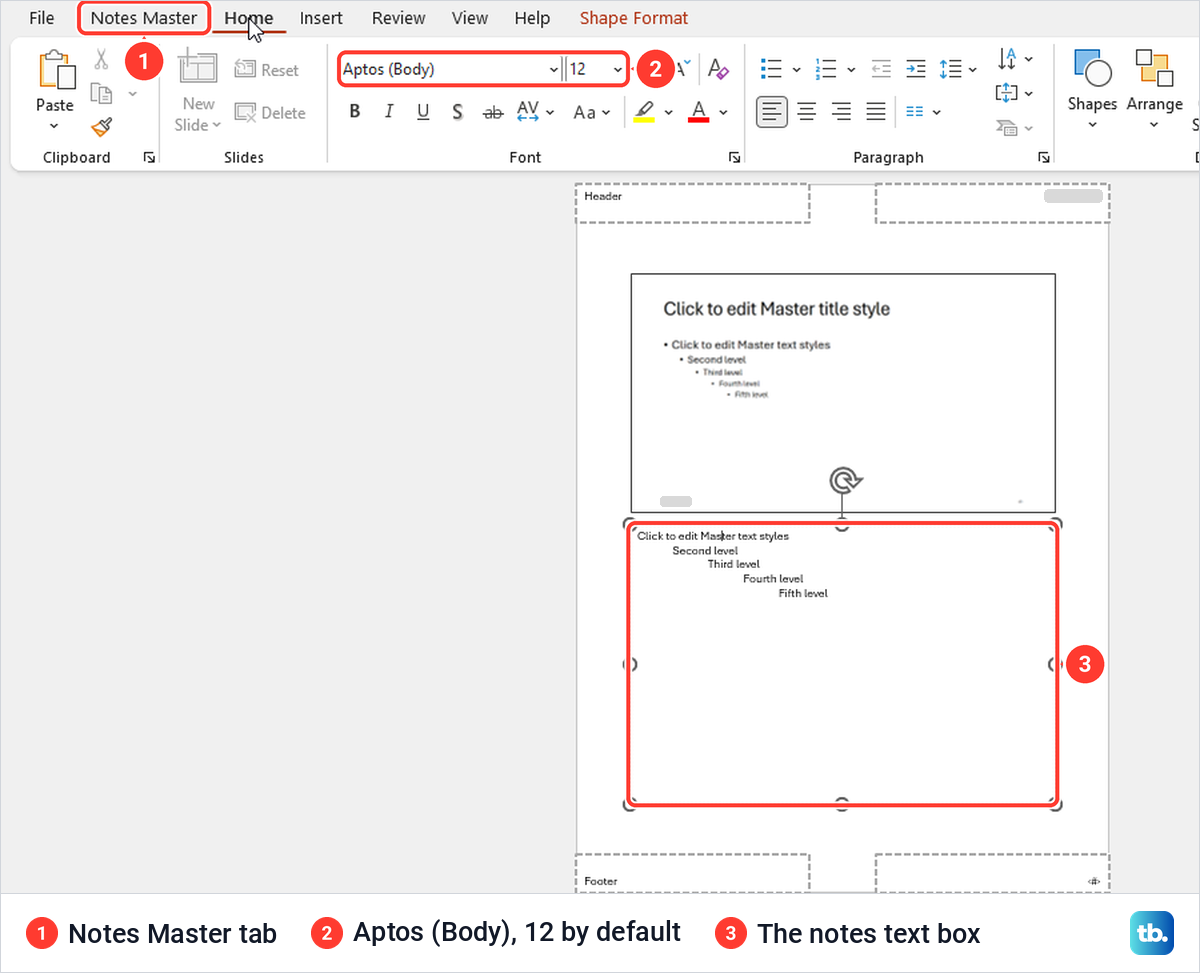
Return to the Notes Master tab and select Close Master View when you are done. Microsoft notes that these changes won't appear in the notes pane in Normal view, only in Print Preview and on the printed pages, so judge the new size in File > Print with Notes Pages chosen.
Add a header and page numbers to notes pages
From Notes Page view, select Insert > Header & Footer. The dialog opened for us on its Notes and Handouts tab, with Page number ticked by default and Date and time, Header and Footer unticked. This tab has only Apply to All and Cancel, so the settings always cover every notes page.
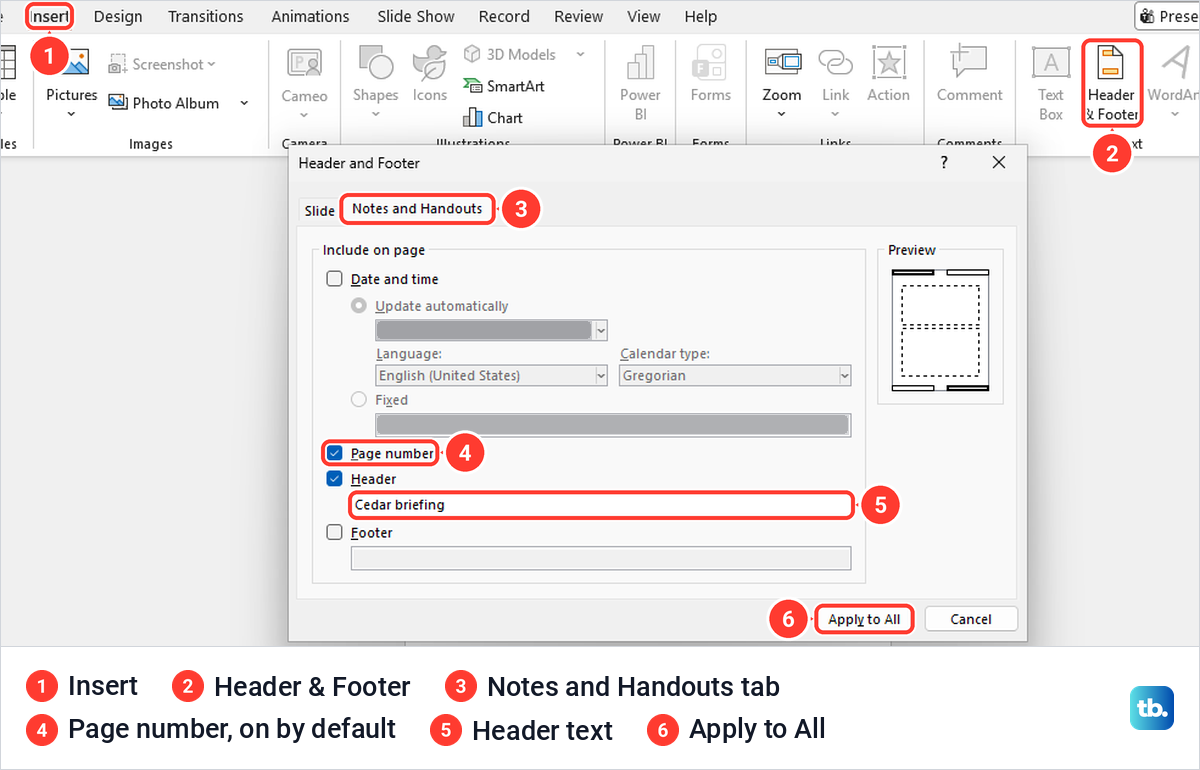
We ticked Header, typed a short title and chose Apply to All. The header then appeared at the top left of each notes page in Notes Page view and in print preview, with the page number at the bottom right.
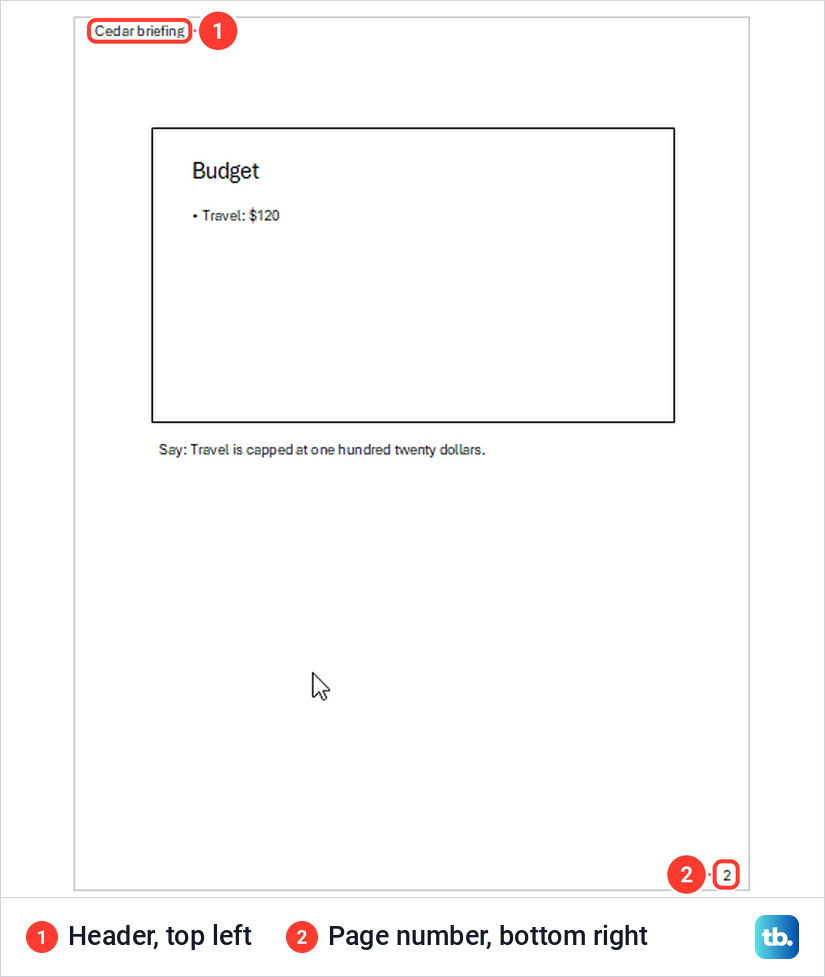
The Print page also shows an Edit Header & Footer link under the color box. These numbers belong to the notes pages only. For numbers on the slides themselves, add slide numbers in PowerPoint on the Slide tab of the same dialog.
How we tested this guide
We tested this in PowerPoint for Microsoft 365 on Windows 11, version 25H2, and in PowerPoint for the web in Microsoft Edge, saving the notes pages as PDFs.
Frequently Asked Questions
How do I print PowerPoint notes without the slides?
Delete the slide picture on each notes page of a copy, then print Notes Pages. The slides themselves stay in the presentation.
Can I print more than one slide with notes on a page?
Not with Notes Pages, which puts one slide and its notes on each page. A Word handout made with Notes next to slides can hold more, and Word's print preview shows how many of yours fit.
Why are my speaker notes not printing?
First check whether the layout box is on Full Page Slides or a Handouts layout, because neither prints typed notes. If one page is still blank after you switch to Notes Pages, check that slide's notes pane.
How do I save PowerPoint slides with notes as a PDF?
Choose Notes Pages, then Microsoft Print to PDF as the printer, and select Print. The saved PDF matched the preview for us.
Can I print speaker notes from PowerPoint for the web?
Yes, for a deck stored online. Choose File > Print > Print slides with notes.
Why does my printed note text look different from the notes pane?
Printed notes take their size from the Notes Master, 12 point by default. Changes there show in print preview, not in the notes pane.