You have a new printer and you want it working with your Windows 11 PC. In most cases Windows finds it on its own within a couple of minutes; you just confirm one prompt and you are printing.
This guide walks every verified method, ordered fastest and most common first: a USB printer, a wireless printer on your network, a Bluetooth printer, and the manual route for when Windows refuses to find it. Each path uses the menu names Windows shows you.
Pick the section that matches how your printer connects. If the printer does not show up at all, jump to the manual and troubleshooting sections near the end.
Connect a USB Printer and Let Windows Detect It
This is the quickest path for a printer sitting next to your PC. Windows usually detects a USB printer automatically and installs it for you.
Plug the printer into the Windows device via USB and make sure the printer is turned on.
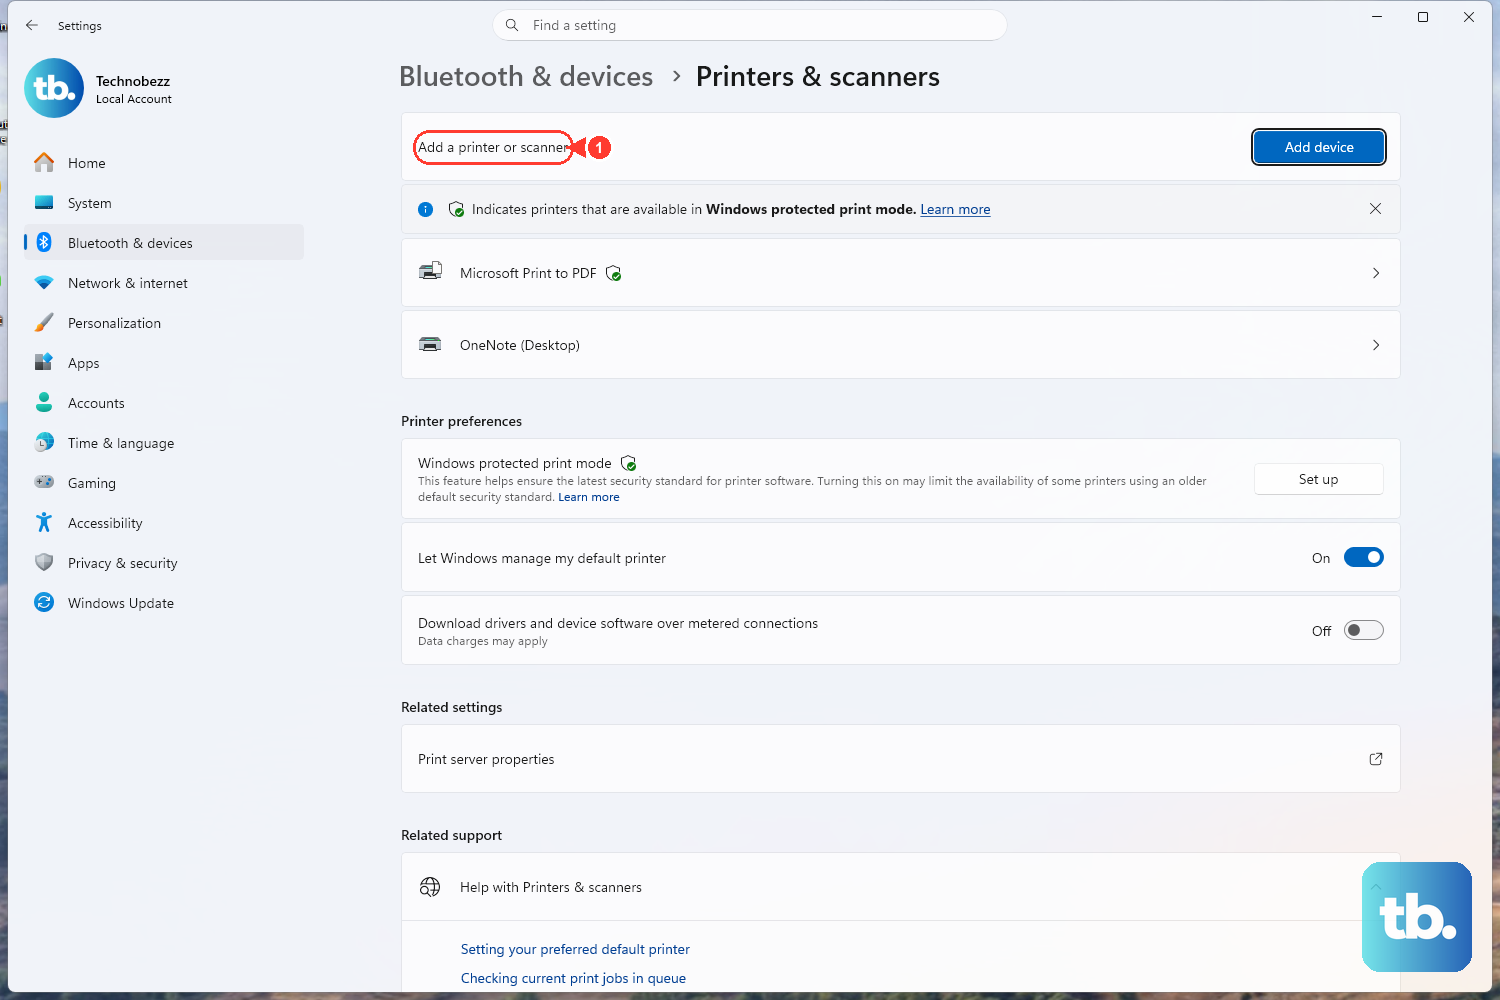
Select Start > Settings > Bluetooth & devices > Printers & scanners.
Check whether the printer already appears in the installed printers list.
If it is not listed, next to "Add a printer or scanner," select "Add device."
Wait for the list of printers to populate; this can take a few minutes.
Select the "Add device" button next to the printer you want.
After the printer installs, check Windows Update to see if there are updated drivers for it.
If a "Find drivers" button appears during setup, install the full drivers rather than a minimal set so you get complete functionality.
Add a Wireless or Network Printer
A wireless printer needs to be on the same network as your PC before Windows can see it. Confirm that first, then let Windows discover it.
Make sure the printer is powered on and connected to the same network (Wi-Fi) as your Windows device.
Select Start > Settings > Bluetooth & devices > Printers & scanners.
Check the installed printers list; if the printer is absent, select "Add device" next to "Add a printer or scanner."
Wait for the list to populate (this can take a few minutes), then select "Add device" next to the printer you want.
After installation, check Windows Update for any updated drivers.
If nothing appears after a few minutes, the printer and PC are likely on different networks; reconnect the printer to the correct Wi-Fi and try again.
Pair a Bluetooth Printer
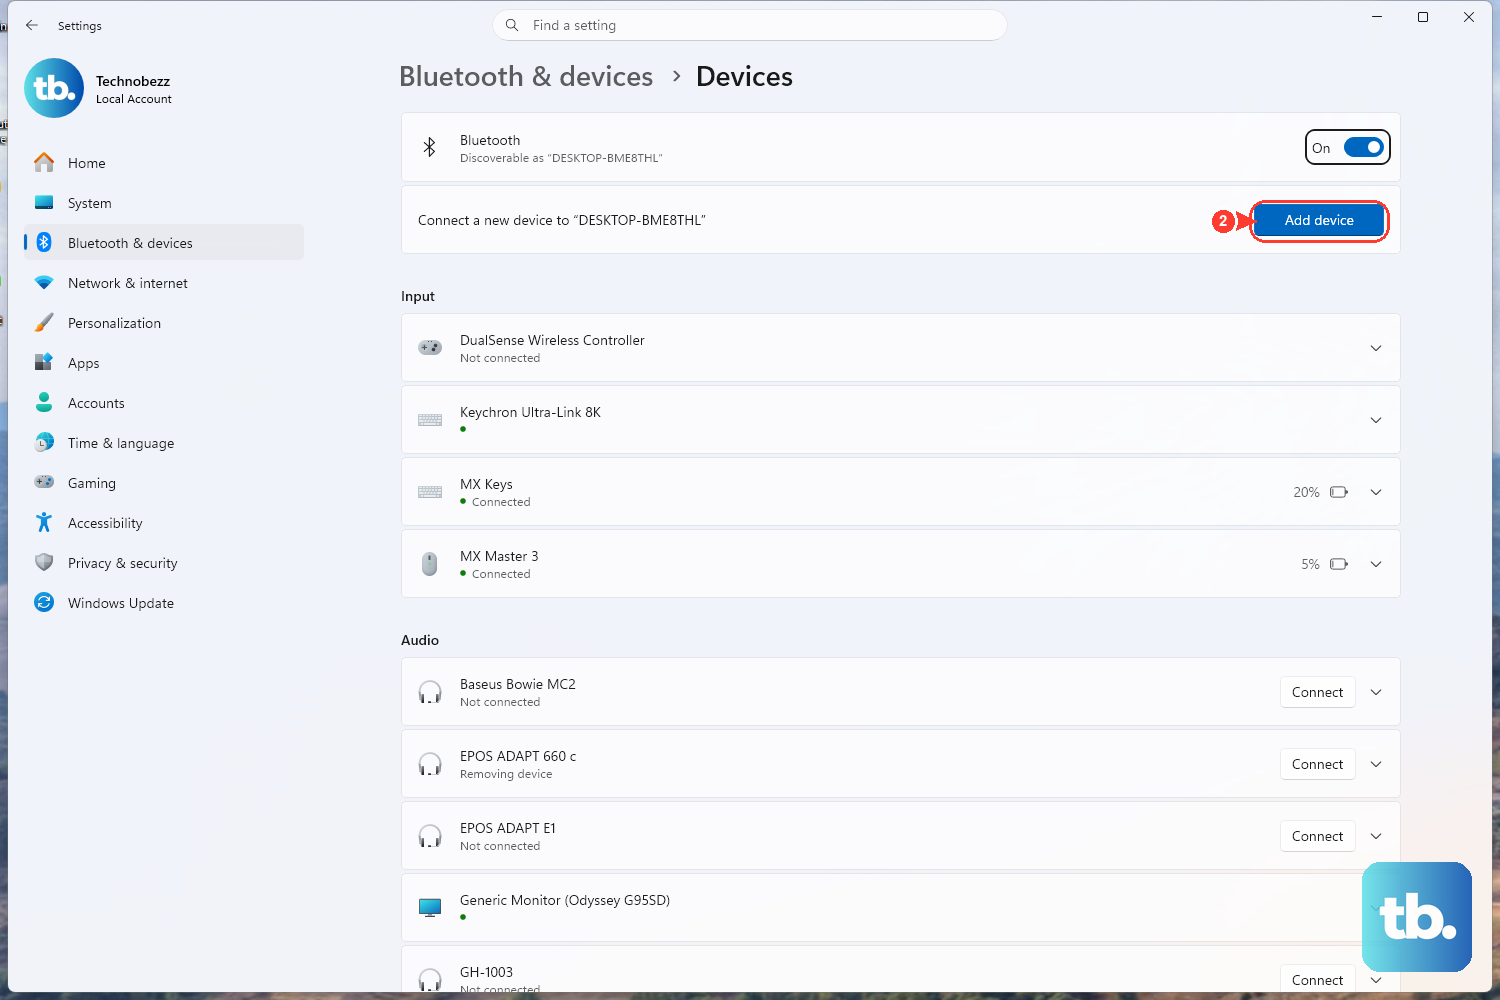
Bluetooth printers are handled through Windows' Bluetooth pairing flow rather than the standard add-printer page. Make sure Bluetooth is enabled on the PC first.
Turn on the Bluetooth printer and make it discoverable. The exact method depends on the device, so check its documentation or the manufacturer's website.
On the Windows device, select Start > Settings > Bluetooth & devices > Printers & scanners.
Next to "Add a printer or scanner," select the "Add device" button.
Wait while Windows searches for and displays local printers and scanners; this can take a few minutes.
Select the "Add device" button next to the desired printer or scanner.
If your printer supports Swift Pair, a notification appears when it is nearby and in pairing mode. Once Bluetooth is on, the two devices reconnect automatically whenever they are in range.
Add the Printer Manually When It Is Not Listed
If Windows cannot find the printer automatically, you can point it to the device yourself through the Add Printer wizard.
Go to Start > Settings > Bluetooth & devices > Printers & scanners and select "Add device" next to "Add a printer or scanner."
If the printer is not found automatically, next to "The printer that I want isn't listed," select "Add a new device manually." Some screens show this as "Add manually"; both lead to the same Add Printer wizard.
Follow the instructions in the "Add Printer" window, choosing the option that best fits your situation.
Add a Local Printer With Manual Settings
For a directly connected printer that still will not appear, you can choose the port and driver yourself. This route also lets you print a test page to confirm everything works.
In the Add Printer wizard, select "Add a local printer or network printer with manual settings," then select "Next."
Select "Use an existing port" and choose the port the printer is connected to, then select "Next." If the printer is connected via USB, select it from the list.
For the driver, if the printer came with a disc that includes the driver, select "Have Disk"; otherwise select "Windows Update."
Select the printer manufacturer in the left column and the printer model in the right column.
Type a name for your printer, then select "Next."
Choose "Do not share this printer," or select "Share this printer" if you want to share it with other devices on your network.
Select "Print a test page" to confirm the printer is working, then finish.
Install or Update the Printer Driver
If Windows does not recognize the printer, the driver is likely missing. Windows Update is the recommended way to get it, and installing the printer through Settings pulls the driver automatically.
To use Windows Update, add the printer via Settings > Bluetooth & devices > Printers & scanners; Windows fetches the driver for you. To get the driver from the maker instead, identify your printer model, go to the manufacturer's official website, open its Support or Drivers section, enter the model in the search bar, and download the latest printer software and drivers. Then right-click the downloaded file, select "Open," follow the on-screen prompts, and restart if prompted.
There is also a legacy route: Settings > Bluetooth & devices > Printers & scanners > "Printer server properties" > "Drivers" tab > "Add..." The wizard there can connect to Windows Update to select a driver.
Run the Troubleshooter When the Printer Still Will Not Connect
If you hit a "Printer not found" or "Printer not recognized" message, the cause is usually a connection problem, an outdated driver, or an incorrect setting. Start with the automated troubleshooter, then work through the manual checks.
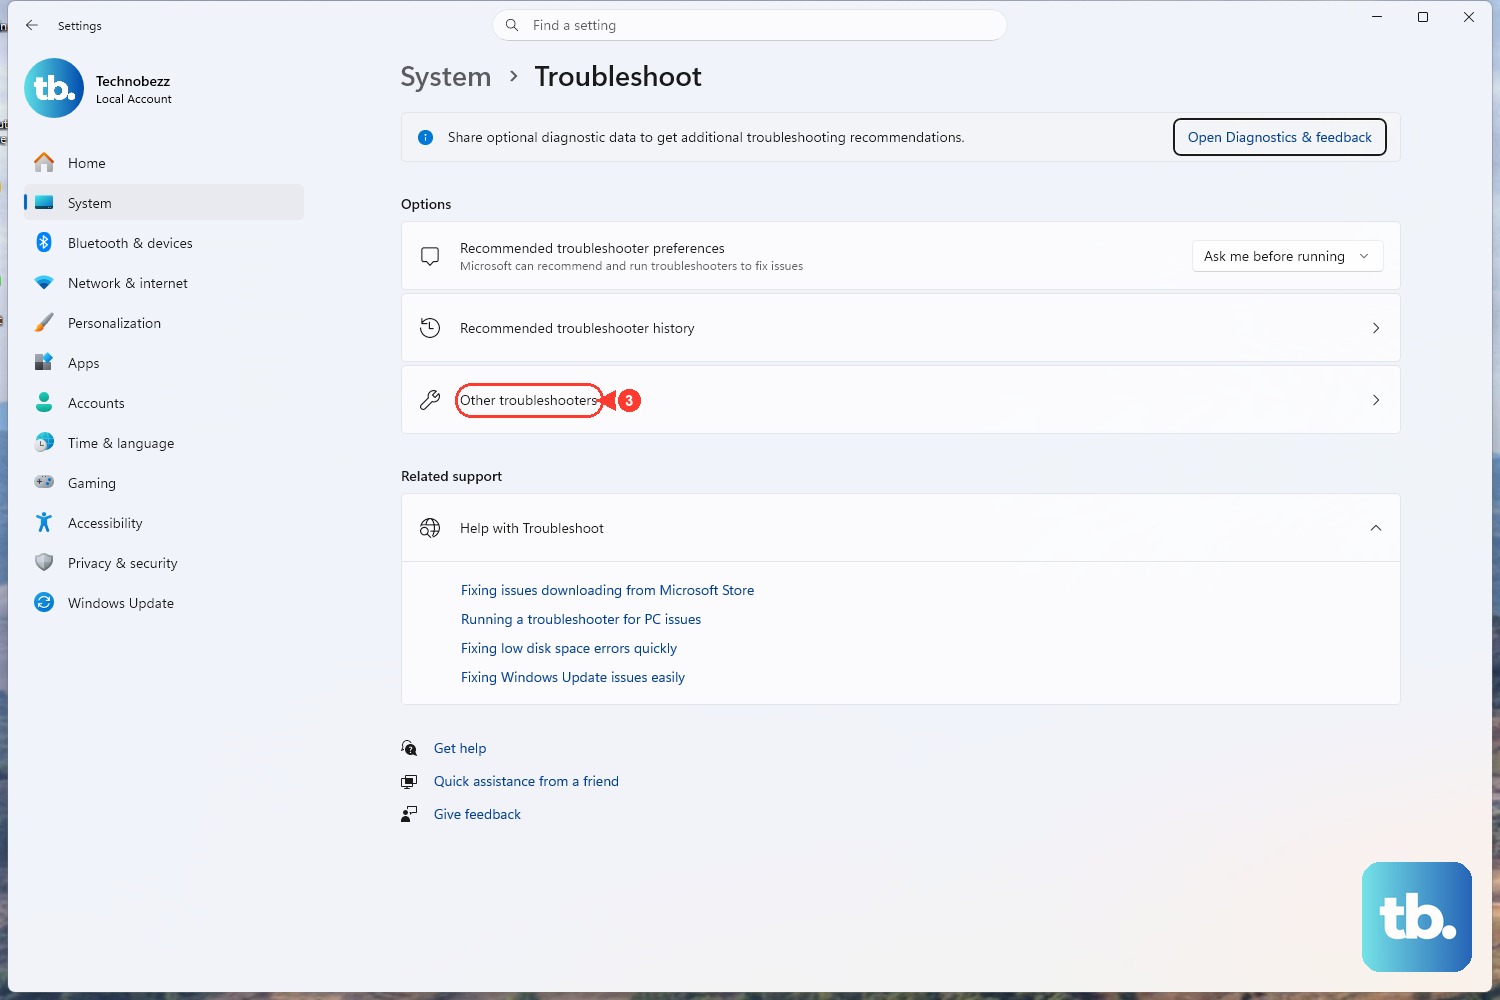
Open the Get Help app's printer troubleshooter (Microsoft links it as "Run the troubleshooter in Get Help," at aka.ms/PrinterConnection); it runs diagnostics and tries to fix the problem automatically. Recent Windows 11 builds steer you here. As an alternative entry point, open Settings, go to "Troubleshoot," open "Other troubleshooters," find "Printers" in the list, and click "Run."
If the troubleshooter does not resolve it, work through these checks:
Check connections: for USB, ensure the cable is securely connected to both the printer and the computer; for Wi-Fi, confirm the printer is on the same network as the computer; for Bluetooth, verify Bluetooth is enabled on both devices.
Restart the Print Spooler: press Windows key + R, type "services.msc" and press Enter, locate "Print Spooler," right-click it and select "Restart."
Update or reinstall the driver: open Start > Device Manager, expand "Printers," right-click the printer and select "Update driver." If that does not help, select "Uninstall device" and reinstall.
Set as default: go to Settings > Bluetooth & devices > Printers & scanners, select the printer, and click "Set as default."
Remove and re-add: in Settings > Bluetooth & devices > Printers & scanners, select the printer and click "Remove," then select "Add device" next to "Add a printer or scanner" to reinstall it.
Frequently Asked Questions
Why is my printer not showing up in the list? Give it a few minutes first, since the list under "Add device" can take several minutes to finish populating. Then confirm the basics: a USB printer must be plugged in and turned on, a wireless printer must be on the same network as the PC, and a Bluetooth printer must be turned on, discoverable, and paired with Bluetooth enabled on the PC.
Do I need to install a driver separately? Usually no. Windows Update is the recommended method, and installing the printer through Settings > Bluetooth & devices > Printers & scanners pulls the driver automatically. If Windows still does not recognize the printer, download the driver from the manufacturer's official website.
What does "Printer not found" or "Printer not recognized" mean? These are two distinct Windows errors, and Microsoft attributes both to the same handful of causes: connection problems, outdated drivers, or incorrect printer settings. Run the Get Help printer troubleshooter, then check your cable or Wi-Fi connection and update the driver.
How do I add a Bluetooth printer? Bluetooth printers are not covered on the main add-printer page; Windows handles them through its Bluetooth pairing flow. Turn the printer on and make it discoverable, then go to Settings > Bluetooth & devices > Printers & scanners and select "Add device" to find and pair it.
I have a Copilot+ or other ARM PC and cannot add a printer. What now? Some ARM PCs cannot add or install a printer through certain standard methods. Use the "Add device" option in Settings > Bluetooth & devices > Printers & scanners instead.
Where is the printer troubleshooter in Windows 11? Recent builds point you to the Get Help app at aka.ms/PrinterConnection. As an alternative, open Settings > System > Troubleshoot > Other troubleshooters and click "Run" next to the Printers entry.