
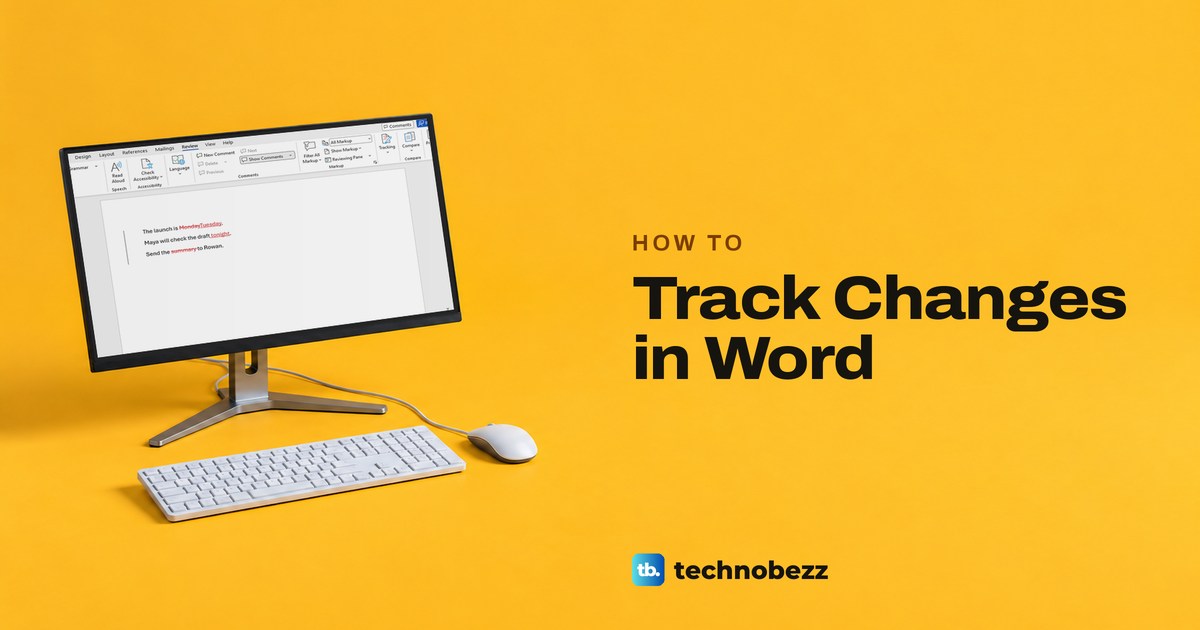
To track changes in Word, open the Review tab, select Tracking > Track Changes and choose For Everyone to mark every edit, or Just Mine to mark only your own. From then on, with the display box on All Markup, Word underlines new words and strikes through deleted ones, the redline most people mean when they ask how to redline in Word. Work through the edits with Next, then Accept or Reject each one.
Two things on today's ribbon catch people out. On our PC, Word folded the whole Tracking group into one Tracking button, so Track Changes, Accept, Reject, Previous and Next only appeared once we opened it. And a new document may already be set to show every mark: ours opened with the display box on All Markup.
The short version
- Turn it on: Review > Tracking > Track Changes, then For Everyone or Just Mine.
- Shortcut: Ctrl + Shift + E switches tracking on or off.
- See every edit: pick All Markup, and check Show Markup > Specific People > All Reviewers if marks vanish.
- Decide one edit at a time: Tracking > Next, then Accept or Reject.
- Finish safely: accept or reject everything in a copy, then check it with Document Inspector.
Where each Track Changes control is
| What you want | Where to go in Word | What happens |
|---|---|---|
| Redline everyone's edits | Review > Tracking > Track Changes > For Everyone | Every new edit gets a revision mark |
| Mark only your own edits | Review > Tracking > Track Changes > Just Mine | Your new edits get marks |
| Switch tracking with Ctrl + Shift + E | Anywhere in the document | Tracking goes on or off, earlier marks stay |
| See every revision | Review > All Markup, plus Show Markup > Specific People > All Reviewers | Underlines, strikethroughs and the margin bar show |
| Review one edit | Review > Tracking > Next, then Accept or Reject | That edit is kept or thrown away |
| Let someone suggest edits only | Save to OneDrive for work or school, then Share > Share > Can review | Their edits arrive as tracked suggestions |
| Make a clean final copy | Save a copy, then Review > Tracking > Accept > Accept All Changes and Stop Tracking | Final text with no marks and tracking off |
Turn on Track Changes in Word
Open the document and select the Review tab. If you see a Track Changes button in a Tracking group, use it. If you see a single Tracking button instead, select it to open a small panel with Track Changes, Accept, Reject, Previous and Next.
Select the arrow under Track Changes. The menu offers For Everyone, Just Mine and Lock Tracking. Choose For Everyone when several people will edit the file, or Just Mine when only your own edits need marking.
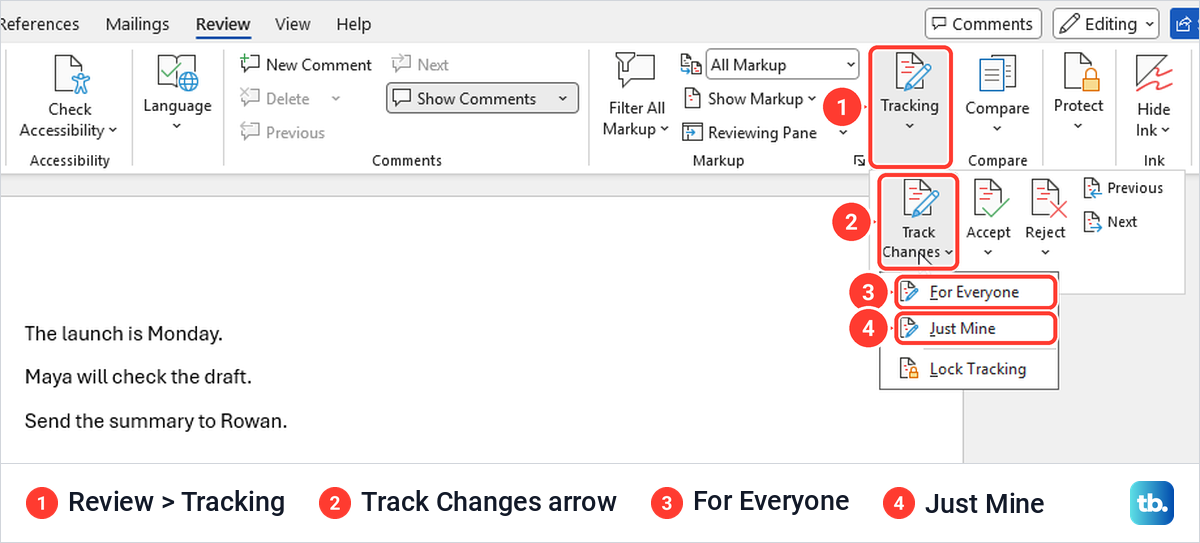
Once tracking is on, the Track Changes button is highlighted. On our PC the mode button at the top right of the window also changed from Editing to Reviewing, which is the quickest way to tell at a glance whether Word is recording. Microsoft describes Reviewing as the mode for suggesting revisions, and says it turns on Track Changes for your own edits.
That button works in both directions. When we chose Editing from its menu, Word switched Track Changes off, and the next words we typed were not marked. If edits suddenly stop being recorded, look at the mode button before anything else.
Use the shortcut or the status bar
Press Ctrl + Shift + E to switch tracking on or off without the ribbon. On our PC the first press turned tracking off and the mode button went back to Editing, so the sentence we typed next, Please confirm, stayed plain black text. A second press turned tracking back on, the next sentence, Thank you, was marked, and the earlier marks stayed where they were.
For the ribbon KeyTips, press Alt, then R, then G to open the Track Changes menu, and then F for For Everyone or J for Just Mine. Microsoft's screen reader guide still prints Alt+R, G, G for this. On our PC that second G did nothing, and the menu stayed open waiting for F, J or L.
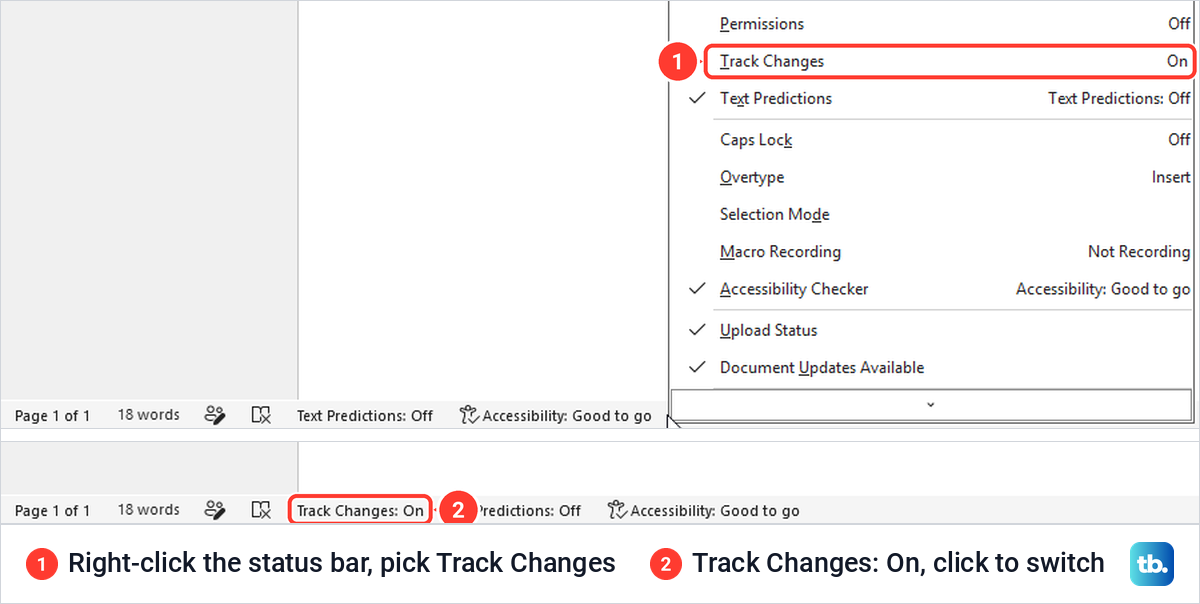
The status bar can show tracking too. Right-click the status bar along the bottom of the window and select Track Changes, and a Track Changes: On item appears in the status bar. Microsoft calls it an indicator, but it is also a switch: on our PC one click changed it to Track Changes: Off, and another click turned tracking back on.
What a redline looks like in Word
To see what tracking records, we made three edits to a three-line practice document with For Everyone on. We replaced Monday with Tuesday, added the word tonight to the second line and deleted summary from the third. In All Markup, Monday was struck through with Tuesday underlined beside it, tonight was underlined, summary was struck through, and a bar appeared in the left margin beside every changed line.
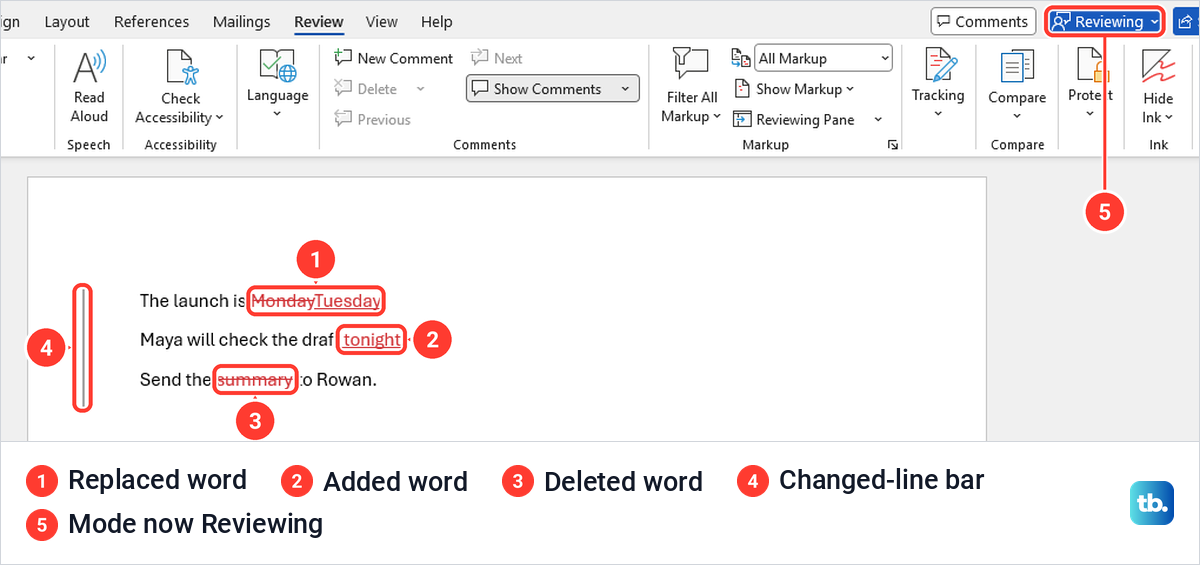
Redline is the everyday name for a document marked up this way, and Word has no separate Redline button. The marks are saved in the file, and Microsoft notes that a document can still hold them even after Track Changes is turned off, so the next person to open it can review each one. Microsoft says All Markup shows each reviewer's changes in a different colour, and that Word picks the colour for each author itself.
Comments are a separate thing. Microsoft says comments are no longer part of the Track Changes function, so add and delete them with the Comments group on the Review tab and keep Accept and Reject for the edits.
Choose how much markup to show
The display box in the Review tab's Markup group decides how much of the redline you see, not what is in the file. It offers four views. Simple Markup shows the edited text with a red line in the margin, All Markup shows every underline and strikethrough, No Markup shows the document as if every edit were accepted, and Original shows it as if none were.
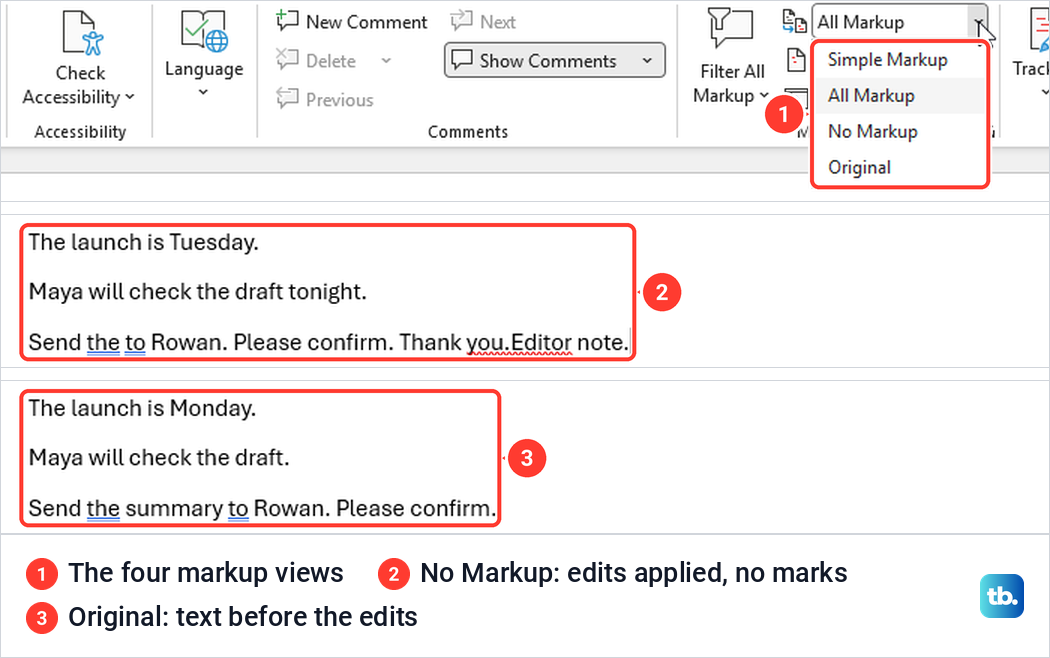
On our document, No Markup showed The launch is Tuesday with no marks, Original showed The launch is Monday, and switching back to All Markup brought every mark back exactly as it was. Microsoft is explicit that any change you have not accepted or rejected stays in the document, so never send a file in No Markup and assume the edits are gone.
Show or hide one reviewer's changes
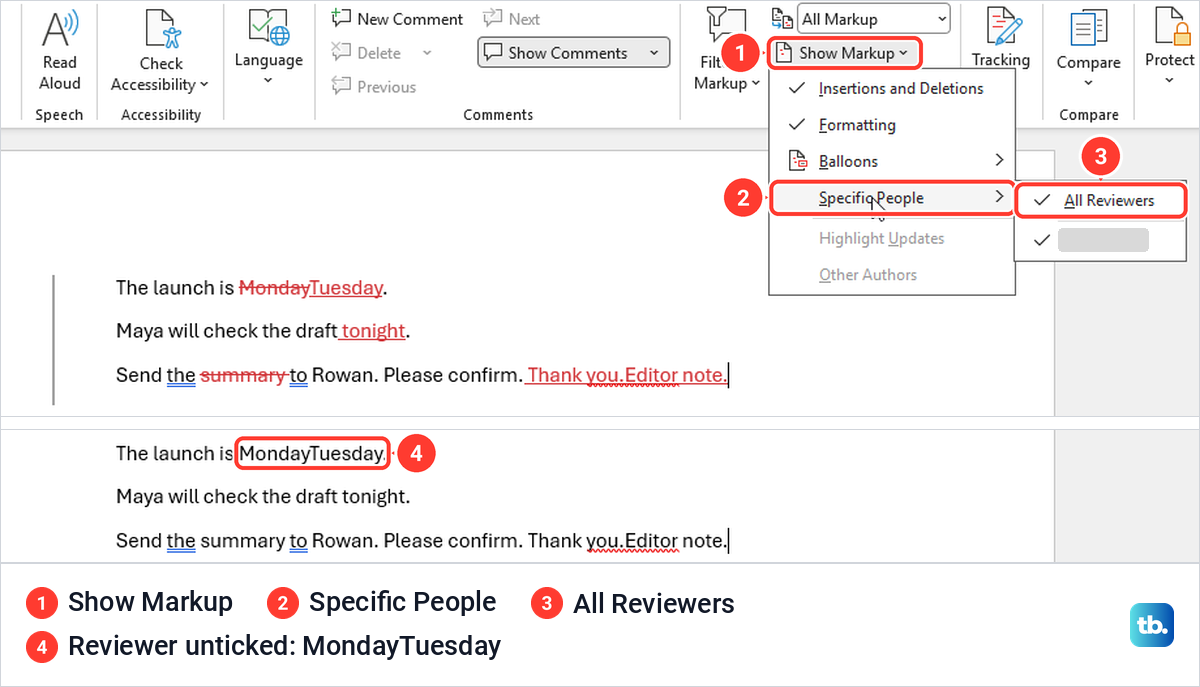
The Show Markup menu filters the redline. Its first two items, Insertions and Deletions and Formatting, were both ticked on our copy, and clearing one hides that kind of mark. Specific People lists All Reviewers and then every person who has edited the file, so you can show one editor's changes at a time.
Be careful with that list. When we unticked the only reviewer in our document, every mark disappeared and the replaced word read MondayTuesday, plain black and run together, as if someone had made a typo. Nothing had changed in the file: ticking All Reviewers again brought the strikethrough and underline straight back. Microsoft adds that markup hidden from this menu shows again each time the document is opened.
Show tracked changes in balloons or inline
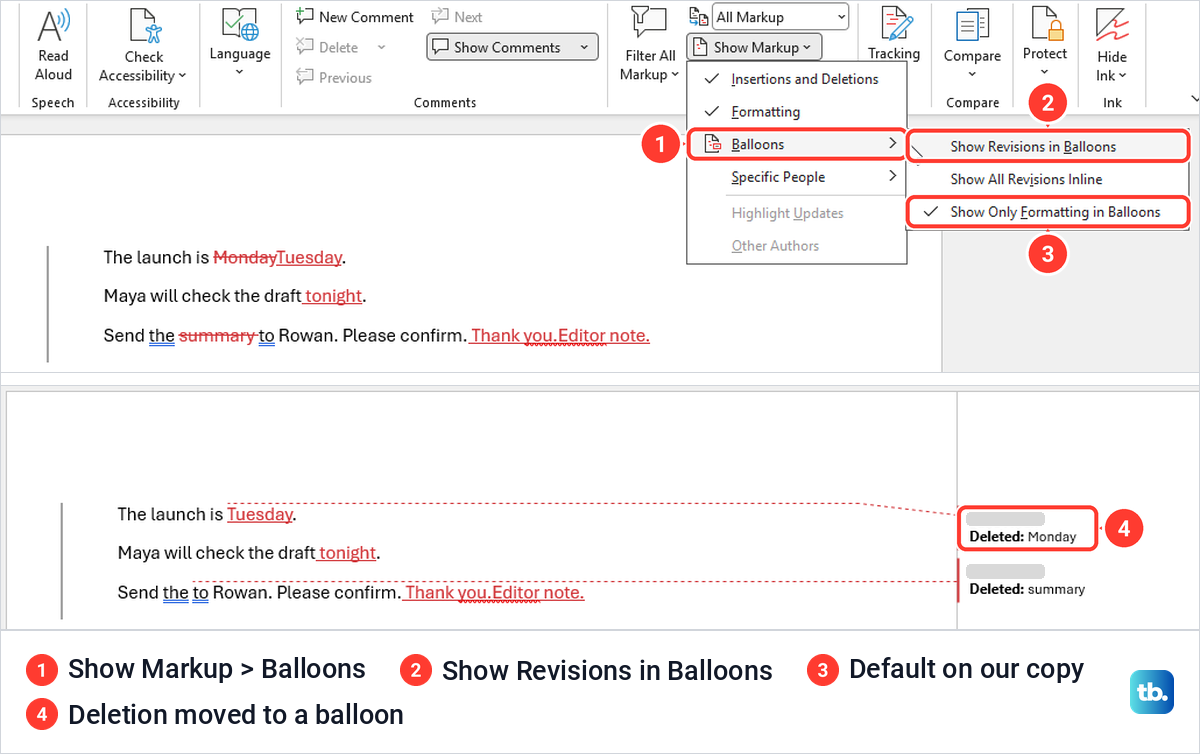
Word can move deletions out of the text and into balloons in the right margin. Select Show Markup > Balloons and choose Show Revisions in Balloons, Show All Revisions Inline or Show Only Formatting in Balloons. On our copy the last one was ticked, which is why our deletions appeared as strikethrough in the text rather than in the margin.
With Show Revisions in Balloons, a markup area opened on the right and each deleted word moved into a balloon such as Deleted: Monday, while added words stayed underlined in the text. Show All Revisions Inline put them back.
Balloons need the right view. Microsoft says they only work in Print Layout or Web Layout, and in Draft view the Balloons item on our Show Markup menu was greyed out. If the balloon margin has disappeared, open the View tab and select Print Layout.
Change the colours and what Word tracks
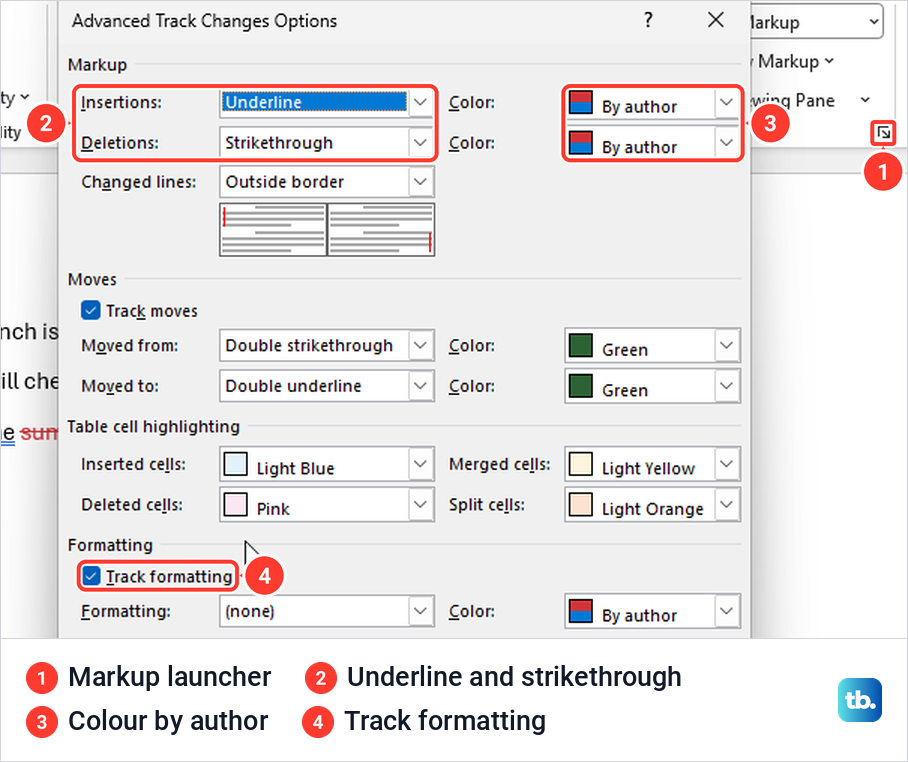
The small arrow at the bottom right corner of the Markup group, with the tooltip Change Tracking Options, opens Track Changes Options. Its Advanced Options button is where the look of each mark is set.
On our PC it showed insertions as Underline and deletions as Strikethrough, both coloured By author, changed lines with an outside border, moved text in green and Track formatting ticked. Microsoft says these colour settings are for your computer only, so changing them here does not change what a reviewer sees on their own PC.
Because formatting is tracked by default, Microsoft says, a word made bold or a changed font size becomes a revision you can accept or reject like any other. Reject an unwanted formatting change from the Tracking panel rather than undoing it by hand, and once the review is finished and tracking is off, clear formatting in Word for any wider tidy-up.
Review tracked changes one at a time
Start at the top of the document and open Tracking > Next. On our PC it selected the first change, the deleted Monday. From there, choose Accept or Reject in the same panel, or use the arrows under them for Accept and Move to Next and Reject and Move to Next, which deal with a change and jump to the next one.
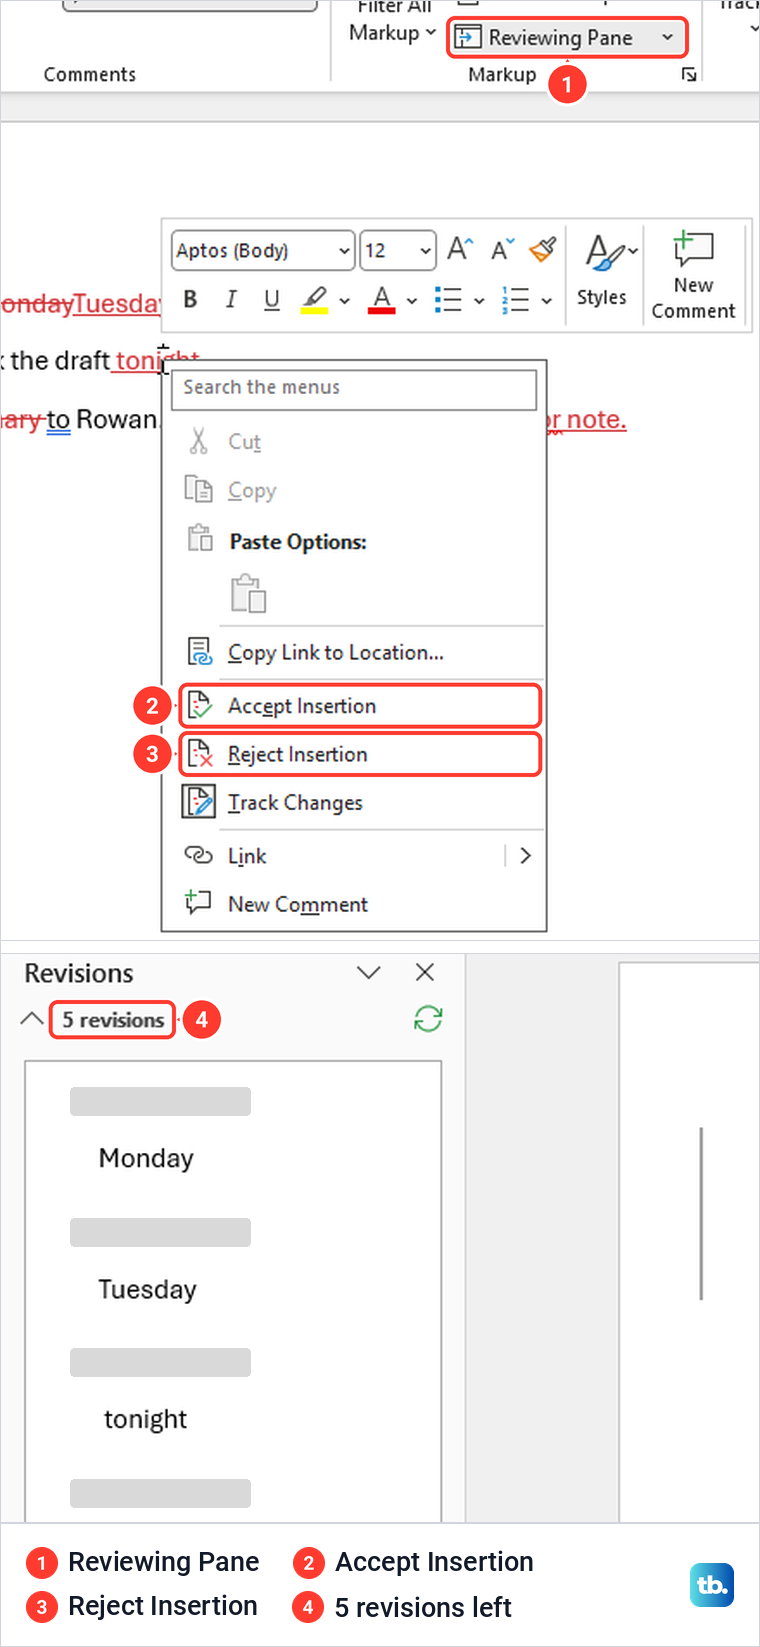
For a list of everything at once, select Reviewing Pane in the Markup group. Ours opened a Revisions pane on the left that named every change, such as Deleted Monday and Added Tuesday, under the reviewer's name, with a count at the top that read 5 revisions. A replaced word counts twice, as Deleted Monday and Added Tuesday, and the two short sentences we typed during testing, Thank you and Editor note, made one more entry.
Right-clicking a change deals with one edit directly. When we right-clicked the added word tonight, the menu offered Accept Insertion and Reject Insertion, plus a Track Changes button. Accept Insertion left tonight as ordinary text, and the pane's count dropped to 4 revisions.
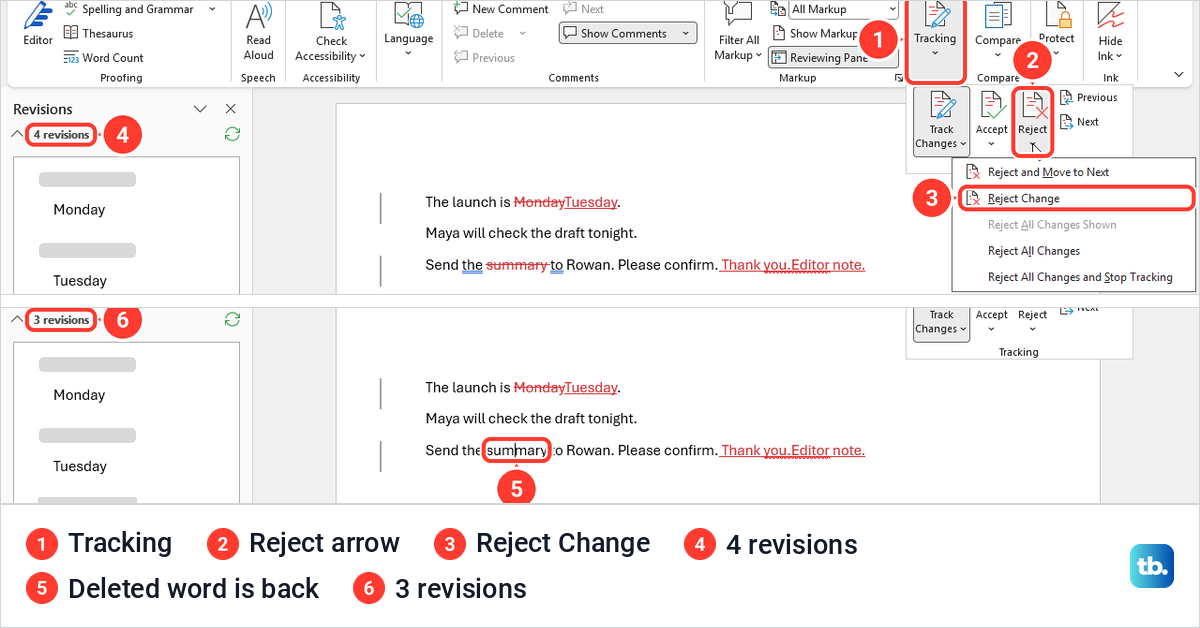
To reject an edit, click inside it, open Tracking, select the arrow under Reject and choose Reject Change. We did that inside the deleted word summary, and Word put summary back as plain text and the count fell to 3 revisions.
On our PC, clicking a marked word in All Markup did not open a card, although Microsoft describes one. The click only placed the cursor, while hovering showed a tooltip with the reviewer, the date and time and the added word. The small icon in the right margin started a new comment, not a review card.
Accept or reject all changes at once
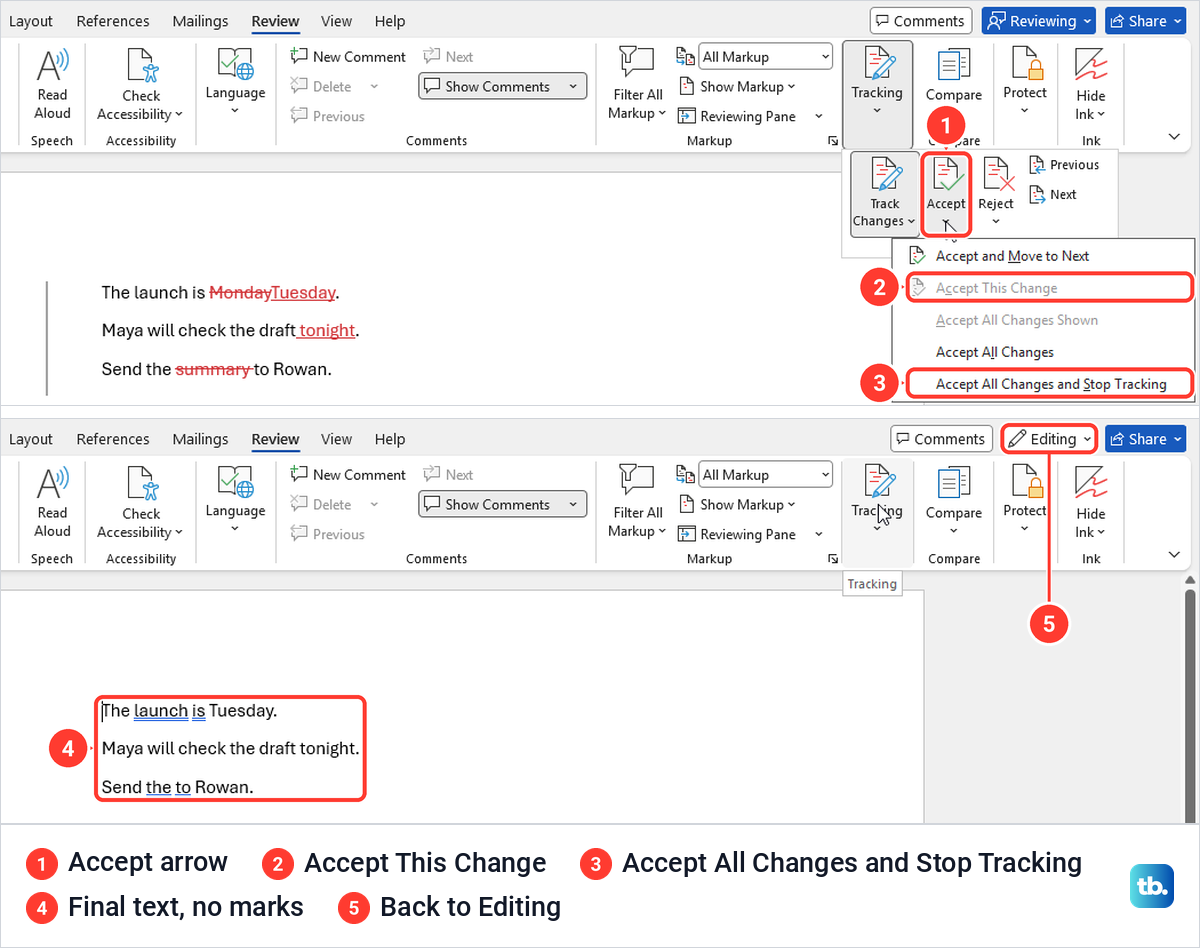
The arrow under Accept holds five commands, from Accept and Move to Next to Accept All Changes and Stop Tracking, and the arrow under Reject has the matching five. The two Shown commands act only on the changes your Show Markup filters leave visible, such as one reviewer's edits, and on our PC they were greyed out while every reviewer was showing.
A bulk accept leaves no marks behind to review again, so first make a copy of the Word document and keep the marked version. If Word refuses to save that copy, fix a Word document that will not save before you accept anything. In our copy, Accept All Changes and Stop Tracking left The launch is Tuesday and Maya will check the draft tonight with no marks, the status bar read Track Changes: Off and the mode button was back on Editing.
In a second copy, Reject All Changes and Stop Tracking did the opposite and brought back the original wording, The launch is Monday and Send the summary to Rowan, again with no marks and tracking off. Use Accept All Changes or Reject All Changes on their own if you want to keep recording edits afterwards.
Turning tracking off does not clear old marks. When we switched it off with the shortcut, everything already marked stayed marked, and Microsoft says the same. Our guide to turn off Track Changes and clean up old marks covers stopping it on every device and removing stubborn revisions.
Print a document with or without the markup
On our PC, Word was set to print the redline along with the text. Open File > Print, select the Print All Pages box under Settings, and look at the bottom of the list. Print Markup was ticked on our copy, and the preview showed every underline and strikethrough.
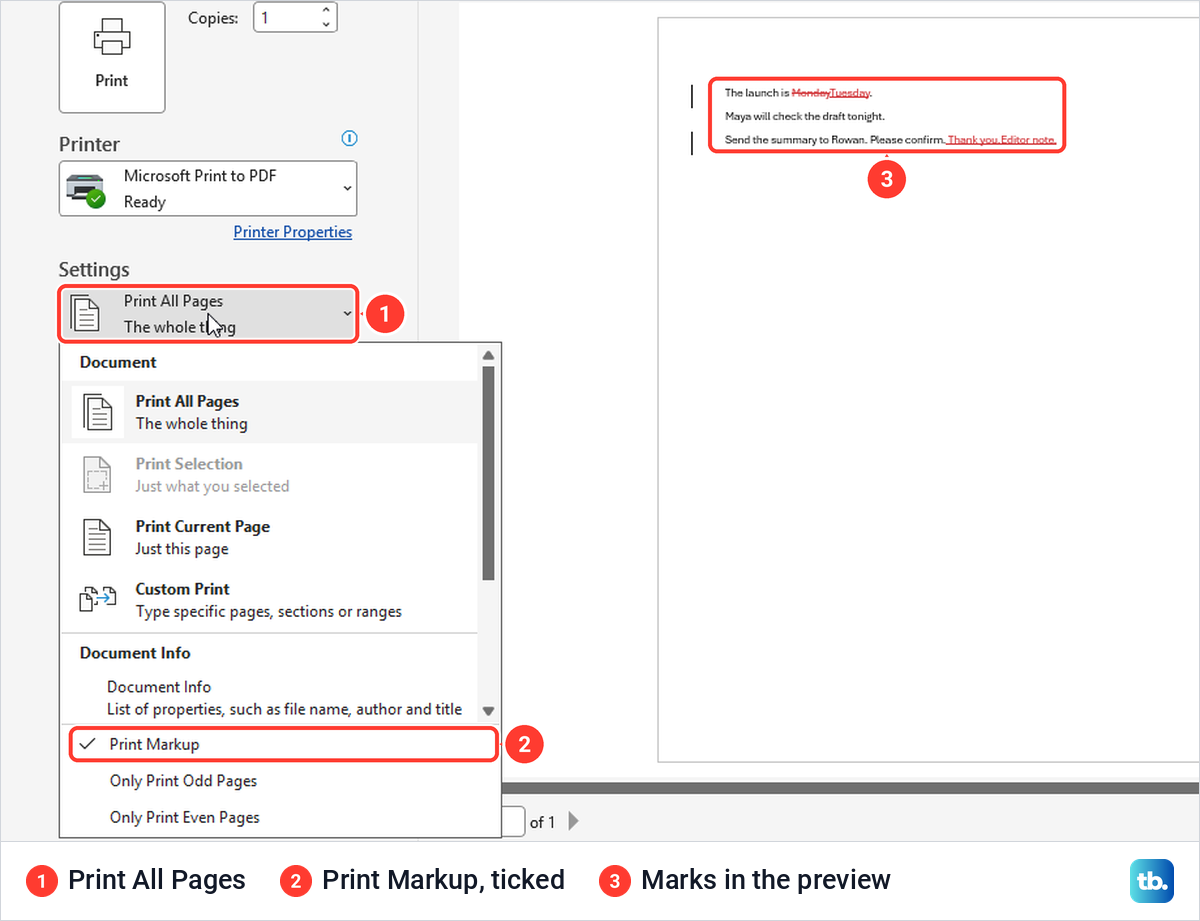
Clearing Print Markup changed the preview to the edited text with no marks, The launch is Tuesday instead of the redline. Back in the document, the tracked changes were still there, which matches Microsoft's warning that hiding changes does not remove them. If the printer then refuses the job, use our steps to fix a Word document that will not print.
Check a clean copy before you send it
Before you send a final version, check that no revisions are left in it. On our copy, File > Info listed Revisions under Inspect Document, which is a quick warning sign. Select Check for Issues > Inspect Document, keep Comments, Revisions, and Versions ticked and select Inspect.
On our marked copy, Document Inspector reported Revision marks under that heading with a Remove All button, and warned at the bottom that some changes cannot be undone. Microsoft recommends running it on a copy, since removed data cannot always be restored.
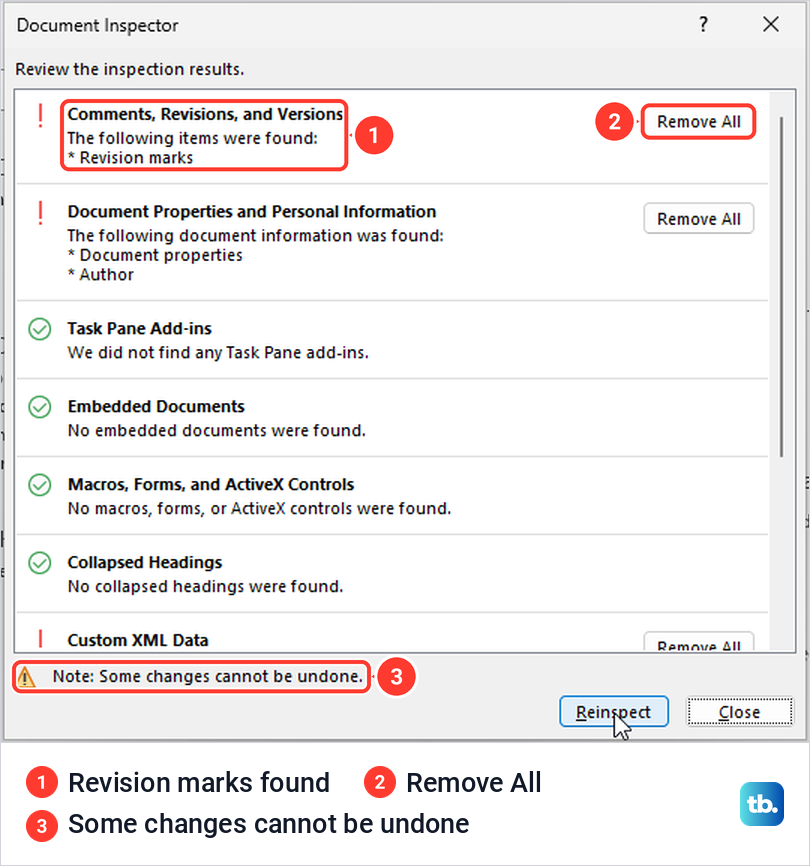
If Document Inspector still lists Revision marks, the copy has edits nobody has decided on. Go back, accept or reject them, then select Reinspect, and send the file only when that heading no longer lists revision marks. Read the final wording as well, because Inspector does not check sense: after we accepted every change, our third line read Send the to Rowan, with the deleted word gone.
Once the wording is right and nothing is left to resolve, you can save the clean Word document as a PDF to keep the layout fixed for the reader. Send that alongside the Word file or instead of it.
Track changes in Word for the web
Word for the web keeps Track Changes on its Review tab. Select Review > Track Changes and choose Off, For Everyone or Just Mine; the menu also lists Ctrl + Shift + E beside For Everyone. In Microsoft Edge, choosing Just Mine switched the mode button to Reviewing, added a Review Mode badge next to the file name and marked our next edit, Monday replaced with Friday.
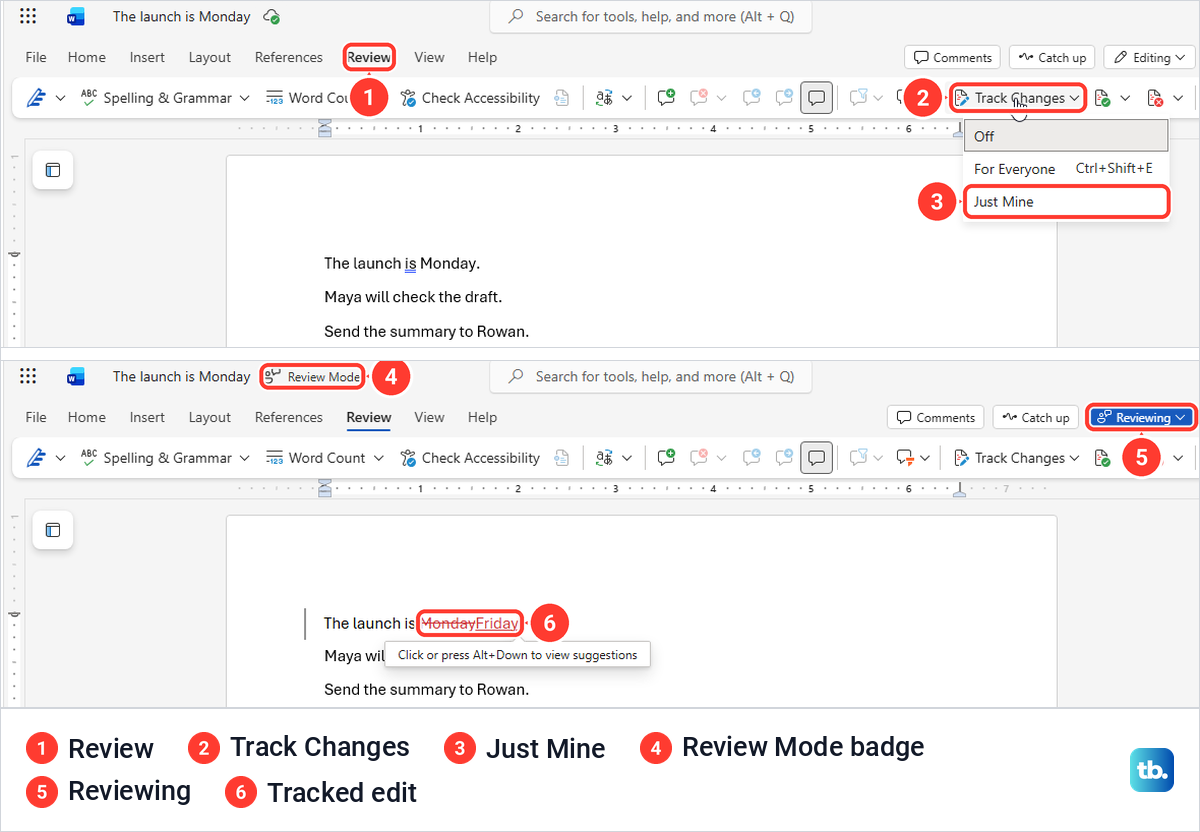
The mode button does the same job. Choosing Reviewing from it, described as Add comments and suggest changes, turned our next edit into a suggestion. Clicking that suggestion opened a card headed Accept or reject suggestion?, with Replaced Monday with Thursday, the date and time, and buttons to accept or reject. For the file's owner, Reviewing equalled Just Mine, and Off was still in the Track Changes menu.
Choosing Off stops the recording. Our next words were plain text and the Monday to Friday mark stayed in place, and Microsoft says the same of Editing mode, where changes do not appear as tracked changes.
Find the markup view when it is not on the ribbon
Microsoft's instructions point to a Markup view control on the Review tab, but in our Edge window neither the Review tab nor its overflow menu nor the View tab showed one. The search box at the top found it. Type markup and choose Markup on page (All Markup) or Markup in margin (Simple Markup).
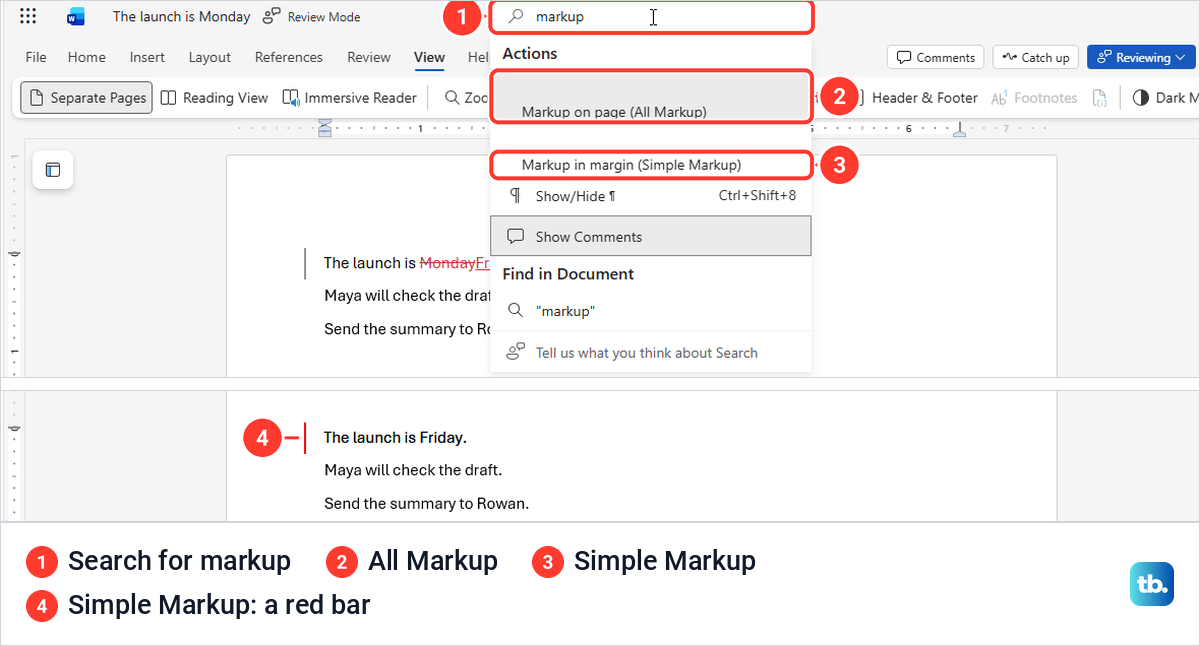
Simple Markup showed The launch is Friday with a red bar in the margin, and All Markup brought back the strikethrough and underline. Microsoft also gives a keyboard route that starts with Alt + Windows + R. On our PC that combination opened the Xbox Game Bar capture overlay on top of Edge, and Microsoft itself warns it can set off Game Bar's screen recording, so the Review tab is the safer route.
Share a document for review so edits arrive as suggestions
To make every edit from a reviewer arrive as a tracked suggestion, share the file for review. Save the document to OneDrive for work or school, select Share > Share at the top right, open the permission menu beside the name box and choose Can review, described as Suggest changes. The other choices were Can edit, Can view and Can't download.
Microsoft says review sharing works on documents stored in OneDrive for Business, its name for OneDrive for work or school. For a file in a SharePoint library, it adds, the library's permissions take precedence, so anyone who already has edit permission can still open it in Editing.
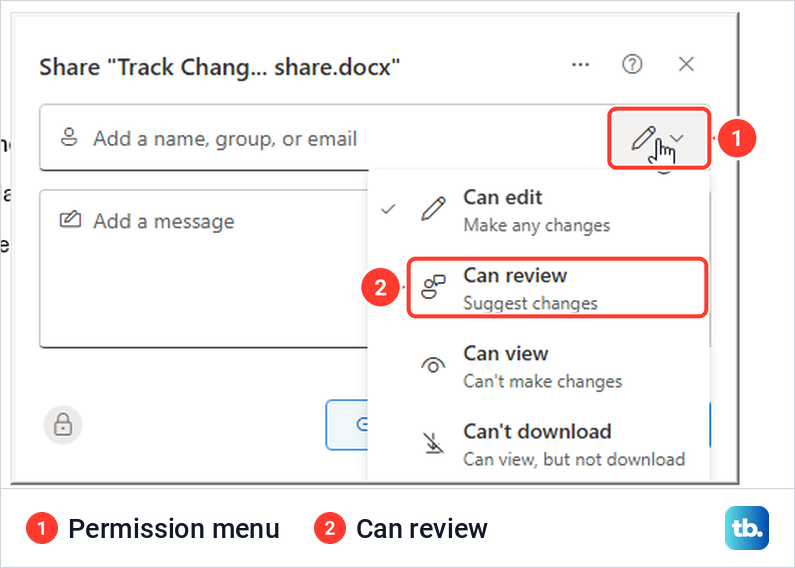
We sent a practice file to a second account this way and Word confirmed the invitation to review. When that account opened the file in Word for the web, it started in Reviewing with the notice This document has been shared with you for reviewing, and explained that suggestions go to the author to approve. Its edit, Monday replaced with Thursday, was marked as a suggestion.
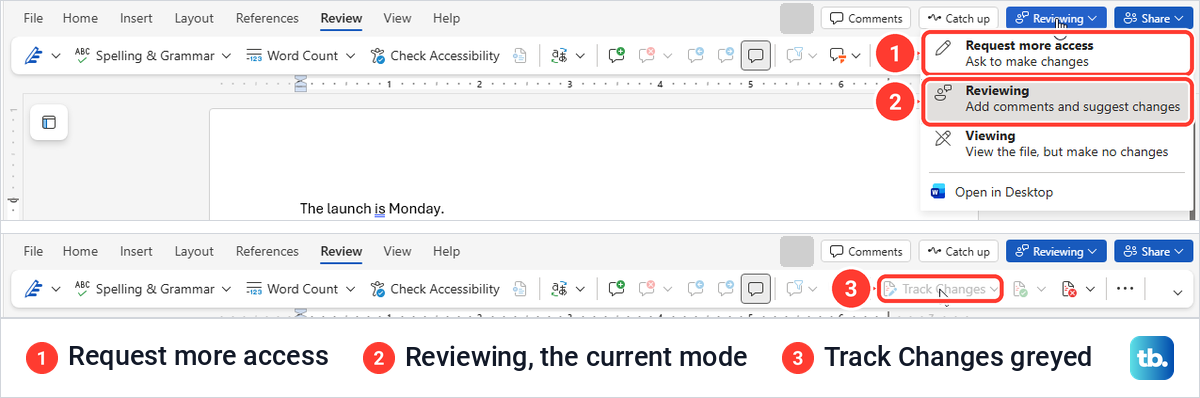
In our shared file, the reviewer could not switch tracking off, and Microsoft says a document shared for review may prevent it. In the recipient's mode menu, Request more access, described as Ask to make changes, took the place of Editing, and the Track Changes control on the Review tab was greyed out. Microsoft says that if a reviewer needs to edit without tracking, they must save a copy or ask the sender to share it again without review mode.
Track changes on a Mac, iPad or iPhone
In Word for Mac, Microsoft's steps are to open the Review tab, select Track Changes and choose For Everyone or Just Mine, and selecting Track Changes again turns it off. Microsoft gives Command + Shift + E as the Mac shortcut, pressed with the cursor in the document text.
On an iPad, tap the Review tab, tap the Track changes and Markup options button, tap Track Changes and choose For Everyone or Just Mine. To accept or reject an edit, tap it twice to select it, then use Accept or Reject under the Changes button on the Review tab.
On an iPhone, tap the edit button to open the ribbon, tap Home and then Review, scroll to Track Changes and turn the toggle on. Display for Review on the same tab switches between All Markup, No Markup and Original, and tapping a change twice selects it so you can accept or reject it from the Review tab.
When Track Changes is greyed out or marks disappear
If the marks have gone, set the display box to All Markup, make sure Insertions and Deletions is ticked under Show Markup, and choose Specific People > All Reviewers. None of those settings changes the file, so check them before anything else.
If Track Changes cannot be turned off, someone may have used Lock Tracking on the Track Changes menu. Microsoft says that while tracking is locked, anyone opening the document can see the changes but cannot turn the feature off or accept or reject changes, and if a password was set when tracking was locked, Word asks for it before Lock Tracking can be turned off. Restrict Editing, in the Protect group on the Review tab, can also limit what a reviewer may change.
A file set to open read-only can look as if Word is broken. We set File > Info > Protect Document > Always Open Read-Only on a copy, closed Word and reopened the file. It opened in Viewing with no Enable Editing bar, and typing only raised a note saying the author had set it to open as view-only. Choosing Editing from the mode button made it editable, and also switched Track Changes off.
If your edits were made in two separate files with tracking off, you can still see them as a redline. Follow our guide to compare two Word documents and see changes to get a marked document out of them.
If the marks vanished because Word closed before the file was saved, the problem is the save rather than Track Changes. Try to recover an unsaved Word document before you start the review again.
How we tested this guide
We tested this in Word for Microsoft 365 on Windows 11, version 25H2, and Word for the web in Microsoft Edge, redlining a three-line practice document.
Frequently Asked Questions
How do I redline in Word?
Turn on Review > Tracking > Track Changes > For Everyone, then edit the document. With the display box on All Markup, added words are underlined and deleted words are struck through, which is the redline you send for review.
Why are my tracked changes not showing?
Usually the view is hiding them. Set the display box to All Markup, check that Insertions and Deletions is ticked under Show Markup, and choose Specific People > All Reviewers.
Does No Markup remove tracked changes?
No. It only changes the view, and All Markup brings every mark back as long as Insertions and Deletions and All Reviewers are selected under Show Markup. To remove a change for good, accept it or reject it.
Can I track only my own edits?
Yes. Choose Just Mine from the Track Changes menu, and only your new edits are marked.
How do I accept one change without accepting all of them?
Move to it with Tracking > Next and select Accept, or right-click the marked word and choose Accept Insertion or Accept Deletion. The other changes stay as they are.
Why is Track Changes greyed out in a shared document?
The file was probably shared with you as Can review. In our test that kept the reviewer in Reviewing with Track Changes greyed, and Microsoft says a reviewer may not be able to turn tracking off. Use Request more access from the mode button, or ask the owner to share it again with editing rights.
How do I show tracked changes in balloons?
Switch to Print Layout on the View tab, then choose Show Markup > Balloons > Show Revisions in Balloons. Deleted words then move into the right margin.