
To compare two Word documents, open them in Word and select Review > Compare > Compare..., choose the older file as the Original document and the newer one as the Revised document, then select OK. Word opens a third document with the differences it finds marked as tracked changes. With Show changes in left at New document, the default, both of your files stay exactly as they were saved.
To read two files next to each other instead, open both and select View > View Side by Side, which lines the windows up but marks nothing. Word for the web cannot compare two files, so open them in the desktop app for that.
The short version
- Marked differences: select Review > Compare > Compare..., pick the original and the revised file, then OK.
- Keep both files as they are: leave Show changes in set to New document.
- Read them next to each other: View > View Side by Side, with Synchronous Scrolling on.
- Reviewers' copies: use Combine... so each person's edits keep a name.
- In a browser: Word for the web has no Compare, so open the files in desktop Word.
Which Word tool to use for comparing files
Word has three tools that sound alike, and each does a different job. Compare marks the differences between two saved files, View Side by Side only arranges two windows, and Combine merges reviewers' copies while keeping track of who changed what.
| What you need | Word command | What you get | Your files |
|---|---|---|---|
| Find the edits between two saved files | Review > Compare > Compare... | A third document with the differences as tracked changes | Unchanged when Show changes in is New document |
| Read two files next to each other | View > View Side by Side | Two windows that can scroll together, with no marks | Unchanged |
| Merge edits from several reviewers | Review > Compare > Combine... | One document with each reviewer's changes under a name | Unchanged when Show changes in is New document |
| See earlier saves of one cloud file | Version History | Older versions of that single file, for files in OneDrive or SharePoint, per Microsoft | One file only, not two separate files |
Compare is the tool to use when you need to compare Word documents for differences, such as what a colleague changed in a contract draft or what a broad pass to find and replace text in Word really touched. It does not need Track Changes to have been on while the edits were made. Our two files were saved separately with no tracking at all, and Word still found the edits between them.
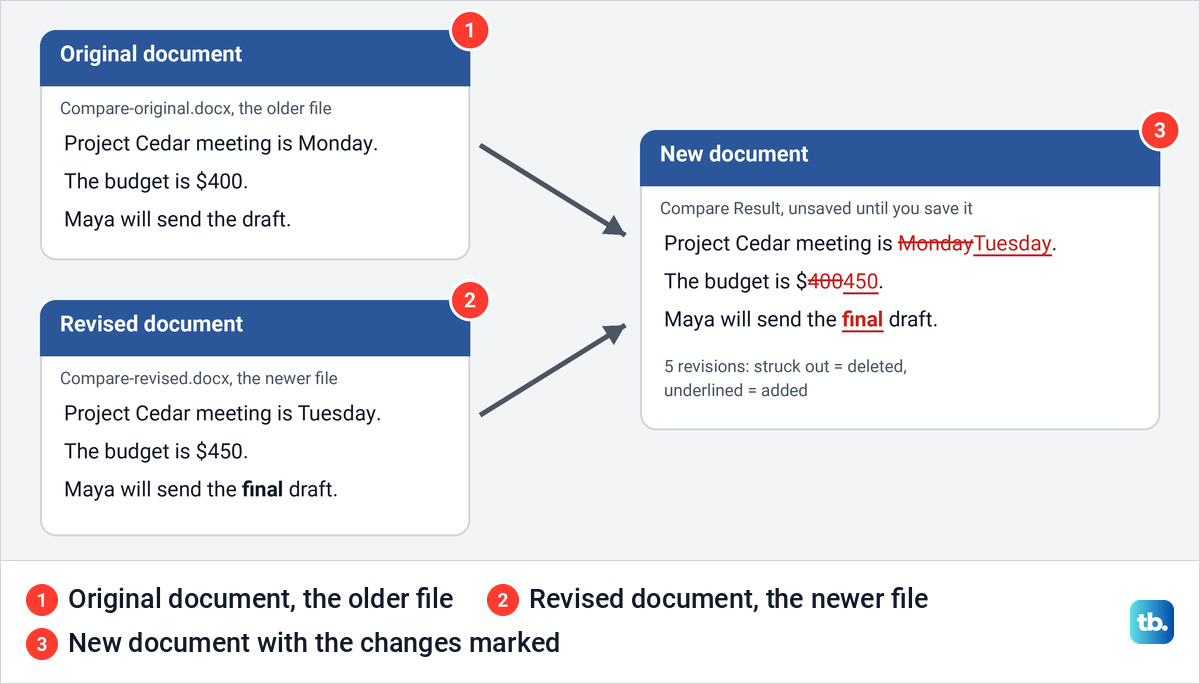
In our example, the original note said the meeting was on Monday with a budget of $400. The revised copy moved it to Tuesday, raised the budget to $450 and added a bold final, so Word reported five revisions, two deletions and three additions.
Compare two Word documents step by step
Save both versions first, with names that make the order obvious, such as Compare-original and Compare-revised. Microsoft's steps start by opening the two documents you want to compare, and open files are also quicker to pick, because the Compare dialog lists open and recent files in its drop-down lists.
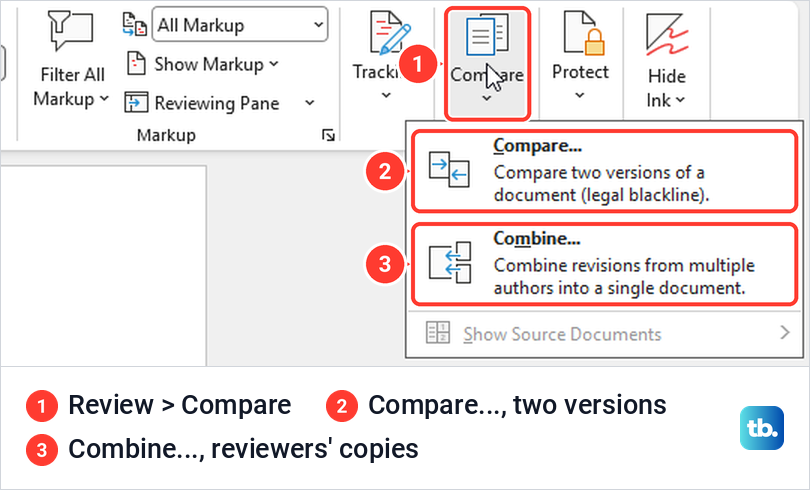
Open the Review tab and select Compare in the Compare group. On our PC the menu showed Compare..., with the description "Compare two versions of a document (legal blackline)", and Combine..., for reviewers' copies, below it. Microsoft's help page tells you to click the legal blackline phrase, but on screen that is only the description line under Compare.
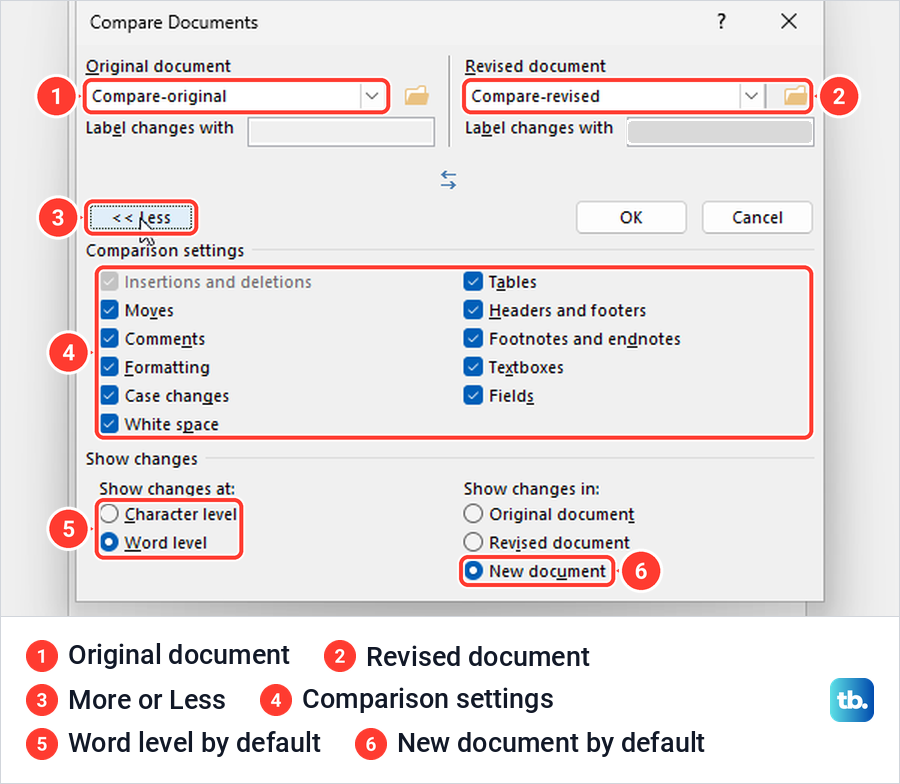
In the Compare Documents box, pick the older file under Original document and the newer one under Revised document. Each list has a Browse entry, and the folder button beside it finds files that are not open.
Word filled the Label changes with box on the revised side with the name of the account signed in to Office. That name became the author of each change in the result, so type something clearer there, such as Legal review, if the result is going to someone else.
Select More to see the settings. All the Comparison settings boxes were ticked by default, Show changes at was set to Word level and Show changes in to New document. Leave New document selected, because Microsoft says choosing Original document or Revised document there will modify the selected document.
Select OK. Word opened a new window with three parts: a Revisions pane listing 5 revisions, the Compared Document in the middle with deletions struck through and additions underlined, and the original and revised files in two small panes on the right.
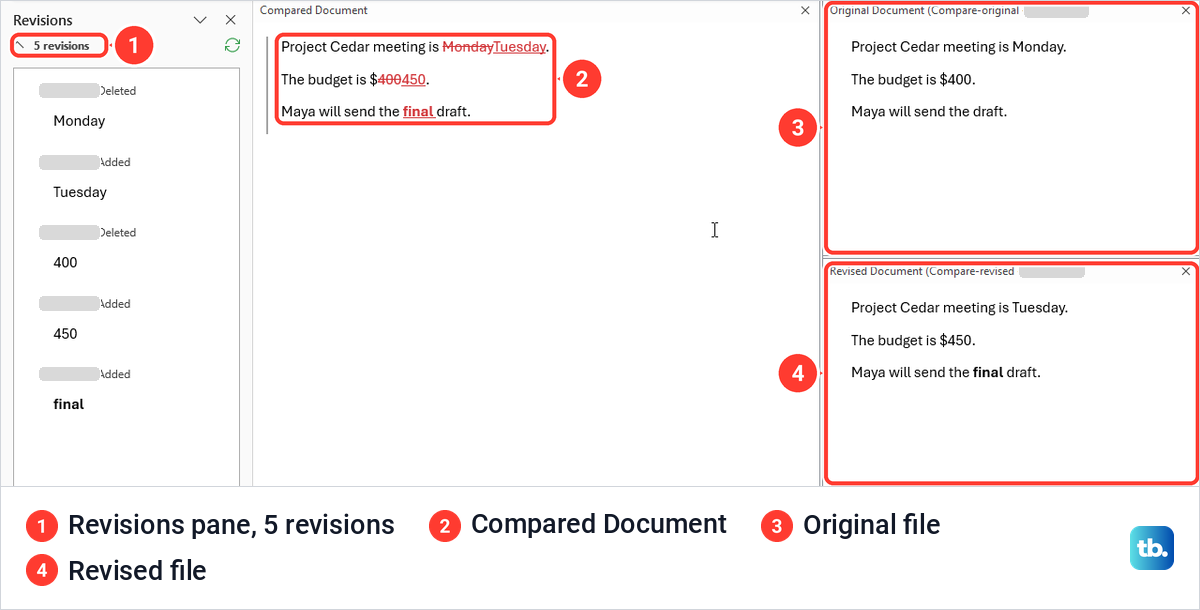
Our two source files kept the same size and saved time after the comparison, so nothing was written to them. The result, though, is a new unsaved document named Compare Result, so save it with File > Save As under a name you will recognize. If Word refuses, our steps to fix a Word document that will not save cover the usual causes.
Put the original and revised files in the right order
Word treats the original as the starting point and marks the revised file's text as what was added or removed since. Pick the files the wrong way round and the result reads backwards, which can make a deleted clause look like a new one.
When we picked Compare-revised as the original, Word marked Tuesday and 450 as deleted, Monday and 400 as added, and the bold final as deleted. The Original Document pane on the right names the file Word used as the starting point, so glance at it before you read the marks.
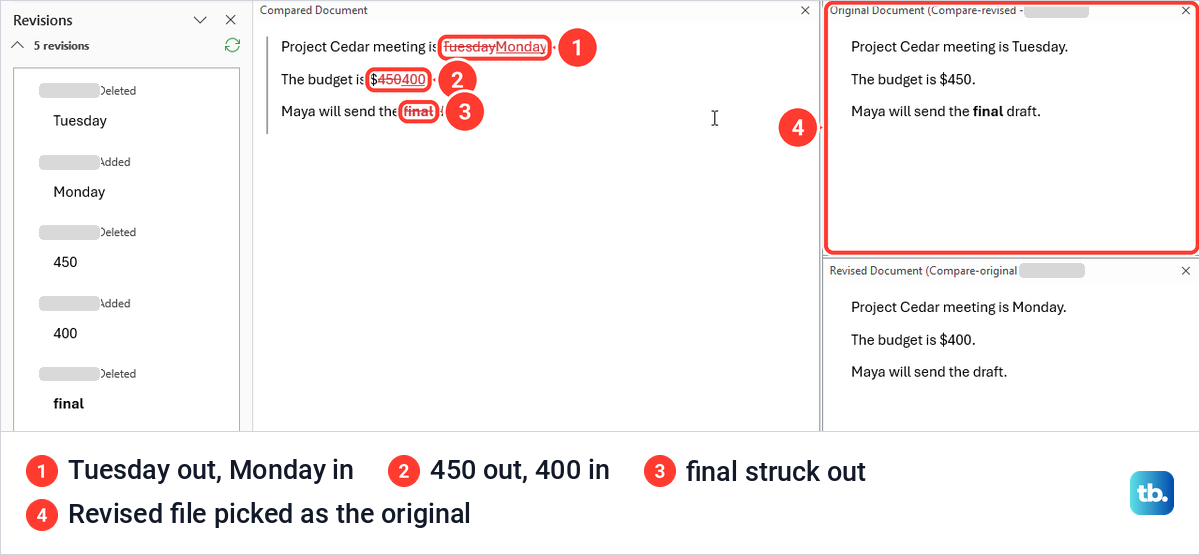
To fix a backwards result, close it without saving and run Compare again with the files the other way round. With New document selected, neither source file is touched either way.
Choose what Word compares and how closely
The Comparison settings boxes decide which kinds of difference count. Untick Formatting, Case changes or White space when you only care about the wording, and keep Footnotes and endnotes ticked if your notes matter.
Unticking Formatting does not hide new words that happen to be bold. With it unticked, our files still gave the same five revisions, and the bold final was listed as Added text both times, never as a formatting change. If the revised draft's styling turns out to be unwanted, clear formatting in Word in that draft rather than in the original.
Show changes at sets how finely Word marks a change. Word level, the default, marked 400 to 450 as a whole number. Character level marked only the digits that changed, Added 5 and Deleted 0, yet it still marked Monday and Tuesday as whole words, so do not expect it to split each word into letters.
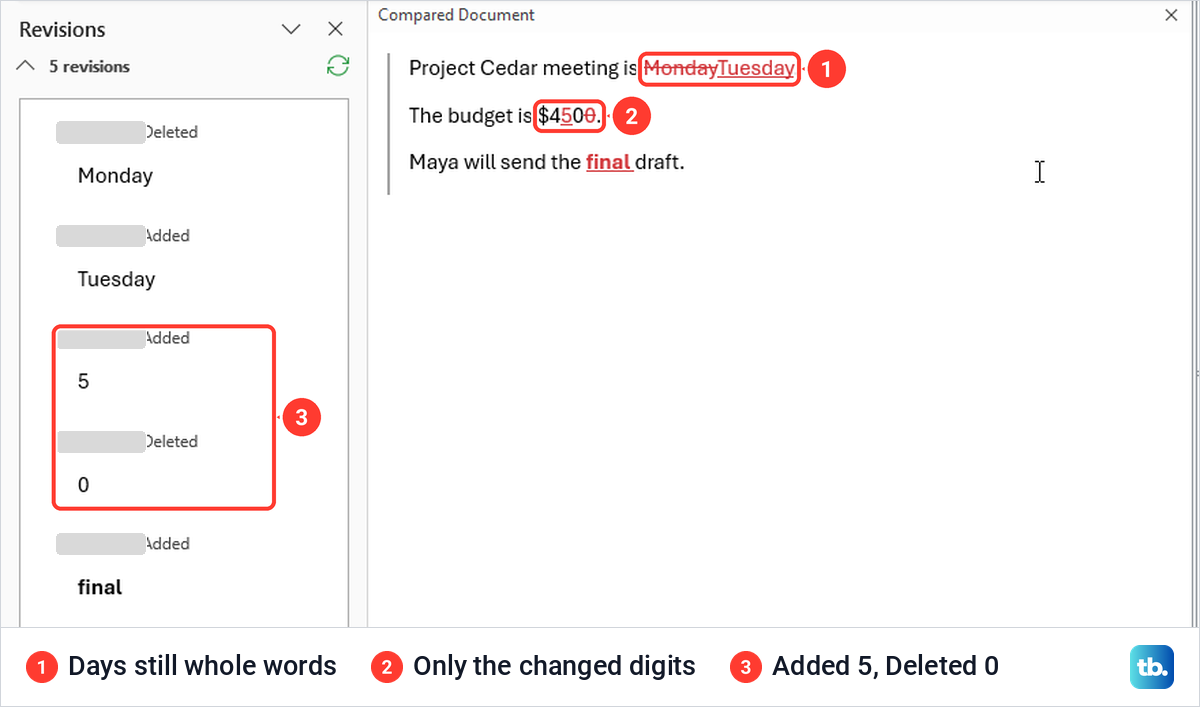
Word kept our last level and Formatting choice the next time we opened Compare in the same session, and the box stayed expanded. After Word was restarted it opened collapsed again, so open More and check the settings before each run.
Work through the marked changes
The result is an ordinary document with tracked changes, so you can accept or reject them like any other edits before you save the final version. Microsoft says the changes in the revised document are shown as tracked changes, and the Revisions pane lists each one with its author and whether it was added or deleted.
If the screen feels crowded, select Review > Compare > Show Source Documents > Hide Source Documents. On our PC that removed both small panes and left the marks in place, and the same submenu offers Show Original, Show Revised and Show Both to bring them back.
Tracking future edits is a separate setting from the marks in this result, and our guide to turn off Track Changes in Word covers it. If you accept heading changes into the file you keep, update a Word table of contents afterwards so its entries match.
Once the result is saved as a Word file, you can also save a Word document as a PDF for someone who only needs to read it. Keep the Word copy as well, since that is where the changes can still be accepted or rejected.
Bring back revision marks that seem to have disappeared
If a comparison looks like plain text with no colors, check the display box in the Markup group of the Review tab. Ours offered Simple Markup, All Markup, No Markup and Original, and the result opened in All Markup.
Switching to No Markup showed the revised text with no marks at all, while the Revisions pane still counted 5 revisions. Choosing All Markup again brought the marks back without running Compare a second time.
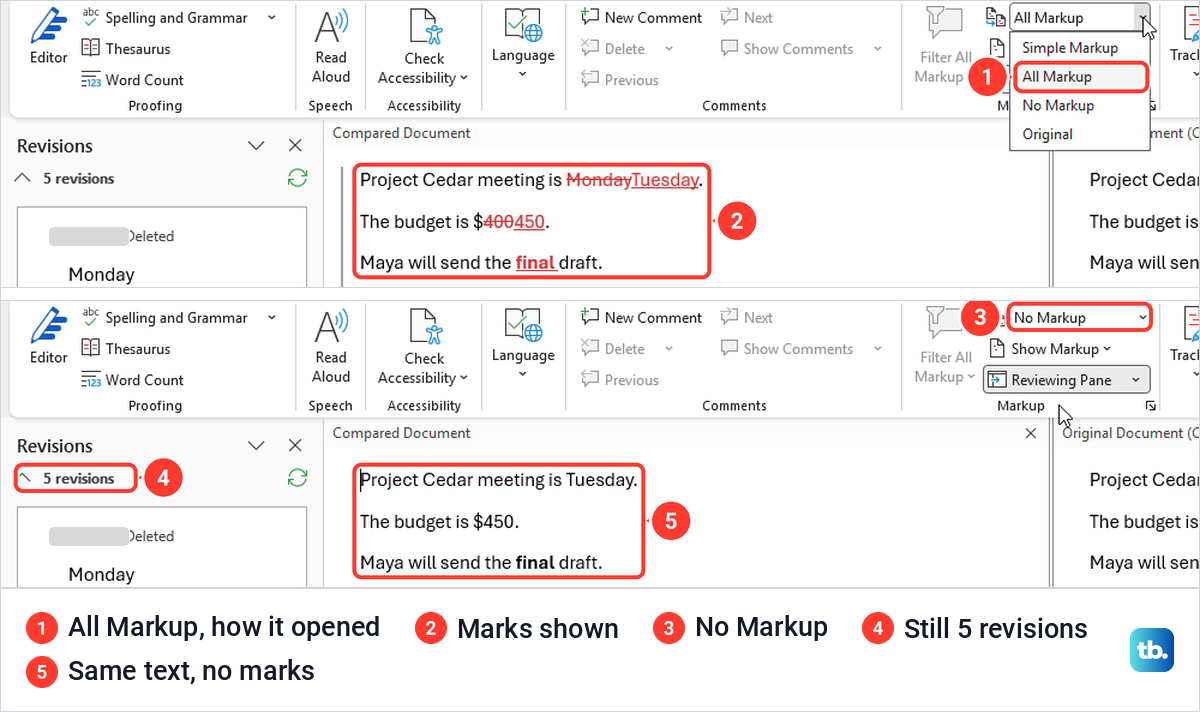
Microsoft says Simple Markup displays tracked changes with a red line in the margin, so if you see that line but no colored text, choose All Markup. It describes No Markup as showing the document with changes incorporated, and Original as showing the original document without tracked changes. None of these views accepts or deletes anything, and the changes stay in the file until you accept or reject them.
Compare a file that already has tracked changes
Compare treats pending tracked changes in an input as if they were already accepted. To see what that means, we saved a copy of the revised note with Track Changes on and one change left pending, Tuesday changed to Wednesday, then compared it with the original.
Word stopped with a box that read "One or both of the compared documents contain tracked changes. For the purpose of the comparison, Word will consider these changes to have been accepted. Continue with the comparison?" No was the highlighted default button.
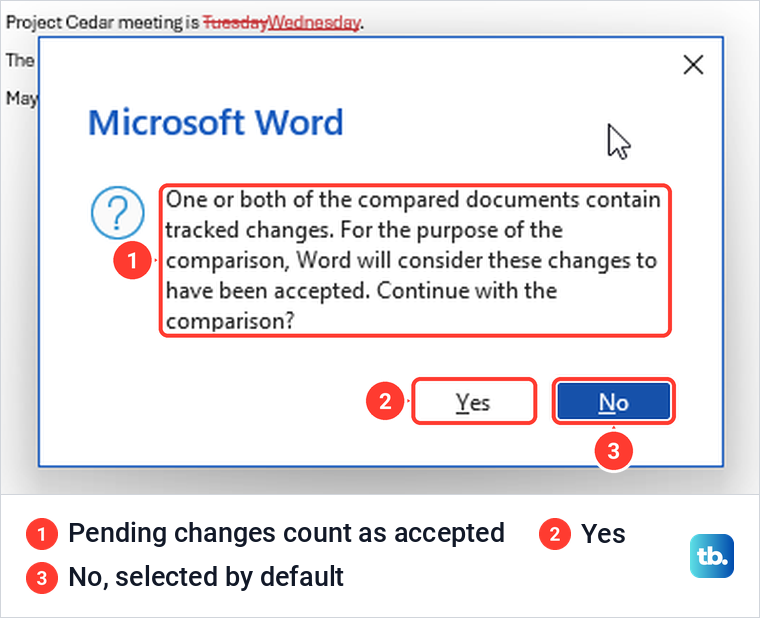
Selecting Yes produced a result showing Monday changed straight to Wednesday, with the pending edit treated as accepted. The tracked copy itself was not changed, and when we checked the saved file afterwards it still held the pending deletion of Tuesday and insertion of Wednesday.
So Yes is fine when you only want to see how the latest wording differs from the original. If you need to keep each reviewer's tracked edits and their names, use Combine instead, which is what Microsoft recommends for changes from a number of reviewers.
Combine changes from several reviewers
Select Review > Compare > Combine..., pick the file you sent out as the Original document and a reviewer's copy as the Revised document. Both sides have a Label unmarked changes with box, and the name you type there becomes the author of edits that were made without Track Changes. Open More, choose New document under Show changes in, then select OK.
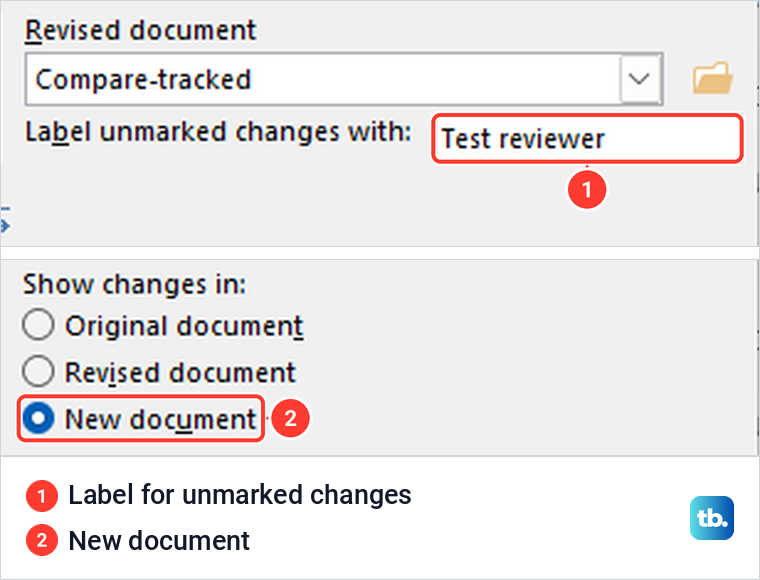
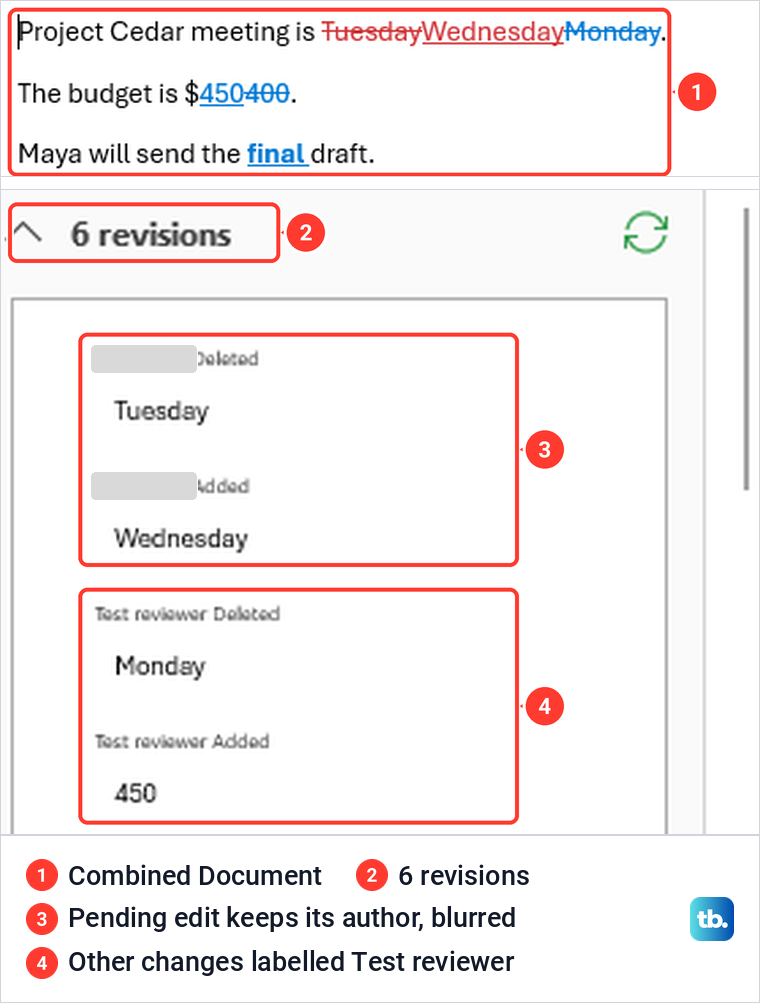
We labelled our tracked copy Test reviewer. Word opened a Combined Document with 6 revisions and both source panes, and showed no warning about tracked changes. The pending Wednesday edit kept its original author, while the other differences were labelled Test reviewer.
To add a third reviewer's copy, Microsoft says to save the combined document first, then combine it as the Original document with the next copy and choose Original document under Show changes in. That choice changes the saved combined file, so make a copy of the Word document before each round if you want a version to go back to.
View two Word documents side by side
View Side by Side is for reading, not marking. Open both files, go to the View tab and select View Side by Side in the Window group. In a full-width window ours was a small unlabelled icon, and its tooltip read "Instead of switching back and forth between documents, view them side by side."
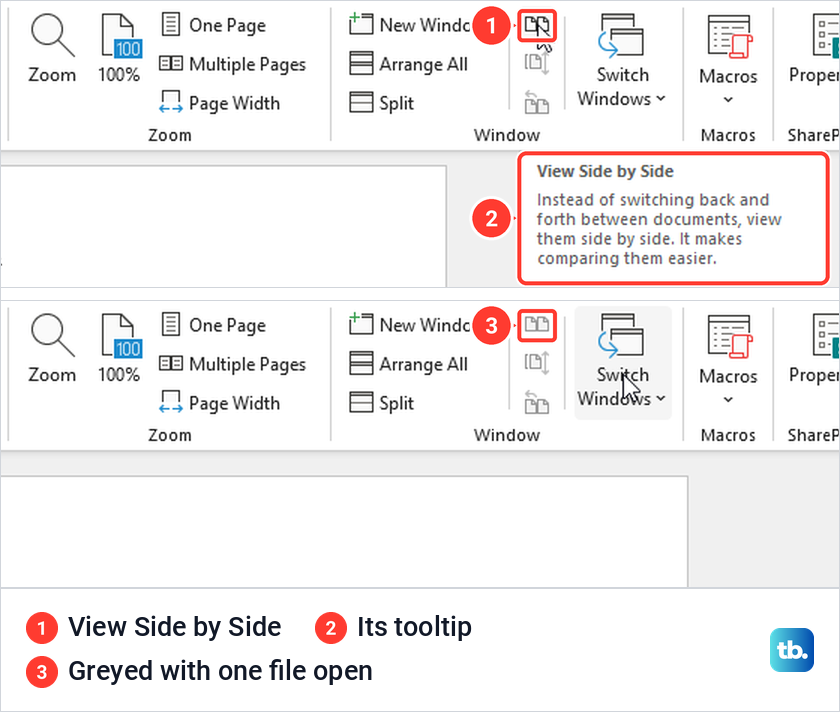
If the button is grey, check that both documents are open in Word. Ours was greyed with one file and became active as soon as we opened the second, and one click then put the two files in the left and right halves of the screen. With more than two open, Word first asked which one to compare side by side with and listed the others.
In a narrower window the same commands sit under a Window button, with labels. There, both View Side by Side and Synchronous Scrolling were already on, and scrolling one document moved the other with it. Select Synchronous Scrolling to turn that off when the files have different lengths, and select View Side by Side again to go back to normal windows.
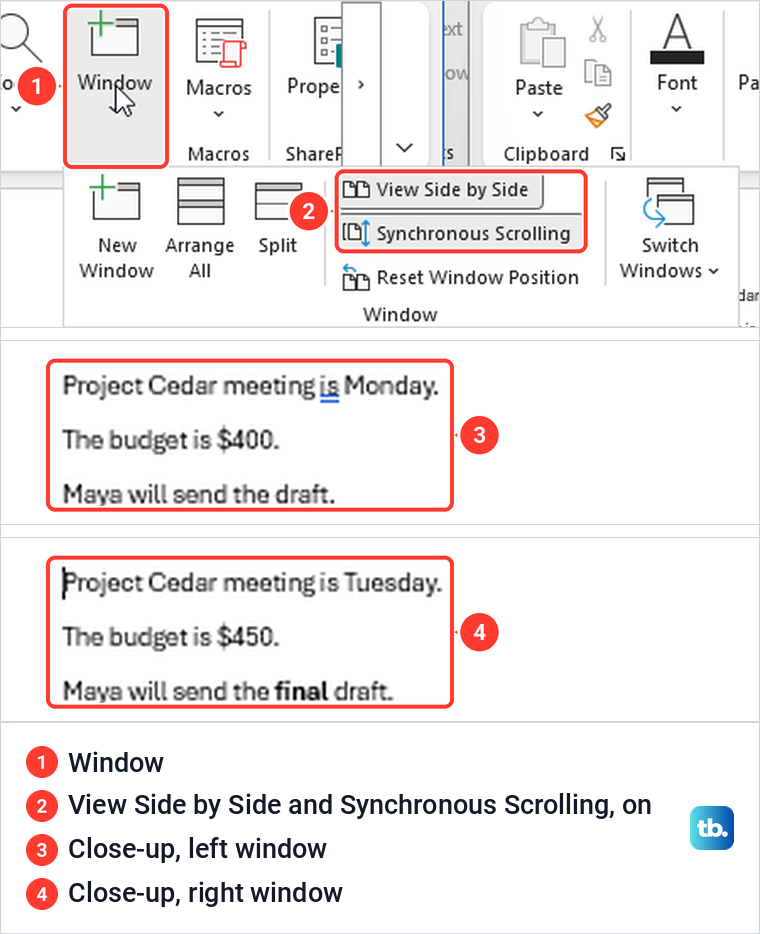
Side by side is also the way to check pictures. The Compare settings cover text, formatting, tables, headers and footers, notes, text boxes and fields, and Microsoft says nothing about comparing what is inside an image, so look at important pictures in both files yourself.
Compare documents in Word for the web
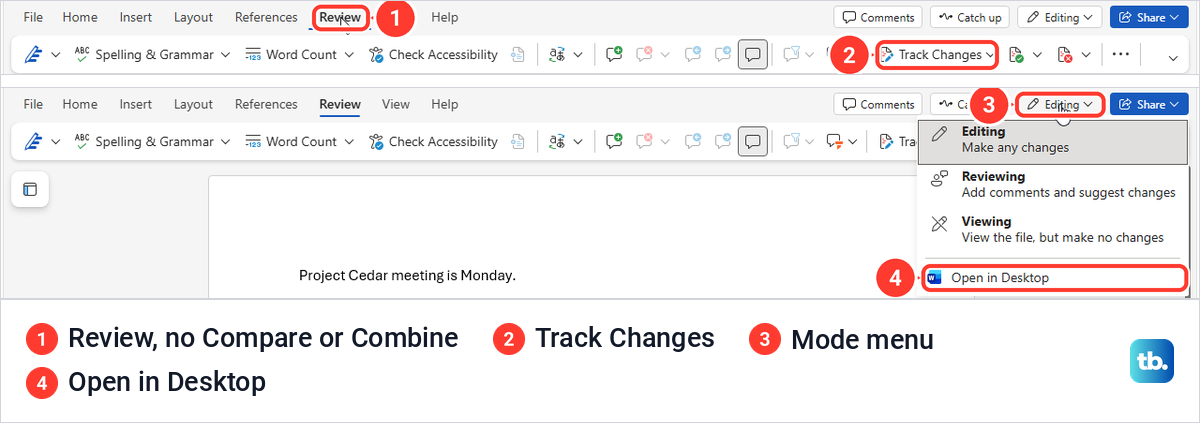
Word for the web cannot compare two files. On its Review tab in Microsoft Edge we found spelling, word count, accessibility and comment tools plus Track Changes with accept and reject buttons, and the overflow menu held only Previous and Next for tracked changes. Microsoft's own feature list marks Compare and Merge revisions as a desktop feature.
For features the browser lacks, Microsoft points to the Open in Desktop command. In our copy it sat at the bottom of the mode menu, the button labelled Editing beside Share, and Edge then showed a prompt saying This site is trying to open Word, with Open and Cancel buttons.
Desktop Word then asked us to type the email of the account to use to open the document. Once both files are open in desktop Word, the steps above apply.
Version History is a different tool. Microsoft says it only works for files stored in OneDrive or SharePoint in Microsoft 365, and it shows earlier saves of one file rather than the differences between two separate documents.
Compare documents in Word for Mac
Microsoft's instructions for Word 2019 for Mac follow the same idea with slightly different labels. Open one of the two versions, select Review > Compare > Compare Documents, choose the original in the Original document list and browse to the other version in the Revised document list, then select OK.
Microsoft says the changes go into a new copy based on the original and that the original copy remains untouched. To merge reviewers' copies on a Mac, the same menu has Combine Documents.
Fix common problems when comparing Word files
If an input file will not open, fix a Word document that will not open before you try to compare it. If the newer draft was never saved, recover an unsaved Word document first, so it exists as a file you can pick.
A file set to open as view-only did not get in the way on our PC. We set a copy to Always Open Read-Only, and it reopened in Viewing mode with the message "the author has set this file to open as view-only", yet Compare still worked with it as the original. Microsoft notes that some editing restrictions are controlled by the document owner or your organization and cannot be changed locally.
If View Side by Side is grey, make sure both files are open in Word. If the result shows no colors, switch the Markup box back to All Markup. If formatting changes crowd out the wording changes, run Compare again with Formatting unticked.
How we tested this guide
We tested this in Word for Microsoft 365 on Windows 11, version 25H2, comparing two made-up versions of a short project note.
Frequently Asked Questions
How do I compare two Word documents and see the changes?
Select Review > Compare > Compare..., choose the older file as the original and the newer file as the revised document, and select OK. Word opens a new document with the differences marked as tracked changes.
Can I compare two Word documents side by side?
Yes. Open both files and select View > View Side by Side, and with Synchronous Scrolling on they scroll together, but no changes are marked.
Does comparing documents change my original files?
Not when Show changes in is set to New document, the default. Microsoft says choosing Original document or Revised document there modifies that file.
Why does my comparison show no markup?
The Markup box on the Review tab is probably set to Simple Markup, No Markup or Original. Choose All Markup and the marks come back, since the changes are still in the document.
What happens if one file already has tracked changes?
Word warns that it will treat those changes as accepted for the comparison. On our PC, choosing Yes left the saved file's own tracked changes in place.
Can I compare two Word documents online?
Not in Word for the web, which has no Compare command. Use Open in Desktop from the mode menu, or open both files in the desktop app.
Should I use Compare or Combine?
Use Compare for two versions when you only need to see what changed. Use Combine for reviewers' copies, because it keeps each person's tracked edits under their name.
Can I compare three Word documents at once?
No, Compare takes one original and one revised file per run. For reviewers' copies, Microsoft's method is to combine two, save the result and then combine it with the next copy.