
To scan a document with your iPhone, open the Notes app, start a note, tap the paperclip button and choose Scan Documents. Hold the phone over the page until it is captured, add any other pages, then tap the check mark, and the pages are saved in the note as one PDF. Nothing needs downloading.
The short version
- Fastest way: Notes, then the paperclip, then Scan Documents. Hold steady and tap the check mark when every page is in.
- It is already a PDF: all the pages of one scan sit in a single PDF inside the note.
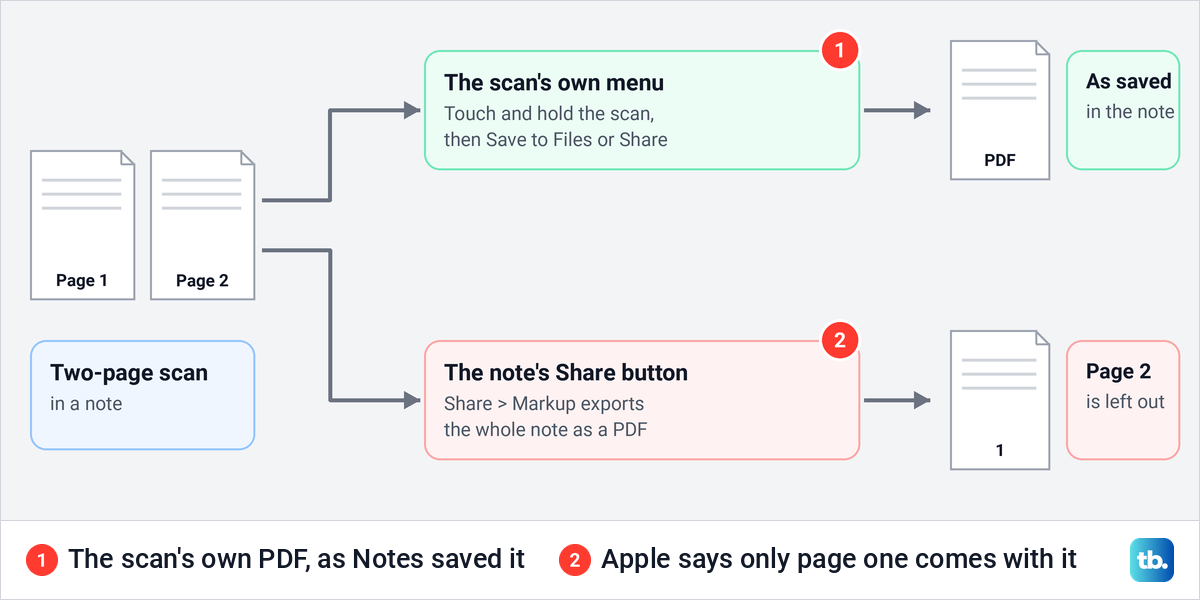
- To get the file out, touch and hold the scan and choose Save to Files or Share, not the note's Share and Markup export, which keeps only page one.
- Sideways or crooked page: open the page's More menu and use Rotate Left, Rotate Right or Crop Page.
- To sign it, tap the Markup (pen) button, then Add and Add Signature.
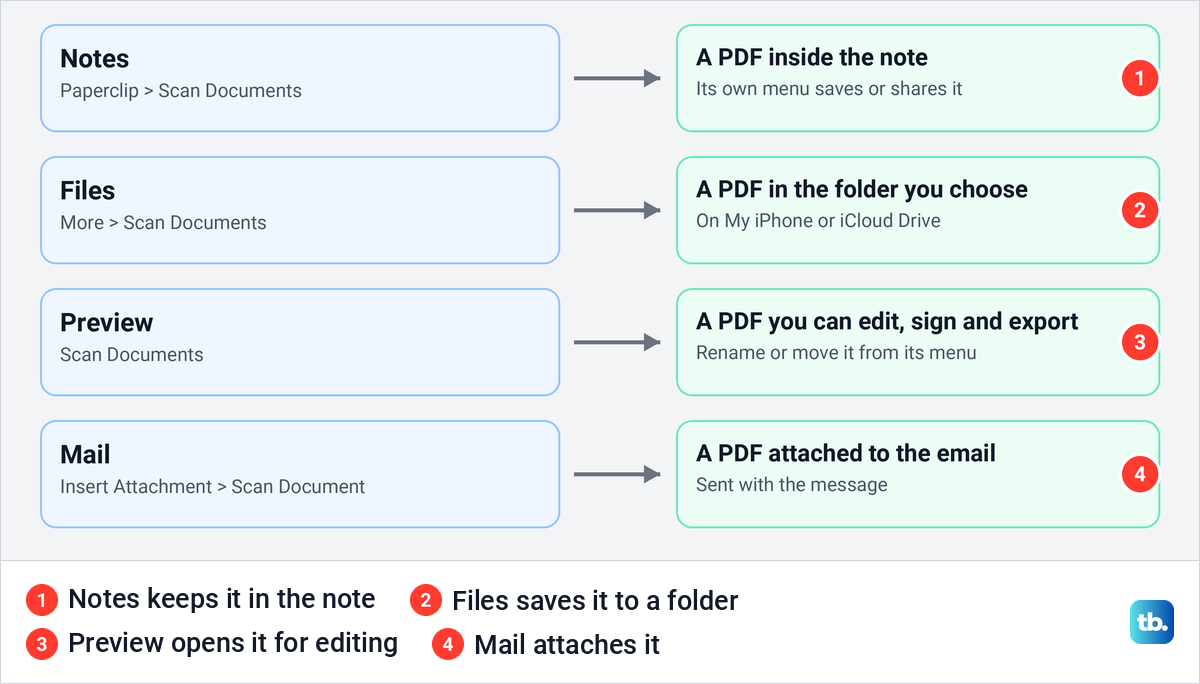
Notes is not the only built-in scanner. The Files app also scans and saves the PDF to a folder you pick, the Preview app (new on iPhone with iOS 26) opens the scan ready to edit or sign, and Mail can put a scan straight into an email.
We scanned two pages of a printed warranty booklet in Notes for this guide, and the screenshots below come from that scan. It came out as one 10.2 MB PDF, and the first page saved sideways because the open booklet lay sideways under the phone. Both are easy to deal with, and the sections on fixing a page and making a scan smaller show how.
Which iPhone scanner to use
Notes, Files, Preview and Mail all make a PDF. The difference is where the file ends up and what you can do with it next, so pick the one that matches where the paper is going.
| Where you start | What you tap | Where the scan ends up | Good for |
|---|---|---|---|
| Notes | Paperclip, then Scan Documents | Inside the note, as one PDF | Keeping a scan with your notes |
| Files | More, then Scan Documents | A folder you choose, as a PDF | Filing a scan in iCloud Drive or On My iPhone |
| Preview | Scan Documents | A PDF in Preview, ready to edit | Signing, cropping or reordering pages |
| Insert Attachment, then Scan Document | Attached to the email as a PDF | Sending a scan straight away | |
| Notes, for words only | Paperclip, then Scan Text | Typed text in the note | Copying a paragraph or a number |
| Camera | Detect Text button | Selected text you can copy or translate | Grabbing a line without saving anything |
| A Mac nearby | On the Mac, Control-click, then Scan Documents | A PDF in the Mac app | Paperwork that ends up on the Mac |
Notes is the quickest for everyday paper, because the scanner is two taps from any note and the scan stays where you will look for it. Files suits a scan that belongs in a particular folder, Preview suits a form you need to sign or tidy up, and Mail suits a page that is going out the door right now.
The last row is Continuity Camera. Apple says you Control-click in a supported Mac app such as Notes, Mail, Pages or Finder, choose Scan Documents (you may need to choose Insert from iPhone or iPad first), and the iPhone camera opens. If you also scan on an Android phone, a Windows PC or a Chromebook, our guide to scanning documents on a phone or computer covers those.
Scan a document in the Notes app
These are the steps we followed for our booklet. They work in a new note or in one you already have.
- 1.Open Notes and start a new note, or open the note the scan belongs in.
- 2.Tap the paperclip button in the toolbar above the keyboard, then tap Scan Documents.
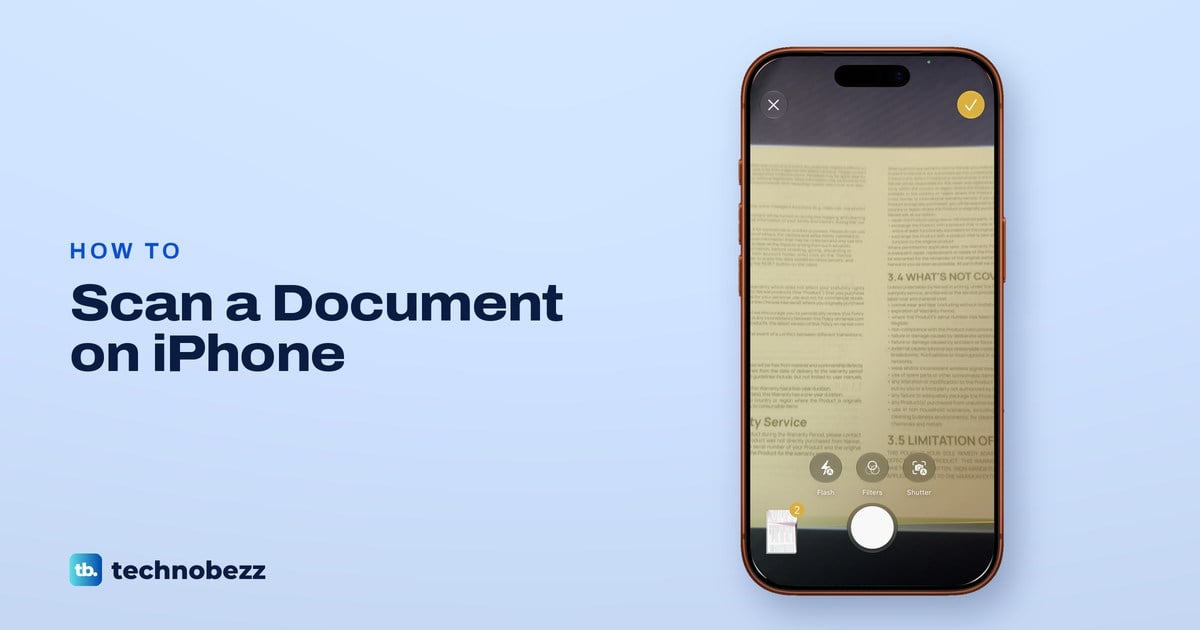
- 3.Hold the iPhone over the page. A yellow layer covers the page while the scanner finds its edges.
- 4.Keep still until the page is captured and its thumbnail appears in the bottom left corner.
- 5.Move to the next page and repeat. A number on the thumbnail counts the pages.
- 6.Tap the check mark at the top right when you have every page.
In our new note, the toolbar above the keyboard showed Aa, a checklist button, a table button, the paperclip and a pen button, with the edge of one more button showing at the right end. The paperclip, which Apple calls the Attachments button, opened a menu with Scan Text, Scan Documents, Take Photo or Video, Choose Photo or Video, Record Audio and Attach File.
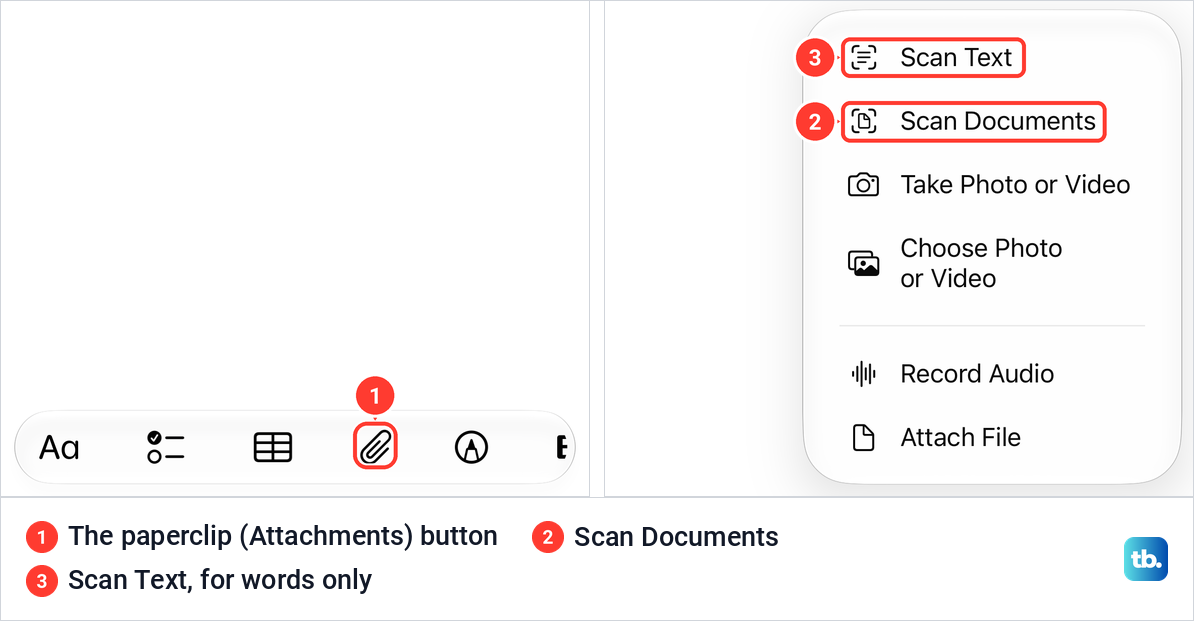
Older guides tell you to tap a camera button in the note. Apple's own steps changed in iOS 18, when Scan Documents moved behind the paperclip, and Apple's support article also gives a second way in: in an open note, tap the More button, then Scan.
Once the scanner had our first page, a thumbnail of it sat in the bottom left corner and a yellow check mark appeared at the top right. After the second page, the thumbnail carried a small 2. That number is the easiest way to check that a page was not missed before you finish.
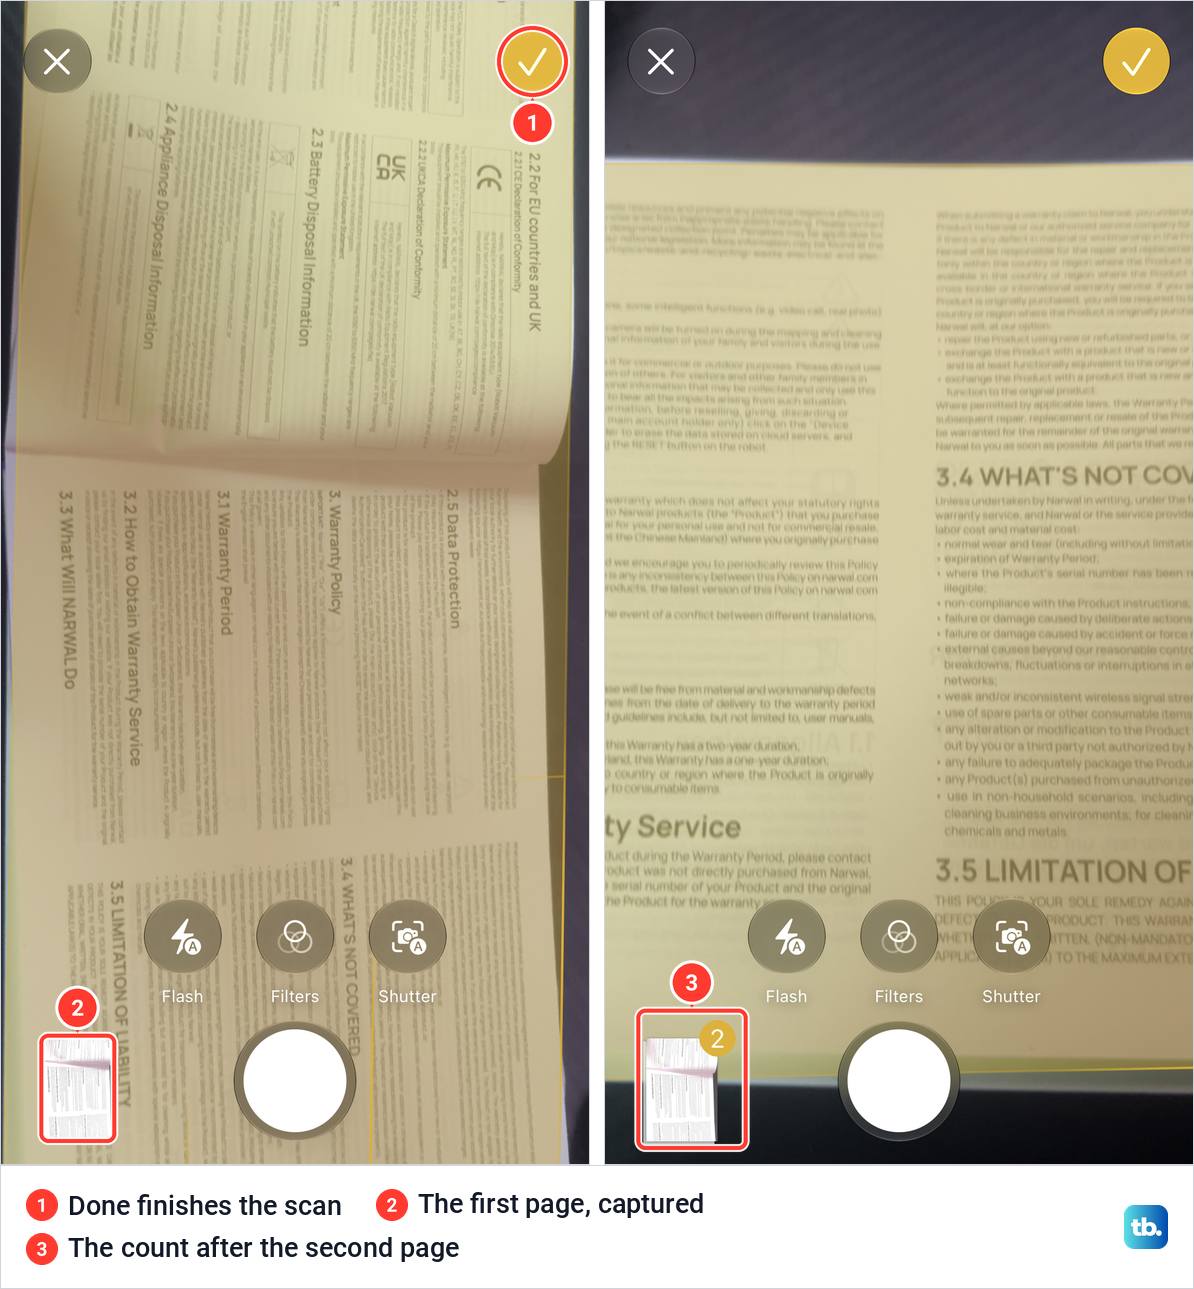
When we tapped the check mark, the scan appeared in the note as an attachment called Scanned Documents. Apple's guide is plain about what that attachment is: the document is saved as a PDF in the note, every page together, not as a set of photos.
Automatic or manual capture
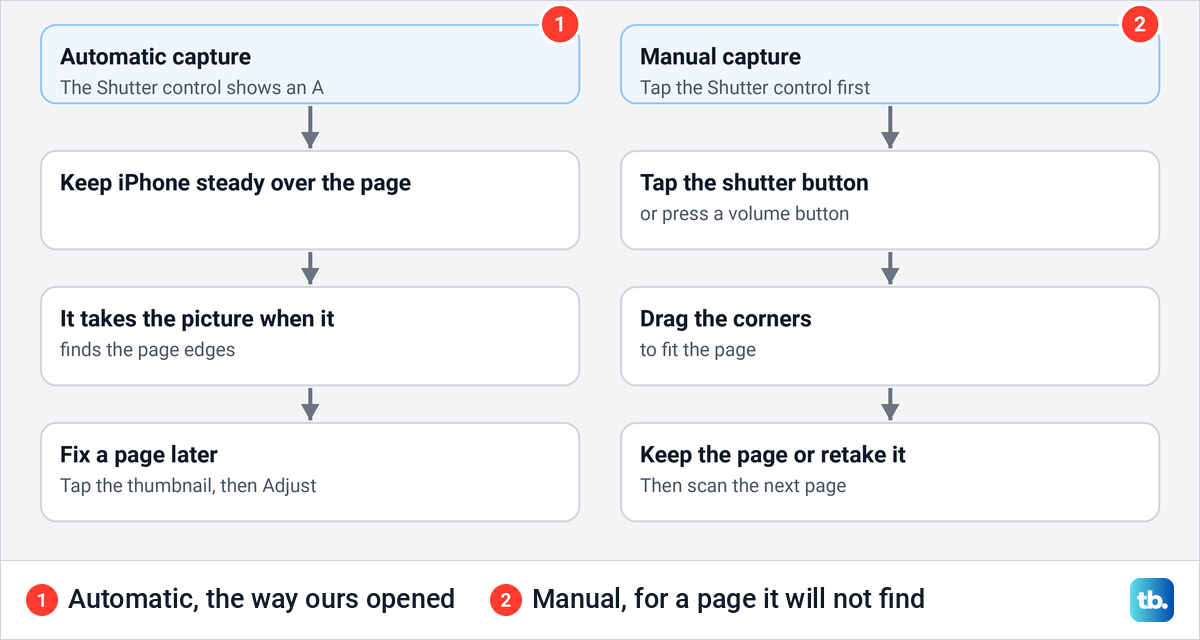
Our scanner opened in automatic mode. Three round controls sat in a row just above the shutter button, labelled Flash, Filters and Shutter, and the Shutter control carried a small A. The close button was at the top left and the check mark at the top right, so if an older guide sends you looking for an Auto switch along the top, look at the bottom instead.
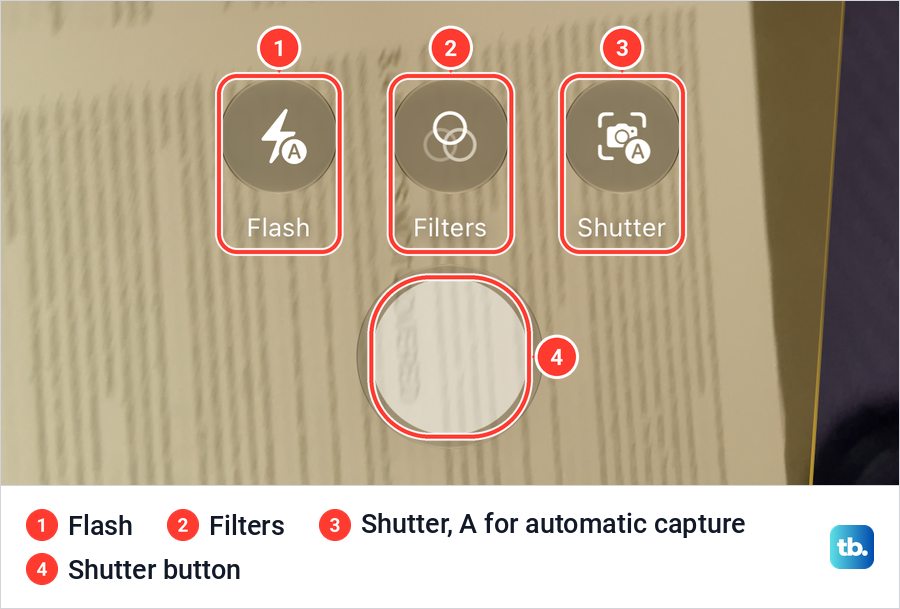
In automatic mode, Apple's instruction is to keep the iPhone steady: it captures the page when it detects the page boundaries. To change a page captured that way, tap its thumbnail, tap an option such as Adjust, make the change and tap the back button. Apple also says you can set Flash or Filters before the picture is taken.
Manual capture is for a page the scanner will not lock onto by itself. Tap the Shutter control (the one with the A badge) first, then the big round shutter button; Apple's support article adds that a volume button takes the picture too. Drag the corners to fit the page, then tap Keep (Apple's support article calls it Keep Scan) or Retake.
Scan straight into the Files app
Files skips the note and saves the PDF where you choose. Apple's steps are to open a location or folder in Files, tap the More button (three dots), and tap Scan Documents. In Auto mode the page is captured automatically; otherwise tap the shutter button or press a volume button, drag the corners and tap Keep Scan. Tap the Done button or add more pages, then choose a location and tap Save.
Pick On My iPhone for a copy that stays on the phone, or iCloud Drive to reach it from your other devices. Files keeps the scan with everything else you save, and the same Browse and Recents tabs help you find downloaded files on iPhone as well.
Scan with the Preview app
Apple brought its Preview app to iPhone with iOS 26, and it has a scanner of its own. Open Preview and tap Scan Documents in the middle of the first screen. Apple says the iPhone captures the page automatically; to take the picture yourself, tap Auto so the label changes to Manual, then tap the shutter button.
Scan the other pages the same way. Apple's guide says to tap the thumbnails to crop, rotate or adjust the colouring of a page, then tap the Done button when you are finished. The file can be renamed or moved later from the Actions menu next to its filename, and Scan Pages adds a freshly scanned page to a PDF you already have.
Preview is the better pick when the scan is a form. It has a Form Filling button for typing into fields, plus signing, export and password tools, all covered further down. Preview arrived with iOS 26, so if your phone does not have it, update the software on your iPhone if it can run iOS 26. On a phone that cannot, Notes and Files still do the scanning.
Fix a crooked or sideways page
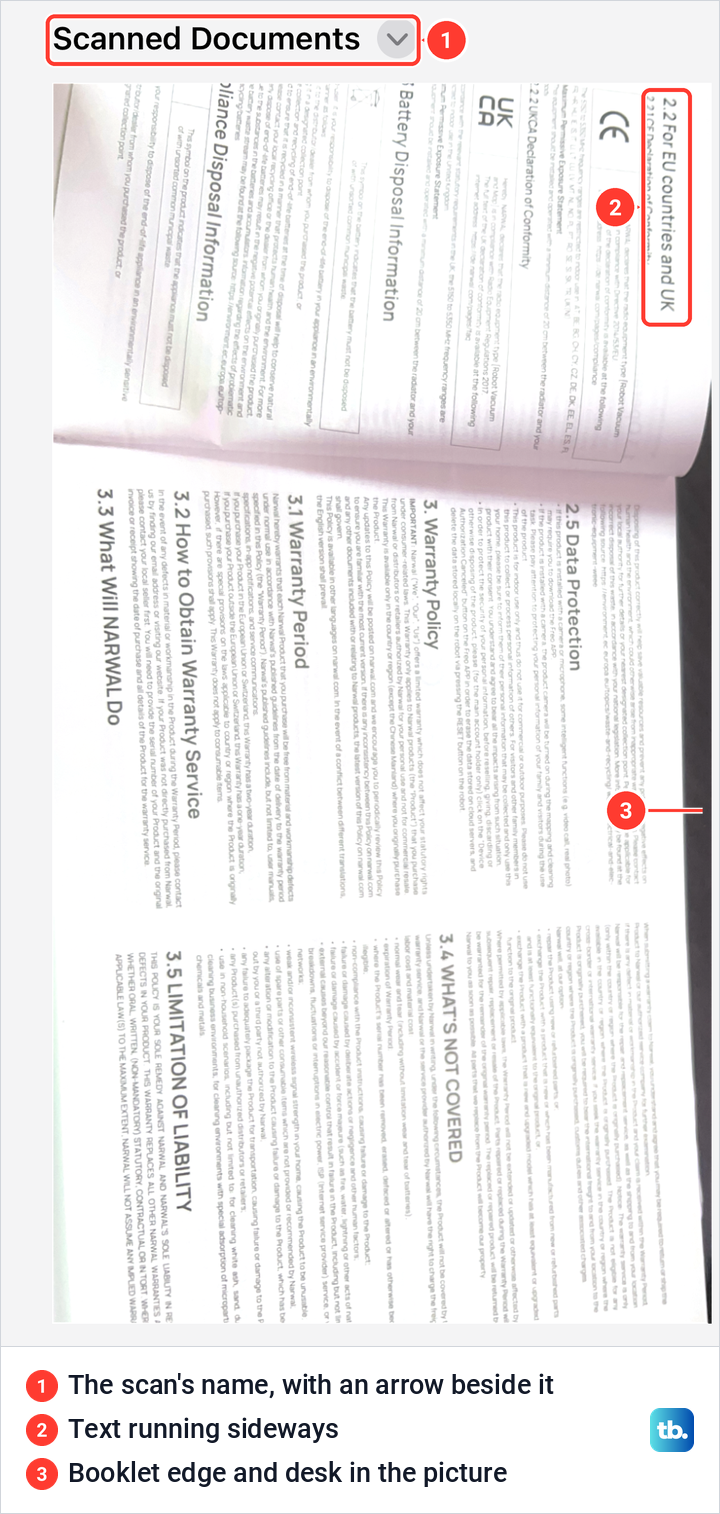
Our first page came out sideways. The open booklet lay sideways under the phone, and Notes kept it that way: the saved page is turned on its side, and a strip of the booklet's edge and the desk made it into the picture. Turning the paper to match the phone before you scan avoids the problem.
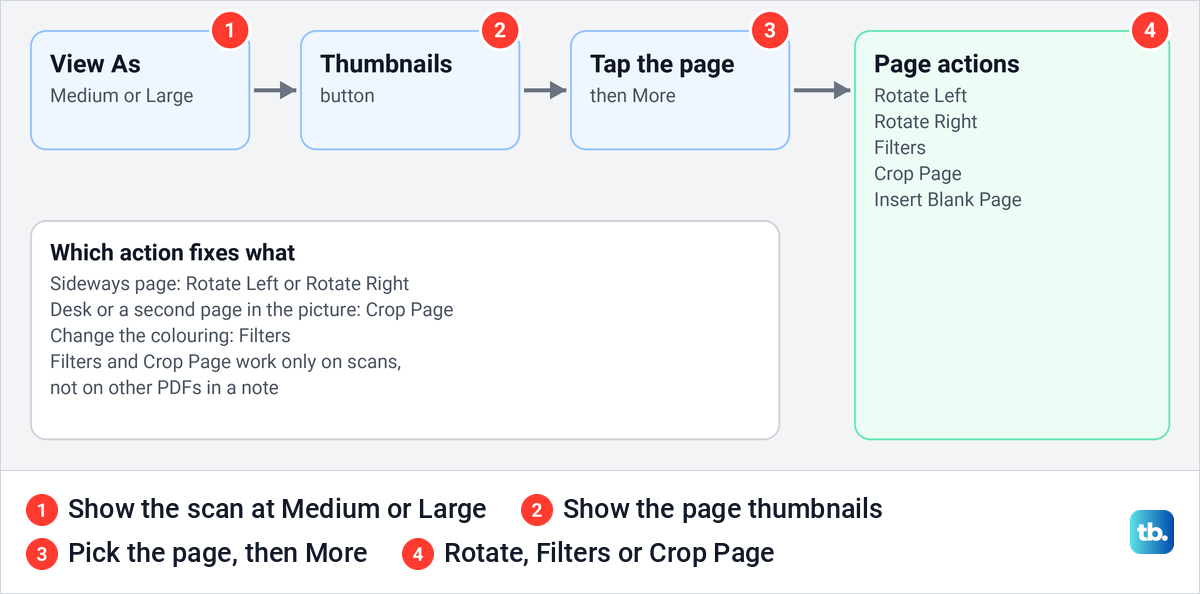
A page that is already saved can still be fixed in the note. Apple's route is to show the scan at Medium or Large size (touch and hold it, then View As), tap the Thumbnails button, tap the thumbnail of the page, then tap the More button. The menu offers Rotate Left, Rotate Right, Filters, Crop Page and Insert Blank Page.
Rotate fixes a sideways page and Crop Page trims a desk edge or half of the next page. Filters changes the page's colouring. Apple notes that Filters and Crop Page work only on scanned documents, not on other PDFs you attach to a note.
In Preview the tools sit in slightly different places. Apple's steps are to tap the page count to show thumbnails, then use the More button for Rotate Left or Rotate Right, and the Crop button: drag the blue handles around the part you want, tap inside it, then tap Crop. A mistake is one tap away from being undone: tap More, then Undo.
Save a scan as a PDF file
A Notes scan is already a PDF, so there is nothing to convert. What you may need is the file on its own, outside the note. When we touched and held our scan, its menu showed the name and size at the top, then Quick Look, Share, Save to Files, Print, View As, Copy, Rename and Delete.
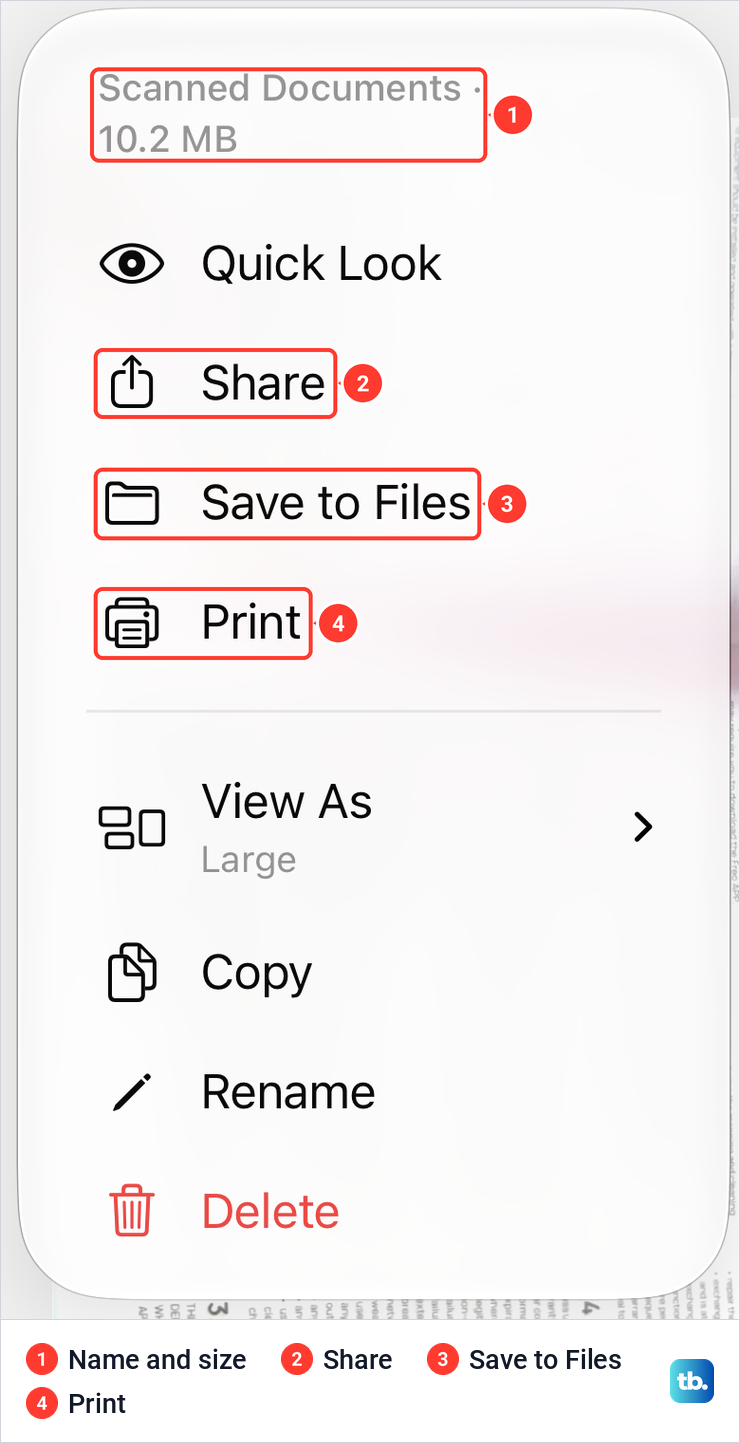
Choose Save to Files, pick a folder and save. That keeps the scan as its own PDF, and you can then open it in Preview, attach it to an email or upload it. Rename in the same menu is worth a tap first, because ours was called Scanned Documents.
Do not use the note's Share button and Markup to make the PDF. That exports the whole note, and Apple warns that in a note with a multipage scanned document, the exported PDF contains only the first page. That is how a two-page form can quietly turn into a one-page file.
If you already took an ordinary photo of the page instead of scanning it, you can still save an iPhone photo as a PDF. To join this scan with another document into one file, see how to combine PDF files together.
Share, email or print a scan
For a quick send, use Share in the scan's own menu and pick Messages, Mail, AirDrop or another app. Print sits in the same menu; if your printer does not show up in the list, connect your iPhone to a wireless printer first, then come back to the scan.
When the scan only exists to be emailed, start in Mail instead. Apple's steps are to tap in the message where the scan should go, tap the Insert Attachment Actions button above the keyboard, then Scan Document. Tap Retake or Keep Scan, scan any other pages, then tap Save, and the scan goes into the message as a PDF.
Make a large scan smaller
Our two-page scan came to 10.2 MB, shown at the top of its menu. A longer scan grows with every page, so check the size before you send one to a form or an inbox with an upload limit.
Preview can make a smaller copy. Save the scan to Files, open Preview, tap Browse and open the file. Apple's steps are then to tap the Actions menu next to the filename, tap Export and select PDF.
What comes next depends on the version. Apple's iOS 26 guide offers a slider to adjust the file size. Its iOS 27 guide keeps the slider for HEIC and JPEG only, and for a PDF lists Optimize Images for Screen and Save Images as JPEG, both meant to make a smaller file, followed by Done, a location and Save.
For email there is a second way out. Apple says that if a file exceeds the maximum size your email account allows, Mail shows onscreen instructions to send it with Mail Drop. For a scan that is still too big, our guide lists other ways to send large files without shrinking anything.
Sign a scanned document
Notes can sign a scan without exporting it first: tap the Markup (pen) button, which Apple's Notes guide calls Handwriting Tools; if the scan shows at Small size, tap it to open it first. Then tap the Add button and Add Signature. Sign with your finger, tap Clear to try again, and tap Done. Then drag the signature into place and drag a dot on its outline to resize it.
The iPhone keeps the signature for the next time you use Markup, and Apple says you can save more than one, such as initials. In Preview, the Form Filling button lets you tap a field and type, and the Add button places a signature or a text box. Both routes work on the scan itself, not on an export of the note.
If a company sends you a DocuSign request instead, here is how to sign documents with DocuSign. To change the words in the scan rather than sign it, see how to edit a PDF on any device.
Copy the words with Scan Text or Live Text
Sometimes you want the words, not a picture of the page. Scan Text sits right above Scan Documents in the paperclip menu. Apple's steps are to point the camera at the text, drag or use the grab points to select what you want, and tap Insert, which puts the words into the note as typed text.
The Camera app does the same without saving anything. Apple says to open Camera, wait for the yellow frame around the text, and tap the Detect Text button. Touch and hold the text, use the grab points, then choose Copy, Translate, Share or another action. Once the text is selected it behaves like any other text, and our guide shows how to copy and paste on any device.
Live Text needs an iPhone XS, iPhone XR or later and a supported language, Apple says. It works on the text in front of the camera; to translate a whole PDF, use the steps in our PDF translation guide.
Find a scan later
Notes search reads scans. Apple says it searches typed and handwritten text, objects in images and text in scanned documents, so typing a word printed on the page can bring the note back. Inside a long note, tap the Note Actions button, then Find in Note, and select Include Attachments to search the PDFs too.
To see every scan at once, tap the Folder Actions button above the notes list, then View Attachments. A Files scan is in the folder you chose, and a Preview scan can be renamed or moved from the Actions menu next to its filename. In Files, tap Recents for anything opened lately, or Browse and pick On My iPhone or iCloud Drive.
Keep a scanned ID or bank letter private
A scan of a passport or a bank statement deserves a lock. Open the note, tap the More button, then Lock, and choose your iPhone passcode or a separate Notes password. Apple warns that it cannot help you back into notes locked with a Notes password you forget. A locked note shows only its title in search results, and its attachments drop out of View Attachments.
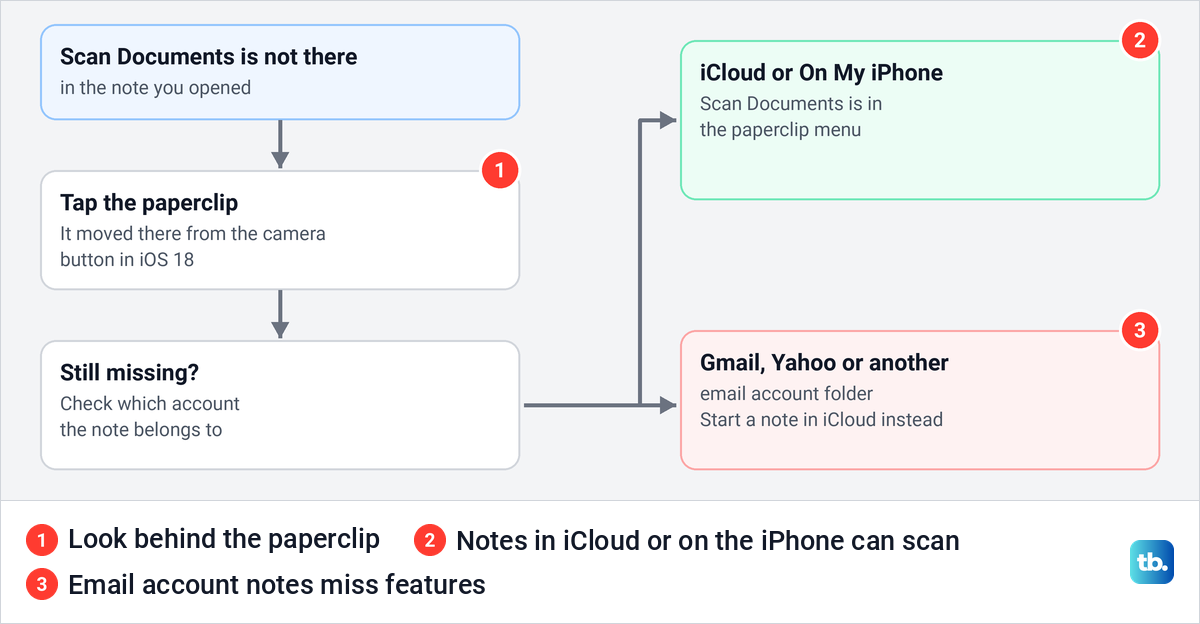
Two limits apply. Notes that sync from Gmail, Yahoo or another outside account cannot be locked, and neither can notes when you are signed in with a Managed Apple Account. Keep sensitive scans in an iCloud or On My iPhone note.
Preview can lock the PDF itself. Apple's steps are to tap the Actions menu next to the filename, tap Lock, turn on Require Password and type the password twice. Apple suggests tapping Duplicate first if you want a copy without a password. If you later need an open copy again, here is how to remove a password from a PDF.
If Scan Documents is missing or will not work
Start with the paperclip. Since iOS 18, Scan Documents sits behind it rather than behind a camera button. If there is no paperclip, or its menu has no scan option, check which account the note belongs to: Apple says the latest Notes features need notes in iCloud or on the device, and many will not work with other email providers.
If the scanner opens but never takes the picture, switch to manual capture with the Shutter control and take it yourself. For Scan Text and Live Text, Apple says to turn on Live Text in Settings, General, Language & Region, and to check that Show Detected Text is on in Settings, Camera.
How we tested this guide
We scanned two pages of a printed warranty booklet with the Notes scanner, kept automatic capture on, finished the scan and opened its menu. Every screenshot here comes from that session, including the sideways first page and the 10.2 MB size.
The Files, Preview, Mail, signing, Scan Text, Live Text, search and locking steps follow Apple's instructions, as does the warning about exporting a whole note. Apple's iPhone User Guide gives the same Notes scanning steps for iOS 26 and iOS 27.
Frequently Asked Questions
Does the iPhone have a built-in document scanner?
Yes. Notes, Files and Mail all have one, and the Preview app added another on iOS 26. Nothing needs downloading.
Does an iPhone scan save as a PDF or a photo?
A PDF. Notes keeps it inside the note, Files saves it to a folder you choose, Preview opens it ready to edit, and Mail attaches it to the message.
Where do scanned documents go on my iPhone?
A Notes scan stays in the note where you made it, and Notes search can find it by the words on the page. A Files scan goes to the folder you chose, and a Preview scan opens in Preview, where you can rename or move it from the Actions menu next to its filename.
How do I scan several pages into one PDF?
Keep capturing pages before you tap the check mark. The number on the thumbnail counts them, and they all end up in the same PDF.
How do I sign a scanned document on my iPhone?
Tap the Markup (pen) button, then Add and Add Signature; if the scan shows at Small size, tap it to open it first. Sign with your finger, tap Done and drag the signature into place.
How do I make an iPhone scan file smaller?
Ours came to 10.2 MB for two pages, so a long scan adds up quickly. Export a smaller copy from Preview, with the size slider on iOS 26 or Optimize Images for Screen on iOS 27, or send it from Mail with Mail Drop.
Can I scan from my iPhone straight to my Mac?
Yes, with Continuity Camera. On the Mac, Control-click in Notes, Mail, Pages, Finder or another supported app and choose Scan Documents, after Insert from iPhone or iPad if the menu shows it. Apple says both devices need Wi-Fi and Bluetooth turned on and the same Apple Account.