

To transfer your data from an old iPhone to a new iPhone, turn on the new one and place it next to the old one, which needs Wi-Fi and Bluetooth on, then follow the Quick Start prompt: scan the animation with the old iPhone, enter its passcode on the new one, and choose to transfer directly or download from iCloud. If the old iPhone is lost or broken, restore an iCloud or computer backup during setup instead.
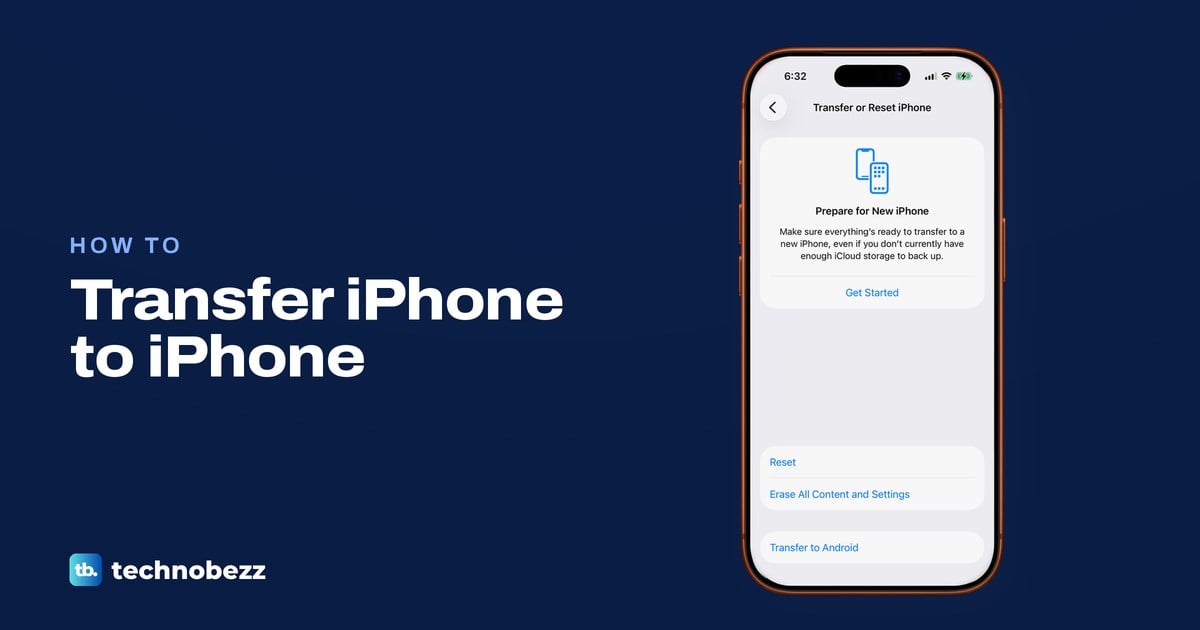
Quick Start sets up the new iPhone from the old one, but your phone number, Apple Watch, sign-in codes and payment cards each have their own step. On our iPhone 17 Pro with iOS 26.6, the preparation starts in Settings > General > Transfer or Reset iPhone, where Prepare for New iPhone sits above the Reset and Erase options. Keep the old iPhone as it is until everything checks out on the new one.
The short version
- Both iPhones with you: use Quick Start on the new iPhone and keep both phones close and plugged in.
- Need the new iPhone now: choose Download from iCloud, and apps and data arrive in the background.
- Old iPhone gone: restore its iCloud backup during setup, or a backup on your Mac or PC.
- Short of iCloud space: Prepare for New iPhone gives eligible buyers temporary storage, with 21 days to restore.
- Before you erase the old one: check your number, Apple Watch, chats, codes and cards on the new iPhone.
Choose the right way to move your data
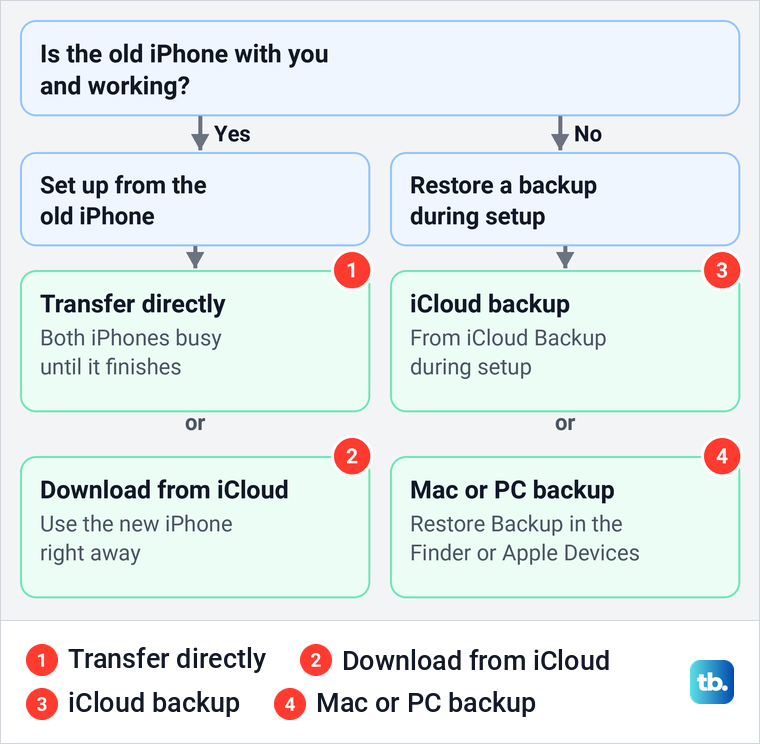
Which method fits depends on whether the old iPhone is still with you and working. Apple offers Quick Start, a wired transfer and a restore from an iCloud or computer backup. None is the fastest in every case, because Apple says transfer times depend on network conditions and the amount of data.
| Your situation | What to use | What to choose | When the new iPhone is ready |
|---|---|---|---|
| Both iPhones with you | Quick Start, direct transfer | Transfer directly from the old iPhone | When the transfer finishes on both iPhones |
| Both iPhones, and you need the new one now | Quick Start with iCloud | Download from iCloud | Right away, while apps and data download in the background |
| Both iPhones and the right cable | Wired transfer | Connect the cable, then follow the onscreen steps | When the transfer finishes on both iPhones |
| Old iPhone lost, broken or erased | iCloud backup | From iCloud Backup during setup | After the progress bar, with content still downloading |
| A backup saved on a Mac or PC | Computer backup | Restore Backup in the Finder or the Apple Devices app | After the restore and the sync with the computer finish |
Get your old iPhone ready
Apple's checklist starts on the old iPhone. Update it to the latest iOS, make sure you know the email or phone number and password of your Apple Account, and have chargers for both iPhones ready. Quick Start can copy your settings from an old iPhone on iOS 11 or later, but Apple says moving all your data directly needs iOS 12.4 or later on both iPhones, and Download from iCloud needs iOS 17.2 or later on the old one.
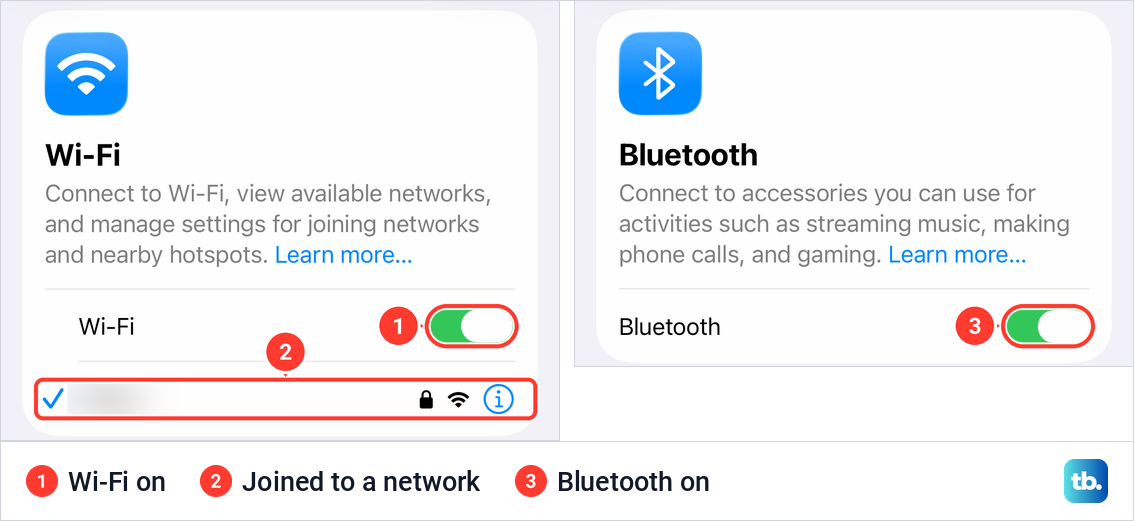
Then check Wi-Fi and Bluetooth, which Quick Start relies on. Apple says the current iPhone must be connected to Wi-Fi with Bluetooth on. On our iPhone, Settings > Wi-Fi showed the switch on with a check mark next to the joined network, and Settings > Bluetooth had its own switch at the top of the page.
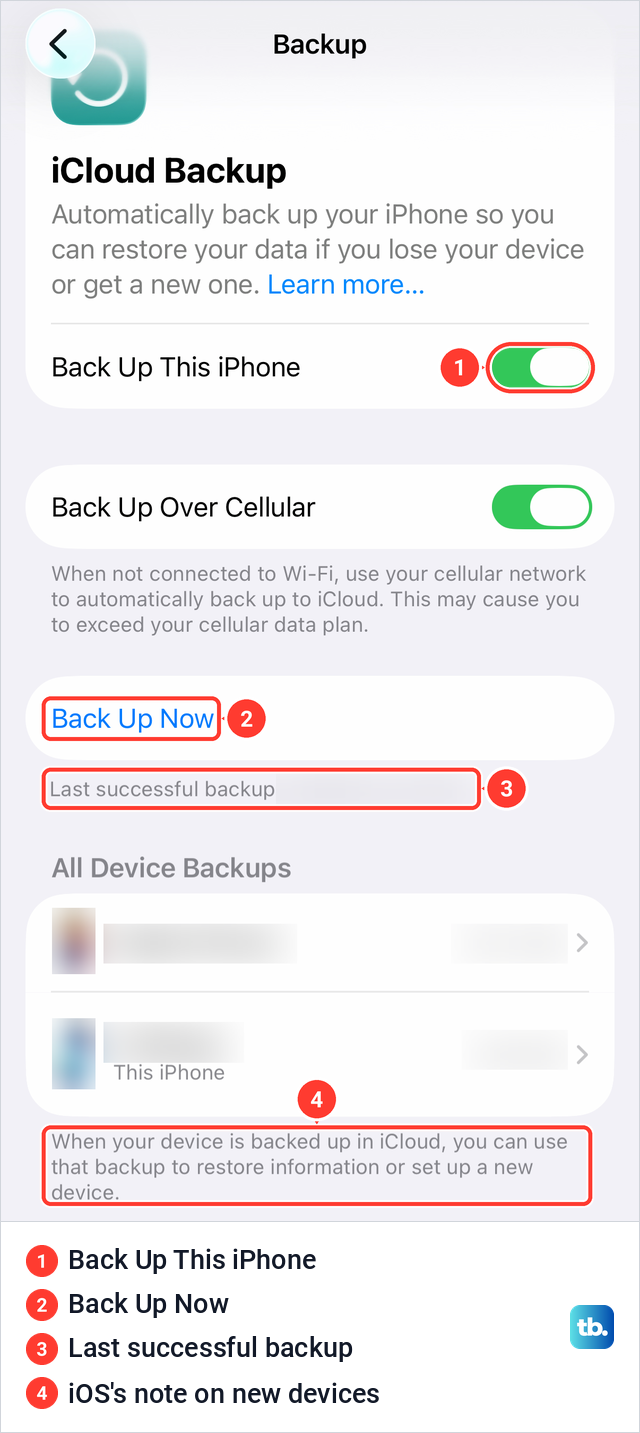
Make a fresh iCloud backup too, even if you plan to use Quick Start. A backup comes first in Apple's own order for moving to a new device, and it is your safety net if the transfer stops halfway. Open Settings > iCloud > iCloud Backup and tap Back Up Now. If your Settings has no iCloud row of its own, go to Settings > [your name] > iCloud > iCloud Backup instead.
On our iPhone 17 Pro, that Backup page showed Back Up This iPhone switched on, the Back Up Now button and a "Last successful backup" line with the date and time. Under the list of device backups, iOS adds its own note that a backup in iCloud can be used to restore information or set up a new device.
If Back Up Now never finishes, fix an iPhone that will not back up to iCloud before you rely on that copy. Do not switch the old iPhone off once the backup is done. Quick Start and an eSIM transfer both still need it nearby and unlocked.
Get temporary iCloud storage for the move
If your iCloud plan is too small for a full backup, Apple gives temporary iCloud storage to people who buy a new iPhone and don't have enough space to back up the old one. You start it on the old iPhone from Settings > General > Transfer or Reset iPhone. On our iPhone 17 Pro that row sat near the bottom of General, just above Shut Down.
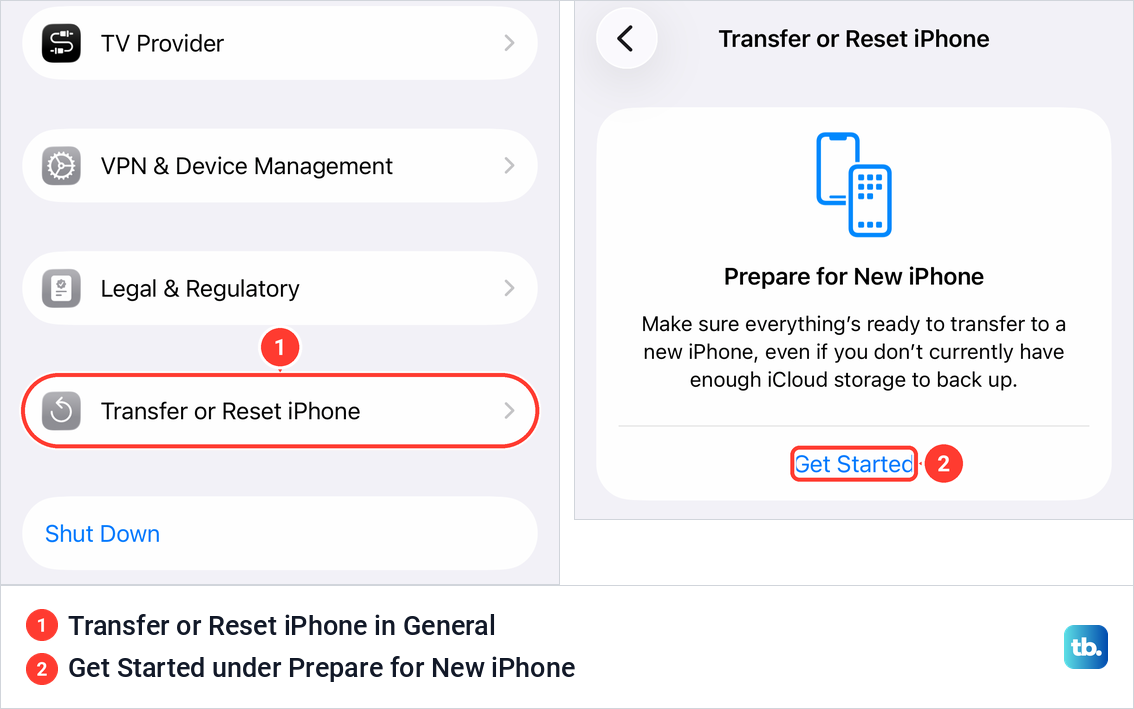
The card at the top of that page reads: "Make sure everything's ready to transfer to a new iPhone, even if you don't currently have enough iCloud storage to back up." Apple's steps are to tap Get Started and, if you see "iCloud Backup is Turned Off", tap Turn On Backup to Transfer. If you are short of space, a message says you're eligible for free extra iCloud storage, so tap Continue and wait for the backup to complete.
Leave Reset and Erase All Content and Settings alone on this page. Both sit lower down on the same screen, and neither is part of preparing a transfer.
Apple gives you 21 days to restore the temporary backup to the new iPhone before it is permanently deleted. If the new iPhone has not arrived in time, open Settings on the old iPhone and tap Keep My Backup Longer for another 21 days. Once you restore it, the temporary backup stays for 7 days, and Apple says not to erase the old iPhone until the restore is done.
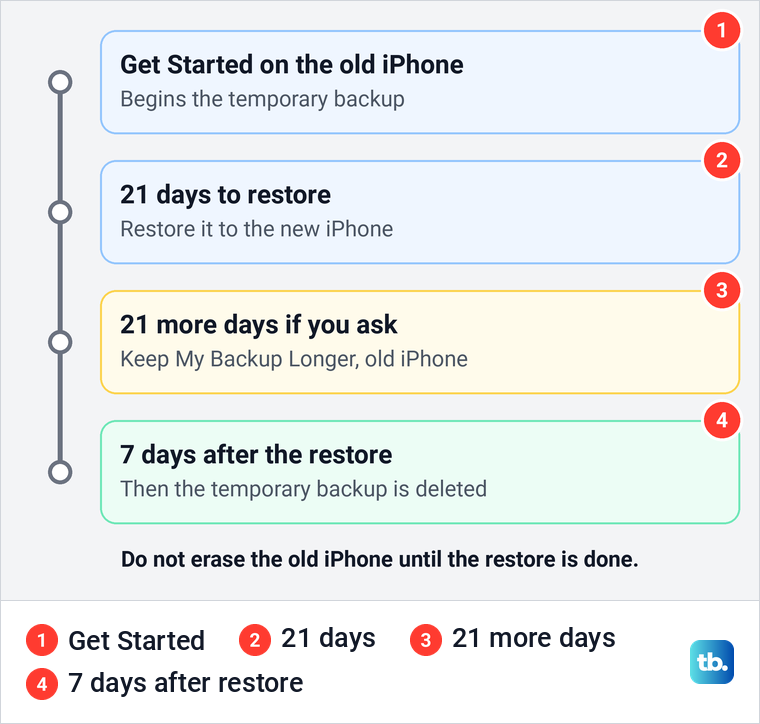
To use it, Apple's steps are to turn on the new iPhone, tap From iCloud Backup on the Transfer Your Apps & Data screen, sign in and choose your most recent backup. The free space covers the move only. To keep backing up to iCloud afterwards, Apple points you to an iCloud+ plan.
Transfer your data with Quick Start
Quick Start is the usual way when both iPhones are in your hands. Apple notes that it occupies both devices, so choose a time when you can leave the old iPhone alone, and it does not work on a new iPhone enrolled in Apple School Manager or Apple Business.
Turn on the new iPhone and place it near the old one, which should be unlocked on its Home Screen. Follow the prompt that appears on the old iPhone, then use its camera to scan the animation that appears on the new iPhone. When the new iPhone asks, enter the old iPhone's passcode.
The new iPhone then asks you to join Wi-Fi or your cellular network, may ask you to activate your cellular service, and has you set up Face ID or Touch ID. Apple notes that even an encrypted backup leaves out Face ID, Touch ID and passcode data, so expect to set it up again. If the prompt to set up the new iPhone disappears from the old one, Apple's fix is to restart both devices.
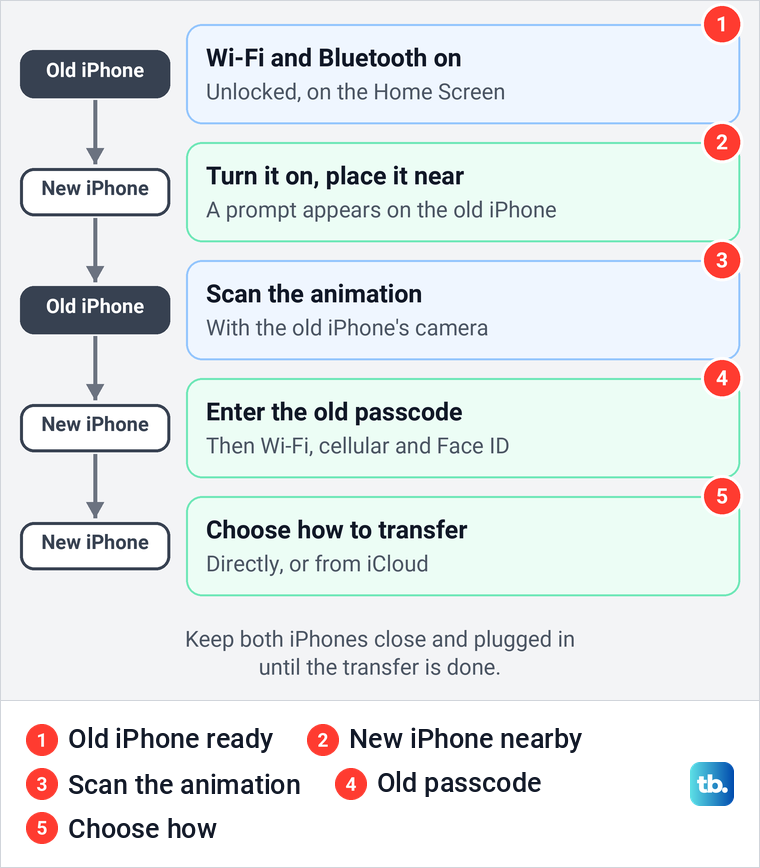
Transfer directly or download from iCloud
Next comes the choice that decides when you can use the new iPhone. With Download from iCloud, Apple says your apps and data download in the background, so you can start using the new iPhone right away. If you transfer directly from the old iPhone instead, you wait for the transfer to complete on both devices before you can use either of them.
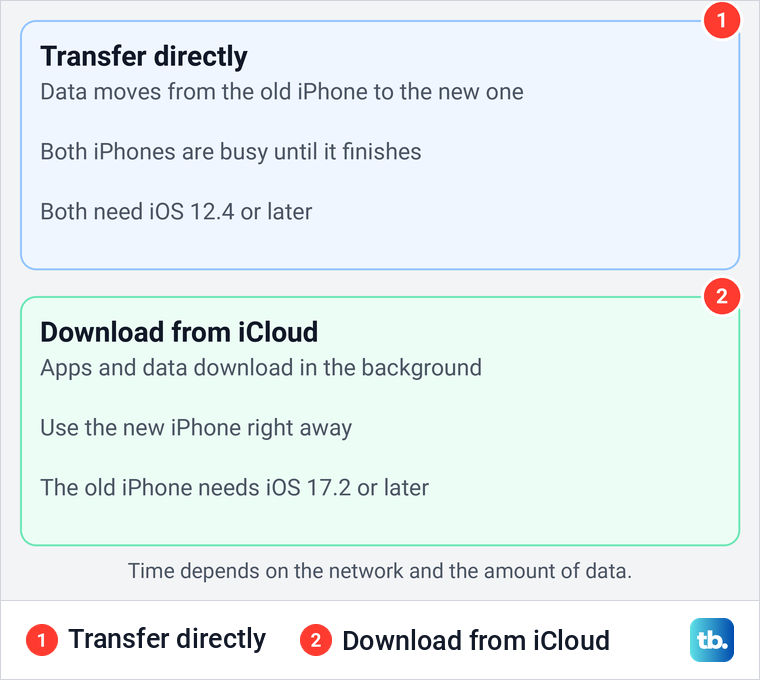
Pick the direct transfer when you can leave both iPhones alone until it finishes. Pick Download from iCloud when you need the new phone working now. Either way, keep both iPhones close together and plugged in until the migration is complete.
Transfer with a cable instead
A cable gives you a wired version of the same phone-to-phone move. Apple names a USB-C Charge Cable between two iPhone 15 or later models, and a USB-C to Lightning Cable from an iPhone 14 or earlier to an iPhone 15 or later. Two iPhone 14 or earlier models need a Lightning to USB 3 Camera Adapter on a 12W or higher power adapter, plus a Lightning to USB Cable.
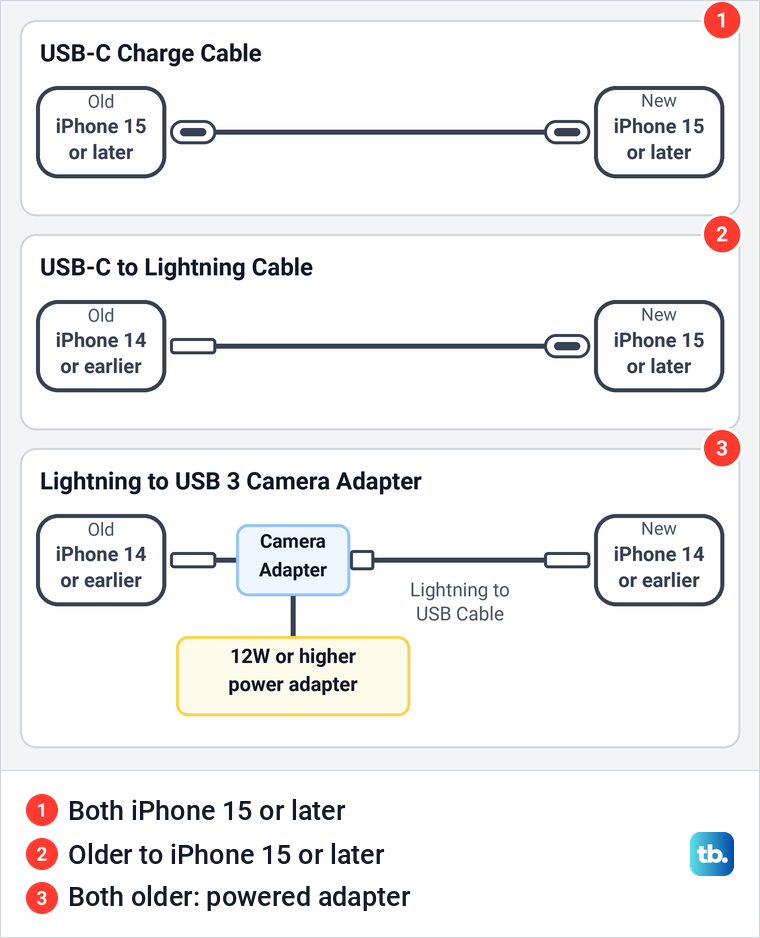
With either USB-C cable, connect it to the charging ports of both iPhones, turn them on and follow the onscreen steps. Apple says you still wait for the transfer to finish on both devices and gives the same note on timing, so a cable is not promised to be faster.
Two older iPhones take more steps. Apple says to power the Lightning to USB 3 Camera Adapter through its Lightning port with a 12W or higher power adapter, connect the adapter to the old iPhone, then plug the Lightning to USB Cable into the new iPhone and connect its other end to the adapter. Turn on both iPhones and follow the onscreen steps.
Restore an iCloud backup without the old iPhone
If the old iPhone is lost, broken or already erased, set up the new one from its last iCloud backup. Turn on the new iPhone and follow the steps to the Transfer Your Apps & Data screen, then tap From iCloud Backup and sign in with your Apple Account. Apple says to pick the backup by checking the date and size of each one.
Stay on Wi-Fi while it works. Apple says the progress bar can take a few minutes to an hour and pauses if Wi-Fi drops, and that apps, photos and music keep restoring in the background for hours or days.
Already set up the new iPhone and started using it? Apple says you need to erase it with Erase All Content and Settings before you can restore a backup, so copy anything new off it first. Erasing returns it to the Hello screen, where setup starts again.
What an iCloud backup includes
An iCloud backup is not a copy of everything in iCloud. Apple says it holds the information and settings on the iPhone that don't already sync to iCloud, such as device settings, the Home Screen layout, app data and your Apple Watch backup. Photos with iCloud Photos turned on, and messages with Messages in iCloud turned on, sync on their own and are left out of the daily backup.
Our iPhone showed that split on screen. In Settings, the iCloud row opened the iCloud page, Storage opened Manage Storage, and its Backups row listed each device. The one marked This iPhone opened Backup Details with Last Backup, Backup Size and Next Backup Size, and a note that the photo library is not included because it is backed up as part of iCloud Photos.
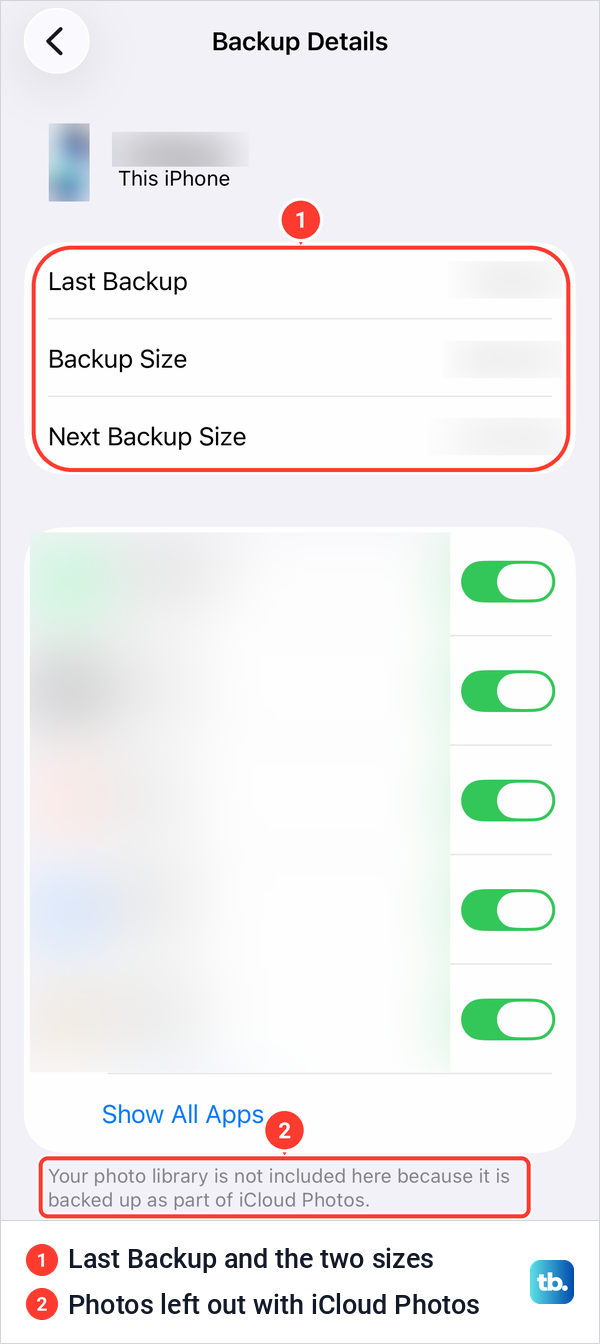
On our iPhone, Next Backup Size read Loading for about 30 seconds before a figure appeared, so give the page a moment. If Last Backup is older than you expected, go back to the Backup page and tap Back Up Now before you start the transfer.
Restore a backup from a Mac or PC
A computer backup works without any iCloud space. On a Mac you use the Finder, and on a Windows PC the Apple Devices app. Apple only sends you to iTunes on a PC without the Apple Devices app or a Mac on macOS Mojave or earlier, so instructions that start with installing iTunes are out of date.
Back up the old iPhone first. Connect it with a USB cable, select it, tick Encrypt local backup if you want saved passwords and Health and Activity data included, and click Back Up Now. Apple says a computer backup isn't encrypted by default, and an encrypted backup can't be restored without its password, so write that password down.
To restore, connect the new iPhone, select it in the Finder or the Apple Devices app, and click Restore Backup. Pick the backup by its date, click Restore, enter the backup password if asked, and keep the iPhone connected after it restarts until it finishes syncing. Before you start, you can find iPhone backups on a Mac to confirm a recent one is there.
Move your phone number to the new iPhone
Your data and your phone number travel separately. Apple says that if your carrier supports eSIM Quick Transfer, you can move the number from the old iPhone with the onscreen prompts during setup, without contacting the carrier. Both iPhones need iOS 18.4 or later, the same Apple Account and Bluetooth on, and the old iPhone has to be unlocked with its passcode.
If you skipped it during setup, Apple's steps on the new iPhone are to open Settings, tap Set Up Cellular or Add eSIM, and choose the plan to move or tap Transfer From Nearby iPhone. You confirm on the old iPhone with Transfer or with the code the new iPhone shows. When the plan activates on the new iPhone, Apple says it deactivates the old SIM.
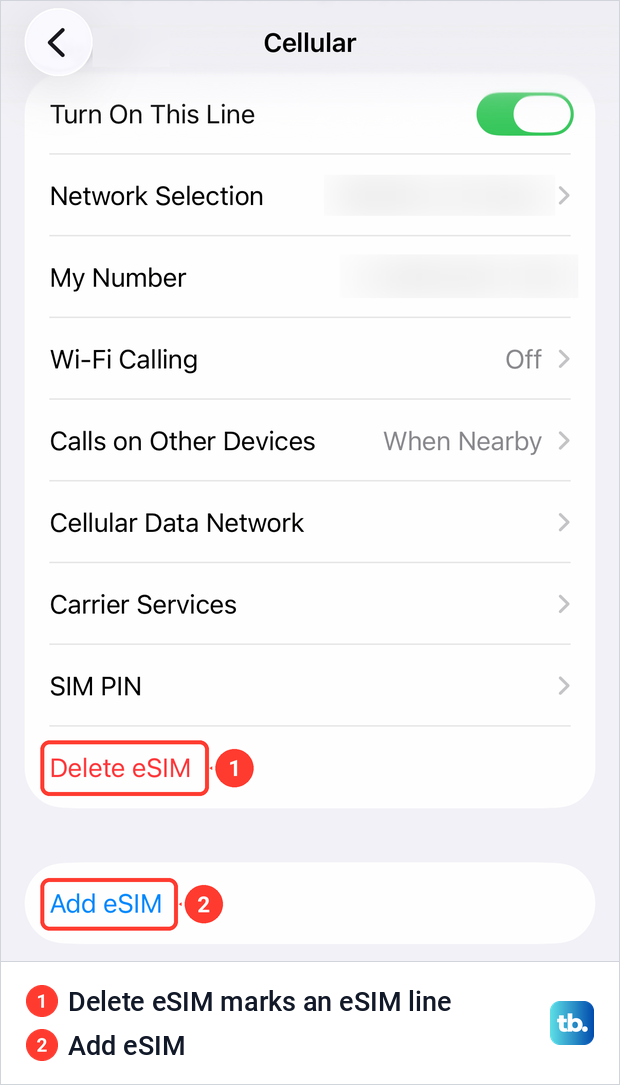
On our iPhone 17 Pro the line was an eSIM. Settings > Cellular listed Turn On This Line, My Number and a red Delete eSIM for it, with Add eSIM in its own box below and no Set Up Cellular row. Leave Delete eSIM alone during a move, because activating the plan on the new iPhone deactivates the old one for you.
Not every carrier supports Quick Transfer. Apple lists other routes: activation by the carrier, a QR code, a carrier app or link, and moving a physical SIM card to a model that takes one. If a banner reads Finish Setting Up Your Carrier's Cellular Plan, tap it to finish on the carrier's page. If calls fail on an active plan, check how to update carrier settings on an iPhone, and if you still can't make a call, Apple says to contact your carrier.
If your number changes with the new iPhone, Apple says to add the new number as a trusted phone number on your Apple Account so you don't lose access. Do the same with banks and other accounts that text you codes, while the old number still works.
Move your Apple Watch to the new iPhone
Your Apple Watch comes along through the backup, because Apple says backing up the iPhone also backs up the watch. Apple asks for both iPhones on Wi-Fi and the watch and new iPhone at least 50 percent charged. With iCloud, check that Health shows Sync this iPhone under Saved to iCloud; with a computer, encrypt the backup.
During setup, the new iPhone may ask whether you want to use your Apple Watch. Apple's steps are to have the watch unlocked and on your wrist and tap Continue, and if it doesn't ask, to open the Apple Watch app on the new iPhone with the watch nearby. Our iPhone's Bluetooth page points the same way: "To pair an Apple Watch with your iPhone, go to the Apple Watch app."
If the Apple Watch app on the new iPhone shows Start Pairing, Apple says to unpair your Apple Watch and then set it up again with the new iPhone. For the full walkthrough and fixes, follow our steps to pair your Apple Watch with a new iPhone.
Check your codes, chats and payment cards
Apps that hold sign-in codes need their own check while the old iPhone still works. Google says Google Authenticator codes sync automatically once you sign in to your Google Account on the new device. Without an account, Google's iPhone steps are Transfer accounts and Export accounts in the app's menu on the old iPhone, then Transfer accounts and Import accounts on the new one to scan the QR code, as in our guide to set up Google Authenticator.
Microsoft Authenticator restores from its own backup in iCloud, which has to be on before you leave the old iPhone. Microsoft's iPhone steps are to turn on iCloud Drive, iCloud Keychain and iCloud Backup, turn on Authenticator in your Saved to iCloud list, and turn on backup in the Authenticator app.
Even then, Microsoft says only the account name comes back for work or school accounts and for accounts with passwordless sign-in, so you sign in to those again. For accounts that text a code instead, keep the old number working until each one is updated, and use our steps to fix a verification code that never arrives if one goes missing.
WhatsApp chats are worth checking on their own, so open WhatsApp on the new iPhone and look at your chats before you remove anything from the old one. If they are missing, use the old phone while you still have it and follow our guide to copy WhatsApp messages to another phone. Open each banking app too, sign in and make sure it works on the new iPhone.
Plan to add your payment cards again. Apple says that during setup on a new iPhone you can add your cards to Apple Wallet, following the onscreen steps for each card, and your bank may ask you to verify by text message, security questions or its app. Our guide to use Apple Pay on an iPhone covers adding cards later.
If photos or messages seem to be missing
Photos and messages that are missing right after a transfer are often still on their way. With iCloud Photos and Messages in iCloud, both sync from iCloud rather than from the backup, and Apple says content can keep restoring for hours or days. Keep the new iPhone on Wi-Fi and power and give it time.
Each app's iCloud page shows whether sync is on. On our iPhone 17 Pro, the iCloud Photos page had a Sync this iPhone switch, and the Messages in iCloud page had a Use on this iPhone switch. iOS describes Messages in iCloud as a way to store messages in case you need to restore the iPhone or set up a new one.
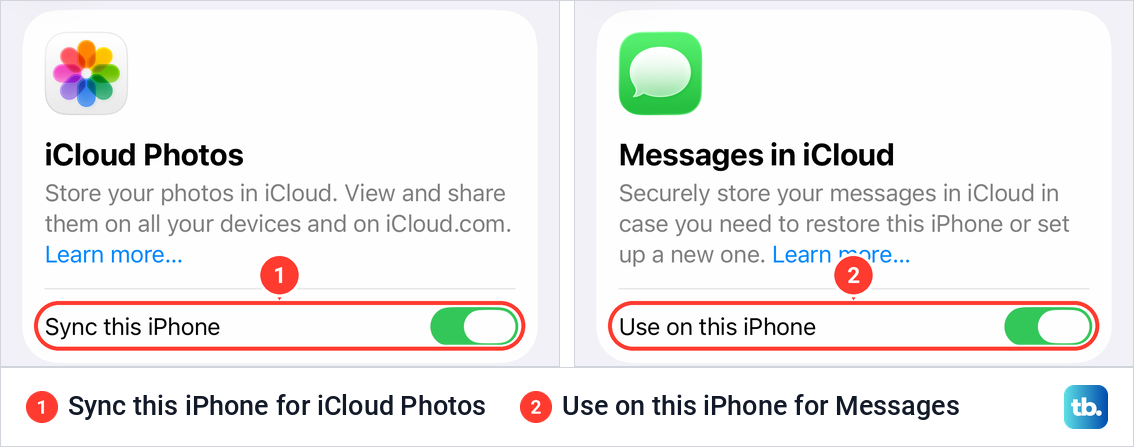
If a service was on for the old iPhone, turn its switch on for the new one too, signed in to the same Apple Account. If it was off, switching it on now won't bring those items back, because they come from the transfer or the backup instead.
If pictures still don't appear, see how to access iCloud Photos on an iPhone, and if conversations are gone, use our steps to recover deleted or missing messages on an iPhone. If the restore failed or the backup was rejected, work through how to fix a backup that will not restore.
Check everything before you erase the old iPhone
Keep the old iPhone exactly as it is until the new one passes every check. Apple warns that while you are signed in to iCloud, manually deleting items removes them permanently from iCloud and from all your connected devices. So never tidy up photos, contacts or files on the old phone first.
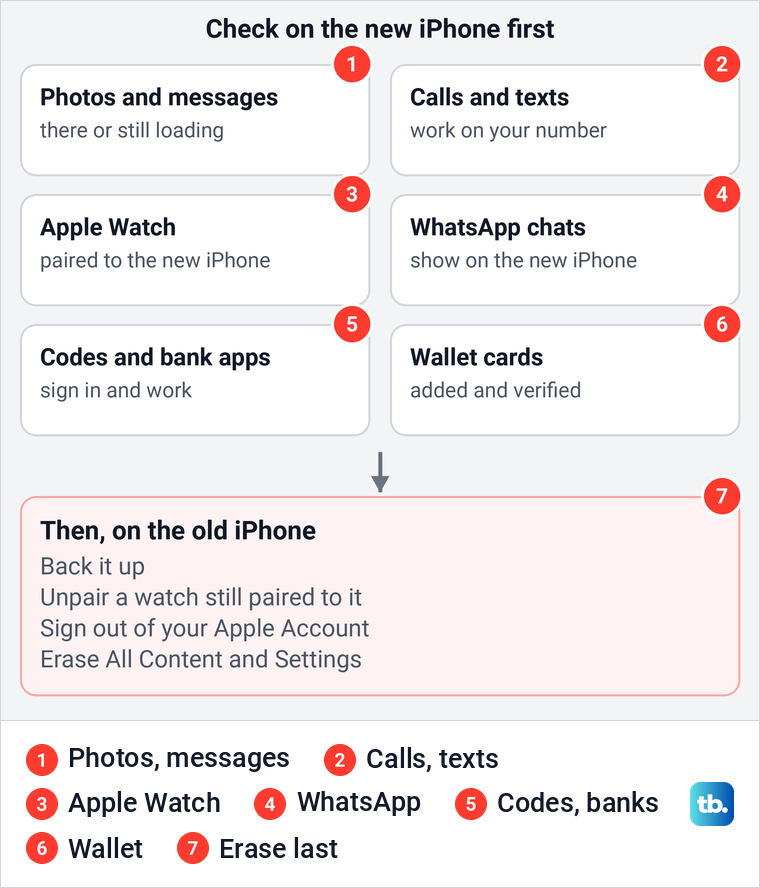
Once the checks pass, Apple's order on the old iPhone is to back it up, unpair an Apple Watch that is still paired to it, sign out of your Apple Account, then erase it with Erase All Content and Settings. Erasing turns off Find My and Activation Lock, and if you sell an iPhone that uses an eSIM, Apple says to erase the eSIM profile too. Our separate guide shows how to erase an iPhone before selling it step by step.
How we tested this guide
We tested this on an iPhone 17 Pro with iOS 26.6, going through Prepare for New iPhone and the iCloud Backup page in Settings.
Frequently Asked Questions
Can I transfer data to a new iPhone without the old one?
Yes, if you have an iCloud or computer backup. Choose From iCloud Backup during setup, or restore the backup from the Finder or the Apple Devices app. Quick Start itself needs the old iPhone nearby.
Can I transfer data after I already set up the new iPhone?
Apple says you need to erase the new iPhone with Erase All Content and Settings and start again from the Hello screen. Copy anything you created on it first, because erasing removes it.
How long does it take to transfer iPhone to iPhone?
Apple gives no fixed time, because it depends on network conditions and the amount of data. For an iCloud restore, the progress bar can take a few minutes to an hour, and content can keep downloading for hours or days.
What should I do if the transfer seems stuck?
Keep both iPhones close together, plugged in and on Wi-Fi, since Apple says transfer times depend on the network and the amount of data. If the prompt to set up the new iPhone disappears from the old one, Apple says to restart both devices, and an iCloud restore pauses when Wi-Fi drops and carries on when you reconnect.
Should I choose Download from iCloud or transfer directly?
Choose Download from iCloud if you need the new iPhone right away, since apps and data then download in the background. Transfer directly if you can leave both iPhones alone, because both stay busy until it finishes.
Does Quick Start move my eSIM and Apple Watch?
Both have their own steps. Setup may ask you to transfer your phone number, which works through eSIM Quick Transfer if your carrier supports it, and the watch pairs through a setup prompt or the Apple Watch app. Confirm both on the new iPhone before you erase the old one.
When is it safe to erase the old iPhone?
After the restore is complete and your number, Apple Watch, photos, chats, codes and cards all work on the new iPhone. If you used temporary iCloud storage, Apple says not to erase the old iPhone until that backup is restored.