Took a screenshot on your Mac and now you can't find it? The Desktop is the default destination, but your screenshot settings and capture method determine where the image ends up. Start with the checks below, then work through saved files, Clipboard captures, and recovery options.
Start with the Desktop folder
If you used Shift-Command-3 or Shift-Command-4, check the Desktop first. These shortcuts save there unless you changed the destination.
Look for an image with the capture date and time in its name. Apple's default naming pattern is “Screen Shot [date] at [time].”
In Finder, press Shift-Command-D to open Desktop directly. This works even when desktop icons are hidden.
If your desktop uses stacks, click the stack containing your images to expand it.
To restore hidden desktop icons on macOS Tahoe 26, open System Settings > Desktop & Dock.
Under Desktop & Stage Manager, enable On Desktop beside Show Items.
Check where new screenshots are saving
A changed save destination sends screenshots somewhere other than the Desktop.
Press Shift-Command-5 to open Screenshot, available on macOS Mojave 10.14 and later.
Select a still-image capture tool.
Open Options to inspect the selected destination under Save to.
Open that folder in Finder to look for your captures.
For a known custom path, use Shift-Command-G in Finder to enter the folder's path.
For future captures, choose a destination under Save to. Use Other Location to select a custom folder.
That setting tells you where new screenshots go. Older captures stay wherever you saved them.
To open the app without its shortcut, go to Finder > Applications > Utilities > Screenshot.
Search for an older screenshot
Search Spotlight for part of the filename, such as “Screen Shot,” using Command-Space to open the search field. If you renamed the image, use that name.
Inspect a matching result with the shortcut you need: hold Command to see its location, press Space for a preview, or press Command-R to reveal it in its app or Finder.
Narrow a Finder search using a filename term and the + control: choose Kind > Image for image files, or use Other to add a creation-date criterion. Use the date filter when you remember roughly when you took the screenshot.
Keep the search open to image formats beyond PNG. Supported Macs running Tahoe save SDR screenshots as PNG and HDR screenshots as HEIF, so a PNG-only search misses HDR captures.
Retrieve a screenshot from the Clipboard
Holding Control while taking a screenshot copies the image to the Clipboard instead of saving a file. Control-Shift-Command-3 is one example. Choosing Save to Clipboard after Control-clicking the floating thumbnail does the same thing.
While the image is still on the Clipboard, open Preview.
Choose File > New from Clipboard to create an image document from the screenshot.
For an earlier Clipboard capture on macOS Tahoe 26, open Spotlight with Command-Space.
Press Command-4 to open Clipboard history.
Click Enable if prompted. History only includes entries the feature retained.
Browse or search the retained entries for your image.
Copy the selected image with Command-C.
Paste it into an app that accepts images with Command-V.
If neither Clipboard method finds the capture, take it again without holding Control. Look in the folder selected under Screenshot > Options > Save to.
Look in your iCloud folders
Desktop and Documents synchronization stores those folders in iCloud Drive, including existing files left there after you turn synchronization off.
In Tahoe, open Finder and look under Favorites for Desktop or Documents with cloud icons. Earlier macOS versions place these folders in the iCloud sidebar section.
For screenshots from another synced Mac, inspect the subfolder named after that Mac.
If you disabled Desktop and Documents synchronization, check the old Desktop and Documents folders in iCloud Drive. Existing files stay there while macOS creates new local folders.
If you kept a local copy when disabling iCloud Drive or signing out, inspect iCloud Drive (Archive) in your home folder.
To access synced screenshots through a browser, sign in at iCloud.com with the same Apple Account.
Open iCloud Drive.
Open Desktop, Documents, or the custom folder used for your captures.
Check the app that handled the capture
The capture or sharing app is another place to look. If you dragged the floating thumbnail into a document, email, note, or Finder folder, check that destination.
For Firefox screenshots saved with Download, open the browser's Downloads panel.
Click the screenshot's magnifying-glass control, Show In Finder, to reveal its file. Firefox's Copy action sends the image to the Clipboard instead.
If you enabled Dropbox screenshot saving, open the Screenshots folder in the applicable Dropbox account.
For Snagit captures, open Snagit Editor.
Choose Snagit > Settings > Library to inspect the configured library location.
To find a screenshot shared in Messages on Tahoe, open its conversation.
Click the contact or group icon at the top.
Select Photos to browse the shared images.
If these locations turn up nothing, check Trash and the recovery options below for a deleted copy.
Recover a screenshot you deleted
Open Trash from the Dock to look for the screenshot.
Restore the selected image with File > Put Back.
For a deleted iCloud Drive screenshot, sign in at iCloud.com/iclouddrive.
Open Recently Deleted.
Restore the selected screenshot by clicking Recover. This applies to eligible files deleted within 30 days that have not been permanently removed.
If a Time Machine backup contains the image, open its former folder in Finder. For a missing desktop item, no folder window is required.
Open Time Machine through Spotlight.
Browse the backup dates using the timeline or arrows to locate the screenshot.
Restore the selected screenshot by clicking Restore.
For easier access next time, choose a familiar folder in Screenshot > Options > Save to.
Frequently Asked Questions
Do Mac screenshots automatically appear in Photos?
No. Ordinary Mac screenshots do not automatically enter Photos. On Tahoe, screenshots imported into or synchronized with your photo library appear under Media Types > Screenshots. That collection appears only when the library contains that media type.
Can I find my Mac screenshots on my iPhone or iPad?
Yes, if the screenshots are stored in iCloud Drive and synchronized with the same Apple Account. Open Files > Browse > iCloud Drive, then open Desktop, Documents, or your custom screenshot folder.
Why can I see a screenshot in its folder but not in Spotlight?
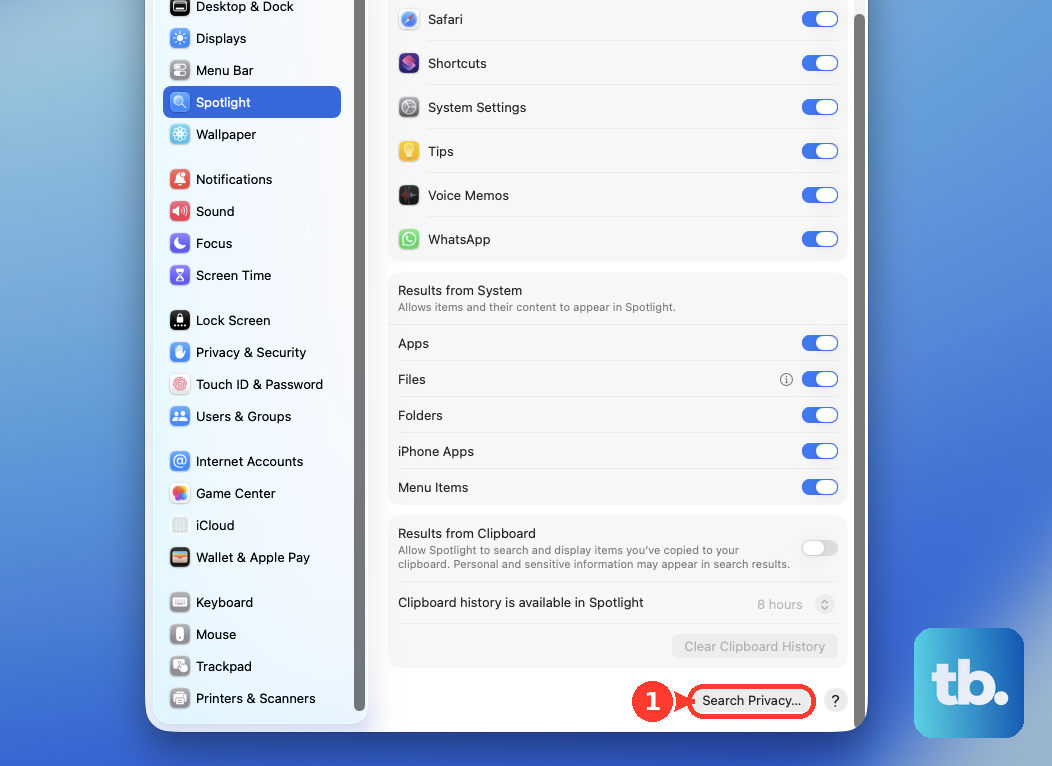
Search exclusions and incomplete indexing prevent files from appearing in Spotlight. On Tahoe, open System Settings > Spotlight > Search Privacy. If the folder is excluded, select it and click the remove button. To rebuild its index, add the affected folder to the exclusions. Wait a few seconds, then remove it. Click Done and allow indexing to finish before searching again.
Can I keep a screenshot search in the Finder sidebar?
Yes. Build your Finder search, click Save below the search field, and select Add To Sidebar. The saved Smart Folder shows files matching your search criteria.