You want to capture something on your Mac, but you can't find the recording controls. Press Shift-Command-5 to open the built-in recorder and capture your whole screen, a selected area, or a single window on macOS Tahoe 26. Here's how to start and stop, add your voice, find the saved video, and capture app playback audio with OBS.
Start with the built-in screen recorder
The built-in recording controls are inside Screenshot, despite its still-image name.
Press Shift-Command-5 to open Screenshot. Its recording tools work on macOS Mojave 10.14 and later, including Tahoe 26, on compatible Intel and Apple silicon Macs.
Select Record Entire Screen in the toolbar.
Click Record to begin.
When you're finished, press Command-Control-Esc or click the menu-bar Stop button. The video saves to your desktop unless you've changed the destination.
Record part of the screen or a single window
Use a selected-area recording when you only need a smaller part of your desktop. On macOS Tahoe 26 and later, there's also a dedicated mode for recording one window.
Press Shift-Command-5 to open the toolbar.
For an area recording, select Record Selected Portion.
Drag the selection's borders to frame the content you want to capture.
Click Record to start.
For a single window on Tahoe 26 or later, select Record Selected Window instead.
Click the window to begin recording. Earlier macOS versions don't have this dedicated window mode; use Record Selected Portion to frame the window instead.
End either recording with Command-Control-Esc or the menu-bar Stop button.
Add your voice to the recording
Screenshot records microphone input alongside the video. Open its toolbar with Shift-Command-5.
Click Options.
Under Microphone, select your narration input, or choose None to leave microphone audio out.
Click Record to begin. The microphone setting captures the selected input; Screenshot has no native toggle for recording app playback audio directly.
If your voice is missing, follow the Microphone permission steps below, then select your input again. For sound playing on your Mac, use the OBS method below.
Save your video where you can find it
Before recording, open Options and choose a destination under Save to. Select Other Location for a different folder. The default destination is your desktop.
Choose a delay under Timer to give yourself time to prepare. Enable Remember Last Selection to retain your previous capture selection.
Enable Show Floating Thumbnail to display a thumbnail after recording. Click the finished thumbnail to trim or share the video.
For a demonstration, enable Options > Show Mouse Clicks to make your clicks visible.
Capture your Mac's playback audio with OBS
Use OBS on macOS 13 or later to capture screen content and app playback audio together.
- 1.Open the official OBS download page, select Mac, and choose the installer for your Intel or Apple silicon processor.
- 2.Open OBS. For initial setup, choose Tools > Auto-Configuration Wizard.
- 3.In Sources, click + and add macOS Screen Capture.
- 4.Under Method, choose Display Capture, Window Capture, or Application Capture, then select the corresponding display, window, or application. This source supports audio capture on macOS 13 and later.
- 5.Open Settings > Output to review your recording configuration.
- 6.Click Start Recording in Controls.
Open the recorder through QuickTime Player
Open QuickTime Player.
Choose File > New Screen Recording. On current macOS, this opens Screenshot.
Select Record Entire Screen or Record Selected Portion.
Click Record to begin.
Use the menu-bar Stop Recording button to finish.
With QuickTime Player active, Control-Command-N also opens New Screen Recording.
Allow an app to record your screen or voice
For a third-party recorder or browser on macOS Tahoe 26, open Apple menu > System Settings > Privacy & Security > Screen & System Audio Recording. Turn on access for your app. This grants permission; it doesn't start recording.
For missing narration, open Apple menu > System Settings > Privacy & Security > Microphone. Enable the recording app or browser. Then select the microphone inside your recorder; microphone permission is separate from screen-recording permission.
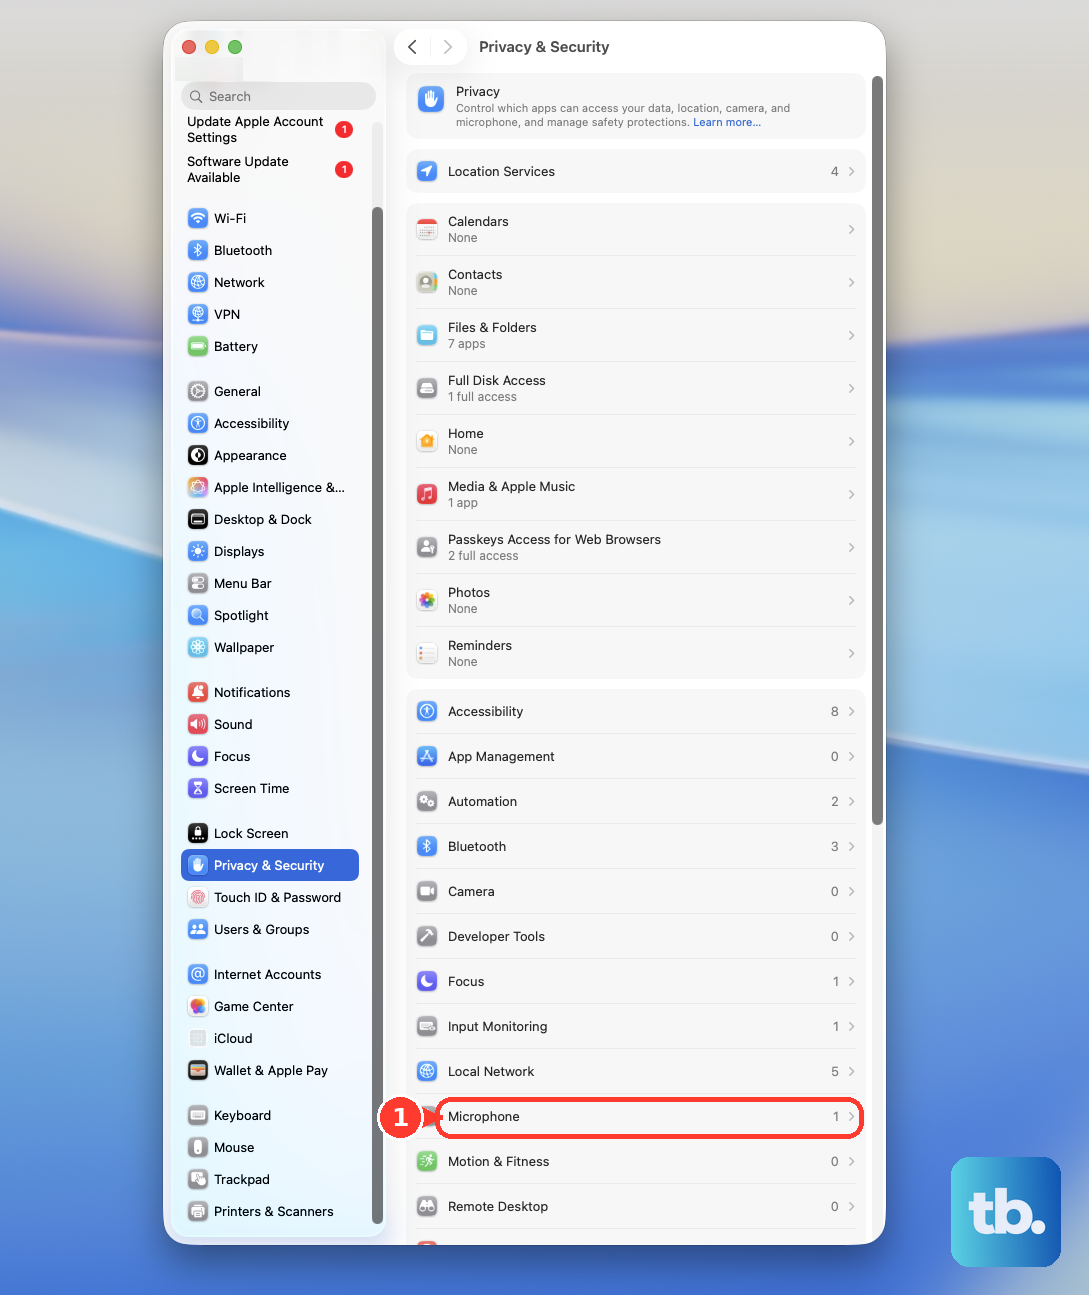
Some apps, such as the Apple TV app, might not let you record their windows. Turning on recording permission doesn't change that.
On a managed work or school Mac, device restrictions can prevent recordings from being saved or deny an app capture access. Ask the administrator to check Screenshots and screen recordings and the app's Screen recording setting in Privacy Preferences Policy Control.
Frequently Asked Questions
Can I open the Mac screen recorder without a keyboard shortcut?
Yes. Use Spotlight to search for Screenshot, then open Screenshot from the results.
Can I change the Shift-Command-5 shortcut?
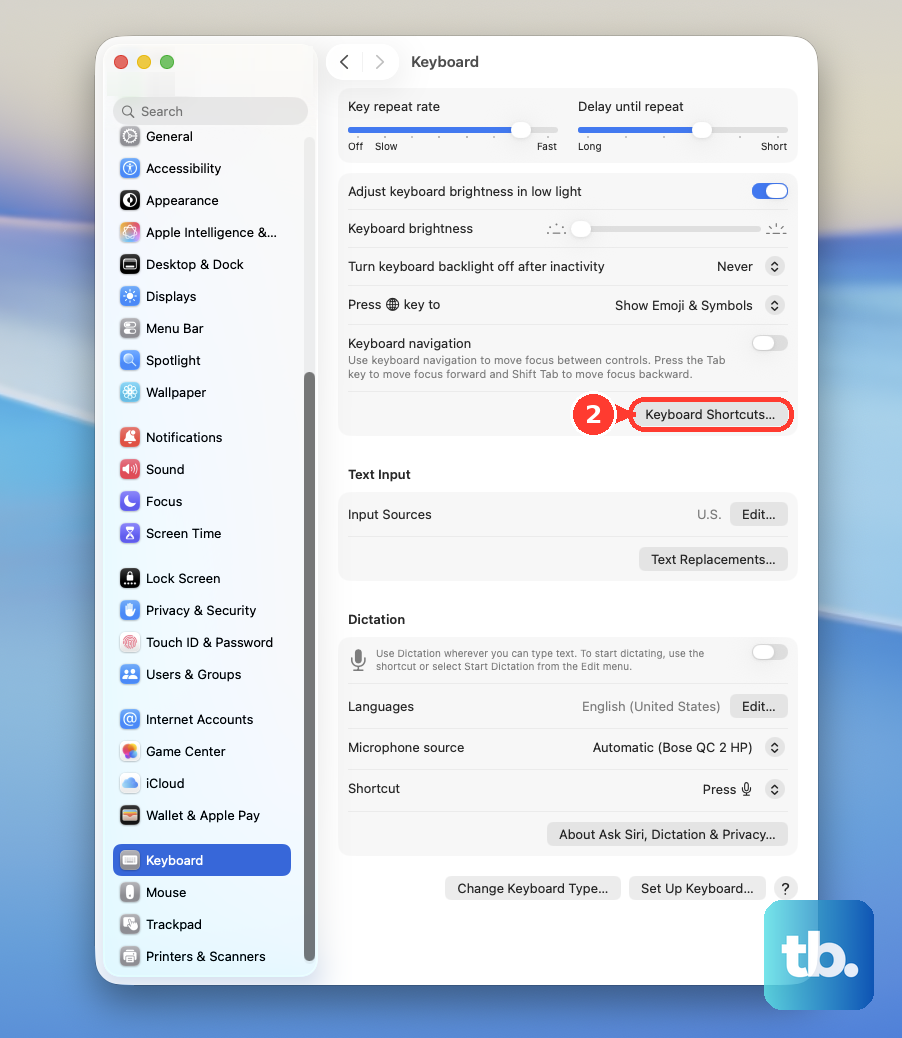
Yes. Open Apple menu > System Settings > Keyboard > Keyboard Shortcuts > Screenshots, then customize the shortcut for opening Screenshot.
Can a Mac screen recording include HDR?
Yes, on supported Mac models running macOS Tahoe 26 or later. Open Screenshot's Options menu and choose HDR or SDR (Most Compatible).
Can OBS capture just one application's audio?
Yes. In OBS Studio 30 or later on macOS Ventura 13 or later, add macOS Audio Capture through Sources > +, then select the application whose audio you want. Avoid capturing the same audio twice if macOS Screen Capture already supplies it.