
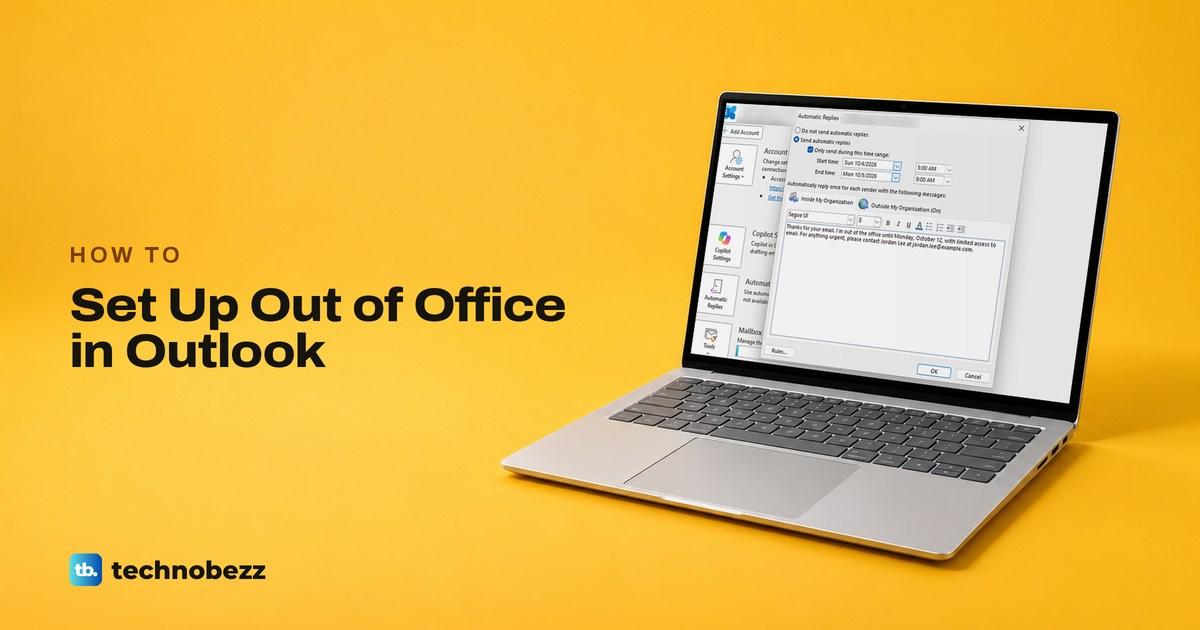
To set up out of office in classic Outlook for Windows, select File > Automatic Replies, choose Send automatic replies, tick Only send during this time range and pick your dates, then type your message and select OK. In Outlook on the web or Outlook.com, open Settings > Account > Automatic replies, turn on the Automatic replies switch, set the time period, write the reply and select Save.
Check the reply for people outside your organization before you save. When we turned automatic replies on in classic Outlook on Windows 11, version 25H2, Outlook switched on outside replies to anyone by itself, with an empty message.
The short version
- Classic Outlook: File > Automatic Replies > Send automatic replies, then OK.
- Outlook on the web and Outlook.com: Settings > Account > Automatic replies, then Save.
- Check the outside reply: on our PC it was switched on by default in both.
- Set an end time and the reply switches itself off when you are back.
- Each person normally gets your reply once while replies are on, and replies still go out with Outlook closed.
- No Automatic Replies button? Gmail, Yahoo, POP and IMAP accounts need a rule in classic Outlook or the mail service's own vacation reply.
Which Outlook do you have
The steps depend on which Outlook is in front of you, and the quickest test is the top right corner. Microsoft's rule is that a Settings gear there means the new Outlook, and no gear means classic Outlook. Outlook in a browser tab is Outlook on the web, or Outlook.com for a personal account.
Do not go by the File tab alone, because Outlook on the web had one on our screen too. Classic Outlook may also show a Try the new Outlook switch at the top right, which Microsoft says appears when your accounts are supported in the new Outlook, and on our PC it was set to Off.
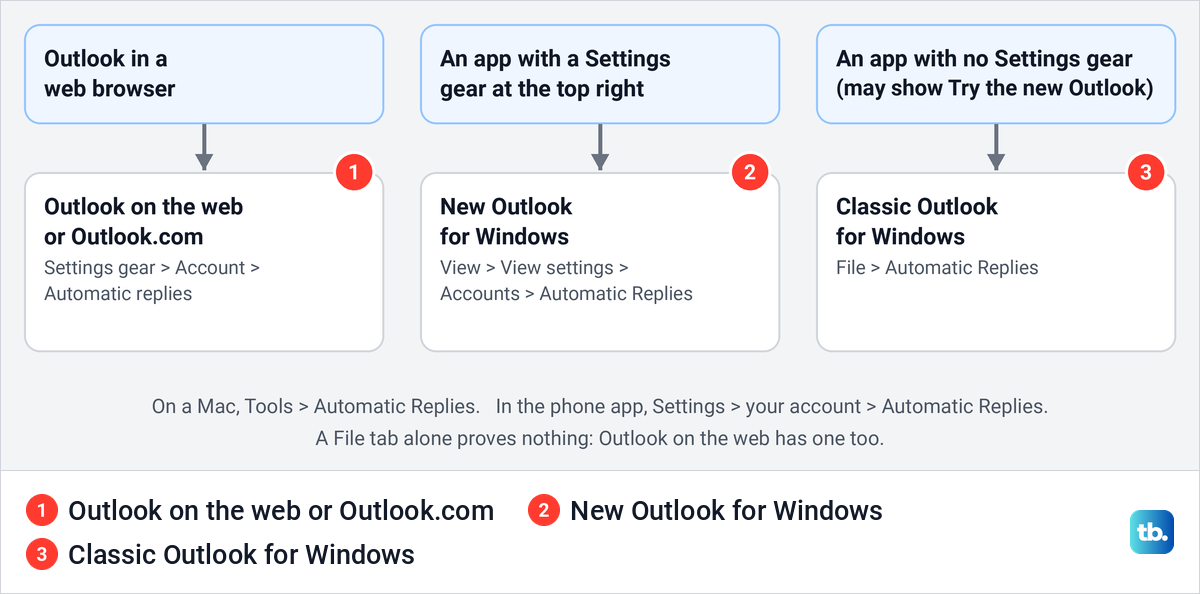
| Your Outlook | Where to find it | Dates | Inside and outside replies |
|---|---|---|---|
| Classic Outlook for Windows | File > Automatic Replies | Only send during this time range | Inside My Organization and Outside My Organization tabs |
| Outlook on the web | Settings > Account > Automatic replies | Send replies only during a time period | Inside reply, plus Send replies outside your organization |
| New Outlook for Windows | View > View settings > Accounts > Automatic Replies | Send replies only during a time period | Inside reply, plus outside replies for work or school accounts |
| Outlook.com and Hotmail | Settings > Account > Automatic replies | Send replies only during a time period | The same page as Outlook on the web |
| Outlook for Mac | Tools > Automatic Replies | Send replies during a specific time period | Separate inside and outside messages |
| Outlook for iPhone and Android | Settings > your account > Automatic Replies | Reply during a time period | Reply to everyone or only your organization |
| Gmail, Yahoo, POP or IMAP | No Automatic Replies button | Set in a classic Outlook rule or the mail service's vacation reply | Whoever the rule or vacation reply covers |
One thing has moved on the web. Older instructions point to a Mail section, but the Automatic replies page now sits under Account, next to Signatures.
Set up out of office in classic Outlook
Select File at the left end of the ribbon. About halfway down the Info page is a block called Automatic Replies (Out of Office) with an Automatic Replies button. Further down sits Manage Rules & Alerts, which you only need if the Automatic Replies button is missing.
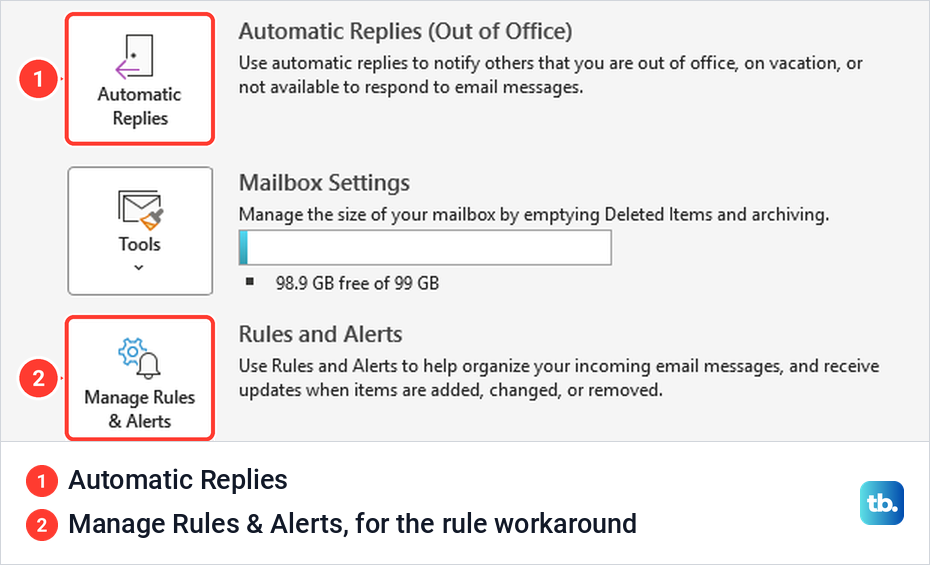
Select Automatic Replies. The dialog opens with Do not send automatic replies selected and everything below it greyed out, so select Send automatic replies first.
Tick Only send during this time range and set the Start time and End time. Each has a date list and a time list, and we could also type a time such as 9:00 AM into the box. Microsoft says the replies then switch off by themselves at the end time, while without a range they stay on until you turn them off.
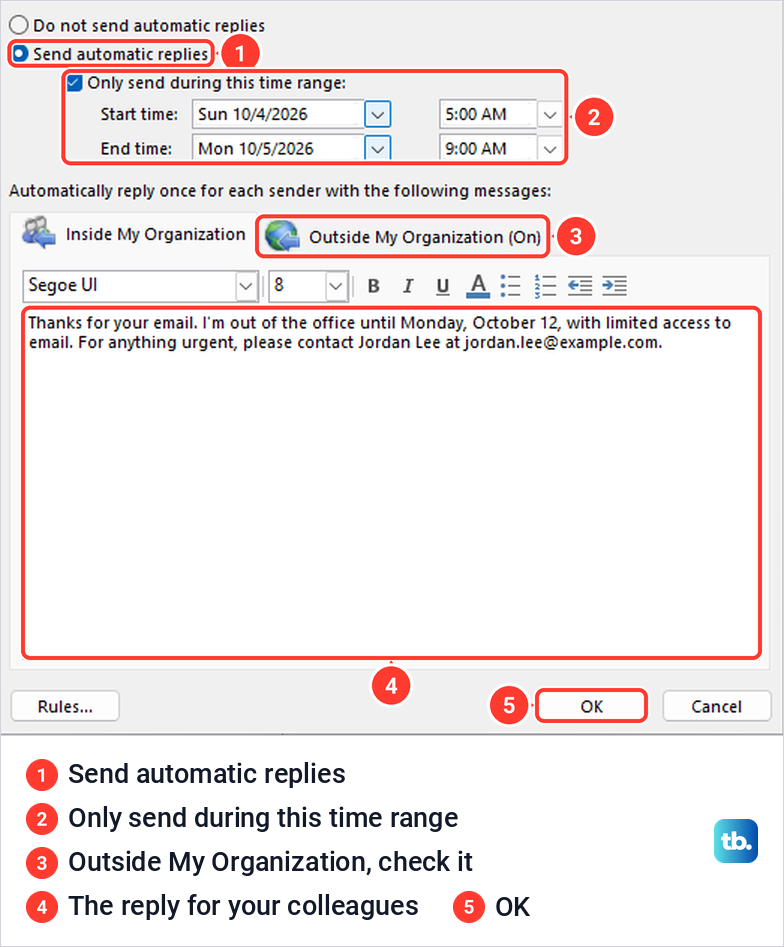
The open tab, Inside My Organization, holds the reply for your colleagues, so type it in the box. The line above it reads Automatically reply once for each sender with the following messages, and Microsoft says you can format the text or paste formatted text, including links.
Watch the text size. The dialog starts at 8 point Segoe UI, and in our tests the reply arrived in that same small type, while the same words set on the web arrived at normal size. Pick a larger size from the toolbar before you type.
Open the Outside My Organization tab next, for the reason in the next section, then select OK. If there is no OK button, Microsoft says certain resolution and scaling settings can hide it and suggests changing them or using a larger monitor.
Back in the main window, a yellow bar under the ribbon read Automatic Replies are being sent for this account, with a Turn off button. On the File tab, the Automatic Replies block turned yellow and gained its own Turn off button.
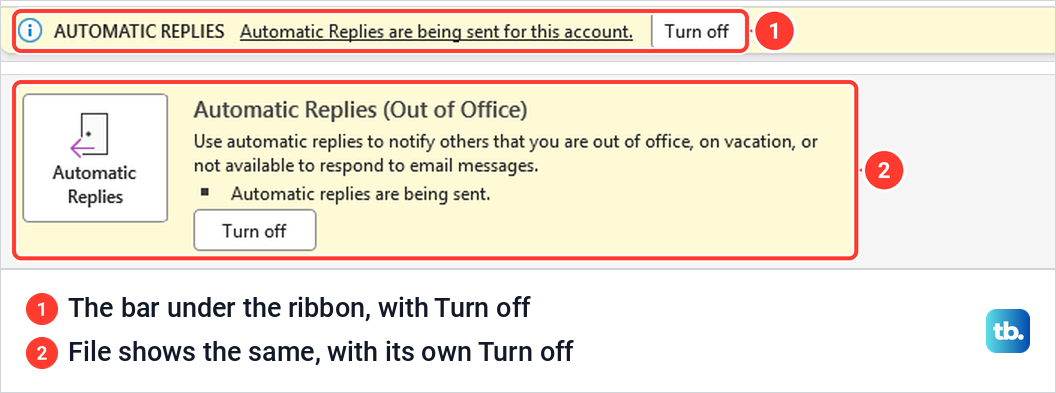
Do not rely on the bar alone. After we closed classic Outlook and opened it again with replies still on, the bar did not come back during the 50 seconds we watched, yet File still said replies were being sent.
Check the reply for people outside your organization
Classic Outlook keeps a second reply for people outside your company on the Outside My Organization tab, and the tab name ends in (On) or (Off). Inside are a box called Auto-reply to people outside my organization, a choice between My Contacts only and Anyone outside my organization, and a message box of its own.
On our PC, the first time we selected Send automatic replies, that tab switched from (Off) to (On) by itself. The outside box was already ticked, Anyone outside my organization was selected and the message box was empty. Nothing on the Inside tab points this out apart from the (On) in the tab name.
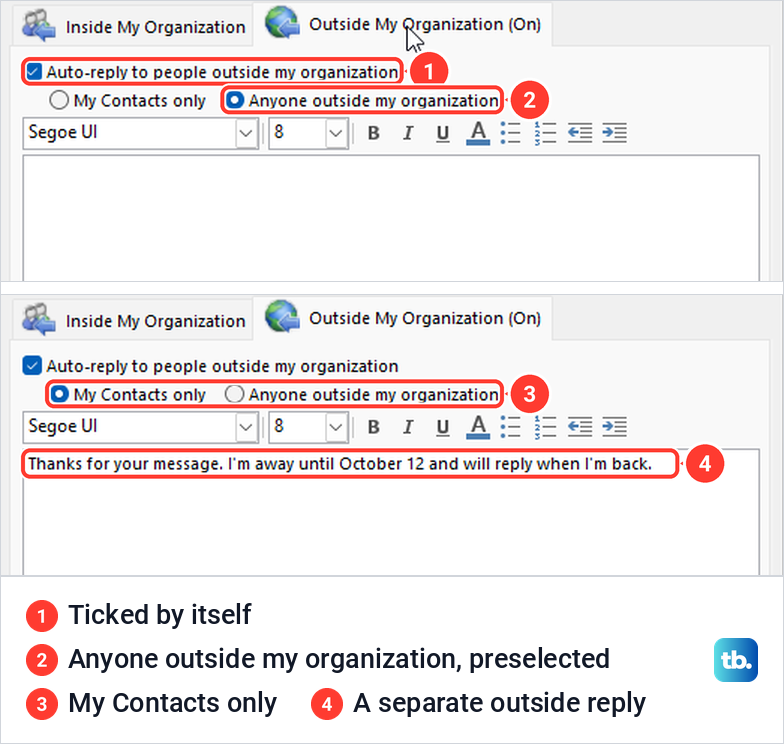
That fits the mailbox setting behind the dialog, where Microsoft lists all external senders as the default. Once we had unticked the box, the tab stayed (Off) when we turned replies on again later, so your choice sticks.
So decide on purpose. If you want outside replies, choose My Contacts only, because Microsoft warns that replying to anyone outside answers every email, including newsletters, advertisements and possibly junk. If you do not, untick the box and the tab reads (Off).
Write the outside reply for strangers, with your return date and a general contact, and leave out travel plans and anything internal. Microsoft says the two tabs come with work or school accounts, and your organization can block replies from leaving the company.
Set up automatic replies in Outlook on the web
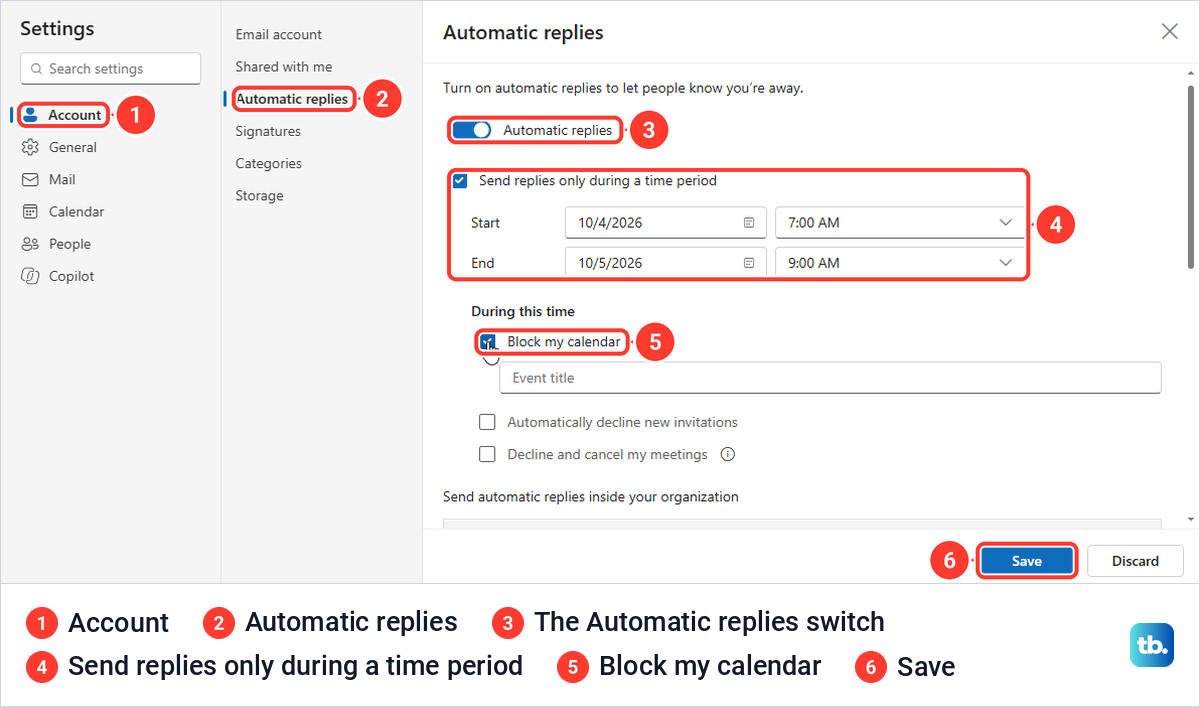
Select the Settings gear at the top right, then Account and Automatic replies. Typing automatic into the Search settings box also works, and Automatic replies was the first suggestion on our screen.
The page opens with one switch, Automatic replies. While it is off, the options are greyed and there is no message box and no Save button. Turn it on, then tick Send replies only during a time period and set the start and end, which come in 30-minute steps.
Ticking the period also opens a During this time group with Block my calendar and two meeting options. All three are covered further down.
Scroll down to Send automatic replies inside your organization and type the reply. Below it, Send replies outside your organization was ticked by default on our page, with Send replies only to contacts unticked and a second box for the outside reply. Untick it if the reply is for colleagues only, and the second box disappears.
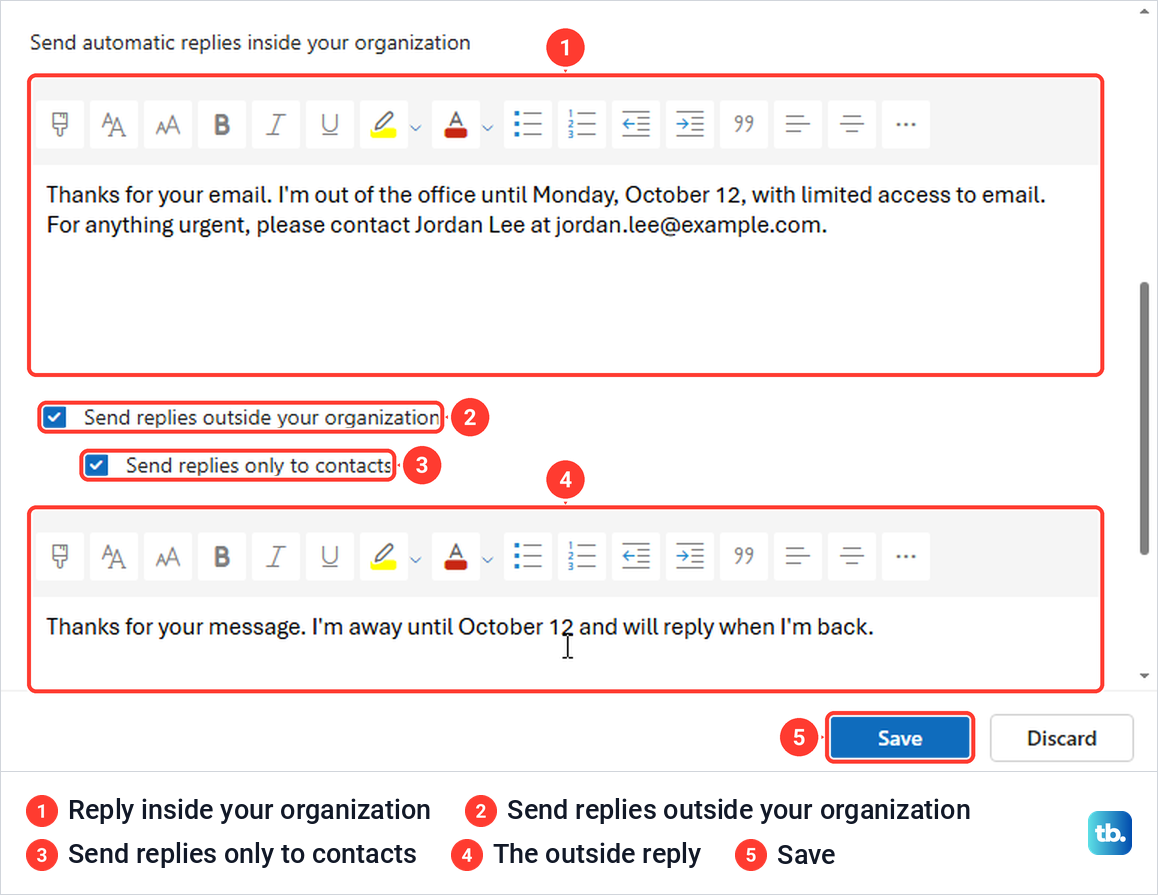
Select Save, and a notice confirms that automatic replies are turned on. The notice also carries a Turn off link for when you are back.
What people see when they email you
Colleagues in your organization can see that you are away before they press Send. As soon as we added the away person to the To line, Outlook on the web showed the automatic reply in a pink bar at the top of the new message. Classic Outlook showed the same kind of note above the address fields.
After Send, the reply arrived within about half a minute in the Focused Inbox. Its subject is Automatic reply followed by the original subject, and the body is your inside message. Outlook on the web filed it in the same conversation as the message we sent.
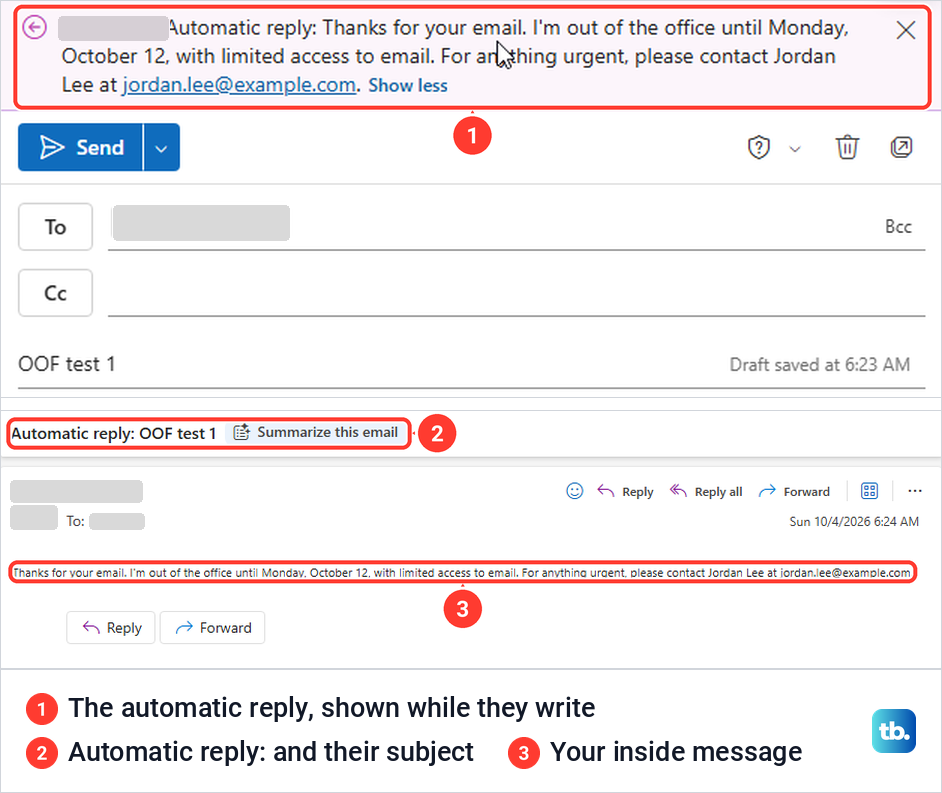
That note can lag behind. Nine minutes after we turned replies off, the web still showed it when we wrote to the same person again, so treat it as a hint.
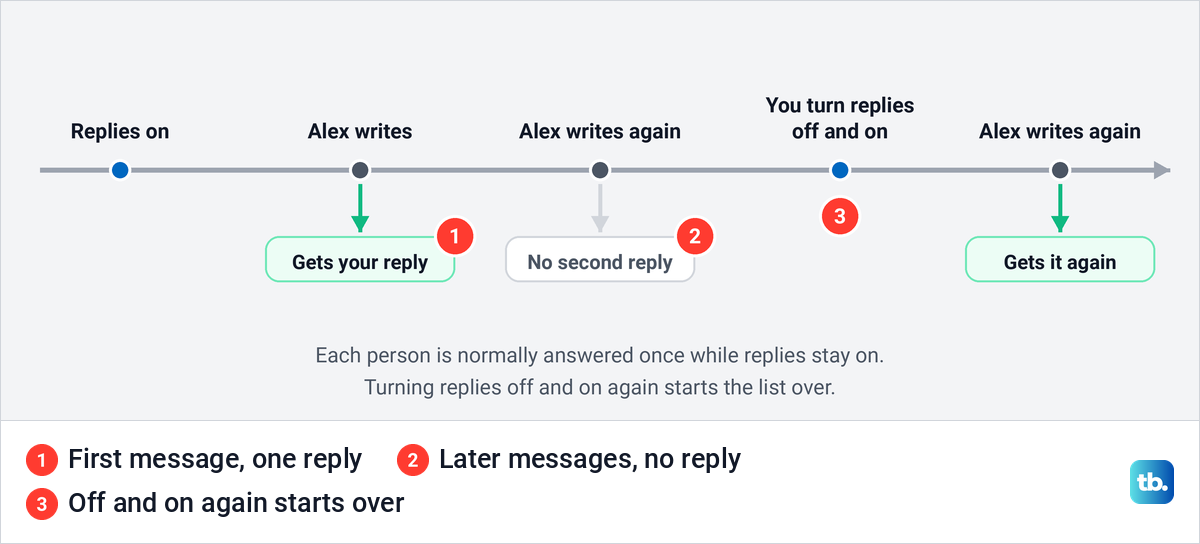
Your reply normally goes to each sender once, not once per message. When we wrote a second time from the same mailbox, no second automatic reply came in over three minutes, in Focused or Other. Microsoft describes it the same way, which is why a second test from the same address seems to fail.
The list starts over when replies are turned off and on. After we selected Turn off and switched replies on again, the same sender got a fresh reply. So turn replies off and on before a second test, or test from another address.
The reply also works with Outlook closed, because it runs in your mailbox rather than in the app. We closed classic Outlook with File > Exit, confirmed it was no longer running and sent a test from the web, and the automatic reply still arrived within about 40 seconds.
Set up out of office in the new Outlook for Windows
In the new Outlook, open the View tab, then View settings, Accounts and Automatic Replies, or use the Settings gear at the top right. Turn the Automatic replies toggle on, select Send replies only during a time period and set the start and end times.
Type the message, and with a work or school account choose whether to Send replies outside your organization, ideally with Send replies only to contacts. Then select Save. If you prefer the classic Automatic Replies dialog, you can switch back to classic Outlook with the toggle at the top right.
Microsoft says automatic replies are not supported for Gmail, Yahoo or other POP or IMAP accounts in the new Outlook. Classic Outlook does not offer them for those accounts either, so see the section on accounts without the button below.
Outlook.com and Hotmail accounts
A personal Outlook.com or Hotmail mailbox uses the same page as Outlook on the web. Open outlook.com, sign in to your Hotmail or Outlook.com account, select Settings > Account > Automatic replies and follow the web steps above.
When there is no Automatic Replies button
If File shows no Automatic Replies button, the account does not support the feature, and Microsoft names Gmail, Yahoo and other POP or IMAP accounts. To check, select File > Account Settings > Account Settings and look in the Type column. Microsoft says an IMAP or POP3 account, such as Yahoo or Gmail, needs a rule instead, while a work mailbox listed as Microsoft Exchange has the button.
Classic Outlook has a way round it, a rule that answers with a saved message, shown in the next section. It only works while classic Outlook is running.
The new Outlook has no such way out, because Microsoft says it supports no rules for Gmail, Yahoo and iCloud accounts and cannot reply with a template. If you added a Gmail account to the Outlook app, set the reply in Gmail under Settings, See all settings, General, Vacation responder: select Vacation responder on, fill in the dates, subject and message, then select Save Changes. Google says it runs from 12:00 AM on the start date to 11:59 PM on the end date.
The same goes for Yahoo Mail in the Outlook app. In Yahoo Mail on the web, Yahoo's steps are More options, Settings, Vacation response, Enable vacation response, the dates, your message and Save.
Use a rule as your out of office reply in classic Outlook
A rule is the fallback for accounts without Automatic Replies, and it starts with a saved message. Select New Email, type a subject and the reply, and leave the To line empty.
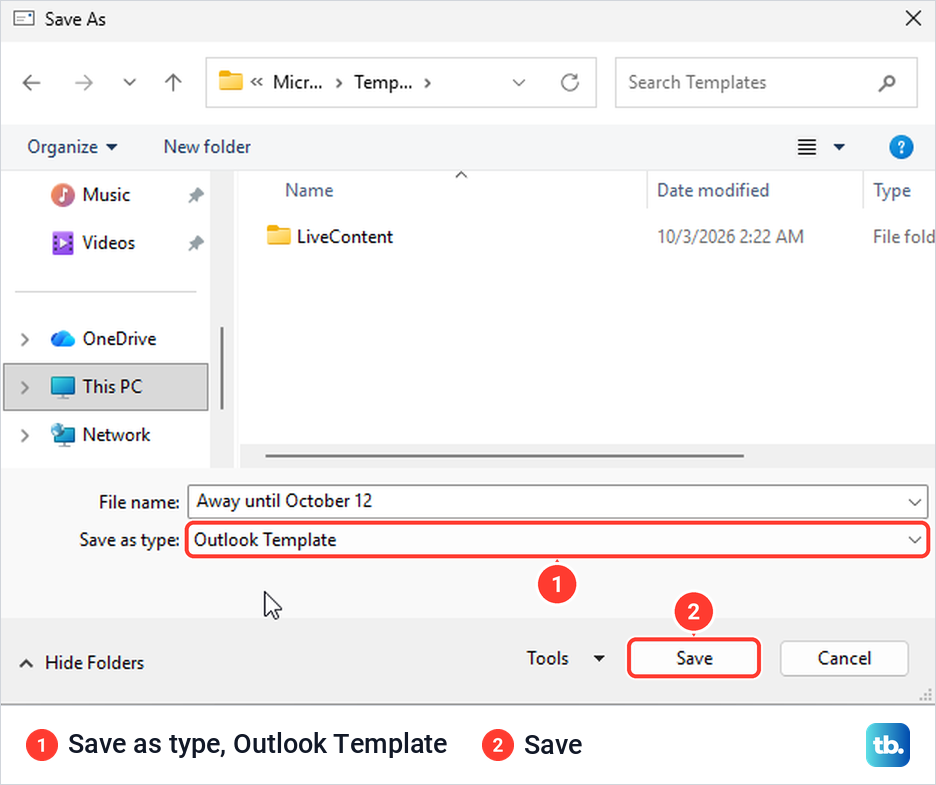
Read the message through before you save it, because when we typed an email address into the template, Outlook capitalised its first letter. Then select File > Save As, choose Outlook Template under Save as type, which switched to the Templates folder on our PC, and select Save.
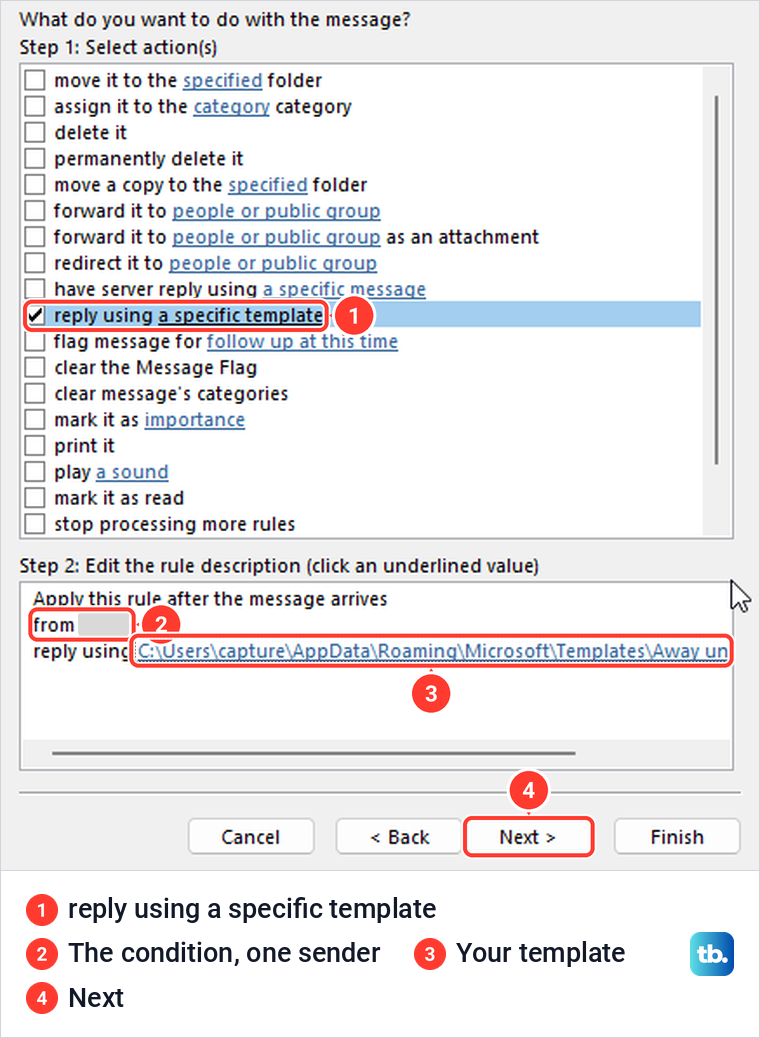
Next, select File > Manage Rules & Alerts and New Rule, choose the first option under Start from a blank rule, for messages you receive, and select Next. To answer everyone, Microsoft's steps leave the conditions empty and select Yes when Outlook asks whether the rule should apply to every message you receive. To limit it, tick a condition such as from people or public group, which we set to one sender.
On the next page, tick reply using a specific template, not the server reply action above it. In Step 2, click the underlined a specific template link.
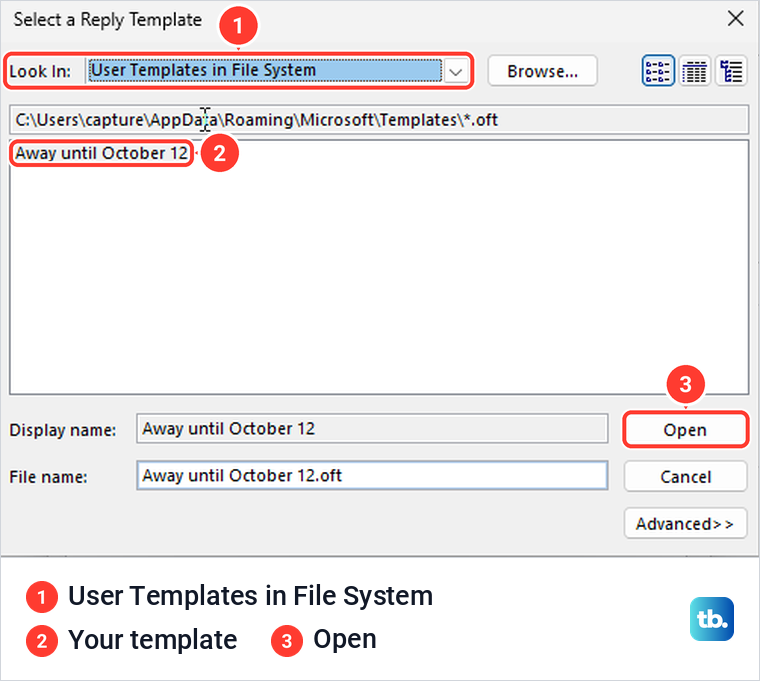
The Select a Reply Template window opened on Standard Templates, where our template was not listed. Change Look In to User Templates in File System, pick your template and select Open. If it is not there either, here is how to find a missing Outlook template.
Select Next and tick the exception except if it is an automatic reply, so the rule does not answer other people's out of office messages. Then name the rule and select Finish.
Outlook then warned that the rule will only run when you check your email in Outlook. The rule list labels it client-only.
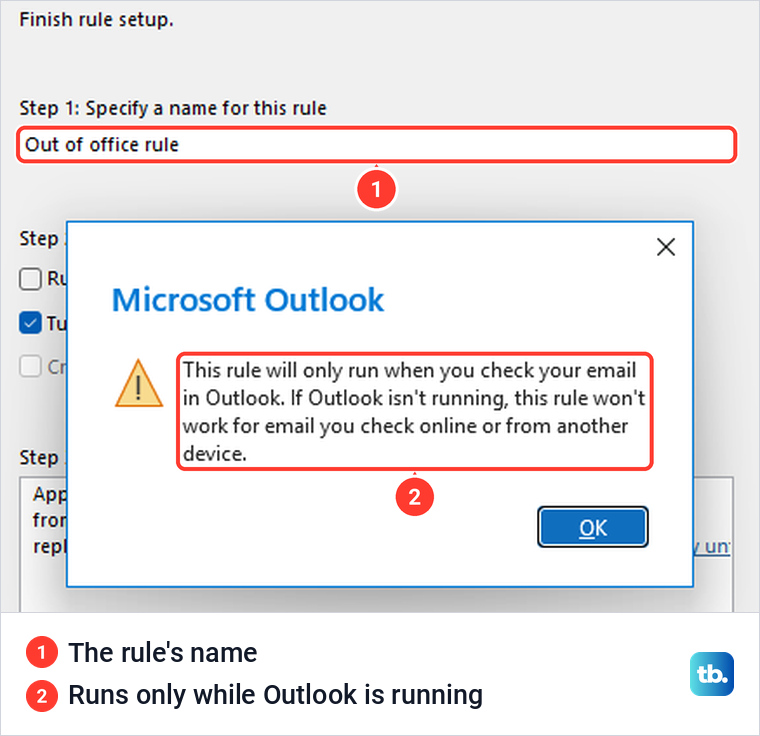
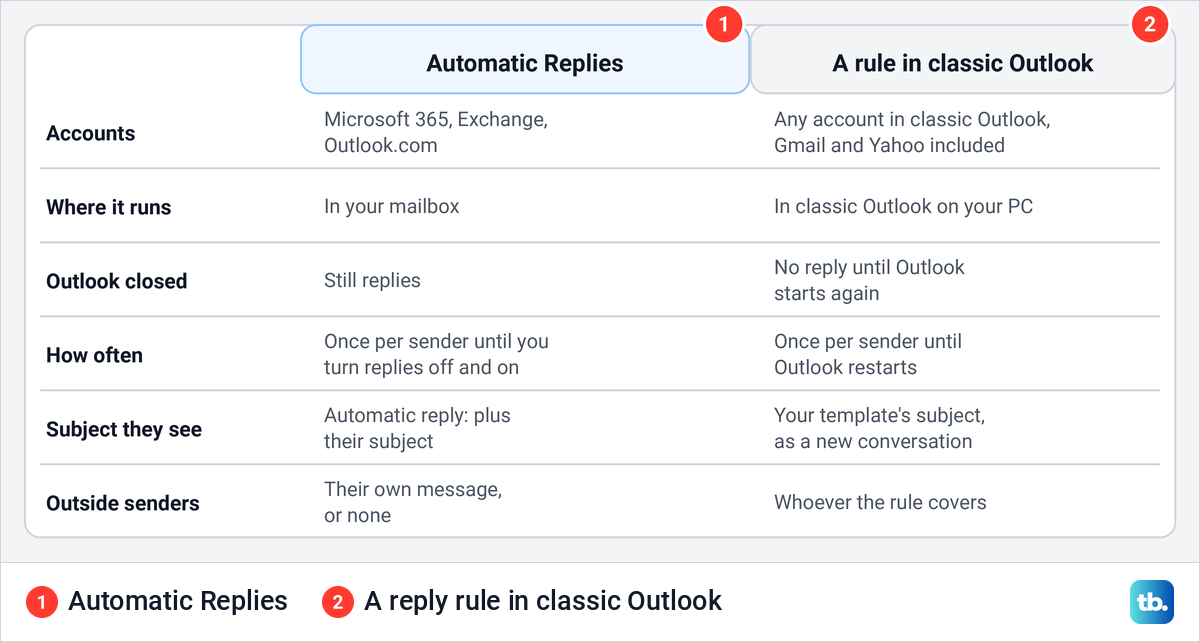
That warning is the whole story. In our tests the rule replied once per sender while classic Outlook stayed open, and a second message from the same person got nothing. After Outlook was closed and reopened, the same person got the reply again, which matches Microsoft's note that Outlook forgets who it has answered each time you close and restart Outlook.
With Outlook closed, our test message got no reply for over two and a half minutes, then Outlook caught up within about a minute of starting again. The reply carried the template's own subject instead of Automatic reply, and arrived as a new conversation.
Turn the rule off or delete it in File > Manage Rules & Alerts when you are back. If it never answers, our fixes for Outlook rules not working cover the usual causes.
Set it from Outlook for Mac or your phone
In Outlook for Mac, open Mail, then select Tools > Automatic Replies, choose the account, turn on Send Automatic Replies and type your reply under Message for inside your organization. For dates, turn on Send replies during a specific time period. Microsoft says to tick Message for outside your organization for outside senders, choose Send only to my contacts or Send to everyone, then close the window.
In the Outlook app for iPhone and Android, tap Settings, your account and Automatic Replies, turn the switch on, set the options and tap Save. It works for Microsoft 365, Exchange and Outlook.com accounts, and if your screens look different, update Outlook on your phone first.
Microsoft says an out of office scheduled in Teams turns on automatic replies in Outlook with the same dates and message. With Copilot in Outlook, a prompt such as Set up automatic replies for tomorrow drafts a reply for you to confirm, in English only.
Block your calendar while you are away
Outlook on the web can mark the time off on your calendar. With a time period set, tick Block my calendar and type an Event title. We left the title empty, and the calendar got an event called (No subject) across the period, shown as Out of office.
The block outlives the reply. When we turned automatic replies off and saved, the event stayed and had to be deleted by hand. If colleagues follow your schedule, our guide to a shared calendar in Outlook explains what each sharing level lets them see.
The other two boxes decline new invitations for the period and decline and cancel your meetings during it, in Microsoft's words. The phone app offers Block my calendar and Clear my calendar.
Turn off your out of office when you are back
With an end time set, Microsoft says the replies stop by themselves. Otherwise, in classic Outlook select Turn off on the yellow bar or the File tab, which removed the bar at once on our PC. On the web, switch Automatic replies off and select Save.
Turning off forgets your dates. Classic Outlook kept the reply text but reset the time range to default times, and the web page reset its time period too, so set the dates again before your next trip. Delete any calendar block or reply rule as well.
If your out of office reply is not working
- You tested twice from the same address. Each sender normally gets one reply until replies are turned off and on.
- The message went to Junk. Microsoft says mail filed as junk gets no automatic reply.
- Your mailbox forwards all mail. Microsoft says forwarding set on the mailbox itself stops automatic replies, and you can check it in your mailbox settings in Outlook on the web.
- The sender is outside your organization. Check the outside reply, and ask IT whether outside replies are blocked.
- You used a rule. It needs classic Outlook running.
- Replies continue after you turned them off. Look for an old rule under File > Automatic Replies > Rules, and ask IT whether someone set replies for you.
Outlook also has to reach your mail server. When classic Outlook could not, Automatic Replies said the settings cannot be displayed because the server is currently unavailable, so reconnect or sign in again and retry.
If a reply stopped before the end date, check that Outlook's time zone matches where you are. If none of this explains it, our guide to Outlook automatic replies not working goes further, including settings only an admin can change.
How we tested this guide
We tested this on Windows 11, version 25H2, in classic Outlook and Outlook on the web, turning automatic replies on and off in both.
Frequently Asked Questions
Why don't I see Automatic Replies in Outlook?
First check which Outlook you have, because the new Outlook keeps it under View > View settings and the web under Settings > Account, not File. If it is still missing, your account is most likely Gmail, Yahoo or another POP or IMAP account, which does not support it. Use a reply rule in classic Outlook, or set the vacation reply in Gmail or Yahoo itself.
Does Outlook send my out of office reply to every email?
No. Each person normally gets it once while replies are on, and turning replies off and on starts the list again.
Will people outside my company get my automatic reply?
Only if outside replies are on, and on our PC both classic Outlook and Outlook on the web had them on by default. Choose contacts only unless you want newsletters and junk answered too.
Does out of office work when my computer is off?
Automatic Replies do, because they run in your mailbox. A rule in classic Outlook does not, and in our test it only replied once Outlook was started again.
Can I set my out of office from my phone?
Yes, in the Outlook app for iPhone or Android. Tap Settings, your account and Automatic Replies, which Microsoft supports for Microsoft 365, Exchange and Outlook.com accounts.
How do I turn off out of office in Outlook?
If you set an end time, it stops by itself. Otherwise select Turn off on the yellow bar or the File tab in classic Outlook, or switch Automatic replies off and select Save on the web.
Why are my automatic replies still going out after I turned them off?
Look for an old reply rule, under File > Automatic Replies > Rules or in Manage Rules & Alerts. Your IT team can also set replies for you, so ask them if no rule turns up.