

To set the print area in Google Sheets, select the cells you want on paper, choose File > Print and change the Print list from Current sheet to Selected cells, then click Next. Sheets has no Set Print Area command that saves a range with the file. In our budget sheet, Print settings opened on Current sheet even with cells selected, and it was back on Current sheet the next time we opened it.
We checked all three choices in the Print list on a two-tab household budget in Chrome, along with page breaks and a heading row repeated on page 2. The steps below are for Google Sheets on the web on a computer, and the phone apps have their own section near the end.
The short version
- Print a range: select the cells, press Command + P on a Mac or Ctrl + P on Windows and ChromeOS, and choose Selected cells under Print.
- Choose it every time: Sheets did not remember Selected cells for us, although it kept our custom page break.
- One tab or all of them: Current sheet prints the tab you are on, and Workbook prints every tab.
- Headings on every page: freeze row 1 with View > Freeze > 1 row, then check that Repeat frozen rows is ticked.
- Too small or too big: change Scale, or type a percent under Custom number.
- On a phone: tap More, then Share & export > Print.
Print area options at a glance
| What you want on paper | What to do in Print settings | What our preview showed |
|---|---|---|
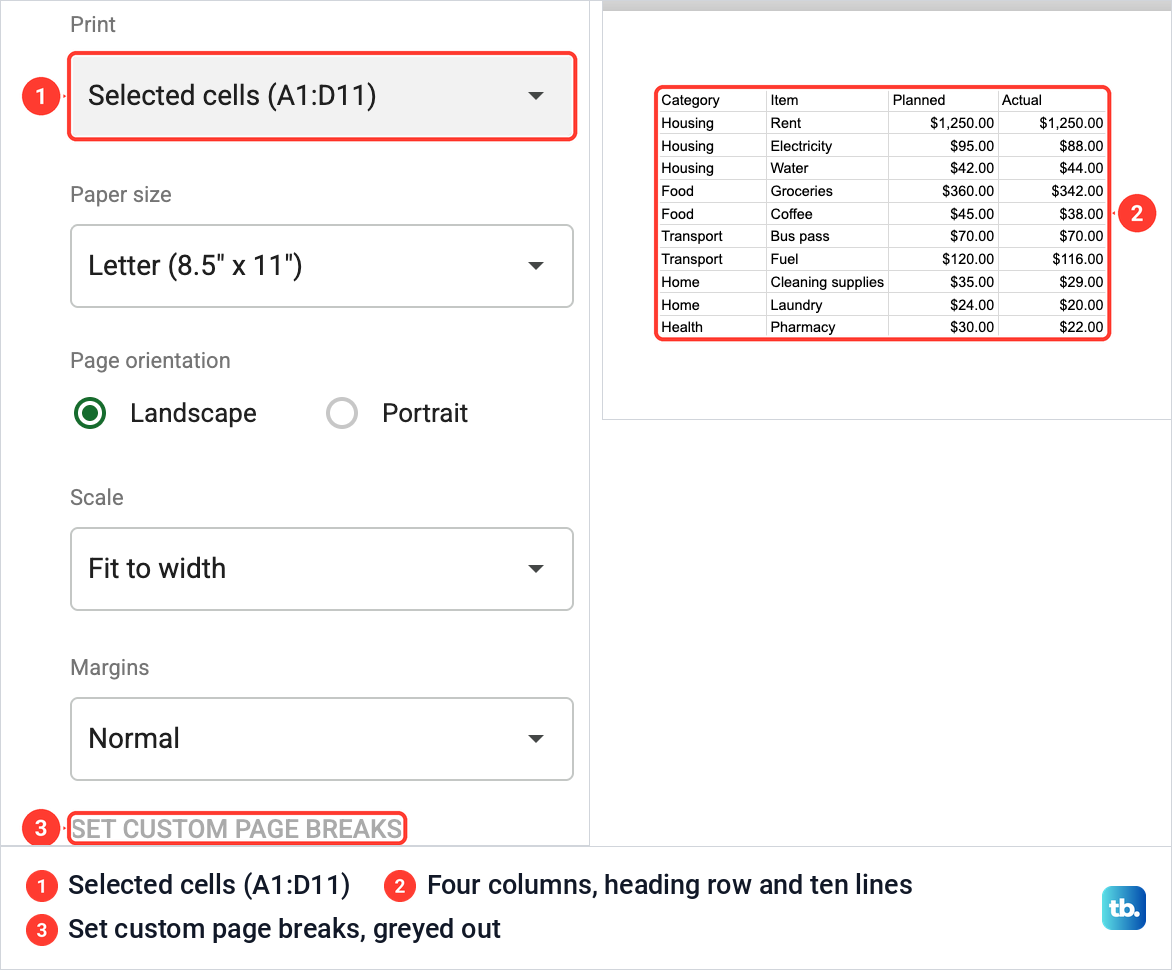
| Only a block of cells | Select the cells first, then choose Selected cells under Print | Only A1:D11, four columns, a heading row and ten budget lines |
| The tab you are on | Leave Print on Current sheet, where it opened | All five columns and 16 rows on one page |
| Every tab in the file | Choose Workbook, with Selection on All sheets | Both tabs, Total: 2 pages |
| A page that ends where you choose | On Current sheet, Set custom page breaks, drag a line, Confirm breaks | Page 1 ended at Fuel, Total: 2 pages |
| The heading row on every page | Freeze row 1 with View > Freeze, then Repeat frozen rows | Category, Item, Planned, Actual and Note at the top of page 2 |
| Bigger or smaller print | Scale, with Fit to width, Fit to page or Custom number | At 200 percent the preview showed our cells at twice the size |
Most print options in the table are in Print settings, the page that File > Print opens, but freeze a heading row in the sheet first. The last column describes our Household Budget file, a 16-row list on Letter paper in landscape.
How to print only the cells you select
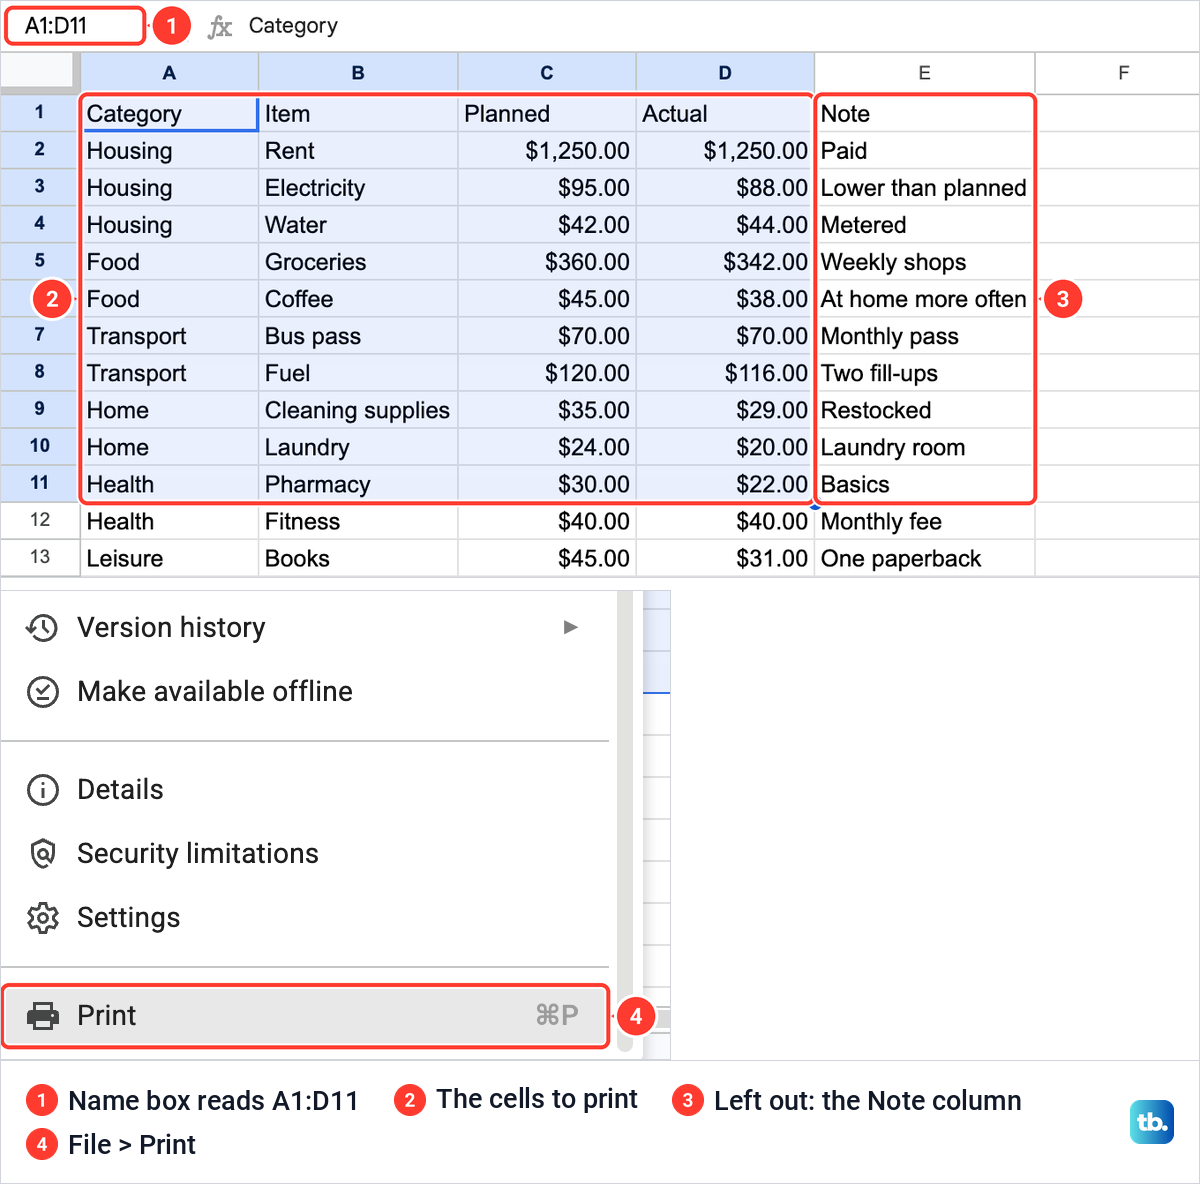
Start in the sheet, not on the print screen. Drag across the cells you want on paper, and check the range in the Name box at the left of the formula bar. We selected A1:D11 in our Household Budget file: the Category, Item, Planned and Actual columns and the first ten budget lines, leaving out the Note column and rows 12 to 16.
Then open File > Print, the last entry in the File menu, or press Command + P on a Mac or Ctrl + P on Windows and ChromeOS. Our File menu showed the Mac shortcut beside Print.
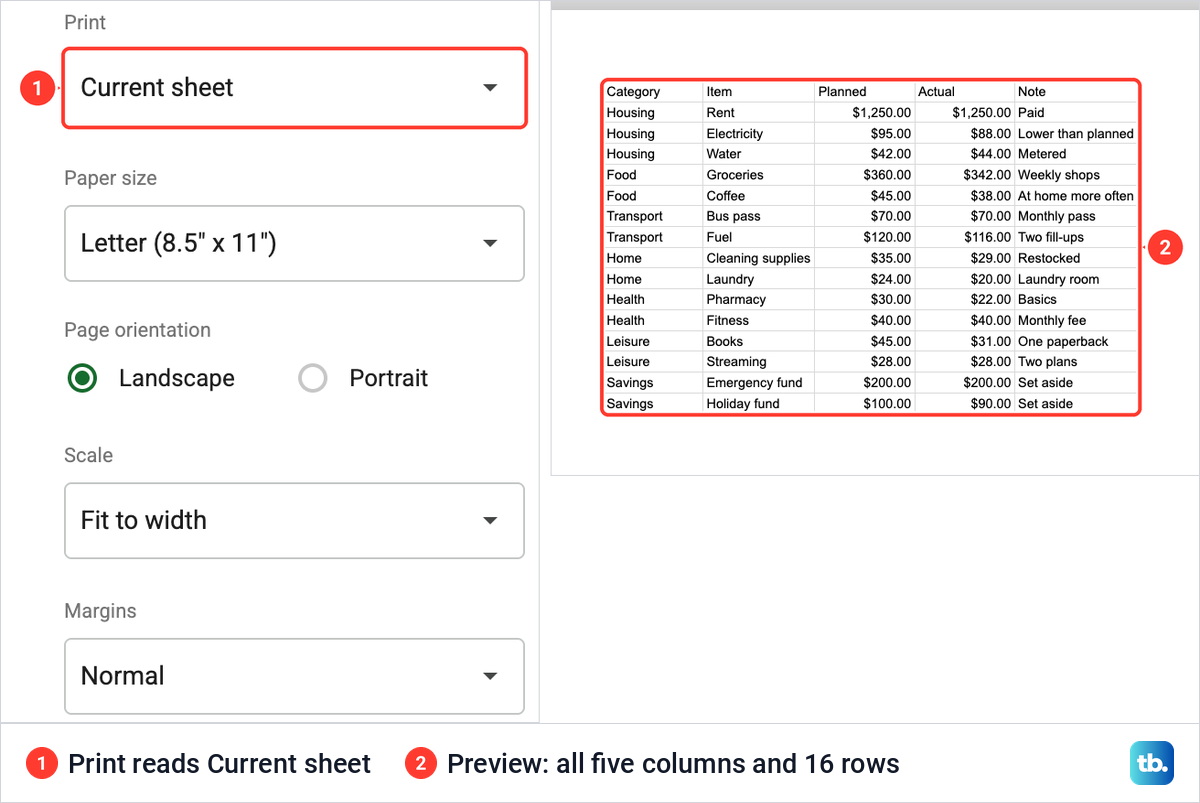
Print settings opens with a preview on the left and the options on the right. Look at the Print list before anything else. Ours read Current sheet, although cells were selected, and the preview showed all five columns and all 16 rows.
Click the Print list. It offers three choices, Current sheet, Workbook and Selected cells, and the last one names your range: Selected cells (A1:D11) in ours. If the range in brackets is not the one you meant, click Cancel, select again and reopen Print.
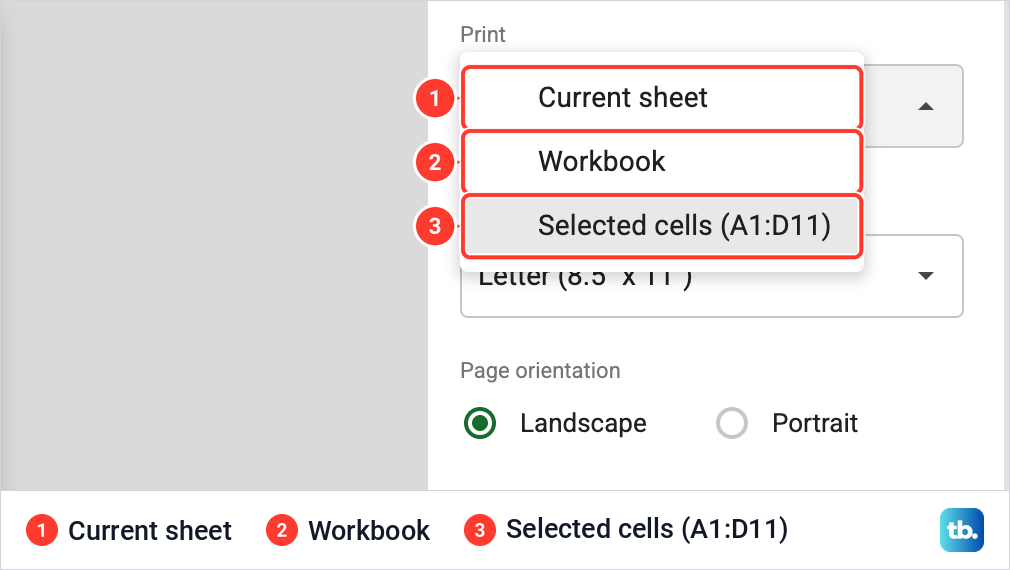
Choose Selected cells. The preview changed at once to the four columns, the heading row and the ten budget lines we had selected, with no Note column and nothing below Pharmacy. The Set custom page breaks link turned grey at the same moment, which the page break section below comes back to.
When the preview looks right, click Next. In Chrome, the browser's own print window opens: choose the printer there and click Print. In Firefox or Safari, Sheets downloads a PDF instead, which you open and print from your PDF viewer.
Sheets prints the block in the order it sits in the sheet, so put the rows in order first, as our guide to alphabetizing in Google Sheets shows. To put a total on the page, total a column in Google Sheets first and include that row in your selection.
Print one tab or the whole workbook
Current sheet prints the tab you are on, and it is where Print settings opened for us. The preview showed our Monthly Spending tab on one page, with all five columns and 16 rows, and nothing from Savings Goals.
Workbook prints all the tabs. Choosing it raised the count at the top to Total: 2 pages, added a Selection field that read All sheets, and put the Savings Goals tab on page 2 of the preview.
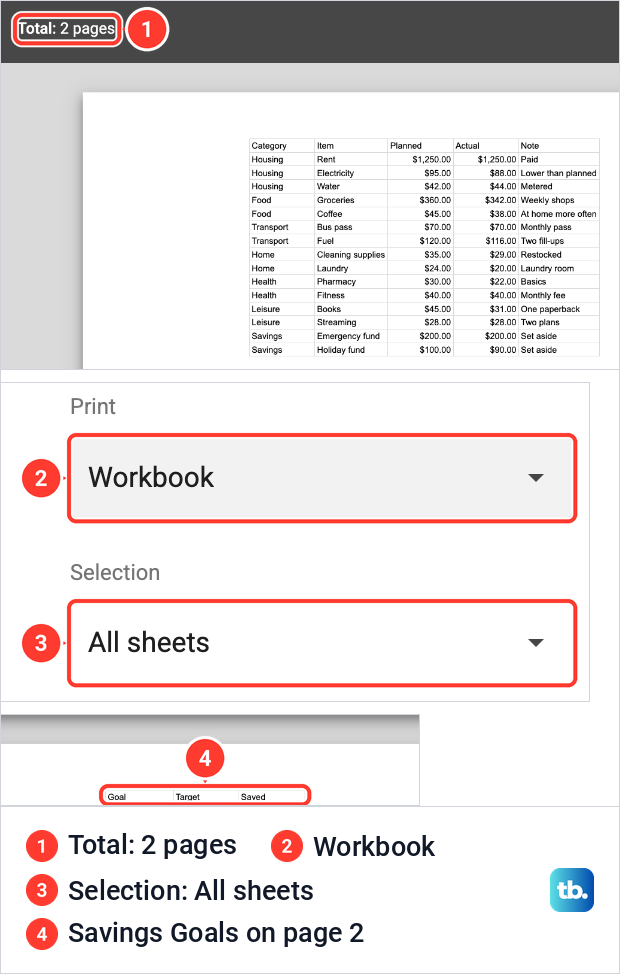
In our preview each tab started on its own page, even though page 1 had plenty of room left. Set custom page breaks was grey under Workbook as well, so use Current sheet when you want to place breaks yourself.
Make the printed cells bigger or smaller
Our Print settings opened on Letter (8.5" x 11") paper in Landscape, with Scale on Fit to width and Margins on Normal. Portrait is the other orientation. The Paper size list ends with Custom size, where you enter a height and width, and Margins offers Normal, Narrow, Wide and Custom numbers.
The Scale list holds Normal (100%), Fit to width, Fit to height, Fit to page and Custom number. For our small selection, Normal (100%) and Fit to width looked the same in the preview: a small table near the top of the page.
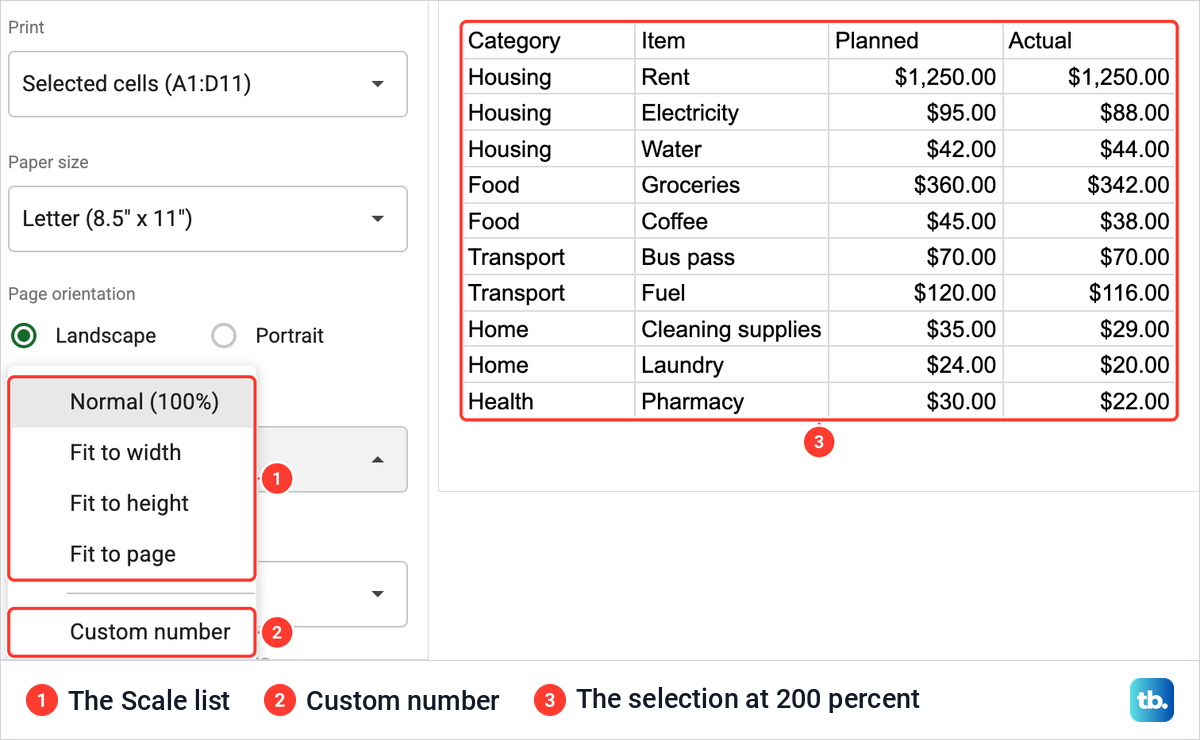
Custom number opens a Percent box. We typed 200, and the preview showed the selected cells at twice the size, filling most of the page width. That is the fix when a short list looks lost on the page, and we set Scale back to Fit to width afterwards.
Leave the gridlines off the printout
Open Formatting in Print settings to find Show gridlines and Show notes, both ticked in our file, then Page order and Alignment. Untick Show gridlines and the preview drops the lines round every cell, leaving only the words and amounts.
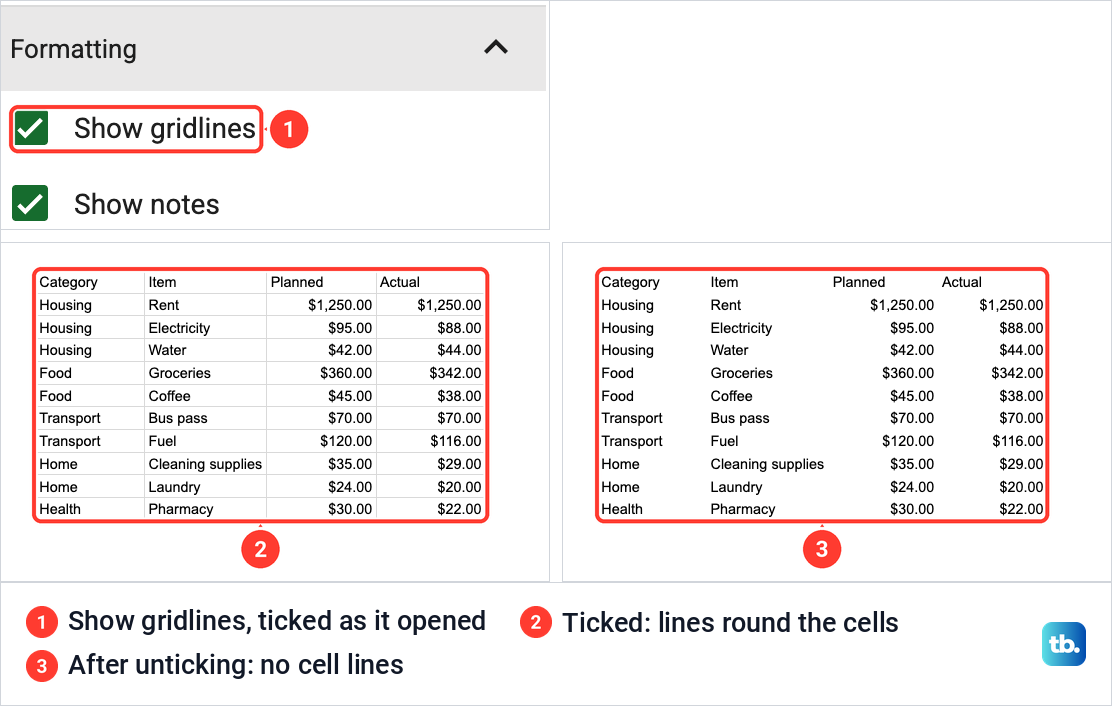
We ticked it again, because a budget is easier to follow with the lines on paper. Alignment, set to Center and Top in our file, decides where the printed cells sit on the page.
Split the printout with custom page breaks
A page break decides where one printed page ends and the next begins. It belongs to the whole tab: with Print on Current sheet, click Set custom page breaks under Margins. With Selected cells or Workbook chosen, the link was grey for us.
The editor shows the sheet inside a dashed blue border, with Cancel, Scale: 100%, Reset and Confirm breaks along the top. Drag a dashed line to where a page should end. We dragged the bottom line up to sit under row 8, Fuel, and it turned into a solid blue line with a handle while Reset and Confirm breaks lit up.
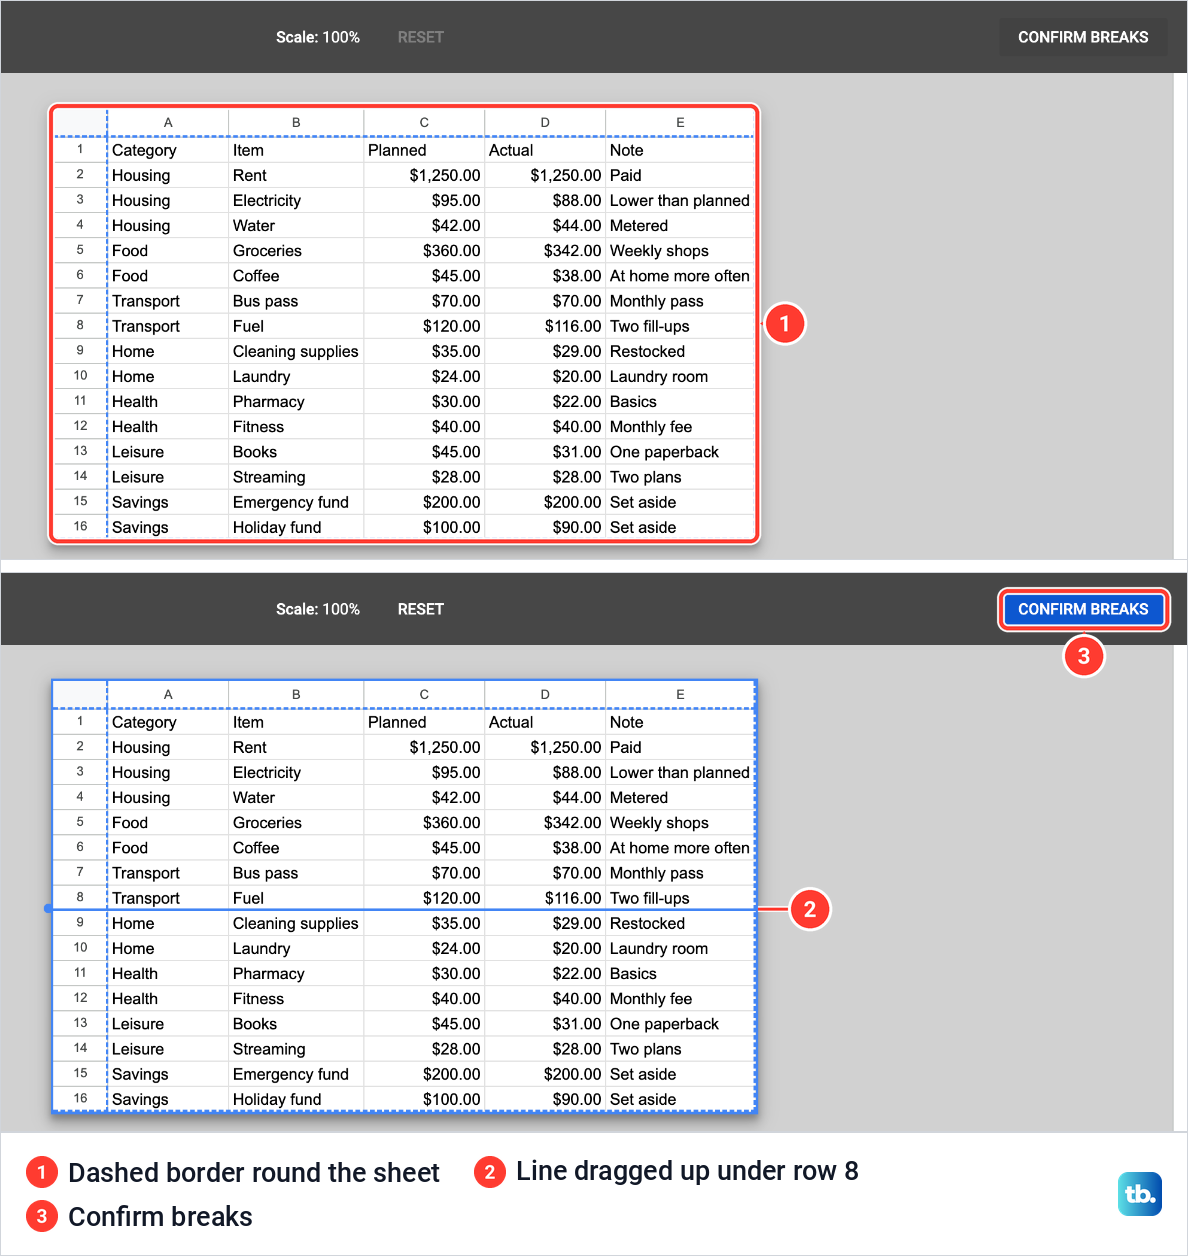
Click Confirm breaks. Back in Print settings the count read Total: 2 pages and page 1 ended at Fuel. Scale had changed by itself to Fit to page breaks (100%), and a Custom page breaks switch had appeared with Edit beside it.
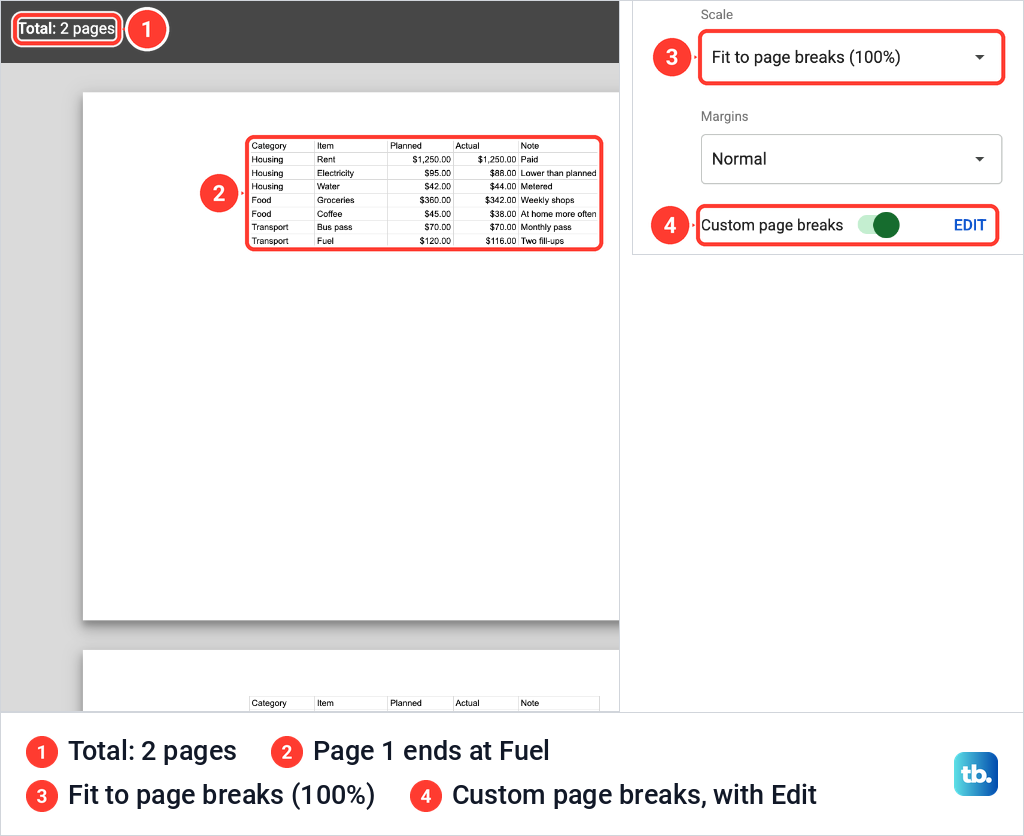
Each block between the lines prints on its own page, so you can keep a group of rows together or end a page at a cleaner spot. To remove a break, open the editor with Edit and point to the break line. An X button appeared at the left end of ours, and one click on it took the break away.
Repeat the heading row on every printed page
Page 2 of a list is hard to read without the column names. Sheets repeats only frozen rows, and Print settings says so: under Headers & footers, Row & column headers reads "Go to View > Freeze to select which rows/columns to repeat on all pages". With nothing frozen, Repeat frozen rows and Repeat frozen columns were both grey.
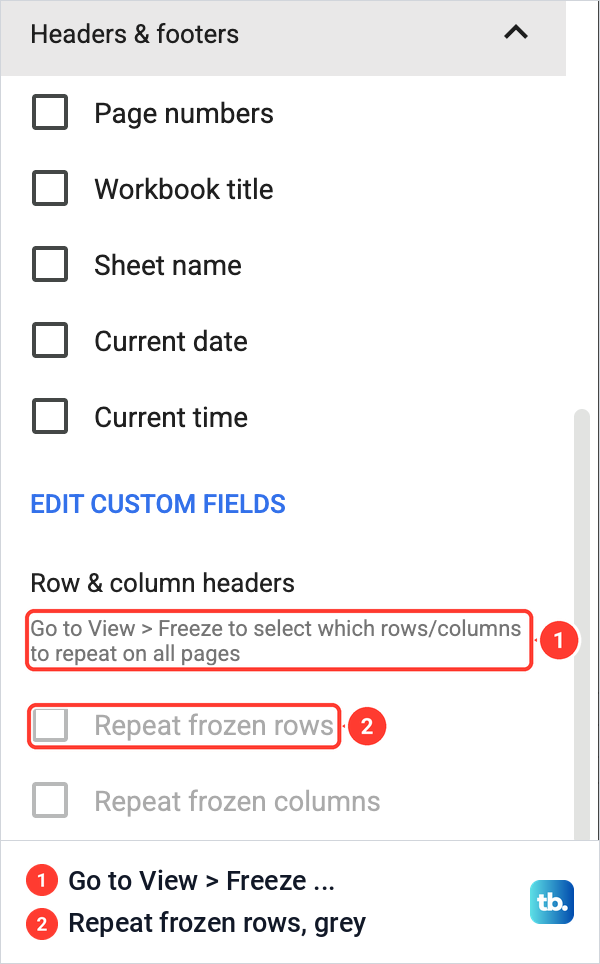
Click Cancel, then choose View > Freeze > 1 row in the sheet. Our guide to freezing a row in Google Sheets covers freezing more than one row and unfreezing. If your list has no heading row yet, the guide to renaming columns in Google Sheets shows how to add one above the data.
We froze row 1 first and then set the page break under row 8. With both in place, page 2 began with Category, Item, Planned, Actual and Note above the rows from Cleaning supplies down. Under Headers & footers, Repeat frozen rows was already ticked, without us touching it.
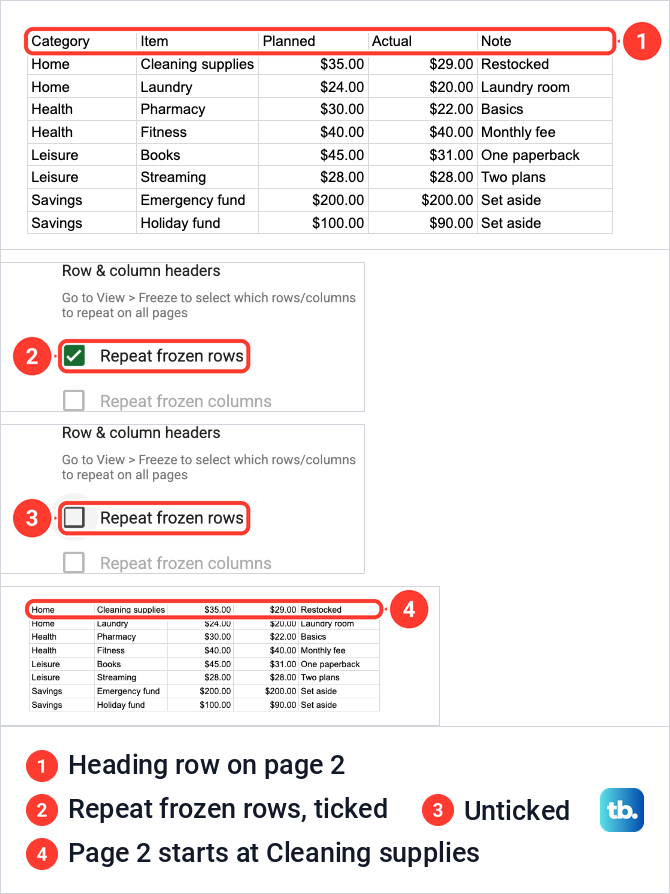
Unticking it put page 2 back to starting at Cleaning supplies with no headings, so leave it ticked. Repeat frozen columns does the same for frozen columns, such as item names on the left of a wide sheet.
What Sheets remembers between prints
This is where Sheets differs most from a saved print area. Next we clicked Cancel, selected A1:D11 again and pressed Command + P. The Print list was back on Current sheet, so Selected cells has to be chosen every time you print.
The page break was remembered. The count still read Total: 2 pages, with the Custom page breaks switch on. Turning that switch off gave Total: 1 page and put Scale back on Fit to width, with Edit greyed out.
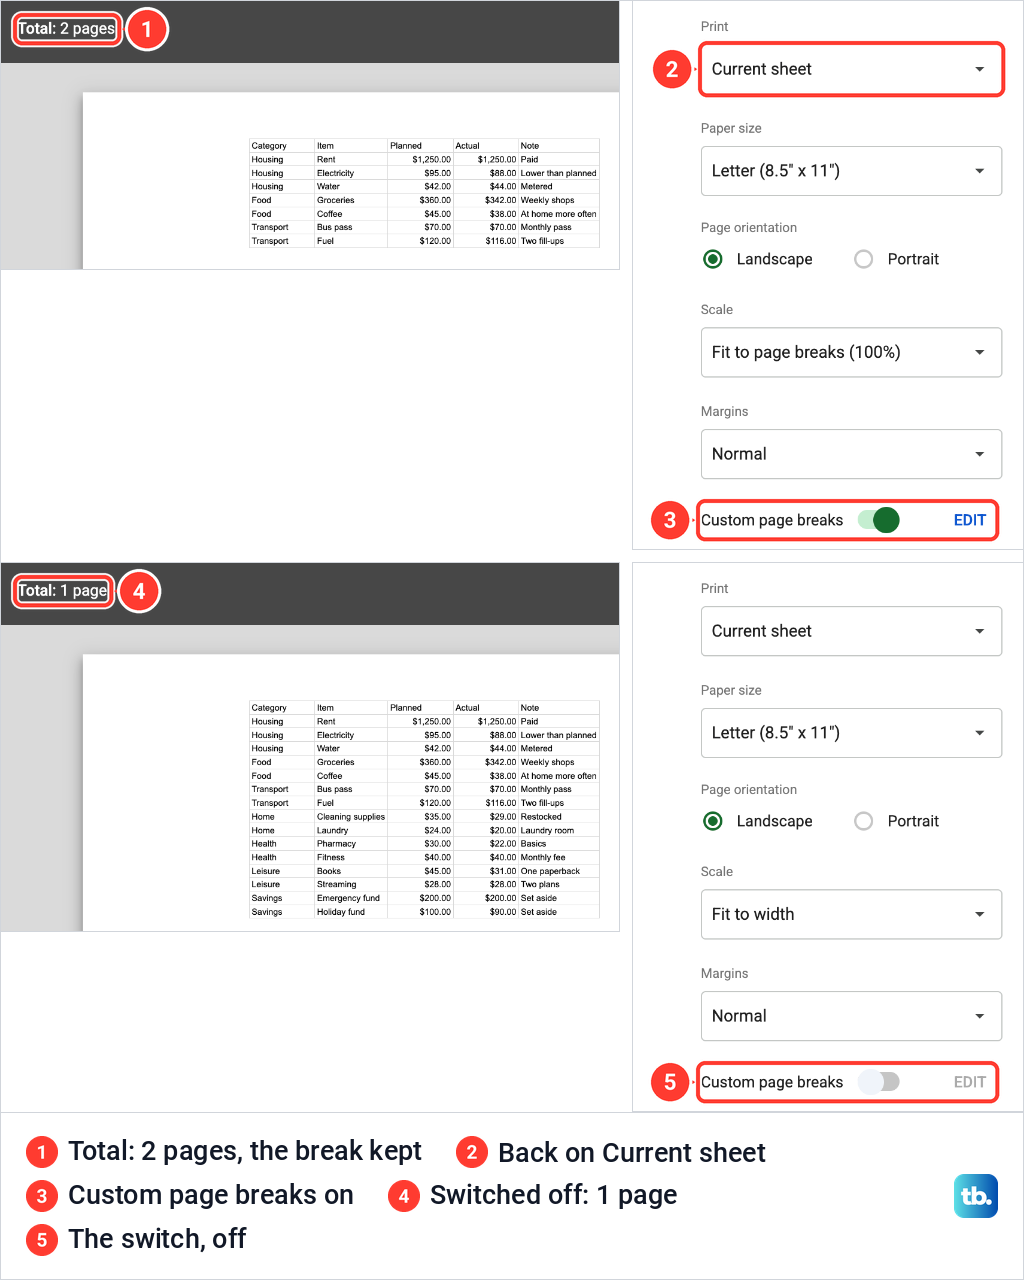
Our page break was still there when we reopened Print, while our Selected cells choice was not. If you print the same block often, make a habit of selecting it first and checking the Print list before you click Next.
Print from the Google Sheets app on a phone
On an Android phone or tablet, open the spreadsheet in the Google Sheets app and tap More. Tap Share & export, then Print. At the top, tap Paper size to choose your print settings, pick the printer and tap Print.
On an iPhone or iPad, open the spreadsheet in the Google Sheets app, tap More, then Share & export > Print. Choose the printer, set your print settings and tap Print. If no printer shows up, follow our steps to connect an iPhone to a wireless printer.
To print only part of a sheet, use Sheets in a browser on a computer, where the Print list offers Selected cells. The steps at the top of this guide cover it.
When the printout is not what you expected
The whole sheet printed although you selected cells. Print settings opened on Current sheet for us every time, selection or not. Open the Print list and choose Selected cells before you click Next.
The text is tiny. A fit option shrinks a wide or long range until it fits the page. Select fewer columns, try Landscape, or set Scale to Normal (100%) or a Custom number and let the printout run onto more pages.
Print is greyed out. The owner of a shared file can stop viewers and commenters from printing, downloading and copying it, and those options then show greyed out. Ask the owner for edit access or for a copy.
The headings are missing from page 2. Freeze the heading row with View > Freeze, then check Repeat frozen rows under Headers & footers. It stays grey until a row is frozen.
A note is cut off at the edge of its column. Our guide to wrapping text in Google Sheets found that wrapped lines carry over to the print preview just as they look on screen. Wrap the column first, then check the preview again.
The preview is right but nothing comes out. That is a printer problem rather than a Sheets one. If your computer shows the printer as offline, fix a printer that shows offline before you print again.
How we tested this guide
We tested this in Google Sheets on the web in Chrome on a Mac, printing a selection, one sheet and the whole workbook of a two-tab budget file up to the print preview.
Frequently Asked Questions
Can Google Sheets save a print area?
No. There is no Set Print Area command, and Selected cells is not remembered: Print settings went back to Current sheet the next time we opened it. A custom page break, by contrast, was still there when we reopened Print.
How do I print only selected cells in Google Sheets?
Select the cells, choose File > Print, open the Print list and choose Selected cells. Check the preview, click Next and print from your browser's print window.
What is the difference between Current sheet and Workbook?
Current sheet prints the tab you are on. Workbook prints every tab, each starting on its own page in our preview, and adds a Selection field that reads All sheets.
Can I use custom page breaks with Selected cells?
Not in our file. Set custom page breaks was grey with Selected cells chosen, and it worked with Current sheet.
How do I print the heading row on every page?
Freeze it with View > Freeze > 1 row, then open File > Print and make sure Repeat frozen rows is ticked under Headers & footers. Ours was ticked already once row 1 was frozen.
Can I print selected cells from the Google Sheets app?
In the app, printing starts from More, then Share & export > Print. To print only part of a sheet, use Sheets in a browser on a computer, where the Print list offers Selected cells.
Why is Print greyed out in Google Sheets?
The file's owner can stop viewers and commenters from printing, downloading and copying it. Ask the owner for edit access or for a copy.