An Apple verification code that will not work leaves you stuck just short of signing in. The next move depends on whether Apple rejects the code, the message never arrives, or the sign-in screen cannot connect. Start with a fresh code, then follow the delivery or connection fixes that match what you see.
Start with a fresh code from a trusted device
A device passcode or recovery code will not work in a field asking for an Apple Account sign-in code.
Confirm that your trusted device and the device you want to sign in on are using the same Apple Account.
Begin signing in again on the destination device or browser.
Open the sign-in notification on an Apple device already trusted for that account.
Select Allow.
Enter the displayed six-digit code on the device or browser where you started signing in.
Use the code supplied for Apple Account sign-in. A recovery contact’s code, a 28-character recovery key, and a code from the Passwords app serve different purposes.
If the notification never arrives
Request a text or automated call when you cannot reach your trusted device but still have access to an existing trusted phone number.
On the verification screen, select Didn’t Get a Code? or Can’t get to your devices?.
Choose text-message delivery to an accessible trusted number.
Enter the code you receive.
If the text does not arrive, return to the delivery options.
Choose a phone call to your trusted number. This also works for a number that receives calls rather than texts.
Answer the automated call.
Enter the spoken code.
If you have another accessible trusted number, choose it from the delivery options. Adding a replacement requires authenticated account access and verification of the new number.
Once you have access, add a backup number through Settings > [your name] > Sign-In & Security > Two-Factor Authentication > Add Trusted Phone Number, also labeled Add a Trusted Phone Number, on iPhone or iPad.
Look for a text hidden by Messages filtering
Open Messages on your iPhone.
Tap the Filter button > Unknown Senders.
Open the Apple message.
Enter its verification code on the sign-in screen.
Choose Mark as Known on the message to keep legitimate future messages visible.
If the message is missing there, open the Filter button > Spam.
Open an incorrectly classified Apple message.
Select Not Spam > Move to Inbox, or Move to Inbox and Report Not Spam. Available spam controls vary.
For an enabled third-party text filter, open Messages and tap the Filter button > Manage Filtering > Text Message Filter.
Inspect that extension’s Transactions or Promotions folders for the code. Folder names depend on the extension.
To receive verification-text alerts through unknown-sender screening, open Settings > Apps > Messages > Unknown Senders > Allow Notifications.
Turn on Time Sensitive. These notification categories particularly apply in the United States, Brazil, and India.
Check the message folders directly even when no notification appears.
A trusted Mac can generate a code offline
A Mac already trusted for your account generates codes offline; accounts using Security Keys need the alternative in the final step.
- 1.Open System Settings and select [your name].
- 2.Select Sign-In & Security.
- 3.Open Two-Factor Authentication.
- 4.Click Get a Verification Code.
- 5.Enter the generated code in the destination’s sign-in prompt.
- 6.If your account uses Security Keys, the code-generation option is absent. Connect or tap a registered security key when prompted, or bring a trusted, signed-in iPhone or iPad nearby and follow both devices’ prompts.
When texts or automated calls cannot reach you
Use these fixes for delivery trouble involving poor cellular reception, multiple SIMs, or silenced calls. They address missing messages and alerts, not a code Apple has already rejected.
Open Settings > Cellular.
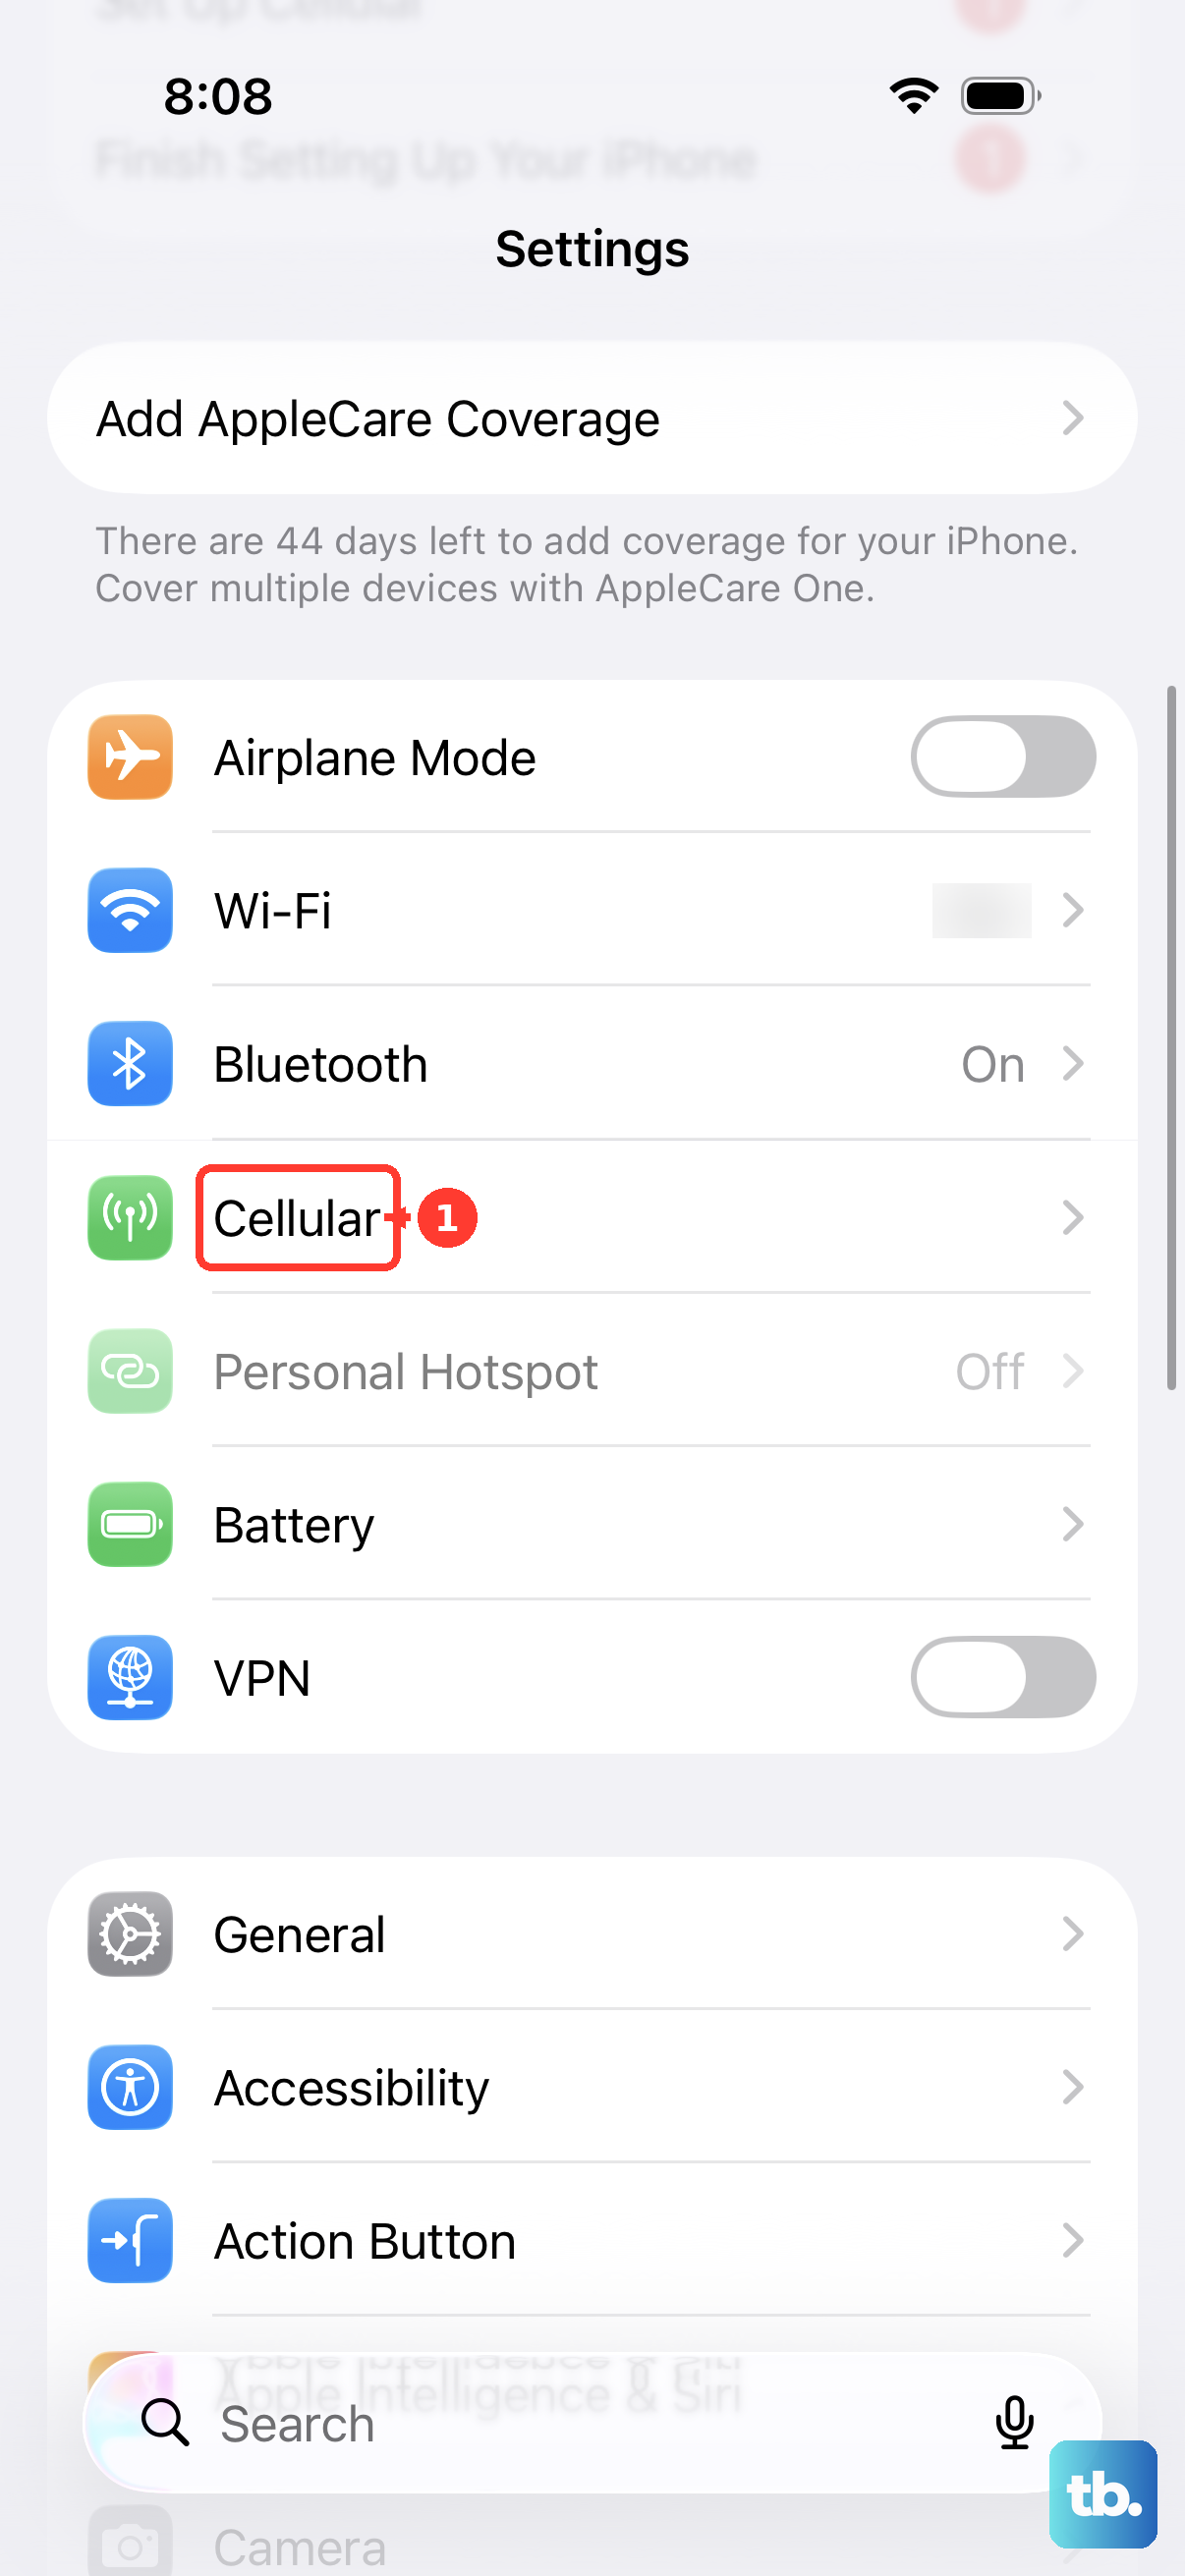
Select the line associated with your trusted number.
Turn that line on if it is off. Working iMessage does not replace working SMS service.
With a compatible iPhone and carrier, open Settings > Cellular > Wi-Fi Calling. For multiple SIMs, select [your line] before opening Wi-Fi Calling.
Turn on Wi-Fi Calling on This iPhone, also labeled Wi-Fi Calling on This Phone.
Tap Enable.
Confirm the emergency address if requested. Supported carriers carry both calls and SMS over Wi-Fi Calling.
For an automated call that does not ring, open Settings > Apps > Phone > Screen Unknown Callers.
Select Never.
Check the Phone app’s Filter button > Unknown Callers or Spam for filtered calls. The filter is in Recents in Classic view or Calls in Unified view.
If Focus is silencing alerts, open Control Center.
Tap the highlighted Focus, such as Do Not Disturb.
Tap it again to turn it off.
Request the verification call again.
Contact your carrier if the trusted line still cannot receive SMS.
Connection trouble at the verification screen
A screen that spins continuously or cannot reach the server calls for connection troubleshooting.
Open Apple’s System Status page to check for iCloud outages or maintenance.
If there is an outage, try signing in later.
Without an outage, connect to a different internet network.
Retry sign-in.
When signing in away from Wi-Fi on a cellular-capable iPhone or iPad, open Settings > Cellular or Mobile Data.
Enable cellular data if it is off. Sign-in needs a strong internet connection.
If the device’s clock is incorrect, connect to the internet.
Open Settings > General > Date & Time.
Turn on Set Time Automatically, also labeled Set Automatically.
For the time zone, open Settings > Privacy & Security > Location Services > System Services.
Turn on Setting Time Zone.
Restart if notified that time-zone information was updated.
If a VPN or security app is interfering with connectivity, open that app.
Disable its network features for a test. Controls depend on the app.
Restart after the change.
On a work-managed device, consult your organization about managed settings.
For continuing iCloud sign-in trouble on iPhone or iPad, back up the device.
Connect it to power and Wi-Fi.
Open Settings > General > Software Update.
Tap Download and Install if an update is offered.
Repair a Safari sign-in page that will not respond
For a webpage that fails despite correct credentials, use the Mac steps first or the final two steps for iPhone and iPad.
- 1.On Mac, reload through View > Reload Page, or press Command-R.
- 2.Test sign-in in File > New Private Window.
- 3.If private browsing works, open Safari > Settings > Privacy > Manage Website Data. Select the affected website, click Remove, then Done.
- 4.Retry sign-in in a normal window.
- 5.On iPhone or iPad, open Settings > Apps > Safari > Advanced and turn on JavaScript if it is off.
- 6.On iPhone, review Settings > Apps > Safari > Advanced > Block All Cookies and turn blocking off if enabled. Blocked cookies interfere with sign-in.
Account recovery when your trusted devices are gone
If you will regain access to a trusted device or phone number soon, wait and sign in with it. Apple identifies this as faster than starting account recovery for a temporary loss of access.
When access is permanently lost, select Didn’t Get a Code? or Can’t get to your devices? at sign-in.
Choose Can’t use [phone number].
Follow the account-recovery instructions. Recovery availability depends on your account’s security configuration.
If you previously set up a recovery contact, begin recovery.
Verify the requested account information.
Ask your contact to open Settings or System Settings > [their name] > Sign-In & Security > Recovery Contacts > Account Recovery For > [your name] > Get Recovery Code.
Enter their code in the recovery flow. It is not a replacement for the routine sign-in code.
For standard recovery started on the web, turn off Apple devices signed in to your account during the wait. Account activity can cancel the request. For recovery started on a device running iOS or iPadOS 17 or later, or macOS 27 or later, Apple permits continued use of the initiating device.
Keep the existing recovery request active without submitting duplicate requests. Apple Support cannot shorten the wait.
Check recovery status at iforgot.apple.com using the same account information you originally supplied.
If the final text or automated call does not arrive after the completion time in your confirmation email, visit apple.com/recover to finish.
If recovery does not restore access, try the route matching your account alert. Choose Request Access for a locked or inactive account, or Continue for a disabled Media & Purchases account. For security-related disablement, reset the password using Settings or System Settings > [your name] > Sign-In & Security > Change Password on a trusted device.
Frequently Asked Questions
Can I turn off two-factor authentication to get past the code screen?
Apple does not provide a general off-toggle for established two-factor accounts. Accounts created with two-factor authentication cannot remove it. For eligible accounts within two weeks of optional enrollment, Apple offers a link in the enrollment-confirmation email to restore the previous security settings.
Why did my verification text disappear after I used AutoFill?
When Delete After Use is enabled, Apple deletes verification messages after AutoFill uses them. On iPhone, open Settings > General > AutoFill & Passwords. Turn off Delete After Use to retain used messages. This changes message retention, not code validity.
What if the verification message should arrive by email?
Email verification is separate from the six-digit sign-in code. Search your email for Apple. Check Spam, Junk, Trash, Deleted Items, and Archive. Check the recorded email address for spelling errors. Allow mail from email.apple.com. With account access, sign in at account.apple.com and choose Resend beside the email address being verified.
Should I put an Apple verification code into a third-party app’s password field?
For third-party apps accessing iCloud data through password-based authentication, use an app-specific password. At account.apple.com, open Sign-In and Security > App-Specific Passwords > Generate an app-specific password. Follow the prompts, then paste the generated password into the app’s password field. Supported apps also offer Apple Account authorization: enter your Apple Account email address, complete Apple’s authentication prompts, and select Allow.