

To create a rule in Outlook, right-click a message and choose Rules > Create Rule in classic Outlook for Windows, or open Settings > Mail > Rules and select Add rule in Outlook on the web. Pick a condition, such as words in the subject, then an action, such as moving the message to a folder, and save it.
From then on the rule handles matching mail as it arrives, so you set up a rule in Outlook once and stop filing the same messages by hand. By default it leaves the messages already in your Inbox where they are. Our two older matching messages stayed put until we ran the rule on them, which takes one more step covered below.
The steps differ between classic Outlook, new Outlook for Windows, Outlook on the web and Outlook for Mac, and only classic Outlook can run rules that need the app itself to be open. The table shows where each one starts, and each version has its own section below.
The short version
- Classic Outlook, quick rule: right-click a message, choose Rules > Create Rule, tick a condition and Move the item to folder.
- Classic Outlook, full rule: File > Manage Rules & Alerts > New Rule opens the Rules Wizard, with templates and exceptions.
- Outlook on the web: Settings > Mail > Rules > Add rule, then a condition, an action and an optional exception.
- Older mail: rules act on new mail by default, so use Run Rules Now or Run rule now for what is already in the Inbox.
- Order matters: a rule with Stop processing more rules keeps the rules below it from acting on the same message.
Where to make a rule in each version of Outlook
Every version builds the same kind of rule, a condition plus an action, but each starts it from a different place. Classic Outlook has a quick box for simple rules and a wizard for everything else.
| Outlook version | Where to start | Best for |
|---|---|---|
| Classic Outlook, from a message | Right-click a message > Rules > Create Rule | A sender, subject or recipient rule that moves mail to one folder |
| Classic Outlook, Rules Wizard | File > Manage Rules & Alerts > New Rule | Templates, several conditions and actions, exceptions, rules for mail you send |
| Outlook on the web and Outlook.com | Settings > Mail > Rules > Add rule | A named rule with conditions, actions and exceptions |
| New Outlook for Windows | Right-click a message > Rules > Create rule | A sender to folder rule, or More options for the full editor |
| Outlook for Mac | Outlook menu > Settings > Rules > +Add Rule | Server rules for incoming mail |
Make the rule in the mailbox you want sorted, starting from a message in that mailbox's Inbox. Create the destination folder first if it does not exist yet. In classic Outlook we right-clicked the Inbox, chose New Folder and typed a name in the box that opened in the folder list, and on the web the same menu says Create new subfolder. Our guide shows how to create a new folder in Outlook step by step.
Create a quick rule from a message in classic Outlook
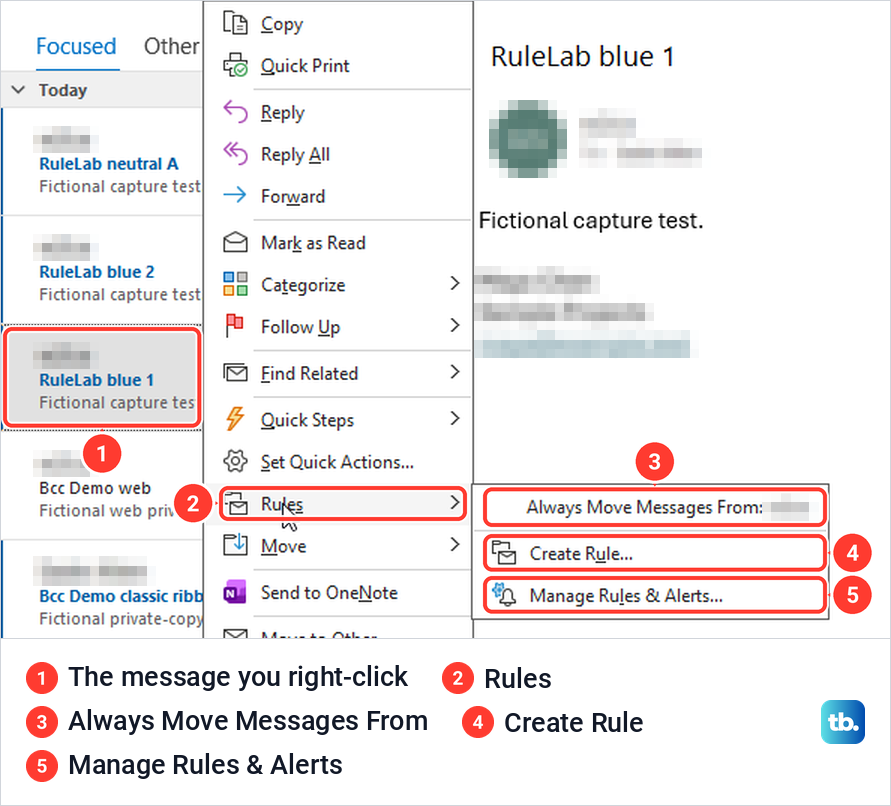
Right-click a message like the ones you want to sort and point to Rules. The submenu has three commands: Always Move Messages From followed by the sender's name, Create Rule and Manage Rules & Alerts. Choose Create Rule to pick the condition yourself.
The Create Rule box has two halves. The top half lists the conditions: From with the sender, Subject contains with the message's subject already typed in, and Sent to. Under Do the following it offers Display in the New Item Alert window, Play a selected sound and Move the item to folder, and on our screen nothing was ticked, so the prefilled subject does nothing until you tick its box.
Tick Subject contains and cut the text down to the words every message you want to catch shares. Our test messages were called RuleLab blue 1 and RuleLab blue 2, so we kept RuleLab blue. Because the heading asks for all of the selected conditions, ticking From as well would limit the rule to messages that match both.
Now tick Move the item to folder. A Choose a folder list opened straight away, with a New button for making a folder on the spot. We picked RuleLab Blue under the Inbox, clicked OK, and then clicked OK again in Create Rule.
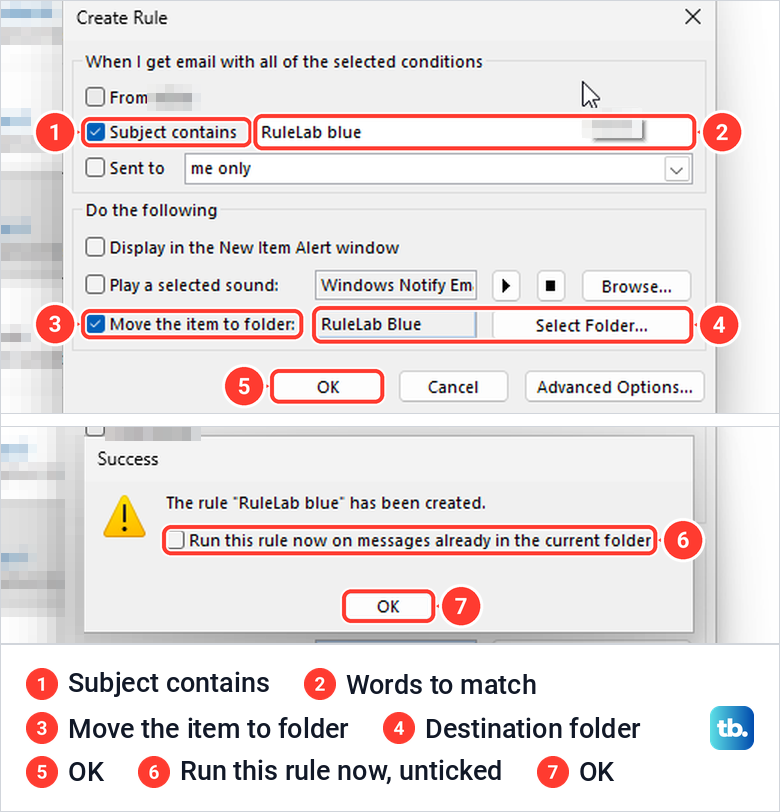
Outlook then showed a Success box saying the rule had been created, with a Run this rule now on messages already in the current folder option that was not ticked. We left it clear, and the two older RuleLab blue messages stayed in the Inbox. Tick it when you want the messages you already have sorted as well.
Leave Display in the New Item Alert window and Play a selected sound alone unless you need them. Microsoft gives playing a sound as its example of a client-only rule, one that only works while classic Outlook is running, which is explained further down.
Check what the rule will do in Rules and Alerts
To see what Outlook actually saved, open File, and on the Info page select Manage Rules & Alerts. Each rule is a row with a tick box, the arrows above the list change the order, and the Rule description box spells out the selected rule in plain words.
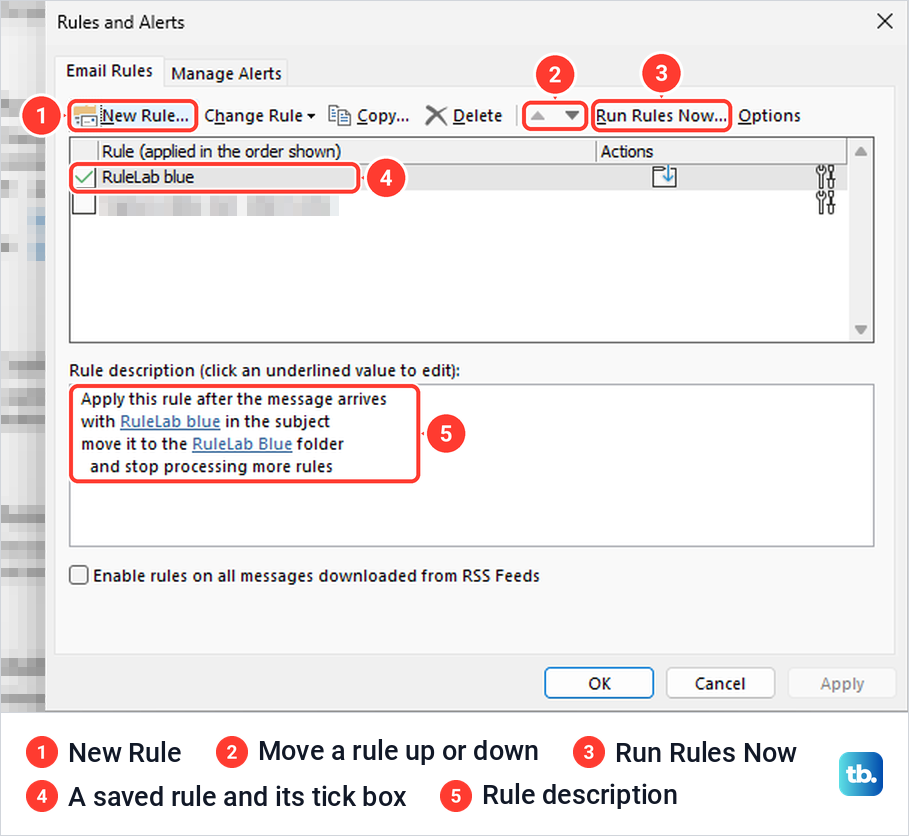
Read that description once. Ours said apply this rule after the message arrives, with RuleLab blue in the subject, move it to the RuleLab Blue folder, and stop processing more rules, although the Create Rule box never offered that last part. Microsoft says classic Outlook creates rules with stop processing set by default unless you add exceptions, and the section on rule order explains why it matters.
Run a rule on messages already in your Inbox
By default, a rule works only on mail that arrives after you save it. Microsoft's help says this for new Outlook, and our classic rule behaved the same way, leaving the older mail in the Inbox until we ran the rule by hand.
In classic Outlook, open File > Manage Rules & Alerts and click Run Rules Now. Tick the rule under Select rules to run, and check that Run in Folder shows the folder that holds the old messages; Browse picks another one. Tick Include subfolders if the messages are spread across folders inside it.
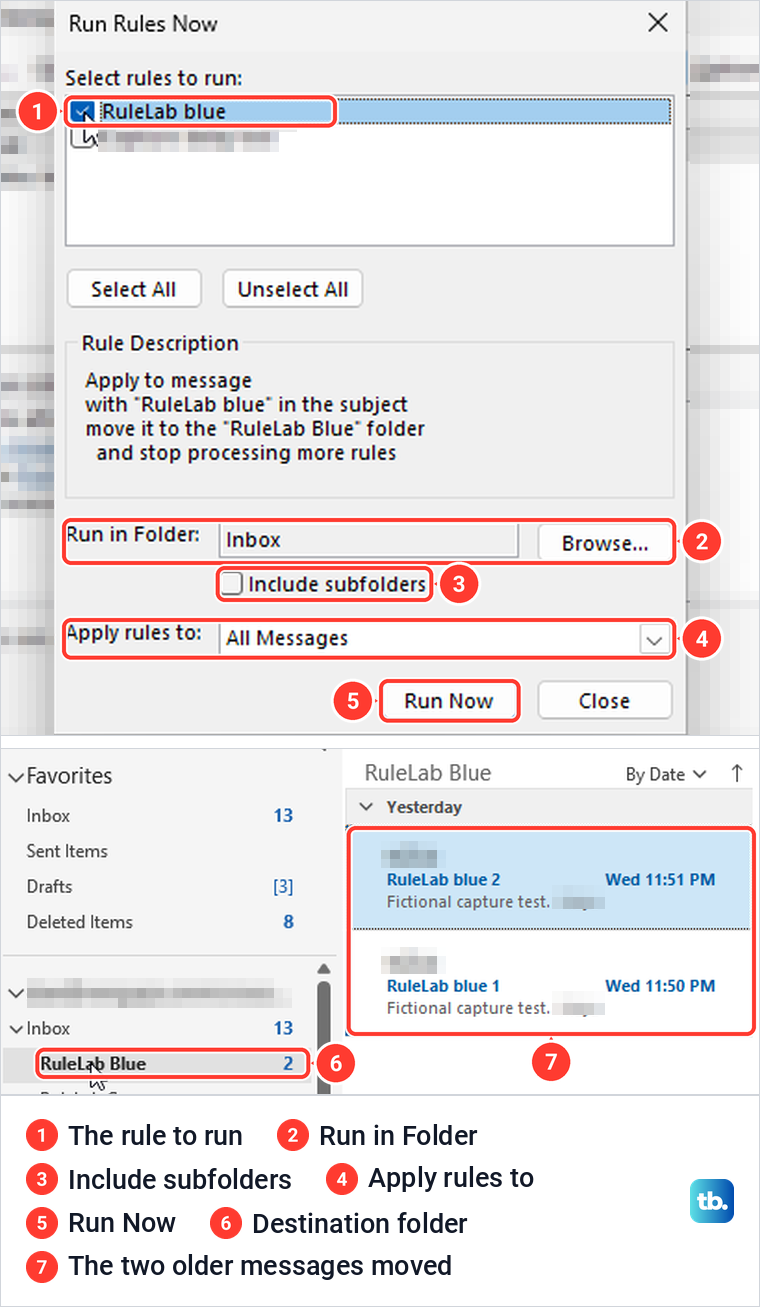
Our Apply rules to box was set to All Messages, which Microsoft says you can change to read or unread messages. After we clicked Run Now, both older RuleLab blue messages were in the RuleLab Blue folder, which had been empty before.
If you only need a handful of messages moved once, a rule is more than you need. You can select multiple emails in Outlook and drag them to the folder instead.
On the web, the rule editor has a Run rule now box below the rule's settings, and a saved rule's More options menu has a Run rule now command too. Microsoft's steps for new Outlook use the same page, Settings > Mail > Rules, with a run button next to each rule.
Build a custom rule with the Rules Wizard
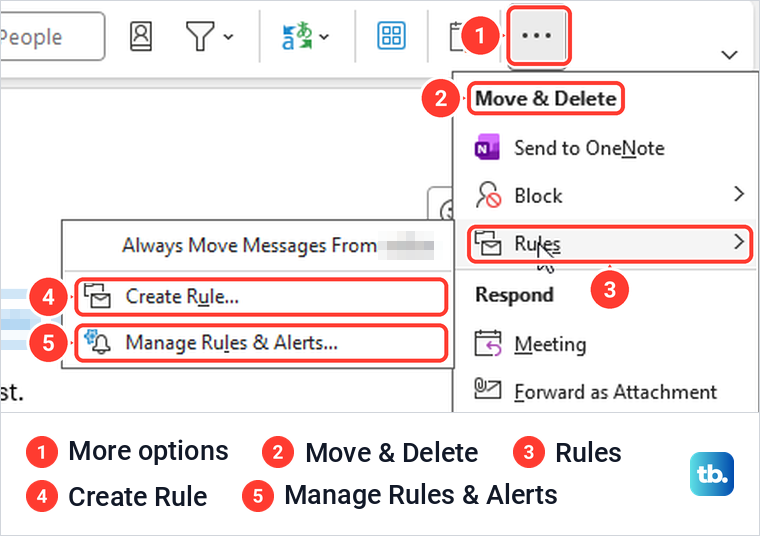
For several conditions, exceptions or a ready-made template, use the Rules Wizard. Open File > Manage Rules & Alerts and click New Rule. You can also start from the ribbon: on our Simplified Ribbon, Rules was not on the Home bar, so click More options, the three dots at its right end, and point to Rules under Move & Delete to find Create Rule and Manage Rules & Alerts.
Step 1 lists templates under Stay Organized and Stay Up to Date, such as Move messages from someone to a folder and Flag messages from someone for follow-up. Under Start from a blank rule, the first option builds a rule for incoming mail from scratch, while the second, for messages you send, is where Microsoft starts rules for outgoing mail, such as copying someone in on every message.
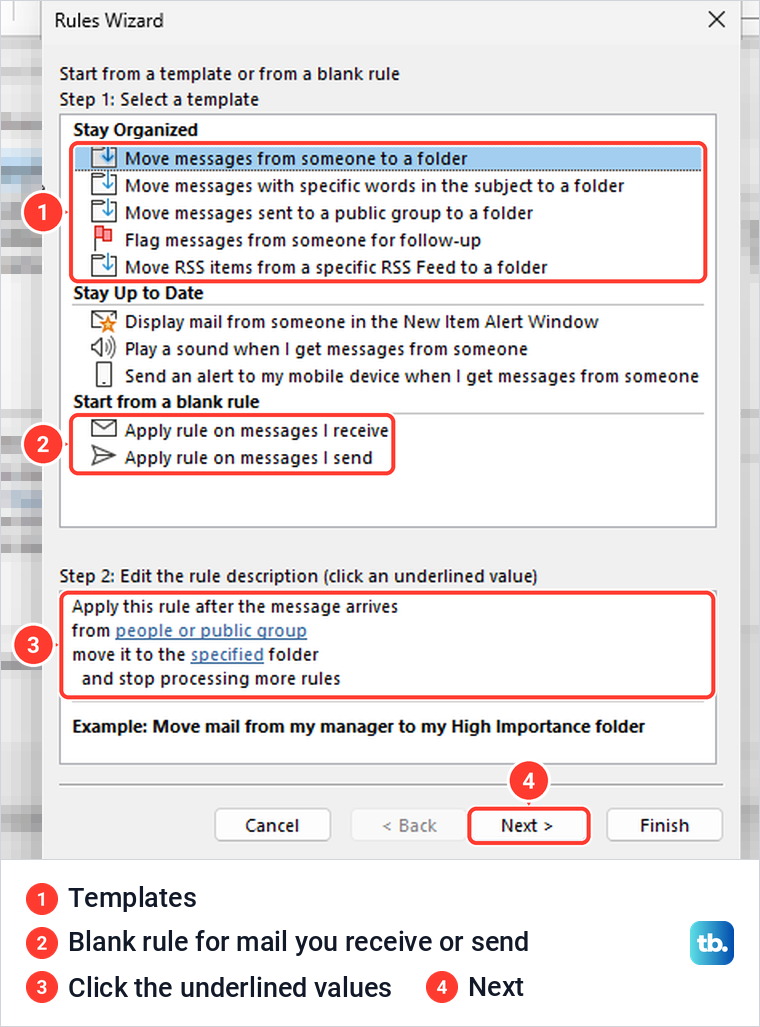
Step 2 at the bottom of each page shows the rule so far, and every underlined value is a link you click to fill in. We chose Flag messages from someone for follow-up, clicked people or public group to pick the sender in the Rule Address box, and clicked follow up at this time, which opened a Flag Message box set to Follow up and Today.
Click Next to move through the conditions, the actions and the exceptions. Each page is a list of tick boxes, and the actions page also offers reply using a specific template and stop processing more rules.
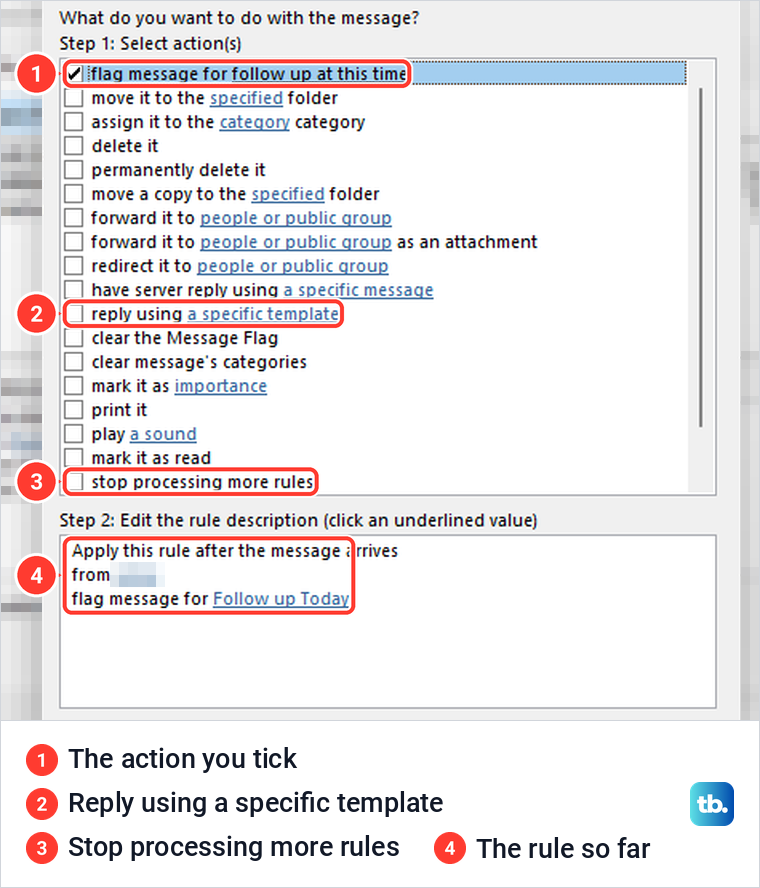
A reply action sends something you prepared earlier, so create an email template in Outlook before you pick reply using a specific template. For replies while you are away, set up out of office in Outlook instead, since that feature is built for the job.
The exceptions page lists the same kinds of tests, each starting with except if, such as except if the subject contains specific words. Tick one and click its underlined value to fill it in, the same way as the conditions.
The last page, Finish rule setup, names the rule after the sender by default, so type a name you will recognise later. Turn on this rule was ticked and Run this rule now on messages already in "Inbox" was not, while Create this rule on all accounts was greyed out for us. Click Finish.
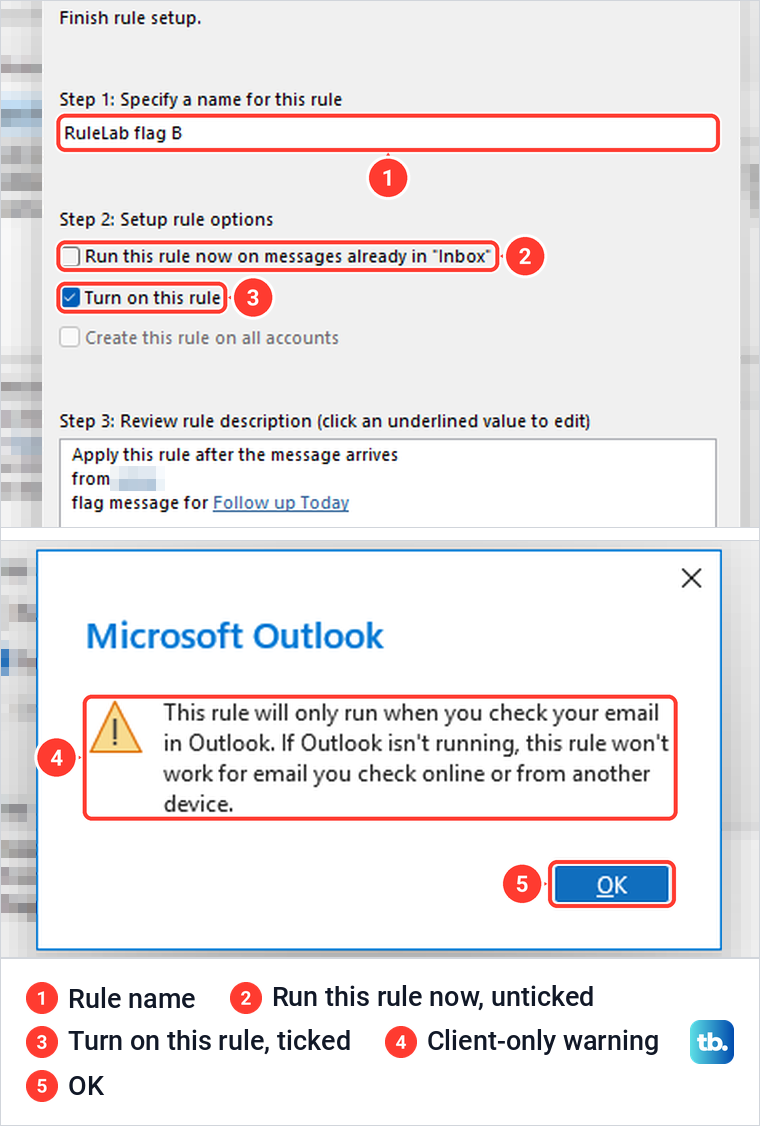
Our follow-up rule then raised a warning that it would only run when we checked email in Outlook, and that it would not work for email checked online or from another device while Outlook was not running. The list now showed it as RuleLab flag B (client-only), and the next message from that sender arrived flagged while classic Outlook was open.
Why some rules only run when Outlook is open
Microsoft splits rules into two kinds. Server-side rules are handled by the mail server whether or not Outlook is open, while client-side rules use an Outlook feature and don't run until you log into classic Outlook for Windows with the account that made them. Only classic Outlook supports both, and new Outlook, Outlook on the web and Outlook.com run server-side rules only.
Flag message for follow up at this time is on Microsoft's list of actions that make a rule client-side, which matches the warning we got. The same list includes conditions such as specific words in the subject, yet our quick Subject contains rule carried no client-only label in Rules and Alerts. Check that label rather than guessing.
If you rely on a client-only action, keep classic Outlook running, and if new Outlook will not run it, you can switch back to classic Outlook. Microsoft says a client-side rule carried over from classic Outlook shows This rule can't be edited or viewed in new Outlook and on the web, and the fix there is to create a new rule to replace it.
Create a rule in Outlook on the web
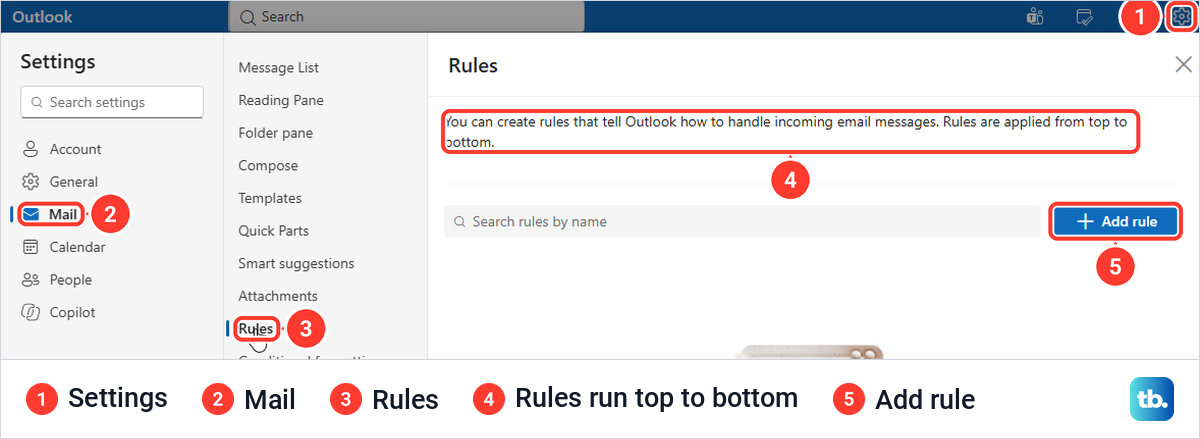
In Outlook on the web, make the folder first if you need one by right-clicking Inbox and choosing Create new subfolder. Then select Settings, the gear at the top right, and choose Mail and then Rules. The page says rules are applied from top to bottom, and its button reads + Add rule, which Microsoft's help page calls Add new rule. With a personal Outlook.com or Hotmail account, Microsoft's steps are the same: Settings > Mail > Rules, then Add new rule.
The new rule opens as numbered steps: Name your rule, Add a condition, Add an action and Add an exception, with Stop processing more rules already ticked. Type a name, then open the condition list, which is grouped under headings such as People, Subject, Keywords and Marked with. We picked Subject includes and typed RuleLab web in Enter words to look for, and the words turned into a tag under the box.
Under Add an action, choose Move to and pick the folder. The folder list had a search box, recent folders and a Create a new folder option. Once a folder was chosen, a note said the messages will be moved without notifying, with a Set notification menu beside it, and Microsoft says a work or school account can turn on such notifications.
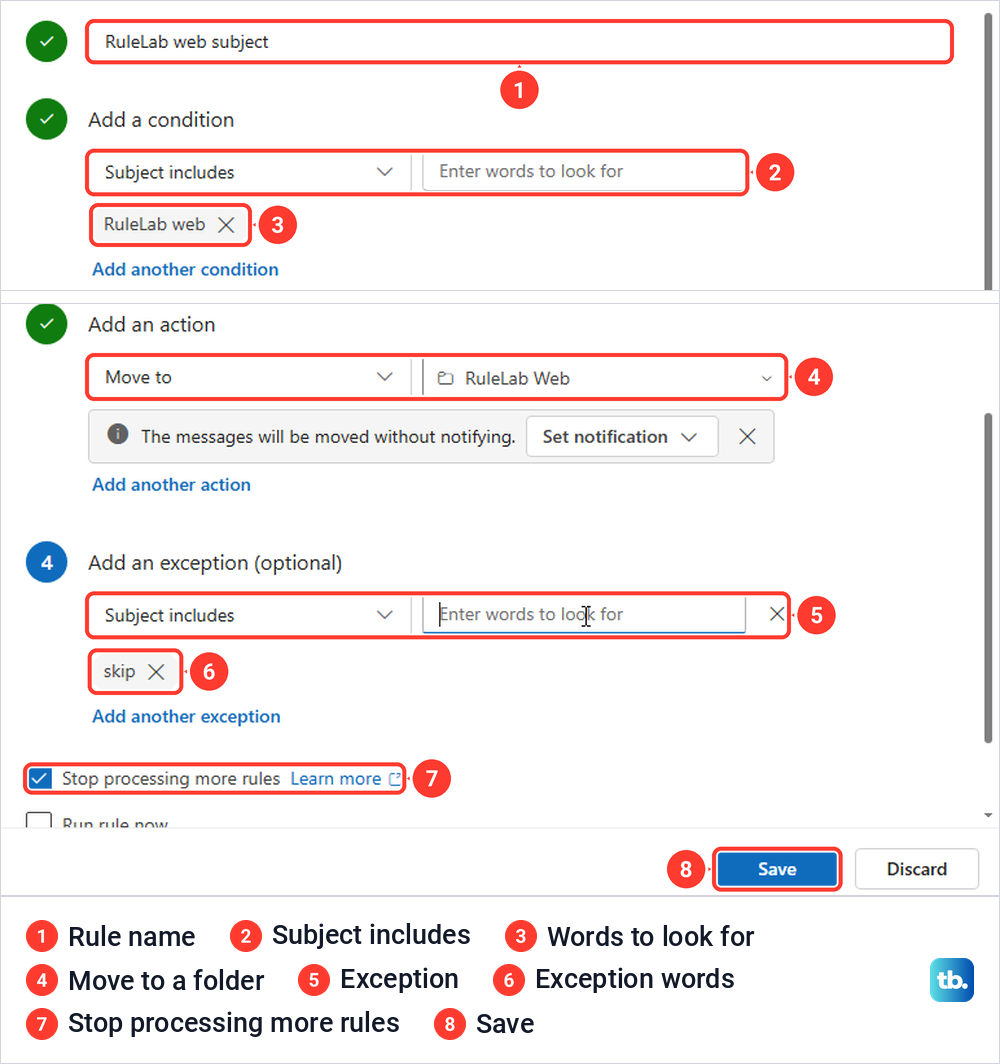
Add an exception (optional) works the same way. We chose Subject includes and typed skip, so a message whose subject also contained skip would stay in the Inbox. A Run rule now box sat below Stop processing more rules, and we left it clear and selected Save.
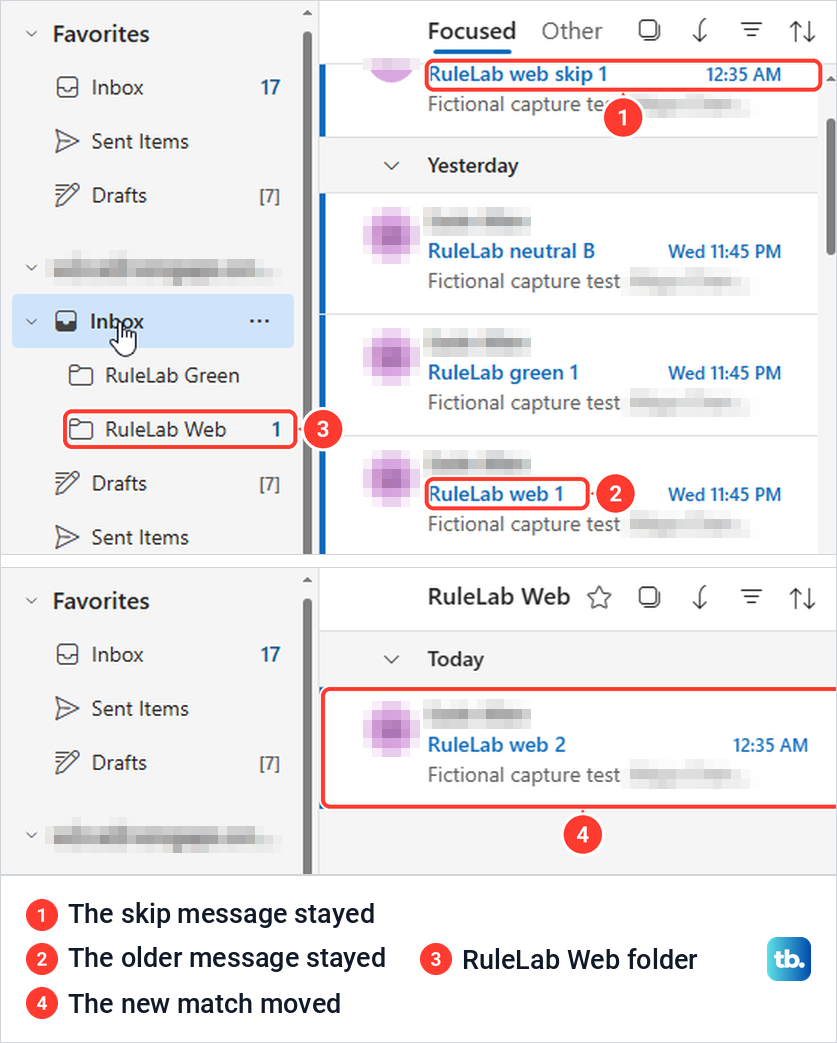
The next RuleLab web message went straight to the RuleLab Web folder. The one with skip in its subject stayed in the Inbox, and so did RuleLab web 1, which had arrived before the rule existed.
Right-clicking a message showed a Rules submenu rather than a Create rule command at the top level. Microsoft's steps for new Outlook and Outlook.com put Create rule inside that Rules submenu for a quick sender to folder rule, and Settings > Mail > Rules > Add rule opens the full editor used above.
Create a rule in new Outlook for Windows
In new Outlook for Windows, Microsoft's quickest route starts from a message. Right-click it, hover over Rules and select Create rule, choose the folder that mail from that sender should go to, and select OK. Microsoft says the rule is then applied to all incoming messages.
For anything beyond a sender and a folder, select More options instead. Microsoft says every rule needs at least a name, a condition and an action, can carry exceptions and a Stop processing more rules box, and is created with Save. To edit, reorder, run or turn off a rule later, open Settings > Mail > Rules.
Microsoft also says new Outlook does not support rules for third-party accounts like Gmail, Yahoo and iCloud, so set those up in the provider's own settings. Rules that need classic Outlook running will not work here, as explained above.
Rule order and Stop processing more rules
Outlook checks rules from the top of the list down. Microsoft's description of Stop processing more rules is plain: subsequent rules will be ignored, even if they apply to the message. With it on, a message that matches two rules gets only the first one.
On the web, Stop processing more rules was ticked on our new rule by default. In classic Outlook it depended on how the rule was made, because our quick move rule's description ended with and stop processing more rules while the flag rule from the wizard template did not include it. Read each rule's description rather than assuming.
To make a narrow rule win over a broad one, Microsoft's advice is to put the specific rule higher in the list and give it Stop processing more rules. Move a rule with the up and down arrows above the classic list, or with the arrows and the More options menu on the web.
Turn off, change or delete a rule
In classic Outlook, untick the rule's box in Rules and Alerts and click OK to pause it without deleting it. We did this with our subject rule, and the next RuleLab blue message stayed in the Inbox. After we ticked the rule again, the next one went straight to RuleLab Blue.
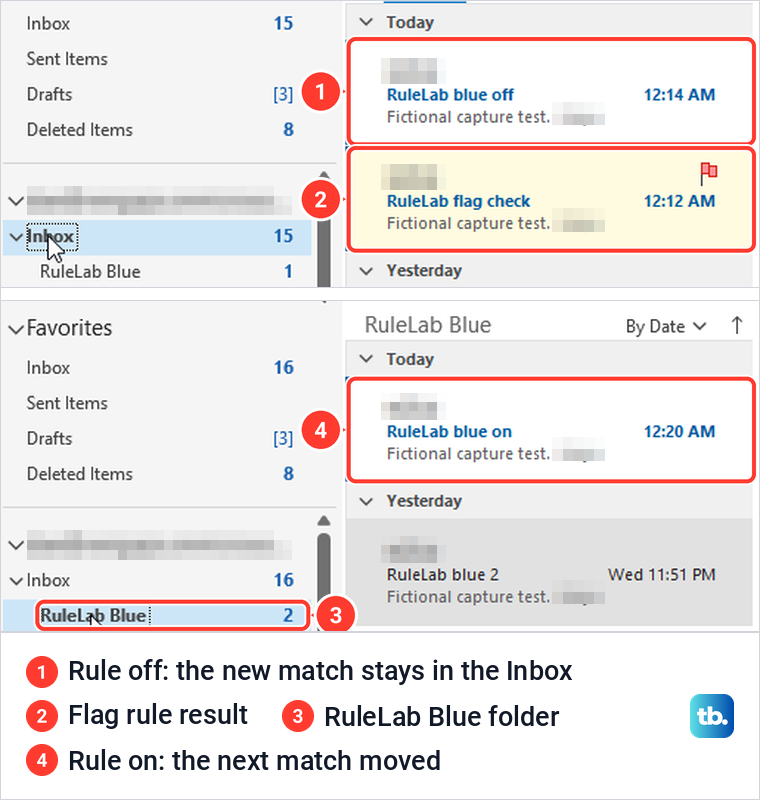
One thing caught us out. When we reopened Rules and Alerts, the rows were in a different order, and ticking the second row, where our rule had been, turned on a different rule. Read the rule's name before you tick or untick anything.
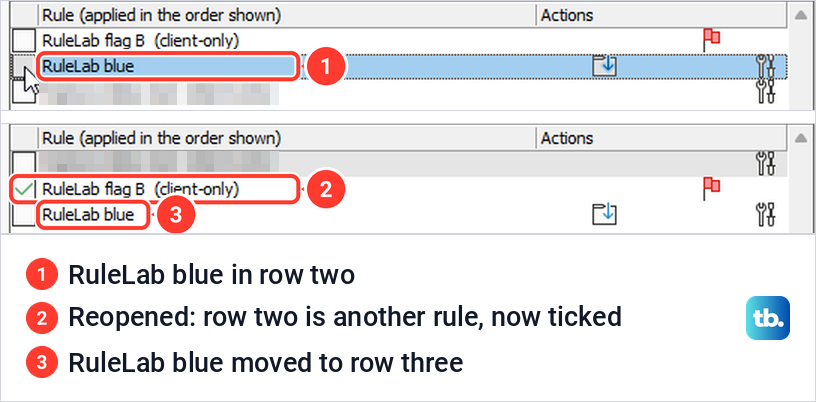
To change a rule in classic Outlook, select it and click Change Rule or an underlined value in its description, and to remove it, select it and click Delete. Microsoft says a broken rule is highlighted in red and labeled Error, and the fix is to tick it and edit the links in its description.
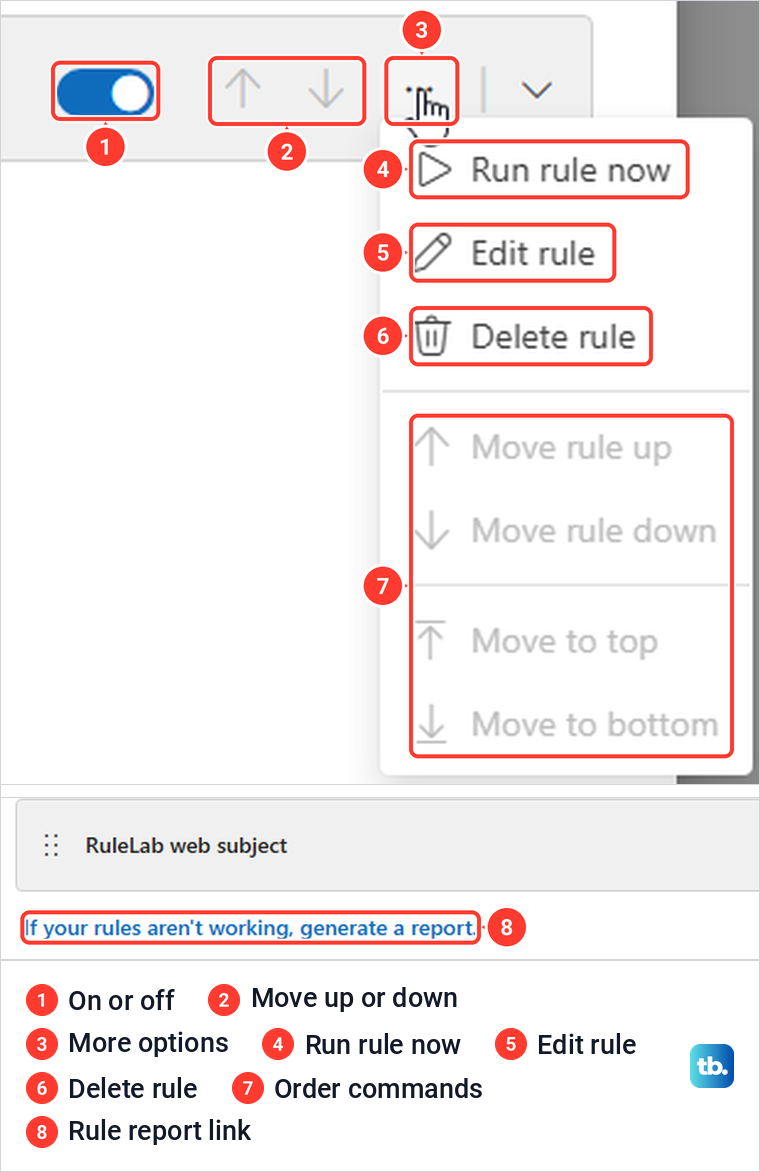
On the web, each saved rule has a switch to turn it on or off, up and down arrows, and a More options button. Its menu holds Run rule now, Edit rule, Delete rule and four commands to move the rule, and a link under the list offers to generate a report if your rules aren't working.
Create a rule in Outlook for Mac
In Outlook for Mac, Microsoft's steps start from the Outlook menu. Select Settings, then Rules in the side pane, then +Add Rule, name your rule, and select a condition and an action, adding an exception if you need one. Microsoft says you can only create server rules in Outlook for Mac, and that Stop processing more rules is on by default.
If a rule does not move a message
Start with the simple causes. Check that the rule is ticked or switched on, that the message arrived after you saved it, and that its subject or sender really matches the words in the condition and not an exception.
Then look at the order. An earlier rule with Stop processing more rules can take the message first, and a client-only rule in classic Outlook only acts while Outlook is running, as its warning says. If new messages are not showing up anywhere, check why Outlook is not receiving emails before changing the rule.
If the goal is to keep a sender out rather than file their mail, you can block unwanted senders in Outlook.com instead of building a rule. For a rule that is switched on and still fails after these checks, our guide to fix an Outlook rule that is not working goes through the remaining causes.
How we tested this guide
We tested this in classic Outlook for Microsoft 365 on Windows 11, version 25H2, and Outlook on the web in Microsoft Edge, moving sample messages into folders by subject.
Frequently Asked Questions
Can an Outlook rule move emails already in my Inbox?
Yes, but by default it does not. In classic Outlook, tick Run this rule now when you create it or use Run Rules Now later, and on the web use the Run rule now box or the saved rule's More options menu.
Why does my Outlook rule only work when Outlook is open?
It is probably a client-only rule, which classic Outlook labels in Rules and Alerts. Our flag for follow-up rule was one, and Outlook warned that it would only run when we checked email in Outlook.
Why did only one of my rules run?
Outlook runs rules from the top, and a rule with Stop processing more rules stops the ones below it for that message. Move the more specific rule up, or clear that option on the earlier rule if both should run.
How do I keep some matching messages in the Inbox?
Add an exception to the rule. Our web rule moved new messages with RuleLab web in the subject but left the one that also had skip in it.
Can I make rules for a Gmail account in new Outlook?
Microsoft says new Outlook does not support rules for Gmail, Yahoo or iCloud accounts. Set up the filter in that provider's own settings instead.
Where is Create rule in Outlook on the web?
On our screen, right-clicking a message showed a Rules submenu rather than Create rule at the top level, and Microsoft's steps put Create rule inside that submenu for a quick sender to folder rule. Settings > Mail > Rules > Add rule opens the full editor.
Is there a limit to how many Outlook rules I can have?
Microsoft says there isn't a maximum number of rules, but the rules share a size limit in Exchange Online mailboxes, 256 KB in total, which an administrator can lower. The limit applies only to rules that are turned on, so switching off rules you no longer use frees space.