
To create a fillable form in Word, show the Developer tab under File > Options > Customize Ribbon, type your questions, and insert content controls where the answers go. Then select Developer > Restrict Editing, choose Filling in forms and start enforcing it, so people can fill in the fields but cannot change the questions. Save it as a normal .docx to send, or as a Word Template to reuse.
For the form built here, use content controls for the answers; Word's older legacy form fields are kept for compatibility. A row of underscores or a typed square only looks like a form field, and nobody can click it. Three results caught us out on a workshop request form with eight kinds of field: Enter did nothing in a rich text field, one lock setting quietly disabled a drop-down list, and an unused field printed its prompt.
The short version
- Show the tab: File > Options > Customize Ribbon, tick Developer under Main Tabs, select OK.
- Add the fields: click after each question and pick a control in the Controls group of the Developer tab.
- Set choices and prompts: select the field, then Developer > Properties, or use Design Mode to retype a prompt.
- Lock the questions: Developer > Restrict Editing, tick Allow only this type of editing, choose Filling in forms, then Yes, Start Enforcing Protection.
- Keep a master: File > Save As with Save as type set to Word Template, then check the print preview.
Choose the fields your form needs
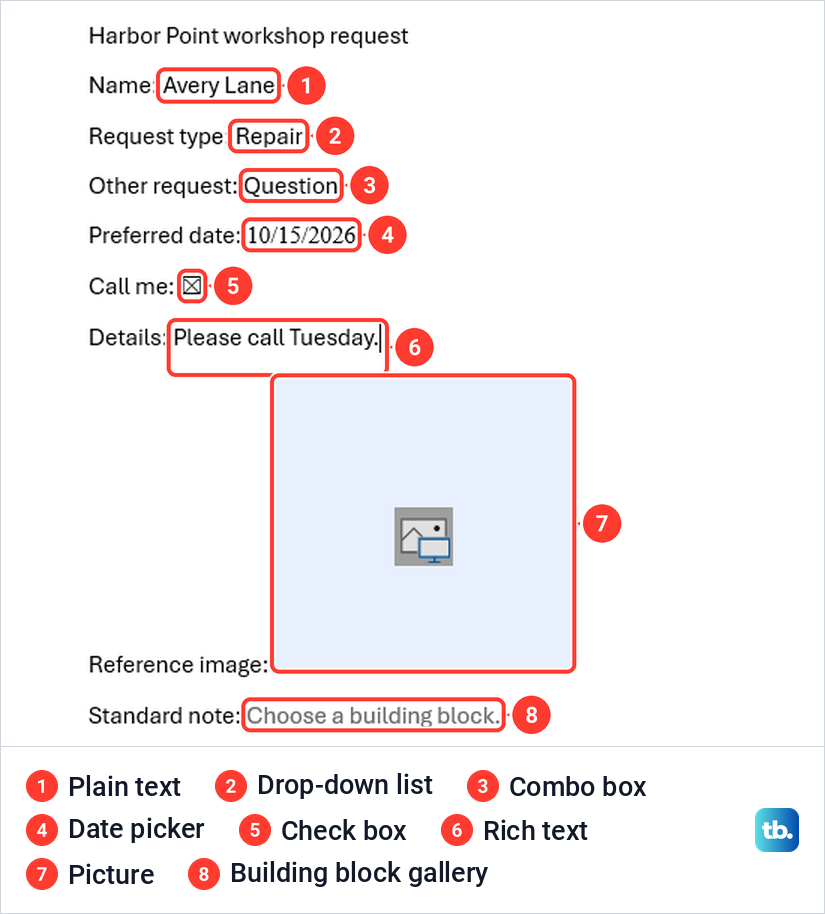
In the form built here, every answer sits in its own content control, and each kind of control accepts a different kind of answer. Pick the control from what the person must give you, not from how the box should look. This table covers the eight controls used in this form.
| Answer you need | Control to insert | What the person filling it in can do |
|---|---|---|
| A name or short answer | Plain Text Content Control | Type text that replaces the grey prompt |
| A longer, formatted note | Rich Text Content Control | Type and format text, such as bold or italic |
| One answer from a fixed list | Drop-Down List Content Control | Pick one of your choices and nothing else |
| A listed answer or their own | Combo Box Content Control | Pick a choice or type a different answer |
| A date | Date Picker Content Control | Pick a day from a month calendar |
| Yes or no | Check Box Content Control | Click the box to tick it |
| A photo or logo | Picture Content Control | Put a picture into a reserved box |
| Standard wording | Building Block Gallery Content Control | Choose a block of text you prepared earlier |
Here is our finished test form with one of each. The labels on the left are ordinary text, and every answer after them is a field. With the form protected, we typed into the Name and Details fields and the labels stayed as they were.
Show the Developer tab in Word
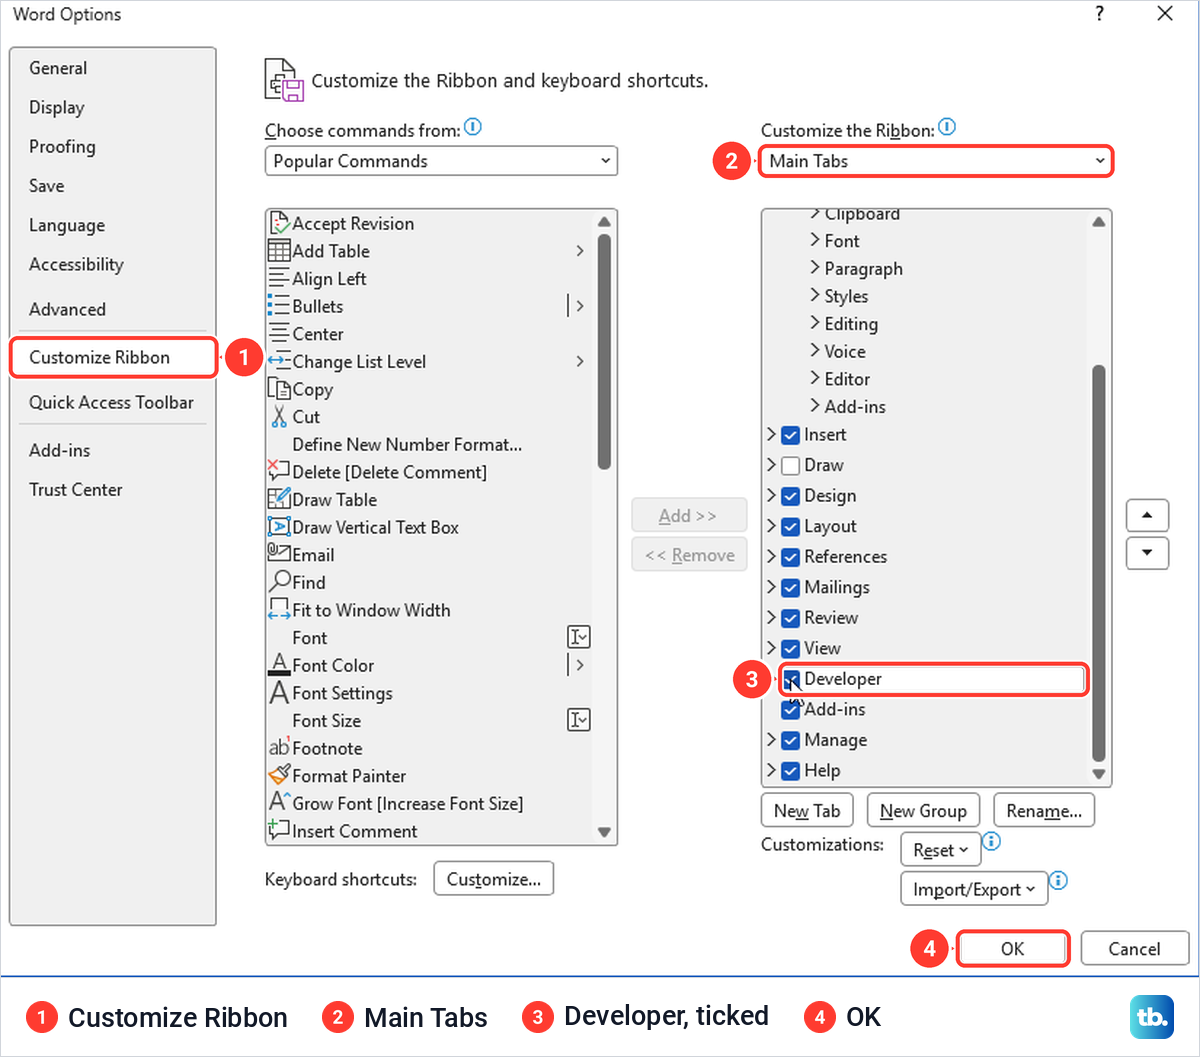
The Developer tab is hidden by default, and our new document opened without it. Select File > Options, then Customize Ribbon on the left. On the right, keep Main Tabs chosen in the Customize the Ribbon box and scroll down the list.
Developer sits between View and Add-ins with its box cleared. Tick it and select OK. The tab appeared between View and Help straight away, and Microsoft says it stays there unless you clear the box again or reinstall Office.
Type the questions before adding fields
Start with a blank document under File > New and type every label first, one per line, such as Name, Request type and Preferred date. Leave a space after each colon so the field has somewhere to go. If the ribbon or Save As are new to you, start with the basics of Microsoft Word and come back.
Microsoft also offers ready-made forms. Go to File > New, type Forms in the search box for online templates and press Enter, then right-click a result and select Create. You still add or change the fields with the same Developer tools.
The buttons you need are in the Controls group of the Developer tab, and in our Word window they were small icons with no names. Point at one and its name appears in a tooltip. This is where each one sat.
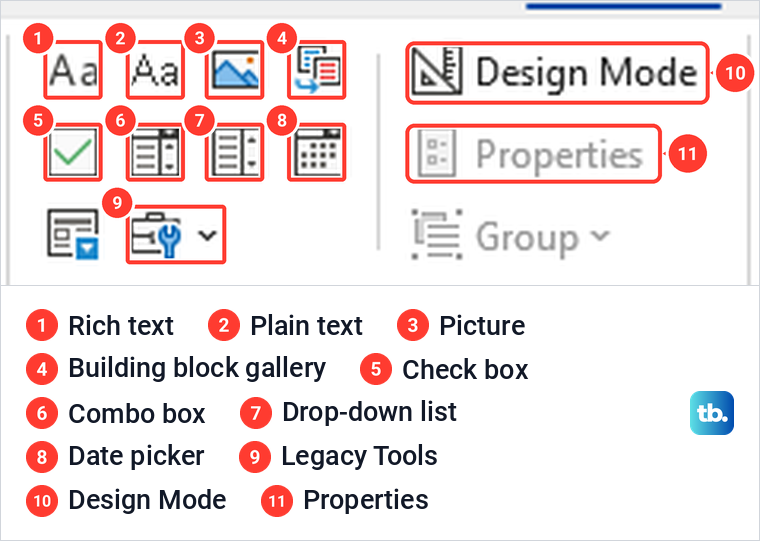
To add any field, click at the end of its label and select the button. Word puts the field at the cursor. Text, list, date and building block fields show a grey prompt, while a check box appears as an empty square and a picture field as a shaded box. While the cursor was inside a field, the insert buttons were greyed on our PC, and Properties only came alive with a field selected, so click in plain text before adding the next one.
Add text fields for names and notes
Click after Name and select Plain Text Content Control. Our field appeared with the prompt Click or tap here to enter text. Clicking the prompt and typing replaced it completely, so the person filling in the form never has to delete anything first.
For a longer answer such as Details, use Rich Text Content Control instead. It shows the same prompt. Microsoft says this control lets people format text and type multiple paragraphs, while the plain text control limits both.
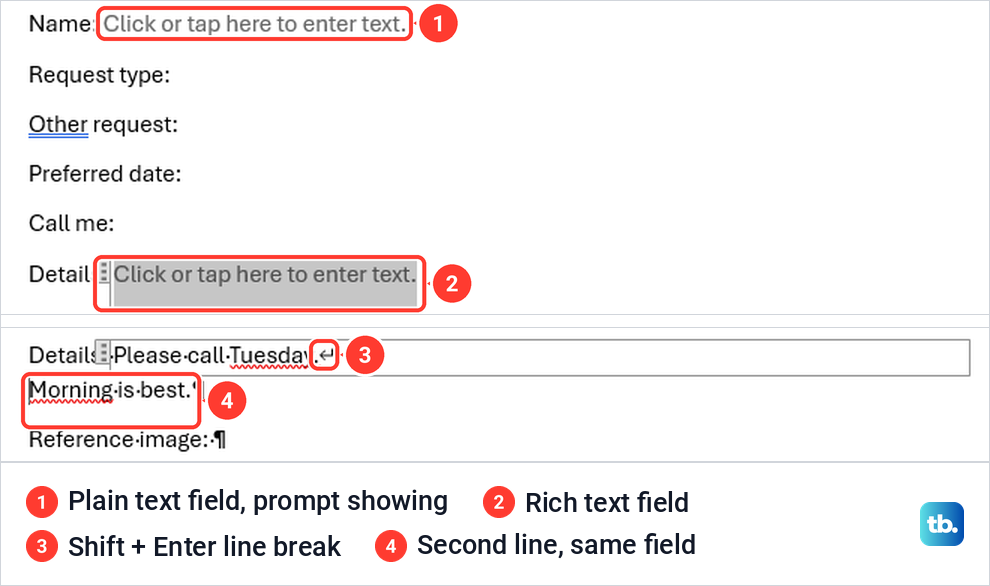
That is not what happened in our form. With the rich text field on the same line as its label, pressing Enter inside it did nothing, and turning on formatting marks showed no paragraph mark inside the field. Pressing Shift + Enter did work, putting a line break in and moving the rest of the answer to a second line in the same field.
If people will need several lines, tell them to use Shift + Enter, or give the field a line of its own under the label and try Enter there before you send the form. Plain text fields have their own setting for this in Properties, labelled Allow carriage returns (multiple paragraphs), and it was cleared on our field.
Add a drop-down list or a combo box
Click after the question and select Drop-Down List Content Control. The field shows the prompt Choose an item with a small arrow, but the list holds nothing else until you fill it. Select Developer > Properties to open Content Control Properties.
Microsoft's template help says to select the shaded field itself before Properties, not just put the cursor inside it. On our PC that was not needed: with the cursor still in the new prompt, Properties opened with the Drop-Down List Properties section ready to fill.
Select Add, type the first choice in Display Name and select OK. Word copied what we typed into Value as well, so there is nothing else to fill. We added Repair and Training this way, selected OK, and the arrow in the form then offered both, with Training filling the field when we picked it. Use Modify, Remove, Move Up and Move Down in the same box to fix the list later.
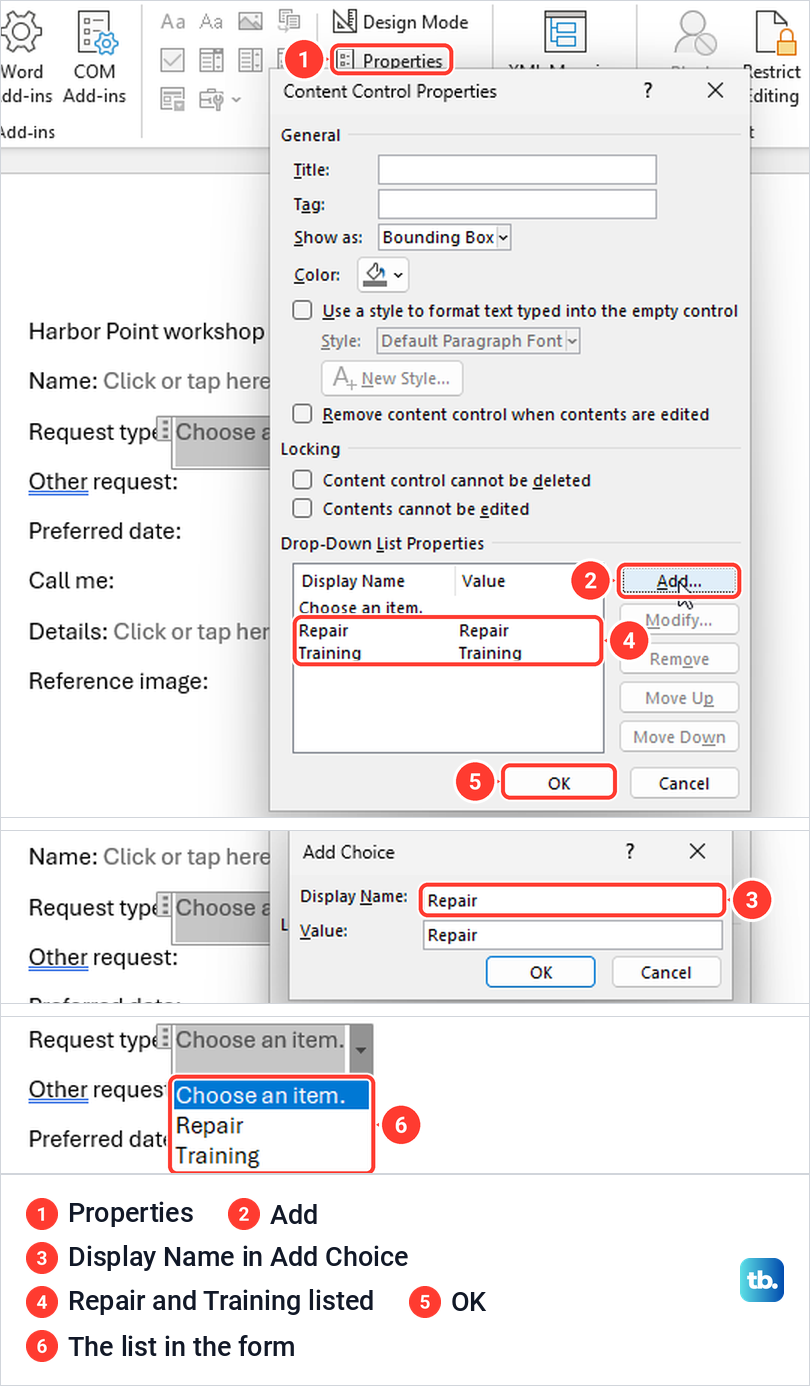
A combo box suits a question like Other request, where most people pick from your list but some need their own answer. Insert Combo Box Content Control and add the choices in Properties in exactly the same way. We added Parts and Visit, then typed Question straight into the field, and Word kept it.

Microsoft's template help calls this part Combo Box Properties, but on our PC the combo box's section was still headed Drop-Down List Properties. It is the right place, so do not go looking for another heading.
Add a date picker and a check box
Click after the date question and select Date Picker Content Control. The prompt reads Click or tap to enter a date. Select the field and an arrow appears at its right edge, which opens a month calendar with a Today button underneath.
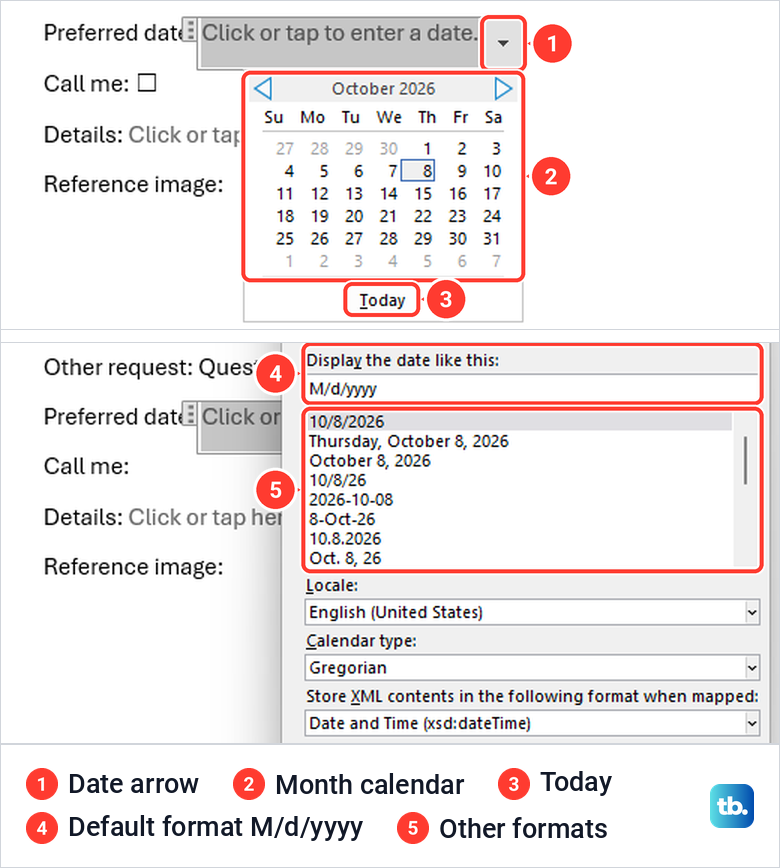
We picked the 15th and the field showed 10/15/2026. That layout comes from Properties, where Display the date like this read M/d/yyyy on our PC, and the list underneath offers longer and shorter layouts. Pick the one your readers expect before you send the form, and check the font too, because our picked date showed in a different font from the labels.
For a yes or no answer, click after the question and select Check Box Content Control. One click in our box put an X in it. Properties shows a Check Box Properties section with the Checked symbol, an X by default, and the Unchecked symbol, an empty square.
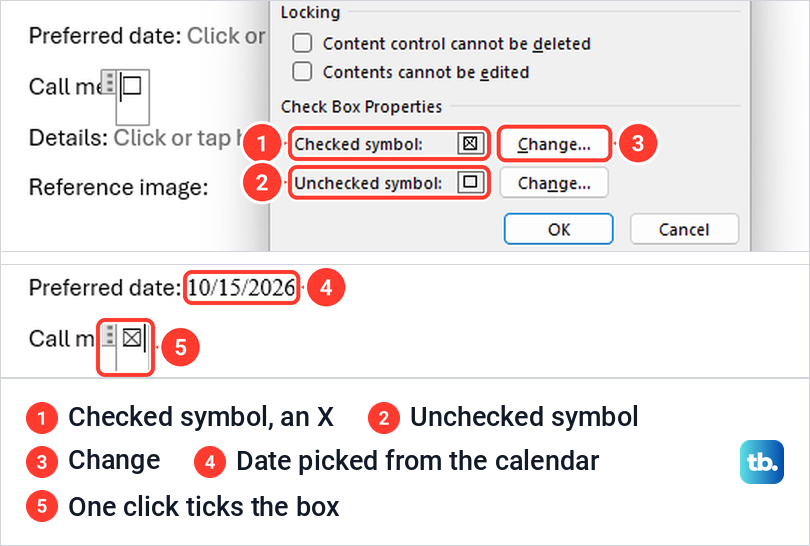
Each symbol has a Change button that opens the Symbol dialog. Ours opened on an unrelated currency symbol rather than the current box, so you choose the font and mark yourself. For a whole list of boxes, ticks instead of an X and boxes for paper, our guide to add check boxes in Word covers each case.
Add a picture field or a block of standard text
A picture field reserves space for a photo or logo. Click after the label and select Picture Content Control. Ours appeared as a large shaded box with a Picture tab on top, and Word added a Picture Format tab to the ribbon while it was selected.
Microsoft says the Building Block Gallery control is for letting people choose a specific block of text, such as different versions of a standard paragraph. Ours appeared with a Quick Parts tab and the prompt Choose a building block. Its Properties offered a Gallery set to Quick Parts and a Category set to (All Categories).
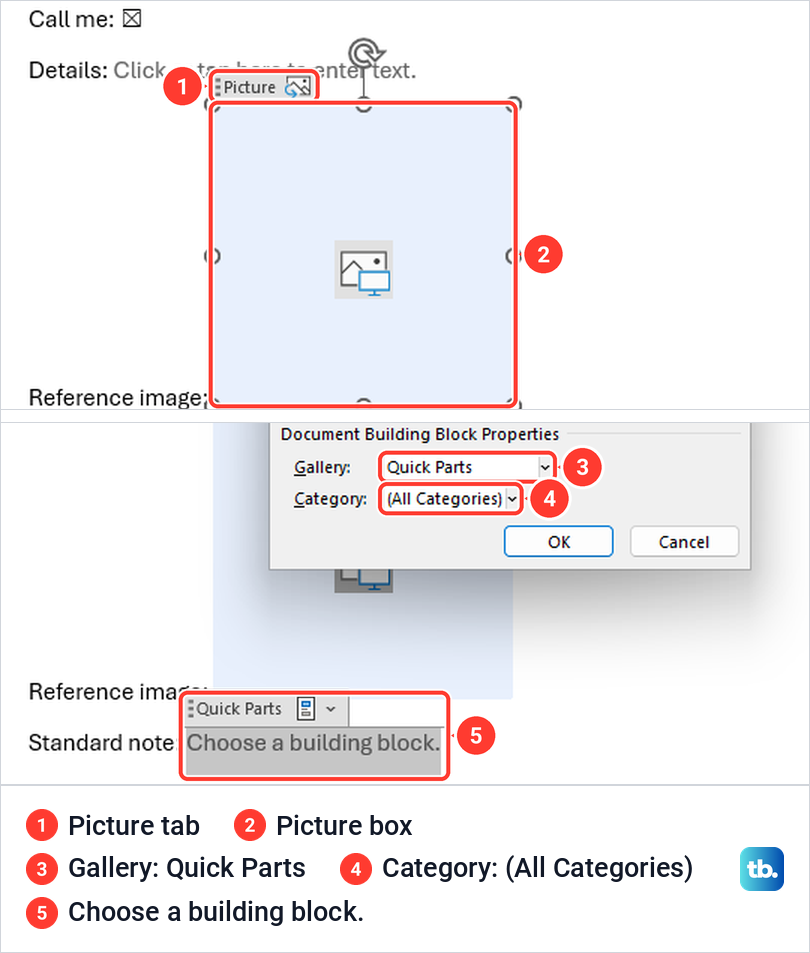
This field is only useful if the blocks already exist, so skip it unless you keep standard wording in Quick Parts. An unused one also causes the printing problem described further down. For a page that ends with a place to sign, our separate guide shows how to add a signature in Word below the fields.
Change the prompt, title and locks of a field
The grey prompt in each field is instruction text, and you can make it more useful. Select Developer > Design Mode. Every field then showed start and end tags, and clicking into our Name field let us retype its prompt as Enter full name. Select Design Mode again to turn it off, and the new prompt stays.
Next, select the field and choose Developer > Properties. A Title gives the field a name, and ours, Contact name, showed as a small tab on the field when we clicked into it. The Locking section has two separate options that do very different things.
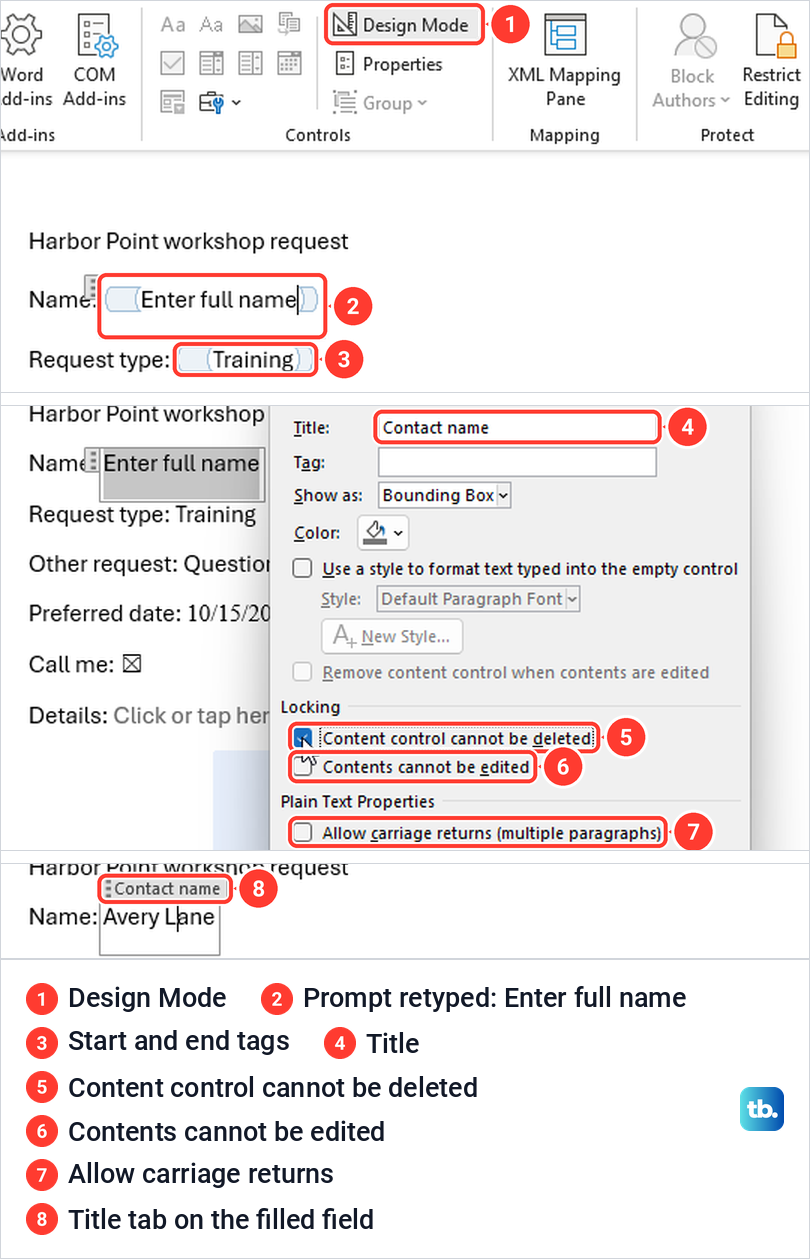
Content control cannot be deleted keeps the field itself in place while still letting people type in it. We ticked it on the Name field, and the field still took Avery Lane. Microsoft describes it as allowing the content to be edited while the control itself cannot be deleted.
Contents cannot be edited does the opposite, and it is the one that breaks forms. Microsoft says that with it ticked, people won't be able to click a choice in a list. Leave it cleared on every field people must fill in.
Protect the form so only the fields can change
Without protection, anyone can edit your questions as easily as the answers. Select Developer > Restrict Editing to open the Restrict Editing pane. On our PC the Yes, Start Enforcing Protection button stayed greyed until we ticked Allow only this type of editing in the document.
Open the list under that box and choose Filling in forms. The other choices were Tracked changes, Comments and No changes (Read only). Those suit a document under review instead of a form, and if you want people to suggest edits to the wording, track changes in Word is the better tool.
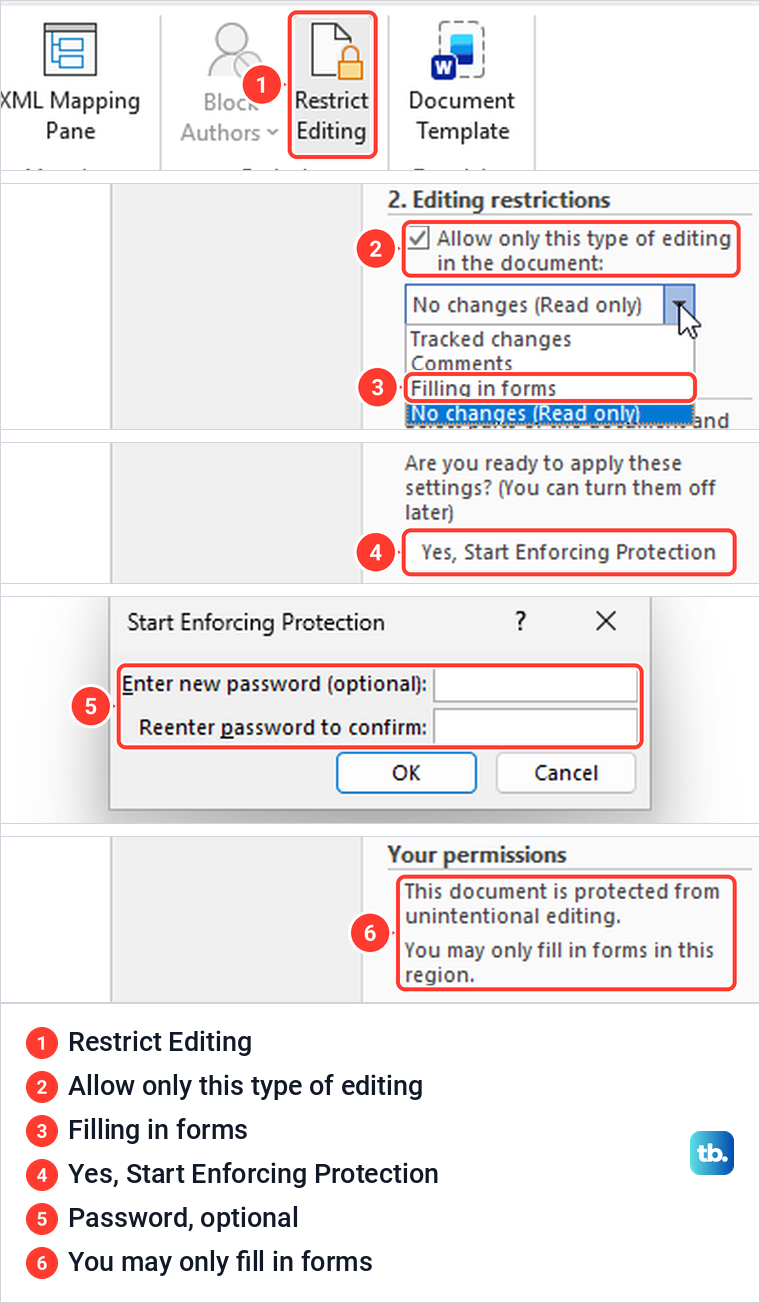
Select Yes, Start Enforcing Protection. Word asks for a password and marks the box as optional. We left both boxes empty and selected OK, and the pane changed to say You may only fill in forms in this region, with a Stop Protection button at the bottom.
The password choice is yours. Microsoft says that if you choose not to use a password, anyone can change your editing restrictions, and that if you forget a password, Microsoft cannot retrieve it. Some restrictions are also set by a document owner or an organization, and Microsoft says those cannot be changed locally.
Protection kept our labels fixed, with one trap. Clicking inside our title text did not put the cursor there. Word moved it into the first field, Name, and the letter we typed next replaced the name that was already in it. Warn people to click inside the field they mean to change.
To edit the questions later, open Restrict Editing and select Stop Protection, typing the password if one was set. Microsoft also describes protecting only part of a document by splitting it into sections and choosing which sections to protect.
Save the form and a reusable template
Save the protected form as an ordinary Word document when you send it to one person or one group. A form you hand out again and again is better kept as a template. Remove the sample answers you typed while testing before you save it, because our template kept the answers that were in the fields when we saved it.
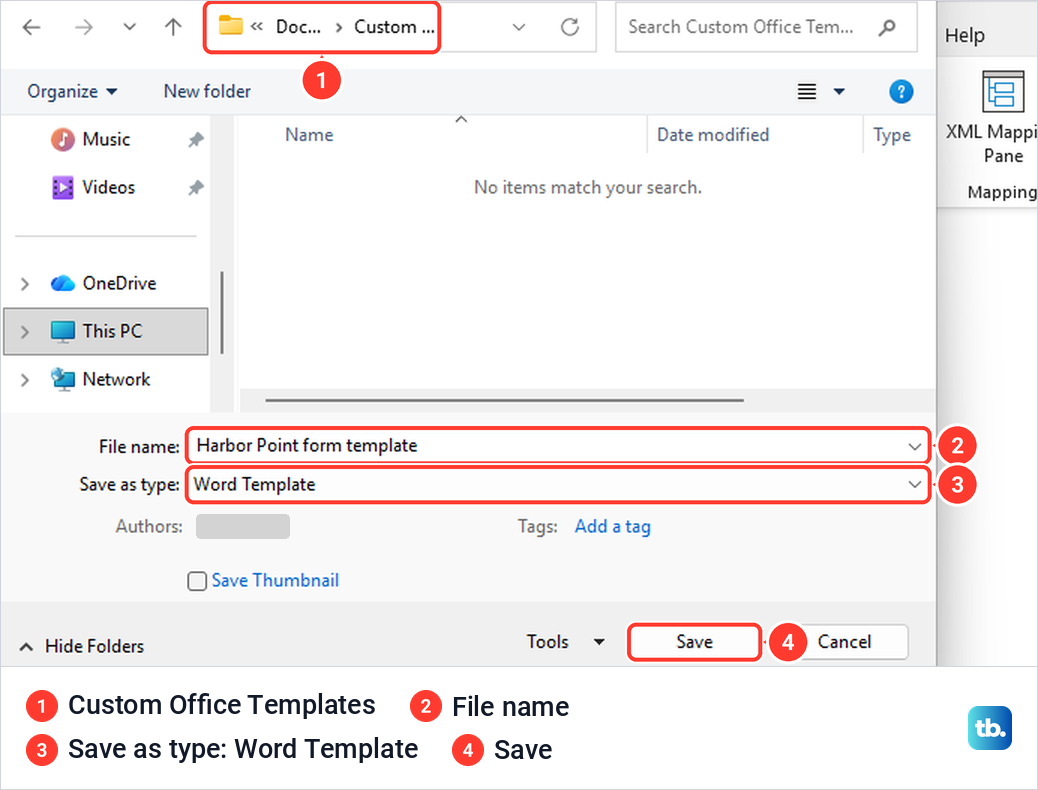
Select File > Save As, type a name, and set Save as type to Word Template. Word switched our save folder to Custom Office Templates by itself, and the file was saved as a .dotx. Microsoft says a document you make from a template and save as a .docx is saved separately from the template. Start one new document from your template and check that it opens the way you want before you share it.
Before you fill in a test copy, make a copy of the Word document so the blank master stays clean. To change the template later, Microsoft's route is File > Open, then This PC and the Custom Office Templates folder. If Word refuses to save the finished file, work through the fixes for a Word document that will not save.
Test the form before you send it
Fill in every field yourself, the way a stranger would. Open each list, pick a date, tick the box, and click on a label to see what the cursor does. Then press Ctrl + P to open the print preview, because the screen and the page do not match.
Microsoft says the boxes around content controls will not print, and our preview agreed: the answers showed as plain text with no field borders. The unused building block field was another matter. Its grey prompt appeared on the page as it does on screen: Choose a building block.
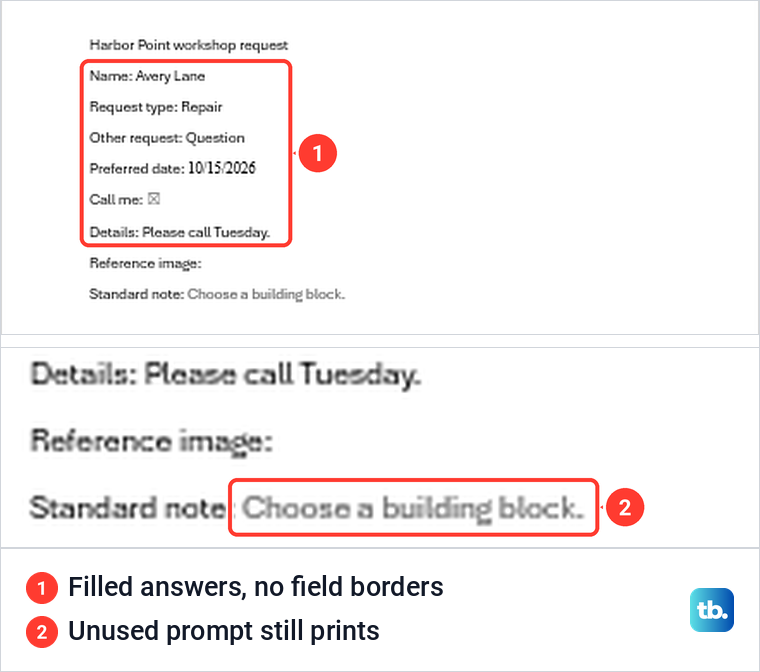
So before you print blank copies, look for prompts in the preview. Shorten them in Design Mode to something worth printing, or remove the fields you do not need. For lines people write on by hand, you can also insert a line in Word after a label instead of a field.
If the preview looks right but nothing comes out, follow the steps to fix printing from Word or Excel. To share a completed form as a fixed page, save the Word document as a PDF. If people must type into the PDF itself rather than into Word, that is a separate job, so use the steps to create a fillable PDF form.
Fix a form field that will not work
If the form is protected, open Developer > Restrict Editing and select Stop Protection first, typing the password if one was set, because Properties stayed greyed on our PC while protection was on. Then select the field that misbehaves and open Developer > Properties. If Properties is still greyed, click inside the field, since it was also greyed whenever our cursor sat in plain text.
The drop-down list will not open
If the arrow has disappeared, check whether Contents cannot be edited is ticked in Properties. With it ticked, our list lost its arrow, Alt + Down arrow opened nothing and typing changed nothing. Word showed no message box. The only clue was in the status bar at the bottom: You can't make this change because the selection is locked.
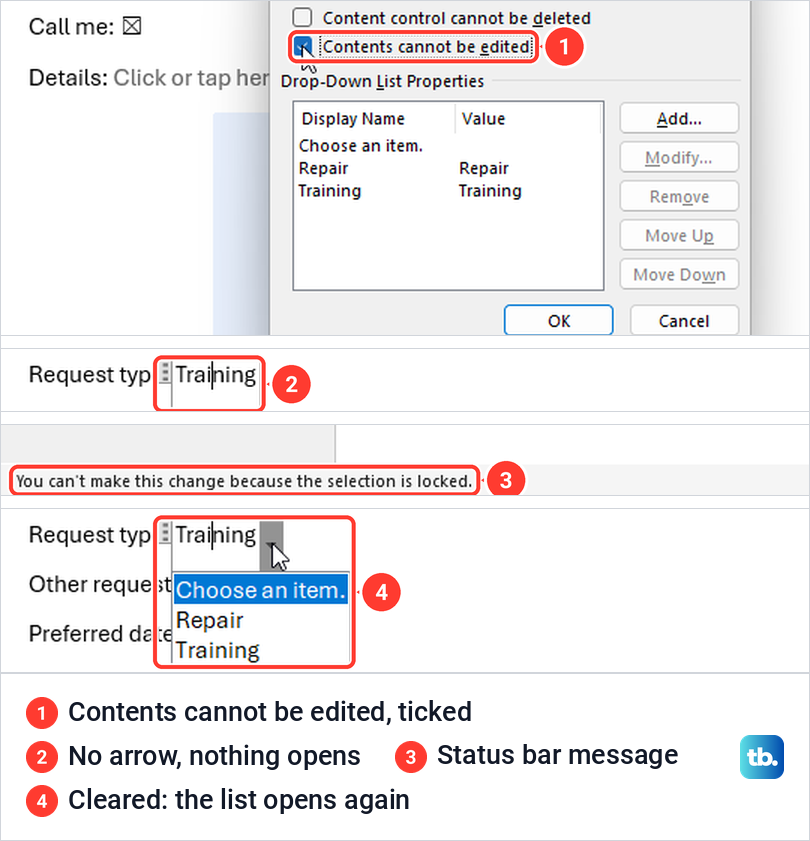
Open Properties, clear Contents cannot be edited and select OK. Our arrow came back at once, and we could pick Repair from the list again.
The buttons for adding fields are greyed out
Check three things in turn. First, click in plain text, because the insert buttons were greyed for us whenever the cursor sat inside a field. Second, check for protection: while ours was enforced, the buttons in the Controls group were greyed, so select Stop Protection before you change the form.
Third, the file may come from an older version of Word. Microsoft says content controls may be unavailable in a document or template created in an earlier version, and the fix is File > Info > Convert, then OK, then save the file.
You inserted the wrong kind of field
Right-click the empty field and choose Remove Content Control. On our empty picture field this removed the whole box and left the label line as plain text, ready for a different field. If the field is locked against deletion, clear Content control cannot be deleted in Properties first.
Make a fillable form on a Mac or in a browser
Word for Mac uses different menus. To show the tab, Microsoft's steps are to open the Word menu, select Preferences, then Ribbon and Toolbar > Customize the Ribbon > Main Tabs, tick Developer and select Save.
Click where a field should go, open the Developer tab and select Text Box, Check Box or Combo Box, then Options to set it up. When the form is ready, select Developer > Protect Form, and select it again to make changes. Microsoft suggests protecting the form, reopening it and filling it in as a user would.
Microsoft says creating fillable forms isn't available in Word for the web. It also says content controls are kept in the file but may appear in the browser as placeholders that cannot be edited or updated, so ask people to open the form in desktop Word. For features the browser lacks, Microsoft points to the Open in Desktop command.
Older legacy form fields
The Controls group also has Legacy Tools. On our PC it opened a small Legacy Forms palette of six icons. Microsoft describes legacy form controls as being for compatibility with older versions of Word, so keep them for old forms that already use them and build new ones with content controls.
How we tested this guide
We tested this in Word for Microsoft 365 on Windows 11, version 25H2, building and protecting a workshop request form with eight kinds of field.
Frequently Asked Questions
How do I turn an existing Word document into a fillable form?
Open it in desktop Word and show the Developer tab. Click after each question, insert the right content control from the Controls group, then protect the document with Restrict Editing set to Filling in forms.
Why is the Developer tab missing in Word?
Word hides it by default. Go to File > Options > Customize Ribbon, tick Developer under Main Tabs and select OK.
Why can't I pick anything from my drop-down list?
Check whether Contents cannot be edited is ticked in the field's Properties. With it ticked, our list lost its arrow and Word only said the selection is locked in the status bar, and clearing the option made the list work again.
How do I stop people from changing the questions?
Select Developer > Restrict Editing, tick Allow only this type of editing, choose Filling in forms and select Yes, Start Enforcing Protection. Word then says you may only fill in forms in this region, and in our test the Name and Details fields still took typing while the labels stayed as they were.
Can people fill in a Word form in a browser?
Microsoft says fillable forms cannot be created in Word for the web, and that content controls may show there as placeholders that cannot be edited. Ask people to open the form in desktop Word instead.
Should I save my form as a .docx or a .dotx?
Send a .docx when people fill in one copy and return it. Keep a .dotx, saved as a Word Template, as the master you make new copies from, and remove your test answers before you save it.