

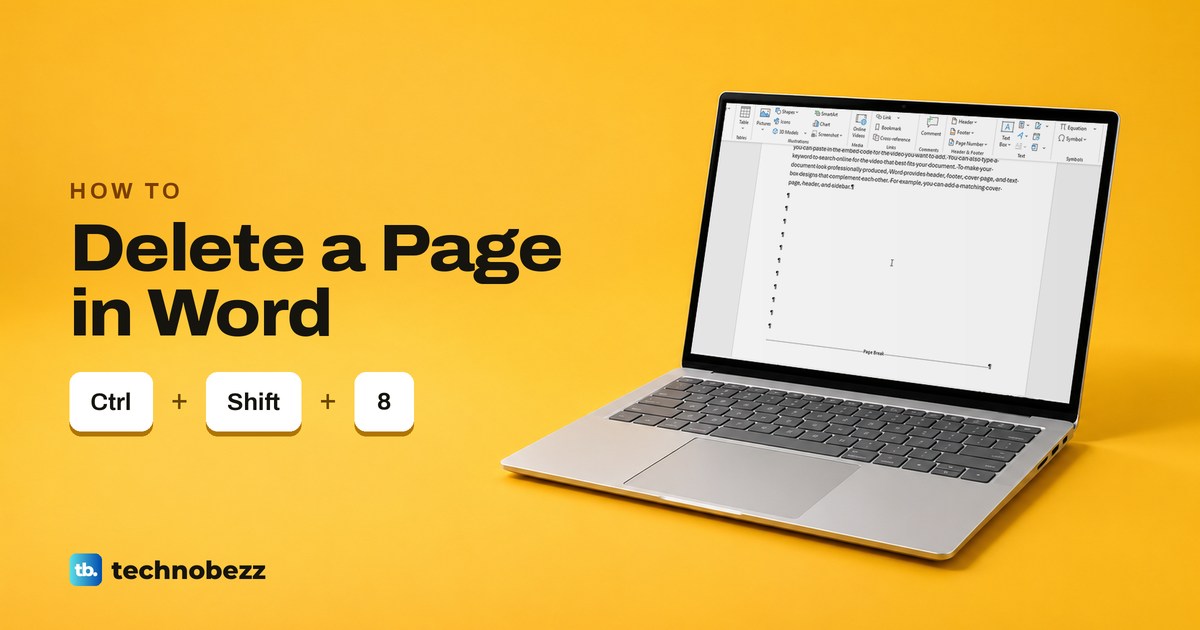
To delete a page in Word, select everything on it, from the first word to the last, and press Delete. A blank page is harder because it looks empty, so press Ctrl + Shift + 8 to show the formatting marks first, then delete whatever they reveal: a run of empty paragraphs, a manual page break or a section break.
One blank page cannot be deleted that way. If the last page holds a single ¶ mark, often right after a table, that mark is Word's end paragraph, and the fix is to shrink it to 1 point. On a Mac the marks shortcut is Command + 8, and Word for the web takes the same Ctrl + Shift + 8 as Windows. Where a step behaved differently for us than Microsoft's help pages say, we flag it below.
The short version
- Page with content: select from its first word to its last and press Delete.
- See what is hiding: press Ctrl + Shift + 8 (Command + 8 on a Mac) to show every ¶ mark and break.
- Blank page in the middle: select its empty ¶ marks, or click at the very start of the Page Break line, and press Delete.
- Blank page at the end with a single ¶: click it, type 1 in the Font Size box and press Enter.
- Section break in the middle: change it to Continuous in Page Setup instead of deleting it, or the text before it takes on the layout of the section after it.
Show the formatting marks to see what is on the page
A blank page is never really empty. Something is sitting on it or pushing text onto it, and Word hides those marks until you ask for them, so turn them on before you try anything else.
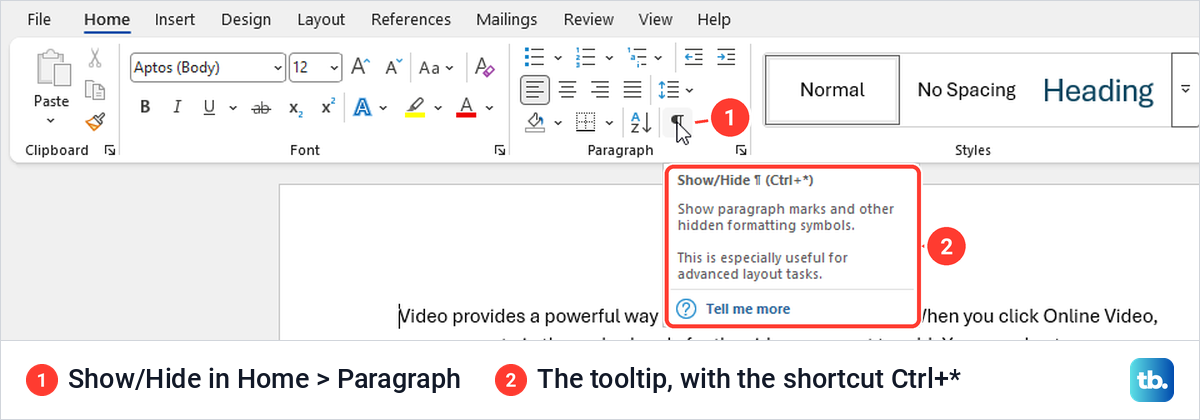
In desktop Word, select the Home tab and then the ¶ button in the Paragraph group. Its tooltip reads Show/Hide ¶ and gives the shortcut as Ctrl+*, which on a US keyboard is the same as Ctrl + Shift + 8. Use the 8 in the top row, because Microsoft's shortcut list says not to use the number pad.
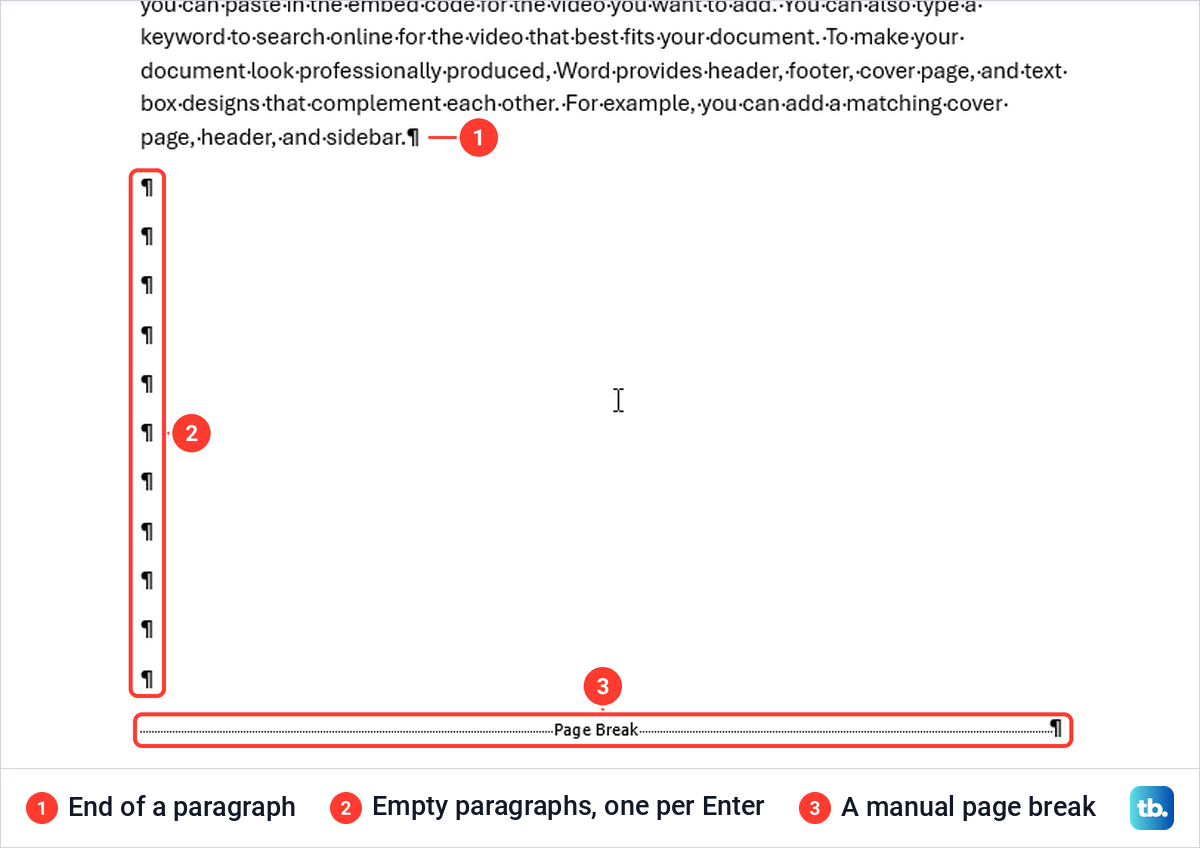
With the marks on, every press of Enter shows as a ¶, spaces show as small raised dots, and a manual page break becomes a dotted line labelled Page Break. If the screen suddenly fills with symbols, relax: they are nonprinting characters and never appear on paper.
When the page is gone, press the same keys to hide the paragraph marks again. To keep them on for good, go to File > Options > Display, where the section Always show these formatting marks on the screen has boxes for Paragraph marks and Show all formatting marks.
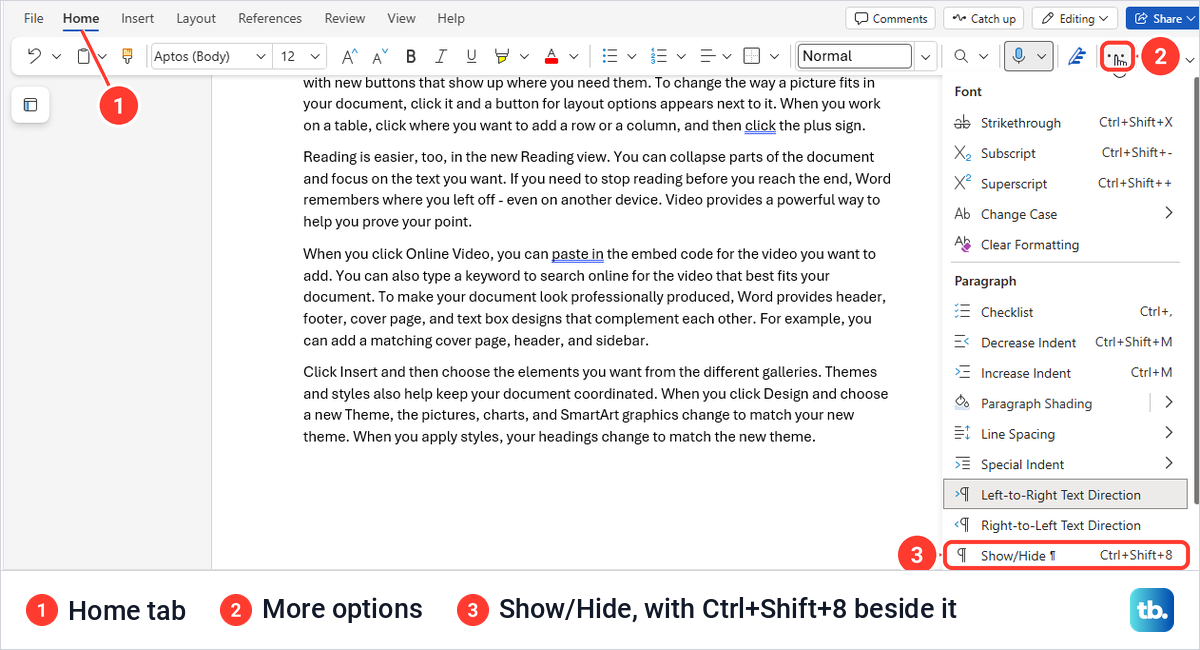
Word for the web has the same switch, a little further in. On the Home tab, select More options (the three dots at the right end of the ribbon) and look under Paragraph for Show/Hide ¶. The menu lists Ctrl+Shift+8 beside it, and that shortcut turned the marks on for us.
On a Mac, Microsoft's shortcut is Command + 8. Microsoft's Mac instructions keep the marks on through Word > Preferences > View, under Show Non-Printing Characters.
Once the marks are on, match what you see on the unwanted page to a row in this table. Each row has its own section further down.
| What you see with marks on | What it is | How to remove it |
|---|---|---|
| Text, pictures or a table | Real content | Select it all and press Delete, or let Go To select the page in desktop Word; for a page that is only a table, select the table with the ¶ after it and press Backspace |
| A column of ¶ marks and nothing else | Empty paragraphs from extra presses of Enter | Select the ¶ marks and press Delete, not Backspace |
| A dotted line labelled Page Break | A manual page break | Click at the very start of the line and press Delete |
| A double dotted line, labelled Section Break in Draft view | A section break | Change it to Continuous in Page Setup, or delete it if the part before it does not need its own layout |
| One ¶ alone on the last page, often after a table | Word's end paragraph, which cannot be deleted | Set its font size to 1 |
| A small black square beside a paragraph that starts a new page | Possibly Page break before, which Microsoft names for this square | Check Paragraph, on the Line and Page Breaks tab, and clear Page break before if it is ticked |
Delete a page that has text or pictures
Click just before the page's first word, hold Shift and click after its last word, then press Delete. If you change your mind, Ctrl + Z brings the whole lot back.
Desktop Word can also select a page for you. Click anywhere on the page and press Ctrl + G or F5, and Find and Replace opens on its Go To tab. Type \page in the Enter page number box, press Enter, select Close and press Delete.
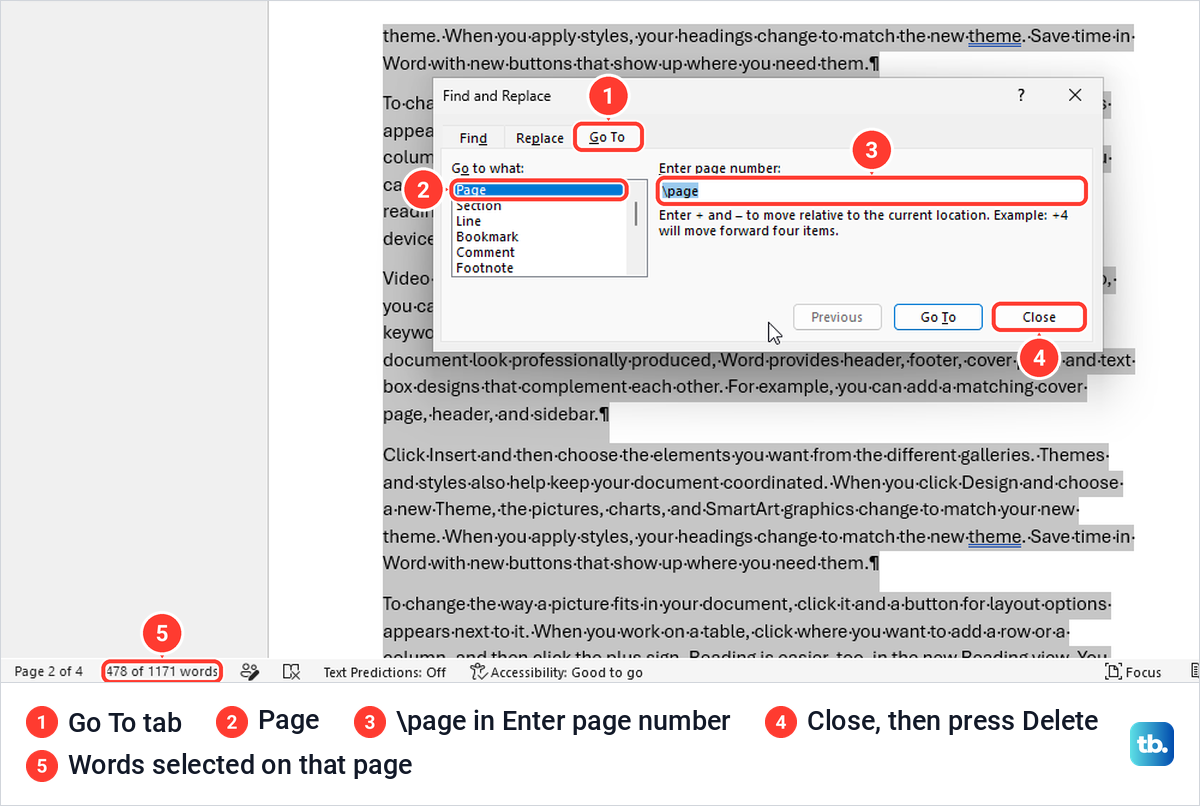
On our PC, \page highlighted the whole page and the status bar counted the words selected, a quick check that you have the right page before you delete it. After the Delete, one Ctrl + Z restored everything in a single step.
There is one catch. \page selects from the top of the page, not from the start of a paragraph, and it stops at the bottom of the page, so paragraphs that run across either edge lose only the part that sat on the deleted page. Read the last line on the page above and the first line on the page below afterwards, and finish or remove those sentences by hand.
On a Mac, Microsoft's steps are the same with Option + Command + G, and F5 also opens Go To. In Word for the web, Microsoft lists Ctrl + G as a shortcut for Find rather than Go To, so select the page with a click and a Shift + click instead.
Delete several pages at once
Click and Shift + click works across page boundaries too. We clicked at the top of one page, scrolled to the end of the next and Shift + clicked after its last word, and the selection ran across both pages. Delete removed them together, and one Ctrl + Z put them back.
For a long stretch, scrolling with Shift held gets fiddly, so use extend mode in desktop Word. Click where the selection should start, press F8, then click where it should end, and Word selects everything in between. Press Esc to leave extend mode.
Before you cut ten pages out of a long report, make a copy of the document so the original stays whole. Microsoft says you can press Ctrl + Z repeatedly to step back, but a copy is the safer net for a big cut.
Remove a blank page made of empty paragraphs
Every press of Enter adds an empty paragraph, and enough of them push the text onto a page of their own. On our PC, the text ended partway down a page, and 15 presses of Enter after it ran onto a new, blank one. How many it takes depends on how much of the page is already used.
Drag from the first empty ¶ on the blank page to the last so they are all highlighted, then press Delete. The page vanished at once and the status bar dropped by one page.
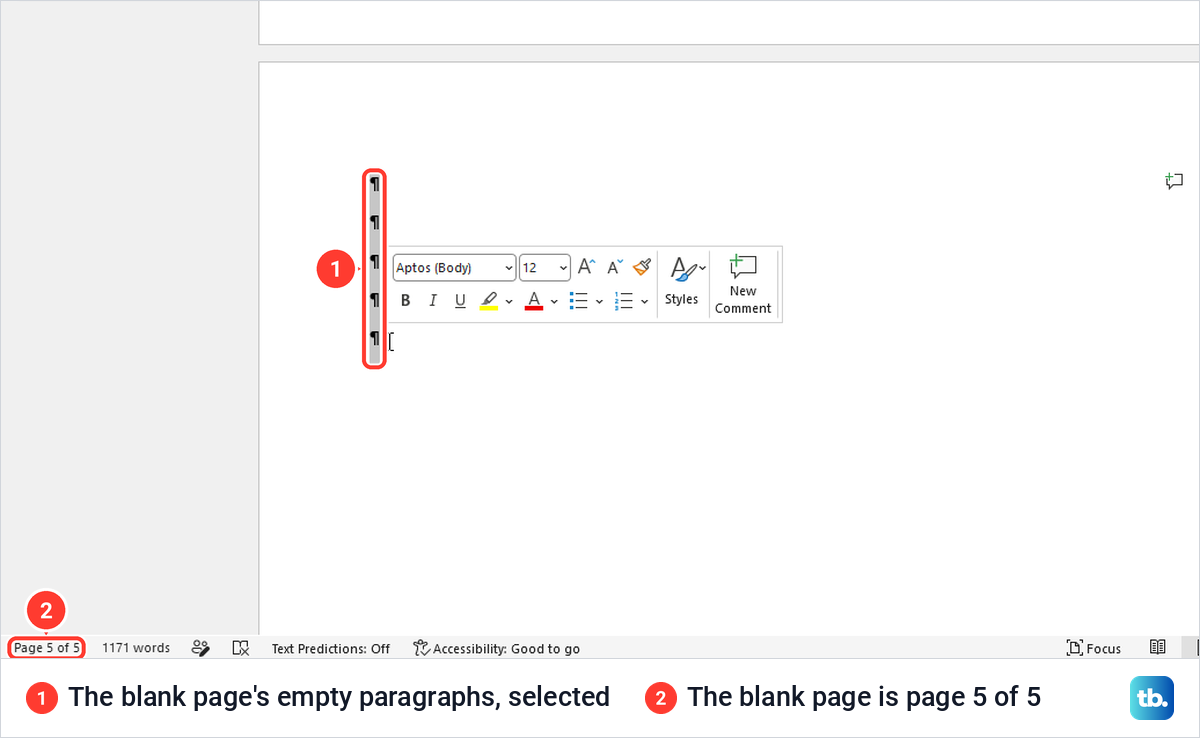
Use Delete, not Backspace, for this. When we undid the deletion and pressed Backspace on the same selection, Word left one ¶ behind and the blank page stayed where it was.
To stop it happening again, stop pressing Enter to make space. Microsoft's advice is to set line and paragraph spacing instead, because Word treats each extra line as a new paragraph and page breaks may not land where you expect.
In Word for the web, Microsoft says empty paragraphs show as blank lines that you select and delete the same way. With Show/Hide on, they appeared as the same column of ¶ marks for us.
Delete the blank page at the end of a document
If the last page holds a single ¶ and nothing else, you are looking at Word's end paragraph. Every document has one, and Microsoft says it cannot be deleted. When the page above is full, that paragraph moves onto a new page by itself.
Tables are a common cause. A table is always followed by a paragraph mark, so when a table reaches the bottom of a page, the mark lands alone on the next one. We built a two-column table that filled page 1, and the end ¶ dropped onto page 2. Résumé and CV templates are often built from tables, so they run into this a lot.
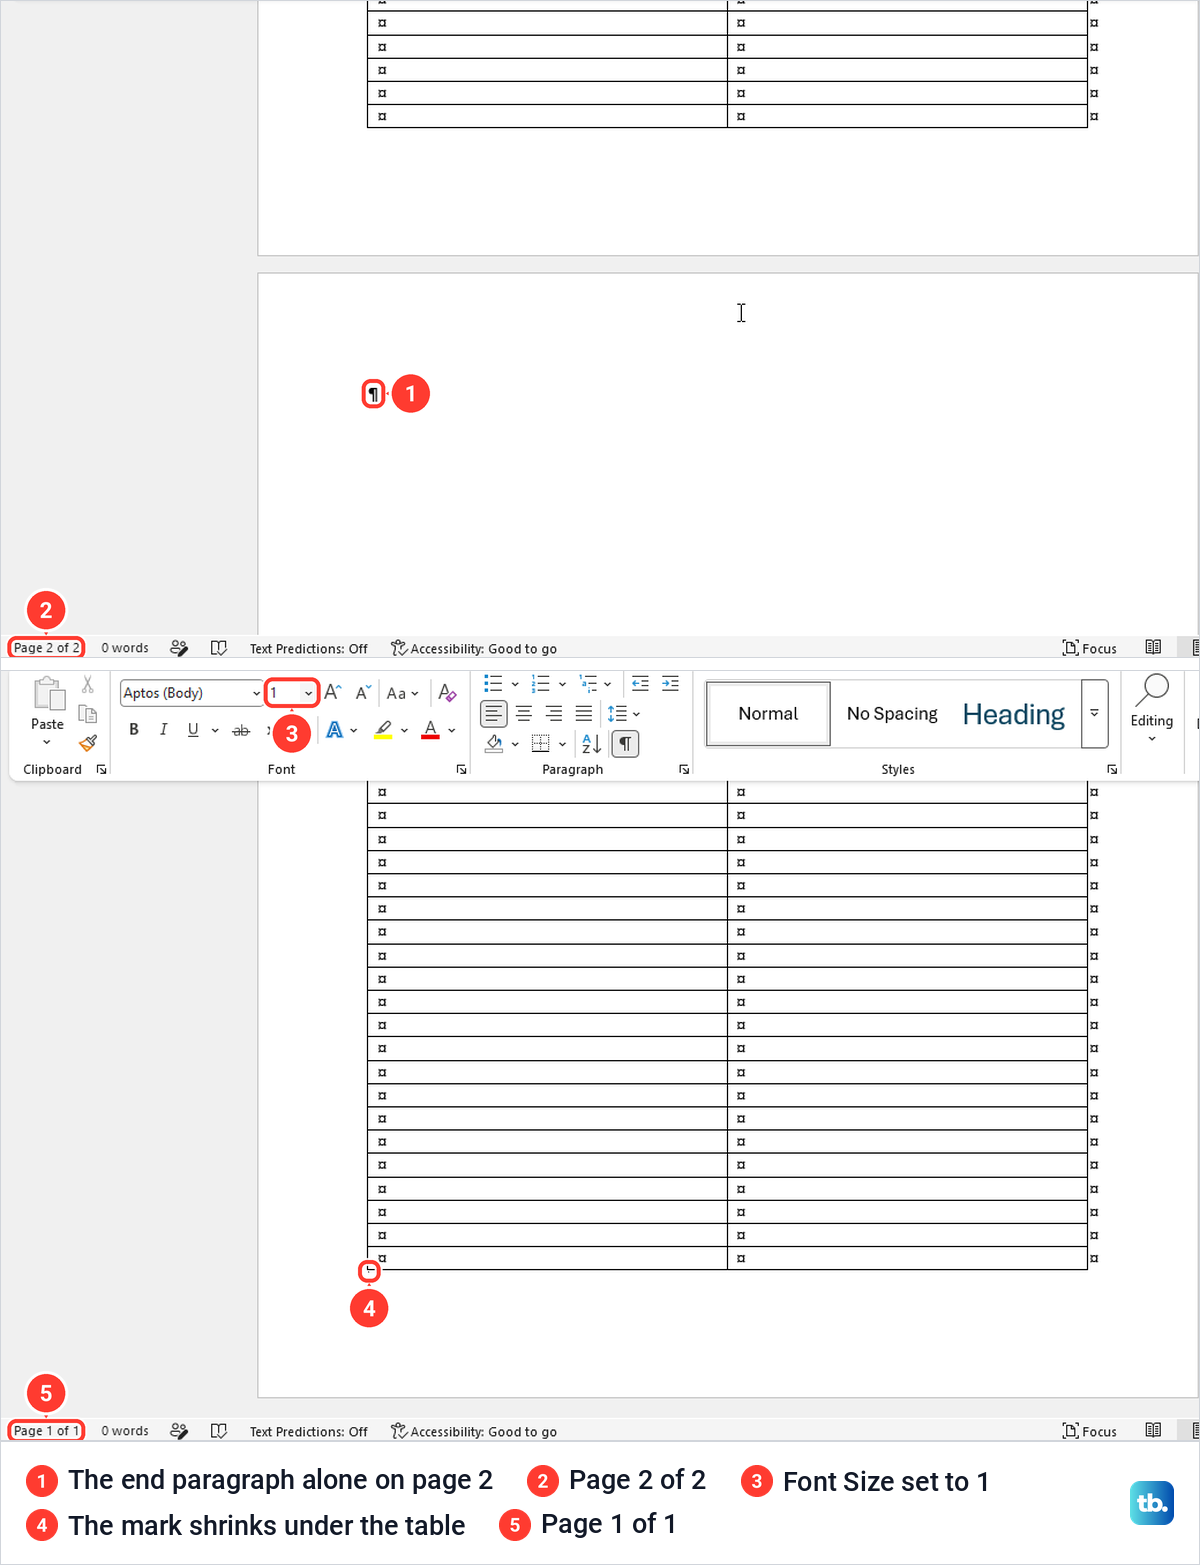
Pressing Delete or Backspace on that ¶ did nothing at all. What worked is Microsoft's fix: click the lone ¶, click in the Font Size box on the Home tab, type 1 and press Enter. The mark shrank to a dot under the table and the status bar read Page 1 of 1.
Microsoft's page says to type 01, and plain 1 did the same for us. If the ¶ still will not fit, Microsoft's fallback is a smaller bottom margin: open Layout > Margins > Custom Margins and set Bottom to something small, like 0.3 inches.
Leave the end paragraph itself in place, because Microsoft says the last paragraph mark carries the layout and formatting of the document's last section. If the table has to go as well, select it together with the ¶ after it and press Backspace, which on our PC removed the whole table and left a single empty paragraph.
Remove a manual page break
A manual page break is one that someone added with Insert > Page Break, Layout > Breaks > Page or Ctrl + Enter. With the marks on it is a dotted line labelled Page Break. Microsoft says the automatic breaks Word adds as text flows onto the next page cannot be deleted, only moved.
The way that worked for us is to put the cursor at the very start of the Page Break line, by clicking at its left edge, and press Delete. The dotted line disappeared and the text from the next page moved up.
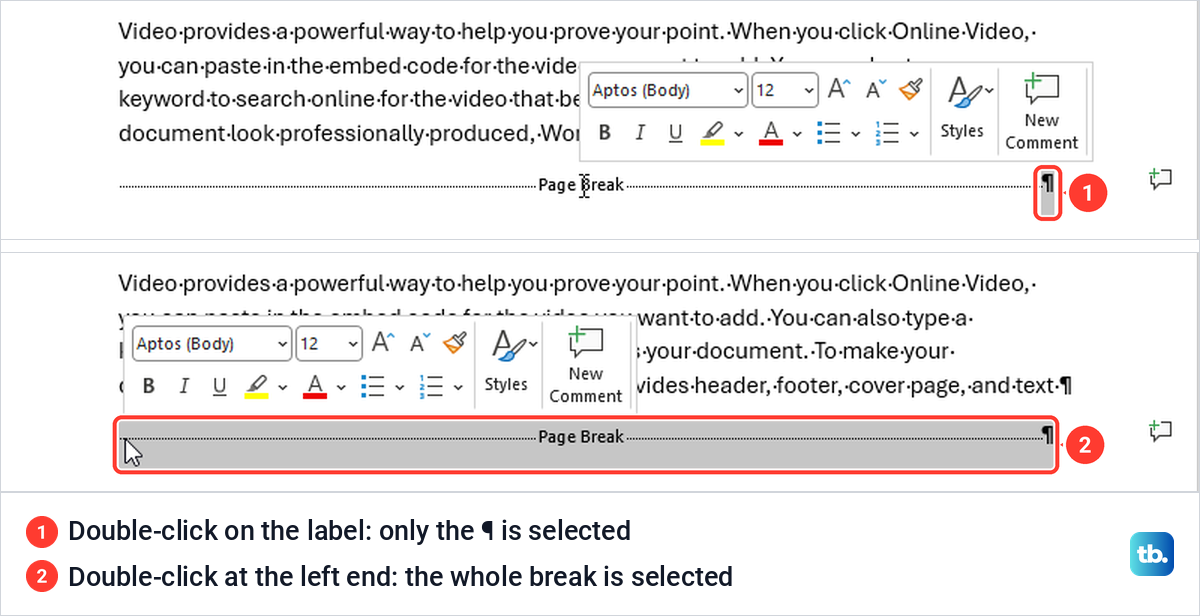
Microsoft's instructions say to double-click the page break and press Delete, and for us that worked only when we double-clicked the left end of the line. When we double-clicked the Page Break label in the middle, Word selected just the ¶ at the right end, and Delete left the break in place. A single click on the label selected nothing, and Backspace at the start of the next line removed the paragraph mark after the break instead of the break.
A page added with Insert > Blank Page, on the same tab, comes out the same way. When we inserted one in front of a heading, the document grew from two pages to four, and the empty line it added started a page of its own even though the page above still had room. Draft view showed a Page Break line right after that empty line, which also kept the heading style and showed up as a blank entry in the Navigation pane.
So check both sides of the empty line in Draft view for a Page Break and delete each one the same way. Then delete the empty line itself.
To clear dozens of breaks at once, Microsoft's route is Find and Replace in Word. Press Ctrl + H, select More >> and then Special, and choose Manual Page Break for the Find what box. Leave Replace with empty and select Replace All.
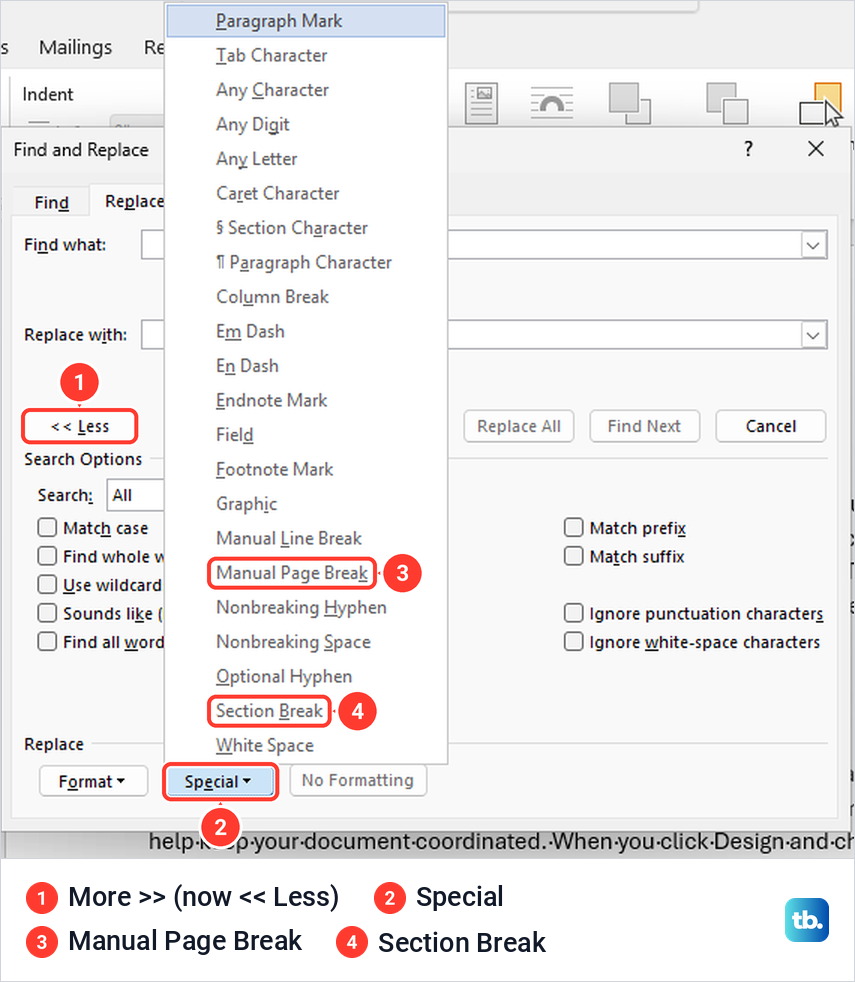
On a Mac, Microsoft says to click just after the ¶ in the page break and press Delete. The delete key on a Mac keyboard deletes backwards, so wherever a step puts the cursor before something and says press Delete, use Apple's forward delete, Fn + Delete.
Word for the web drew the same dotted Page Break line for us when the marks were on. Microsoft's newer web instructions are to click the break to select it and press Delete, while an older page says Backspace, so if one key does nothing, try the other.
Remove a section break without breaking the layout
Section breaks are what let one part of a document have its own margins, columns, orientation or headers. Microsoft says each break controls the layout of the section before it, which is why deleting one can change more than you expect. Layout > Breaks offers four kinds.
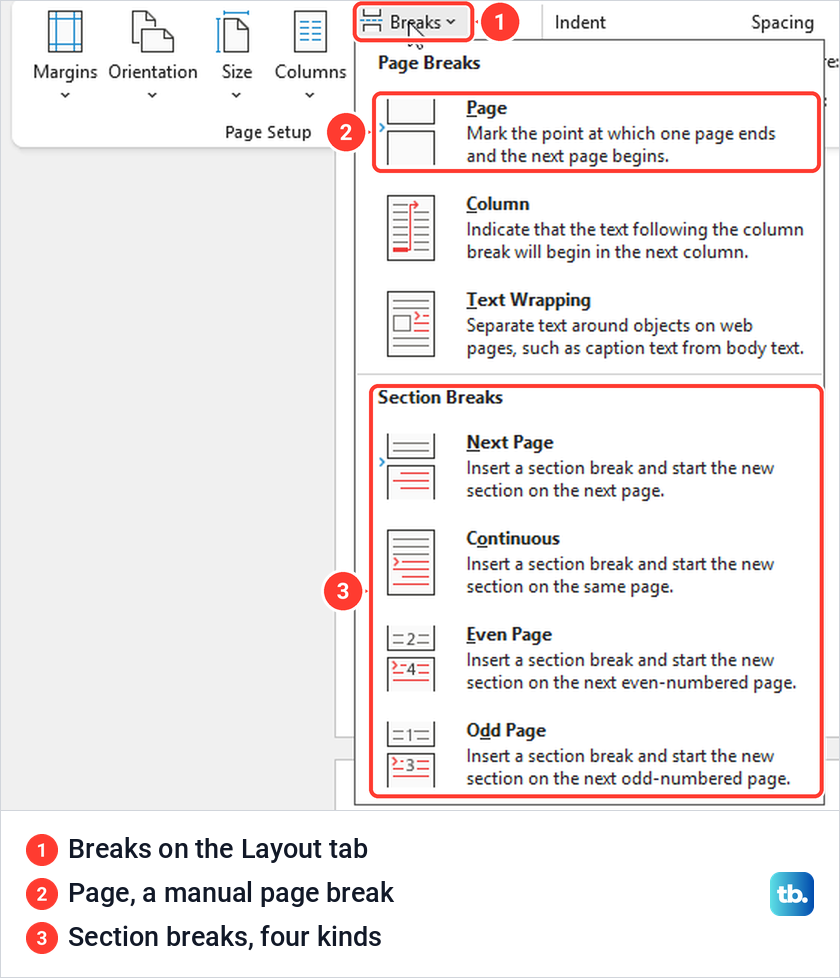
Next Page starts the new section on the next page, Continuous on the same page, and Even Page or Odd Page on the next even or odd page. That last pair can leave a blank page on purpose: Microsoft's example is an Odd Page break at the end of page 3, which starts the next section on page 5.
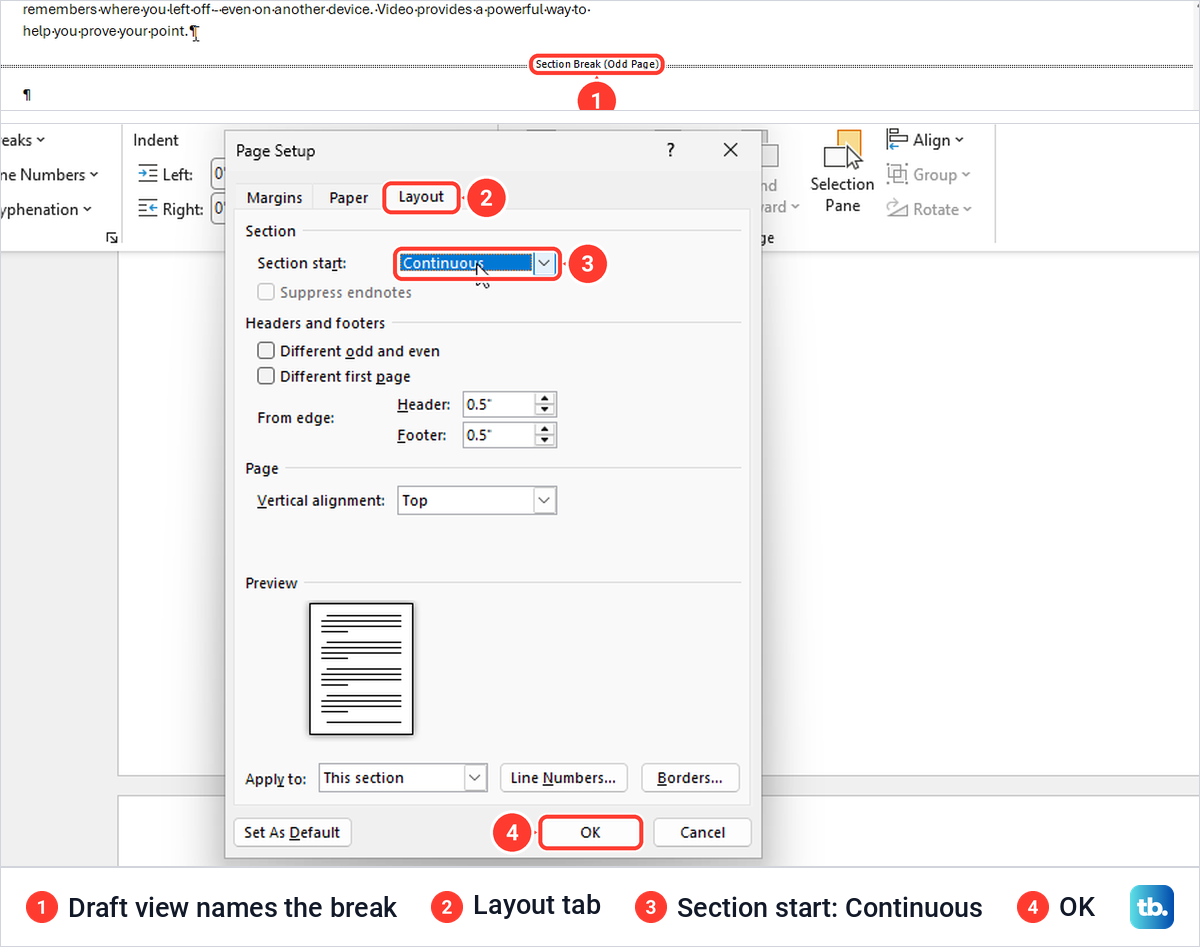
Section breaks are also easy to miss. In Print Layout, a break at the end of a full line showed on our PC as a short dotted stub with no label. Switch to Draft view with Ctrl + Alt + N, or View > Draft, and every break becomes a full-width line naming its kind, such as Section Break (Odd Page); Ctrl + Alt + P takes you back.
To delete a break, put the cursor just before it and press Delete. That removed a Next Page break for us and pulled the text after it back onto the previous page. Backspace at the start of the line after the break did not remove it.
An Odd Page break at the very end behaved differently. Delete removed the break, but the document stayed at three pages and the text above simply moved onto the last page. Microsoft's warning explains it: the merged section takes the formatting of the section after the break, and that section was set to start on an odd page.
So for a blank page caused by an Odd, Even or Next Page break, and for any break in the middle of a document, change the break instead of deleting it. Click in the text after the break, open Page Setup with the small arrow in the corner of the Page Setup group on the Layout tab, select the Layout tab and set Section start to Continuous. After OK, the blank page went and Draft view showed Section Break (Continuous).
Microsoft's own page words this step differently: double-click the break, then choose Layout > Breaks > Continuous. When we did that, the double-click only selected the break, and Breaks > Continuous added a second, Continuous break above it, leaving the Odd Page break and the blank page in place.
If the break separates different headers or footers, Microsoft suggests using Link to Previous in the header instead of deleting the break. If you once made one page landscape, that page sits between two section breaks. Deleting the break after it turns the page back to portrait, and deleting the one before it can turn the pages above it landscape. Continuous breaks are also what Word uses when you set up two columns in part of a page, so leave those alone.
If the break itself is what you are after, rather than a blank page, our guide to removing a section break on its own goes further. On a Mac, Microsoft's steps change the kind of break from Format > Document > Layout, in the Section start list. Microsoft's Mac pages still show older menu names in places, so if a name does not match, look for a similar one.
Microsoft's help for Word for the web disagrees with itself on section breaks. Its section break article says to put the cursor just before the break and press Backspace, while its blank page article says you need the desktop app to delete or change them. Try Backspace first, and if nothing changes, use the Open in Word command that the blank page article points to and fix the break in the desktop app.
Stop a page from coming back by itself
Sometimes a paragraph starts a new page even though no break sits in front of it. With the marks on, look in the left margin for a small black square beside that paragraph, which Microsoft says means it might have Page break before turned on. The same square showed beside headings in our documents too, so check the setting rather than trusting the square alone.
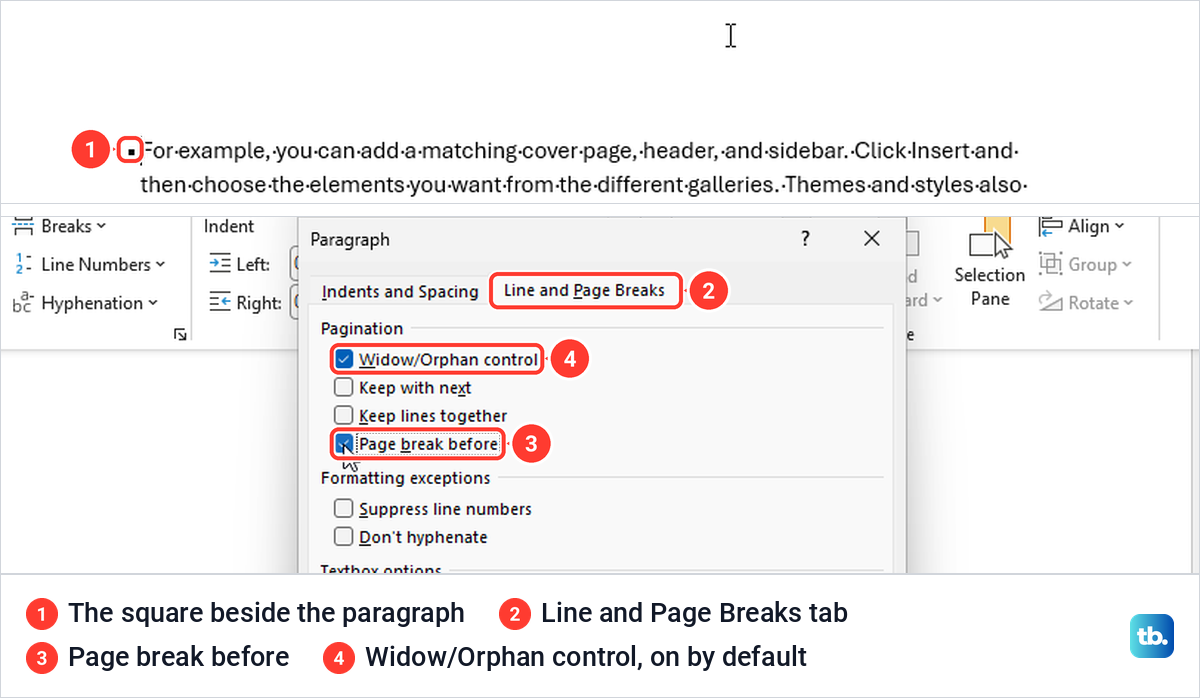
Right-click the paragraph, choose Paragraph and open the Line and Page Breaks tab. Clear Page break before and select OK. When we ticked it on an ordinary paragraph, the paragraph jumped to the top of a new page and the square appeared beside it, and Ctrl + Z moved it back.
The same tab holds three settings that move text down without adding a break. Keep with next keeps a paragraph on the same page as the next one, Keep lines together stops a paragraph splitting across pages, and Widow/Orphan control, which was ticked by default, keeps at least two lines of a paragraph together at the top or bottom of a page. On a Mac, Microsoft's route to this tab is Format > Paragraph.
Find the page fast with the Navigation pane
In a long document, the Navigation pane gets you to a blank page faster than scrolling. Press Ctrl + F, or tick Navigation Pane on the View tab, and select Pages in the pane to see a thumbnail of every page.
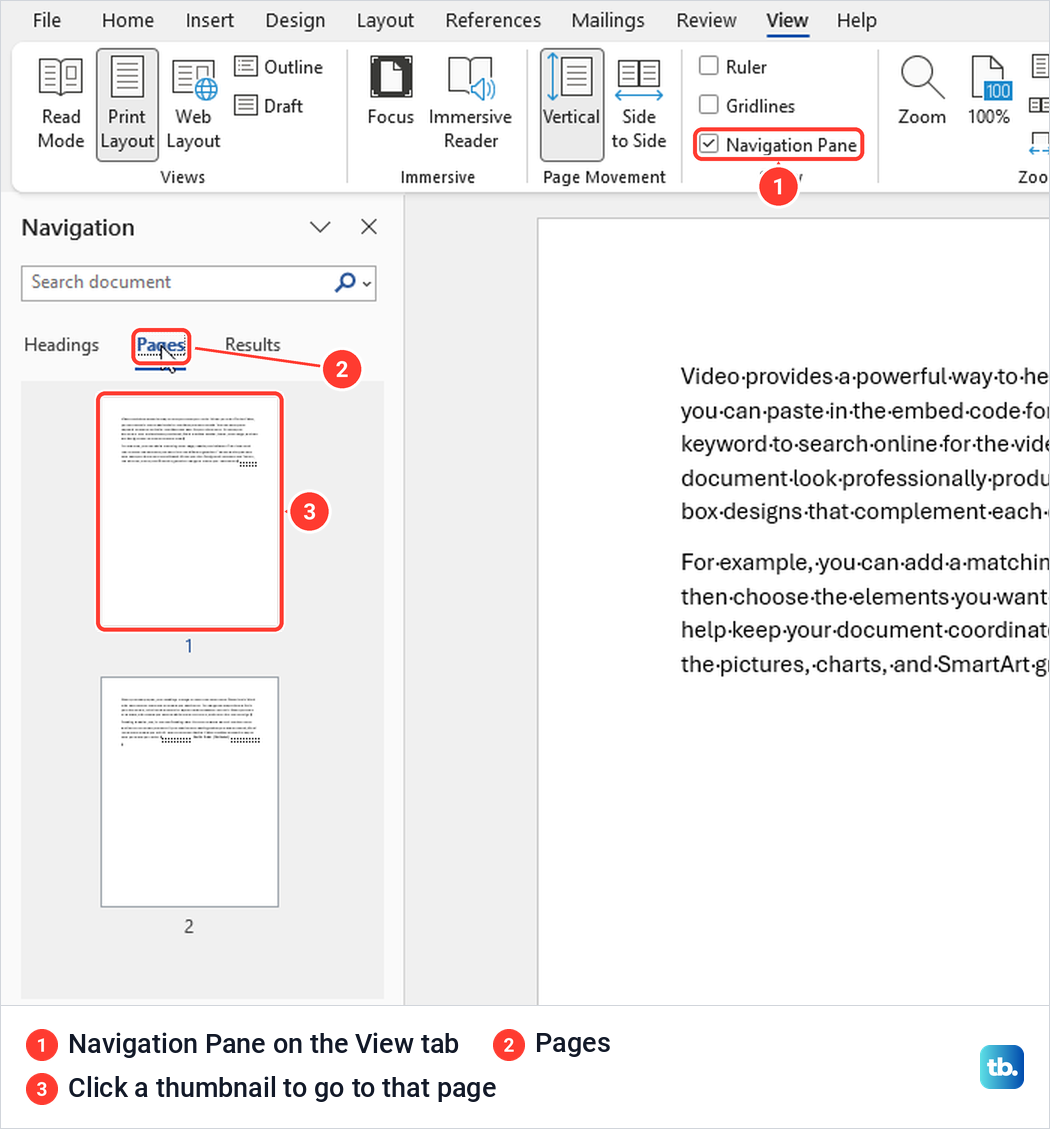
A blank thumbnail stands out at a glance. Click it to jump to that page, then show the marks and delete what is there, because Microsoft describes the thumbnails as a way to go to a page, not as a place to delete one.
On a Mac, Microsoft's help puts the Navigation pane on the View tab, with a Thumbnails view and a Document map. In Word for the web, Microsoft describes the pane as a list of headings plus search.
When Delete does nothing
Check the mode button first. Desktop Word now has the same Editing, Reviewing and Viewing switch as Word for the web, next to Comments and Share at the top right, and Microsoft says Viewing blocks every change. In Viewing we could still select text, but Delete changed nothing and Word showed no message.
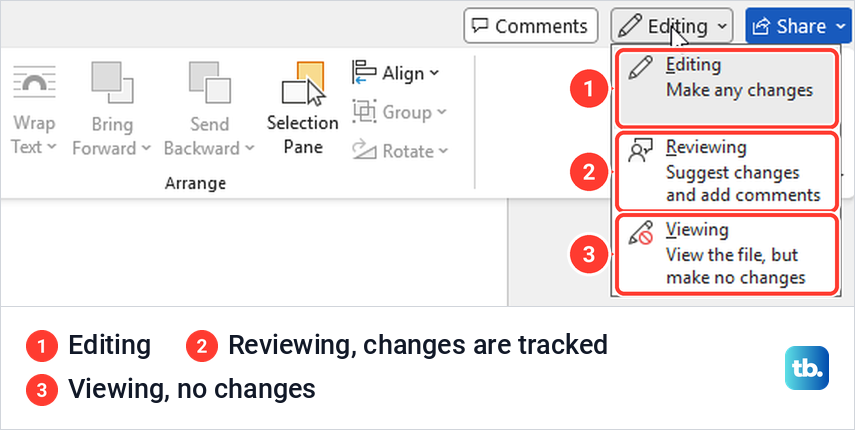
Reviewing turns on Track Changes, and that can make a deleted page look as if it is still there. When we deleted a page break in Reviewing mode, the break line stayed exactly as it was and the page still broke, while the Reviewing Pane listed one deletion. Deleted empty ¶ marks turned red with a bar in the margin and stayed in place.
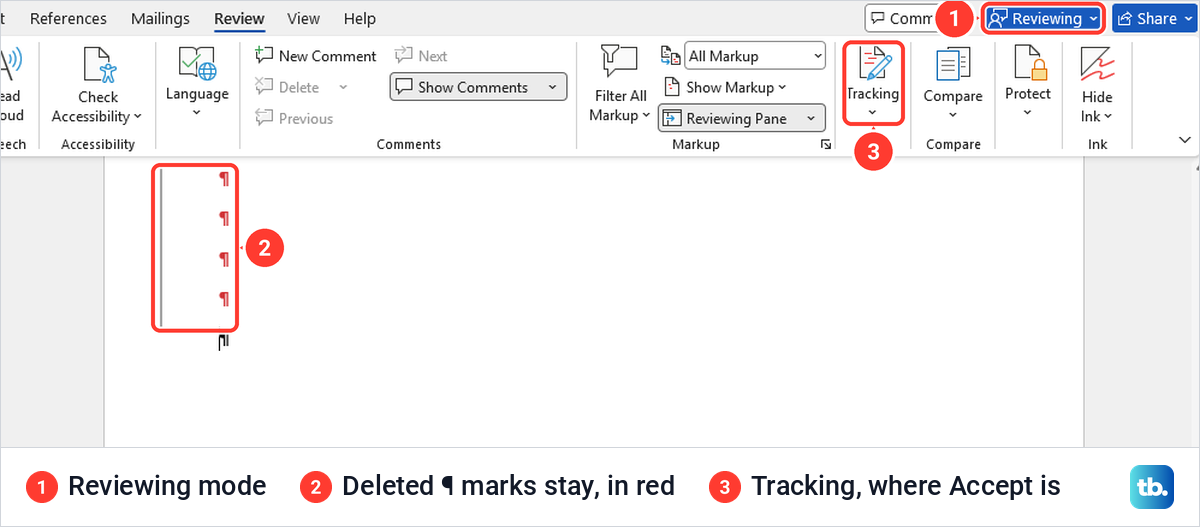
The page only closes up once you accept the change. On the Review tab, select the arrow under Accept and choose Accept All Changes, which closed the gap at once for us; in our window, Accept sat inside the Tracking button. To avoid the detour, switch the mode back to Editing or turn off Track Changes before you delete.
Microsoft adds that a document shared with you for review may not let you turn tracking off, in which case save a copy or ask the sender to share it again without review mode. A file that always opens read-only can be cleared under File > Info > Protect Document > Always Open Read-Only, and Review > Protect > Restrict Editing has a Stop Protection button.
A file opened from an email or a download may also be in Protected View, which Microsoft says blocks changes until you enable editing, and an administrator can lock that too. If the page disappears but the change will not stick, our fix for when Word will not save your document covers read-only files and permissions.
How we tested this guide
We tested this in Word for Microsoft 365 on Windows 11, version 25H2, removing blank pages caused by empty paragraphs and manual page breaks.
Frequently Asked Questions
Why can't I delete the blank page at the end of my Word document?
Word always keeps a final paragraph and will not let you delete it, and when the page above is full that paragraph sits alone on a new page. Show the marks, click that ¶, type 1 in the Font Size box and press Enter. If it still does not fit, make the bottom margin smaller.
How do I get rid of the blank page after a table?
A paragraph mark always follows a table, and when the table reaches the bottom of the page the mark moves onto a page of its own. Shrink it to 1 point the same way. Résumé templates show this a lot because they are built from tables.
How do I delete a page in Word on a Mac?
Microsoft's Mac steps are to click in the page, press Option + Command + G, type \page, press Enter (Return on most Mac keyboards), select Close and press Delete. For a blank page, press Command + 8 to show the marks first.
Can I delete a page from the Navigation pane?
Microsoft documents no way to delete a page from the thumbnails. It describes them as a way to go to a page, so click the thumbnail, then delete the content or the marks on that page in the document.
How do I delete several pages at once?
Click at the start of the first page, hold Shift and click after the last word of the last page, then press Delete. In desktop Word on Windows you can also click at the start, press F8 and click at the end.
Will deleting a section break change my headers or layout?
It can. Microsoft says the merged section takes the formatting of the section after the break, so the part before the break can lose its own headers, margins or orientation. Change the break to Continuous in Page Setup instead, or use Link to Previous for headers.
Why does pressing Delete do nothing?
Check the mode button. In Viewing, Delete changes nothing, and in Reviewing a deleted break can look untouched until you accept the change. The file may also be read-only, restricted or in Protected View.
How do I keep a blank page out of a PDF?
Remove it from the document first with the steps above. If you only need it gone from the copy you send, Microsoft's Save As dialog in desktop Word has an Options button for choosing the pages, and our guide on how to save a Word document as a PDF walks through it.