
To make a table of contents in Word, give your main sections the Heading 1 style and your subsections Heading 2, click where the list should go, and choose References > Table of Contents > Automatic Table 1. Word builds the list from those headings, and after you add or rename one, Update Table on the same tab refreshes it. In our Automatic Table 1, each entry had a dotted leader and its page number.
The headings are the whole trick. An automatic table of contents normally builds its entries from paragraphs that carry a heading style, so a line you only made bold and larger stays out of it. That is a common reason a heading is missing, and it happened in Word for the web too.
The short version
- Give main sections Heading 1 and subsections Heading 2, from Home > Styles or Ctrl + Alt + 1 and Ctrl + Alt + 2.
- Insert the list from References > Table of Contents > Automatic Table 1 or Automatic Table 2.
- After edits, click Update Table or press F9 inside it, and pick Update entire table if Word asks.
- Use Custom Table of Contents to change the dots, page numbers and how many heading levels show.
- A Manual Table is typed by hand and never updates from your headings.
Table of contents fixes at a glance
| What changed | What to do | What to expect |
|---|---|---|
| You renamed a heading | References > Update Table, or F9 with the cursor in the table, then Update entire table if Word asks | The new wording replaces the old. On our PC it refreshed with no question asked |
| A heading is missing | Apply Heading 1 or Heading 2 to it, then Update Table and Update entire table | The heading joins the list in the right place |
| Only the page numbers moved | Update Table, then Update page numbers only if Word asks | Entries keep their wording and the numbers refresh |
| Too many heading levels | Custom Table of Contents, lower Show levels, then Yes to replace | Deeper headings drop out of the list |
| You used a Manual Table | Remove Table of Contents, then insert Automatic Table 1 | Word rebuilds the entries from your current headings |
| You edit in Word for the web | Right-click the table and choose Update Table of Contents | Our renamed heading refreshed with no dialog |
Give your headings the Heading styles first
Click in the line that starts a main section, open the Home tab and choose Heading 1 in the Styles gallery. Do the same with Heading 2 for each subsection inside it, and Heading 3 for a level below that. Microsoft calls heading styles the simplest way to add headings, and they are what the table reads.
The gallery can hide the name you are looking for. In our Word window the Heading 1 thumbnail was labelled only Heading, and pointing at it showed the full name, Heading 1, in a tooltip. Opening the gallery with its arrow showed Heading 2 and Heading 3 right after it, followed by Title and Subtitle.
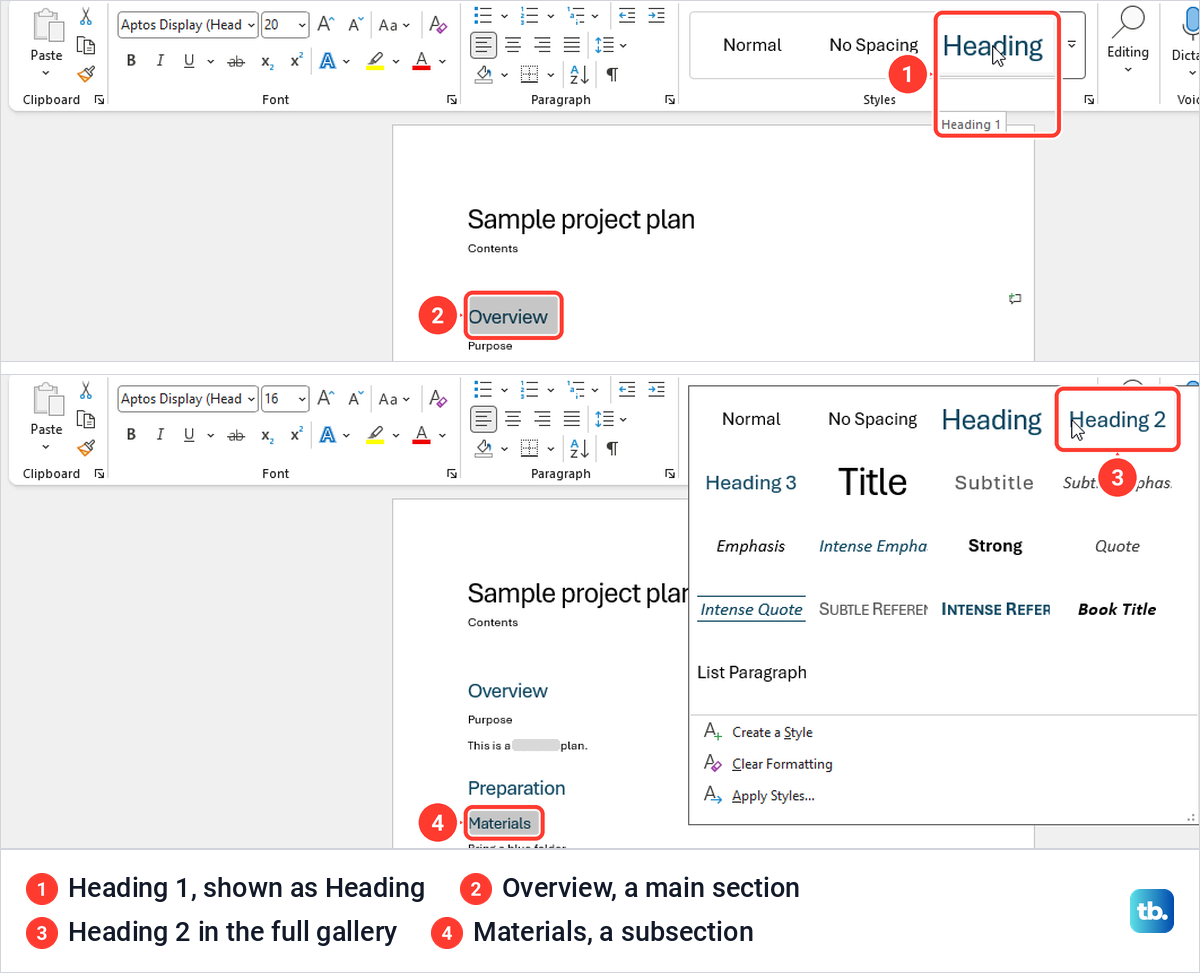
The keyboard is quicker once you know it. On our PC, Ctrl + Alt + 1 applied Heading 1 and Ctrl + Alt + 2 applied Heading 2, in the desktop app and in Word for the web. If the ribbon or the Styles gallery is new to you, learn the Word ribbon and styles before you format a long document.
Leave the document title alone. Our sample used the Title style for its name, and Word kept it out of the list, which is what you want for the line at the top of the page. If a heading has picked up a mix of fonts and sizes from pasting, clear unwanted formatting in Word and then apply the heading style again.
To check your headings before you insert anything, press Ctrl + F and open the Headings tab of the Navigation pane. Ours listed exactly the heading-styled lines, with subsections indented under their sections. It is a good check, but not a full preview, because the table can show fewer levels than the pane, and a marked entry described later appears in the table but not in the pane.
Insert an automatic table of contents
Click at the start of the line where the list should go, usually just under the title or on its own page. Open the References tab, where the Table of Contents group holds the Table of Contents button, Add Text and Update Table.
Click Table of Contents. Our gallery offered three built-in choices, Automatic Table 1, Automatic Table 2 and Manual Table, followed by Custom Table of Contents and Remove Table of Contents. The visible difference between the two automatic styles is the heading line Word adds above the list, which reads Contents for the first and Table of Contents for the second.
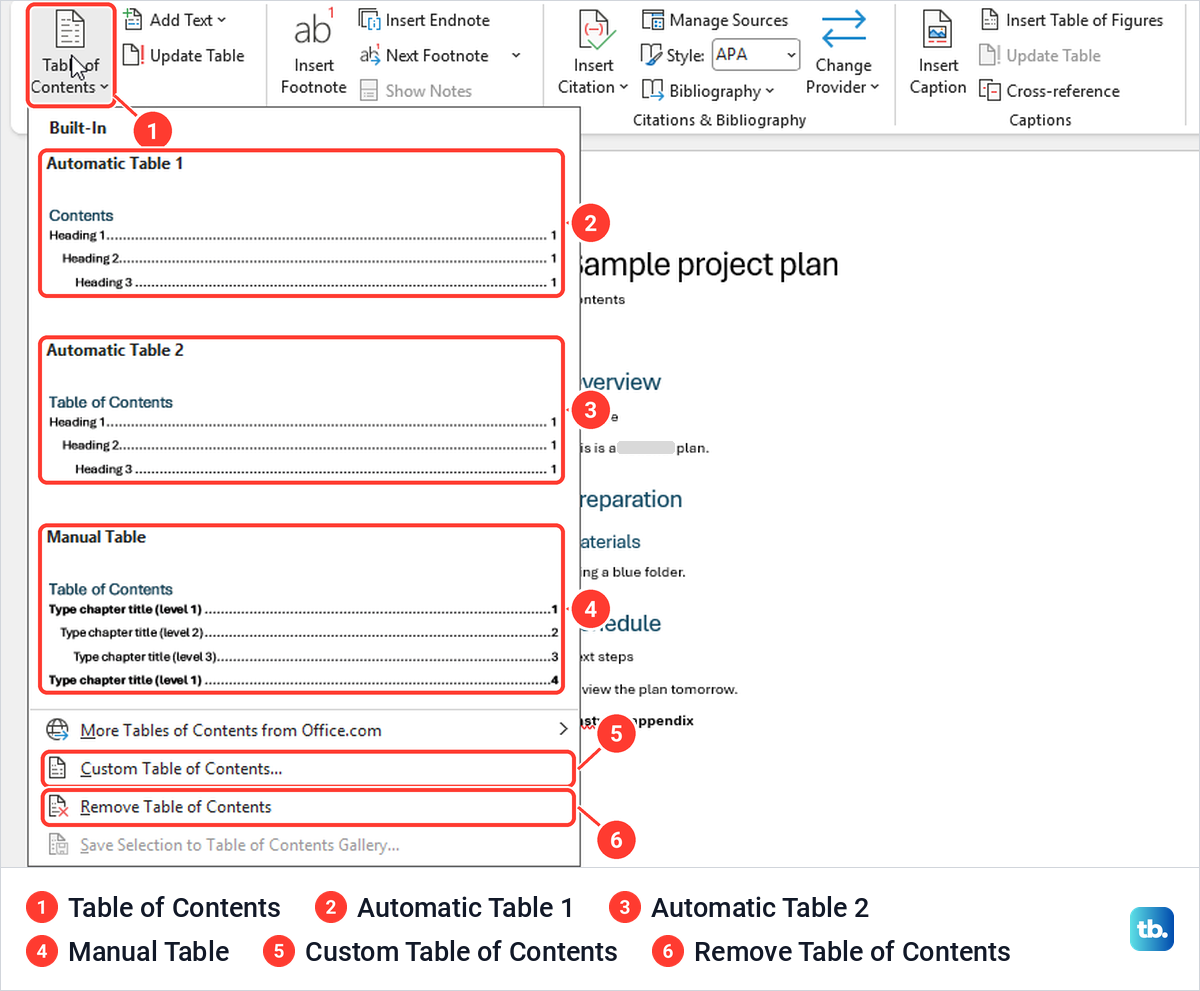
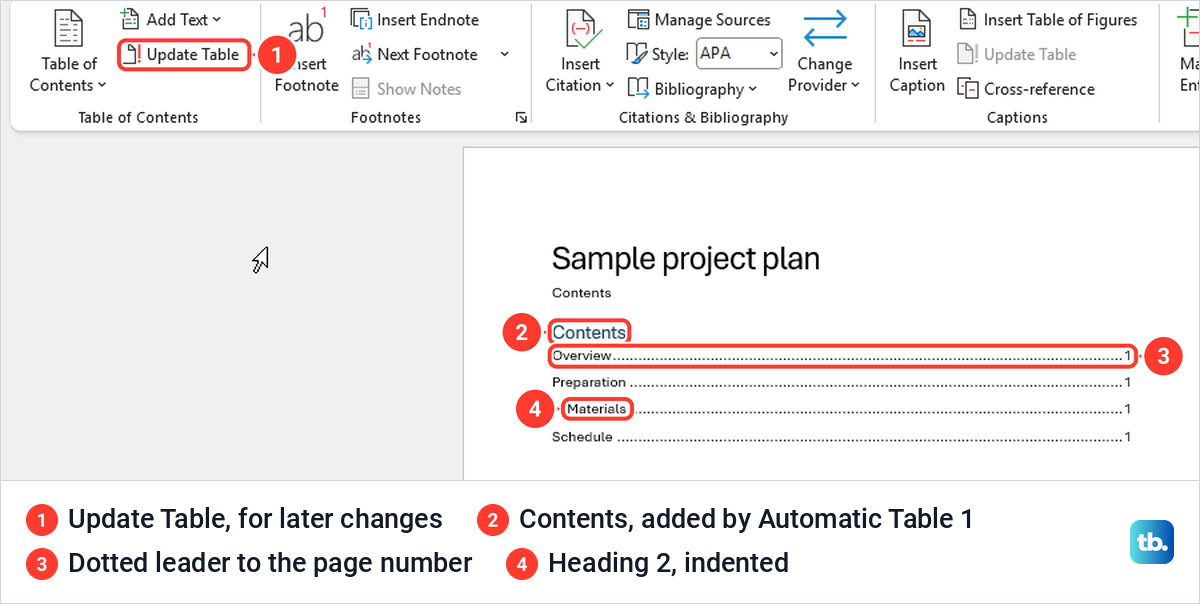
Pick either automatic style. Our Automatic Table 1 listed Overview, Preparation and Schedule, with Materials indented beneath Preparation because it uses Heading 2. Each line had dotted leaders running to a page number at the right margin.
Avoid Manual Table unless you really want to type every line yourself. Microsoft says that with a manual style Word won't use your headings to create the table, and it cannot update it. What that looks like in practice is covered further down.
Fix a heading that is missing from the table
Our sample ended with a line called Unstyled appendix, typed in bold Normal text so it looked like a heading. Automatic Table 1 left it out completely. Microsoft's own explanation is that missing entries often happen because headings aren't formatted as headings, and that is exactly what we saw.
Click in the missing line, apply Heading 1 from Home > Styles, then click References > Update Table. Word showed a box called Update Table of Contents, and after we picked Update entire table and clicked OK, Unstyled appendix appeared at the bottom of the list.
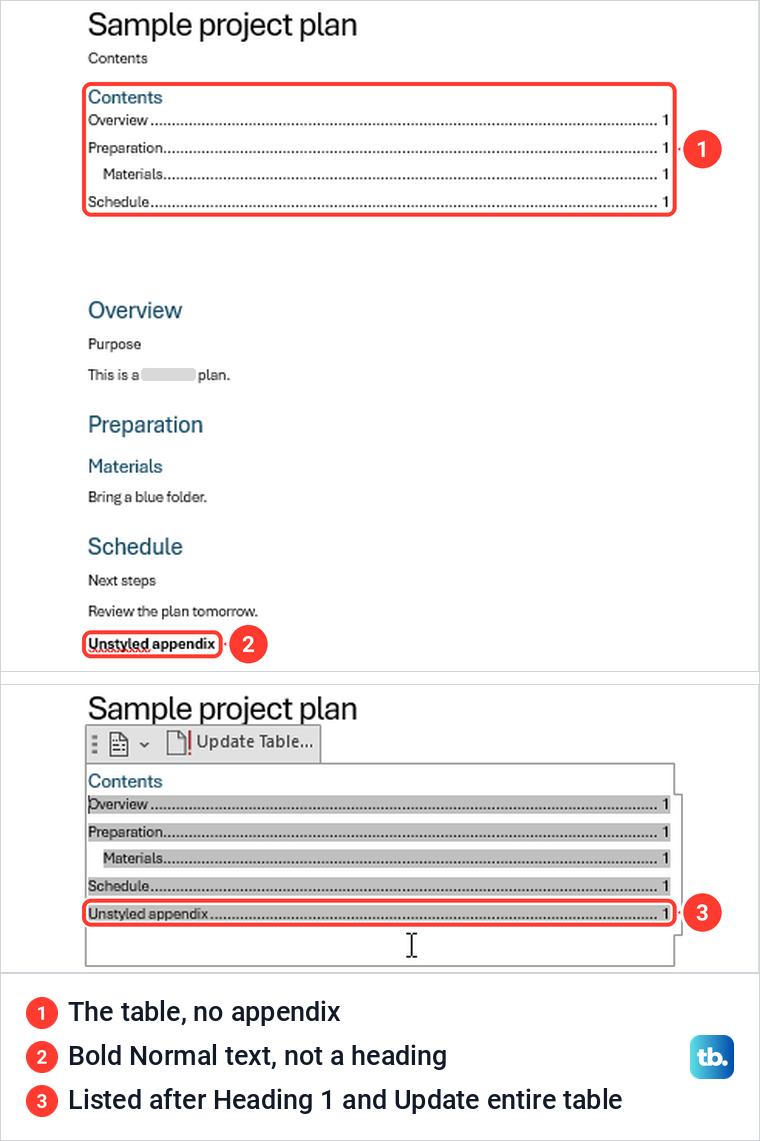
If the line already uses a heading style and still does not show, check how many levels the table displays. A Heading 3 line stays out of a table set to two levels, and a Heading 2 line stays out of a table set to one, as the Custom Table of Contents section shows.
Update a table of contents in Word after edits
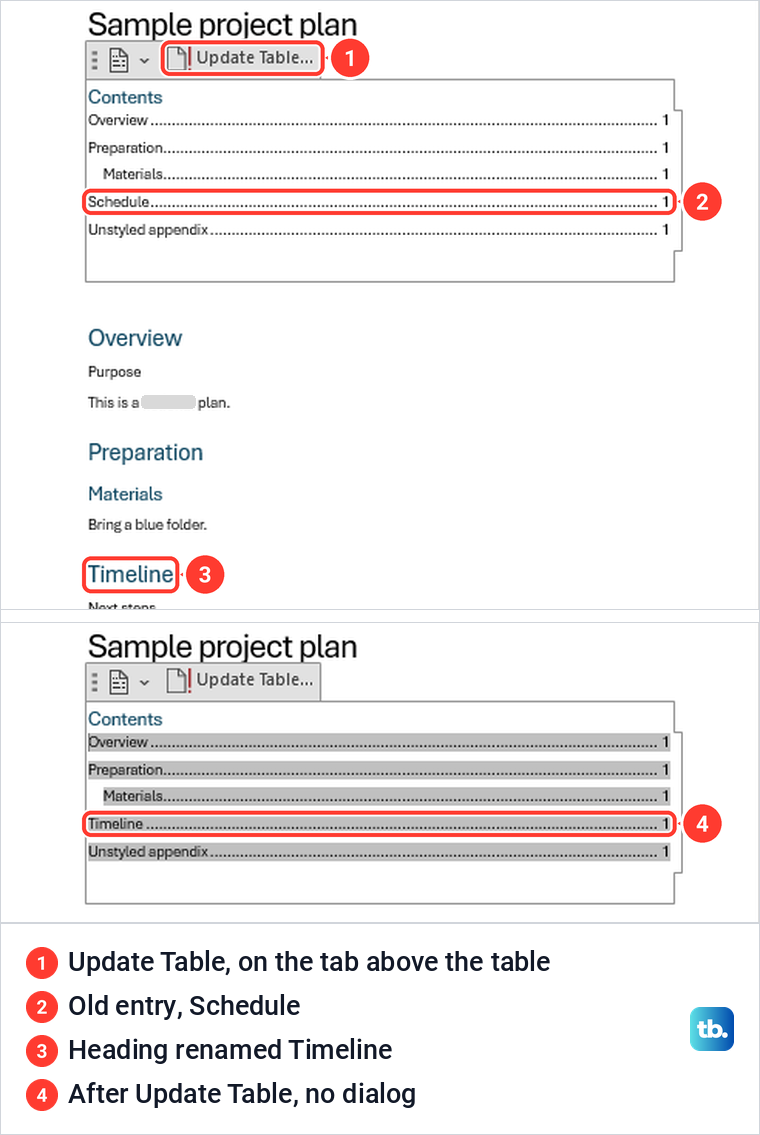
A Word table of contents does not change on its own while you type. When we renamed the Schedule heading to Timeline, the table still said Schedule until we refreshed it. Click anywhere in the table and Word shows a small tab above it with an Update Table button, or use Update Table on the References tab.
On our PC a renamed heading brought up no choice. Update Table rebuilt the whole list at once, and so did right-clicking the table and choosing Update Field, even after we saved the file with the old entry showing, closed it and reopened it. That was after we had already picked Update entire table once, with Word left running throughout, so your copy of Word may ask instead. If it does, pick Update entire table.
The choice box does exist, and it appeared in two cases. It came up when we had turned a bold line into a new heading, and when we clicked Update Table on a list that was already current. It offers Update page numbers only, selected by default, and Update entire table.
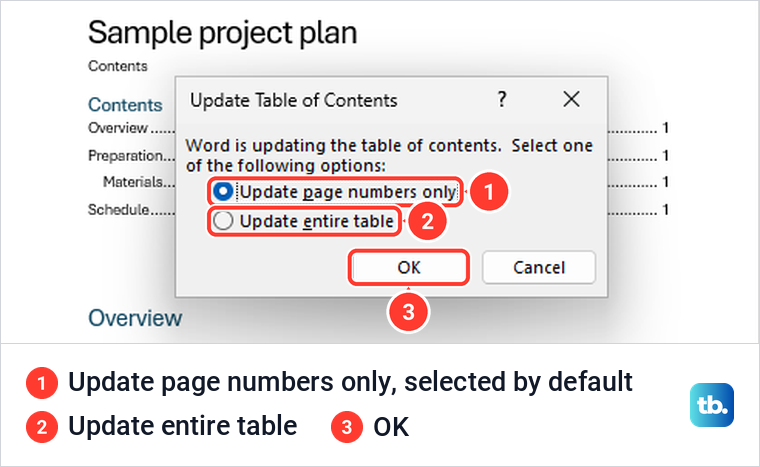
Microsoft's rule for the two choices is simple. Update page numbers only refreshes the numbers and ignores any changes to the heading text, while Update entire table reflects the new wording as well as any page changes. When in doubt, pick Update entire table, because it covers both kinds of change.
If the same section name appears throughout a long file, find and replace text in Word first, then refresh the table once at the end. One update after all your edits is enough.
Update it with the keyboard
Click inside the table and press F9. When we renamed Materials to Supplies, F9 replaced the old entry straight away with no dialog. On a table that was already current, F9 opened the same Update Table of Contents box as the ribbon button.
To refresh every field in the document at once, press Ctrl + A and then F9. That updated a renamed entry on our PC, from Preparation to Getting ready, again without a dialog. Microsoft notes that if your document has tables with fields or formulas, you might need to select each table separately and press F9.
Word can also refresh fields every time you print. The setting is File > Options > Display, then Update fields before printing under Printing options, and it was switched off on our PC. Microsoft suggests turning it on so you don't forget to update the table before printing.
Change the page numbers, dots and heading levels
Open References > Table of Contents > Custom Table of Contents. Word opens a dialog called Table of Contents with a Print Preview and a Web Preview side by side. Our automatic table opened with Show page numbers and Right align page numbers ticked, dots as the Tab leader, Formats set to From template and Show levels at 3.
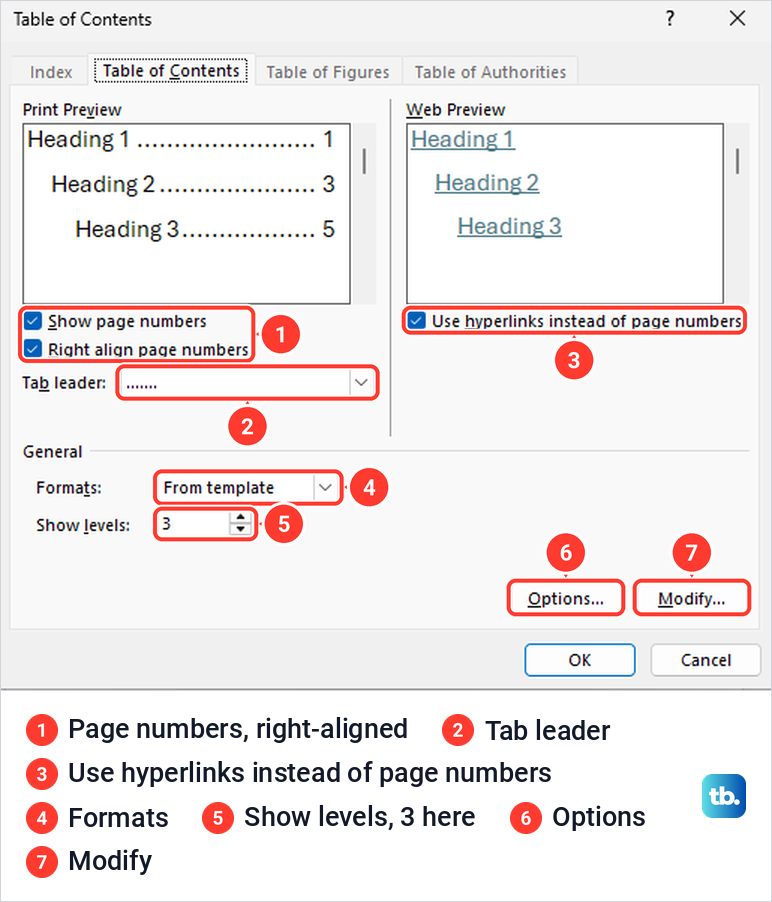
The Tab leader list had four choices, none, dots, dashes and a solid line. Formats offered From template, Classic, Distinctive, Fancy, Modern, Formal and Simple, and Show levels went up to 9. The Web Preview side carried a Use hyperlinks instead of page numbers box, which was ticked on ours.
We set Show levels to 1 and clicked OK. Word asked Replace this table of contents? with Yes, No and Cancel, and after Yes the list held only the Heading 1 entries. The Heading 2 line, Supplies by then, had dropped out even though it still had its heading style.
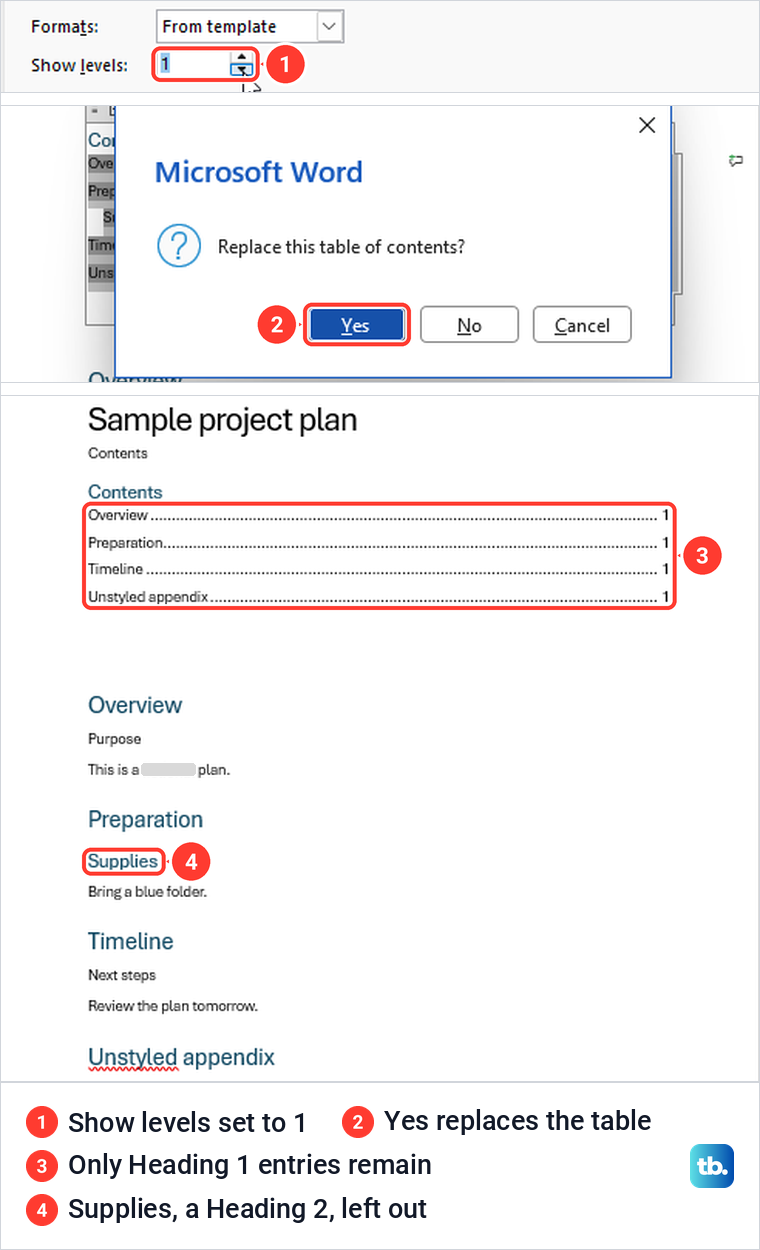
These options control the table only, not page numbers printed on the pages. Word counts the table's numbers whether or not the pages show them, but on a printed copy readers need numbers on the pages too, so add page numbers in Word if yours have none.
Change the font of the table of contents
Each level of the table has its own style, named TOC 1 for the first level, TOC 2 for the second and so on. To restyle them, open Custom Table of Contents and click Modify. On our PC Modify was greyed out while Formats was set to Distinctive, and became available again with From template, which matches Microsoft's advice to change Formats to From template when Modify is grayed out.
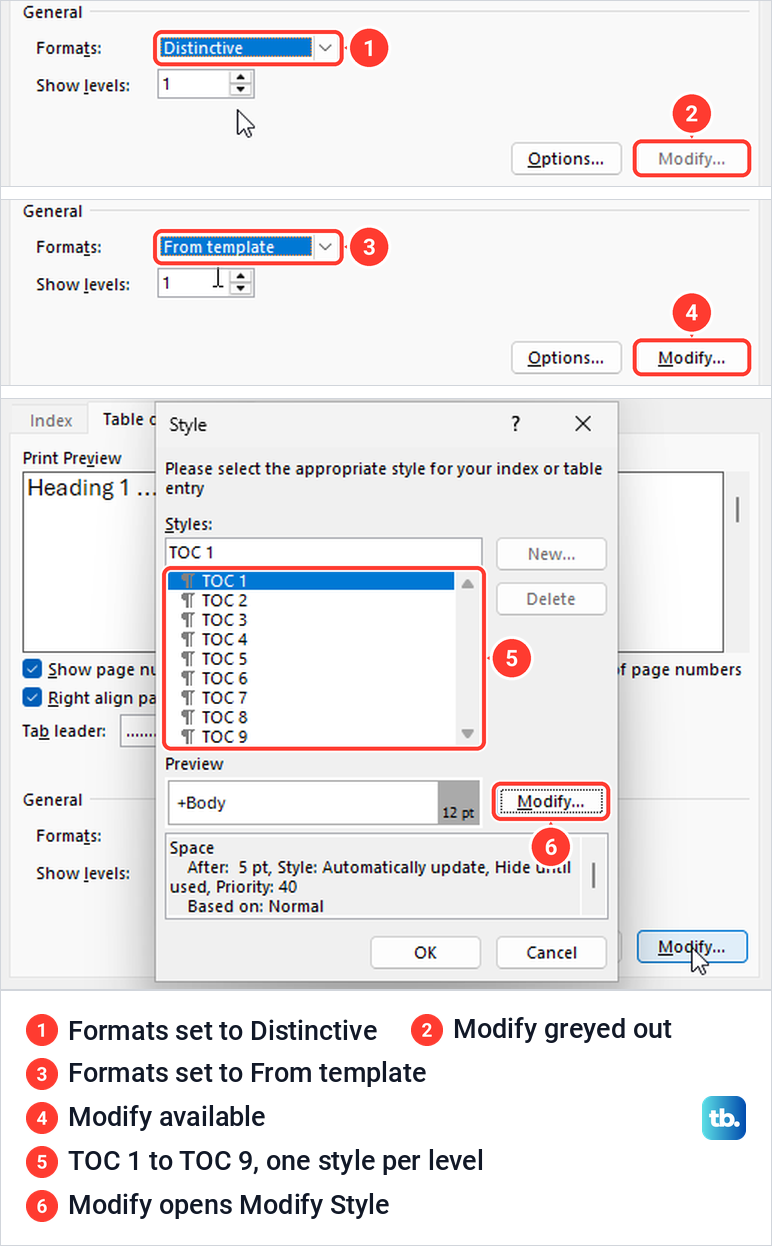
Modify opened a Style box listing TOC 1 to TOC 9, with a preview of the selected one. Select a TOC level in that list, then click Modify to open Modify Style for it. Ours opened on TOC 1, with the font, size, colour, spacing and alignment controls you know from any other style. Microsoft's steps are to make your changes, select OK, and repeat for each level you want to change.
Why a Manual Table does not update
Manual Table looks like the automatic ones, but it is filled with placeholders. Ours inserted six lines reading Type chapter title, at levels 1, 2 and 3, numbered 1 to 6. Clicking a placeholder selected it, and we typed Overview over the first one.
Then we renamed the Overview heading to Introduction. The manual entry kept saying Overview, and References > Update Table produced a message saying There's no table of contents to update. You can insert one from the References tab.
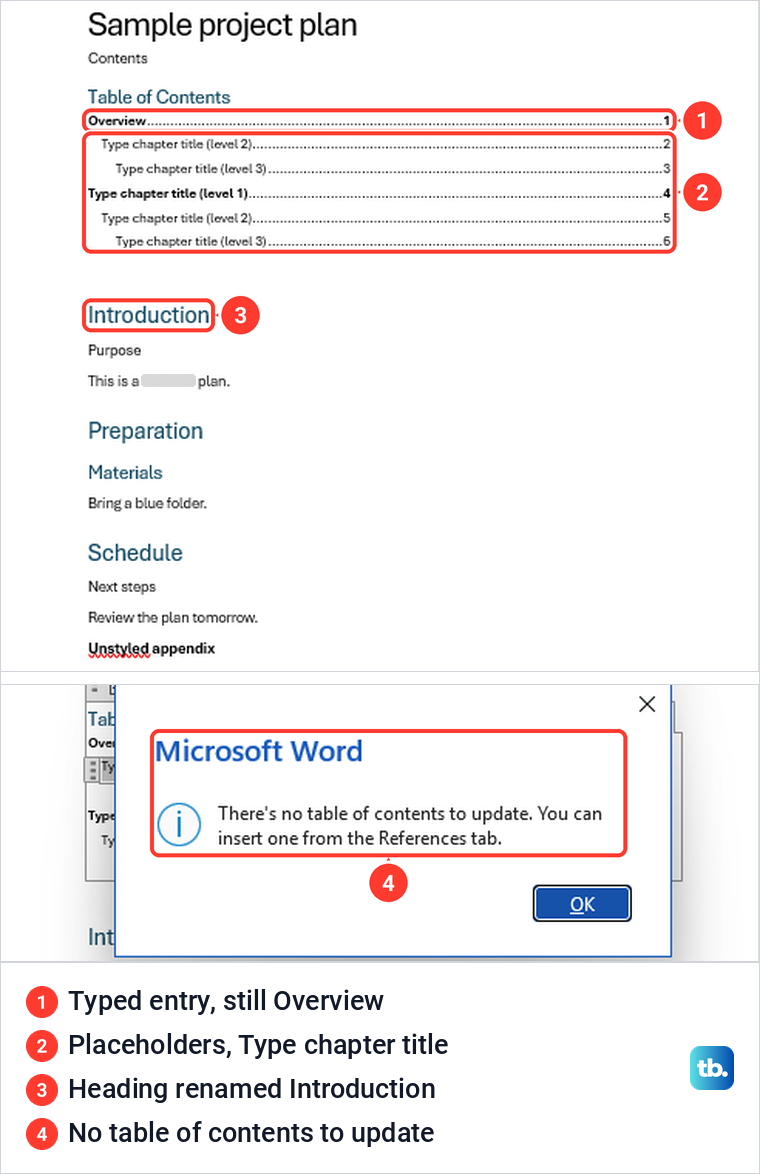
The table looks updatable, which is what catches people out. Its tab still showed an Update Table button, yet the right-click menu had no Update Field. Microsoft is plain about it: manually created tables can't be updated by Word, and you have to type your changes into them.
Replace a manual table with an automatic one
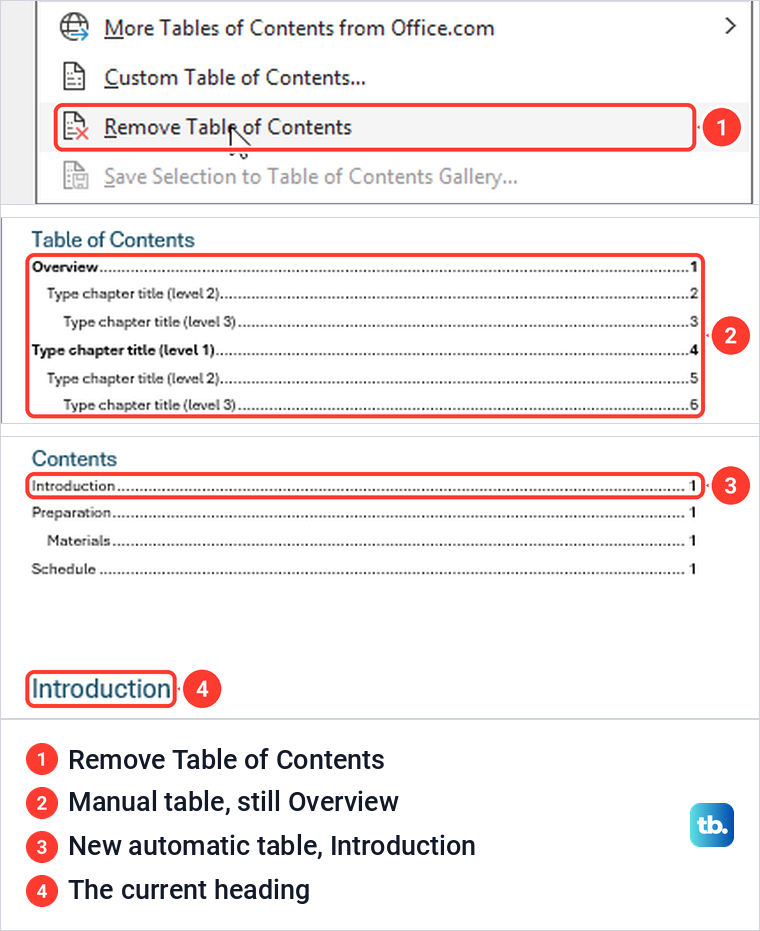
Before replacing a hand-built contents page, make a copy of the Word document so you can compare the two layouts. Then open References > Table of Contents and choose Remove Table of Contents at the bottom of the gallery.
On our copy, Remove Table of Contents took the whole manual table away, typed entries and all. Choosing Automatic Table 1 in the same spot built a fresh list, and its first entry read Introduction, the current heading, instead of the stale Overview.
Add a line that is not a heading
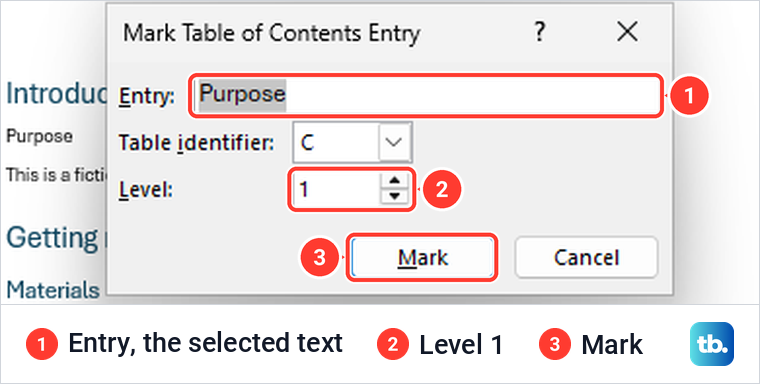
Sometimes you want a line in the table without turning it into a heading. Select the text and press Alt + Shift + O, which Microsoft lists as the shortcut to mark a table of contents entry. Our Mark Table of Contents Entry box showed the selected word Purpose, a Table identifier of C, Level 1, and a Mark button.
Marking alone was not enough. Our first full update left Purpose out, because Table entry fields was unticked under Custom Table of Contents > Options, while Styles and Outline levels were ticked. After we ticked Table entry fields, Purpose joined the list at level 1.
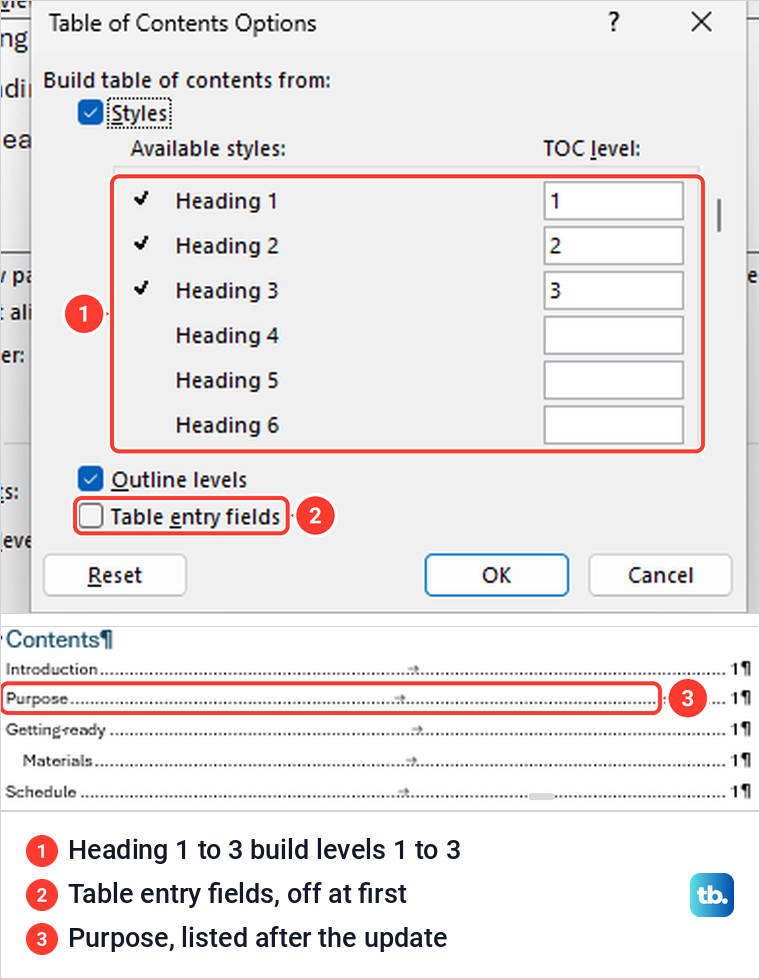
The mark is a hidden field, which we saw as TC "Purpose" with formatting marks switched on. It is useful for long reports, but for most documents a real heading style is easier to keep track of, and the Navigation pane does not show marked entries.
Make a table of contents in Word for the web
Word for the web uses the same headings. On its Home tab, the Styles drop-down listed Normal, No Spacing, Heading 1, Heading 2, Title and Subtitle, and the Ctrl + Alt + 1 and Ctrl + Alt + 2 shortcuts worked there as well.
Click where the list should go, open References, click Table of Contents and choose Insert Table of Contents. In our browser that was a short menu, with Update Table of Contents and Remove Table of Contents greyed out until a table existed. There is no gallery of styles to pick from.
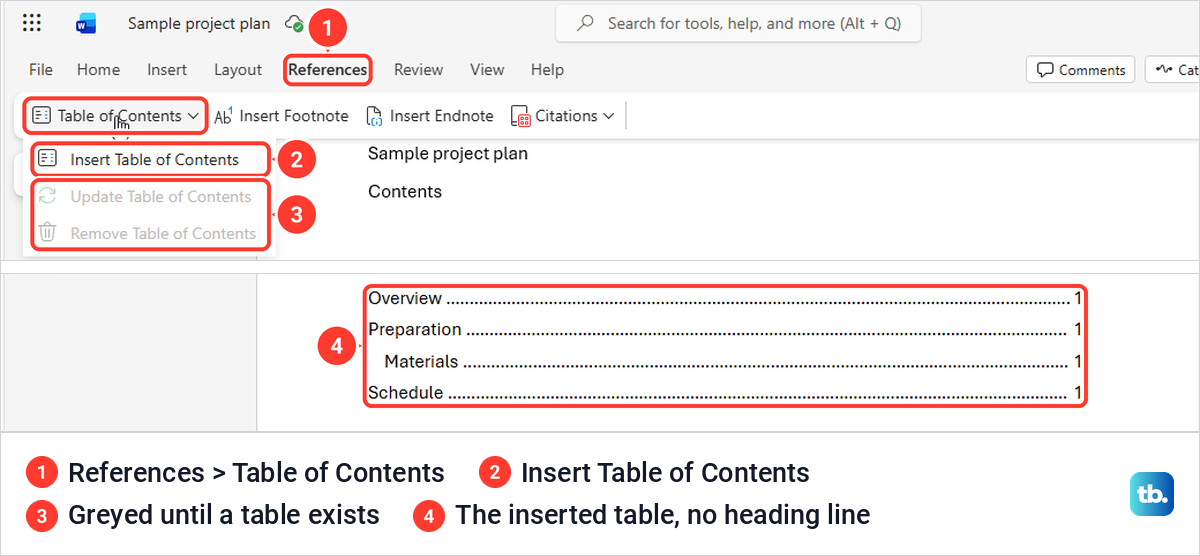
Our web table listed the styled headings with dotted leaders and page numbers. Unlike the desktop styles, it added no Contents or Table of Contents heading line, so type your own above it if you want one.
To refresh it, right-click the table and choose Update Table of Contents. When we renamed Schedule to Timeline, that replaced the entry at once with no dialog. A bold-only line was missing in the browser too, and appeared after we gave it Heading 1 and updated the table.
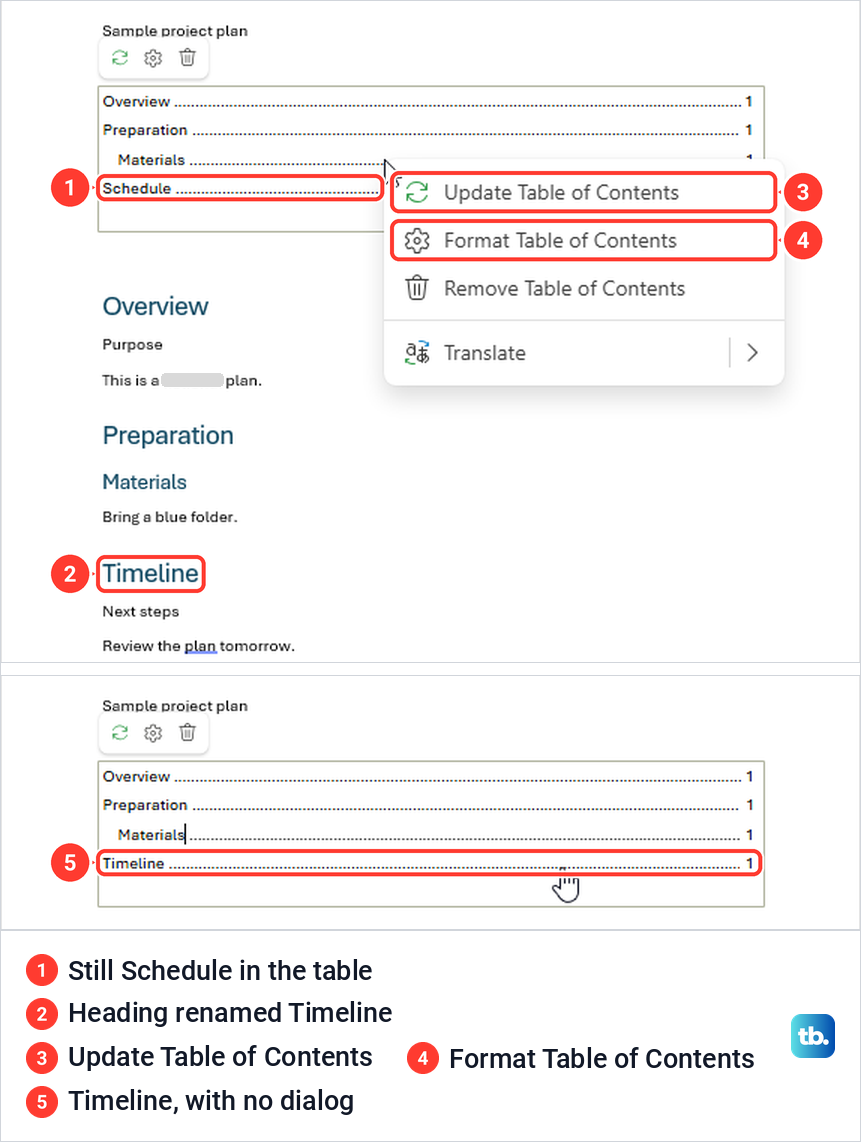
The same right-click menu has Format Table of Contents, which opened a Table of Contents pane on the right. It had boxes for Page numbers with a Right Align choice, Tab leaders with dots, Heading links, and Show headings up to, which read Heading 9 on our table.
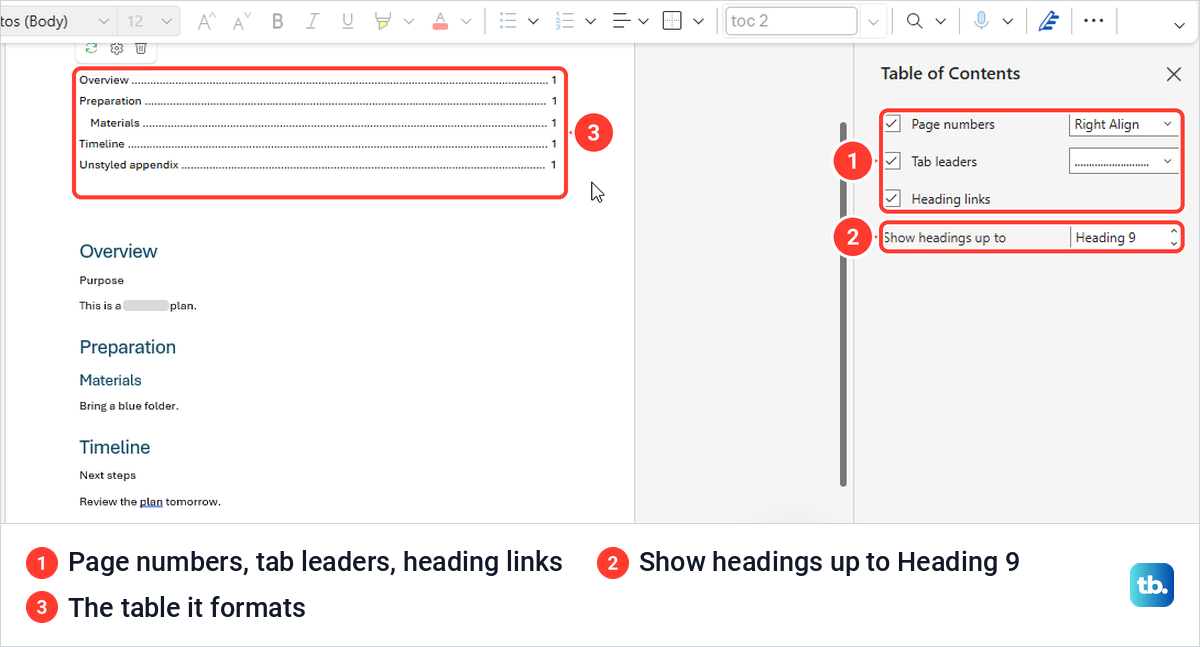
One older Microsoft help page still says a table of contents may appear in the browser as a placeholder that cannot be edited or updated. Microsoft's current feature comparison lists the table of contents in both Word for the web and the desktop app, and that matches what we saw. The desktop app still offers more, since the web menu had no Automatic or Manual Table styles and no Custom Table of Contents dialog.
Word for Mac and phones
In Word for Mac, Microsoft's steps follow the same path. Click where the table should go, select References > Table of Contents and choose an automatic style, then update it from the References tab after you edit the headings.
Phones are different. An older Microsoft feature table for Word on Android and iOS lists opening a table of contents as supported, but adding and updating one as not supported. Build or refresh the table on a computer or in Word for the web, and Word on the phone can then open it.
Check the table before you share the document
Do one last update after your final edit, then read the list against the document. Every section should be there, in order, with sensible page numbers. If a stray break changes the pagination, remove an unwanted section break before you update the page numbers.
Wide tables or charts can change the page count too. If a wide section has to turn sideways, make one page landscape in Word and then refresh the contents page numbers. If inserting the contents leaves a blank page, remove an extra page in Word before doing the final update.
Once the entries and numbers are correct, save the Word document as a PDF if you need to share it in that format. Run that final update first, so the PDF carries the entries and page numbers you just checked.
How we tested this guide
We tested this in Word for Microsoft 365 on Windows 11, version 25H2, and Word for the web in Microsoft Edge, updating a table of contents after renaming headings.
Frequently Asked Questions
Why is a heading missing from my table of contents?
Usually it is bold or large text in the Normal style rather than a heading style. Apply Heading 1 or Heading 2, then use Update Table and pick Update entire table if Word asks. If it already has a heading style, check Show levels under Custom Table of Contents.
Why does my table of contents still show an old heading?
The table only changes when you update it. Click References > Update Table, or click in the table and press F9. If Word offers a choice, Update page numbers only keeps the old wording, so pick Update entire table.
Does a Word table of contents update by itself?
No. An automatic table updates when you tell it to, from Update Table, Update Field or F9, and Word can also refresh fields before printing if you turn that option on. A Manual Table never updates from your headings, so you retype its entries.
Can I change the dots and the number of levels?
Yes. On the desktop, Custom Table of Contents has a Tab leader list with dots, dashes, a solid line or none, and Show levels from 1 to 9. Word for the web has a Format Table of Contents pane with Tab leaders and a Show headings up to box.
Can Word for the web make and update a table of contents?
Yes. Use References > Table of Contents > Insert Table of Contents, then right-click the table and choose Update Table of Contents after edits. In our browser it updated a renamed heading straight away.
Can I add a line to the table that is not a heading?
Yes, on the desktop. Select the text, press Alt + Shift + O and click Mark, then tick Table entry fields under Custom Table of Contents > Options and update the table.
Can I make a table of contents in Word on my phone?
An older Microsoft feature table for Word on Android and iOS says you can open a table of contents but not add or update one. Make it in Word on a computer or in Word for the web instead.