
To change margins in Word, open the Layout tab, select Margins and pick a preset, or choose Custom Margins at the bottom of the list, type the Top, Bottom, Left and Right sizes you need, then select OK. By default a new blank document uses Normal, which is 1 inch on every side. The same steps set margins for a school paper, adjust margins on a report, or put one inch margins back on a file someone sent you.
Margins are the blank border between the text and the edge of the paper. They are not the same as an indent, which moves one paragraph, or line spacing, which sets the gap between lines, so to open up the text itself, change line spacing in Word instead. If you want two blocks of text side by side, create two columns in Word rather than moving the page edges.
Word changes the margins of the current section. In most documents that is the whole file, but if yours has section breaks, the Apply to box in Page Setup decides which part moves. The steps below cover Word for Windows first, then Word for the web, a Mac and a phone.
The short version
- Open Layout > Margins and pick a preset such as Normal (1 inch) or Narrow (0.5 inch).
- For exact sizes, choose Custom Margins, type the four edges and select OK.
- From the keyboard, press Alt, P, M to open the Margins list.
- For one page or part of a file, add section breaks and set Apply to to This section.
- For pages printed on both sides and bound like a book, use Mirror margins and add a gutter for the binding.
Which margin setting to use
Most jobs need only a preset or the Custom Margins box. The rest of this guide covers the cases where only part of a document should change, or where the pages will be bound.
| What you need | What to choose | What it changes |
|---|---|---|
| One inch on every side | Layout > Margins > Normal | The current section, which is the whole file unless it has section breaks |
| More room for text | Narrow, 0.5 inch on every side | The current section |
| Exact sizes | Custom Margins, then type Top, Bottom, Left and Right | Whatever the Apply to box says |
| Alt, P, M from the keyboard | The Margins list, then the arrow keys and Enter | The current section |
| Different margins on one page | Two section breaks, then Apply to > This section | Only the section holding the cursor |
| Facing pages for a bound document | Multiple pages > Mirror margins | Inside and Outside replace Left and Right |
| Room for binding | Gutter, on the Left or Top | Extra space on that side, on top of the margin |
| Default margins for new documents | Set As Default in Page Setup | New documents based on the Normal template |
| Word for the web | The Margins icon on the Layout tab | Presets and the four edges only |
Change margins with a preset
Open the document and select the Layout tab. Margins is the first button on the left, in the Page Setup group, and it opens a list of presets with the sizes printed beside each one.
On a new document our list had Normal highlighted at 1 inch on all four sides, then Narrow at 0.5 inch, Moderate with 1 inch at the top and bottom and 0.75 inch at the sides, and Wide with 2 inch sides. Mirrored and Office 2003 Default came next, with Custom Margins at the bottom.
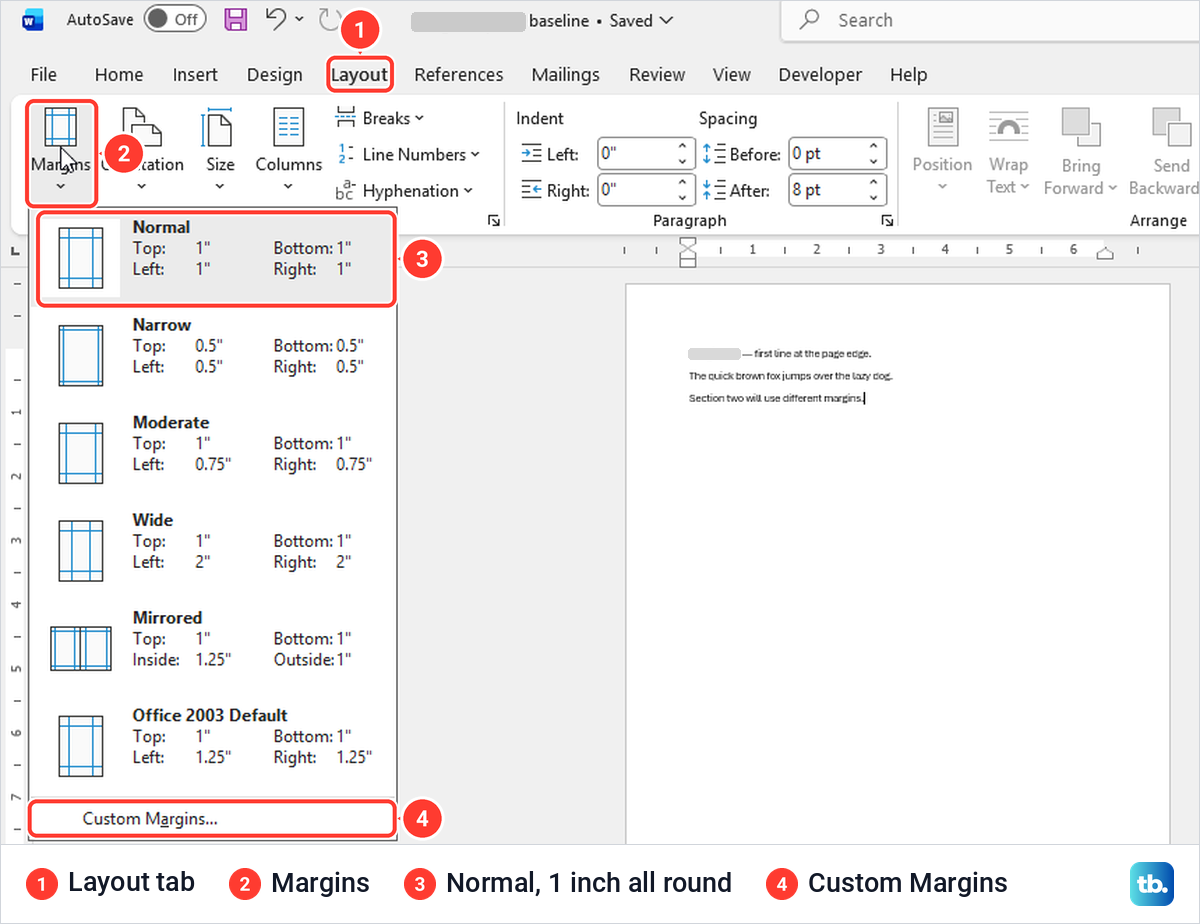
Select a preset and Word applies it at once, with no OK button to press. When we chose Narrow, the text jumped toward the edges of the page, and Narrow was highlighted the next time we opened the list. That highlight is the quickest way to see which preset a document is using.
To see the change properly, stay in Print Layout, the view Word opened in for us, where the page edges are visible, and use View > One Page to fit the whole page on screen. If the ribbon is new to you, our guide to using Microsoft Word for beginners shows where the main tabs sit.
Set one inch margins in Word
For the common 1 inch rule, choose Normal from the list. A document someone else made may have started from a template with other sizes, so if the rule matters, open Custom Margins and check that Top, Bottom, Left and Right all read 1 inch. If the file has more than one section, set Apply to to Whole document before you select OK.
Set exact margins with Custom Margins
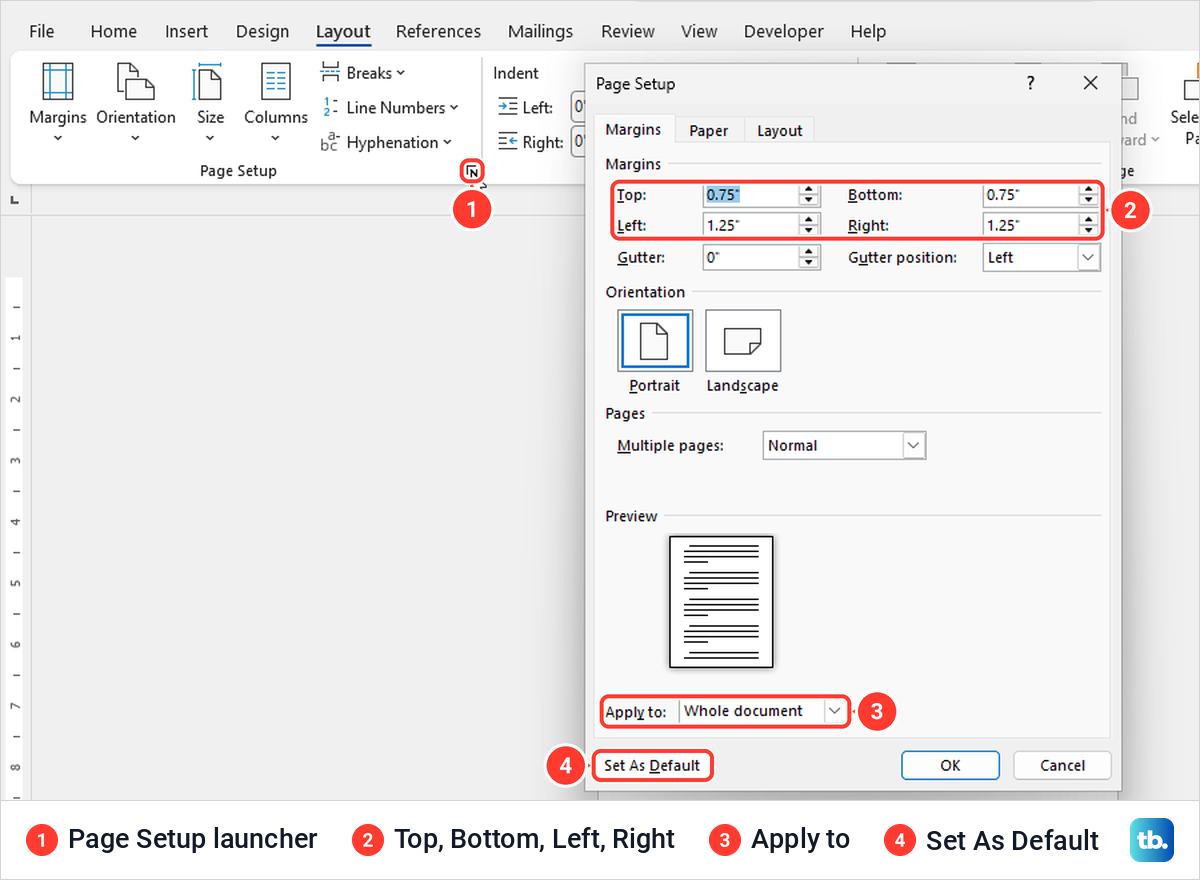
Select Layout > Margins > Custom Margins. The Page Setup dialog opens on its Margins tab, with boxes for Top, Bottom, Left and Right, a Gutter box, the page orientation, Multiple pages, a preview and Apply to.
Click in each box and type the size. Our copy of Word measured in inches, so we typed 0.75 for the top and bottom and 1.25 for the left and right, checked that Apply to read Whole document, and selected OK. The text block moved in from the sides and closer to the top straight away.
To check or change the numbers later, you do not need the Margins list. The small arrow at the bottom right corner of the Page Setup group, the dialog launcher, opens the same dialog, and ours read back all four values.
Page Setup is also where Word keeps a page's vertical alignment, which is the setting you need to center text vertically in Microsoft Word on a title page. Margins only decide how far the text sits from the edges.
Open the margin settings from the keyboard
Press Alt and Word shows a letter on each tab. On our screen P opened Layout, M then opened the Margins list, and inside the list A chose Custom Margins. Typing S and P instead of M opens the Page Setup dialog directly.
In the open list, the arrow keys move between presets and Enter applies one. We moved down to Moderate, pressed Enter and the page changed. These letters are ribbon KeyTips rather than a fixed shortcut, so they follow the tabs on your screen.
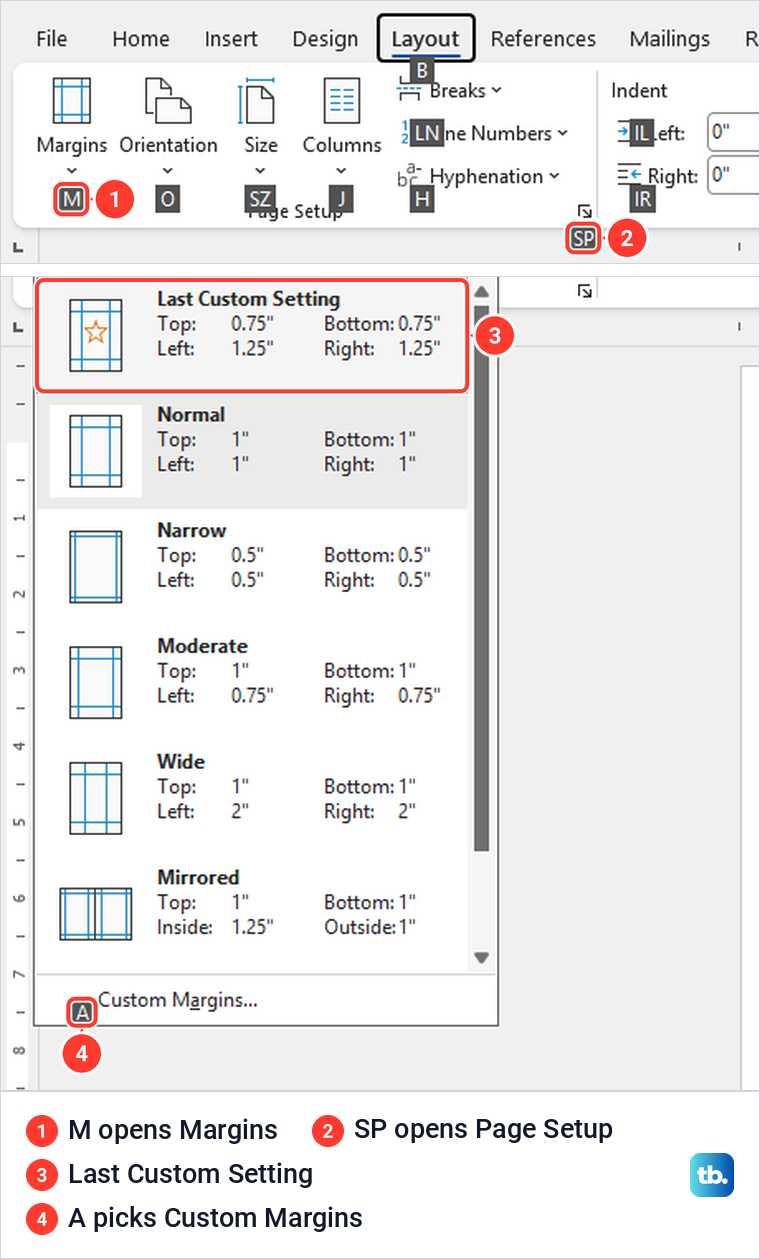
Once you have used custom sizes, Word adds Last Custom Setting at the top of the list. It was still there after we closed the document without saving and opened it again, so the same sizes stay one click away.
Apply margins to one section of a document
Word keeps margins per section, and Microsoft's help says that in a document with several sections a new margin applies only to the current one. That is why a change can land on some pages and not others. The divider between sections is a section break, which you add from Layout > Breaks.
The Breaks menu has two groups. Page, under Page Breaks, only starts a new page and does not make a new section, so it cannot carry different margins. Under Section Breaks, Next Page starts a new section on the next page and Continuous starts one on the same page.
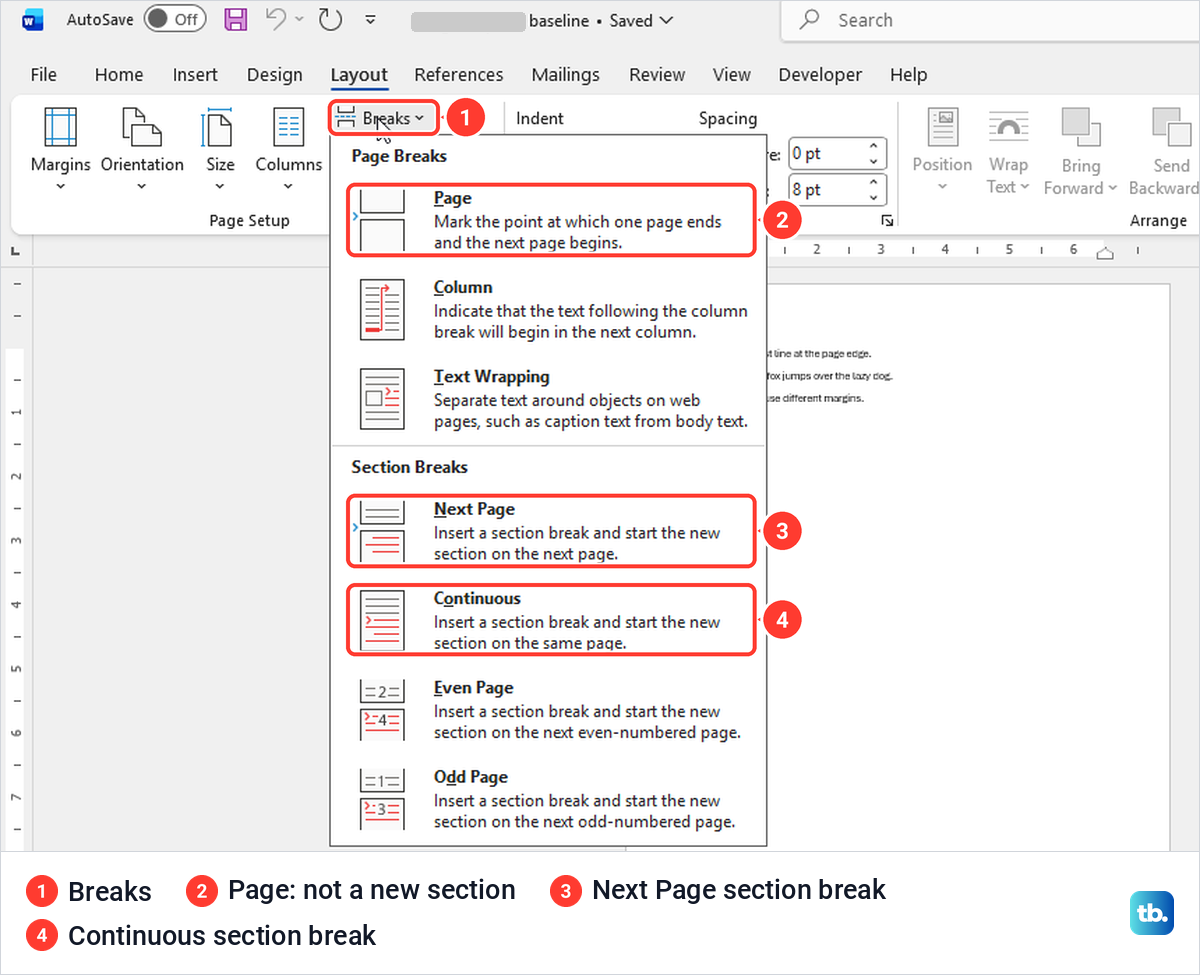
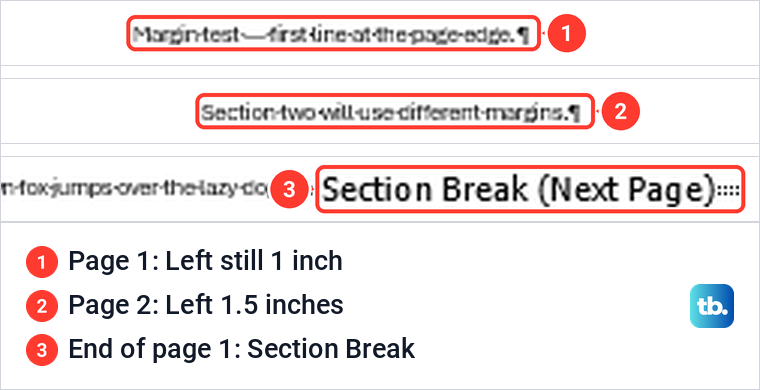
We put the cursor at the start of our third paragraph and chose Next Page. With Home > Show/Hide on, page one ended with a marker reading Section Break (Next Page), and the third paragraph moved to page two. Keep the marks showing while you work with sections, then turn off the paragraph marks in Word when you are done.
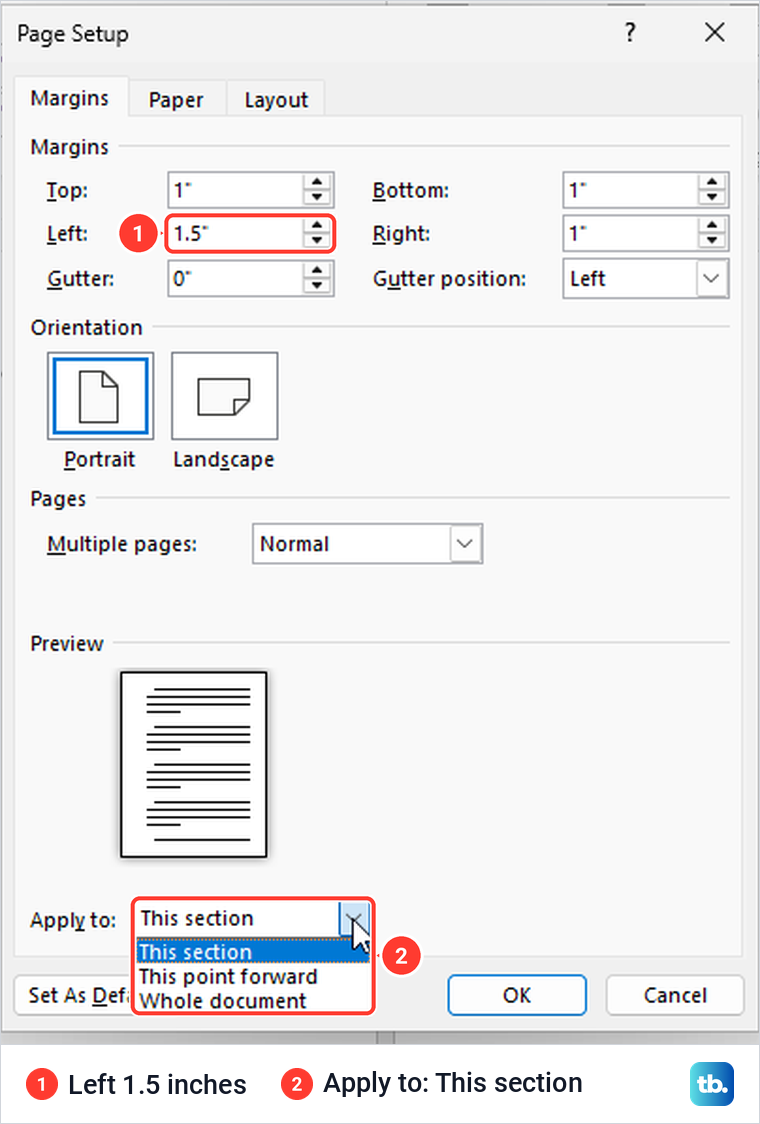
Next, click in the section you want to change and open Custom Margins. With the cursor on page two, Apply to already read This section, with This point forward and Whole document as the other choices. We typed 1.5 for Left and selected OK.
Only page two moved in. When we clicked back on page one and reopened Page Setup, its Left box still read 1 inch, because the dialog shows the section the cursor is in. If a change lands in the wrong section, Microsoft's advice is to press Ctrl + Z, move the cursor to after the section break and try again.
To put the whole file back on one set of margins, choose Whole document in Apply to. If a stray break is the cause, follow the steps to remove a section break in Word, then check the pages on either side of it.
Change margins on one page only
One page needs a section of its own, so it takes two section breaks. Microsoft's instructions are to insert a section break at the beginning of where you want the change, set up the change just past that break, and put in another section break where the layout should change back.
For a single page, put a Next Page break at the start of that page and another at the start of the page after it. Click anywhere on the page between them, open Custom Margins, type the sizes and check that Apply to reads This section before you select OK. If the new margins should start partway down a page, Microsoft says to use a Continuous break instead.
The same two-break method is how you make one page landscape in Word while the other pages stay portrait. If a new break leaves an empty page behind, check where the breaks sit, then use our steps to remove a blank page in Word.
Set mirror margins for facing pages
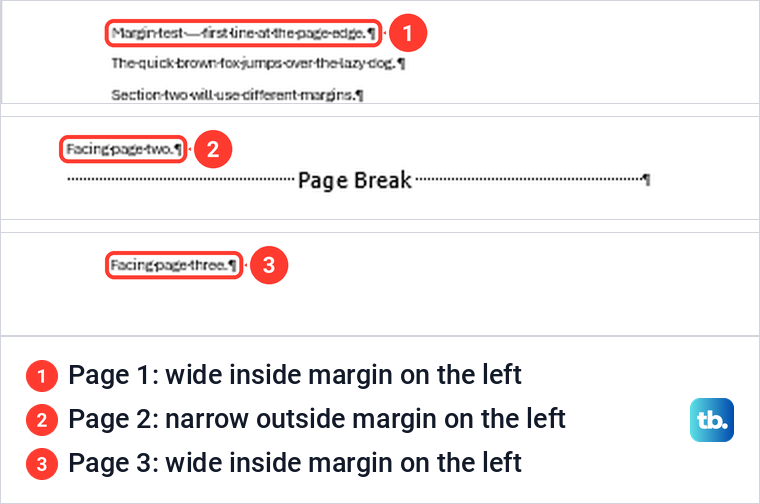
Mirror margins are for documents printed on both sides and bound like a book or magazine, where Microsoft says the margins of the left page mirror those of the right. Instead of Left and Right you set Inside, the edge nearest the spine, and Outside, the edge away from it.
Open Custom Margins, find Multiple pages and choose Mirror margins. The same list also offered Normal, 2 pages per sheet and Book fold. On our screen the Left and Right labels changed to Inside and Outside, Gutter position turned gray and the preview showed two facing pages.
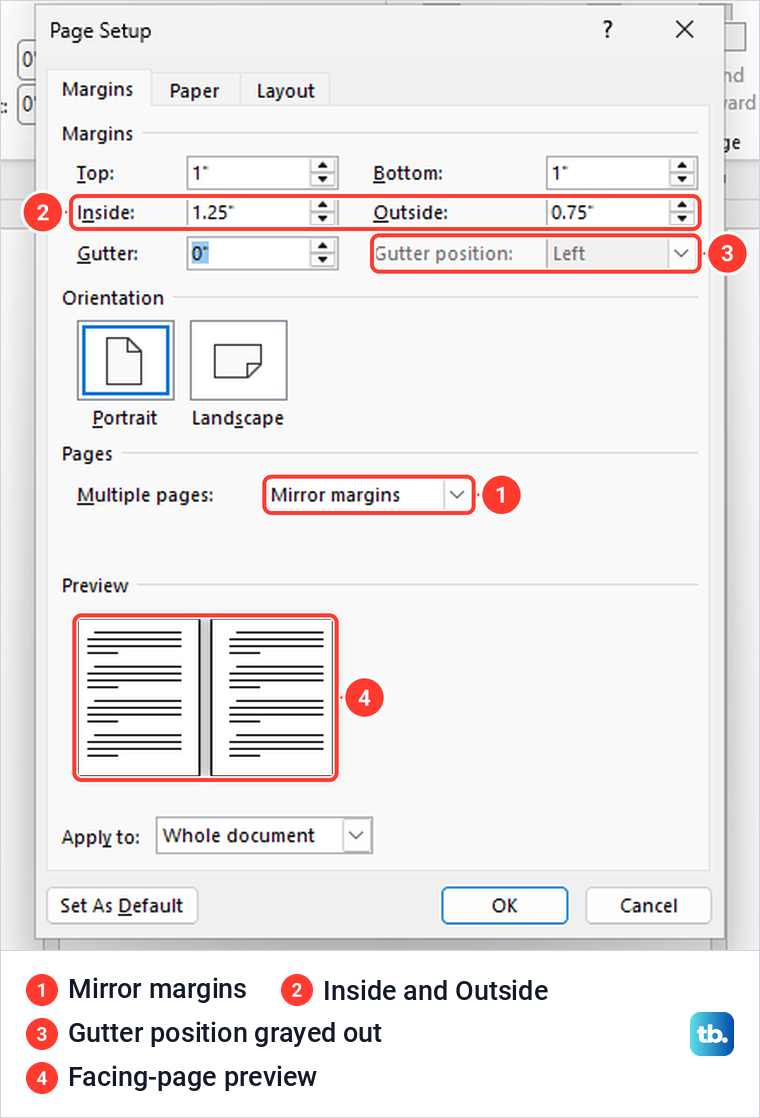
We set Inside to 1.25 inches and Outside to 0.75 inch on a three-page document. After OK the wide margin sat on the left of pages one and three and on the right of page two, so the text block shifted from side to side like a printed book. The Mirrored preset in the Margins list does the same job with 1.25 inches inside and 1 inch outside.
Add a gutter margin for binding
A gutter is extra space for the binding. Microsoft describes it as space added to the side margin, top margin or inside margins of a document you plan to bind, so that no text is hidden by the binding.
In Custom Margins, type a width in the Gutter box and pick Left or Top under Gutter position. We added a 0.5 inch Left gutter, and the preview showed a hatched strip down the left edge. After OK the text area narrowed from the left, even though the Left margin box still read 1 inch.
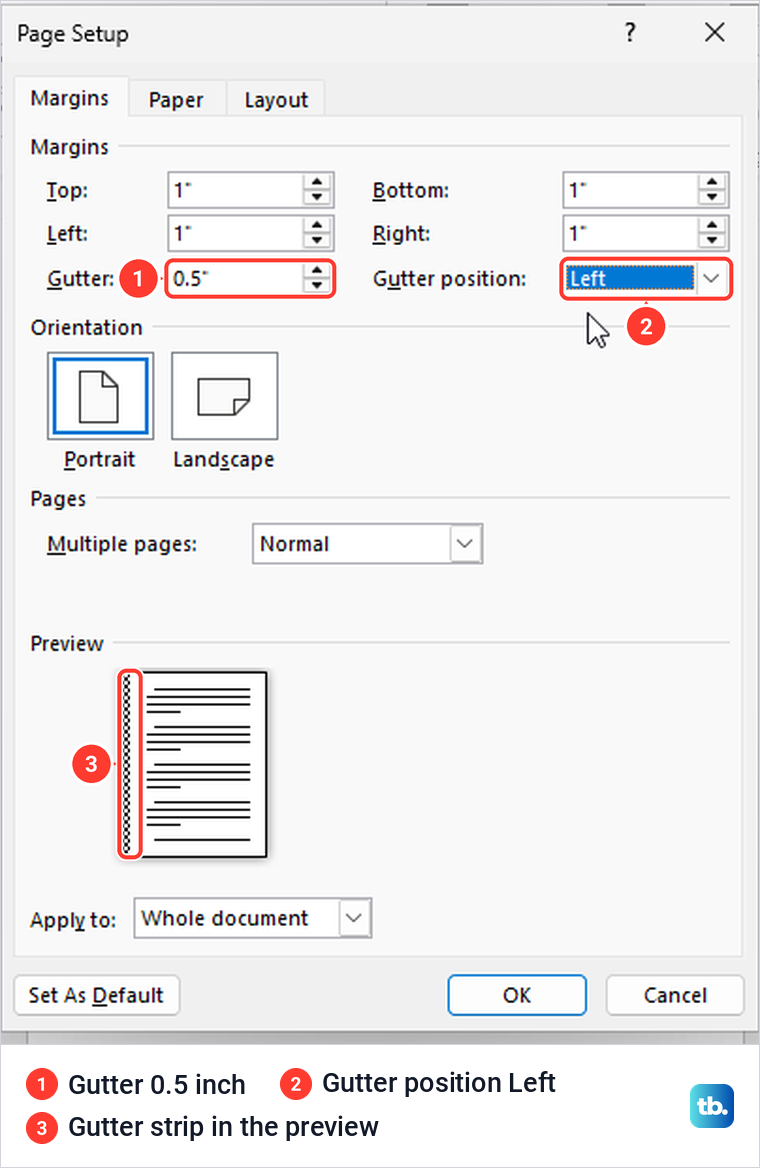
The gutter was still set when we saved the file and reopened Page Setup. With Mirror margins, 2 pages per sheet or Book fold, Microsoft says Word works out the gutter position by itself, which is why that box goes gray. If the bound document needs numbering, add page numbers in Word once the margins are set.
Make your margins the default for new documents
Set your sizes in Custom Margins, then select Set As Default at the bottom left of the dialog. Word asks whether you want to change the default settings for page setup, and warns that the change will affect all new documents based on the NORMAL template.
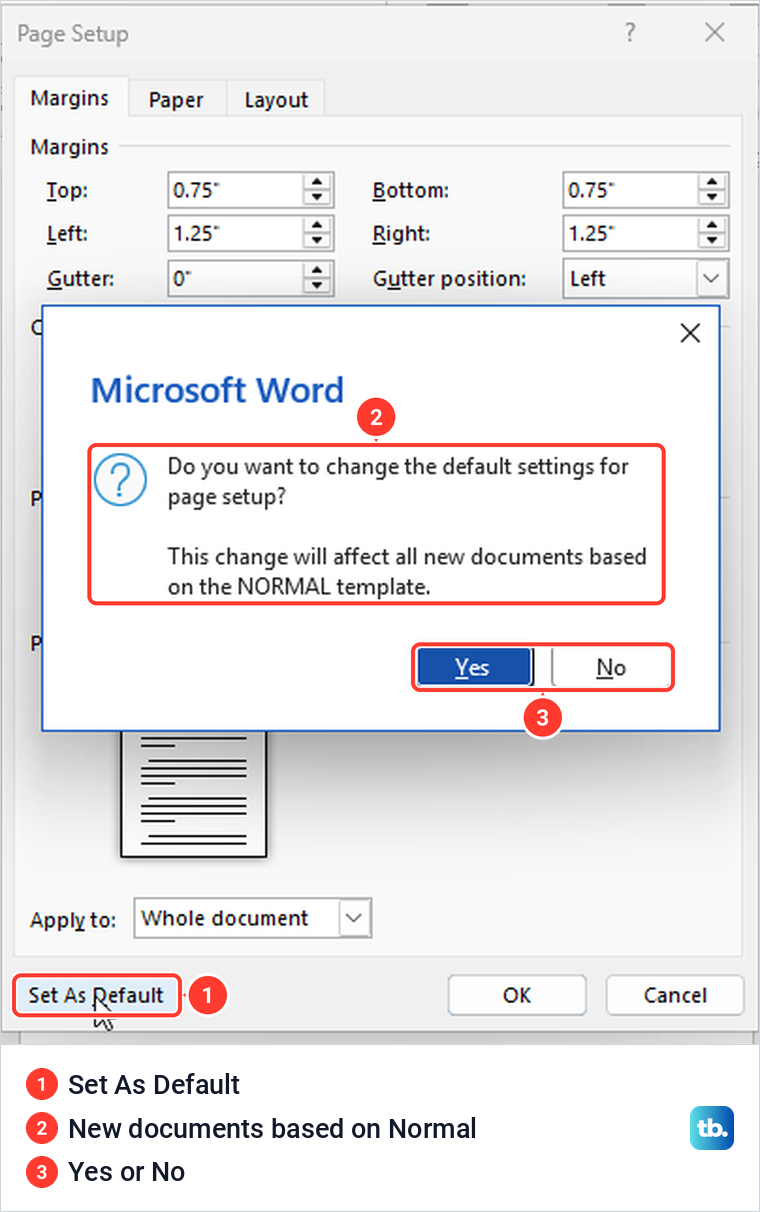
Select Yes to save the sizes into that template, or No to leave it alone. Microsoft says changes to the Normal template apply to documents you create in the future, so the files you already have keep their own margins.
Word for the web has no default button. Microsoft says a new web document goes back to the Normal setting of 1 inch on each side, and that matched what we saw: after we set custom margins in one web document, the next new one still had Normal highlighted.
Change margins in Word for the web
Word for the web has the same Layout tab, but on our screen its ribbon showed icons without labels. Margins was the first icon on the Layout tab, and pointing at it showed the name. Some of Microsoft's help pages still call the tab Page Layout, while the tab we saw was named Layout.
The web list has Normal, Narrow, Moderate, Wide, Office 2003 Default and Custom Margins, with no Mirrored preset and no Last Custom Setting entry. Choosing Wide moved our text in from both sides, and Wide stayed highlighted when we opened the list again.
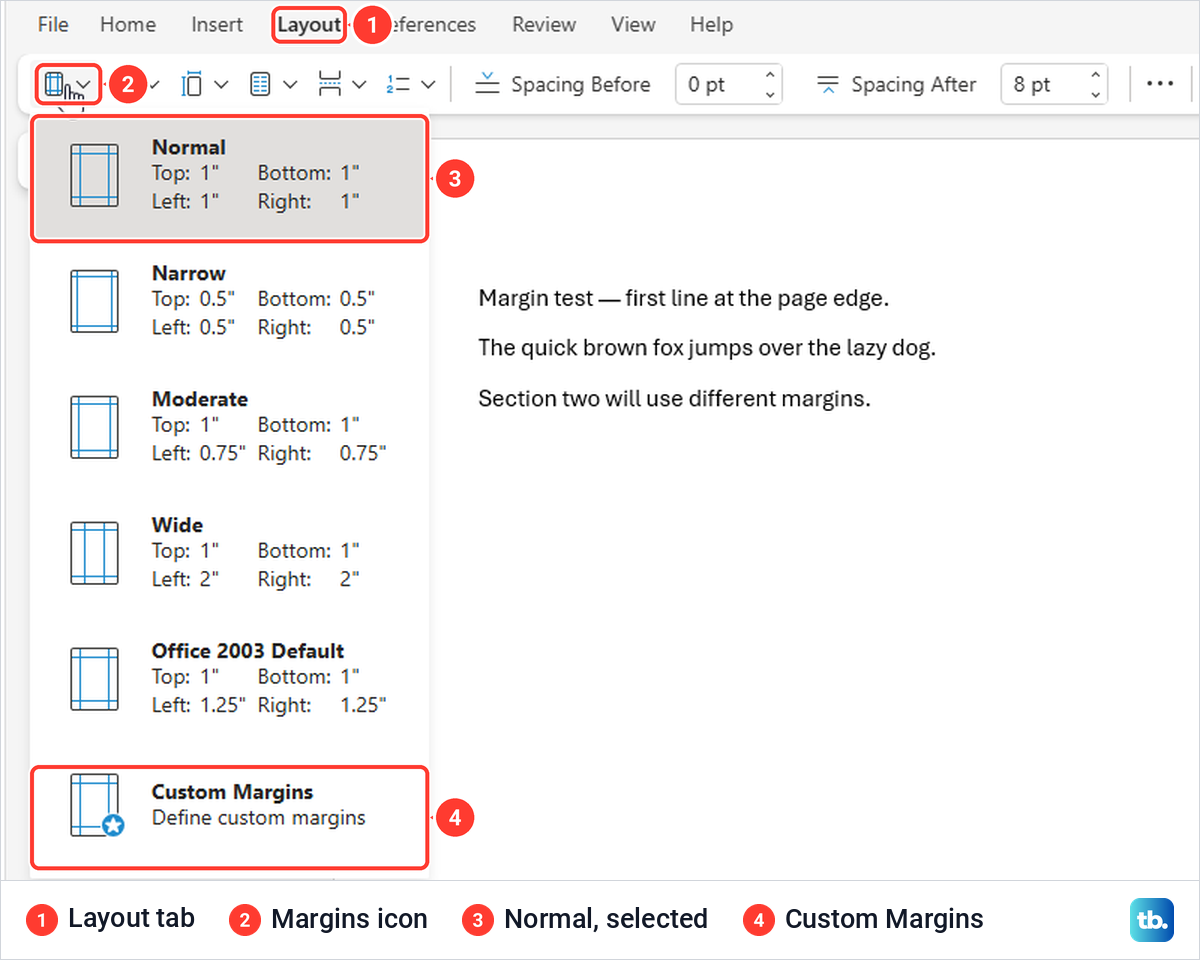
Custom Margins opens a small Margins box with Top, Bottom, Left and Right only, and no gutter, multiple pages or Apply to. We typed 0.75 for the top and bottom and 1.25 for the sides, selected OK, and the same numbers were there when we reopened it. After a custom change the list highlights Custom Margins itself.
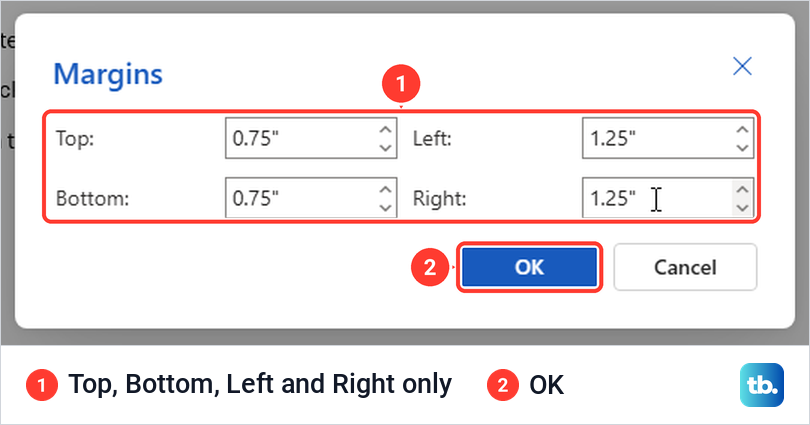
Mirror margins and gutters are set in the desktop app. Microsoft says Word for the web preserves mirror margins already in a document and honors a gutter set in Word for the desktop, but only lets you change the top, bottom, left and right margins. If a web document opens in Viewing, the whole ribbon is hidden, and Edit Document > Edit brought back the Layout tab for us.
Drag margins with the ruler
The ruler is handy when you want to judge a margin by eye. Turn it on with View > Ruler, which Word for Windows has too, though the steps below are the ones we did in Word for the web. There, each end of the ruler has a gray zone that marks the margin, with the indent markers sitting on the line where the white part starts.
The margin and the indent are two different handles, almost on top of each other. Pointing just left of the markers, inside the gray zone, showed a two-headed arrow and the tip Left Margin. Dragging from there moved all three of our paragraphs, and Custom Margins then read 1.31 inches for Left.
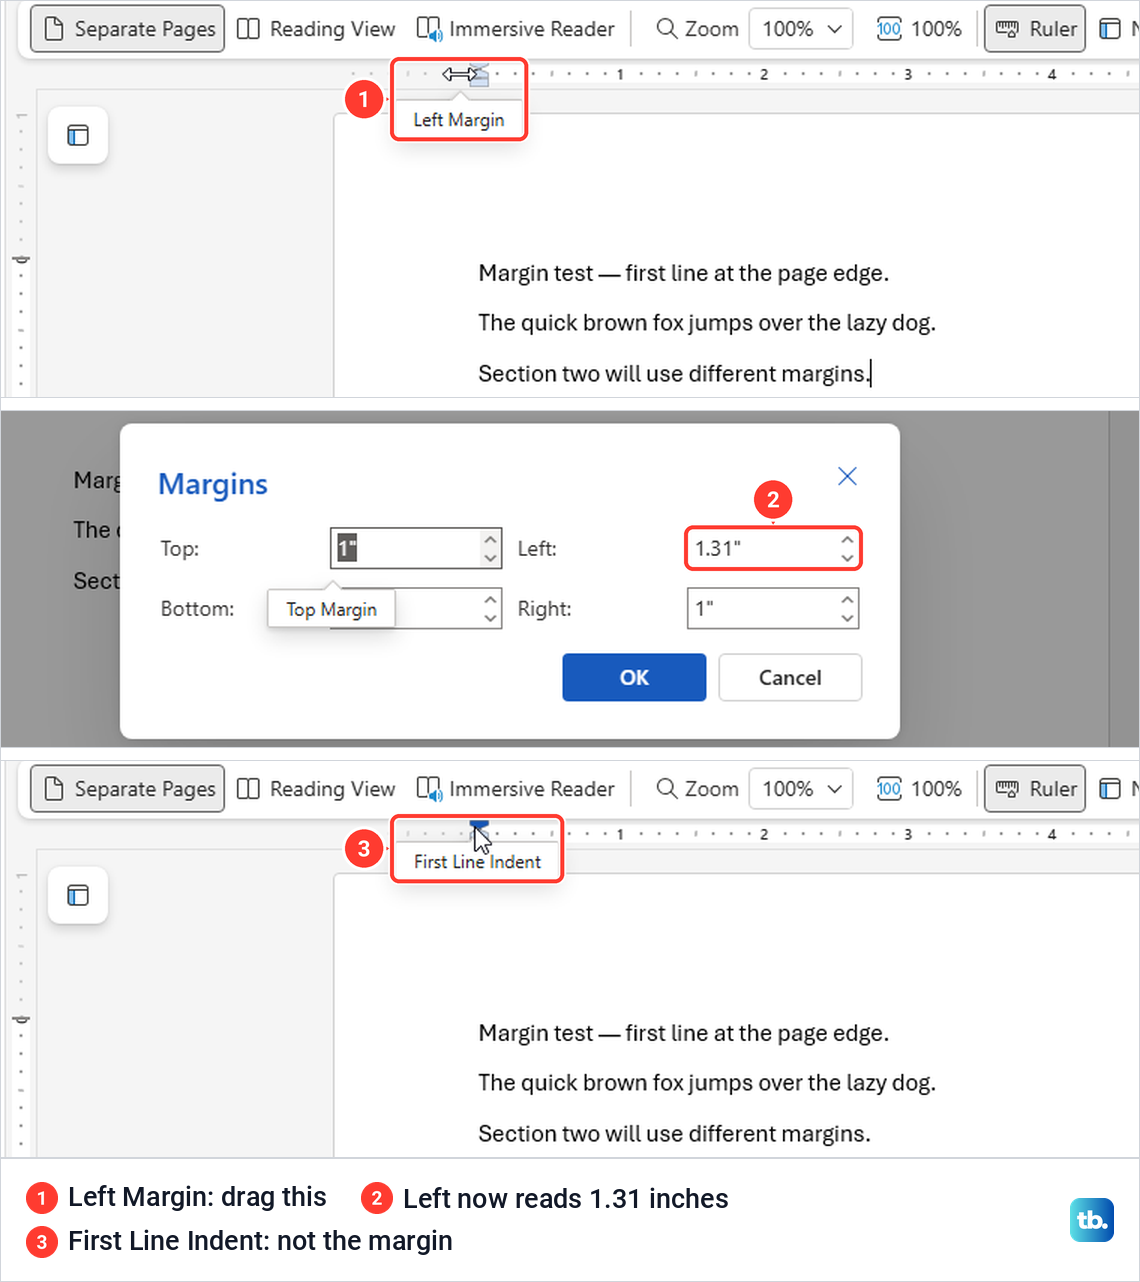
The marker right on the line is the First Line Indent. When we dragged that one instead, only the first line of the paragraph holding the cursor moved, and the page margin stayed where it was. Use the ruler for a rough position and the Custom Margins box when the size has to be exact.
Change margins in Word for Mac, iPhone and Android
Word for Mac uses the same names. Microsoft's steps are to go to the Layout tab, select Margins, choose a preset or Custom Margins, enter the new values and select OK. Mirror margins and the gutter are in that same Custom Margins dialog on a Mac.
On an Android phone or an iPhone, Microsoft's route is to tap the Edit icon, tap Home, switch to Layout and tap Margins, while on an iPad or Android tablet you tap Layout straight away. Pick a preset from the gallery, which shows each one's sizes, or Mirrored for facing pages.
Custom sizes are less certain on a phone. Microsoft's mobile help says in one note that you can't create custom margins in the Office apps for mobile devices, while its Android steps say Custom Margins is available to Microsoft 365 subscribers in the Office Insider program and its iPhone and iPad steps list Custom Margins with no such note. Rely on the presets there and set exact sizes on a computer.
Fix a missing top margin or a grayed out Margins button
If the page seems to start right at the first line, the margin is probably only hidden. In Print Layout, pointing just above a page's top edge showed the tip Double-click to hide white space, and one double-click there made our top margin look as if it had gone.
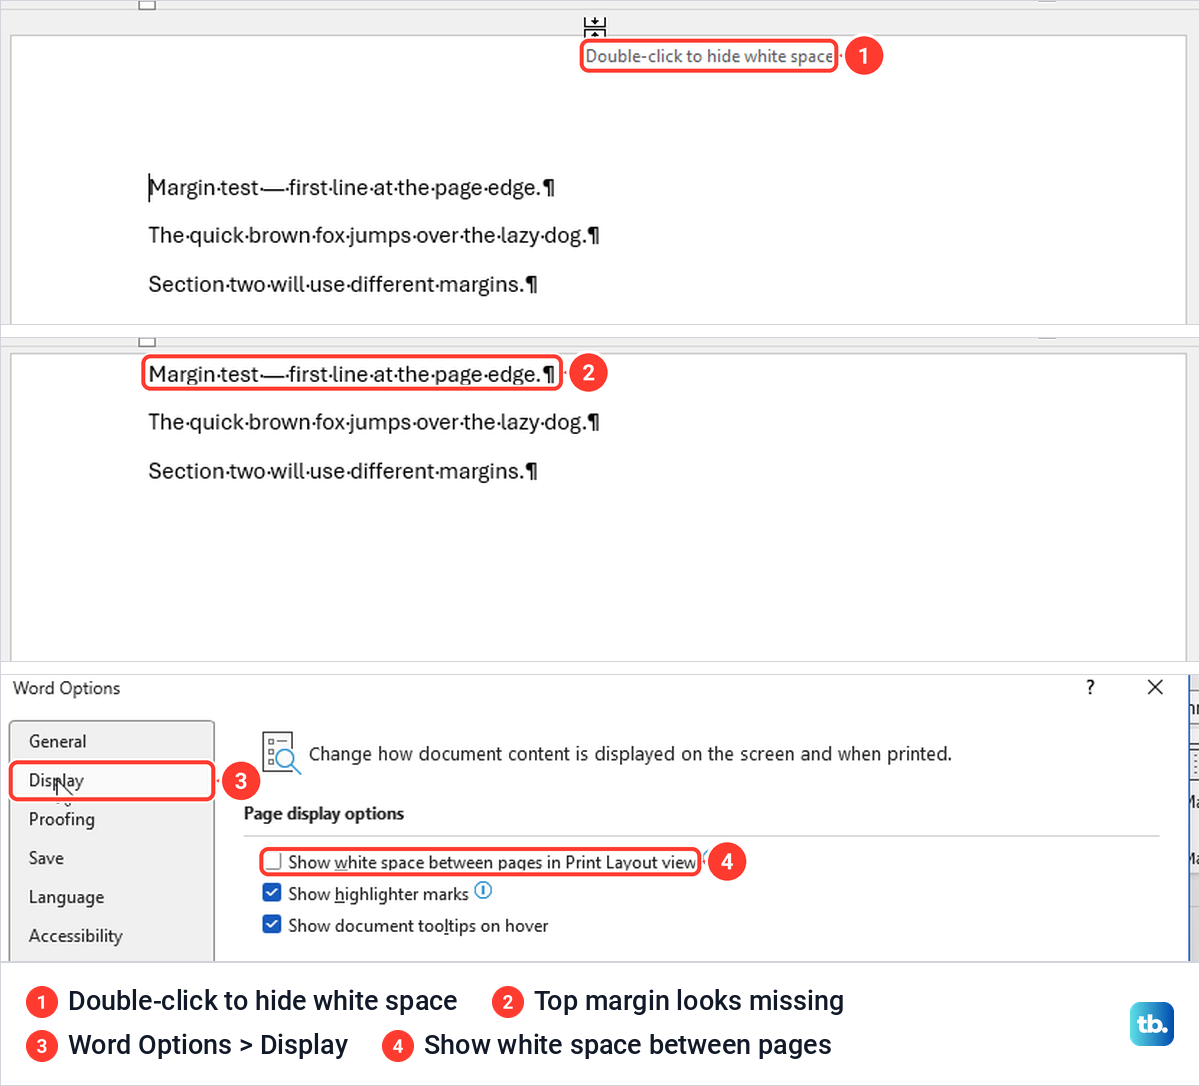
Nothing had changed in the document. The double-click had cleared File > Options > Display > Show white space between pages in Print Layout view, and ticking that box brought the gap back, while Page Setup still read 1 inch on every side. Microsoft's help gives the other way back, which is to double-click the top or bottom edge of the page again.
One cause of a grayed out Margins button is a document open in Viewing. We set a copy to File > Info > Protect Document > Always Open Read-Only, and when we opened it again it went straight to Viewing, with a note that the author had set it to open as view-only. Margins, Orientation, Size and the rest of Page Setup were all grayed out.
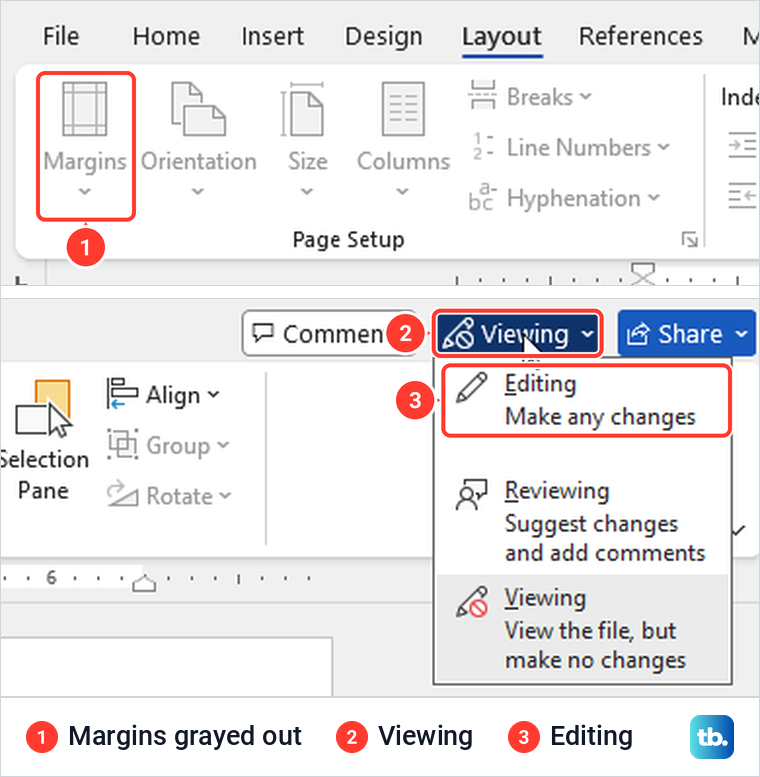
Microsoft's first step is to select the Viewing button at the top right and switch to Editing, if it is available. To stop the file opening that way, open File > Info > Protect Document, select Always Open Read-Only again to clear it, and save. On our copy, Margins worked again after we switched to Editing, cleared that setting and saved.
Microsoft adds that a file can also open for viewing only in Protected View, and that some editing restrictions are controlled by the document owner or your organization and cannot be changed locally. In that case, ask whoever owns the file for an editable copy.
Check margins before you print
Small margins can look fine on screen and still be cut off on paper. Microsoft explains that most printers cannot print all the way to the edge of the paper, and its help for older versions of Word describes a warning that margins are set outside the printable area, with a Fix button that raises them to the minimum.
If you go below the 0.5 inch of the Narrow preset, print one test page first. Before sharing a finished layout, save the Word document as a PDF and look at the page edges there. If the layout is right but nothing comes out, work through the steps for when you cannot print from Word or Excel.
How we tested this guide
We tested this in Word for Microsoft 365 on Windows 11, version 25H2, and in Word for the web in Microsoft Edge, changing the margins of a three-paragraph document.
Frequently Asked Questions
How do I set one inch margins in Word?
Select Layout > Margins > Normal, which is 1 inch on every side. For a file someone else made, open Custom Margins and check that all four boxes read 1 inch.
How do I change margins on just one page?
Put a section break at the start of the page and another at the start of the next page. Then click on that page, open Custom Margins, type the sizes and set Apply to to This section.
Why did my margins change on only part of the document?
The document has more than one section, and Word applies new margins to the section holding the cursor. Turn on Show/Hide to find the section breaks, or choose Whole document in Apply to.
How do I make my custom margins the default?
Set the sizes in Custom Margins and select Set As Default, then Yes. New documents based on the Normal template use them, while documents you already have keep their own margins.
Why has my top margin disappeared?
The white space at the top of the page is probably hidden in Print Layout. Double-click the top edge of the page, or tick Show white space between pages in Print Layout view under File, Options, Display.
Can I change margins in Word online?
Yes. In Word for the web, open the Layout tab, select the Margins icon and pick a preset or Custom Margins, which has boxes for the four edges only.
Why is the Margins button grayed out?
One cause is a document open in Viewing, for example because it is set to always open read-only. Switch the mode button at the top right to Editing if it is available, or in Word for the web select Edit Document, then Edit. If the owner or your organization has restricted editing, ask for an editable copy.