

To make columns in Word, open the Layout tab, click Columns and choose Two for two columns, or Three, Left or Right for other layouts. Select whole paragraphs first if only part of the page should change. On a short document Word keeps filling the first column until the text reaches the bottom of the page, so an empty second column does not mean the setting failed.
Use More Columns at the bottom of the same menu to add columns of your own widths, set the gap and draw a line between them, and a column break to send text to the next column straight away. These are page columns that text flows through, like a newsletter, not the columns of a table.
The short version
- Two columns: choose Layout > Columns > Two.
- Part of a page: select whole paragraphs first, then choose Two, and Word adds section breaks around them.
- Widths, gap and divider: open Columns > More Columns, set Number of columns, then clear Equal column width and tick Line between.
- Next column now: choose Layout > Breaks > Column or press Ctrl + Shift + Enter.
- Empty second column: normal for short text, until the first column fills or you add a column break.
Ways to make columns in Word
| What you want | Where to go | What happened on our PC |
|---|---|---|
| Two columns for the whole document | Layout, Columns, Two | Our short text stayed in column one until a column break moved part of it across |
| Columns for some paragraphs only | Select the paragraphs, then Layout, Columns, Two | Only the selection split into two balanced columns, between two Continuous section breaks |
| Three columns, or one narrow and one wide | Layout, Columns, Three, Left or Right | Three and Left both put our text in a narrow first column |
| Your own widths, gap or a divider line | Layout, Columns, More Columns | A 4 inch first column gave a 2 inch second column and a half inch gap, with the line showing once column two had text |
| Text that starts in the next column | Layout, Breaks, Column, or Ctrl + Shift + Enter | Both inserted the same Column Break |
| One column, then two, then one on the same page | Two Continuous section breaks, then Two in the middle part | The introduction and closing note stayed full width |
| Back to one column | More Columns, One, then check Apply to | The text and the section breaks stayed where they were |
| Columns in a browser | Word for the web, Layout, the Columns icon, Two | Two columns and a column break both worked in Microsoft Edge |
In a document that already has section breaks, a column change applies to the section the cursor is in. Check the Apply to box in More Columns before you click OK, as shown further down.
Make two columns in Word
Click anywhere in the document without selecting anything. Open the Layout tab and click Columns in the Page Setup group, next to Margins, Orientation and Size. The menu lists One, Two, Three, Left, Right and More Columns, and the layout the document already uses is highlighted.
Choose Two. Word applies it to the whole document when there are no section breaks, and the text flows down the first column before it continues at the top of the second.
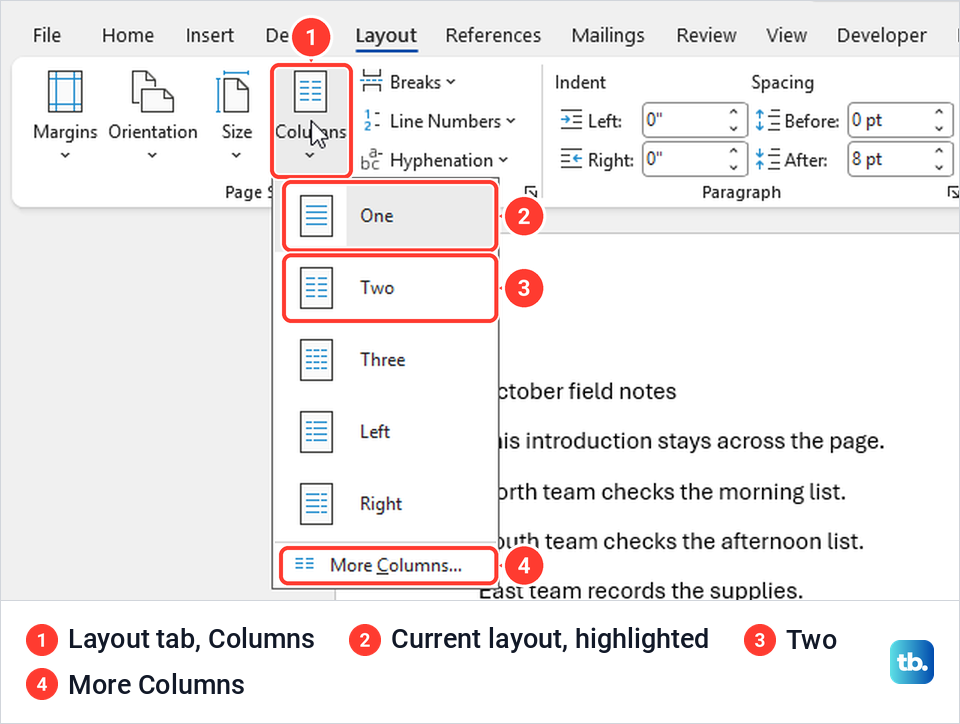
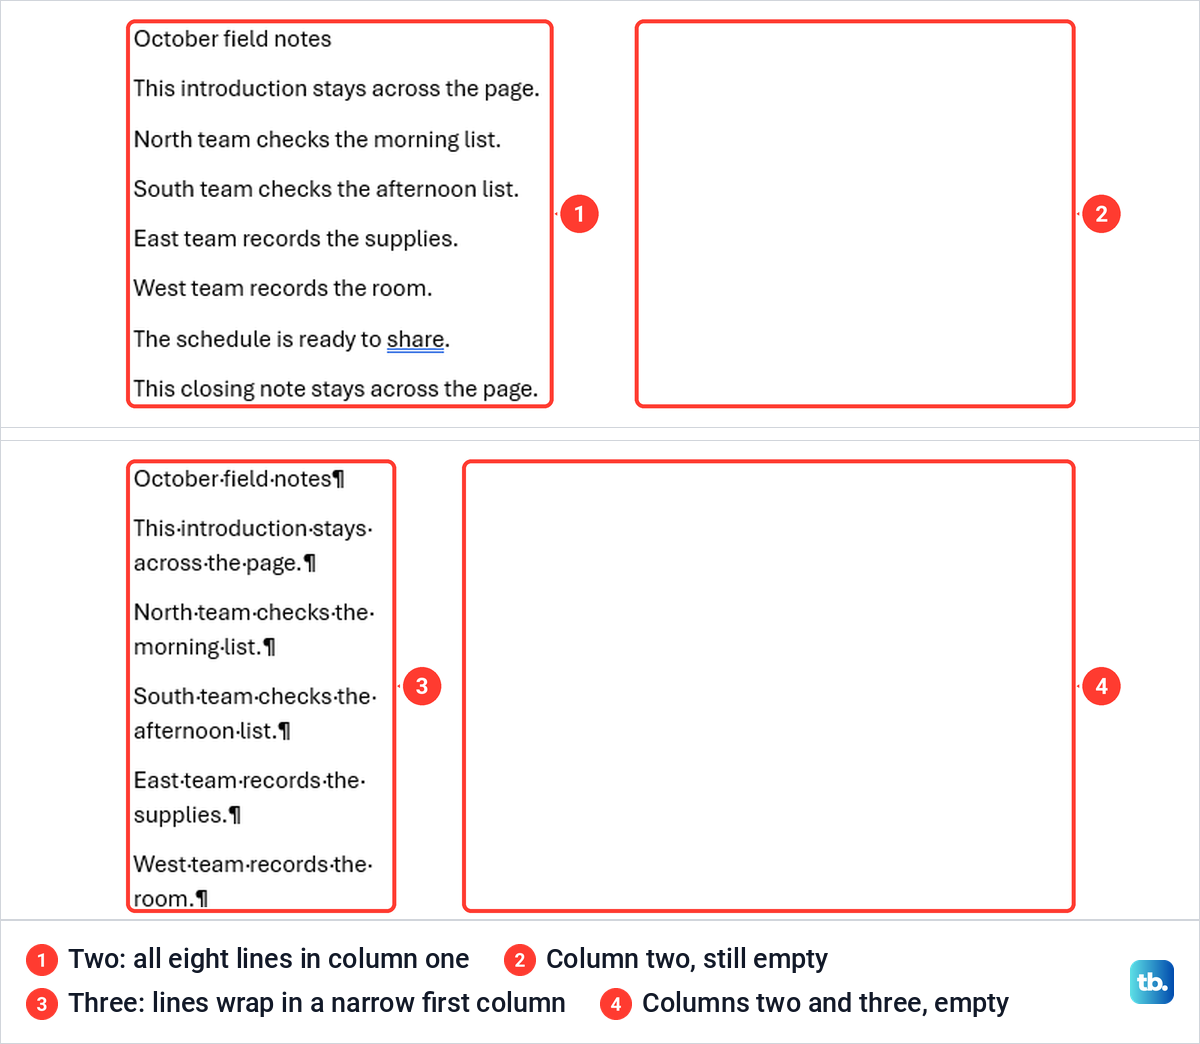
This is the point where the setting can look broken. Our eight-line test page looked unchanged after we chose Two, because every line still fit in the first column and nothing had reached the bottom of the page. With Three, the lines wrapped inside a narrow first column and the other two columns stayed blank.
When the whole document is in columns, Word moves text into the next column only once the current column is full. On a short page, add a column break where the second column should begin, as shown below.
Put only selected text into two columns
To keep a heading or introduction across the full width, select the paragraphs that belong in columns before you choose the layout. Drag from the start of the first paragraph to the end of the last one, so the selection takes in whole paragraphs. Then open Layout > Columns and choose Two. If pasted paragraphs keep their old character or paragraph styling, clear formatting in Word before you judge the column layout.
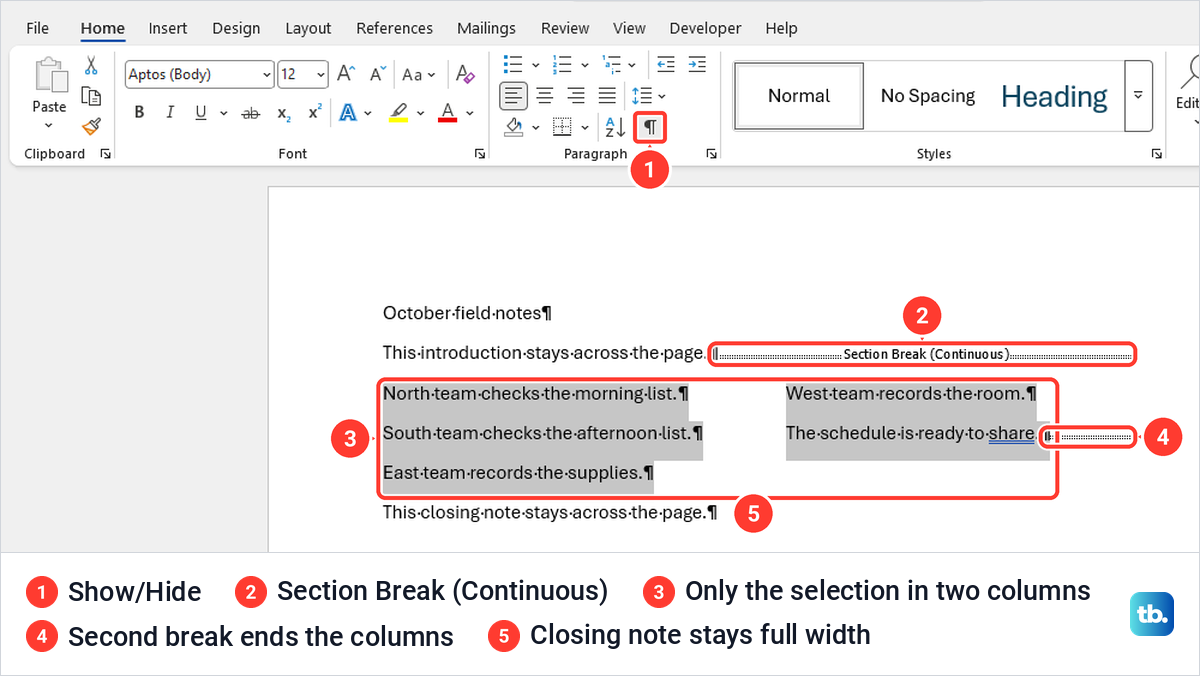
We selected the five middle paragraphs of our sample document. Word split only those into two columns, three paragraphs on the left and two on the right, while the title, introduction and closing note stayed across the page. Unlike the whole-document version, Word balanced the selected text between the two columns at once.
Word does this by adding section breaks. To see the section boundaries Word inserted, show or hide paragraph marks with the ¶ button on the Home tab. A dotted line labelled Section Break (Continuous) sat after our introduction, and a second dotted line ended the column text.
Make three columns or uneven columns
The other presets in the Columns menu work the same way. Three makes three equal columns, while Left and Right make two columns of different widths. The preset pictures in the More Columns dialog show the narrow column on the left for Left and on the right for Right.
On our short page, Three and Left looked alike at first, with all the text wrapped in a narrow first column. Left has only two columns, so the difference shows once the text runs into the next one. For more than three columns, or for widths the presets do not offer, use the More Columns dialog.
Set column width, spacing and a line between columns
Open Layout > Columns > More Columns. The Columns dialog has the same five presets at the top, then Number of columns, a Width and spacing table (in inches for us), Equal column width, Line between, Apply to and a Preview. On a one-column page, Line between and Equal column width were greyed out until we set two columns.
Microsoft notes that choosing a preset changes the number of columns and every width and spacing value at once, so pick a preset first and adjust it afterwards. To make the columns different widths, clear Equal column width, then type a width for column 1.
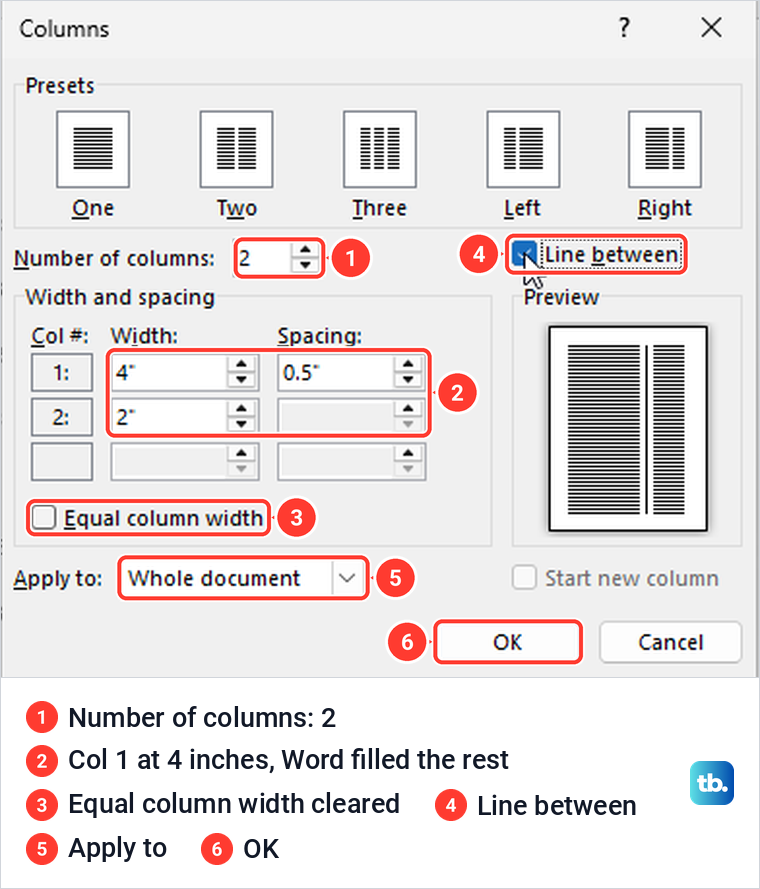
We set two columns, cleared Equal column width and typed 4 inches for column 1. Word filled in 2 inches for column 2 and a half inch of spacing by itself, 6.5 inches in all, the width the single column had. Microsoft says Word sets column widths to fit your page, so other page sizes or margins give other numbers. We ticked Line between for a divider and clicked OK.
Nothing seemed to change on our short page, and no line appeared. The wide first column and the divider only showed after a column break put text into column 2, as in the next picture. If you tick Line between and see no line, check whether the second column has any text yet.
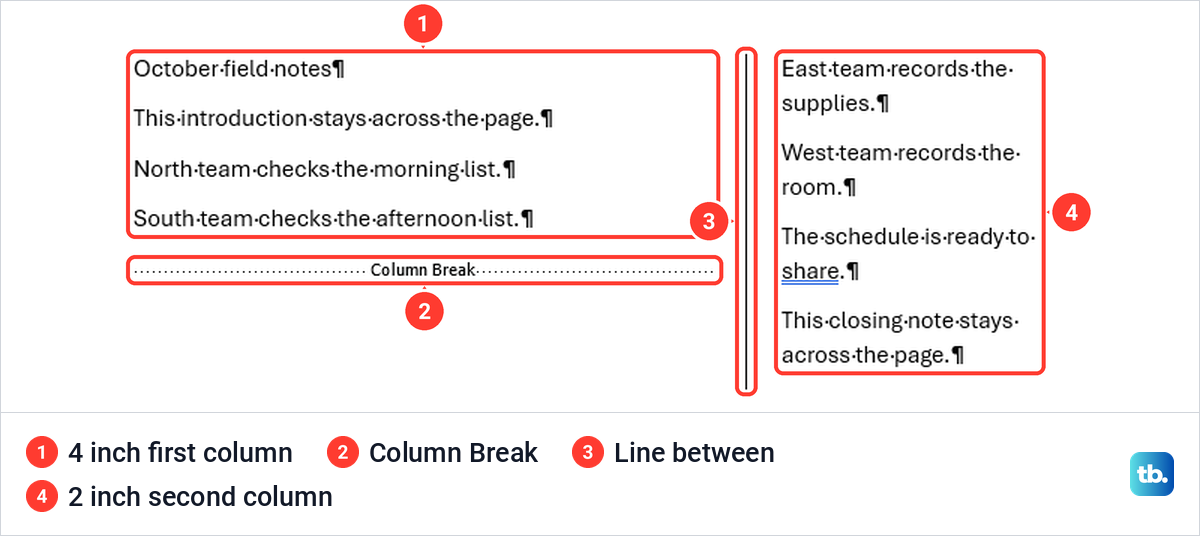
Narrow columns fit fewer words per line, so each paragraph runs over more lines. If those lines look packed together from top to bottom, change line spacing in Word after you set the widths. For a wide three-column handout, you can also make one page landscape first and then tune the widths for the wider page.
Choose where the columns apply
The Apply to box at the bottom of the Columns dialog decides how much of the document changes, and its choices depend on where the cursor is. In our one-section page with nothing selected, it offered Whole document and This point forward, with Whole document chosen.
Once the document had section breaks, the same box offered This section, This point forward and Whole document, and This section was chosen by default. Microsoft says that in a document with more than one section, a column layout only applies to the current section. That is why columns sometimes appear in one part of a long document and not another.
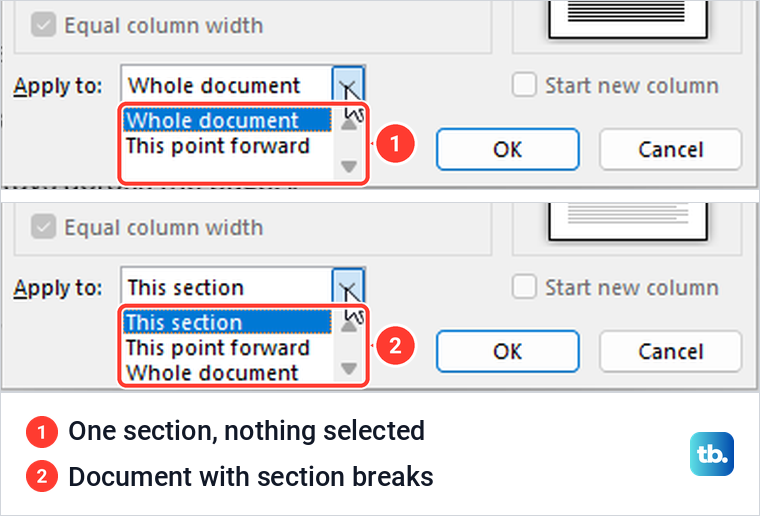
Before you click OK, read the Apply to box. If it says This section and the columns should cover everything, switch it to Whole document.
Start text at the top of the next column
A column break ends the current column wherever you put it, and the text after it starts at the top of the next column. Click just before the first word that should move. Then open Layout > Breaks and choose Column, which sits under Page Breaks, between Page and Text Wrapping.
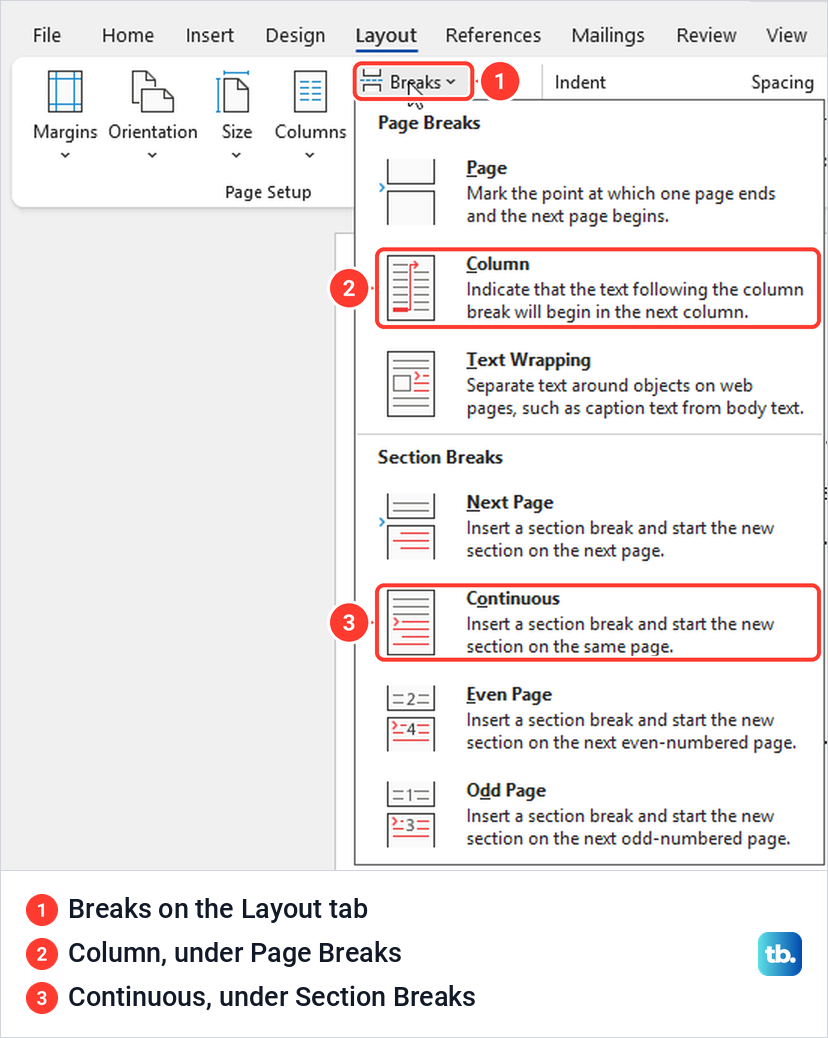
With the cursor before our East team line, the ribbon command moved that line and everything after it to the top of column two. With paragraph marks showing, the break appeared as a dotted line labelled Column Break.
The keyboard shortcut does the same job. We clicked before the South team line in a fresh two-column copy and pressed Ctrl + Shift + Enter, and the same Column Break mark appeared. This shortcut inserts a break in existing columns; it does not create the columns.
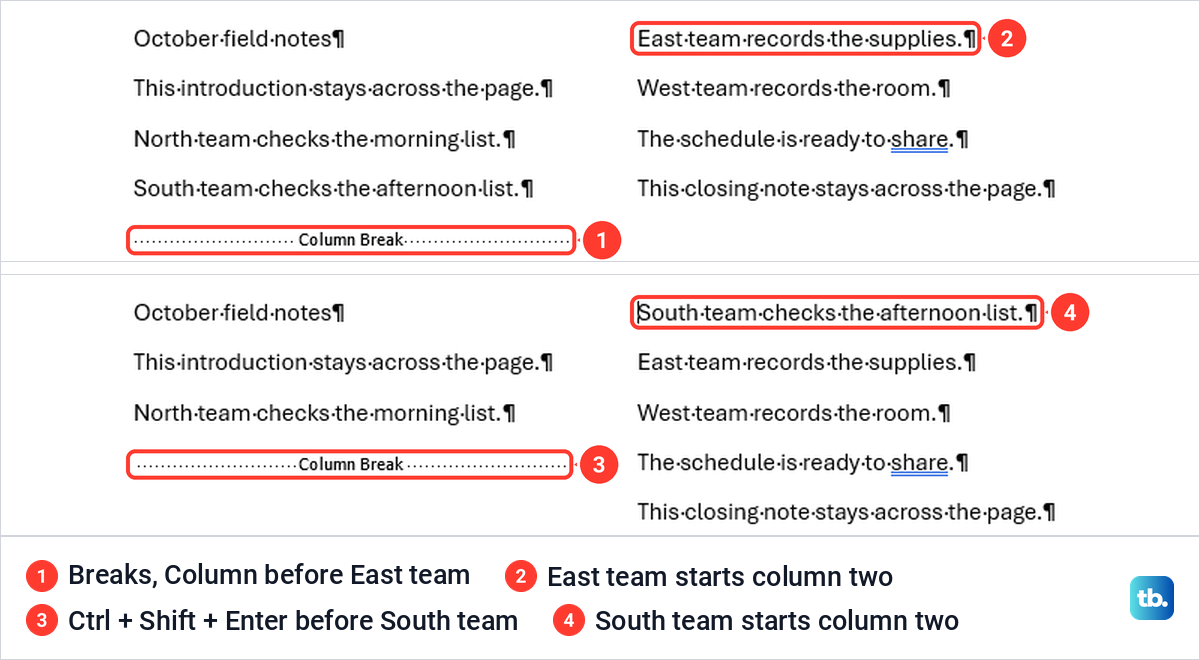
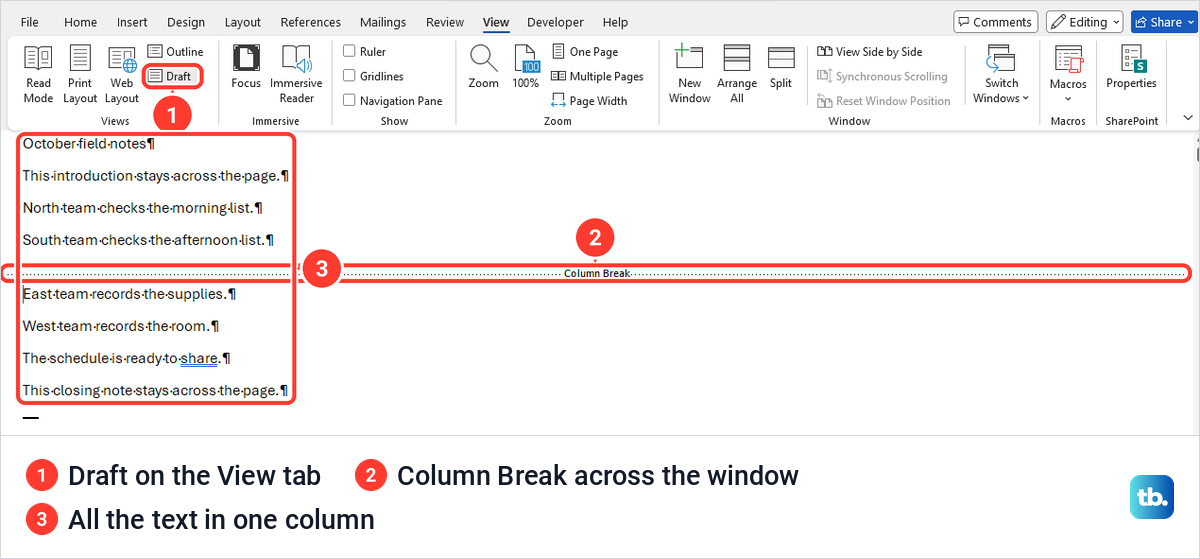
Microsoft's instructions for column breaks use Print Layout view, the page view that shows the columns. In Draft view the same break looks very different, as the troubleshooting section below shows.
Use two columns in the middle of a page
Selecting the text is the quickest way to get one column, then two, then one again. When you want to place the boundaries yourself, use two Continuous section breaks, which Microsoft describes as starting a new section on the same page to change the number of columns.
Click at the end of the paragraph just above the columns, open Layout > Breaks and choose Continuous under Section Breaks. Click at the end of the last paragraph that belongs in columns and add a second Continuous break. Each break we added left an empty paragraph after it, so expect a blank line at each boundary.
Now click in the text between the two breaks and choose Layout > Columns > Two. Our introduction and closing note stayed full width and the middle text split into two columns. If the change lands in the section above, Microsoft's advice is to undo with Ctrl + Z, click after the section break and try again.
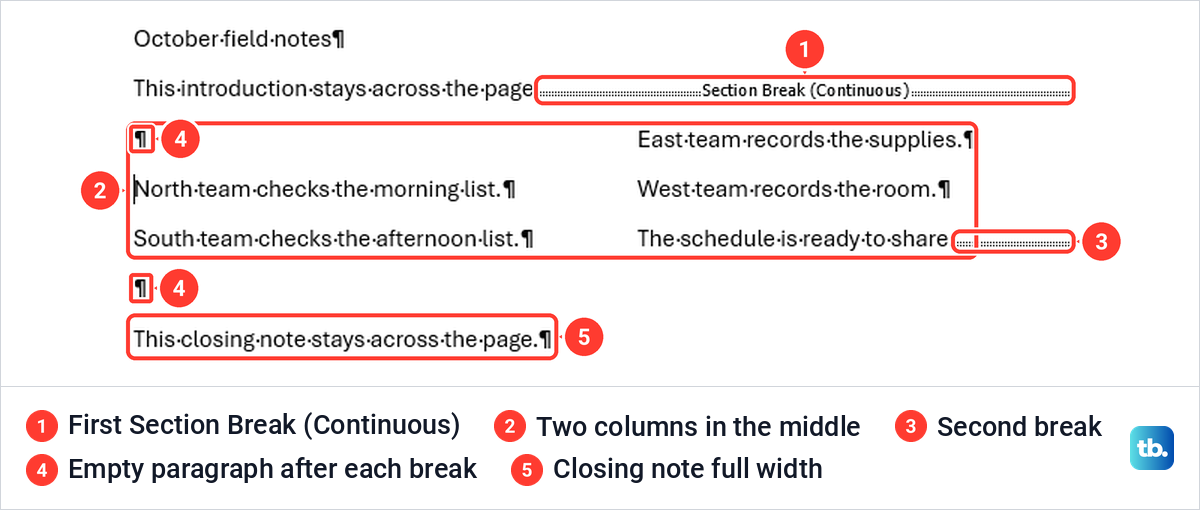
Each section keeps its own column setting, and the breaks stay in the document even after you change the columns back. If a leftover boundary later changes how other pages look, inspect the marks before you remove a section break.
Go back to one column
Click in the columns you want to undo and open Layout > Columns > More Columns. Choose the One preset and check Apply to. In a document with section breaks, This section changes only the section the cursor is in, while Whole document changes every part. Then click OK.
Our middle section went back to a single column, and nothing else moved. The text stayed where it was, and both Section Break (Continuous) marks stayed in the document.
Make columns in Word for the web
Word for the web can make page columns too when its Layout tab shows a Columns icon. In our Edge window, its Layout tab showed small icons without labels. The fourth one showed the tooltip Columns, and its menu offered One, Two, Three, Left, Right and More Columns, the same choices as the desktop app.
We chose Two, and our short text stayed in the first column, just as it did on the desktop. Microsoft's column-width help page still says you can see newsletter columns in Word for the web but can't create them there.
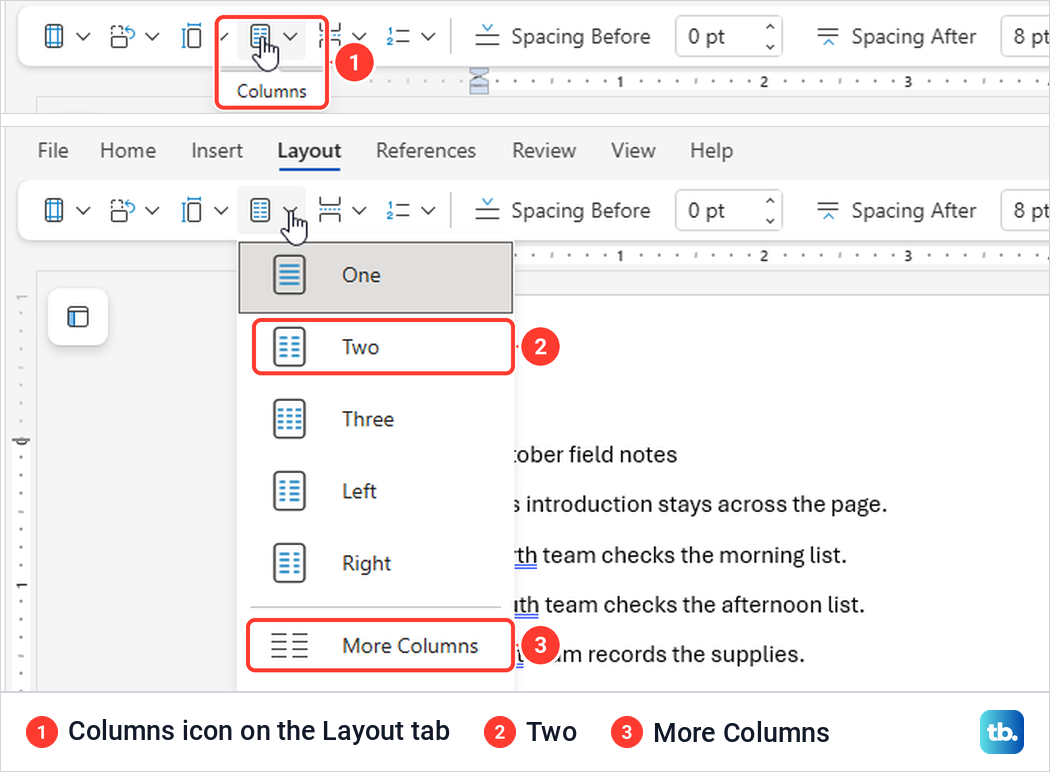
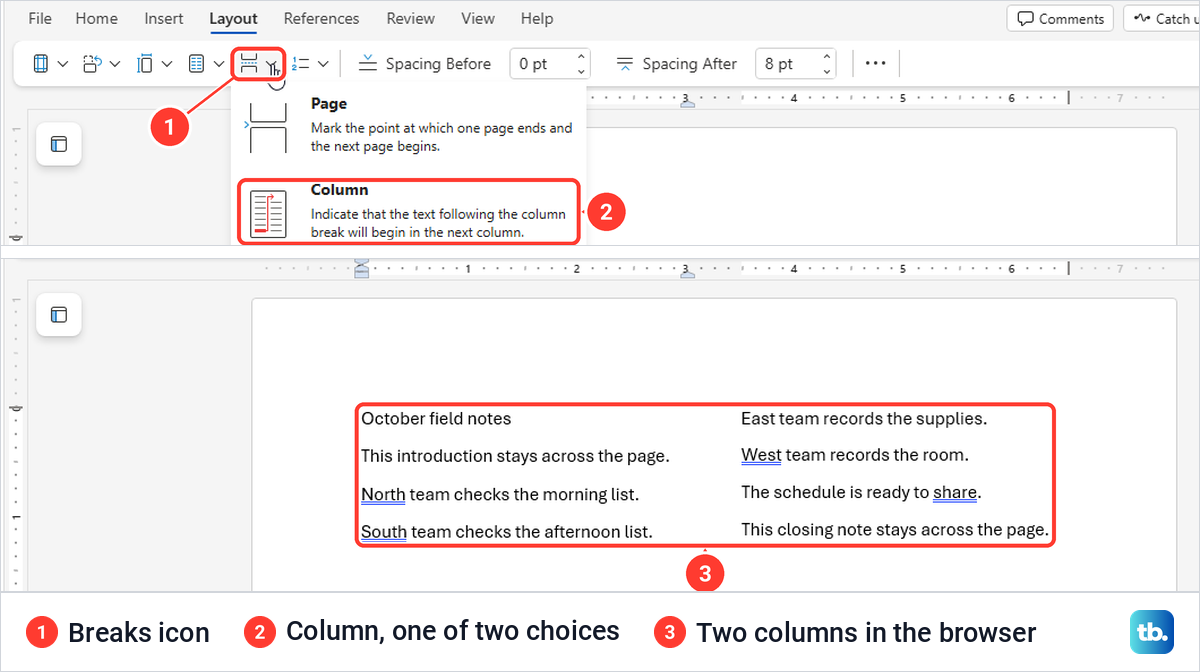
To move text across, click before the line that should start column two, open the Breaks icon next to Columns and choose Column. The web Breaks menu offered only Page and Column, and our text then sat in two columns in the browser.
Microsoft says Word for the web can't add section breaks yet, and its Breaks menu has no Continuous break. For a page that switches between one and two columns, open the document in the desktop app, add the section breaks there and save it.
Why columns look blank or will not work
When columns look wrong, the cause is usually visible on the page once you know where to look. Check these four in order, each with its fix.
The second column is empty
In a whole-document layout, short text stays in the first column until it reaches the bottom of the page, while our selected text, which ended at a section break, was balanced across both. Add a column break where the second column should start, or keep writing and the text will flow across. If the second column looks too narrow, open More Columns and check the widths.
The page shows one long column in Draft view
Draft view does not show page columns. In Draft, our two-column page appeared as one column of text, with the Column Break running across the whole window as a dotted line. Switching to View > Print Layout brought both columns back.
The columns changed the wrong part of the document
The cursor was in a different section from the one you meant. Turn on paragraph marks, find the Section Break lines, click inside the section you want and check Apply to in More Columns.
The Columns button is greyed out
Protection from editing is one reason for a grey Columns button. We protected our test page with Review > Protect > Restrict Editing, chose No changes (Read only) and started enforcing it without a password. The mode button switched to Viewing and Columns, Breaks and the rest of the Page Setup group went grey. Clicking Columns opened nothing and showed no warning; only the Restrict Editing pane said the document was protected.
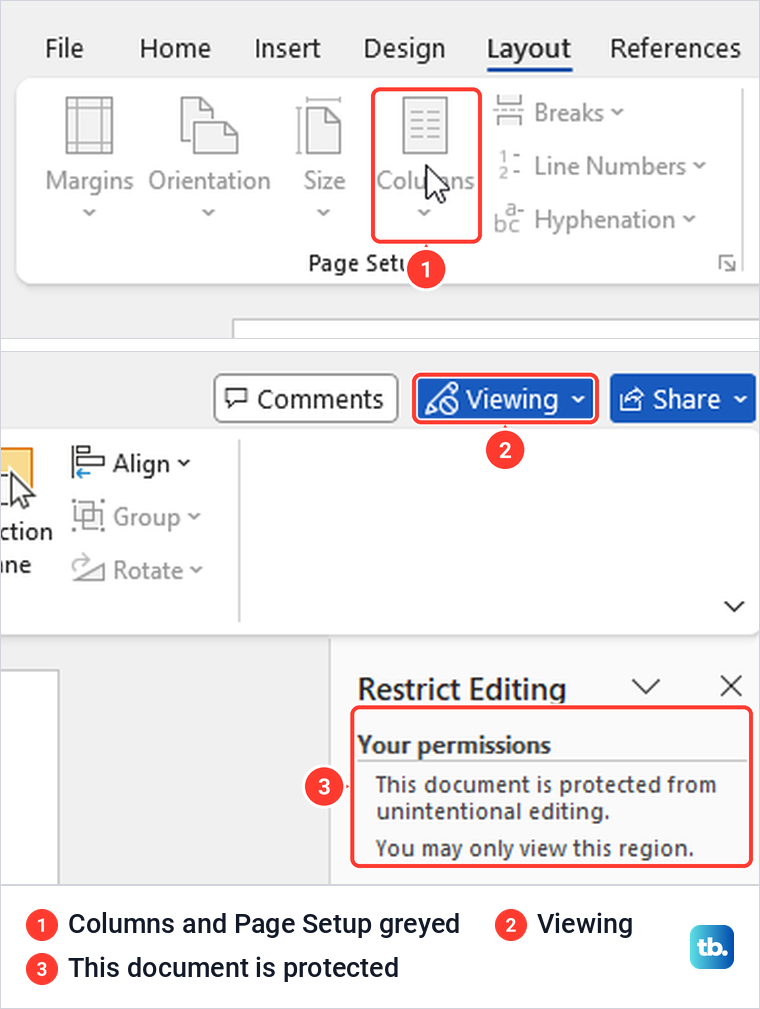
Clicking Stop Protection at the bottom of the Restrict Editing pane turned it off, and Columns worked again. Microsoft says to type the password if Word asks for one at that point. For a file someone else protected, ask them to remove the protection or share the password.
A file can also open for viewing only. Microsoft says a document you receive may open in Protected View, and that you can switch the mode menu in the upper right corner from Viewing or Reviewing to Editing. If you can't leave Protected View, Microsoft says the author or your administrator may have set rules that prevent editing.
Page columns or a table
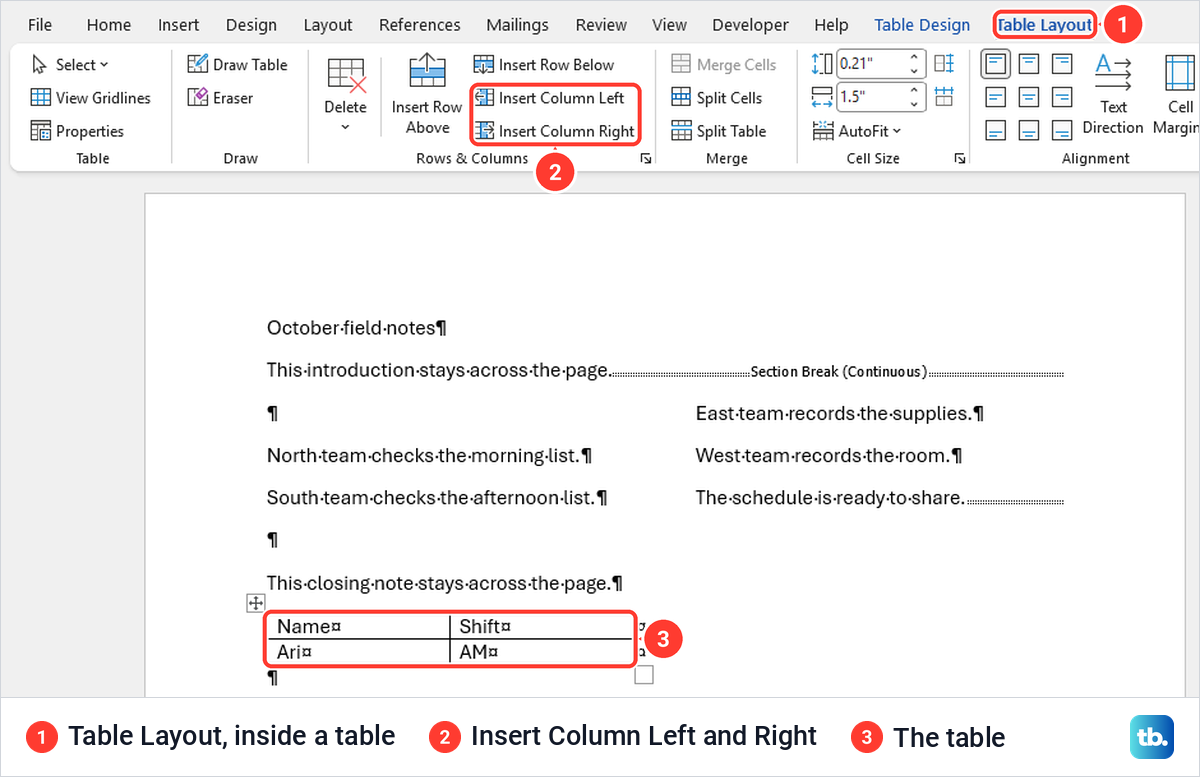
Page columns suit text that should flow from one column into the next, like a newsletter or a leaflet. A table suits content that sits side by side in pairs, such as names next to shifts, where each cell stays put whatever you type in the one beside it.
The two use different controls. When we clicked inside a table, Word added the Table Design and Table Layout tabs, and Table Layout's Rows & Columns group read Delete, Insert Row Above, Insert Row Below, Insert Column Left and Insert Column Right. Those buttons add a column to the table, while page columns always come from Layout > Columns with the cursor in ordinary text.
For a line that is part of the text rather than a column divider, use the separate steps to add a line in Word. If a picture will not sit where you expect in a narrow column, the guide to move images in Word covers its wrapping controls. When the layout is finished, save the Word document as a PDF to share it with people who do not use Word.
How we tested this guide
We tested this in Word for Microsoft 365 on Windows 11, version 25H2, and Word for the web in Edge, splitting an eight-paragraph document into columns.
Frequently Asked Questions
How do I make two columns in Word without changing the whole page?
Select the paragraphs you want in columns, then choose Layout, Columns, Two. Word puts only that text in two columns and adds a Continuous section break before and after it.
Why is my second column blank?
The text is not long enough to fill the first column yet. In a whole-document layout Word moves text across only when a column is full, so add a column break with Layout, Breaks, Column where the second column should start.
How do I start typing in the next column?
Click where the next column should begin and choose Layout, Breaks, Column, or press Ctrl + Shift + Enter. The text after the cursor moves to the top of the next column.
How do I make one part of a page two columns and the rest one?
Select that part and choose Two, or put a Continuous section break before and after it and set only the middle section to Two. The text above and below stays full width.
Can I make columns in Word for the web?
Yes, if its Layout tab shows the Columns icon. That unlabelled icon offers Two and the other presets, and its Breaks menu has a Column break. It has no section breaks, so add those in the desktop app.
Should I use page columns or a table?
Use page columns for text that should flow from one column to the next. Use a table when each side must stay paired with the other, row by row.