

To create an agent in Copilot, open Microsoft 365 Copilot with your work or school account, select Agents and then New agent, describe the job, check the answers in Preview and select Create. The same steps create a Copilot agent whether you describe it in plain words, fill in a blank form or start from a template, and the new agent stays private until you share it.
We built a small help desk agent for a fictional company called Orion Desk this way, in Microsoft 365 Copilot in Microsoft Edge on Windows 11, version 25H2. Your screen can differ from ours, because Microsoft says Agent Builder and the features you can add depend on your organization's licenses and admin settings.
The short version
- Open Microsoft 365 Copilot with a work or school account and select Agents > New agent.
- Describe one job, select Skip for a blank form, or pick a template.
- Check the name, description, instructions and suggested prompts, then ask questions in Preview.
- Select Create. The agent is private and appears under Your agents in the Agent Store.
- Use Share only when others need the agent, and make sure they can open its sources.
Choose how you want to build the agent
Agent Builder gives you three ways to start, and all three end with the same Create button. Describing the agent is the quickest route to a first draft, because the builder writes the instructions for you. The blank form suits you if you already know the exact wording, and a template gives you a finished example to adapt.
| Start with | What to select | What you do next | Best for |
|---|---|---|---|
| A description | Agents > New agent, then the Message Agent Builder box | Describe one job, send it, then review the Configure view and Preview | The fastest first build |
| A blank form | Agents > New agent > Skip | Type a name, description and instructions, then open Preview | Exact control of the wording |
| A template | Agents > New agent > Templates | Pick a template, rewrite its fields, then open Preview | A ready example to adapt |
Whichever start you pick, the agent is only created when you select Create. Microsoft says the same about templates, describing them before that point as a scaffold you are still editing.
An agent is worth building when you will ask the same kind of question again and again with the same rules. For one-off help inside a workbook, using Copilot in Excel directly is quicker. For everyday chat, drafting and summaries, our guide to using Microsoft 365 Copilot across apps is the better place to start.
Open Agent Builder in Microsoft 365 Copilot
Go to microsoft365.com/chat in your browser and sign in with your work or school account. On our PC the address opened Microsoft 365 Copilot in Edge, with New chat, Search, Library, Agents and Notebooks in the left pane.
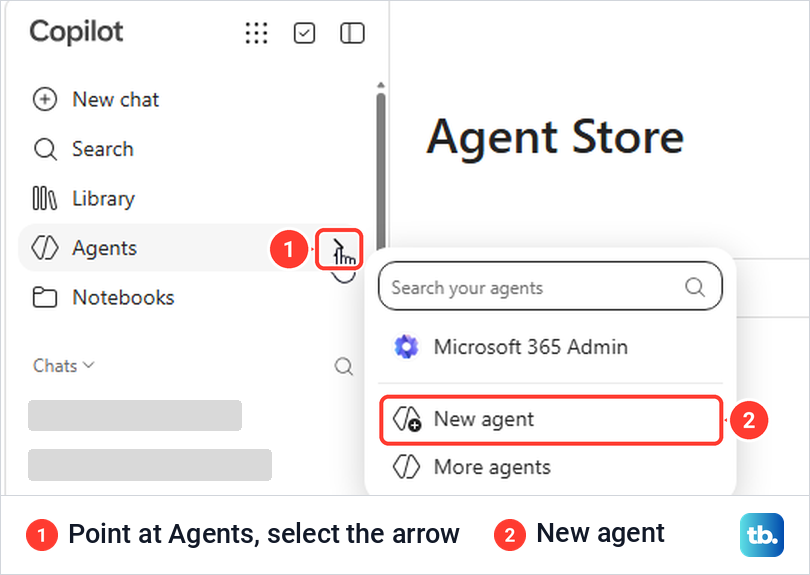
Selecting Agents opens the Agent Store, which lists your own agents above the ones Microsoft built. To start a new agent, point at Agents and select the arrow at the right end of that row. A small menu opens with a search box, the agents you already have, New agent and More agents.
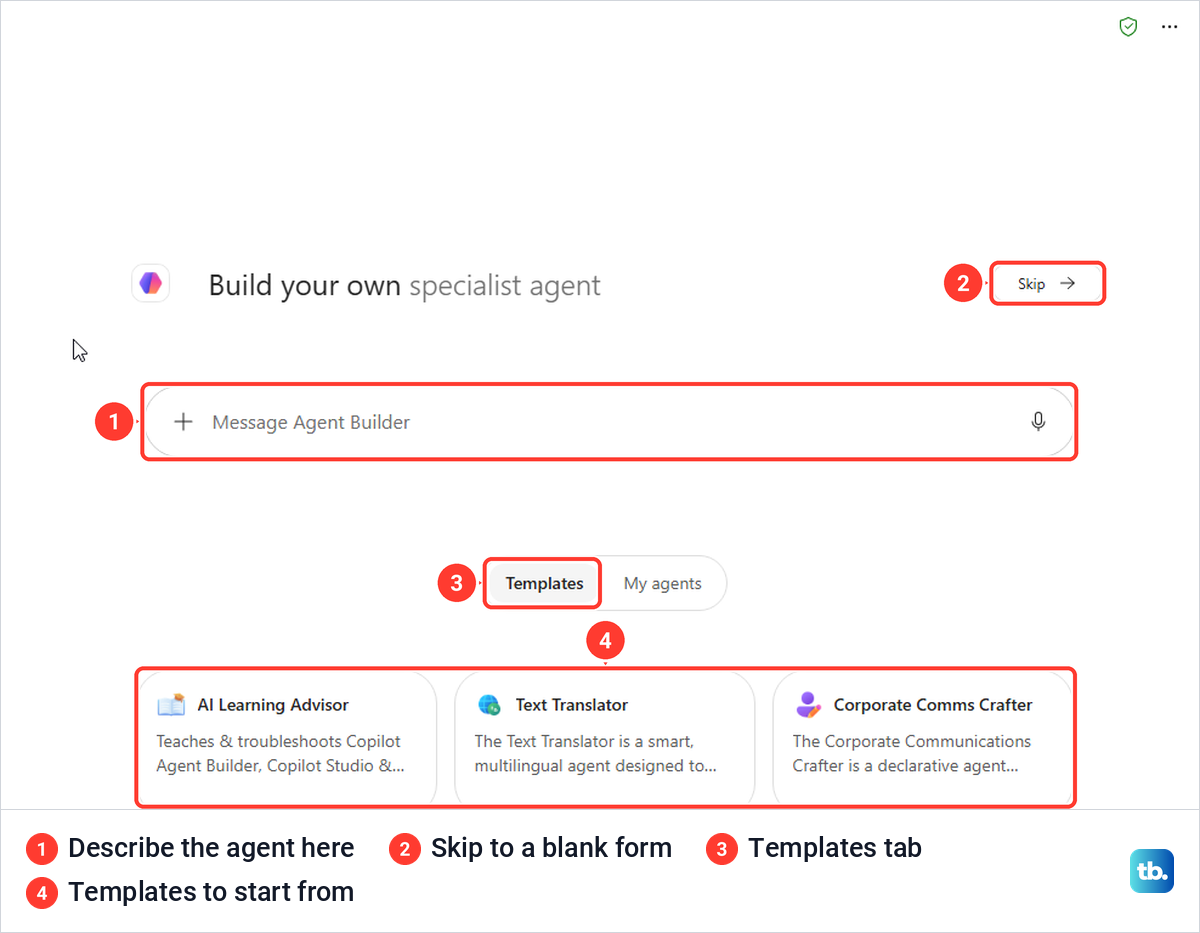
Select New agent. The page that opened for us was headed "Build your own specialist agent", with a Message Agent Builder box, a Skip button and two tabs, Templates and My agents. Microsoft's help pages show Describe and Configure tabs here instead.
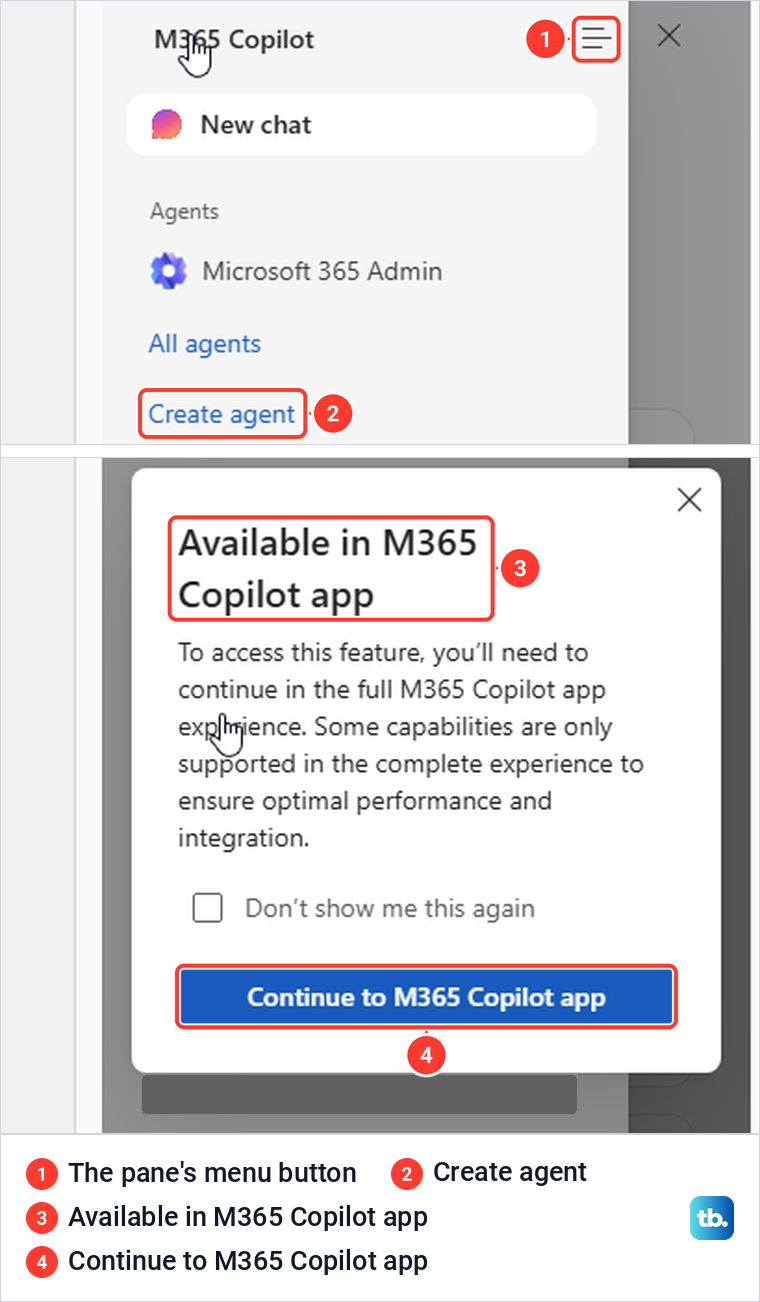
Word for Microsoft 365 has a shortcut to the same place. In the Copilot pane, the one you use to draft and edit with Copilot in Word, the menu button at the top lists New chat, your agents, All agents and Create agent.
Create agent does not build anything inside Word. It shows a card headed "Available in M365 Copilot app", which says "you'll need to continue in the full M365 Copilot app experience", with a Continue to M365 Copilot app button.
Microsoft also lists office.com/chat and the Microsoft Teams desktop and web app as places to build agents. It says Agent Builder is not available in the mobile apps.
Agent Builder belongs to the work version of Microsoft 365 Copilot. If the page has no Agents item, check which Copilot you opened, and see how to access Copilot on Windows and Edge for the different entry points.
Describe the job in one clear prompt
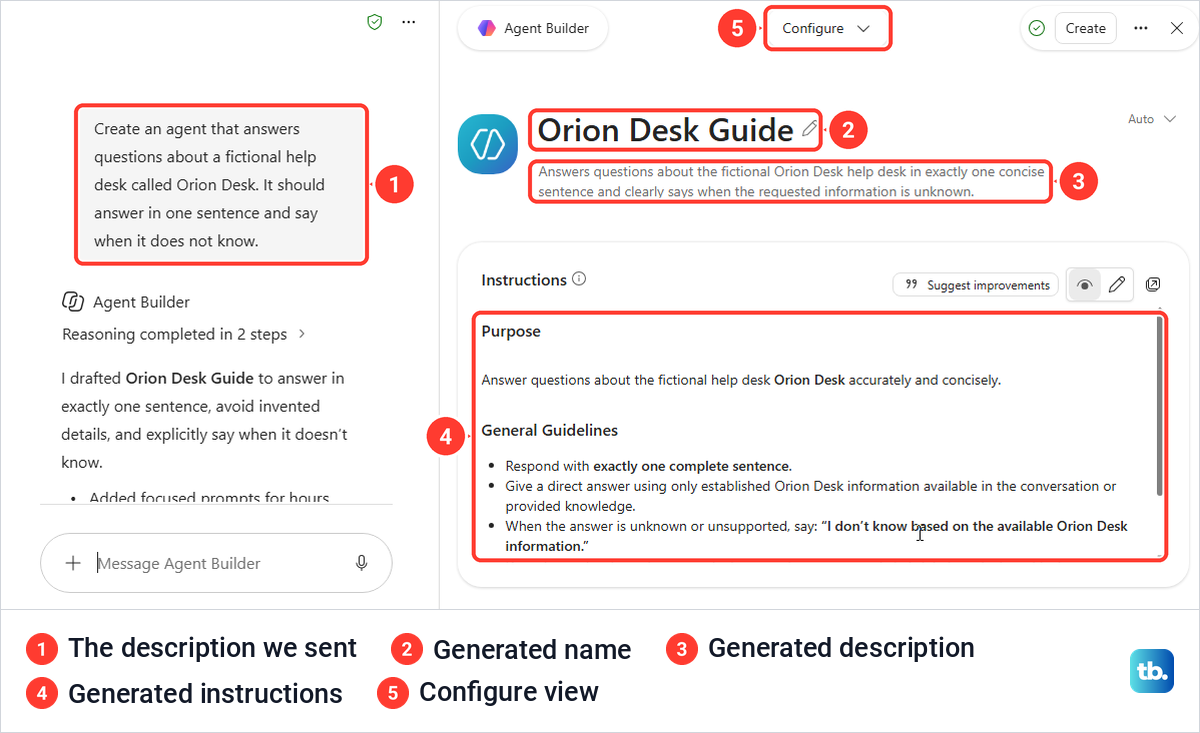
Type what the agent should do into the Message Agent Builder box and press Enter. Keep it to one job, and say how the agent should answer and what it should do when it does not know. This is the description we sent.
Create an agent that answers questions about a fictional help desk called Orion Desk. It should answer in one sentence and say when it does not know.The page split in two in under half a minute. On the left, Agent Builder said it had drafted Orion Desk Guide to answer in exactly one sentence and say when it doesn't know. On the right, the Configure view already held a name, a description and headed instructions.
Read those instructions before you go further, because they are what the agent will follow. Ours included "Respond with exactly one complete sentence." plus a fallback line telling the agent to say it doesn't know based on the available Orion Desk information. That matched our request, but check that the builder has not added rules you did not want.
The first time the builder opened, a "What's new in Agent Builder" card appeared on top. It said "Uploaded files" is now called "Attachments", and that every agent can write code, create Word, Excel and PowerPoint files and generate graphics, on by default. Select Got it to close it.
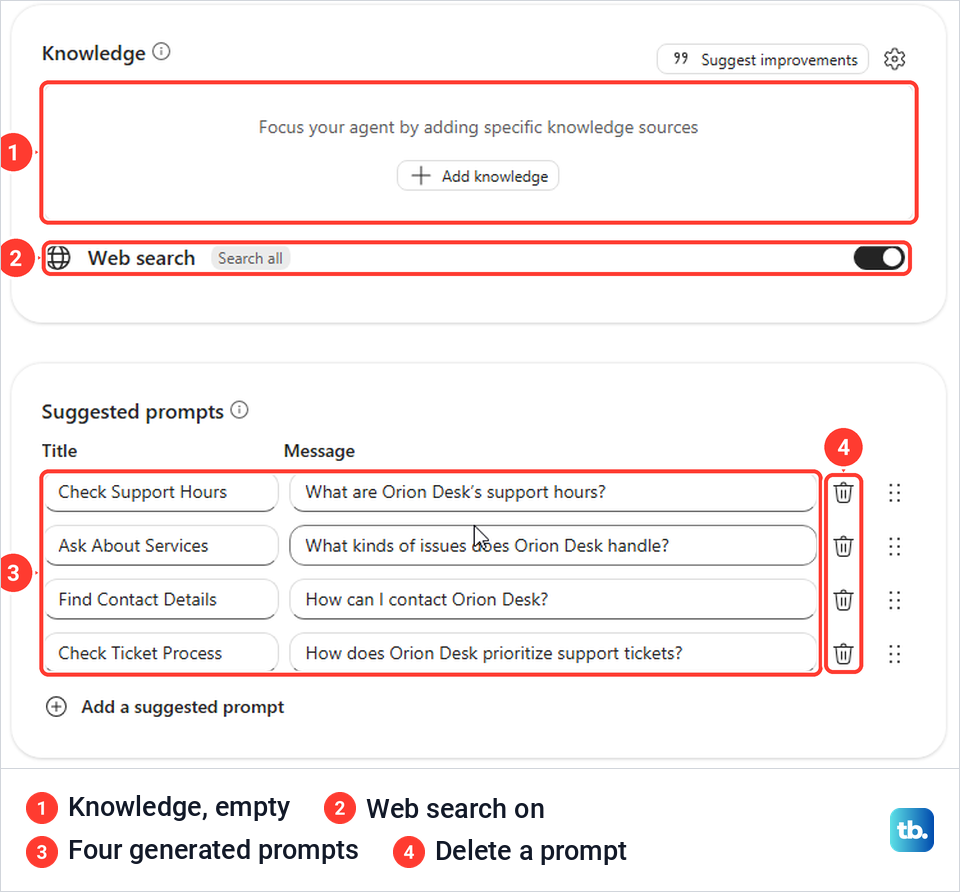
Scroll down the Configure view and check the rest. Skills and Knowledge were empty, Web search was switched on, and four suggested prompts had been added. Two of them asked how to contact Orion Desk and how it prioritizes support tickets, details our description never supplied. Ask each suggested prompt in Preview before you share the agent, so you know what people will see when they select it.
Suggested prompts are the starter questions people see when they open the agent. Use the bin icon beside a prompt to delete it if the agent cannot answer it, or rewrite the prompt. To change anything else, type the change into the builder chat, and Microsoft says the name, description and instructions update as you go.
Set up the agent yourself with Skip
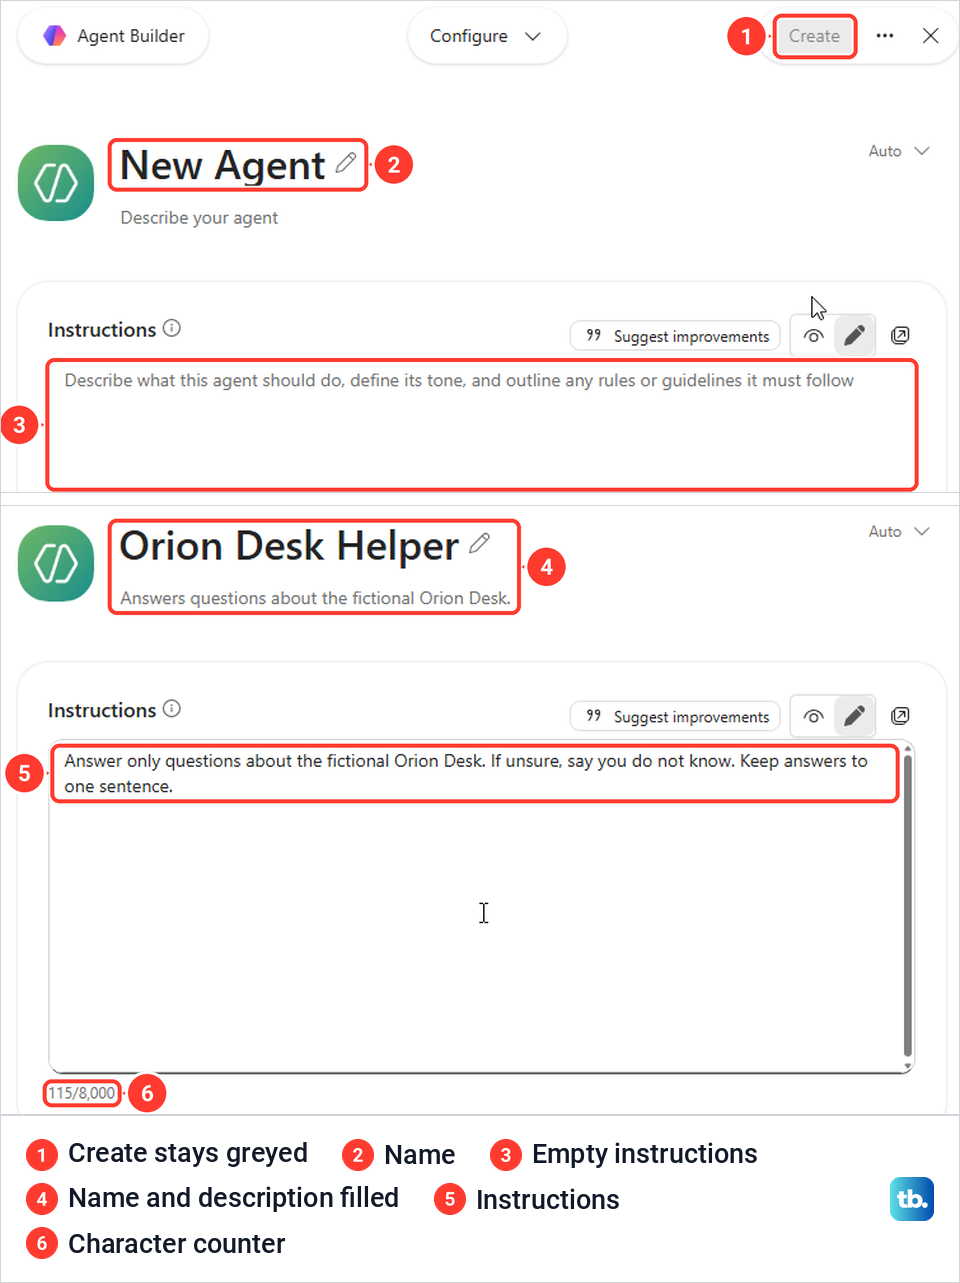
Select Skip on the New agent page to get an empty agent. Ours opened in the Configure view with the name New Agent, a Describe your agent line, an empty Instructions box and a greyed Create button.
Select the pencil beside the name to type your own. Microsoft allows up to 30 characters for the name, 1,000 for the description and 8,000 for the instructions. While we typed, a counter showed 0/1,000 under the empty description box, and the finished instructions read 115/8,000.
Write the instructions as rules the agent can follow, with the job first and the limits after it. We named ours Orion Desk Helper, described it as answering questions about the fictional Orion Desk, and gave it the three rules below.
Answer only questions about the fictional Orion Desk. If unsure, say you do not know. Keep answers to one sentence.
Microsoft's help page still shows two switches in this form, "Create documents, charts, and code" and "Create images". Our Configure view had Skills, Knowledge and Suggested prompts instead, and the "What's new" card said those abilities are now on by default. Microsoft says Skills are in preview and only for organizations in its Frontier Program, so an empty Skills box is normal.
Preview the agent before you create it
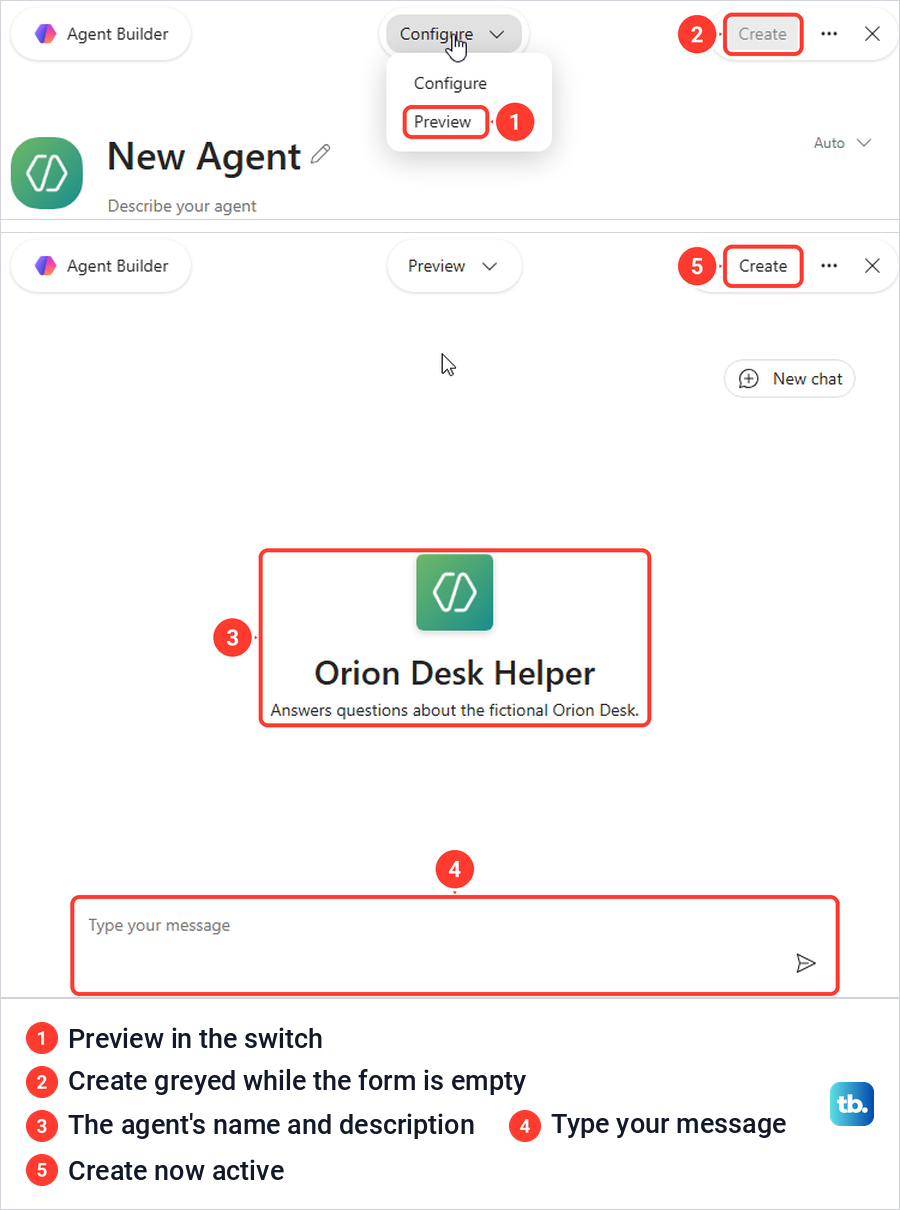
The switch at the top of the builder, labelled Configure, also offers Preview, the chat view where you try the agent. Microsoft's pages call it the Try it tab. With the form still empty, our Preview showed a greyed New Agent card and a message box with no prompt and no send button.
Once the name, description and instructions were in place, Preview showed the agent's name and description above a "Type your message" box with a send arrow. Create stayed greyed for a moment after we finished typing and was active when we opened Preview. Microsoft says this view is enabled after the agent has a name, description, and instructions, which matches what we saw.
Ask three kinds of question here. Ask one the instructions or sources can answer, one they cannot, and one that is off the agent's topic, so you can see it answer, admit a gap and stay on its job.
If an answer is wrong, change the instructions, select New chat in Preview and ask again. Treat the replies like any Copilot answer, and check a few against the real facts before you rely on the agent or share it.
Start from a template
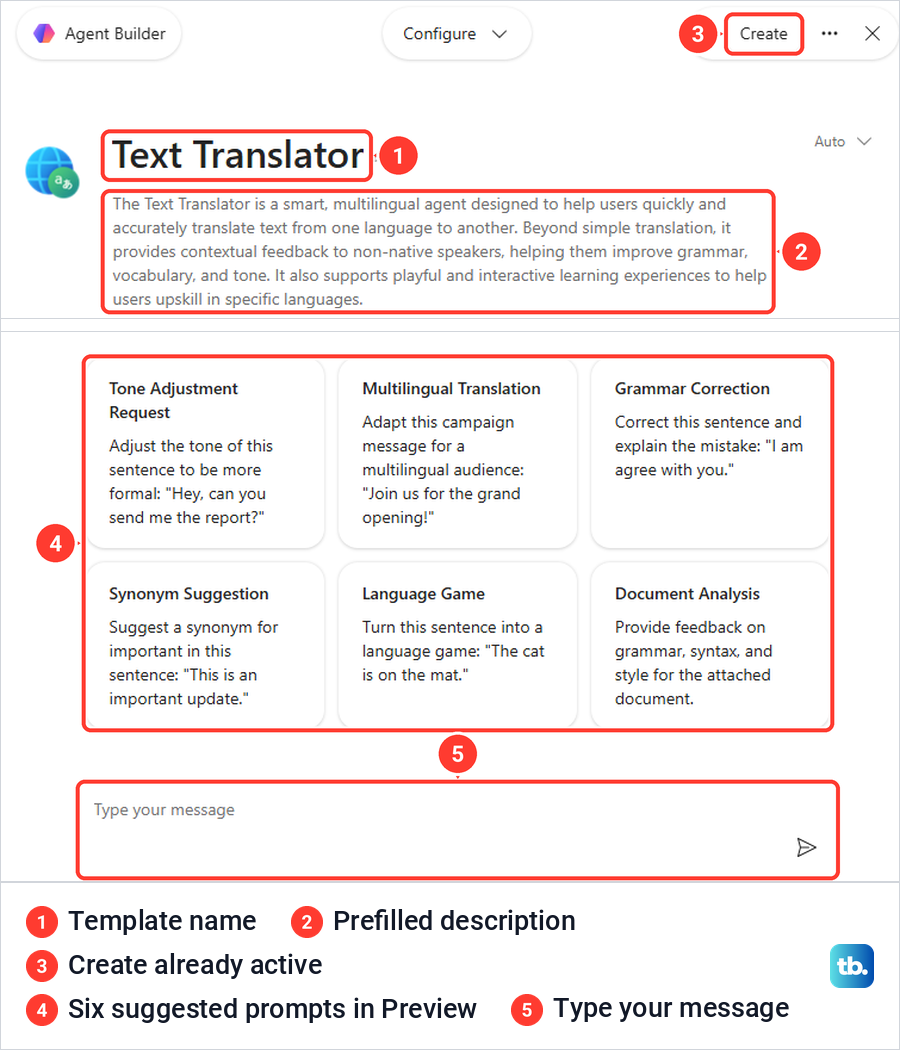
On the New agent page, the Templates tab showed AI Learning Advisor, Text Translator and Corporate Comms Crafter, with View all for the rest. Microsoft lists more than twenty templates.
Selecting Text Translator opened the builder already filled in, with the name, a long description, full instructions and a link to the template's documentation. Create was active straight away. In Preview it offered six suggested prompts, among them Grammar Correction and Language Game.
We sent the Grammar Correction prompt, which asks the agent to correct a sentence that puts am before agree. It returned three corrected versions and explained the mistake. Change the name, instructions and prompts to fit your team before you select Create, because the template only becomes an agent at that point.
When we selected the X on an unfinished draft, the builder closed without a save prompt and returned to the start page. Select Create before closing if you want to keep the agent.
Add knowledge only when the job needs it
An agent with no knowledge source works from its instructions, and may use the public web if your organization allows web search. Add knowledge when it should answer from your own material, and first decide whether everyone who will use the agent may see that material.
Microsoft lists public websites, SharePoint and OneDrive files, Teams chats and meetings, Outlook email, uploaded files and connectors as sources, and says limits vary by source type. Which of these you get depends on your license. Microsoft says grounding an agent in organizational data needs a Microsoft 365 Copilot license or pay-as-you-go billing in your organization.
The account we used showed the label "Copilot Chat (Basic)". Its Knowledge section had an Add knowledge button that offered only an "Enter a link" box. In the builder chat, the plus menu had Add content, with Upload images and files greyed out, and pointing at the greyed item showed a blocked cursor and no reason.
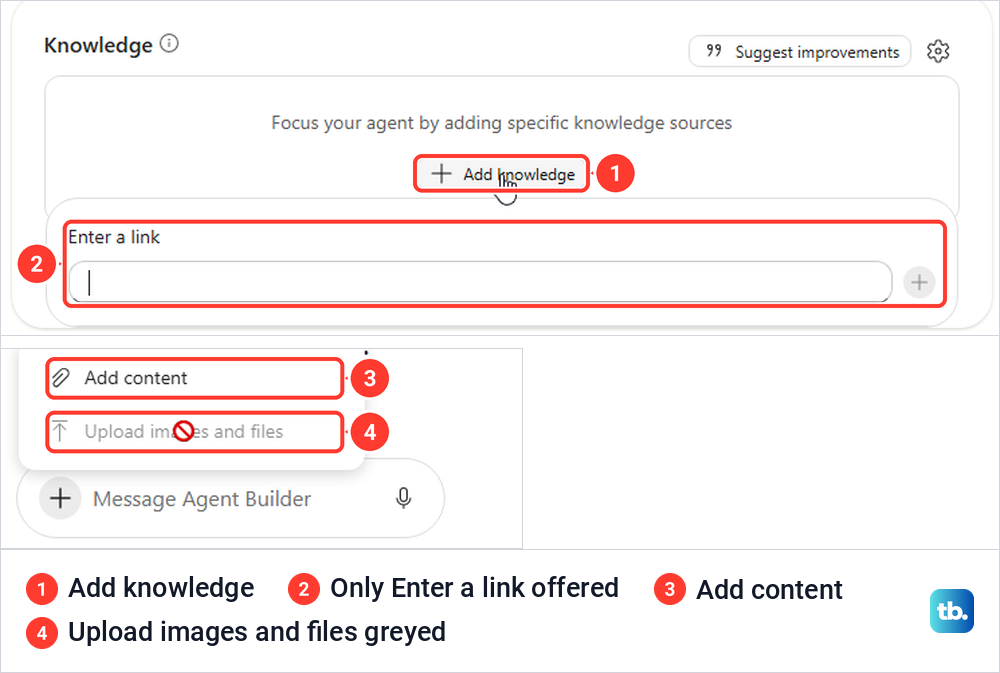
If your menus look like that, ask your administrator which knowledge sources your account can use. Where they are available, Microsoft documents Upload for files from your PC, Browse for SharePoint and OneDrive files, folders and lists, and Search for items such as email and Teams messages.
Work files the agent picks from the cloud need to live in SharePoint or OneDrive. A document saved only on your PC, like our Orion Desk file, has to get there first, and our guide to set up OneDrive on Windows covers syncing it. For team documents, it helps to know how SharePoint organizes files and sites so you pick the right library.
Microsoft adds two warnings. New SharePoint and OneDrive content can show Preparing, and the agent does not use it until that clears. Anyone who can use the agent also gets the information in files you upload to it, so keep private documents out of agents you plan to share.
Check website links after you add them
For a public website, select Add knowledge, paste the address into Enter a link and press Enter or select the plus button. Microsoft's rules are up to four website addresses, no more than two levels deep, and no query parameters such as ?test=1 at the end.
The form did not enforce those rules the way Microsoft describes them. We entered https://example.org?test=1, and it was accepted without a message and saved as https://example.org/ under Web search. A second address, https://example.org/a/b/c, was saved as https://example.org/a/b, again with no warning.
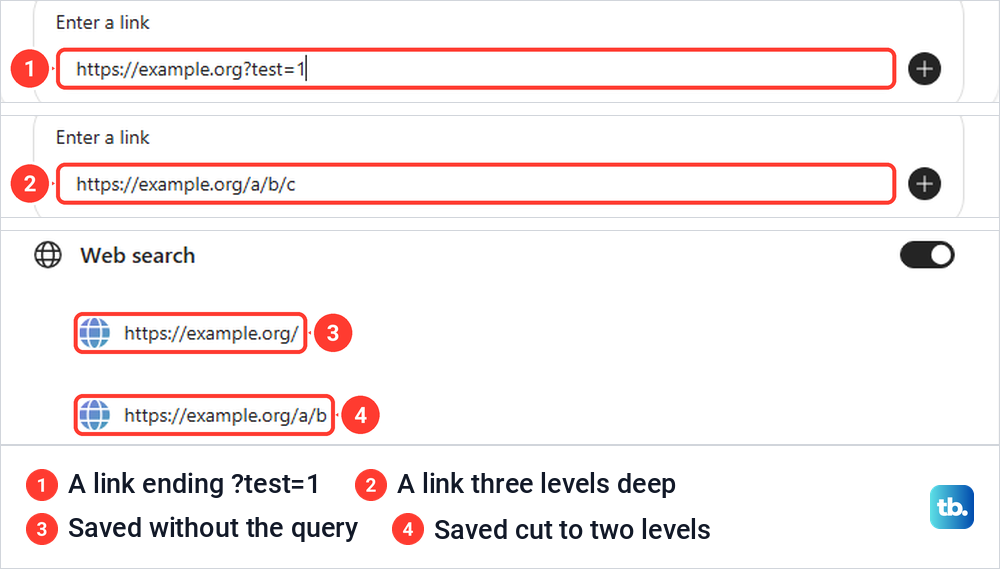
So look at the saved list under Web search after every link you add. If the saved address differs from the one you entered, replace it with a supported address within two levels, then ask a question in Preview that only the page you meant can answer. To remove a link, point at its row and select the X at its right end.
The Search all tag beside Web search also disappeared once the first link was saved. Microsoft notes that an administrator's web search policy can block web content even when the Web search switch still looks on.
Create the agent and find it again
When Preview answers the way you want, select Create at the top right. About ten seconds later we saw "Your agent was created successfully!" with the line "This agent is currently private and only available to you." and two buttons, Share and Start chat.
The Create button then read Update. Microsoft says later changes save automatically but only reach other people after you select Update, and can take several minutes to appear.
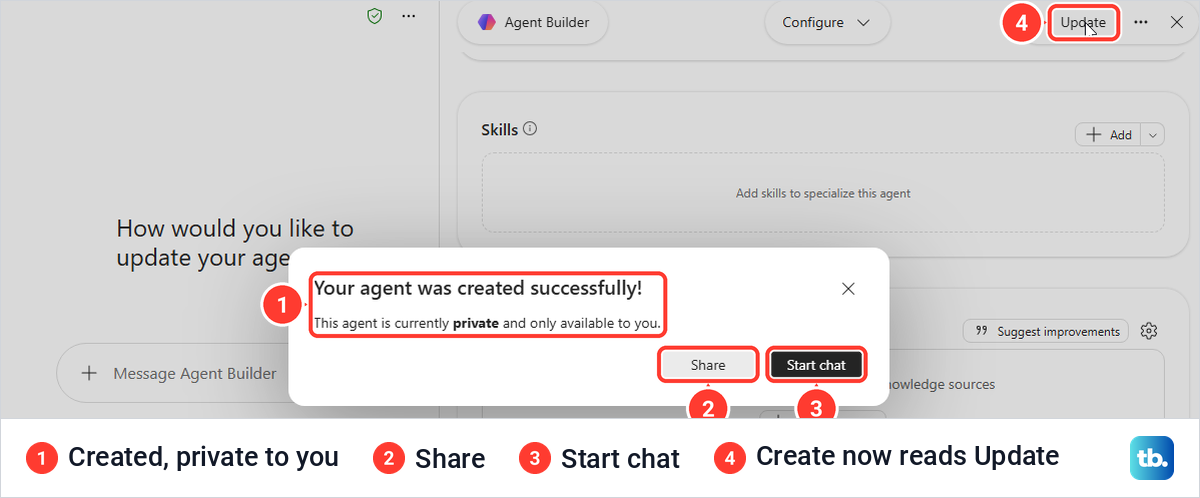
Select Start chat to use the agent straight away. To find it later, select Agents in the left pane, where our new agent appeared under Your agents in the Agent Store, next to the Microsoft 365 Admin agent.
On the agent's chat page, a model menu at the top left offered Auto, Quick response and Think deeper, with Auto ticked. Microsoft says the builder sets the default mode and anyone using the agent can change it from this menu.
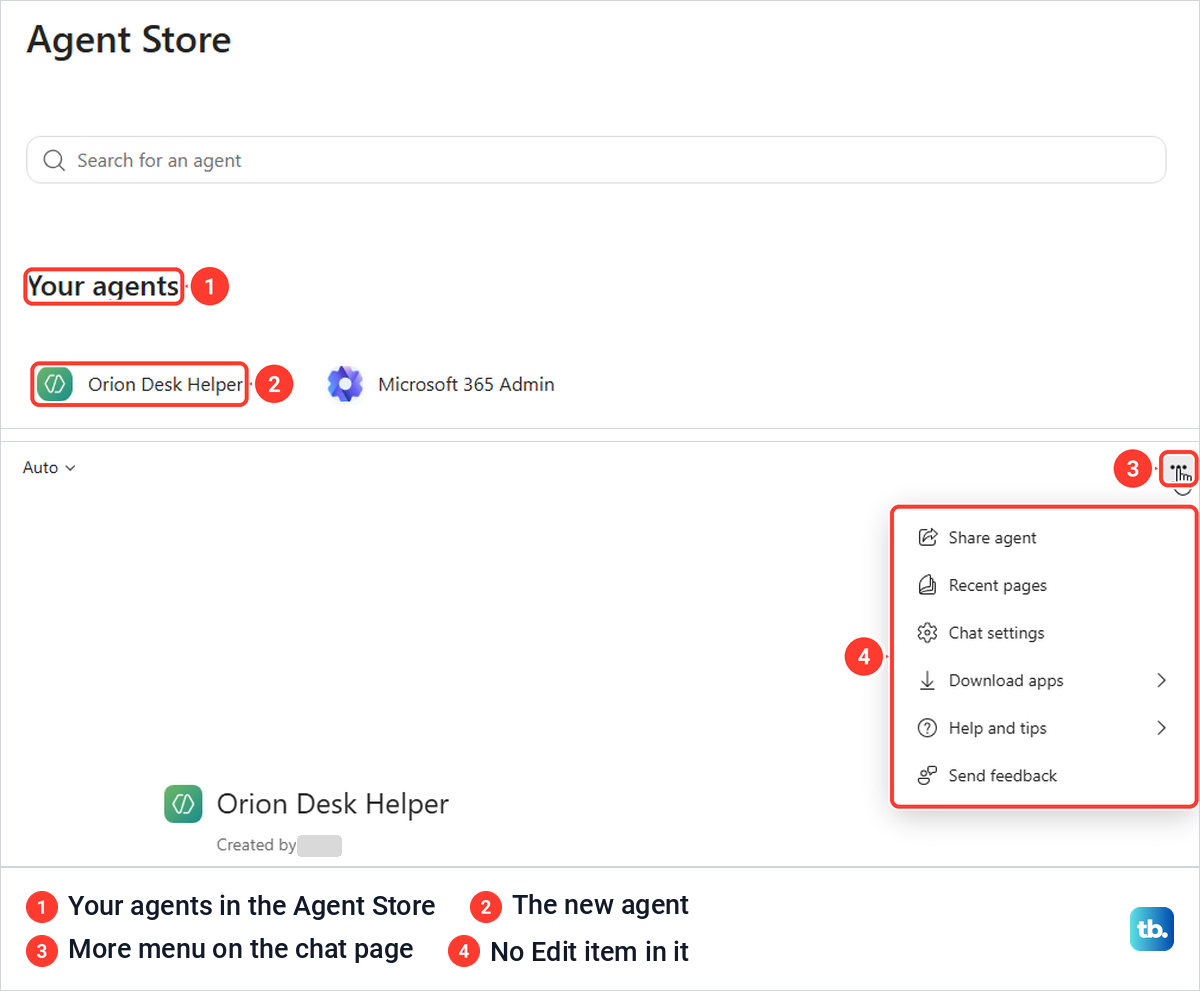
To change the agent later, do not look for Edit on its chat page. The More menu there listed Share agent, Recent pages, Chat settings, Download apps, Help and tips and Send feedback, with no Edit item.
Microsoft's route starts from the list of agents you own, either Agent Store > Your agents > See more or New agent > View all agents. For an agent you used recently, Microsoft says you can also select the More button, the three dots next to its name in the left pane. Open that More menu and choose Edit, the pencil icon. The same menu has Delete, which Microsoft says is permanent and can't be reversed.
Ask questions that show where an answer comes from
A tidy answer does not prove the agent read your source. Microsoft's advice is to ask a question whose answer sits in one of the sources, then confirm the response uses that information.
Our Orion Desk file held one fact nobody would guess, the escalation word blue lantern, but the agent we created had no knowledge source. Asked "What is the escalation word?", it replied in one sentence that it did not know, exactly as its instructions said. That is right for an agent with nothing to read, and the same question becomes a real check once a file is attached.
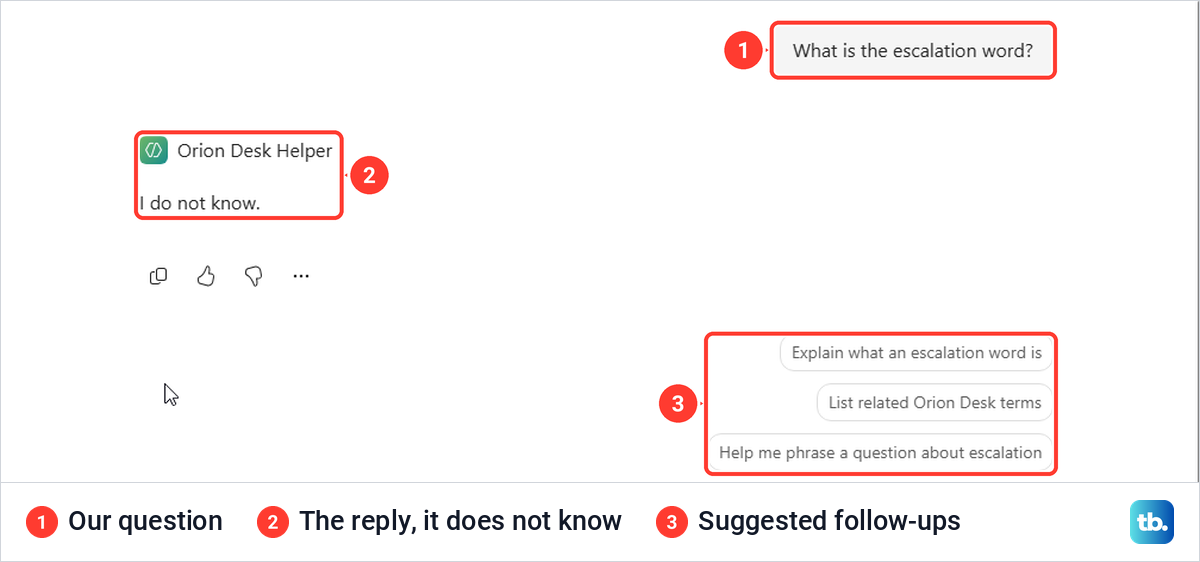
Use the same idea with your own material. Pick a detail only the source contains, such as a product code or a policy date, and ask for it. If the agent guesses or answers in general terms, check that the source is listed under Knowledge and no longer shows Preparing.
Share the agent when other people need it
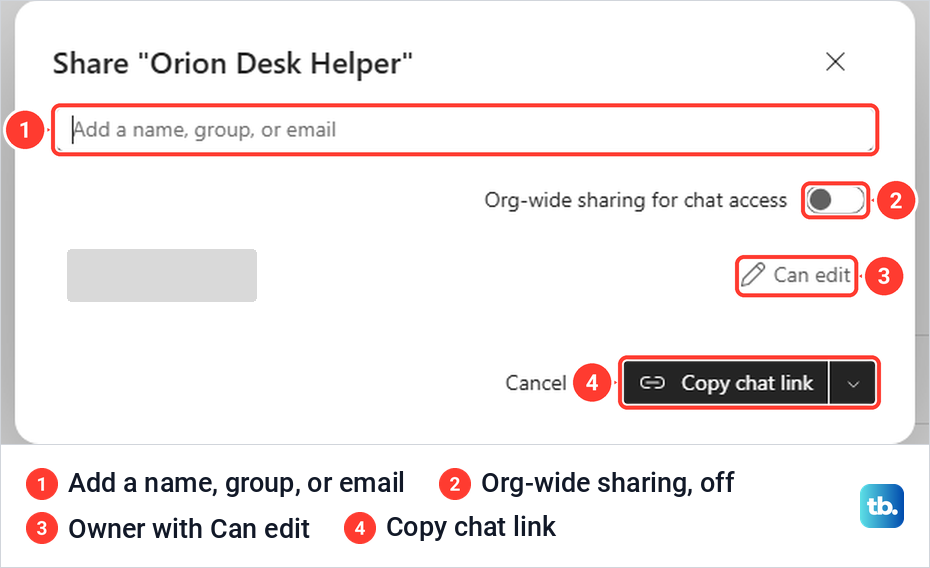
Select Share in the creation message, or Share agent in the agent's More menu. Our dialog, titled "Share Orion Desk Helper", had an "Add a name, group, or email" box, an "Org-wide sharing for chat access" switch turned off, the owner listed with Can edit, and a Copy chat link button. We closed it with Cancel, so the agent stayed private.
Type a person or group, choose Can edit to make them a co-owner or Can chat so they can only use the agent, leave Send notification ticked if they should get an email, and select Add. Groups can only be chat users, and turning on org-wide sharing lets everyone in your organization find the agent in the Agent Store.
Microsoft says the agent respects each person's own access, so someone without permission to a SharePoint or OneDrive source gets answers without that content. When you share, you can choose SharePoint files and folders the agent uses to share with the same people, which Microsoft says only works if you already have permission to share them.
Files uploaded into the agent work differently, because Microsoft says anyone who can use the agent also has access to the information in them. Your administrator can also limit who may share agents, so follow your organization's rules on what a shared agent may contain.
When New agent or a knowledge source is missing
Microsoft says administrators can control whether Agent Builder is available, and that access and the capabilities you can add depend on the licenses in your tenant. If Agents or New agent is missing, first make sure you signed in with your work or school account, and use our Microsoft 365 sign-in fixes if that fails. After that, ask your IT administrator.
If the Copilot page itself will not load or the builder stays blank, work through the fixes for Copilot not working. When only the browser tab fails, our Microsoft Edge page loading fixes cover that side.
If Upload images and files is greyed out, the screen may not explain why, so ask your administrator which knowledge sources your account can use. If Create fails with "We're unable to create this agent due to an error", Microsoft says to try again in a few minutes. If the message says the agent includes a file with an unsupported sensitivity label, Microsoft says to check the shield icon next to your uploaded files and remove the ones with a red error icon.
Agent Builder also has a ceiling. Microsoft says it cannot add actions that connect to outside services, and points you to copying the agent into Copilot Studio for low-code actions, connectors and workflows.
Build an agent from a SharePoint library instead
SharePoint has its own agent builder for the content of one site. Microsoft says you need edit permissions on the site and either a Microsoft Copilot license or pay-as-you-go billing for agents in SharePoint. Open a document library or list and select Copilot > Create an agent, or select files, right-click them and choose Create an agent.
That builder uses Overview, Sources and Behavior tabs and saves the agent as a .agent file in the library. If your team has nowhere to keep its documents yet, first create a SharePoint site and add the files there.
How we tested this guide
We tested this in Microsoft 365 Copilot in Microsoft Edge on Windows 11, version 25H2, building and creating a private help desk agent from a blank form.
Frequently Asked Questions
Can I create a Copilot agent without coding?
Yes. Agent Builder takes a plain-language description, a form with a name, description and instructions, or a template, and our help desk agent needed nothing more than those three fields.
Do I need a paid Microsoft 365 Copilot license to make an agent?
Not always. Microsoft says access and capabilities depend on your organization's licenses and admin settings, and agents grounded in organizational data need a Microsoft 365 Copilot license or pay-as-you-go billing. An account labelled Copilot Chat (Basic) still showed New agent and created an agent from instructions alone.
Why can't I send a message in Preview?
The agent needs a name, a description and instructions first. With the form empty, Preview had no send button and Create was greyed, and once all three were filled in, Preview showed a message box with a send arrow and Create was active.
Why does my agent not answer from my file?
Check that the file is listed under Knowledge and no longer shows Preparing, then ask for a detail only that file holds. Our agent had no knowledge source and replied that it did not know, which is what a well-limited agent should say.
Where is my agent after I select Create?
It is private to you. Select Agents in the left pane and look under Your agents in the Agent Store, or select Start chat in the message that appears after Create.
Can I share an agent without sharing its files?
Partly. People only get answers from SharePoint or OneDrive sources they can open, and the Share step lets you share selected SharePoint files and folders with them if you have permission to. Files uploaded into the agent are different, because Microsoft says their information is available to everyone who can use the agent.