

To insert a line in Word, click an empty line, type three hyphens (---) and press Enter. Word turns them into a horizontal line across the full width of the text. For a line under text you already have, use Home > Borders > Bottom Border, and for a line you can drag, angle or color, use Insert > Shapes.
Those are different things in Word, and knowing which one you made is how you change or remove it later. The hyphen line and Bottom Border are borders attached to a paragraph, so you cannot click them like a picture. A shape is an object you select, drag and delete.
We added the lines below to a sample event notice in Word for Microsoft 365 on Windows 11, and repeated the border and table methods in Word for the web. If you came to change the gap between lines of text instead, our guide to changing line spacing in Word covers that.
The short version
- Fast divider: type three hyphens on an empty line and press Enter.
- Line under existing text: click in the paragraph, then Home > Borders > Bottom Border.
- Line you can move or angle: Insert > Shapes > Line, then drag, holding Shift for a level line.
- Line to write on: Ctrl + U, Tab, Ctrl + U for print, or a one-cell table with only a bottom border for typing.
- Hyphen line that will not delete: click in the paragraph above it and choose Home > Borders > No Border.
Which kind of line to use in Word
| Method | Best for | What Word makes | To remove it |
|---|---|---|---|
| Type - - -, then Enter | A quick divider between paragraphs | A bottom border on the paragraph above | Click in that paragraph, then Home > Borders > No Border |
| Home > Borders > Bottom Border | A line under text you already typed | A bottom border on that paragraph | Home > Borders > No Border |
| Home > Borders > Borders and Shading | A dashed, colored or thicker divider | A custom paragraph border | Home > Borders > No Border |
| Insert > Shapes > Line, then drag (hold Shift for a level line) | A line you can move, angle or color | A shape | Select it and press Delete |
| A pen on the Draw tab | A hand-drawn mark | An ink stroke | Press Esc, select the stroke and press Delete |
| Ctrl + U, Tab, Ctrl + U | A blank on a form you will print | Underlined tab characters | Select the blank and delete it |
| Insert > Table, one cell, bottom border only | A line someone types on | A table cell border | Change it on Table Design > Borders |
The first two rows cover most documents, and the last two are for forms. If the ribbon names here are new to you, start with our guide to using Microsoft Word for beginners, then come back for the line you need.
Insert a horizontal line with three hyphens
Click an empty line where the divider should go, type three hyphens and press Enter. The hyphens disappear and a thin line runs across the full width of the text. Microsoft says the characters must sit on a line by themselves, and that in a multi-column layout the line may match the column width, so check it if you set up two columns in Word.
On our PC the line did not appear where we typed the hyphens. It ran along the bottom of the paragraph above, the opening-times line in our sample. An AutoCorrect Options button appeared beside that paragraph, and the cursor moved to an empty line below the new divider.
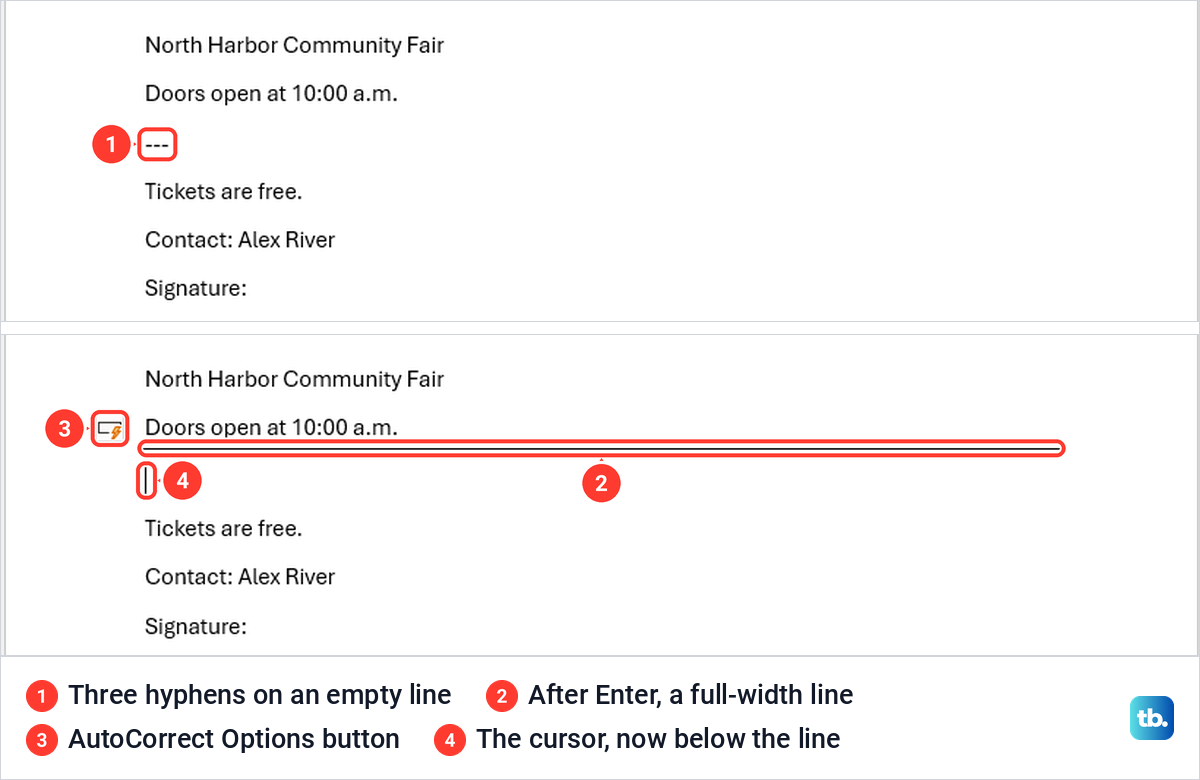
That placement explains most of the trouble people have with this line. You cannot click it to select it, because it belongs to the paragraph above. Turn on paragraph marks to see which paragraph owns it, and our guide to showing and hiding paragraph marks in Word explains that view.
Changed your mind? Press Backspace straight away. On our PC that removed the line and brought back the three hyphens as plain text, as Microsoft describes. Microsoft also says the look of the line depends on which character you type three times, and besides hyphens its help page shows equal signs, underscores, asterisks, number signs and tildes.
Add a line under a paragraph with Bottom Border
When the text is already there, you do not need an empty line. Click anywhere in the paragraph, open the Home tab and select the small arrow beside the Borders button in the Paragraph group. Choose Bottom Border.
We clicked into the ticket line of our sample and chose Bottom Border. A line appeared under the whole paragraph, margin to margin, and no shape was added. The Borders button then showed the bottom-border icon.
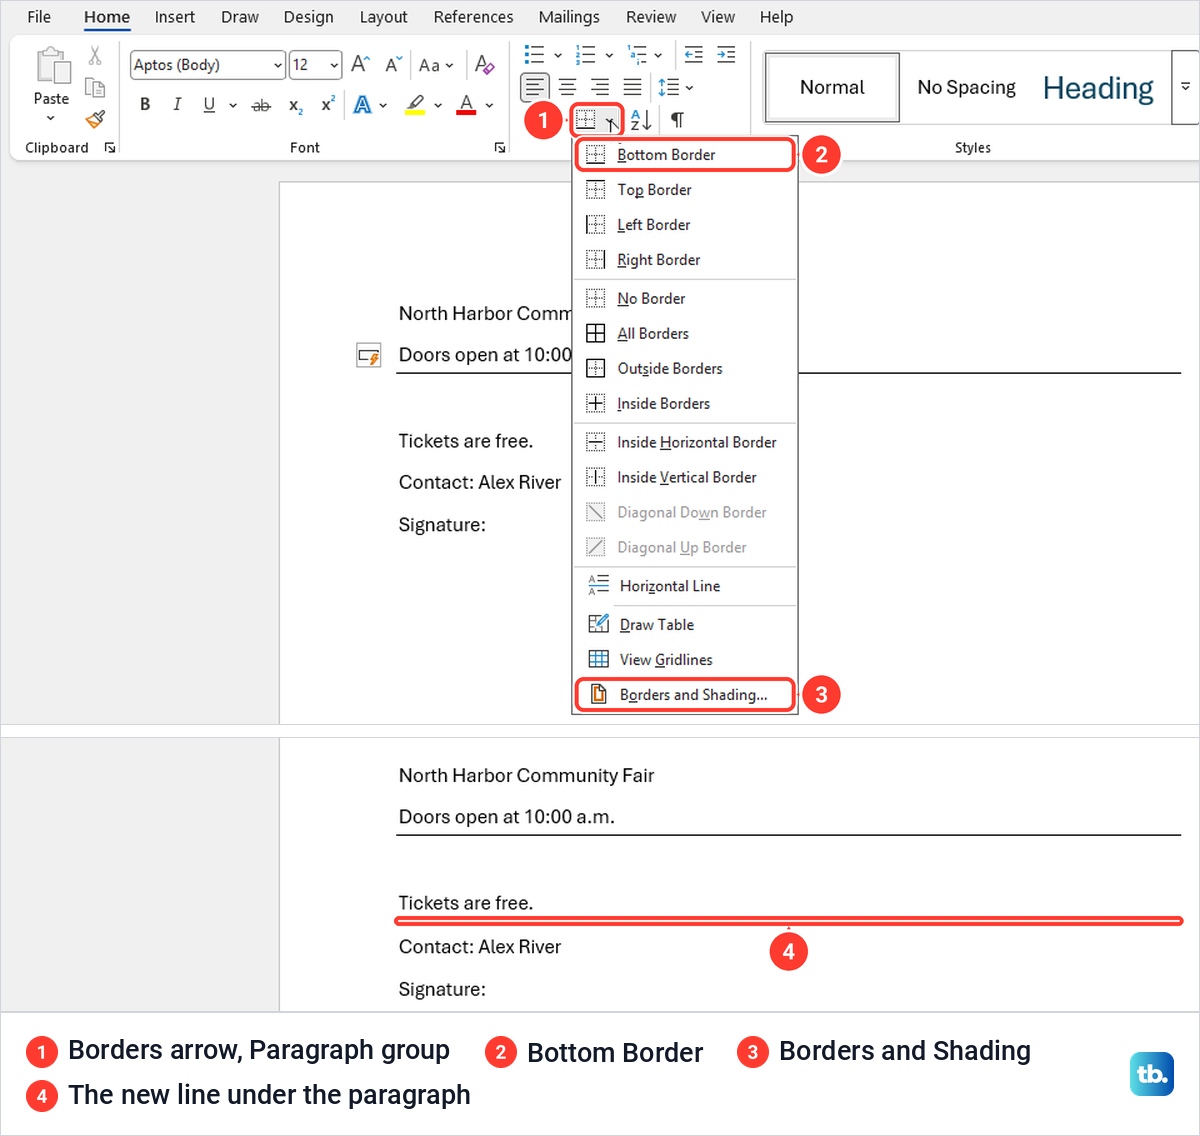
The same menu has Top Border, Left Border, Right Border and Outside Borders for the other sides, and No Border to take them off. For a line under one word rather than the whole paragraph, select the word and press Ctrl + U to underline it instead.
Change the style, color or thickness of the line
For a dashed, colored or heavier line, open the same Borders menu and choose Borders and Shading at the bottom. The Borders tab has Setting, Style, Color and Width on the left and a Preview on the right. The box to watch is Apply to, under the Preview.
When we selected just the word Tickets and opened the dialog, Apply to was already set to Text. Text keeps the border to the selected words, while Paragraph runs it the full width. Switch it to Paragraph for a divider.
Next, pick a Style. On our PC choosing the dashed style also switched Setting to Box, and the Preview showed a dashed box on all four sides. Click None under Setting, check that your style is still highlighted, then click the bottom-edge button beside the Preview. Setting changes to Custom and the Preview shows only a bottom line.
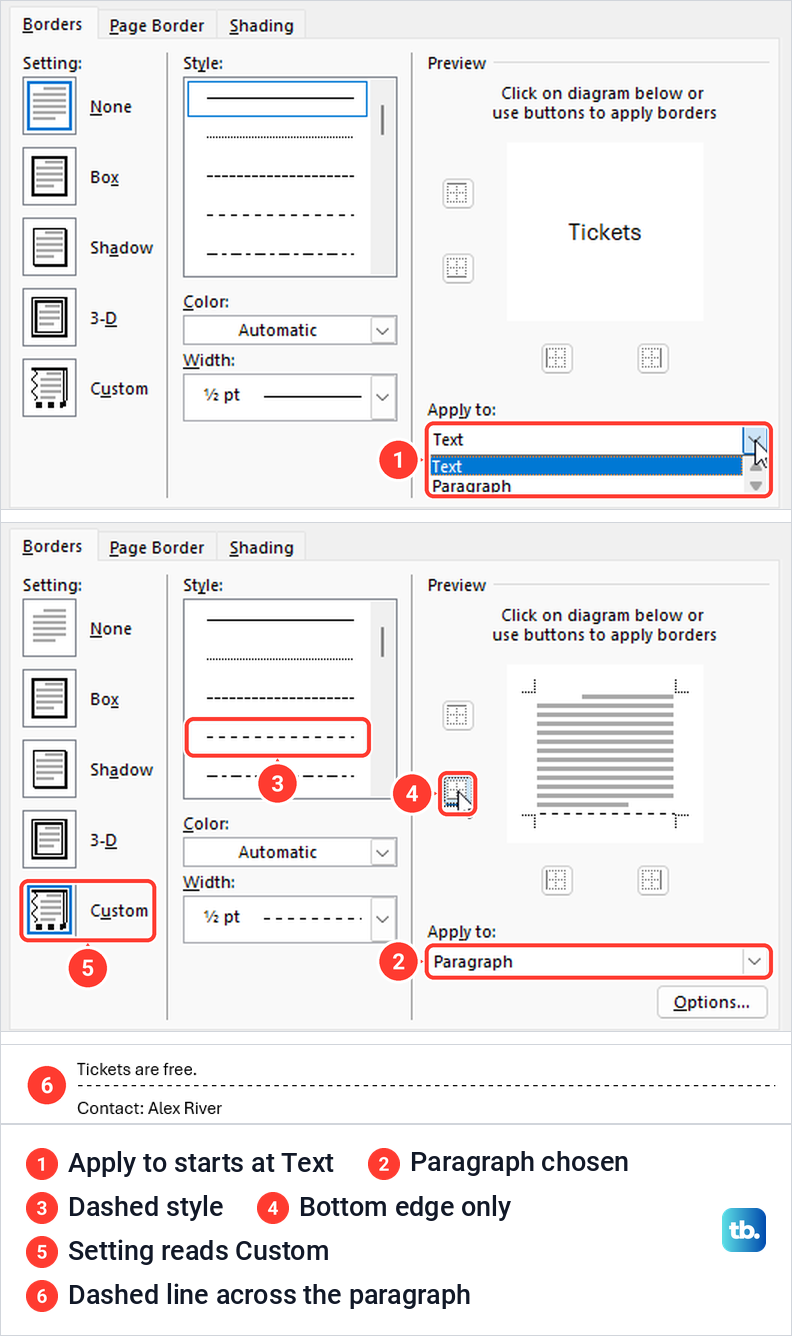
Select OK. Our dashed line replaced the plain one under the whole paragraph straight away, with no further click.
Microsoft's help page adds one step for restyling a line made with three hyphens: after OK, select the Borders button again to apply the change. Our test restyled a border made with Bottom Border, so if a hyphen line keeps its old look after OK, click Borders once more. If the paragraph came from another document with odd styling, clear the formatting in Word before you add the new border.
Draw a line you can move or angle
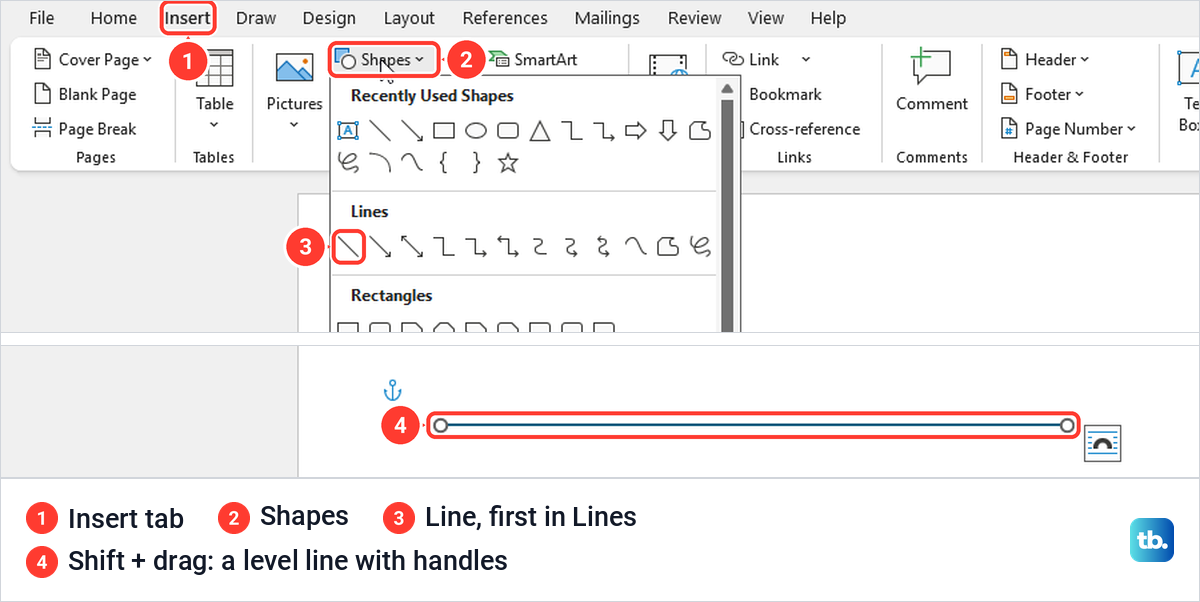
A shape line is the one to use when the line must sit at an angle, point at something or move freely on the page. Open Insert > Shapes and choose Line, the first item under Lines. Then drag across the page where the line should go.
Hold Shift while you drag to keep the line level or vertical. Our drag ended a little lower than it started, yet Shift kept the line flat, and the height box on the Shape Format tab read 0 inches. The line came out selected, with a handle at each end.
With the line selected, open Shape Format > Shape Outline. The menu has theme and standard colors, Weight for thickness, and Dashes and Arrows for the style and ends of the line. Weight offered ¼ pt up to 6 pt, plus More Lines for anything else.
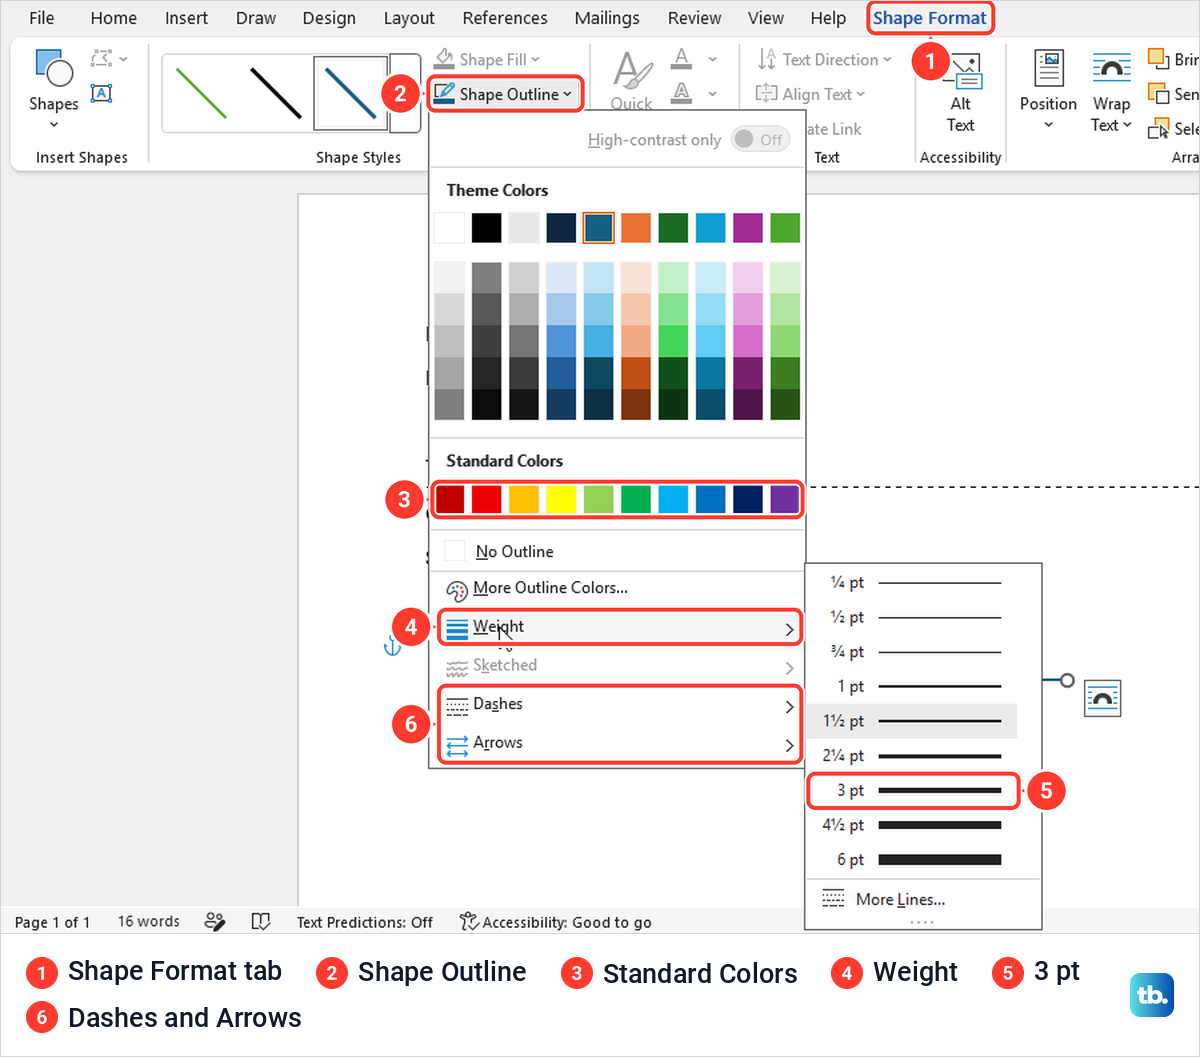
We picked 3 pt and standard red, then dragged the line by its middle to move it lower on the page. To remove a shape line, Microsoft says to select it and press Delete.
Draw a line by hand with a pen
The Draw tab turns the mouse, a finger or a stylus into a pen. Microsoft says the tab turns on by itself on touch-enabled devices, and on other PCs you open File > Options > Customize Ribbon and pick Draw.
Word only lets you ink in Print Layout. In Draft view on our PC the pens on the Draw tab were grey, and after View > Print Layout they were in color again. We chose the red pen and drew a wavy stroke with the mouse, and Esc stopped inking and left the stroke on the page.
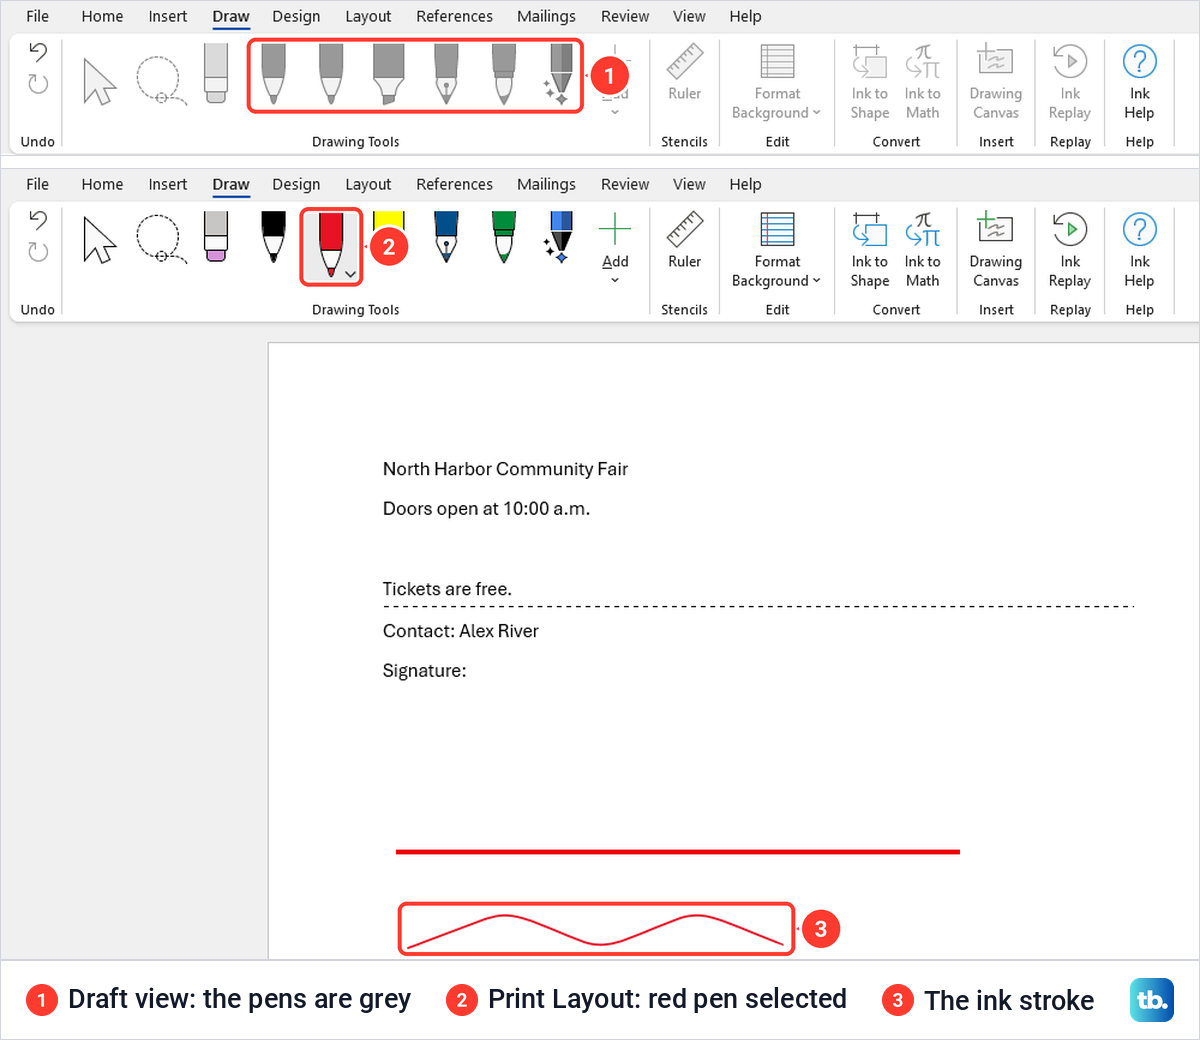
To change a pen, select the small arrow on it for Thickness and Color, as Microsoft describes. A pen stroke follows your hand, so it suits a mark, a circle or a quick underline, not a neat divider.
Make a blank line to write on in a printed form
For a form people fill in with a pen after printing, underline a few tabs. Click where the blank should start, press Ctrl + U to turn on underlining, press Tab once or twice, then press Ctrl + U again.
We pressed Tab twice and then typed the made-up name Alex River. The two tabs became an underlined blank, and the name after it was not underlined. Press Tab more times for a longer line.
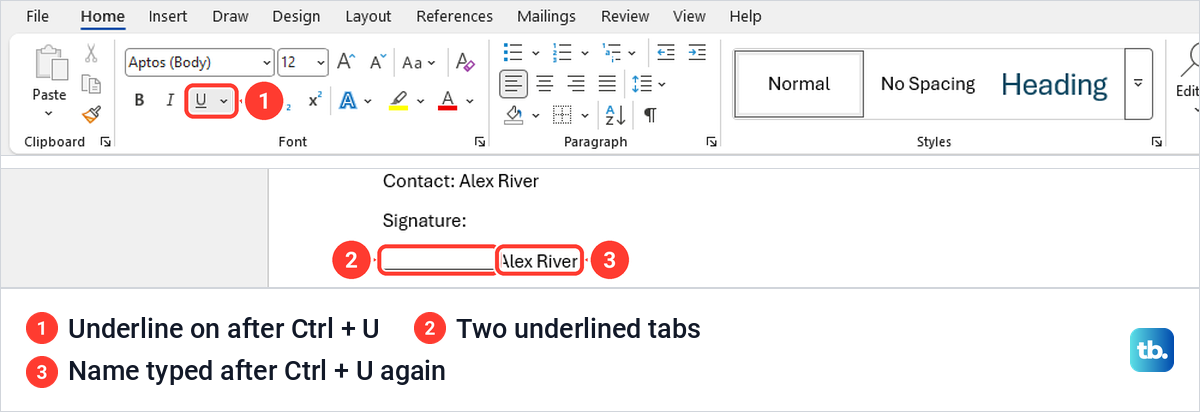
This blank is underlined empty space, so it is meant for pen and paper rather than typing. For a form that will be filled in on screen, use the table method below. When the printed version is ready to share, save the Word document as a PDF so the layout travels with it.
Make a line someone can type on
A line that stays put while someone types on it is a table cell with only its bottom border showing, which is also what Microsoft recommends for online forms. Select Insert > Table and pick the top-left square of the grid, labelled 1x1 Table. Word adds a one-cell table across the page with a border on each side.
With the cursor in the cell, open Table Design > Borders and choose No Border, then open Borders again and choose Bottom Border. Only the bottom line remains. We typed a test phrase in the cell, and the line stayed under it.
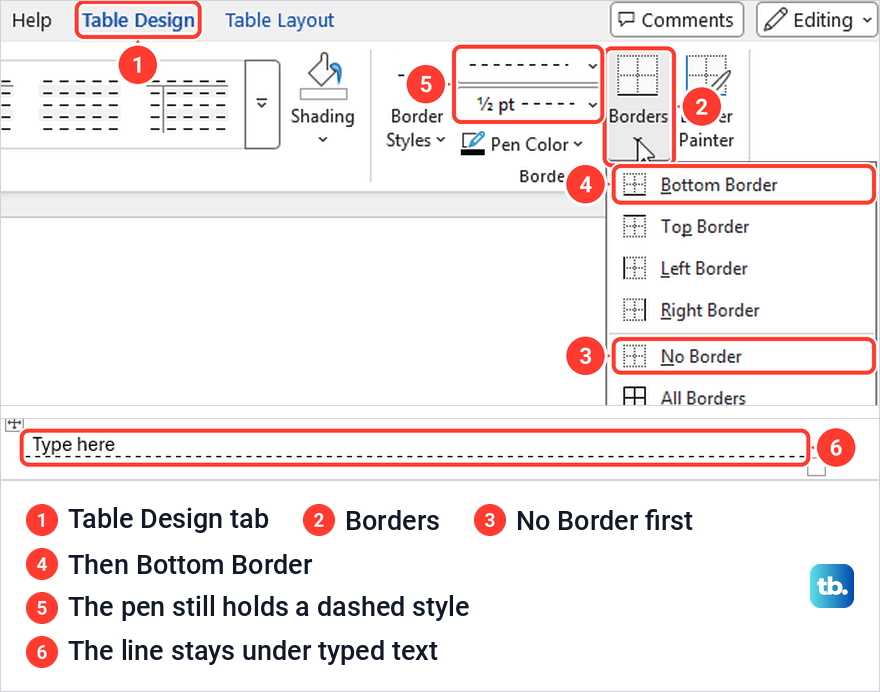
Check the border pen before you click. Our bottom border came out dashed, because the line style box beside Borders still held the dashed style we had picked earlier in Borders and Shading. Pick a solid line in that box first if you want a plain one.
Drag the right edge of the table to shorten the line, as Microsoft suggests. For the rest of a fill-in form, add check boxes in Word beside the choices and keep each writing line in its own cell.
A signature line is something else
Word also has a formal signature line, and it is not a plain line. On the Insert tab, the command is a small unlabelled icon in the Text group whose tooltip reads Add a Signature Line, and its drop-down offers Microsoft Office Signature Line.
In Signature Setup we typed a made-up signer and title, left the e-mail address empty and selected OK. Word placed an X on a line with the name and title under it, as a placeholder for a digital signature. The tooltip notes that inserting a digital signature requires a digital ID, so use this only when the document will be signed that way.
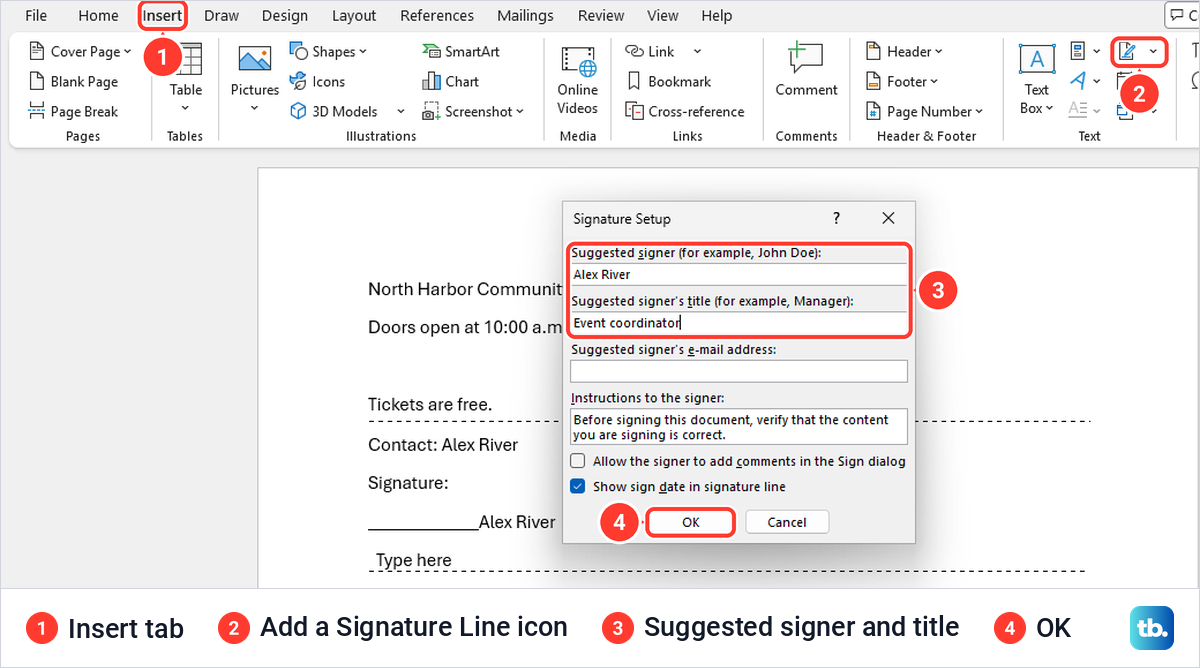
The placeholder is not a signature until someone signs it. For a line a person signs on paper, the underlined blank or the table line above is all you need.
Insert a line in Word for the web
Word for the web handles the two most useful lines the same way the desktop app does. We started a new document from word.new in Microsoft Edge, where it opened in Editing mode, and typed the same sample text.
Three hyphens and Enter turned into a full-width line under the paragraph above, as on the desktop. The Home tab also has a Borders button, and its arrow opens a Border Options panel of unlabelled icons with Weight, Style, Color and Padding menus. Hover over an icon to see its name, and the second one, Bottom Border, drew a line under our paragraph.
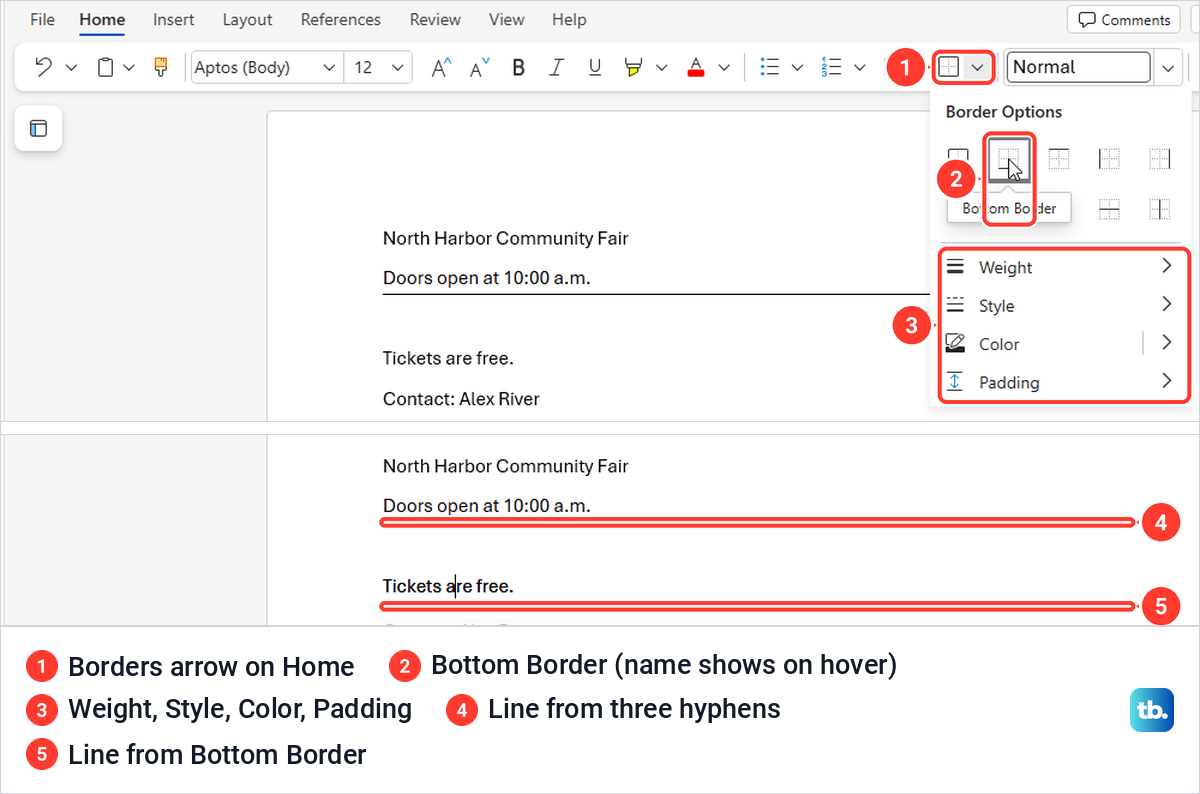
One of Microsoft's help pages still says Word for the web does not let you add borders to text. That is not what we saw in Edge, so try the Borders button before you switch apps.
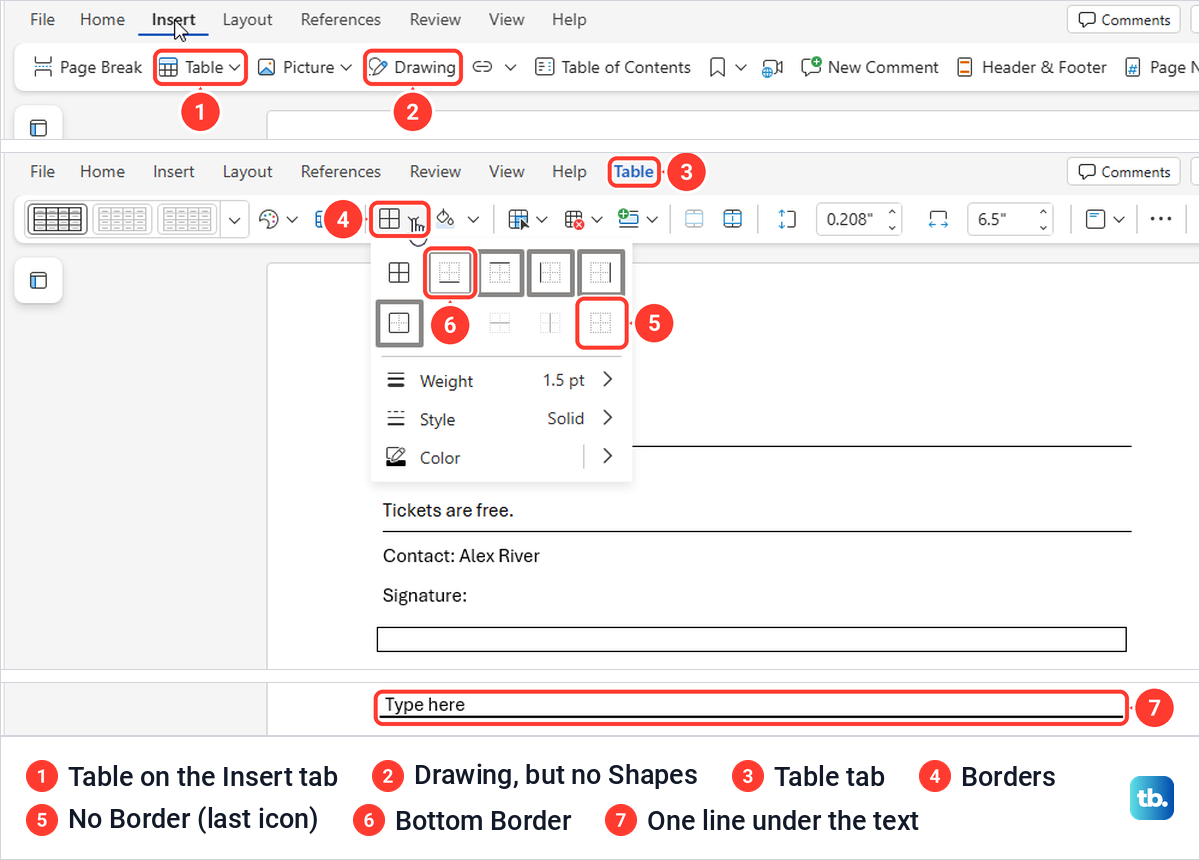
Our web ribbon had no Draw tab, and the Insert tab showed Table, Picture and Drawing but no Shapes button. To use the Insert > Shapes method shown above, open the document in desktop Word.
For a line someone types on, the table method works in the browser too. Select Insert > Table, pick one square, and a Table tab opens with a Borders button. Its icons have no labels, but hovering shows No Border on the last icon and Bottom Border on the second, and choosing them in that order left one solid line under the text we typed.
Remove a line you cannot select
A line made with three hyphens or Bottom Border cannot be clicked. We clicked straight on our hyphen line twice, and nothing was selected and no Shape Format tab appeared. That is the sign it is a paragraph border, not a shape.
To remove it, click in the paragraph just above the line, open Home > Borders and choose No Border. Our line disappeared, the text around it stayed, and the dashed border further down was not touched. That matches Microsoft's instruction to place the cursor immediately above the line.
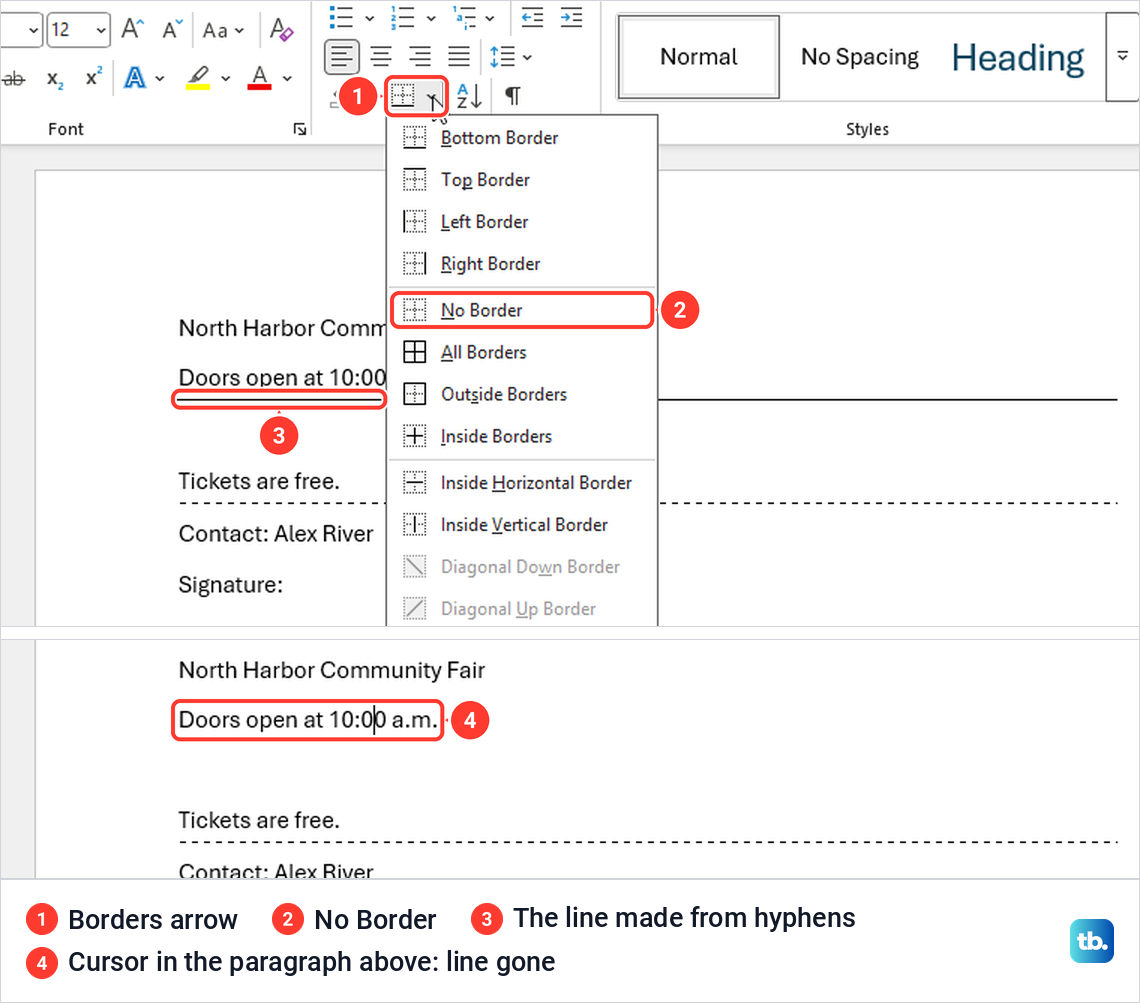
If No Border does nothing, the line may be something else. A line that shows handles at each end when you click it is a shape, which you select and delete. A short line above the notes at the bottom of a page is usually the footnote separator, covered in our guide on how to add footnotes in Microsoft Word, and a line around the edge of the page is a page border, set on the Page Border tab of Borders and Shading.
Deleting a hyphen line can leave an empty paragraph behind. If one of those spills onto a new page, remove the extra blank page in Word once the paragraph marks are showing.
Why three hyphens stay as text
The conversion is an AutoFormat feature, and it can be switched off. In Word for Windows, open File > Options > Proofing, select AutoCorrect Options and open the AutoFormat As You Type tab. Border lines was ticked by default on our PC.
With Border lines cleared, three hyphens and Enter stayed as plain hyphens, and ticking it again brought the line back. If your hyphens never turn into a line in desktop Word, this box is the first thing to check. In Word for the web, use Home > Borders > Bottom Border instead.
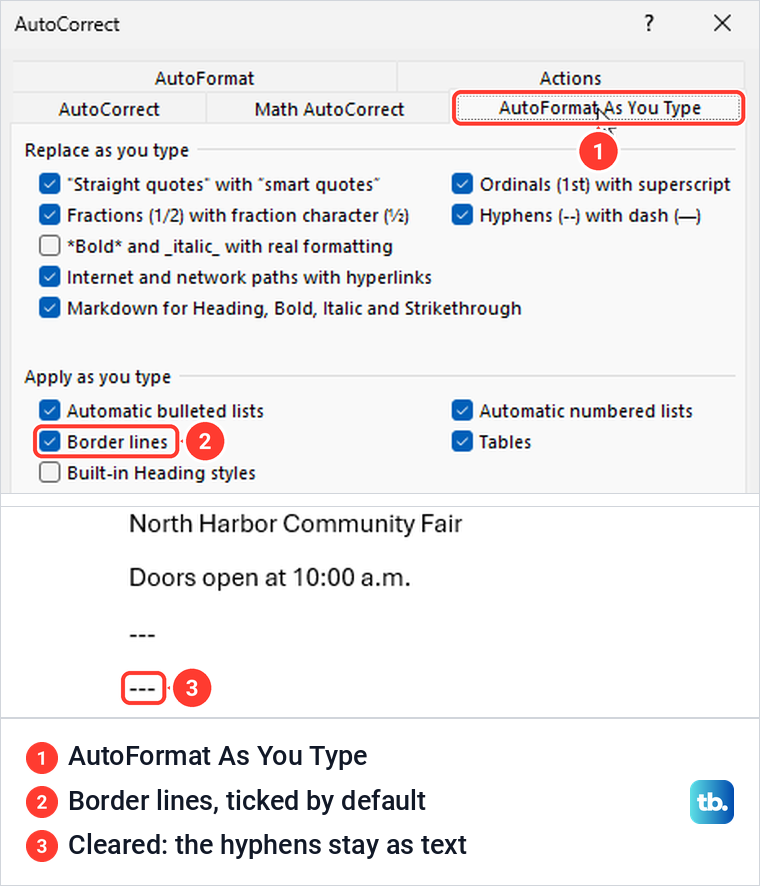
Two other things stop it. The hyphens must be alone on their line, and you must finish with Enter, because Shift + Enter only starts a new line inside the same paragraph.
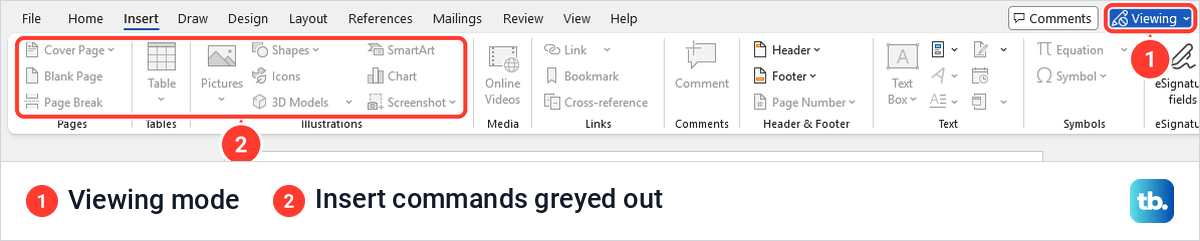
If the Insert commands are grey, check whether Word is in Viewing mode. On our PC the mode button at the top right read Viewing, most Insert commands were greyed out and typing changed nothing, and choosing Editing from that button brought them back. In Word for the web, typing in Viewing mode raised a Read-only bar with an Edit Document button, which returned us to Editing.
Lines in Word for Mac, iPhone, iPad and Android
Microsoft's help for the three-hyphen shortcut is written for Word on Windows and notes that the steps and options may differ in Word for Mac. For a shape line on a Mac, Microsoft's route is to select Shapes on the Insert tab, pick a shape, then click and drag to draw it.
On a phone or tablet, Microsoft suggests holding down the underscore key until the line is long enough. For a neater line, it suggests inserting a table, deleting rows and columns until one cell is left, then choosing a Table Styles option with a gridline under the header row and no others. Microsoft also notes that a digital signature line cannot be added from a mobile device without installing an add-in.
How we tested this guide
We tested this in Word for Microsoft 365 on Windows 11, version 25H2, and Word for the web in Edge, adding the lines to a sample event notice.
Frequently Asked Questions
Why do my three hyphens not turn into a line?
They must be alone on the line and followed by Enter, not Shift + Enter. If that is right, in Word for Windows open File > Options > Proofing > AutoCorrect Options > AutoFormat As You Type and tick Border lines, which was on by default on our PC. In Word for the web, use Home > Borders > Bottom Border instead.
Why can I not click or delete the horizontal line in Word?
If three hyphens made the line, it is a bottom border on the paragraph above it, not a shape. Click in that paragraph and choose Home > Borders > No Border, which removed ours at once.
How do I put a line under one word instead of across the page?
Select the word and press Ctrl + U, the shortcut Microsoft gives for underline formatting. Use a paragraph border, with Apply to set to Paragraph in Borders and Shading, only when you want the line across the full width.
How do I make a line someone can type on?
Insert a one-cell table, choose No Border on Table Design > Borders, then choose Bottom Border. The line stayed under the text as we typed, on the desktop and in Word for the web.
Can I insert a line in Word for the web?
Yes. Three hyphens and Enter, Home > Borders > Bottom Border and a one-cell table all worked for us in Microsoft Edge, but our Insert tab had no Shapes button.
How do I keep a drawn line straight?
Hold Shift while you drag after choosing Insert > Shapes > Line. Shift kept our line level even though the drag drifted downward.