

To add check boxes in Word that you can click, turn on the Developer tab under File > Options > Customize Ribbon, then insert a checkbox with Developer > Check Box Content Control wherever the cursor is. Click the box once for an X and again to clear it. For a list you will print and tick with a pen, use an open-box bullet instead, and in Word for the web use Checklist or Ctrl + ,.
Those are three different features, and picking the wrong one gives you a box that will not tick. Two results caught us out when we built our lists: the Group command stayed greyed until the selection started on plain text, and saving an old .doc copy turned our boxes into ordinary characters for good.
The short version
- A box you click on screen: tick Developer in File > Options > Customize Ribbon, then select Developer > Check Box Content Control.
- A whole checklist: select the first box and the space after it, press Ctrl + C, then Ctrl + V at the start of each line.
- A tick instead of an X: select the box, then Developer > Properties and Change next to Checked symbol.
- Boxes for paper: Home > Bullets arrow > Define New Bullet > Symbol, then pick an open box.
- Word for the web: select the lines and choose Checklist, or press Ctrl + ,.
Choose the right kind of check box
Word gives you four main kinds of box, and two of them tick with a click: the check box control, called Check Box on a Mac, and the Checklist in Word for the web. Older legacy and ActiveX boxes are covered at the end. Decide first whether people will tick the box on screen or on paper, and whether they will use desktop Word or a browser.
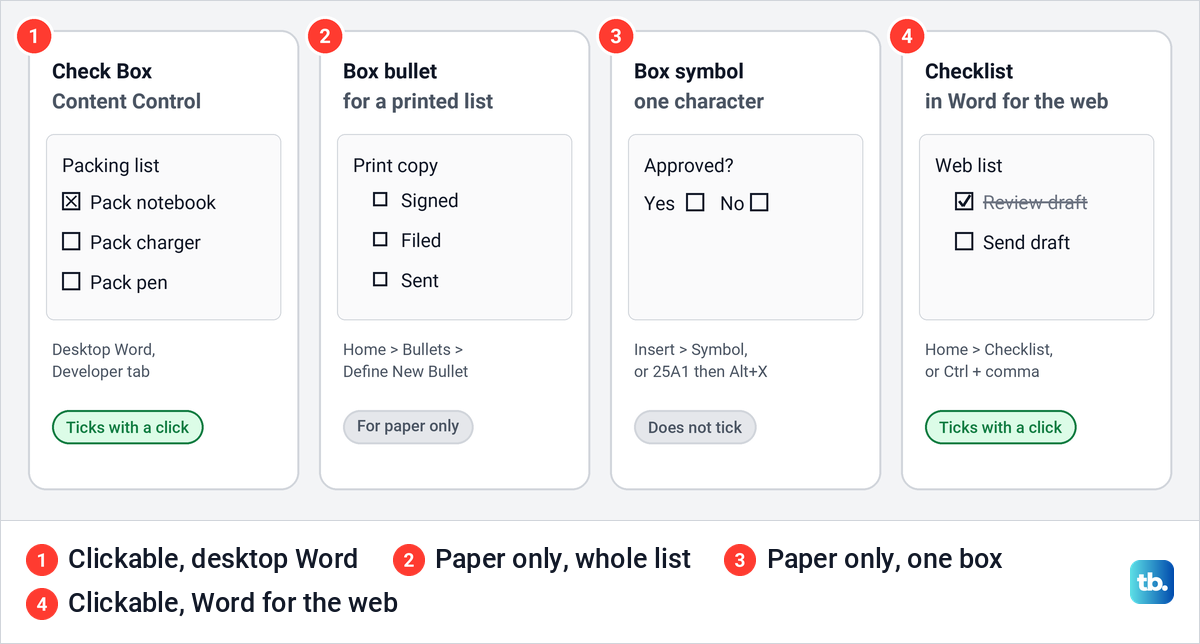
| Method | Where it works | What you get | Ticks with a click |
|---|---|---|---|
| Developer > Check Box Content Control | Word for Windows | A box that shows an X by default when ticked | Yes |
| Define New Bullet with an open box | Word for Windows and Mac | A box bullet on every line of a list | No, it is for paper |
| Insert > Symbol > More Symbols | Word for Windows | One box character inside a line | No |
| Type 25A1, then Alt + X | Word for Windows | One hollow square character | No |
| Checklist or Ctrl + , | Word for the web | A list whose ticked items are struck through | Yes |
| Developer > Check Box | Word for Mac, per Microsoft | A clickable box for each list item | Yes |
The first and the last two rows are real controls. Everything else is a character that happens to be square, so clicking it only moves the cursor or selects it. That difference explains most of the trouble covered further down.
Show the Developer tab in Word
The Developer tab is hidden by default, and our new document opened without it. The ribbon ran from File to Help with no Developer in between.
Select File > Options, then Customize Ribbon in the list on the left. On the right, under Customize the Ribbon with Main Tabs chosen, scroll down to Developer, tick it and select OK. The tab appeared between View and Help straight away.
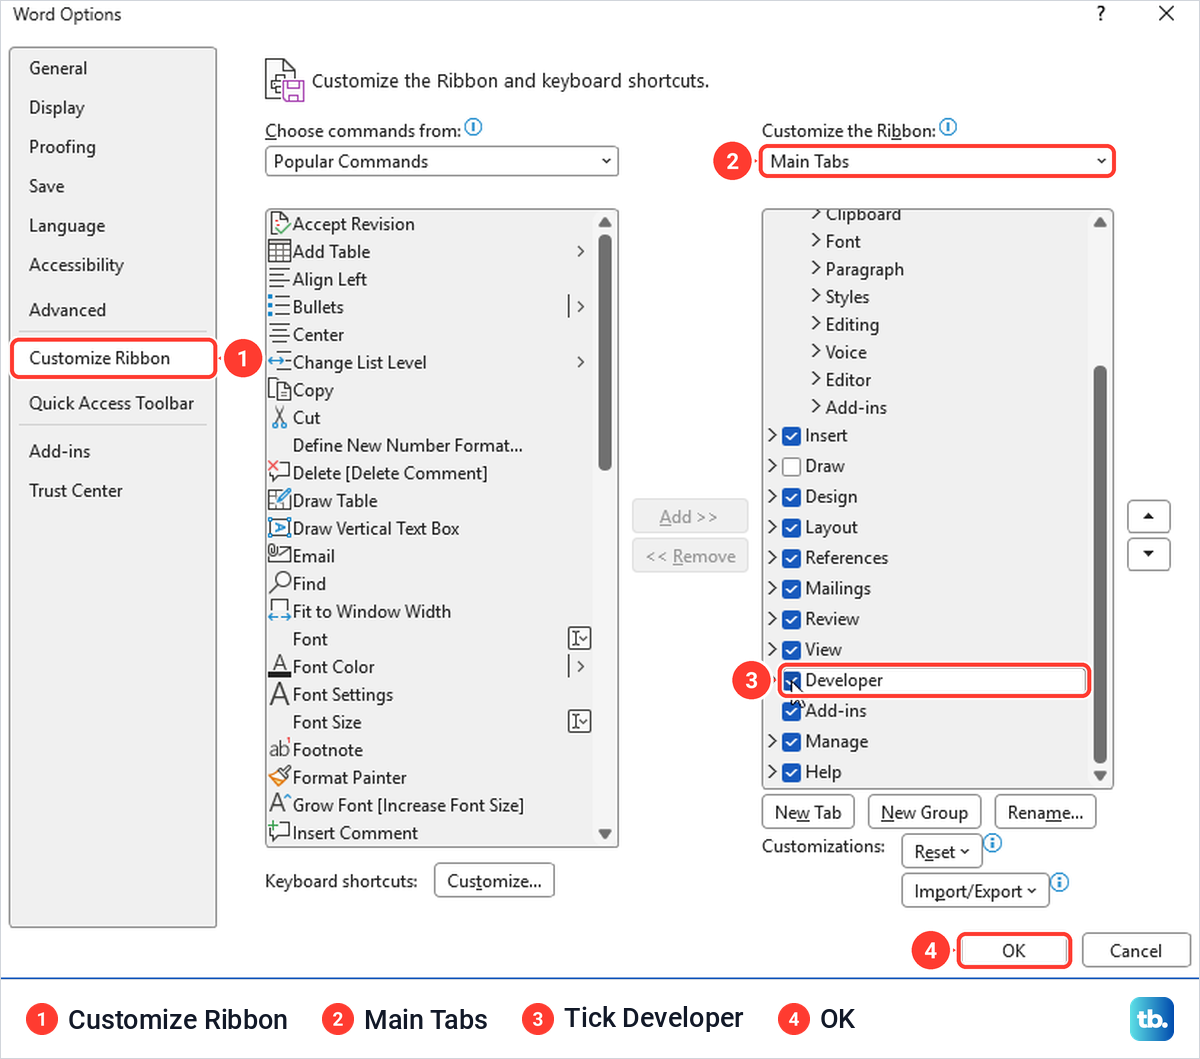
You only do this once. We closed Word completely, started it again, and Developer was still there. Microsoft says it stays until you clear that box or reinstall Office, and clearing it did remove the tab on our PC until we ticked it again.
Insert a checkbox you can click
Click where the box should go, usually at the very start of a list item, and open the Developer tab. In the Controls group the check box button is a small icon with no label, a green tick in a box. Point at it and the tooltip reads Check Box Content Control.
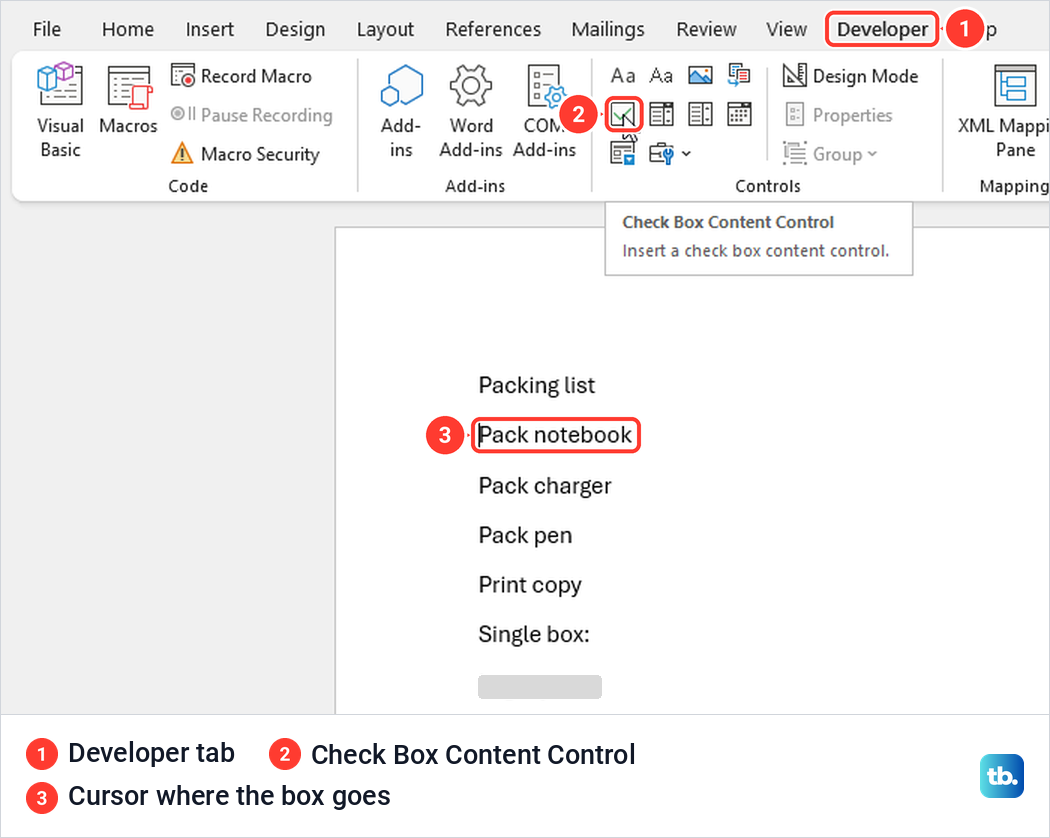
Select it and Word puts an empty box at the cursor, with a small handle to its left that shows it is a content control. Click the box and an X appears. Click it again and the box is empty.
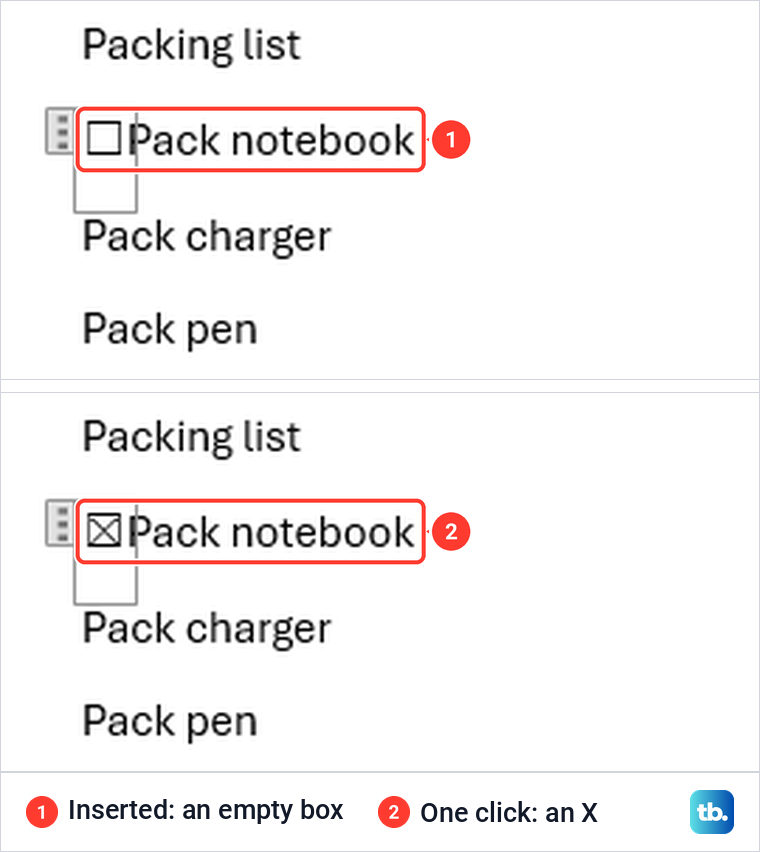
One thing tripped us up. Right after inserting the box we pressed Space to separate it from the text, and the box ticked instead, because the new control was still selected. To add the space, click just before the item's first letter and press Space there.
The X is only the default checked symbol. The section on changing it to a check mark comes after the list steps, because the change has to be made on each box.
Make a checklist with several boxes
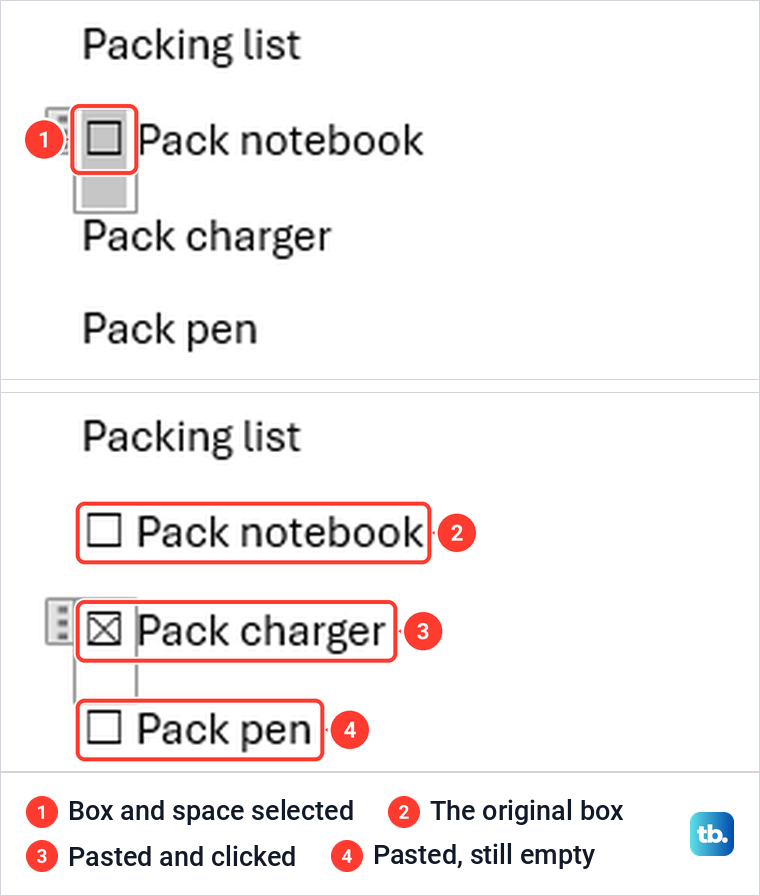
Inserting a fresh control on every line works, but copying is faster. Click anywhere in the line that already has a box, press Home, then press Shift + Right arrow twice to select the box and the space after it. Press Ctrl + C.
Click at the start of the next item and press Ctrl + V, then repeat for each remaining line. Each paste is a separate control. When we clicked the box on the second line, only that item was ticked.
If text you paste into the list brings a different font or size with it, clear unwanted Word formatting from the text and leave the boxes alone. If the lines sit too tightly together once the boxes are in, change the line spacing in Word for the list.
Long items that wrap onto a second line look untidy, because the wrapped text runs back under the box. Microsoft's fix is a hanging indent. Select the list, open the Paragraph dialog launcher in the corner of the Paragraph group on the Home tab, change Left to 0.25, choose Hanging under Special and select OK.
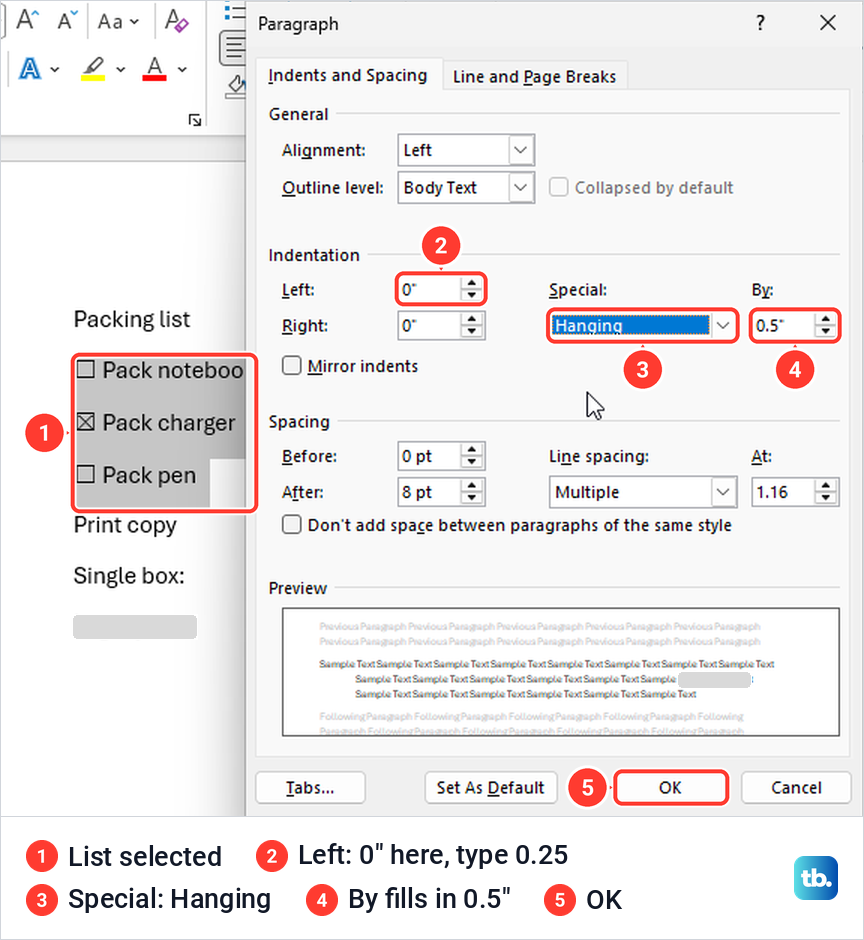
Our list started with Left at 0" and Special set to (none), so the 0.25 has to be typed in. Choosing Hanging filled By with 0.5" on its own, which you can change if the wrapped lines need a different offset.
Change the X to a check mark
Select the box without ticking it. The reliable way on our PC was to click in its line, press Home, then Shift + Right arrow. Then select Developer > Properties.
The Content Control Properties dialog has a Check Box Properties section at the bottom, with Checked symbol and Unchecked symbol and a Change button beside each. Select Change next to Checked symbol. In the Symbol dialog, set Font to Segoe UI Symbol and type 2611 in Character code to land on Ballot Box With Check.
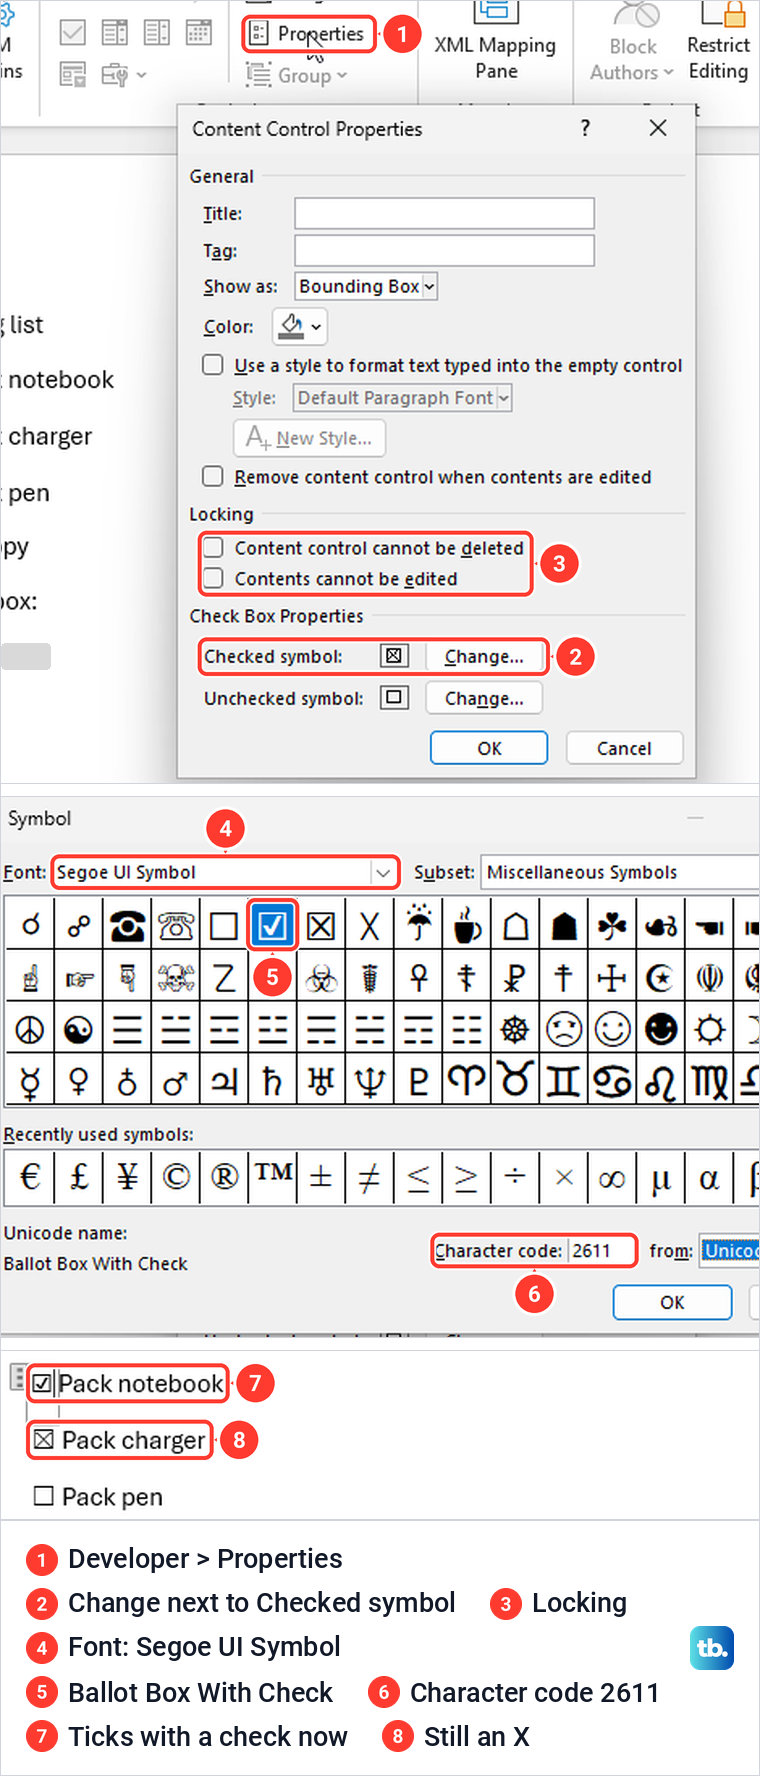
Select OK, then OK again. Our notebook box now showed a tick when clicked, while the charger box on the next line still showed its X. Microsoft's instruction is to repeat the same steps for each check box, so change the first one before you copy it down the list.
The same dialog has a Change button for the empty state too, if you would rather show a different blank box. Its Locking section matters later, because one of those two boxes stops a check box from ticking at all.
Lock the checklist text with Group
Microsoft's steps for protecting a list are to select the list and its check boxes, then choose Developer > Group > Group. On our PC that failed the first time. With only the three box lines selected, starting at the first box, the Group button was greyed out and did nothing.
Starting the selection on plain text fixed it. We dragged from the heading line, Packing list, down to the last item, and Group came to life with Group and Ungroup in its menu. Pressing Ctrl + A to select the whole document enabled it as well.
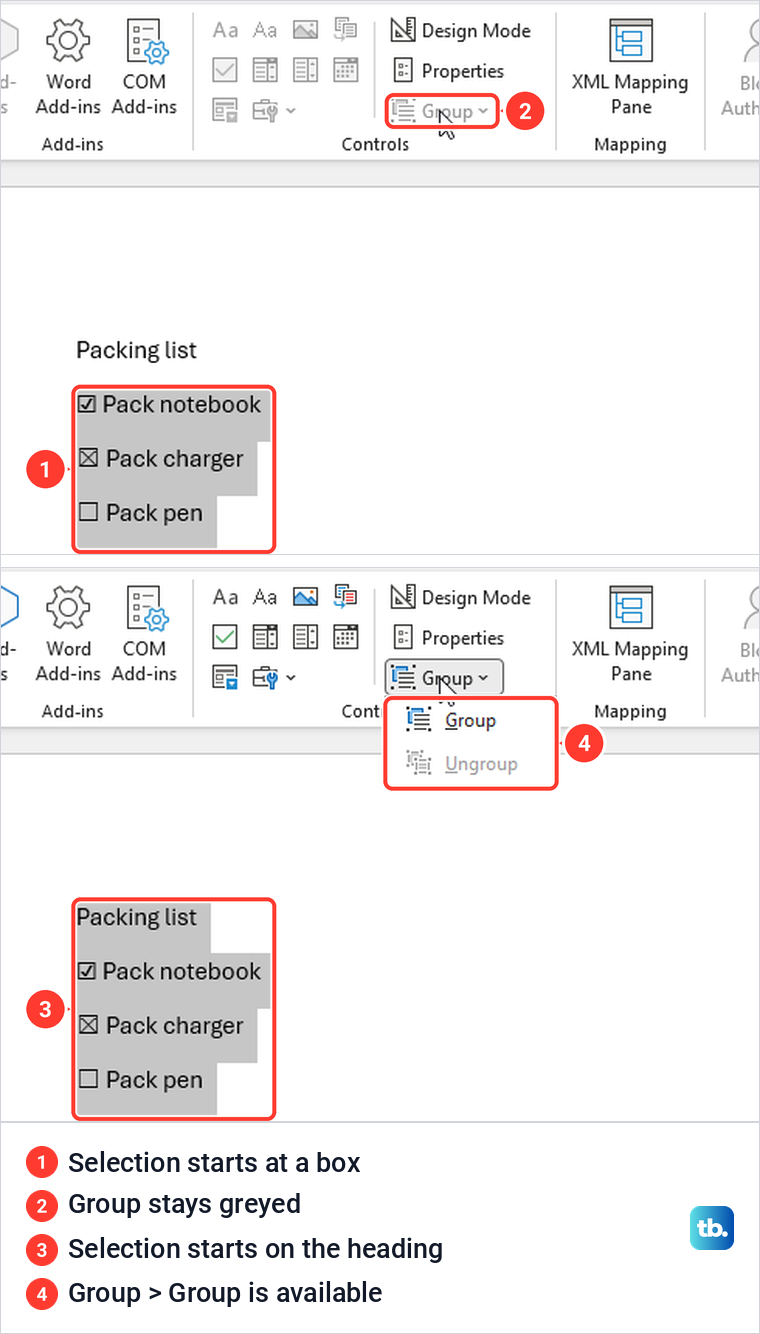
Grouping does what it promises, with one oddity. When we typed a letter at the end of a grouped item, the item did not change. Word put the letter on a new line under the group instead, so you may find a stray character there.
The boxes inside a grouped list still tick, which is the point. To edit the text again, click inside the group and choose Developer > Group > Ungroup. If you turn on formatting marks to find stray lines, hide Word's paragraph marks again when you finish.
Make check boxes for a printed list
A list that people will tick with a pen does not need controls. Bullets shaped like boxes are simpler, and they line up neatly because Word indents them like any bulleted list.
Select the lines, then select the small arrow next to Bullets on the Home tab and choose Define New Bullet. Select Symbol, change Font to Wingdings, and pick the open square. On our PC it was the first symbol shown, and the dialog named it Wingdings: 168 with 168 in Character code, so check those before you select OK twice.
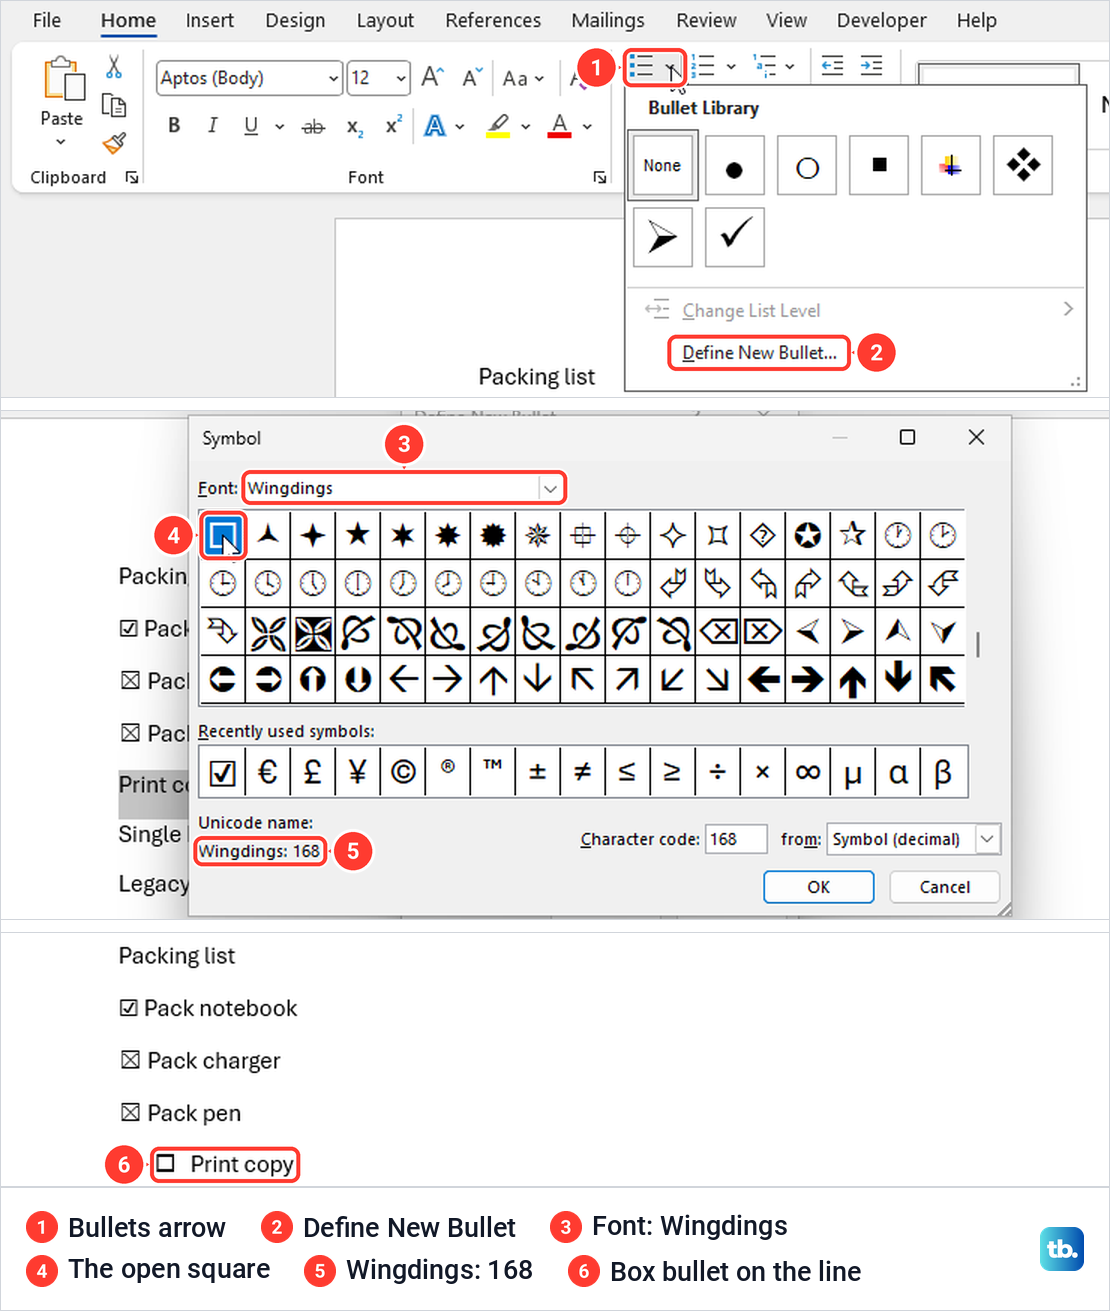
Clicking one of those bullets only selected it. Nothing ticked, which is exactly right for a paper form. Microsoft also suggests Segoe UI Symbol if Wingdings does not have the box you want.
For a fixed copy to email or print, save the Word checklist as a PDF after checking the layout. If the boxes look right on screen but nothing comes out of the printer, fix a Word document that will not print before you change the list.
A form often needs more than boxes. Our guides show how to insert a line in Word for people to write on, and how to add a signature in Word at the bottom of the page.
Insert one empty box symbol
For a single box inside a sentence, such as a Yes or No choice on a printed form, insert a character. Go to Insert > Symbol > More Symbols, set Font to Segoe UI Symbol and type 2610 in Character code. The selected symbol is named Ballot Box.
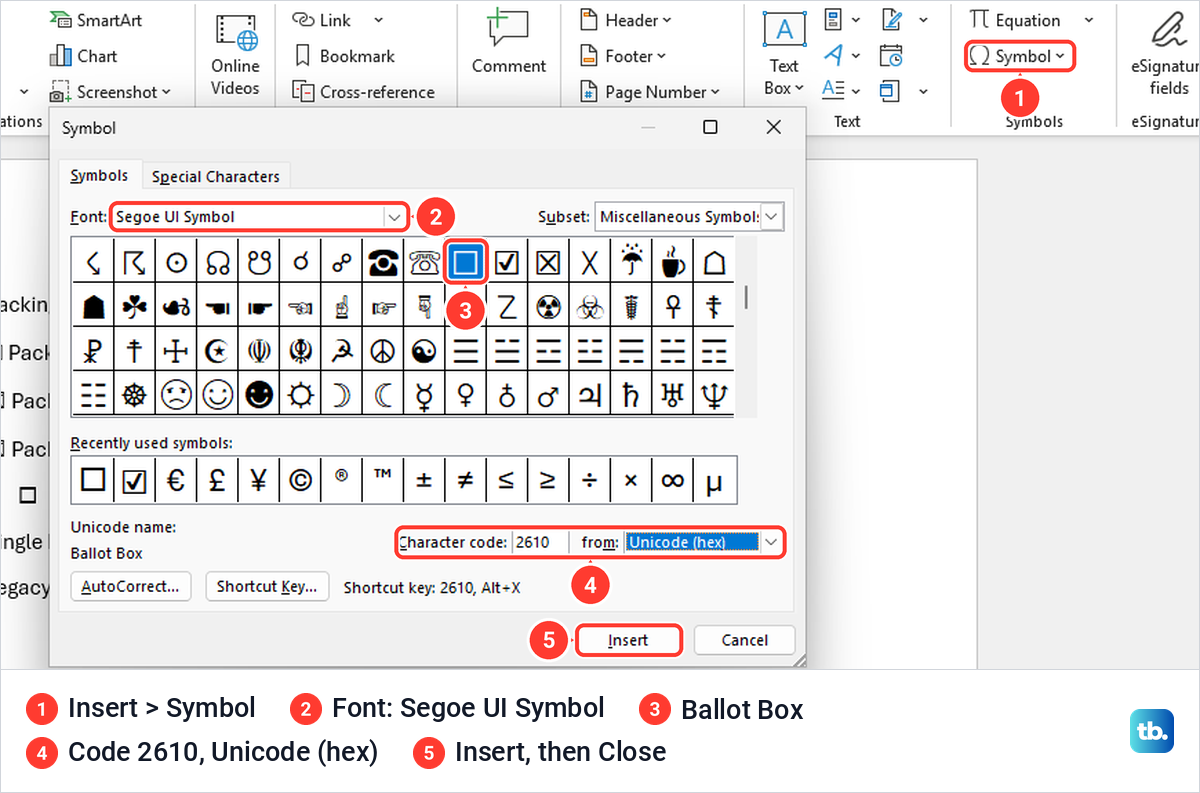
Select Insert, and the dialog stays open with its Cancel button renamed Close, so select Close when you are done. Microsoft calls these marks static symbols, and that is what we saw: clicking our ballot box only placed the cursor beside it.
There is a keyboard route too. Type 25A1 where the box should go and press Alt + X. Word turned the code into a hollow square, which the Symbol dialog then identified as White Square, code 25A1, from Unicode (hex).
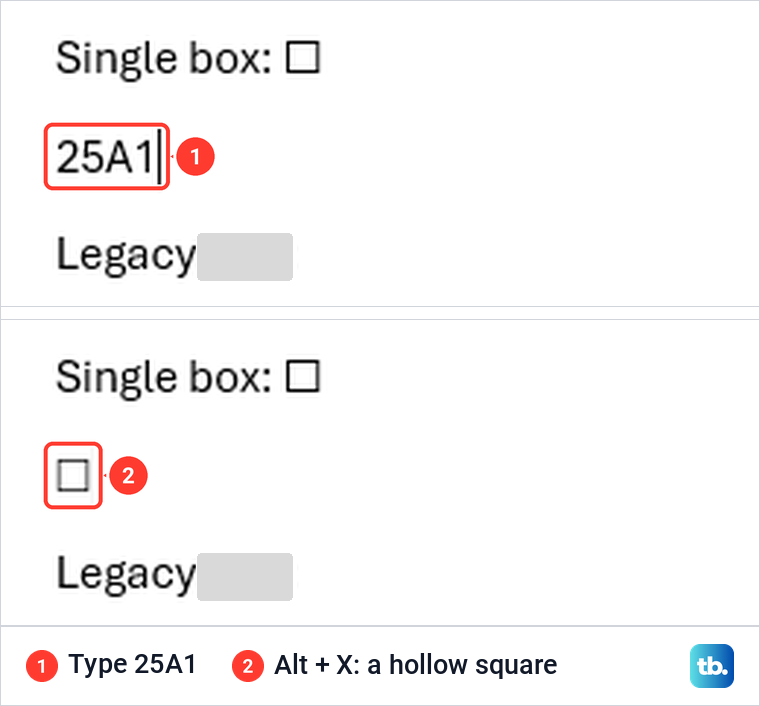
Microsoft adds one warning. If the code follows another letter or digit, Word may read that character as part of the code, so select just the four characters before you press Alt + X. The Symbol dialog also shows the code to use, such as 2610, Alt+X beside the Ballot Box.
Make a checklist in Word for the web
Word for the web has no Developer tab, but it has its own Checklist, and it ticks with a click. Microsoft's help places it in the Paragraph group on the Home tab. In our Edge window it was not on the ribbon at all.
Select the lines and choose Checklist in the Paragraph group on the Home tab. If it is not there, as in our Edge window, open More options, the three dots at the right end of the Home ribbon, and Checklist is under Paragraph with its shortcut, Ctrl+comma, beside it. Selecting it put an empty box in front of each line.
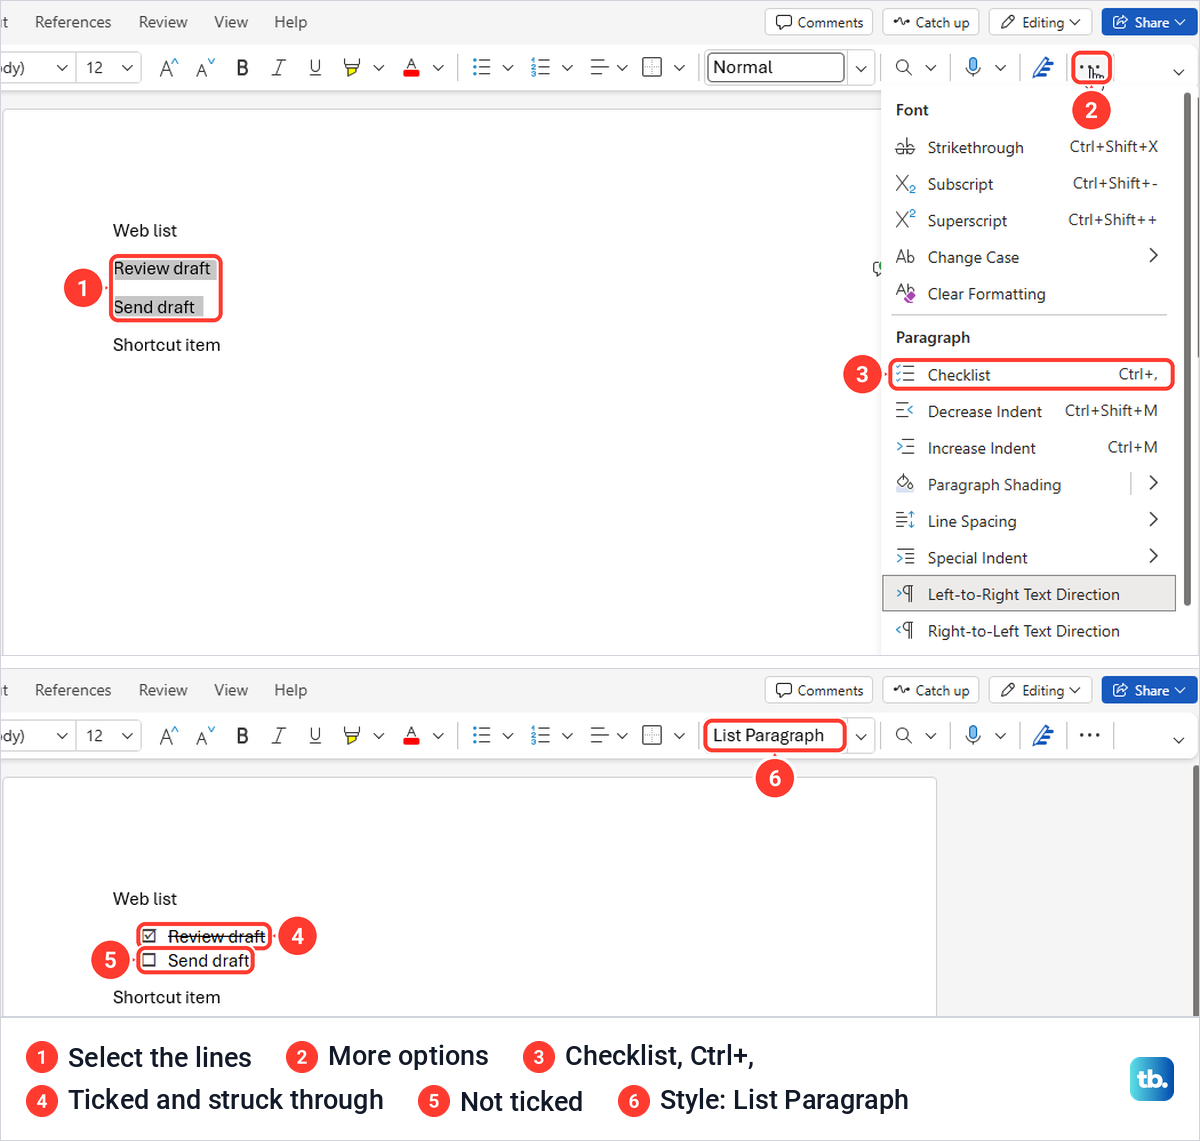
Click a box and the item is ticked and struck through in grey. Click again and both the tick and the line disappear. Desktop Word's content control left our text untouched when ticked, so use that if ticked items must not be crossed out.
The shortcut is quicker. With the cursor on a line, press Ctrl + , and the line becomes a checklist item. Edge did not take the key for itself, and the new box ticked the same way.
Fix a check box that will not tick or insert
Start by clicking the box. If it does not tick, do not judge by the grey highlight, because a selected control turned grey on our PC just like a clicked bullet. Check the document first: if the title bar says Compatibility Mode or the mode button reads Viewing, go to those cases below, because both greyed out Properties on the Developer tab for real controls on our PC.
Otherwise, put the cursor in the box and open the Developer tab. Properties stayed greyed for us unless the cursor was in a content control, and for a check box control it opens a dialog with Check Box Properties. If Properties stays greyed in an ordinary document, the box is probably a symbol or a bullet, which no setting will make tick.
Replace a box like that with a real control: Check Box Content Control in Word for Windows, Developer > Check Box on a Mac, or Checklist in Word for the web. If the button for adding one is greyed in an ordinary document, check where the cursor is: while it was inside an existing box, the insert buttons in the Controls group were greyed for us, so click in plain text first.
If it is a real control, or the button for adding one is greyed out, the four cases below are the ones we ran into. Each has its own fix.
The command is greyed out in an older .doc file
Files in the old Word 97-2003 format cannot hold content controls. When we saved a copy that way, Word's Compatibility Checker warned that content controls will be converted to static content. In the reopened copy the title bar said Compatibility Mode and the content control buttons on the Developer tab, Check Box Content Control among them, were greyed.
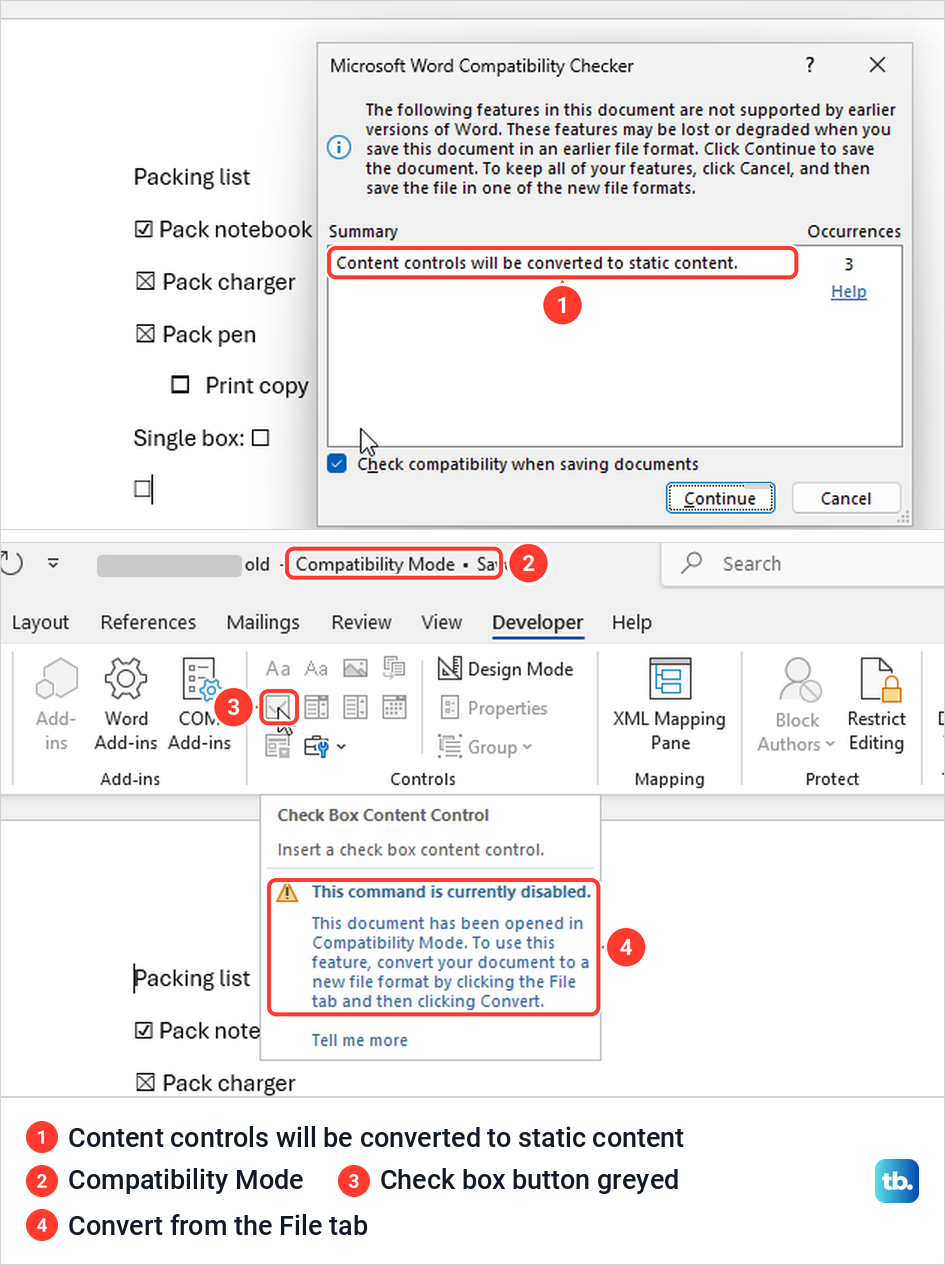
Pointing at the greyed check box button explains the fix: convert the document from the File tab. Go to File > Info and select Convert, then OK when Word says the document will be upgraded to the newest file format. The controls came back straight away.
The old boxes did not. The box we clicked after conversion was still a plain character, and Microsoft says the properties are permanently lost even if you convert later. Before saving in an older format, make a copy of your Word document and keep the .docx as the working file. If Word will not save the converted .docx, work through our fixes for a Word document that will not save.
The document is protected
Restrict Editing set to No changes greys out the button for adding boxes and blocks typing. In our Word window it sat under Review > Protect > Restrict Editing, and the Developer tab has its own Restrict Editing button in the Protect group. We set the document to No changes (Read only) and started enforcing it, leaving the optional password boxes empty.
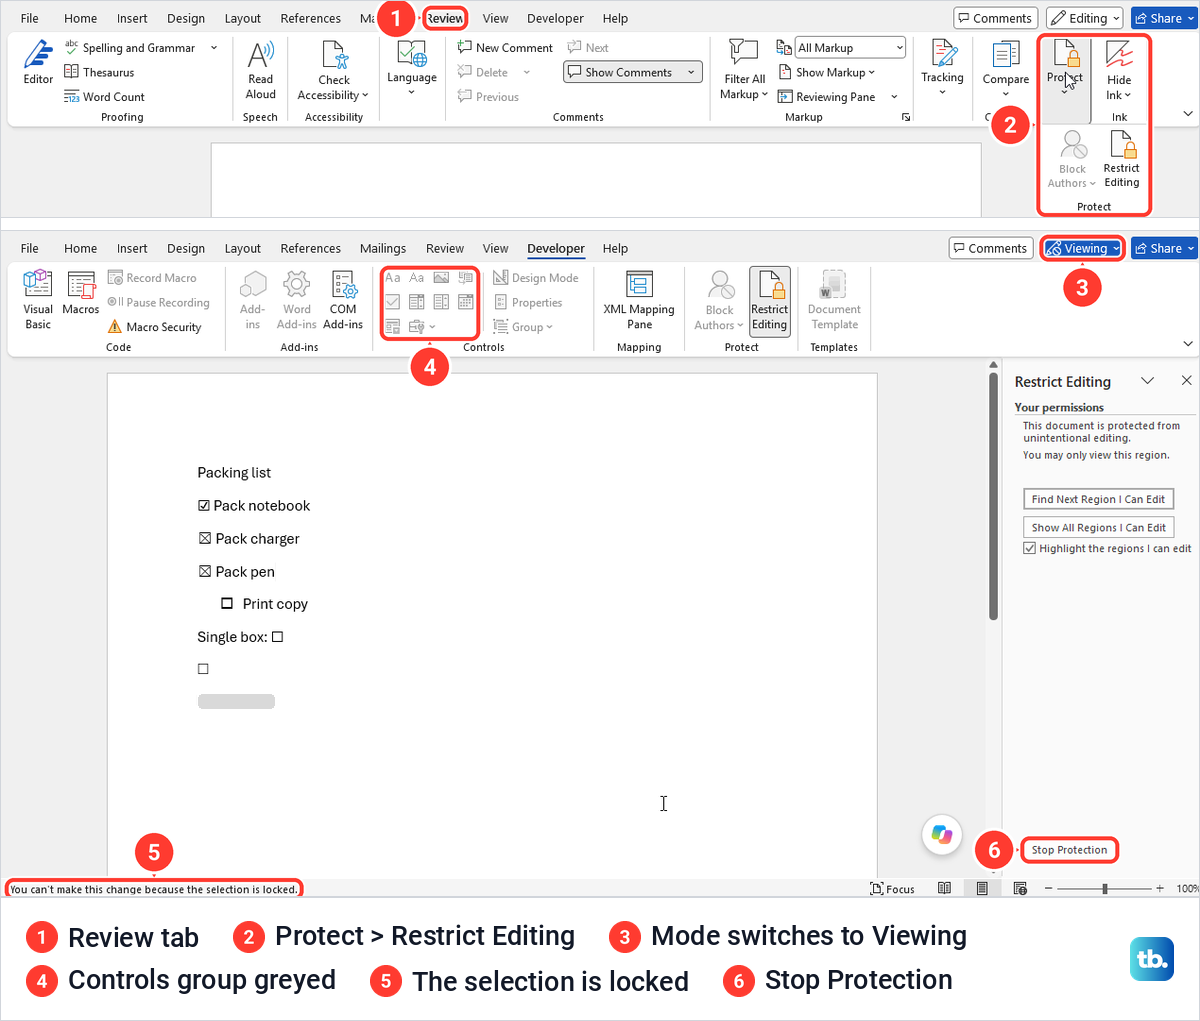
The mode button switched to Viewing and the buttons in the Developer tab's Controls group went grey. Pointing at the check box button gave no reason this time. The only clue was at the bottom of the window when we tried to type: You can't make this change because the selection is locked.
Select Stop Protection at the bottom of the Restrict Editing pane. Our test file had no password, so Word went straight back to Editing with the controls enabled. Microsoft says you will be prompted for a password if one was set; without it, ask the person who protected the document.
The box itself is locked
A content control can be locked on its own. Select the box, open Developer > Properties and look under Locking. With Contents cannot be edited ticked, clicking our box did nothing at all.
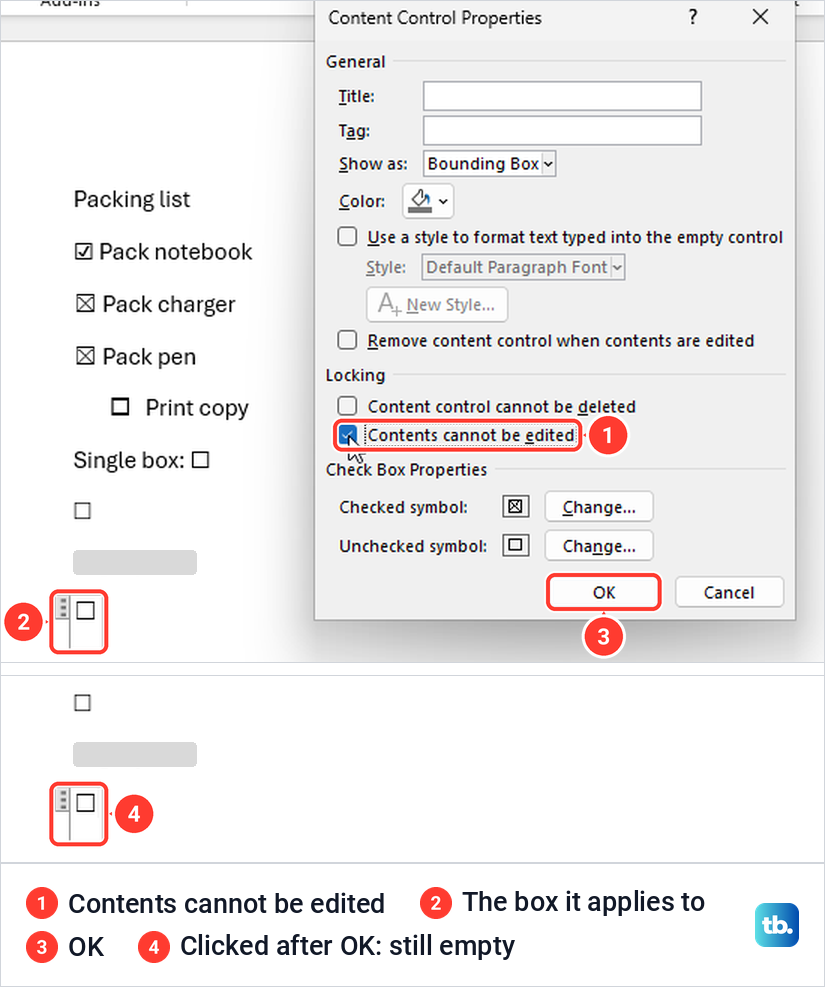
Clear that option and select OK, and our box ticked again with one click. The setting belongs to each box, so check the Properties of every box that will not tick.
Word for the web will not tick the box
Our web checklist ticked in Editing and not in Viewing. The mode menu at the top right of Word for the web offers Editing, Reviewing, Viewing and Open in Desktop. When we switched to Viewing the ribbon vanished, and clicking a box changed nothing.
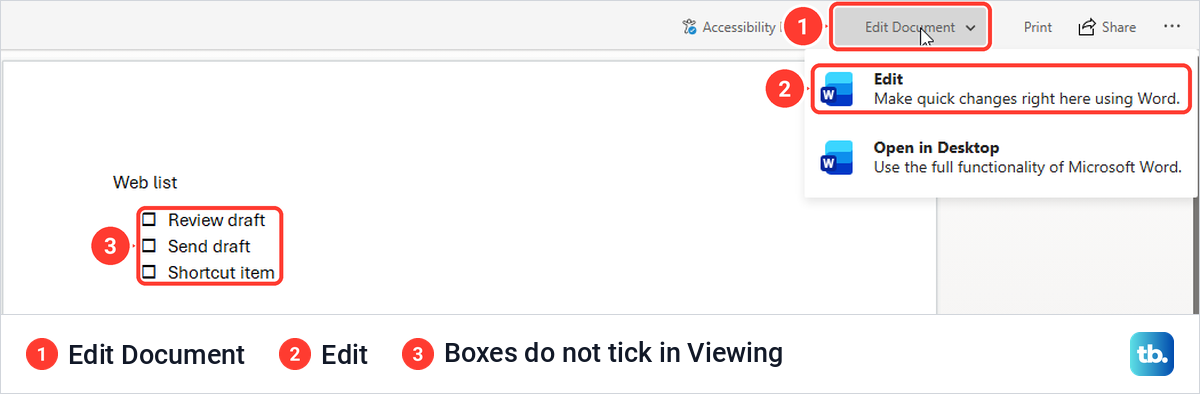
The way back is not the same menu, because it disappears with the ribbon. Select Edit Document, then Edit. Our ribbon returned in Editing mode and the boxes ticked again, so switch to Editing before you tick.
If you only see Viewing and no way to edit, Microsoft's advice is to request edit permission or open the file in desktop Word. Boxes made with desktop Word's Developer tab are a separate case: Microsoft says content controls may appear in the browser as placeholders that cannot be edited, so change those in desktop Word.
Add check boxes in Word on a Mac
Microsoft's Mac steps follow the same idea with different menus. To show the tab, open the Word menu, select Preferences, then Ribbon and Toolbar > Customize the Ribbon > Main Tabs, tick Developer and select Save.
Place the cursor at the start of the first line and select Developer > Check Box. Microsoft says to press Tab or the Spacebar if you want a space after the box, then copy the box with Command + C and paste it at the start of each item with Command + V.
For a printed list on a Mac, select the list, choose the arrow next to Bullets on the Home tab, then Define New Bullet > Bullet and an open box. For one check mark, Microsoft's route is Insert > Advanced Symbol > Symbols. Hanging indents are under Format > Paragraph.
On phones and tablets, Microsoft's help covers typing special characters from the touch keyboard, not inserting a check box control. A box typed that way is a character like any other symbol, so build a clickable list on a computer or in Word for the web.
Older legacy and ActiveX check boxes
The Developer tab also has a Legacy Forms menu with older check box types. Microsoft describes legacy form controls as being for compatibility with older versions of Word, so keep them for forms that already use them.
Microsoft says ActiveX controls are disabled by default in Microsoft 365 and Office 2024. For any new checklist or form, the Check Box Content Control is the one to use.
How we tested this guide
We tested this in Word for Microsoft 365 on Windows 11, version 25H2, and in Word for the web in Microsoft Edge, ticking a short list in each.
Frequently Asked Questions
How do I insert a clickable checkbox in Word?
Show the Developer tab under File > Options > Customize Ribbon, put the cursor where the box belongs and select Developer > Check Box Content Control. Click the box to tick it with an X, and click again to clear it.
Why is the Developer tab missing in Word?
Word hides it by default. Turn it on once under File > Options > Customize Ribbon by ticking Developer under Main Tabs, and it stays on the ribbon after Word restarts.
Can I make a checklist in Word for the web?
Yes. Select the lines and choose Checklist, or press Ctrl + comma. Each box ticks with a click, and a ticked item is struck through.
Why will my checkbox not tick?
It may be a symbol or a box bullet, which never tick. If it is a real control, check Contents cannot be edited in Developer > Properties, and in Word for the web make sure the document is in Editing rather than Viewing.
How do I change the X to a check mark?
Select the box, choose Developer > Properties and select Change next to Checked symbol. Pick a check mark, for example Ballot Box With Check in Segoe UI Symbol, then repeat for each box or change the first one before copying it.
Can I print empty check boxes in Word?
Yes. Use Define New Bullet with an open box for a whole list, or Insert > Symbol > More Symbols for one box. Both are plain characters made for marking on paper.
Why is Check Box Content Control greyed out?
Three things to check are the cursor sitting inside an existing box, an old .doc file in Compatibility Mode, and a document protected with Restrict Editing set to No changes. Click in plain text, convert the file from File > Info, or stop the protection if you have the password, and in our tests the button returned.