

To add a signature in Word for Windows, save a picture of your handwritten signature, click where it should go, then select Insert > Pictures > This Device and insert the file. Then crop away the blank edges. That picture is only a mark, so when a document needs a digital signature that Word can check, insert a Microsoft Office Signature Line and sign it with a signing certificate.
There are several ways to insert a signature in Word, and they do different jobs. A picture or a pen drawing is how you add a handwritten signature in Word for the reader to see, and a printed line leaves space to sign on paper. A digital signature is for when someone has to confirm who signed a Word document and that nothing changed afterwards.
The short version
- Picture: select Insert > Pictures > This Device, then crop and size your signature.
- Draw it: turn on the Draw tab, pick a pen in Print Layout, sign, then press Esc.
- Line to sign on paper: press Ctrl + U, Tab twice, then Ctrl + U again.
- Digital signature: insert a signature line, right-click it and choose Sign, which needs a signing certificate.
- Word for the web: use Insert > Picture with a saved signature.
Which signature method to use in Word
| Word route | What it puts in the document | Certificate needed | Use it when |
|---|---|---|---|
| Insert > Pictures > This Device | A picture of your handwritten signature | No | You want your real signature on a letter |
| Draw tab, a pen, then Esc | Ink strokes you can move | No | You have a pen, a touch screen or a mouse |
| Ctrl + U, Tab, Tab, Ctrl + U | An underlined blank space | No | The page will be signed by hand |
| A 1x1 table with only a bottom border | A line that stays under typed text | No | Someone will type on the line |
| Insert > Add a Signature Line | An unsigned signature line with an X | Not to insert it | Someone else will sign |
| Right-click the signature line, then Sign | A visible signature plus a digital signature | Yes | A digital signature is required |
| File > Info > Protect Document > Add a Digital Signature | A digital signature with no mark on the page | Yes | The file needs sealing, not a visible mark |
A picture, ink or a name typed onto the page is a visual signature, and anyone can copy or move it. A name typed in Word's Sign box is different, because signing a signature line adds a digital signature with your certificate at the same time. Microsoft describes a digital signature as an encrypted stamp of authentication that confirms the information came from the signer and has not been altered. Whoever asked for your signature decides which kind they accept, so check before you choose.
If you meant the signature under your emails, that is an Outlook setting, and you can change your signature in Outlook separately. Everything below happens inside a Word document, and if the ribbon is new to you, learn the basics of Word first.
Insert a picture of your handwritten signature
Start with an image file of your signature. Microsoft's route is to write it on paper, then scan the signature on paper and save it as a .png, .jpg or .bmp file. A sharp phone photo of the paper also gives you an image file.
For this guide we drew a made-up signature, A. Vale, with the mouse in Paint and saved it as a PNG. We then opened a short sample agreement in Word with Signature and Date lines, ready to sign.
Click where the signature should go, such as just after Signature. Open the Insert tab and select Pictures. On our PC the button opened a menu headed Insert Picture From, with This Device first, followed by Generate an Image, Stock Images and Online Pictures.
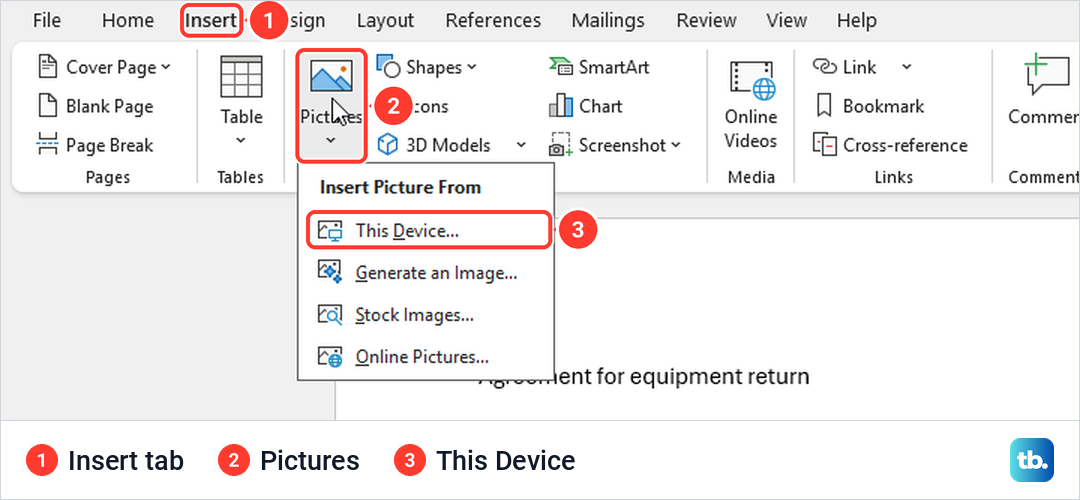
Select This Device, find your signature file in the Insert Picture window and select Insert. Word placed our PNG in line with the text and switched to the Picture Format tab. It came in far too big, filling the whole width of the text area, which is normal for a scan or a full-page drawing.
Crop and size the signature
With the picture selected, select Crop on the Picture Format tab. Thick black crop marks appear on the edges and corners. Drag a black mark inwards and the part you are cutting away turns gray, so you can see what will be left.
Drag the black marks, not the small round handles a little further out. The round handles resize the whole picture, and one of our drags caught a round handle and squeezed the signature before we undid it with Ctrl + Z. Press Esc when the edges are close to the ink and Word finishes the crop.
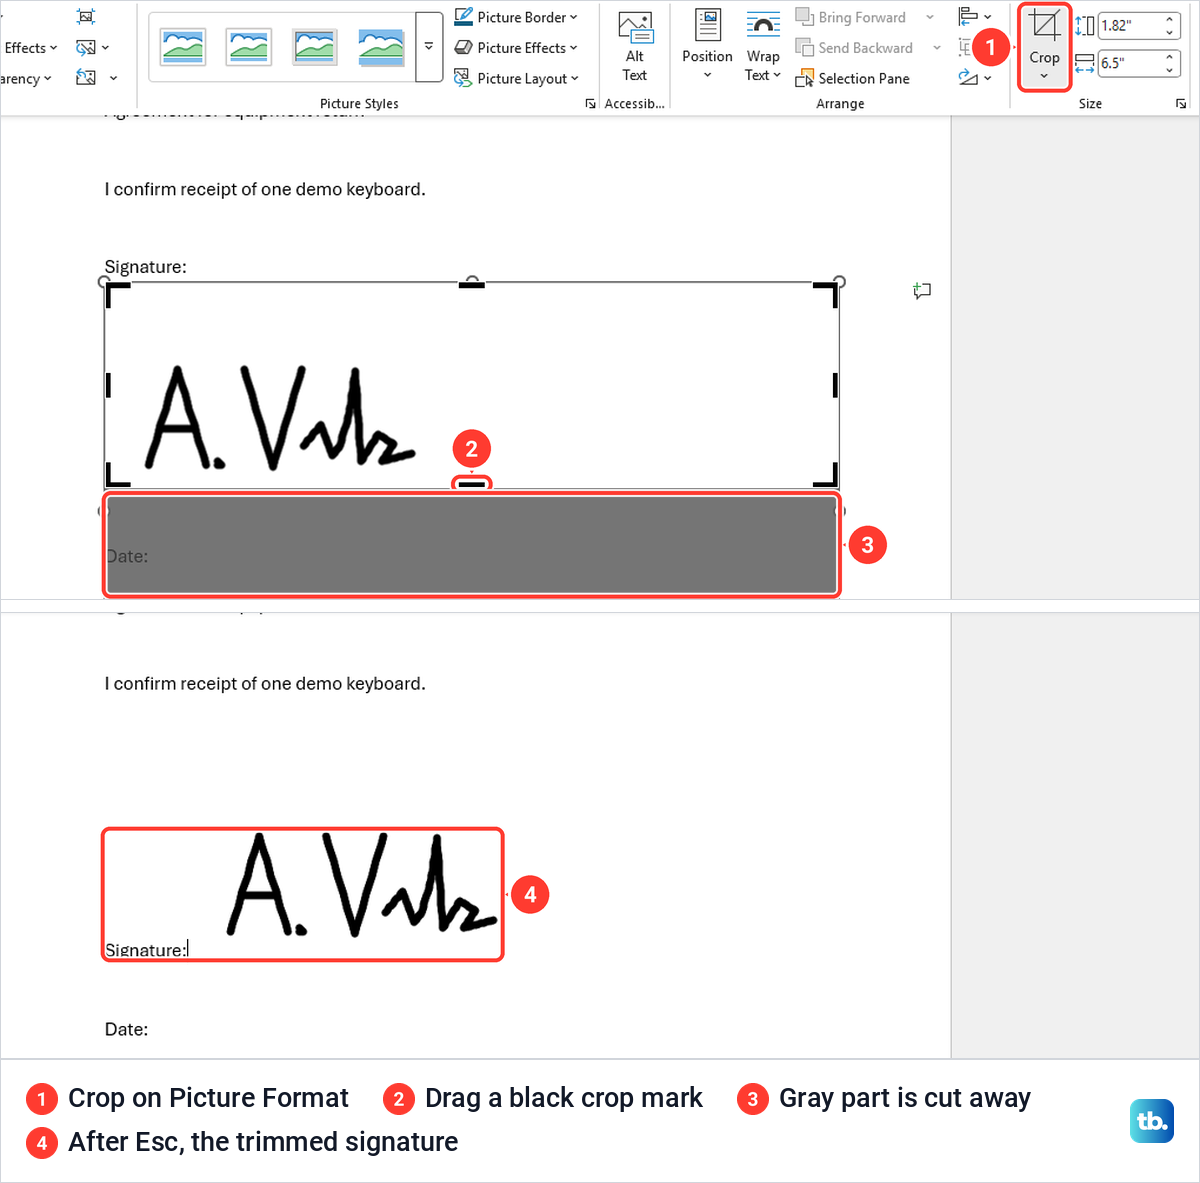
Our trimmed signature sat next to Signature, lined up with the bottom of the text, and made that line taller. Drag a corner handle to shrink it to pen size. To let it float over a line or beside text, move pictures in Word with the wrapping choices that guide explains.
Cropping trims the edges but does not make a white background see-through. For a signature that must sit on a printed line, use a PNG with a transparent background, or try the Remove Background button at the left of the Picture Format tab. Right-click the inserted signature and Word offers Save as Picture, which Microsoft suggests for keeping it as a separate file for other documents.
Save your signature block to reuse it
If your signature always comes with your name and job title under it, save all three as AutoText. Type the lines under the picture, then select the picture and the text together. Open Insert, select Quick Parts and choose Save Selection to Quick Part Gallery.
On our ribbon Quick Parts was a small unlabeled icon in the Text group. In the Create New Building Block box, type a name, change Gallery to AutoText and select OK. When we picked AutoText, Word switched Save in from Building Blocks to Normal by itself, so leave that setting alone.
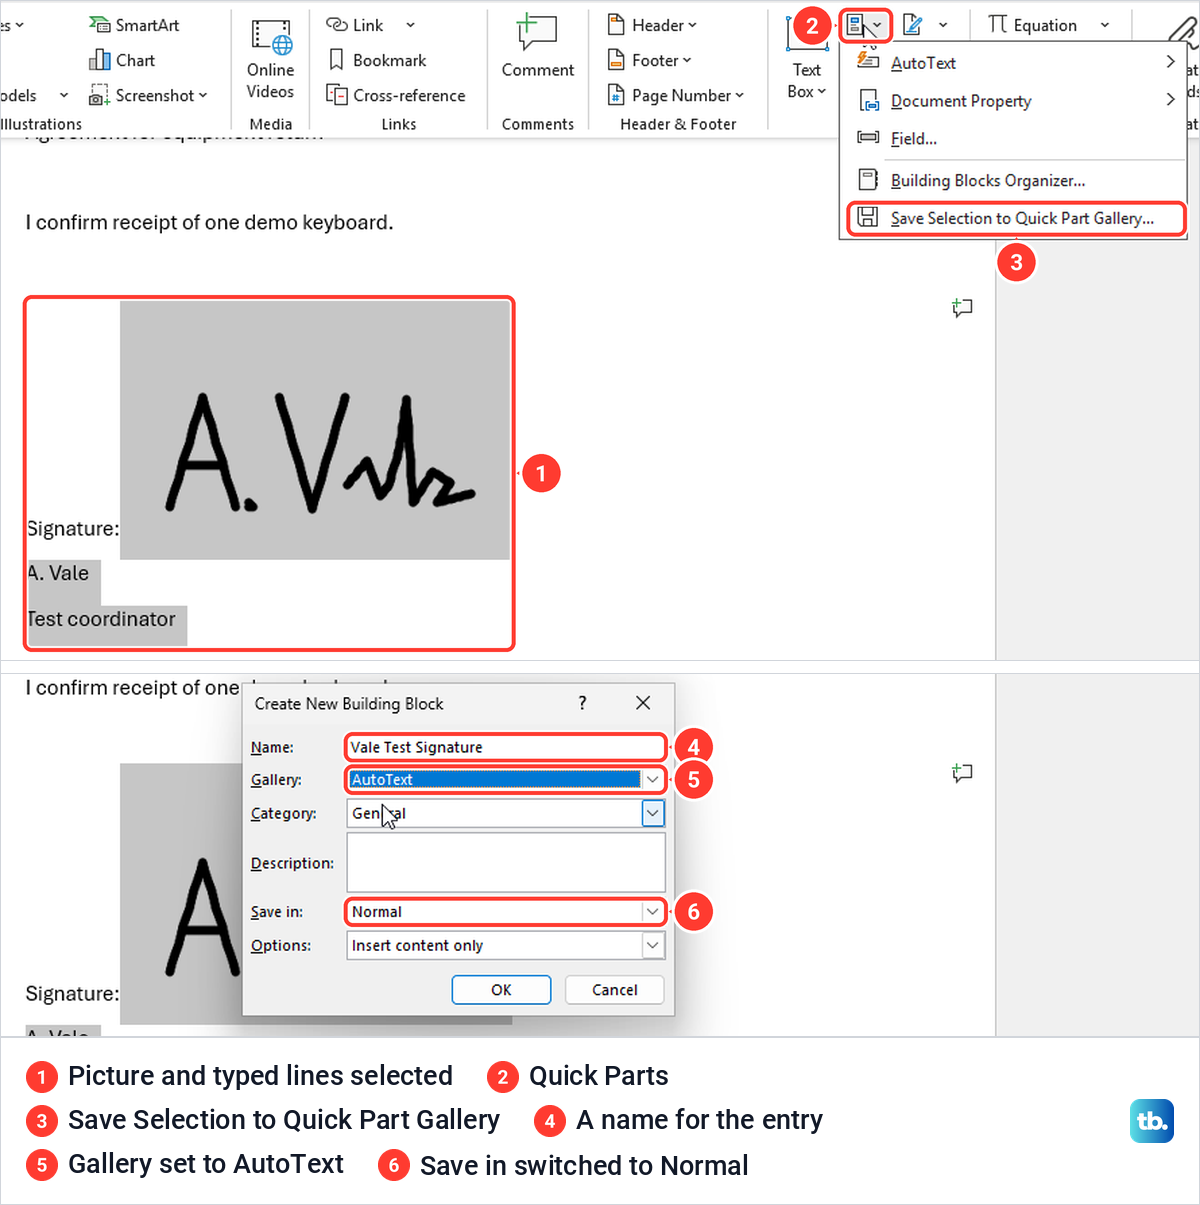
To use it, click where the signature should go and select Insert > Quick Parts > AutoText, then your entry. Ours inserted the picture and both typed lines in one click. Word also offered it as we typed, because typing Vale raised a tip reading Vale Test Signature (Press ENTER to Insert).
Watch out for initials at the start of a line. When we typed the signer's name as an initial, a period and a space, Word turned it into an automatic lettered list and made the title line underneath item B. Press Ctrl + Z straight after the list appears and the line goes back to plain text.
Draw your signature with the Draw tab
You can also sign with a mouse, a touchpad, a pen or a finger. Microsoft says the Draw tab turns on by itself on a touch-enabled device. On our PC a new blank document had none, so we added it. To add it, select File > Options > Customize Ribbon, tick Draw in the Main Tabs list and select OK.
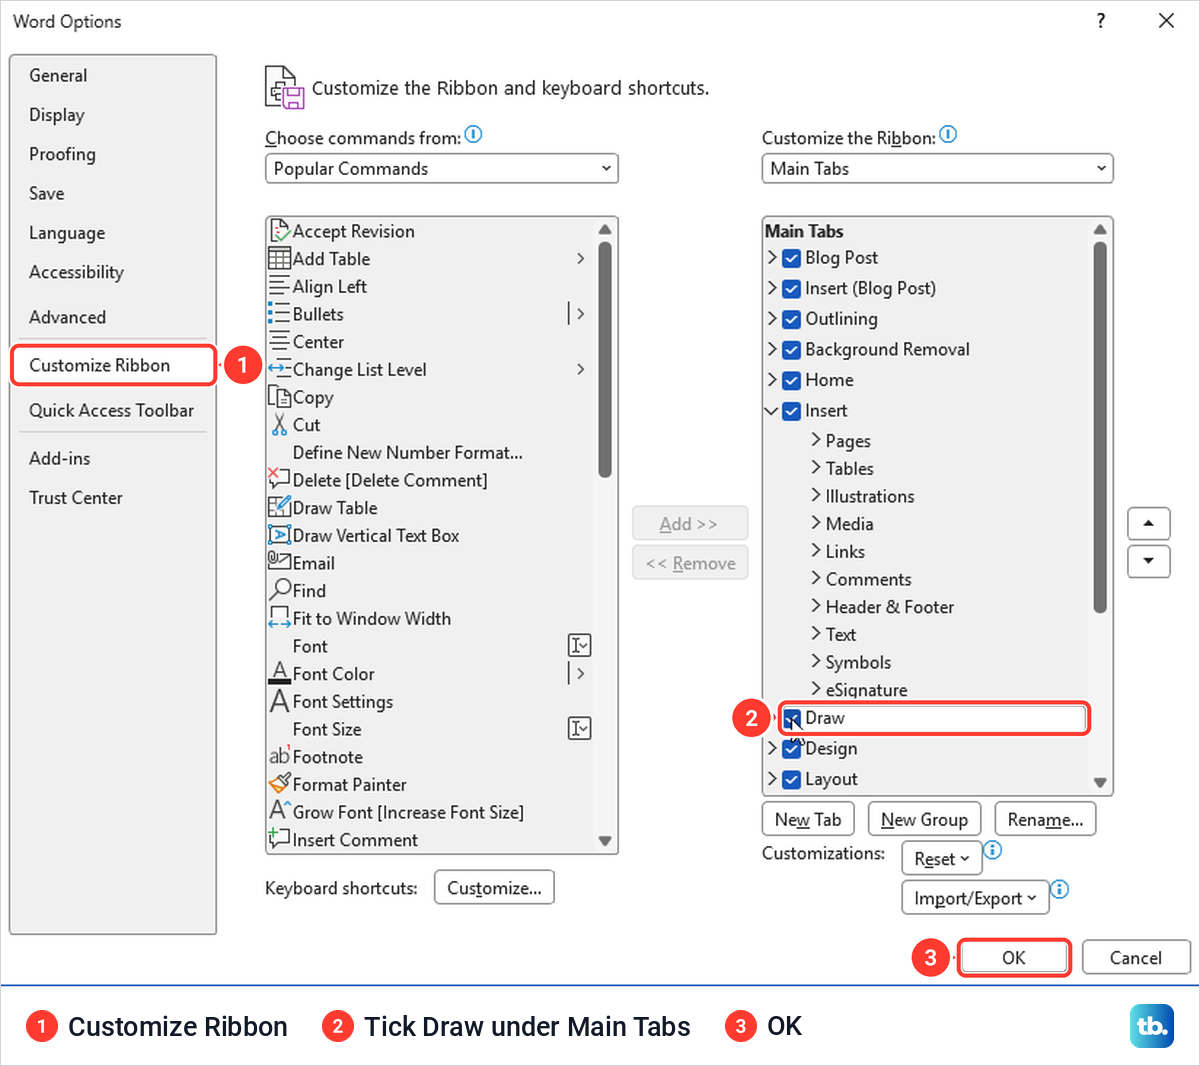
The Draw tab appeared between Insert and Design straight away. Open it and choose a pen, and if the pens are gray, check the view. In View > Draft our pens were grayed out and clicking one did nothing, while View > Print Layout brought them back in color. Draft view also hid our inserted signature pictures completely.
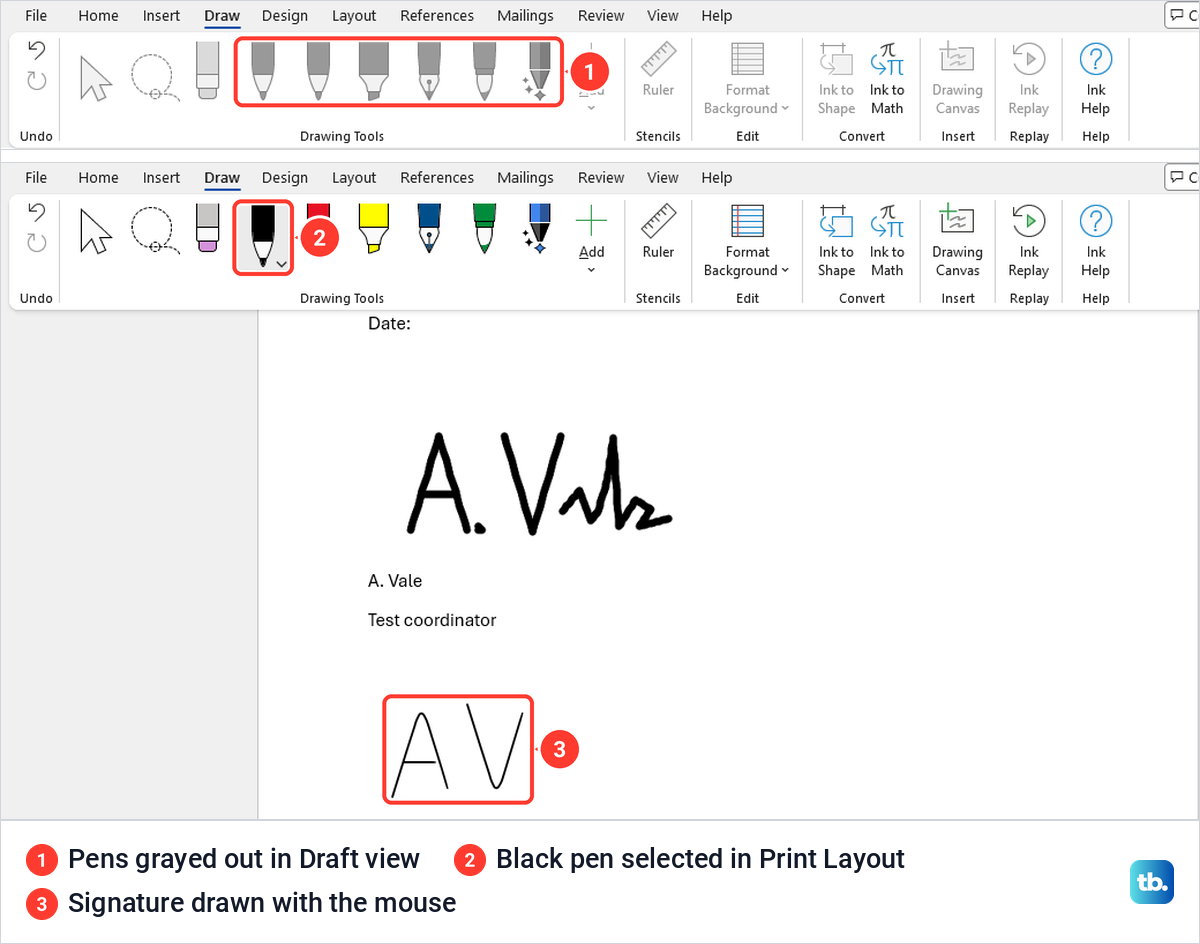
Select the small arrow on the pen to change its thickness and color, then sign and press Esc to stop drawing. Clicking a stroke afterwards selected it as an object with sizing handles, and each stroke was separate, so clicking our V selected only the V. Like a picture, ink is a mark on the page, and Word showed no signature status for it.
Make a blank line to sign on paper
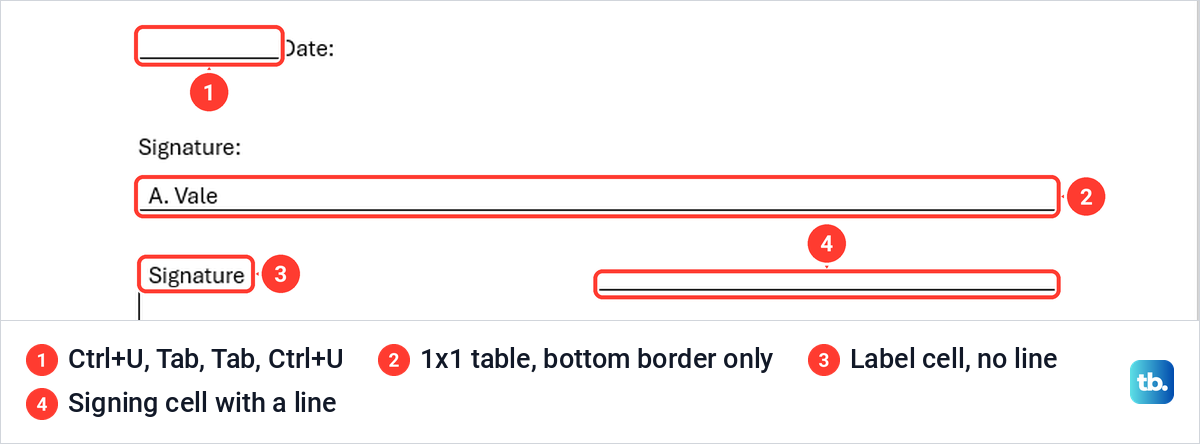
For a document that will be printed and signed with a pen, an underlined space is enough. Click where the line should start and press Ctrl + U to turn on underlining. Press Tab once or twice for the length you want, then press Ctrl + U again to turn it off.
On our PC the Underline button lit up after the first press, and after two tabs and a second press the next word we typed came out plain beside an underlined blank. For a separator, a border or a thicker rule instead, add another kind of line in Word with our line guide.
Make a signing line that stays under typed text
An underlined tab moves when someone types on it, so for a form filled in on screen, use a table cell with only a bottom border. Select Insert > Table and click the top-left square, which Word labelled 1x1 Table. The new table had borders on every side.
With the cursor in the table, open Table Design > Borders and choose No Border, then open the menu again and choose Bottom Border. Microsoft's help page calls this option None, but our menu read No Border. Type a name in the cell and the line stays underneath it.
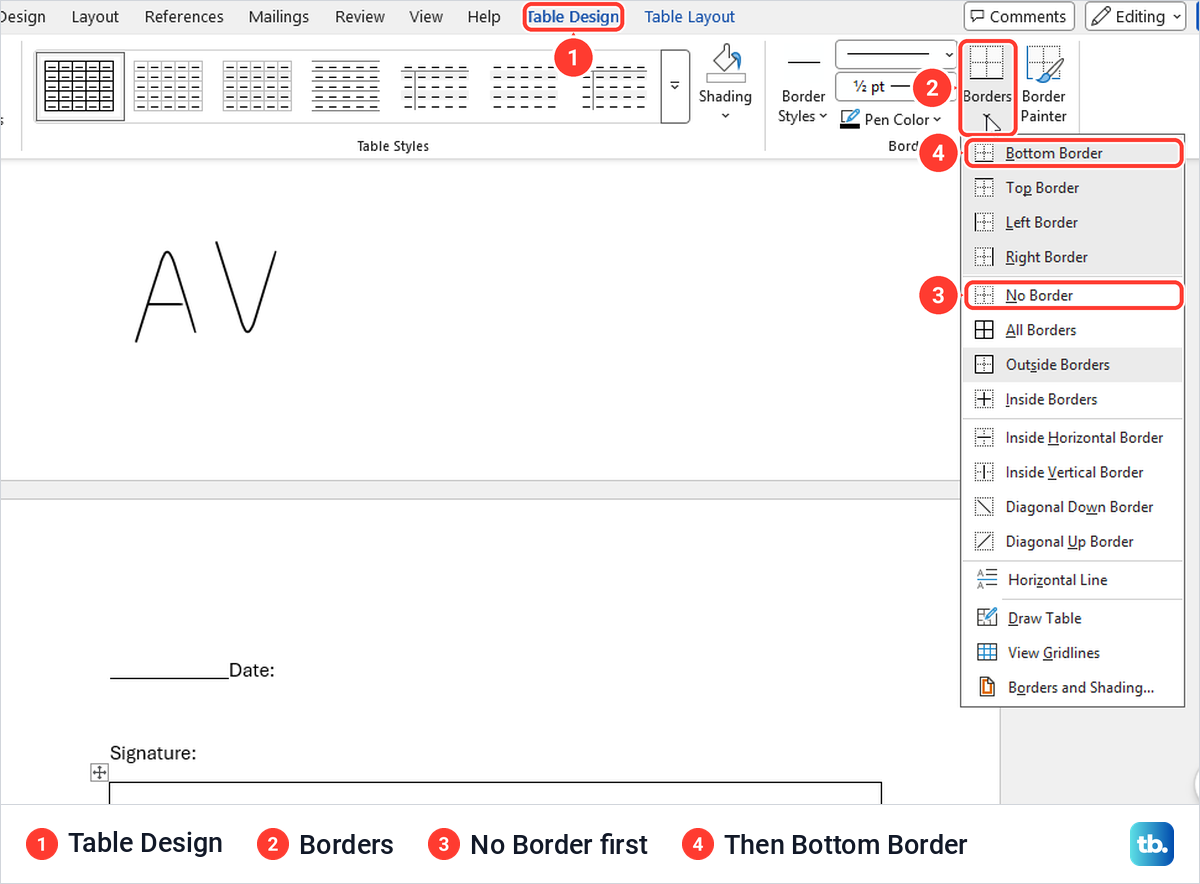
To put a label beside the line, insert a 2x1 Table instead, since Word counts columns first. We typed Signature in the left cell, selected the whole table with its move handle and chose No Border. Then we clicked the right cell and chose Bottom Border, which left a line under the signing cell only.
Insert a signature line for someone else to sign
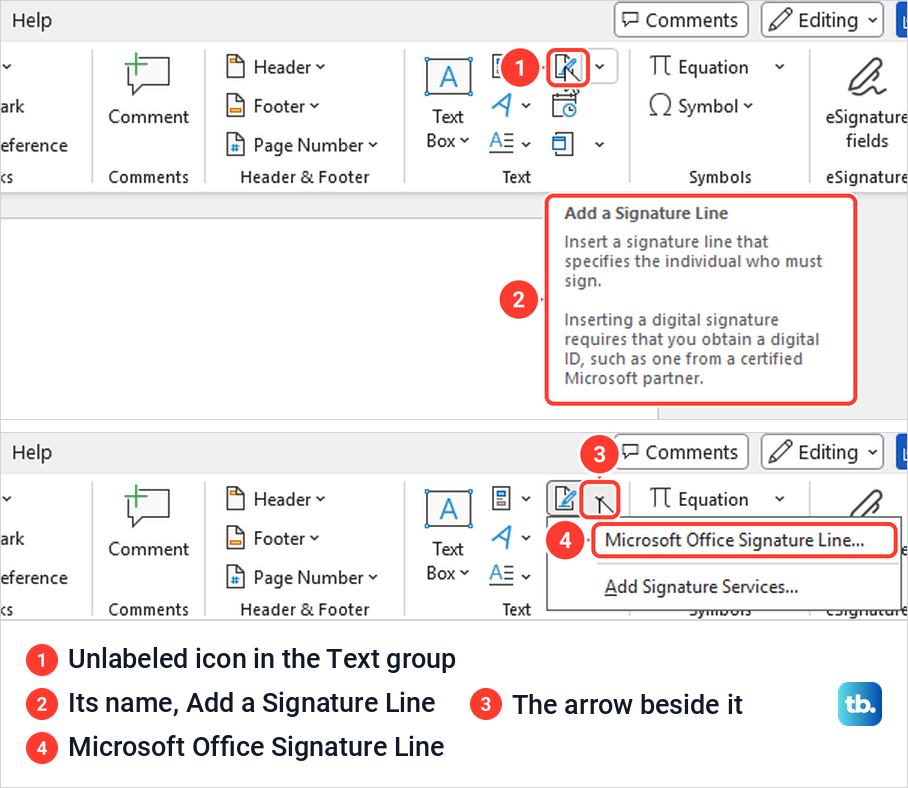
Word's own signature line is an object with an X, a line, and the signer's name and title under it, and on its own it is only a placeholder for a digital signature. Click where it should go and open the Insert tab. Microsoft calls the command Signature Line or Add a Signature Line, but on our ribbon it was an unlabeled icon next to Quick Parts.
Pointing at it showed the name Add a Signature Line and a note that inserting a digital signature requires a digital ID. Its arrow opened two items, Microsoft Office Signature Line and Add Signature Services.
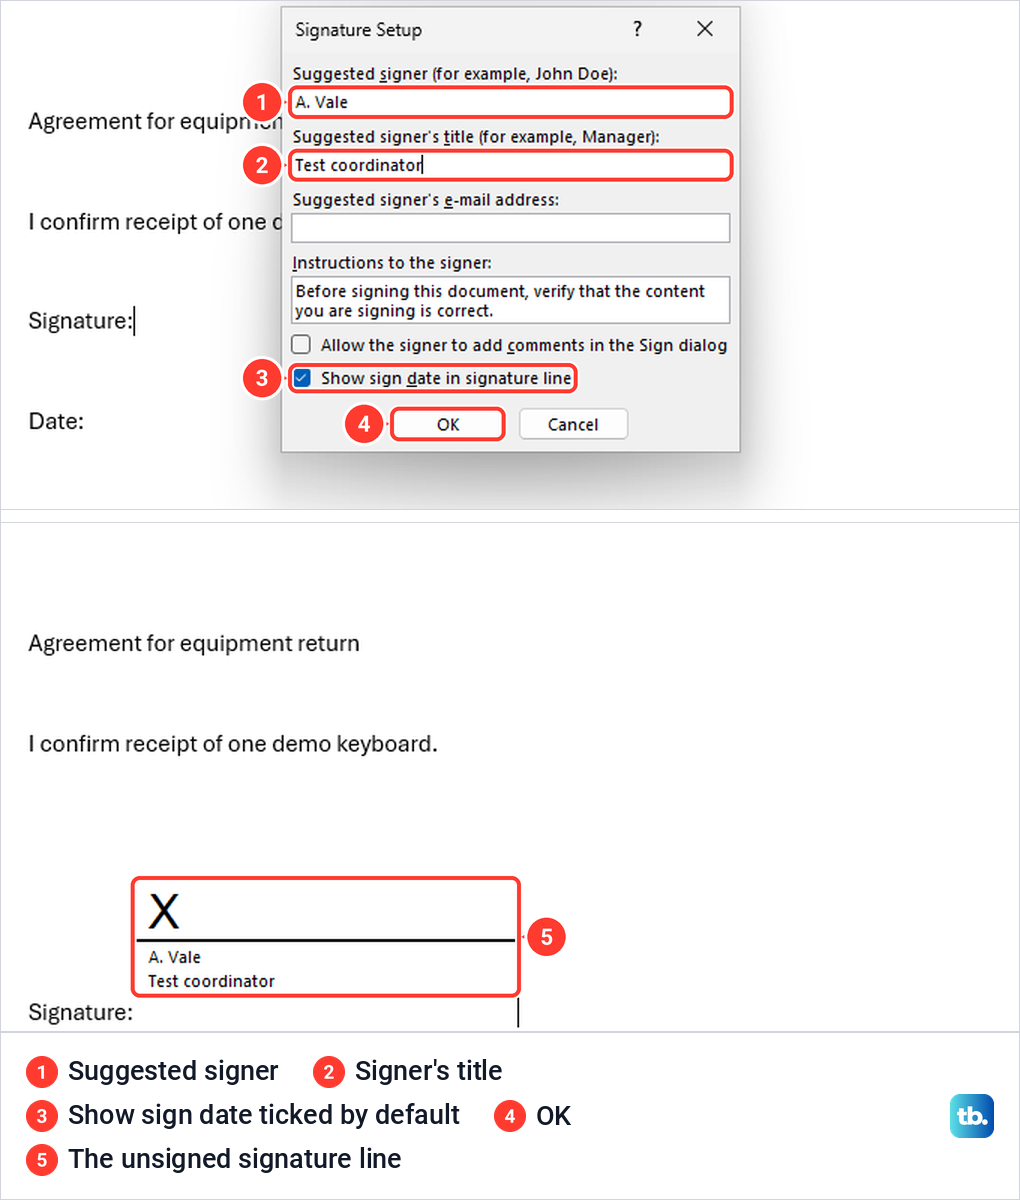
Choose Microsoft Office Signature Line. The Signature Setup box asks for the suggested signer, their title and email address, and has ready-made instructions to the signer. Show sign date in signature line was ticked by default and Allow the signer to add comments was not.
We filled in a made-up signer and title and selected OK. Word placed an X with a line above the signer's name and title. Microsoft's page says a Signatures message bar appears while the document is unsigned, but none appeared on our screen, before or after saving.
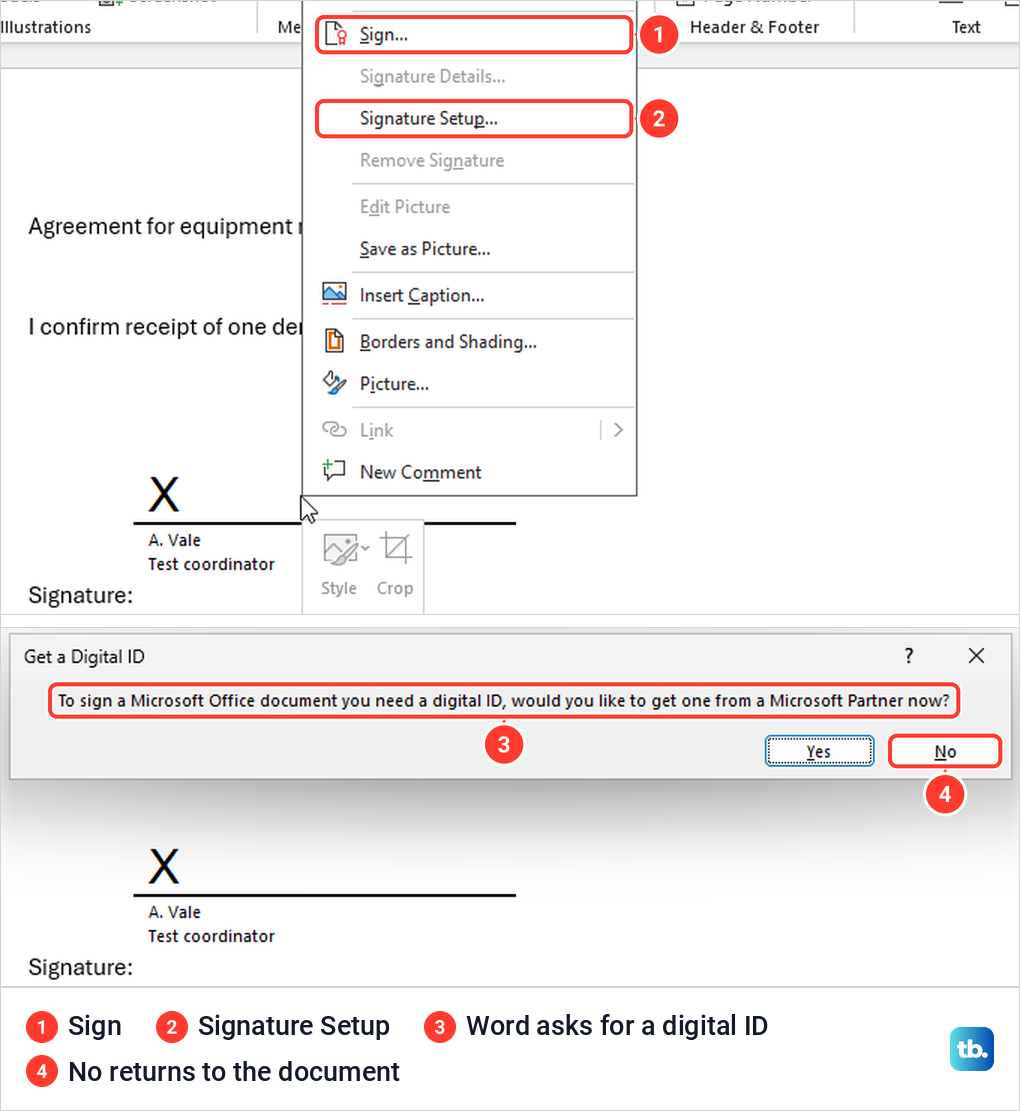
Until someone signs it, the line proves nothing. Right-clicking it offered Sign and Signature Setup, with Signature Details and Remove Signature grayed out, so you can still change the signer details later.
Our Insert tab also had an eSignature fields button. Microsoft says this is a separate request service that an admin has to switch on, for .docx files saved in a SharePoint site enabled for it, and that recipients sign a PDF copy of the document rather than the Word file. If your workplace uses it, follow its own instructions.
Sign the signature line with a digital ID
To sign, right-click the signature line and choose Sign, or double-click it. Microsoft says you need a signing certificate, also called a digital ID, to create a digital signature. Without one, our PC did not open the signing box at all.
Instead a Get a Digital ID box said a digital ID is needed to sign a Microsoft Office document and asked whether to get one from a Microsoft Partner now. No returned us to the document with nothing signed. Microsoft adds that many institutions, governments and companies can issue their own certificates, so at work ask your IT team first.
To practice, Microsoft documents a small tool that makes your own certificate. In File Explorer, open C:\Program Files\Microsoft Office\root\Office16, or for 32-bit Microsoft 365 the folder Microsoft gives, C:\Program Files (x86)\Microsoft Office\root\, and look for SelfCert.exe there or in the Office16 folder inside it. Run SelfCert.exe, type a name and select OK. Its window says this type of certificate does not verify your identity.
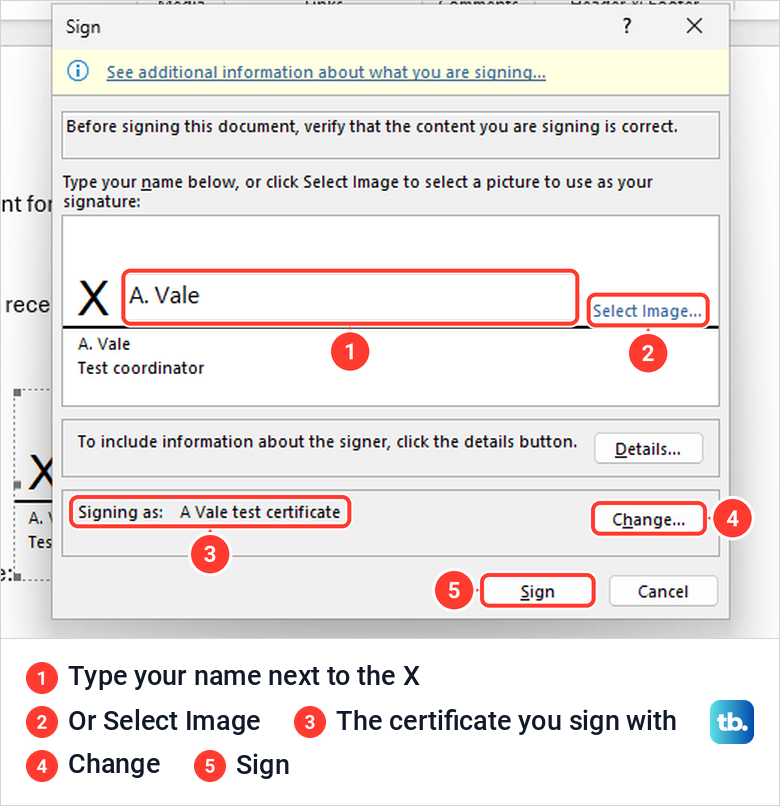
With a certificate in place, the Sign box opened. Type your name next to the X, or choose Select Image to use your signature picture instead. The box shows which certificate you are signing as, and Change lets you pick another if you have more than one. The Sign button stayed gray until we typed a name.
Before you sign anything for real, make a Word document copy so an editable original stays available. A signed file is read-only, and Word warns that changing the document makes the signature invalid.
What a signed document looks like
When we selected Sign with the self-made certificate, Word warned that the certificate you selected cannot be verified and asked whether to use it. After Yes, it said the signature had been saved with the document and that it would become invalid if the document changed.
The line then showed our typed name next to the X, plus Signed by and the certificate name. A yellow MARKED AS FINAL bar appeared, the mode button switched to Viewing and a small signatures icon showed up in the status bar. Typing was refused with the message You can't make this change because the selection is locked.
Above the line, in red, Word wrote Recoverable Signature, and File > Info showed a red Recoverable Signatures box saying a signature in the document was recoverable or could not be verified. That happened on the same PC that made the certificate. Microsoft warns that people you share such a file with cannot verify the signature unless they choose to trust your self-signed certificate, so treat SelfCert as practice only.
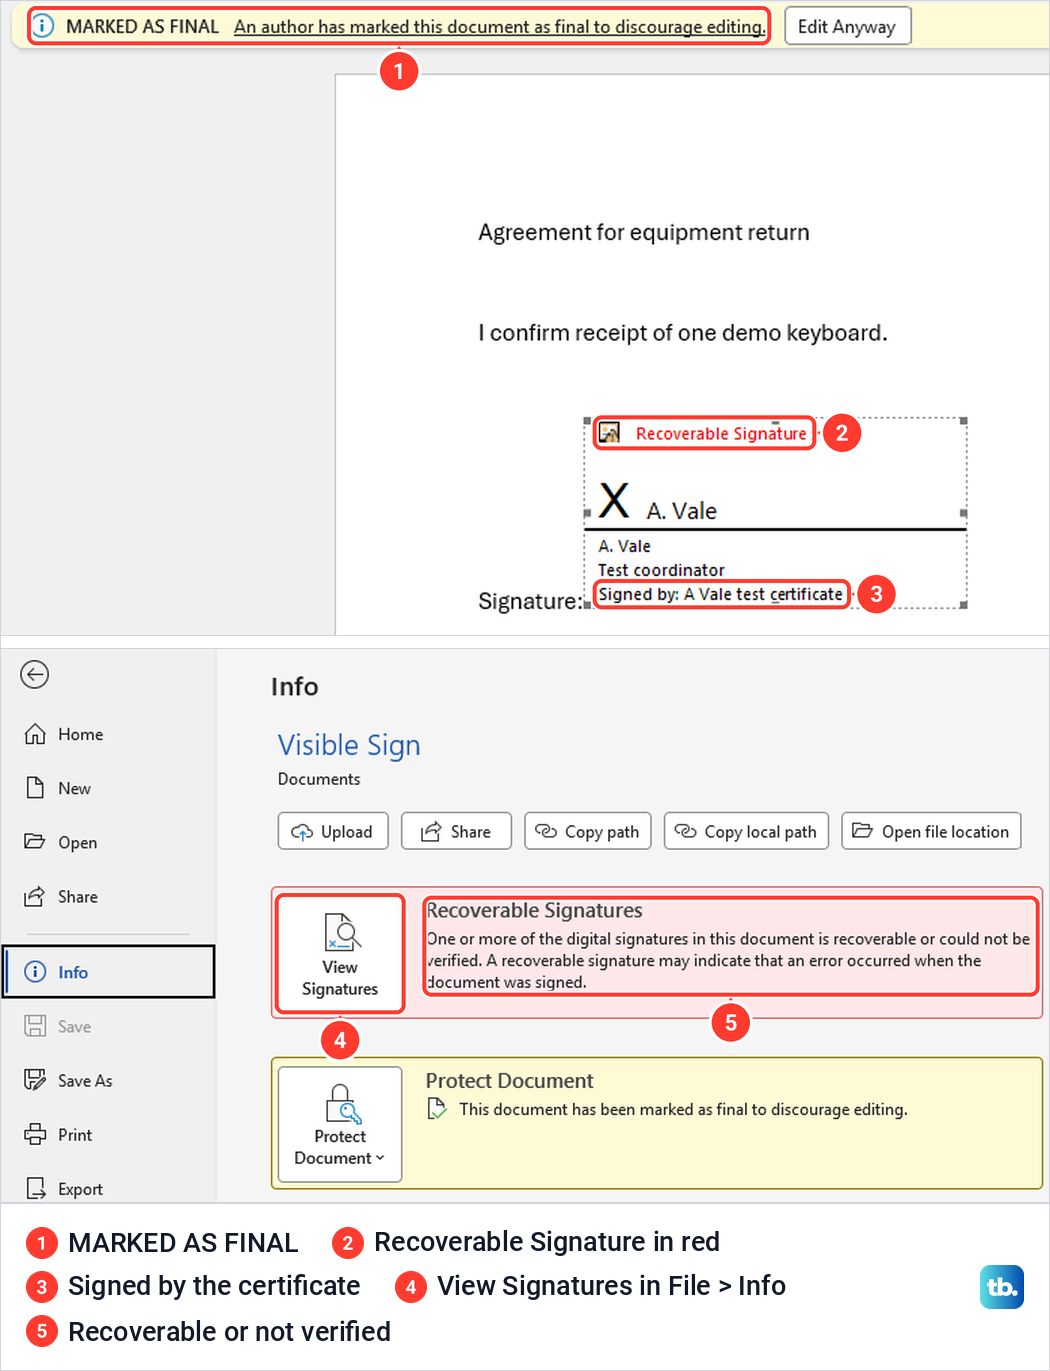
Microsoft's conditions for a digital signature to give its assurances include a valid signature, a current certificate and a signer who is trusted. A red label like ours is a reason to check the certificate before you rely on the file.
Remove a digital signature
To edit a signed document, remove the signature first. Right-click the signed line, choose Remove Signature and select Yes. Word warned us that this cannot be undone, then said the signature had been removed and the document saved.
The MARKED AS FINAL bar disappeared, the mode went back to Editing and typing worked again. The line itself stayed, unsigned, ready for Sign once the text is final.
Add an invisible digital signature
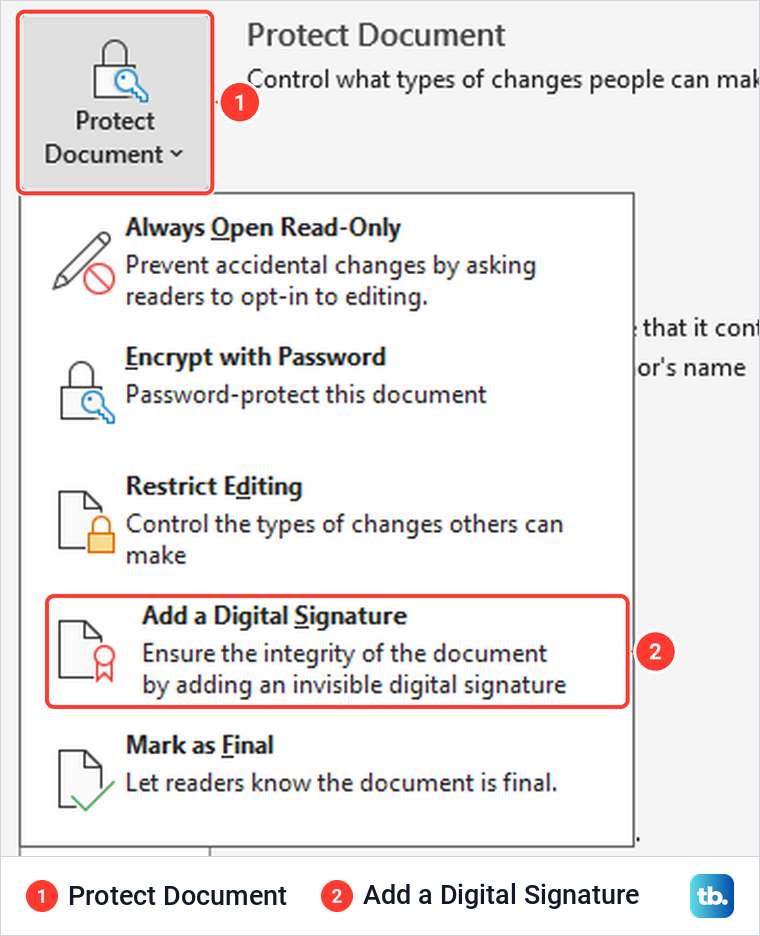
An invisible signature seals the whole file without putting anything on the page. Select File > Info, then Protect Document and Add a Digital Signature, which the menu describes as ensuring the integrity of the document by adding an invisible digital signature.
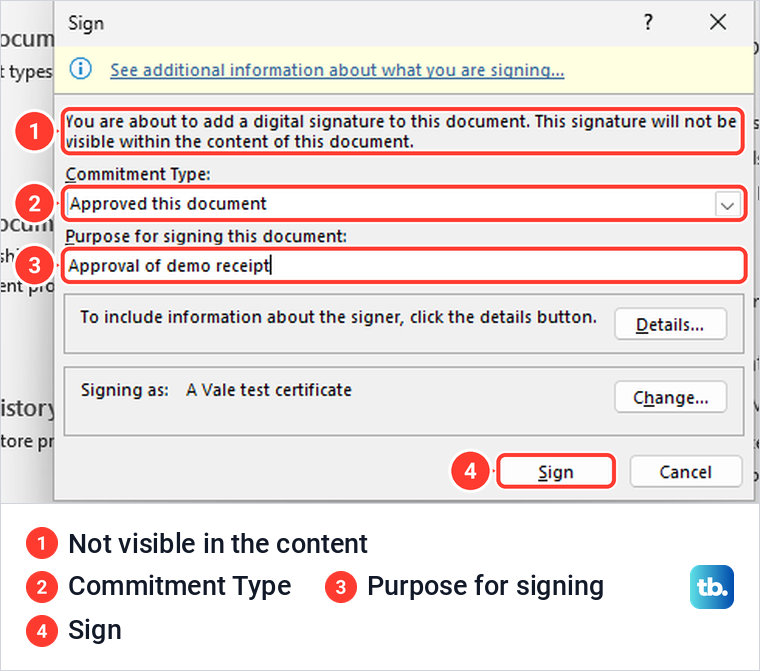
On our PC the Sign box opened straight away, saying the signature will not be visible within the content of this document, with no message to acknowledge first. Pick a Commitment Type, type a purpose and select Sign. The Commitment Type box started empty, and we chose Approved this document from its four choices.
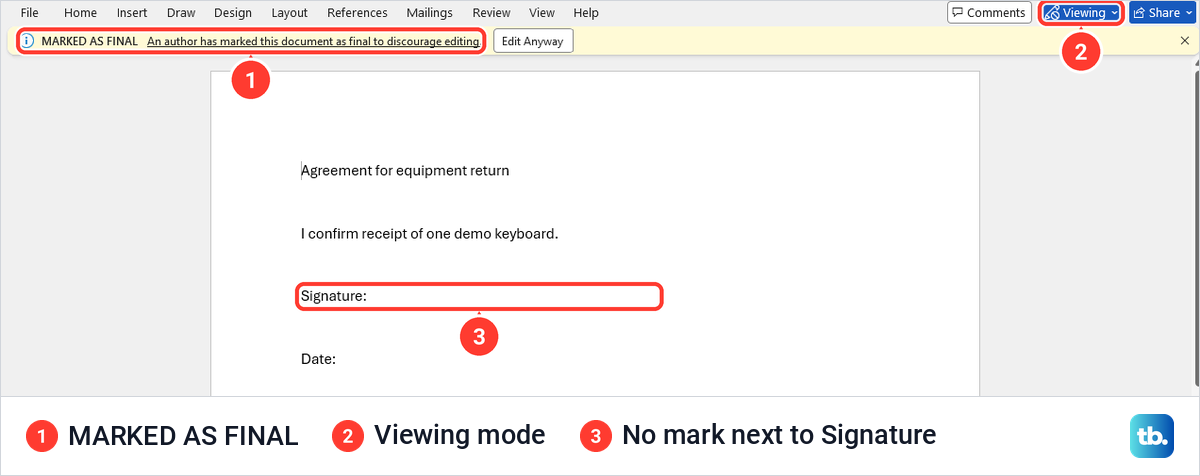
After signing, the agreement looked exactly as before, with nothing next to Signature. The file switched to MARKED AS FINAL and Viewing mode, and File > Info showed View Signatures in a red Recoverable Signatures box, which is how you can tell it was signed. To remove it, Microsoft's route is File > Info > View Signatures, the arrow next to the signer's name, Remove Signature and Yes.
Add a signature in Word for the web
Microsoft says Word for the web has no command for inserting your signature, so the picture route is the one to use. Crop the scanned signature in a photo editor first and save it where you can find it.
Click in the document where the signature should appear, select Insert > Picture, find the file and select Open. For a signature line or a digital signature, open the file in the Word desktop app, which Microsoft says can do more with signatures. If the requester wants a fixed copy, save the Word file as a PDF once the page looks right.
Add a signature in Word on a Mac or phone
In Word for Mac, the picture route has its own labels. On the Insert tab, select Pictures > Picture from File, choose your signature and select Insert, then use Crop on the Picture Format tab. To save it with typed details, Microsoft's Mac steps use Insert > AutoText > New from the menu bar.
Microsoft says Word for Mac has the Draw tab too, in Microsoft 365 and Office 2019 for Mac or later. Pick a pen, sign with the trackpad or mouse and press Esc to stop.
On an iPhone, iPad or Android device, Microsoft gives three options. Hold down the underscore key to draw a line, insert a one-cell table styled with a single line, or add pictures in Word on a phone to place a saved signature. Microsoft also says you cannot add a digital signature line from a mobile device without installing an add-in.
When a signature will not insert or sign
If the saved signature turns into a blank box or a red X, fix a picture that will not display in Word before you sign or send the file. If a form will not let you click its signature line at all, the author may have restricted editing, so ask them for an editable copy.
How we tested this guide
We tested this in Word for Microsoft 365 on Windows 11, version 25H2, signing a sample agreement with a picture, mouse ink, a signature line and a test certificate.
Frequently Asked Questions
Can I add a signature in Word without printing the document?
Yes. Insert a saved picture of your signature or draw it with the Draw tab for a visible signature. When the file has to prove who signed it, sign a signature line with a digital ID instead.
Is a picture of my signature a digital signature?
No. A picture is just an image on the page, and anyone can copy it. Word adds a digital signature only when you sign a signature line, or add an invisible signature, with a signing certificate.
Why does Word ask me for a digital ID?
Signing a signature line needs a certificate, and Word asks this when it cannot find one. On our PC it offered to get one from a Microsoft Partner, and No returned us to the document unsigned.
Can I add a signature in Word for the web?
Yes, as a picture. Select Insert > Picture and choose your saved signature file. For a signature line or a digital signature, open the document in the desktop app.
Why can I no longer edit my signed document?
A digitally signed document becomes read-only, and ours refused typing with a message that the selection is locked. For a signature line, right-click it and choose Remove Signature, which cannot be undone. For an invisible signature, select File > Info > View Signatures, then the arrow next to the signer's name and Remove Signature.
Can I add a digital signature line on my phone?
Not without an add-in, Microsoft says. On a phone you can still type a line with the underscore key, use a one-cell table or insert a picture of your signature.