
To remove a background in desktop PowerPoint, select the picture, choose Picture Format > Remove Background, fix the magenta preview if it is wrong and click Keep Changes. To remove a slide's own background instead, right-click an empty part of the slide and choose Format Background, then choose Solid fill and pick white. In PowerPoint for the web, the slide route is Design > Background > Solid Fill, and the picture route is Picture > Remove Background where that button is shown.
Those are two different jobs, and most of the frustration comes from using the wrong one. A picture background is made of pixels inside the image, while a slide background is a fill that sits behind everything on the slide. A logo or picture that shows on every slide and refuses to select may be each slide's fill or a picture on the slide master, and both have their own fix below.
Our sample picture is a flat orange lamp graphic on a blue square. The Mac section follows Microsoft's instructions.
The short version
- Picture: select it, choose Picture Format > Remove Background, then Keep Changes.
- Magenta marks what will disappear. Correct it with Mark Areas to Keep or Mark Areas to Remove.
- Slide: Format Background > Solid fill, then pick white under Color, changes the selected slide, and Apply to All changes every slide.
- A picture you do not want at all: select it and press Delete.
- The same picture on every slide that will not select: check Format Background first, then View > Slide Master.
- Went too far: press Ctrl + Z straight away.
Which background are you trying to remove
Click the thing you want gone and watch what happens. If a box with round handles appears and a Picture Format tab shows up, it is a picture, and you can either cut its background out or delete the whole picture. If nothing selects and the slide still shows a color or an image behind everything, it is the slide's fill or something on the master.
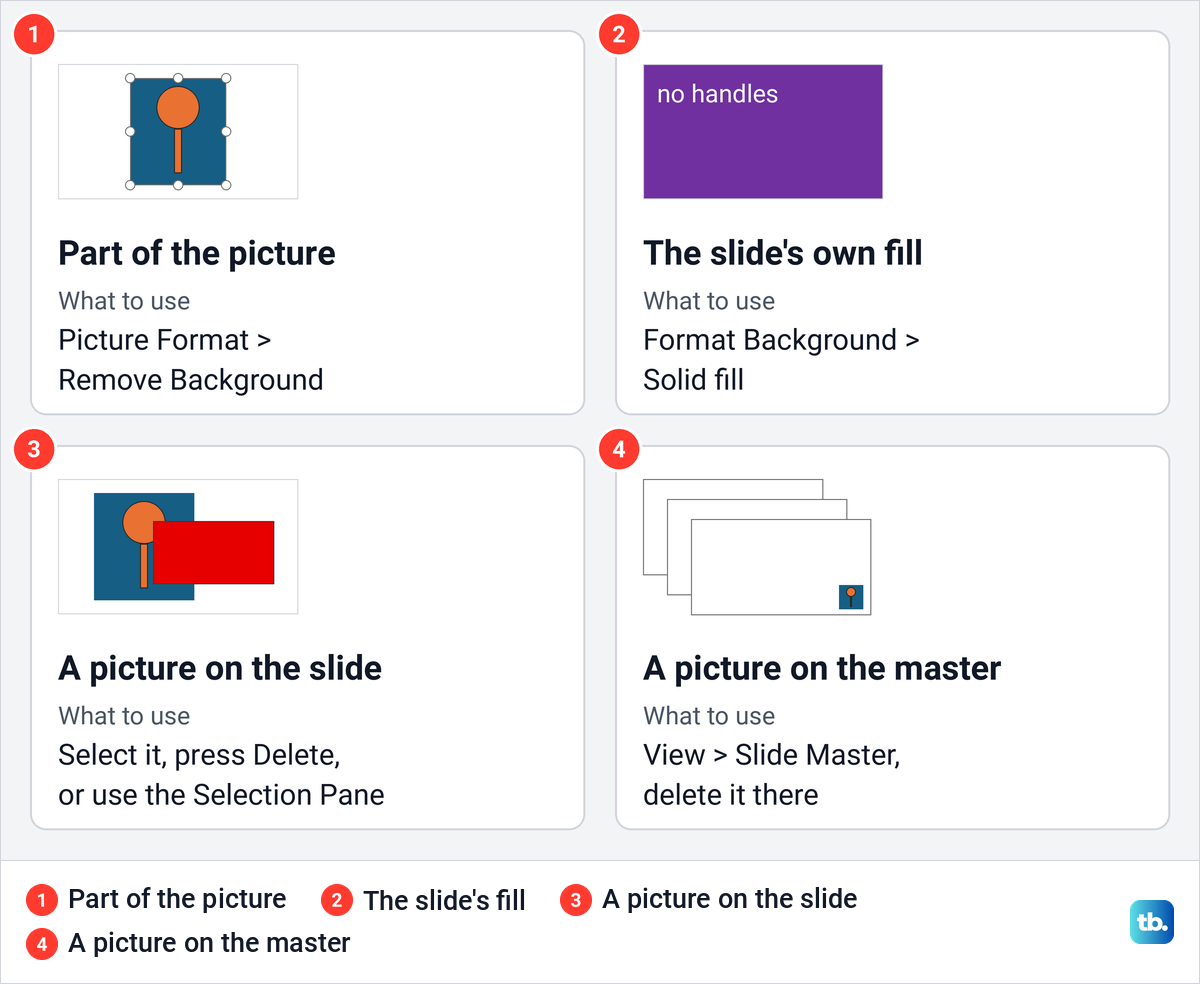
Microsoft's help for deleting pictures points the same way, noting that a picture can sit behind other items, on the slide master or in the background setting. The table sorts the six cases we ran into, and each has its own section below.
| What you see | Where it lives | What to do | What changes |
|---|---|---|---|
| Handles and a Picture Format tab, and you want only the subject | Pixels inside the picture | Picture Format > Remove Background, then Keep Changes | The picture's background becomes transparent |
| No handles, and one slide has a color or image behind everything | That slide's fill | Format Background > Solid fill, white | The selected slide only, by default |
| The same fill on many slides | Each slide's fill | Solid fill, then Apply to All | Every slide's fill, including other colors |
| Handles on a picture you do not want at all | A picture placed on the slide | Select it and press Delete | The picture goes, the fill stays |
| A click selects a shape on top instead | A picture under another object | Home > Editing > Select > Selection Pane | You pick the hidden picture by name |
| The same picture on every slide, and nothing selects | Each slide's fill, or the slide master or one of its layouts | Format Background first, then View > Slide Master if it is not a picture fill | The fill, or every slide that uses that master or layout |
This guide is about slides and pictures inside PowerPoint. If you want to blur or replace what is behind you on a video call, that is a different setting, and our guide shows how to change your background in Teams.
Remove the background from a picture
This is the tool for cutting a person, product or logo out of a picture you inserted on a slide. Click the picture once so its handles show, and the Picture Format tab appears at the end of the tab row. On our PC Remove Background was the first button on that tab, with the tip Automatically remove unwanted portions of the picture.
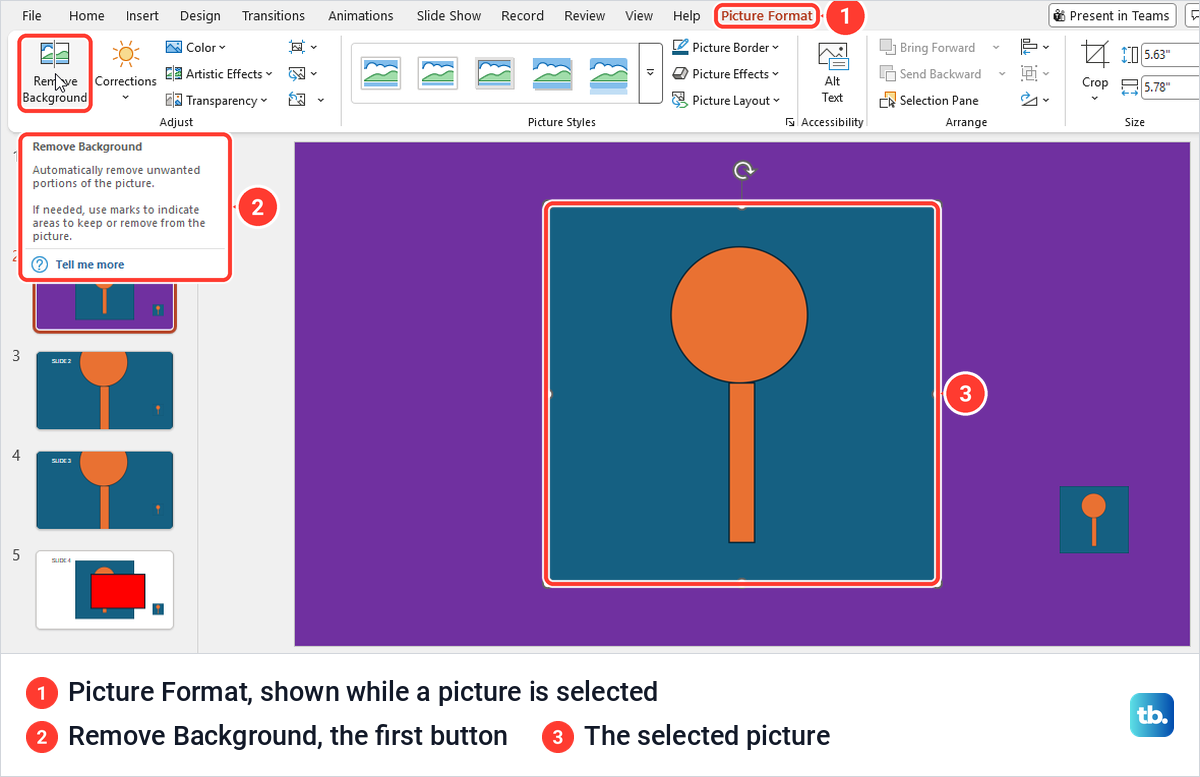
Microsoft notes that you might have to double-click the picture to select it and open the Picture Format tab. If the tab never appears, skip to the section on why Remove Background is missing, because the object may not be a picture at all.
Click Remove Background. The ribbon switches to a Background Removal tab with four buttons, and PowerPoint paints everything it plans to remove in magenta while the part it keeps stays in its normal colors. On our lamp graphic the whole blue square turned magenta and the orange lamp kept its color.
Check the edges before you go on, because the magenta preview is only a proposal. When it looks right, click Keep Changes. The magenta area disappeared from our picture, the slide's purple fill showed through around the lamp, and the slide thumbnail changed with it.
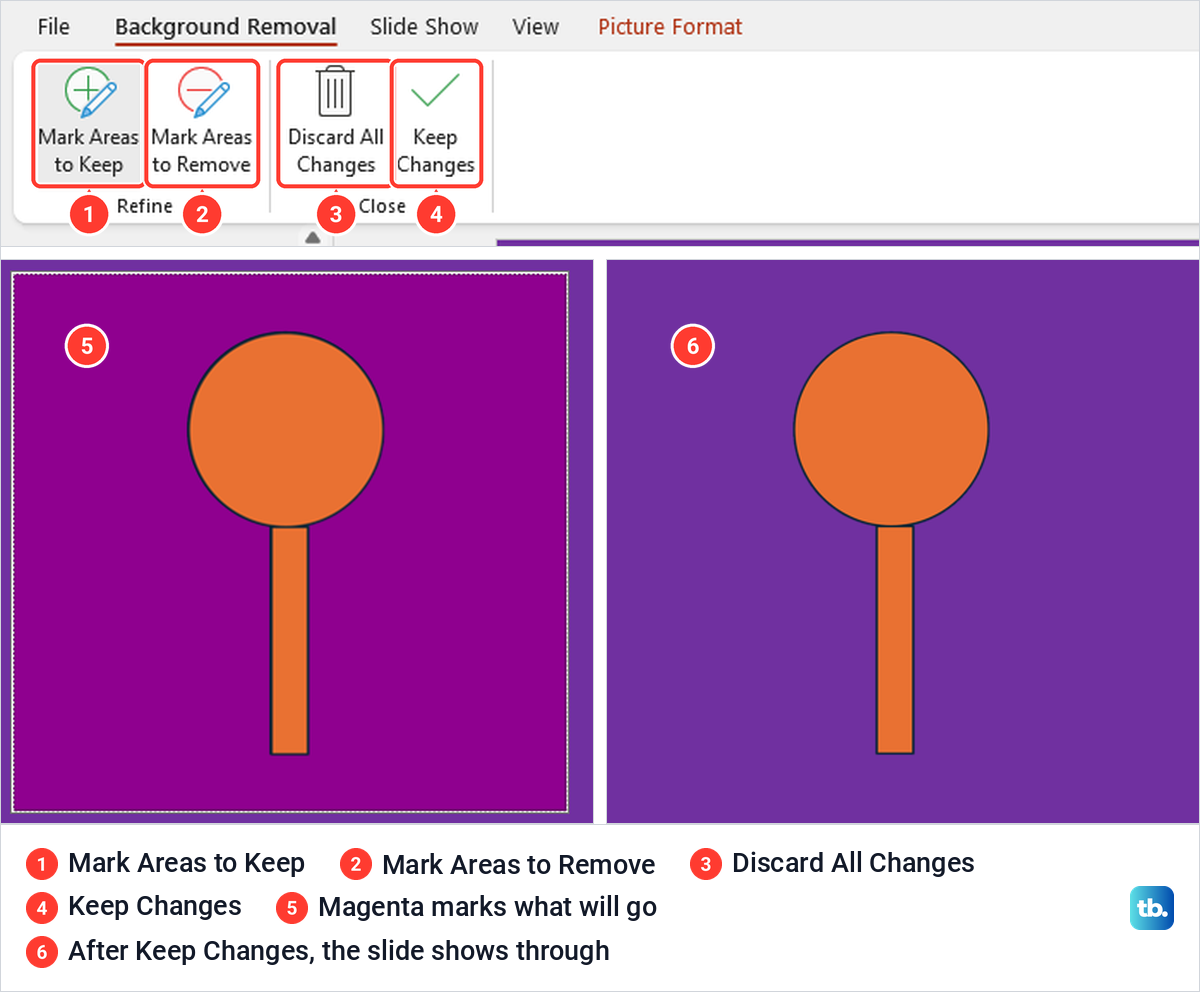
If you change your mind while the tab is open, Discard All Changes closes the tool and puts the picture back as it was. We tried it after marking part of the lamp for removal, and the original square came back untouched.
If the image you want to clean up began on your screen, taking a screenshot on Windows gives you a picture file to insert and then cut out. If the picture is still outside PowerPoint and you would rather prepare it first, our guide to removing a background from an image on any device covers other tools.
Fix the parts PowerPoint keeps or removes
The two marking buttons correct the preview. Mark Areas to Keep rescues parts of the subject that turned magenta, and Mark Areas to Remove gets rid of background that PowerPoint left in place. Both turn the pointer into a pencil, and you draw a line over the area you want to change.
A mark is not a paint brush, and the results surprised us. On our flat graphic, one short Mark Areas to Remove stroke across the lamp's orange bar turned the whole bar magenta at once, as if PowerPoint treated the connected area as one piece. One Mark Areas to Keep stroke across the magenta background kept only a thin line exactly under the stroke.
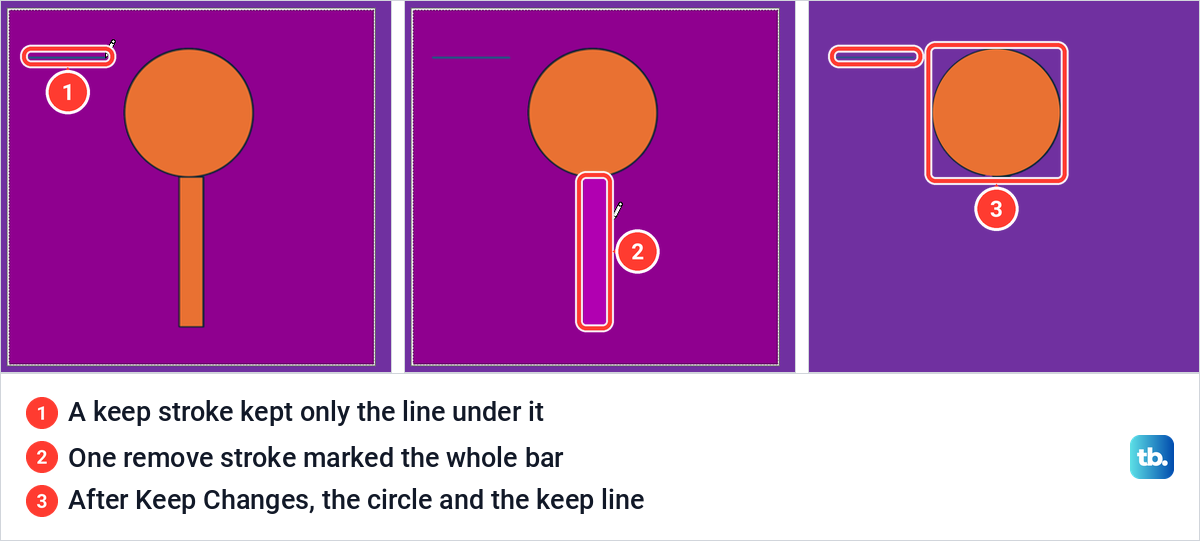
So draw one short stroke, look at the preview again, and add another only if it still needs one. Our sample picture was a flat graphic with hard edges, so on a photo, judge each stroke by the preview rather than expecting one click to fix a whole region.
Save the cutout as a transparent PNG
The cutout lives inside the presentation until you export it. Right-click the picture and choose Save as Picture, which is also Microsoft's instruction for keeping the image in a separate file. Give it a name and leave Save as type on Portable Network Graphics, the first entry in the list on our PC.
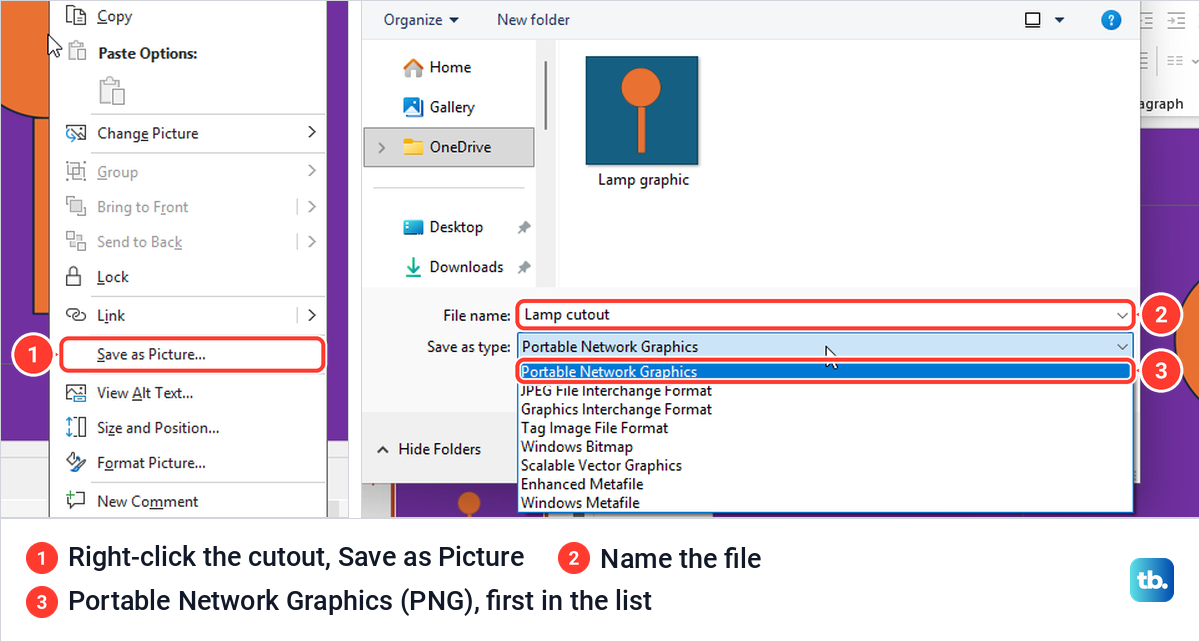
PNG is the format to pick, because it carries the see-through area with it. When we inserted our saved PNG on another slide, the purple slide fill showed all around the lamp and the blue square did not come back. The same list also offers JPEG, GIF, TIFF, bitmap, SVG and two metafile formats.
Remove a slide background on one slide
A slide background is a fill, not an object, so there is nothing to click and delete. Select the slide in the thumbnail pane, then open the Format Background pane. Microsoft's help puts that button at the far right of the Design tab, but on our PC it was folded into Design > Background Styles, at the bottom of the menu.
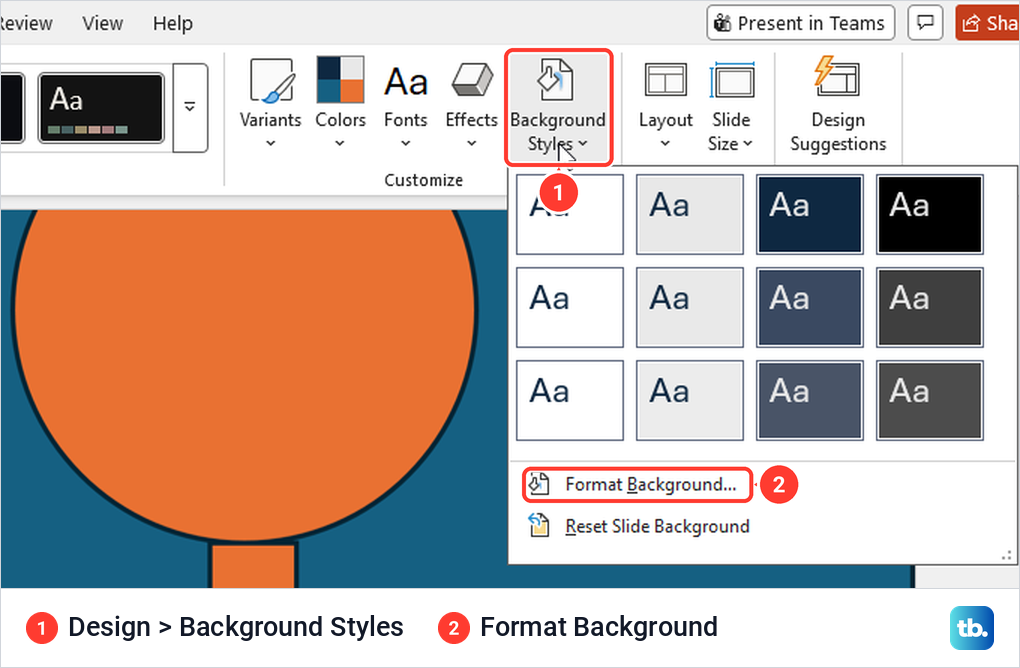
Two quicker routes worked too. Right-click an empty part of the slide, or the gray margin around it, and choose Format Background. On a slide whose background was a picture, that menu also listed Save Background just above it.
In the pane, choose Solid fill under Fill. On our sample slide that click alone replaced the picture background with white, before we opened the color list. Open Color if you want a different shade, where the first theme swatch is White, Background 1.
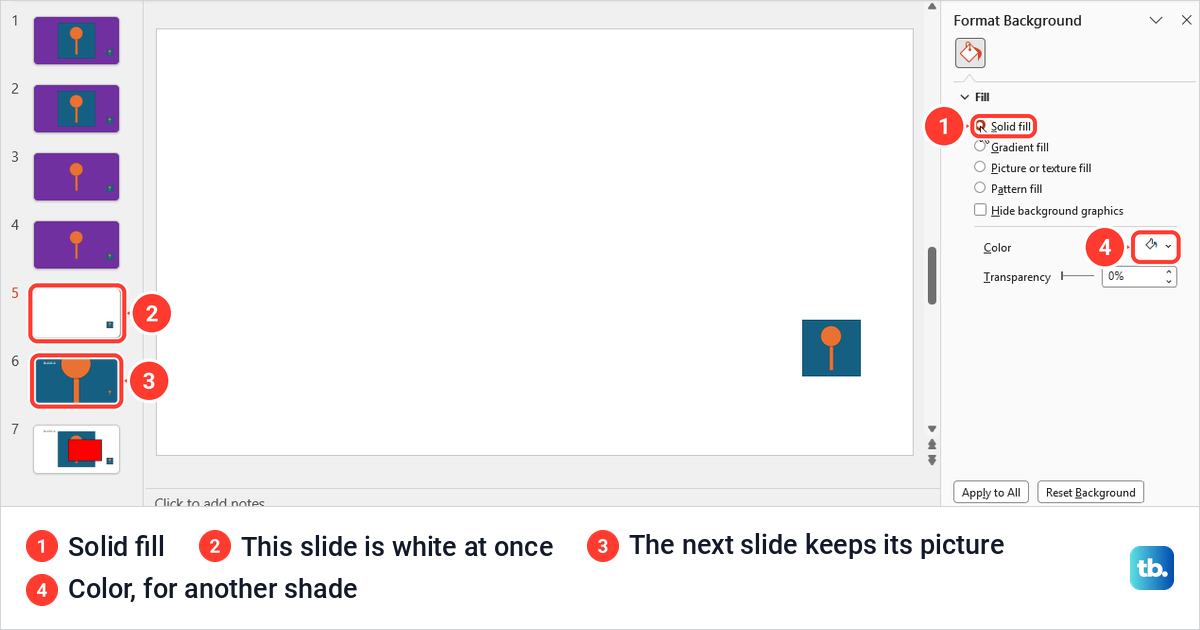
By default the change applies only to the selected slide. Our next slide kept its picture background, which is what you want when a single slide needs a plain background. Press Ctrl + Z straight away if you picked the wrong slide.
Remove the background from every slide
To give every slide a plain white background, set the white Solid fill as above, then click Apply to All at the bottom of the Format Background pane. Microsoft's page says that by default your choice applies to the current slide, and Apply to All extends it to every slide in the file.
Apply to All is broader than it sounds. On our deck it also wiped the purple fill from four slides that had nothing to do with the picture background, so any slide with its own color loses it too. Pictures placed on the slides and the small picture on the slide master all stayed where they were.
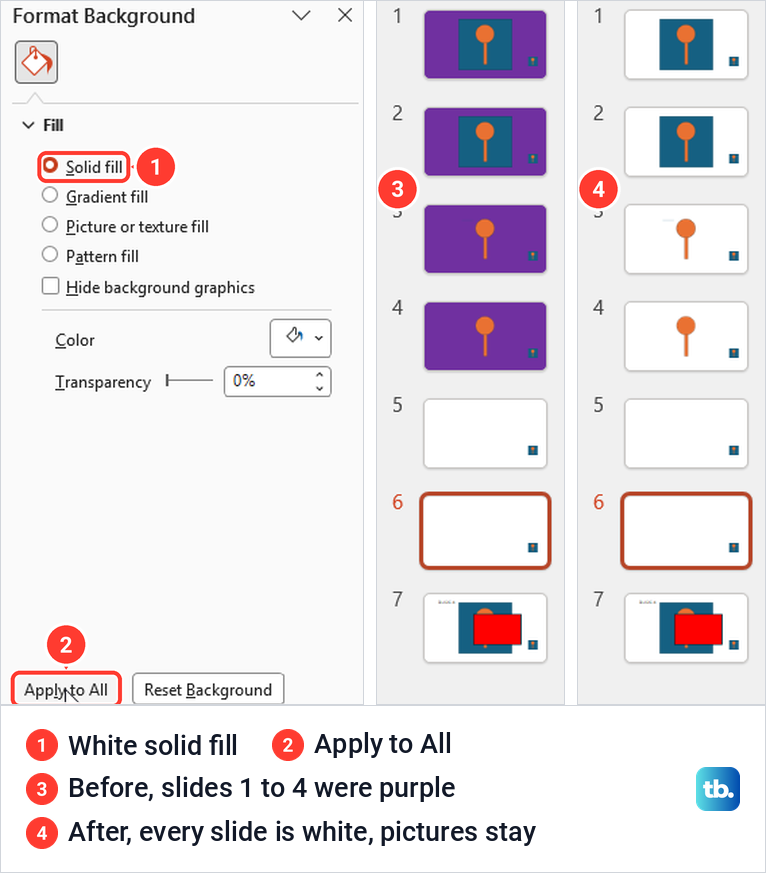
One press of Ctrl + Z brought the purple back on all four slides, so apply it, check the thumbnails and undo at once if it went too far. If only a few slides need a plain background, change them one at a time without Apply to All.
Delete a picture that only looks like a background
Some templates and downloaded decks use a large picture on the slide as a background. If clicking it shows handles, it is an ordinary picture, and pressing Delete removes it. On our slide the picture went and the purple fill behind it stayed.
When another object sits on top, a click lands on that object instead. On our sample slide a red rectangle covered part of the picture, and clicking the overlap selected the rectangle. Open Home > Editing > Select > Selection Pane to see every object on the slide, listed from top to bottom.
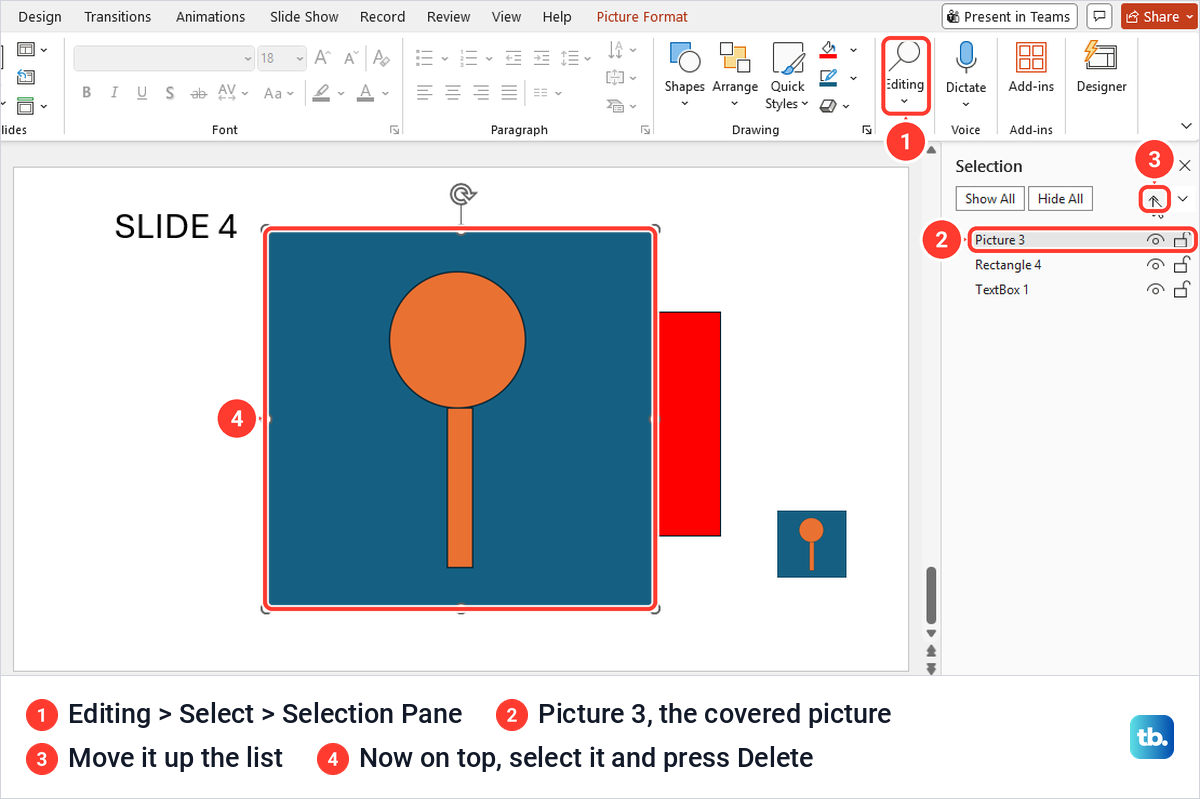
Our pane listed Rectangle 4, Picture 3 and TextBox 1. We selected Picture 3, moved it to the top with the up arrow and pressed Delete, which left the rectangle, the text and the fill in place. Microsoft warns that the names in the pane can be misleading, and suggests clicking each item's eye icon from the top down to hide layers until you find the right one.
If the thing you selected holds editable words rather than a picture, follow our steps to remove a text box in PowerPoint instead. Text boxes show up in the same Selection Pane, so it is a quick way to tell them apart.
Remove a logo or picture repeated on every slide
A picture that shows on several slides but will not select in the normal view is either each slide's fill or a picture on the slide master or one of its layouts. Check the fill first: select one of those slides and open Format Background. If Picture or texture fill is chosen, as it was on our picture-background slides, the picture is the fill. Choose Solid fill on each of those slides, or use Apply to All as described above.
If the fill is a plain color, look at the master. On our deck a click on the small master picture selected nothing at all, and no Picture Format tab appeared. Go to View > Slide Master and click the large thumbnail at the top of the left pane, the one numbered 1.
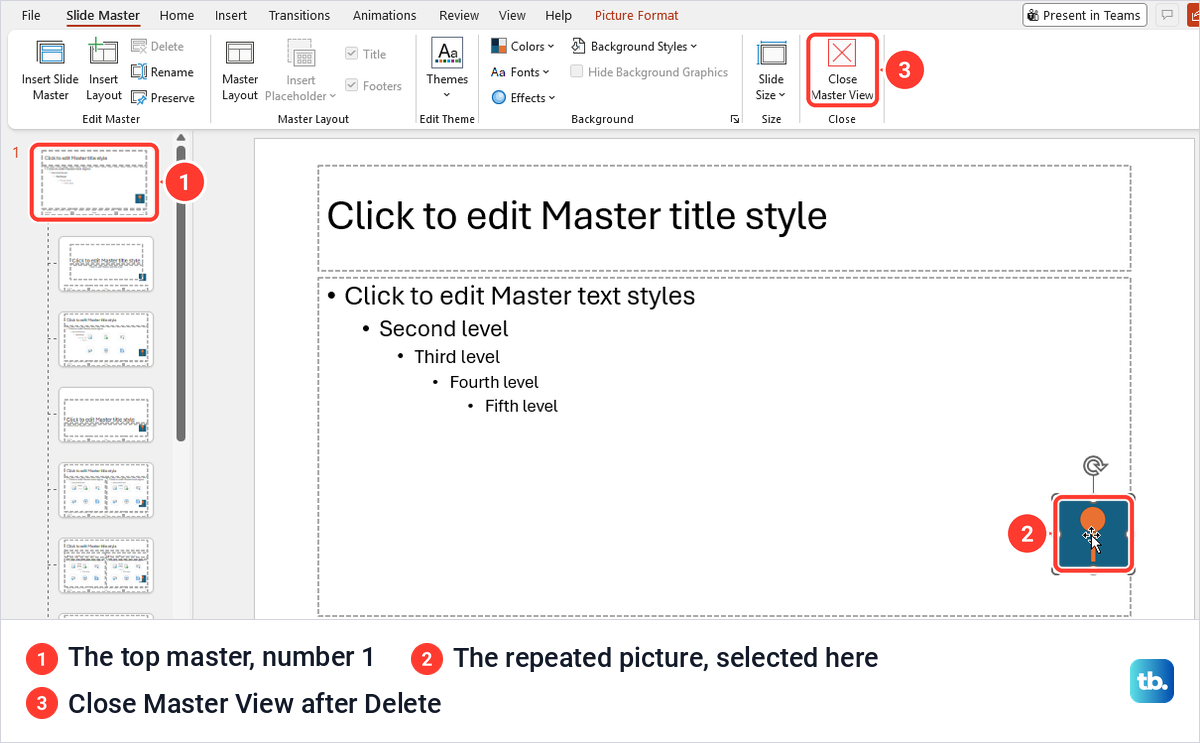
There the picture selects like any other, so click it, press Delete and click Close Master View. Back in the normal view, the small picture was gone from every slide in our deck.
If the picture is still there, it is probably on one of the layouts under the top master. Microsoft notes that something you cannot edit in the normal view may be defined on the slide master or a layout master, so click each layout thumbnail that shows the picture and delete it there. When the repeated image is a layout's background fill, Microsoft's steps use Background Styles > Format Background > Solid fill on the Slide Master tab.
If an older slide still shows the picture after you close Master View, Microsoft's advice is to reapply its layout in Normal view: select the slide and pick the same layout again from Home > Layout. Slide Master view is also where the footer placeholders for the date and slide number sit, and our separate guide shows how to add slide numbers in PowerPoint on every slide.
Remove a background in PowerPoint for the web
PowerPoint for the web can change a slide's background. In our web session, its Picture tab also had Remove Background, and if yours does not, use desktop PowerPoint. For a slide, select it, open Design > Background, point at Solid Fill and pick White, Background 1, the first theme color. In Microsoft Edge that made only the selected slide white, and the slide above it kept its picture background.
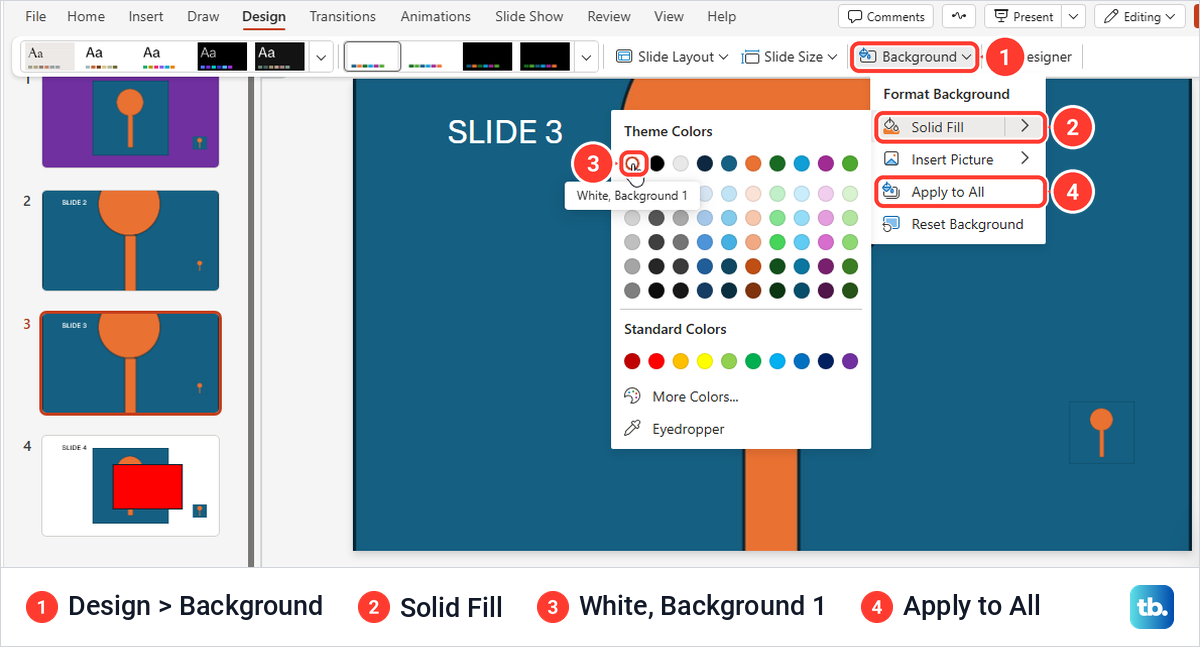
The same Background menu has Apply to All for every slide. To go back, Microsoft points to Home > Undo, and on our web deck that brought the previous fill straight back.
For a picture, select it and open the Picture tab. Ours had its own Remove Background button, with the tip Remove the background of this picture, next to Edit Picture, Enhance and Erase.
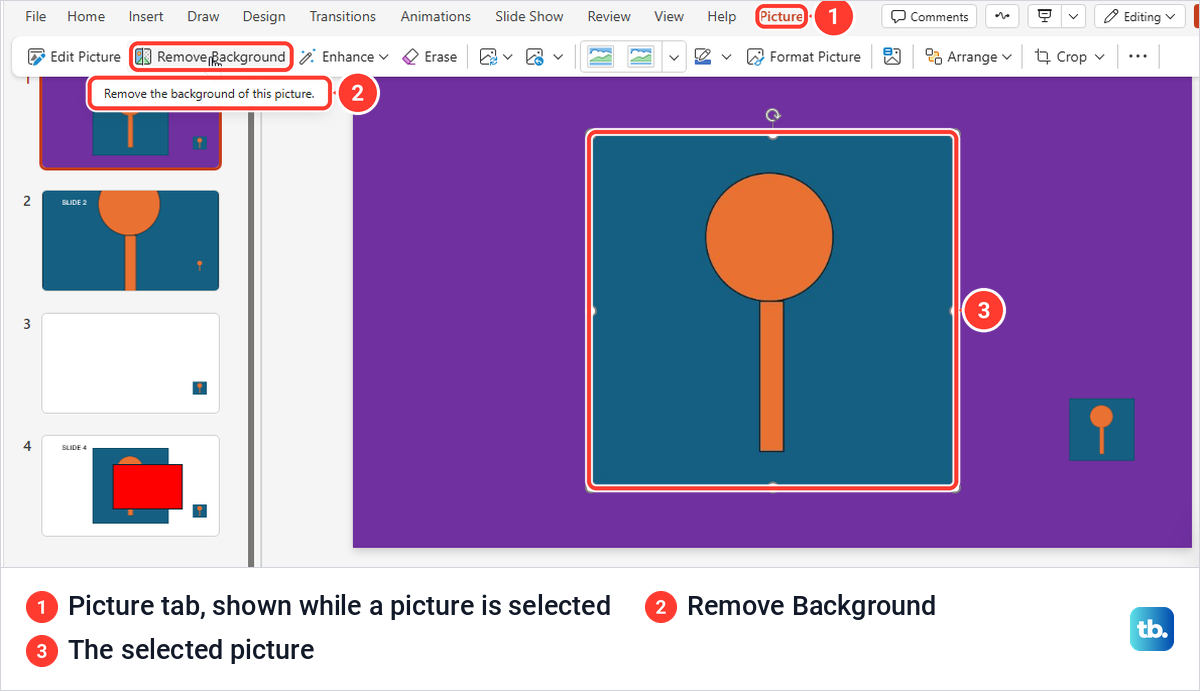
Clicking it opened an Edit Picture window. After a few seconds the blue area showed as a checkerboard, which means removed, with Brush, Keep, Remove and Color tools for corrections. Select Done, scroll down if Save is out of view, and select Save to put the cutout on the slide, where our purple fill showed around the lamp.
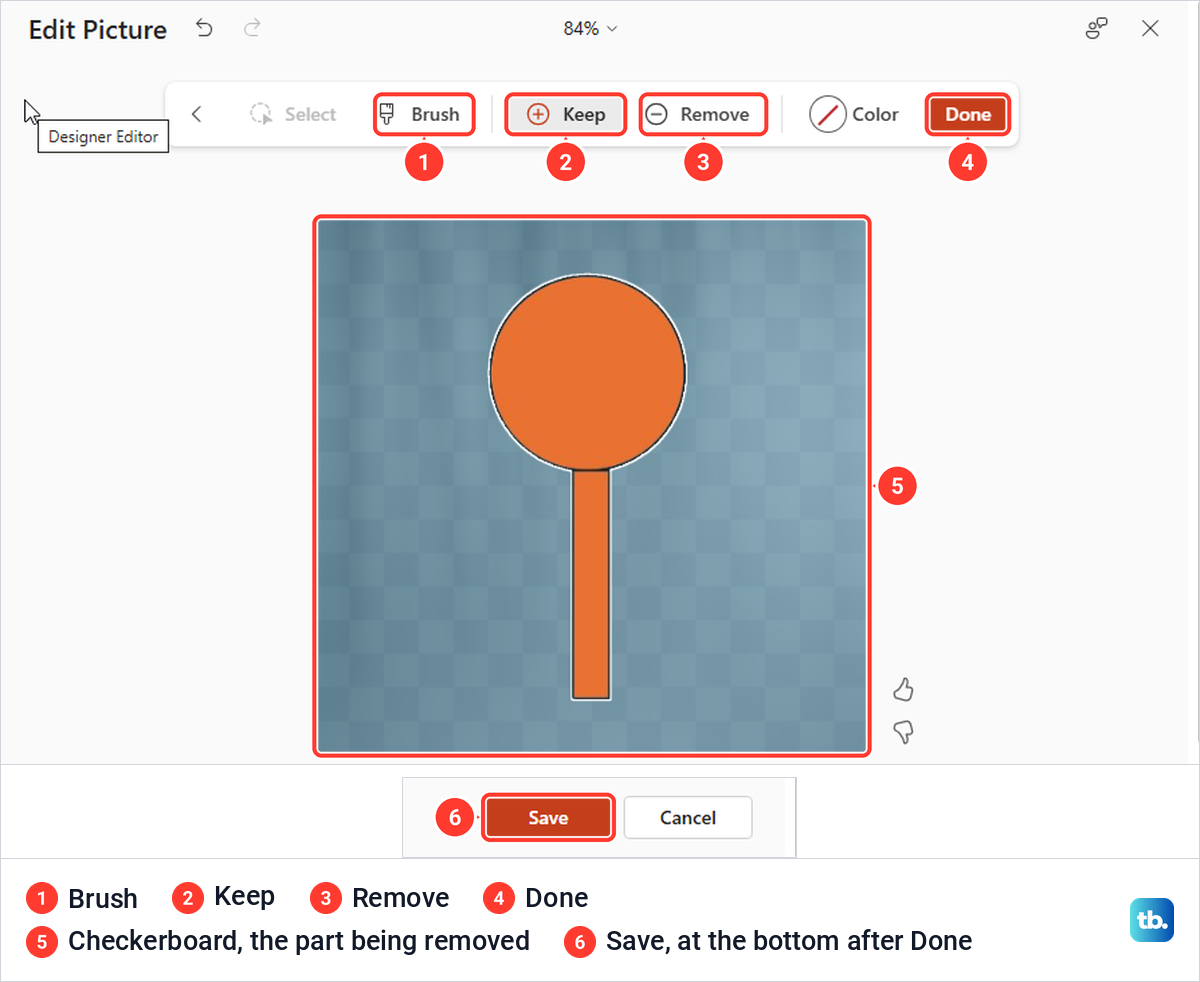
Look over the edges of the cutout before you select Save, and use Keep or Remove on any part that is wrong. Microsoft's slide background help page still says the web app cannot remove a picture's background, so do not worry if your Picture tab looks different from ours.
If your Picture tab has no Remove Background, open the file in the desktop app with Editing > Open in Desktop, the mode button at the top right. Edge then asked whether the site could open PowerPoint, with Open and Cancel buttons. Select Open to continue in desktop PowerPoint, then use the desktop steps above.
Why Remove Background is missing
Remove Background lives on the Picture Format tab, and that tab only exists while a picture is selected. With nothing selected our ribbon had no Picture Format tab at all, and it came back as soon as we clicked the picture. Click the picture once, or double-click it as Microsoft suggests.
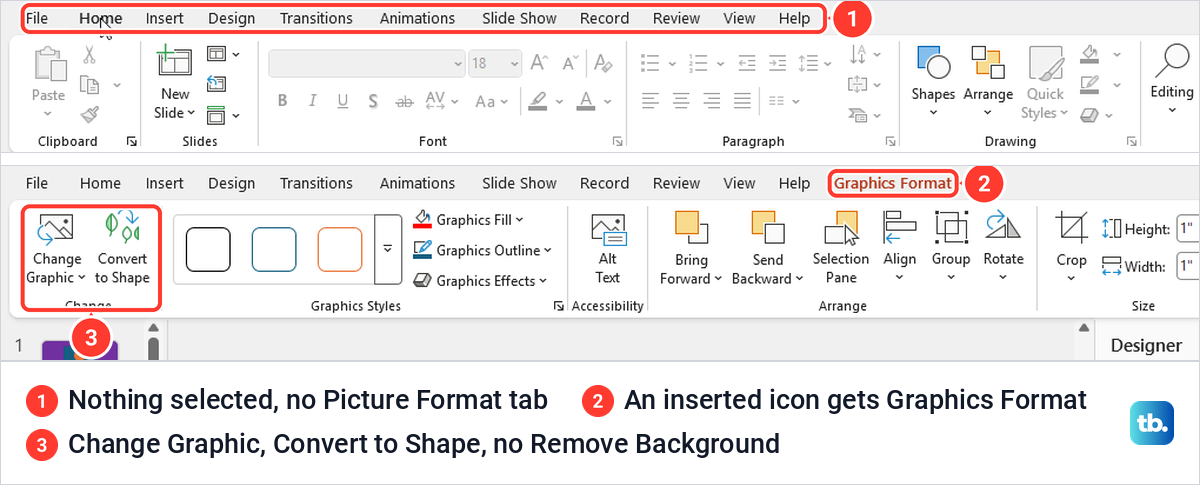
The other common cause is that the object is not a picture. An icon from Insert > Icons is a vector graphic, saved in the file as an SVG, and selecting ours opened a Graphics Format tab with no Remove Background button anywhere. Microsoft's page says the option is grayed out for vector files such as SVG, AI, WMF and DRW, while on our PC it was absent.
A slide fill has no Remove Background either, because it is not a picture, so use the slide sections above. A picture on the slide master cannot be selected in the normal view, so work with it in View > Slide Master instead. Do not mistake Transparency on the Picture Format tab for the same tool. Microsoft describes its slider as changing the opacity of the picture, so it fades the whole image rather than cutting out the background.
Remove a background in PowerPoint for Mac
Microsoft's steps for PowerPoint for Mac match Windows for pictures. Select the picture, choose Picture Format > Remove Background, use Mark Areas to Keep and Mark Areas to Remove on the magenta preview, then choose Keep Changes or Discard All Changes. To keep the result as a file, right-click it and select Save as Picture.
For a background graphic or watermark that repeats on slides, Microsoft's Mac route starts from the View menu with Master > Slide Master. Click each slide layout that shows the watermark, then on the Slide Master tab choose Background Styles > Format Background, select Solid Fill and pick white or any other color. Click Apply to All if every slide should change.
Whichever app you used, save the deck once it is clean. From there you can convert a PowerPoint file to Google Slides for people who work there, or make a PDF from the finished presentation for a copy to share without slide editing.
How we tested this guide
We tested this in PowerPoint for Microsoft 365 on Windows 11, version 25H2, and PowerPoint for the web in Microsoft Edge, removing picture and slide backgrounds in a sample deck.
Frequently Asked Questions
How do I remove only the background behind a person or object?
Select the picture and choose Picture Format > Remove Background. Magenta shows what will be removed, so correct it with Mark Areas to Keep or Mark Areas to Remove, then click Keep Changes.
Why is Remove Background grayed out or missing in PowerPoint?
Usually no picture is selected, or the object is a vector graphic such as an icon or an SVG file. Microsoft says the option is grayed out for vector files, and on our PC an inserted icon showed a Graphics Format tab with no Remove Background at all.
How do I remove the background from all slides at once?
Set a white Solid fill in the Format Background pane and click Apply to All. It replaces every slide's fill, including slides with their own color, and Ctrl + Z undid it in one press on our deck.
Why can't I select the picture on my slide?
Usually it is the slide's fill, a picture covered by another object, or a picture on the slide master or one of its layouts. Use Format Background for a fill, the Selection Pane for a covered picture and View > Slide Master for a picture that repeats.
Can PowerPoint for the web remove an image background?
In our web session, yes. Select the picture, choose Picture > Remove Background, adjust it in the Edit Picture window, then select Done and Save, and if your Picture tab has no such button, open the file in the desktop app.
How do I keep the cutout transparent outside PowerPoint?
Right-click the edited picture, choose Save as Picture and keep Portable Network Graphics as the type. The PNG we saved stayed transparent when we inserted it on another slide.