

To curve text in PowerPoint, choose Insert > WordArt and type your words, or select a text box or slide title already on the slide, then choose Shape Format > Text Effects > Transform and pick Arch under Follow Path. For text around a circle, choose Circle in the same gallery and drag a corner handle to size the ring. A short title fills only part of the ring, and longer text fills more of it.
We made arches and circles this way in desktop PowerPoint and then opened the same presentation in PowerPoint for the web. In our deck, a new circle came out small until we resized its box, and saving a copy as OpenDocument (.odp) straightened every curve, so keep a .pptx copy.
The short version
- New curved title: Insert > WordArt, type your words, then Shape Format > Text Effects > Transform > Arch.
- Text already on the slide: select the text box or title and use the same Transform menu.
- Text around a circle: choose Circle, then drag a corner handle until the box is roughly square. A short title fills only part of the ring.
- Straight again: Text Effects > Transform > No Transform keeps the words and the box.
- In a browser: PowerPoint for the web shows a curve made on the desktop, and Editing > Open in Desktop is the way to add one.
Ways to curve text in PowerPoint at a glance
Every route below ends in the same Transform gallery. What changes is the object you start from, so pick the row that matches what is on your slide.
| What you have | Choose | What it changes |
|---|---|---|
| A new decorative title | Insert > WordArt, then Shape Format > Text Effects > Transform > Arch | The new WordArt follows an upward arc |
| An existing text box | Select the box, then Text Effects > Transform > Arch: Down | Its words sag into a bowl shape, the opposite of Arch, inside the same box |
| A slide title | Select the title placeholder, then Text Effects > Transform > Arch | The title bends without adding another object |
| A circular label or badge | Text Effects > Transform > Follow Path > Circle | The words follow a circle that grows and shrinks with the box |
| Curved text you want straight | Text Effects > Transform > No Transform | The words stay, and only the curve is removed |
Curve text with WordArt
WordArt is the quickest start when the slide does not have the words yet. Open the Insert tab and select WordArt in the Text group. On our screen the button was shown with its name, and Microsoft notes that the icon can look different depending on your version and the size of your screen. A gallery of 20 styles opens.
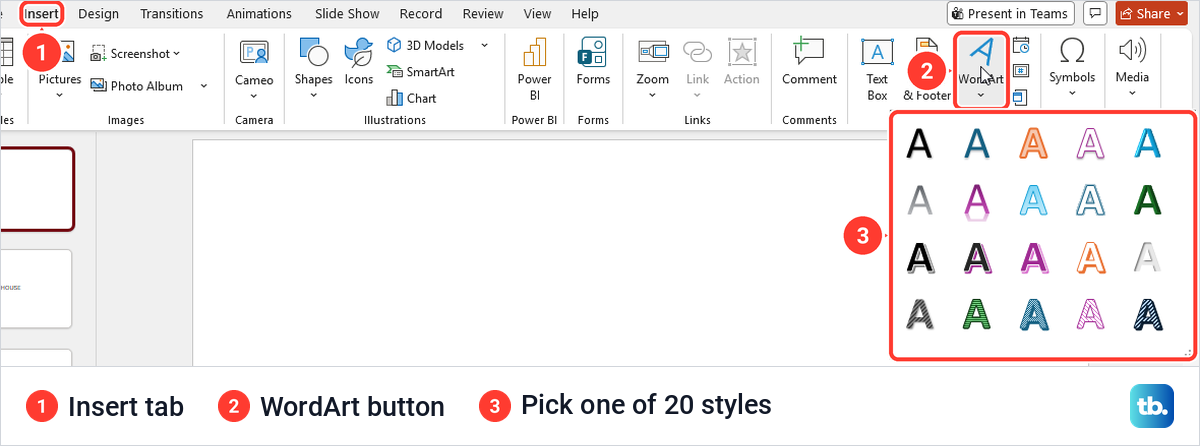
Click a style, and a WordArt box appears on the slide. Type your words over the placeholder text. Our sample title was AUTUMN FESTIVAL, and the box came out wide and short, which matters later if you want a circle.
Now click the WordArt's border so the whole object is selected. The Shape Format tab appears at the end of the ribbon, the same tab our guide to making your first PowerPoint presentation shows for a drawn shape. In its WordArt Styles group, Text Effects is the third small button down, a blue outlined A, and on our screen it showed as an icon without a label.
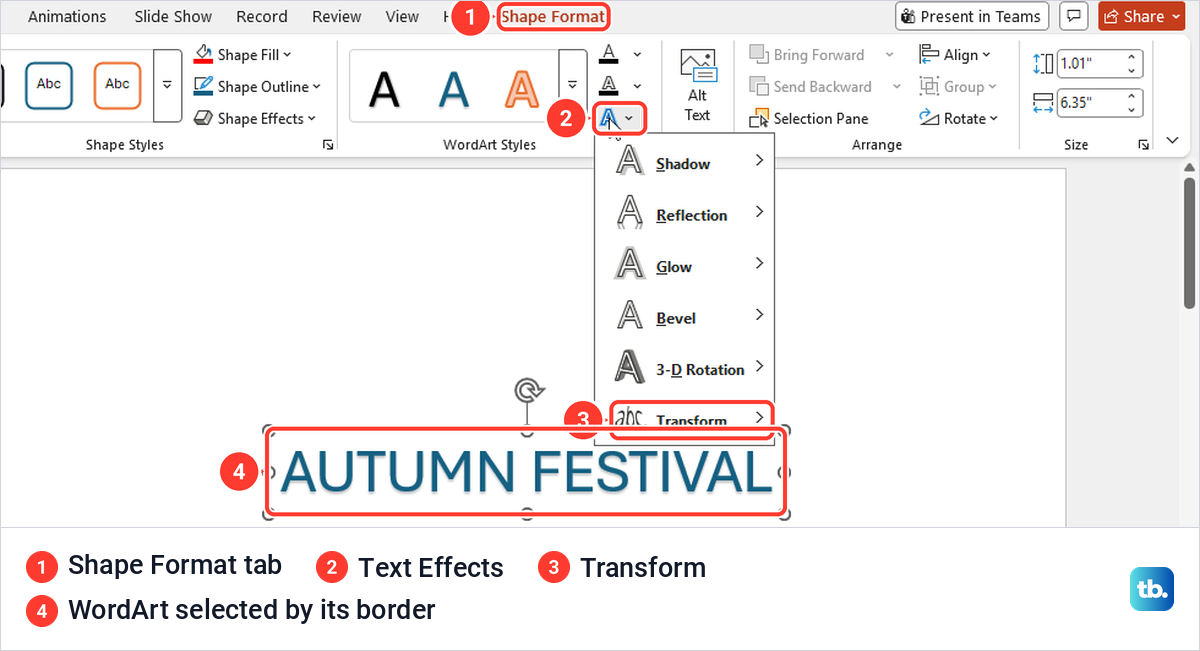
Text Effects opens a short menu: Shadow, Reflection, Glow, Bevel, 3-D Rotation and Transform. Point to Transform to open the gallery that does the curving.
Make an upward or downward arch
The Transform gallery has three parts. No Transform sits at the top, Follow Path holds four presets that set the line your letters sit on, and Warp fills the rest with presets that change the shape of the letters themselves.
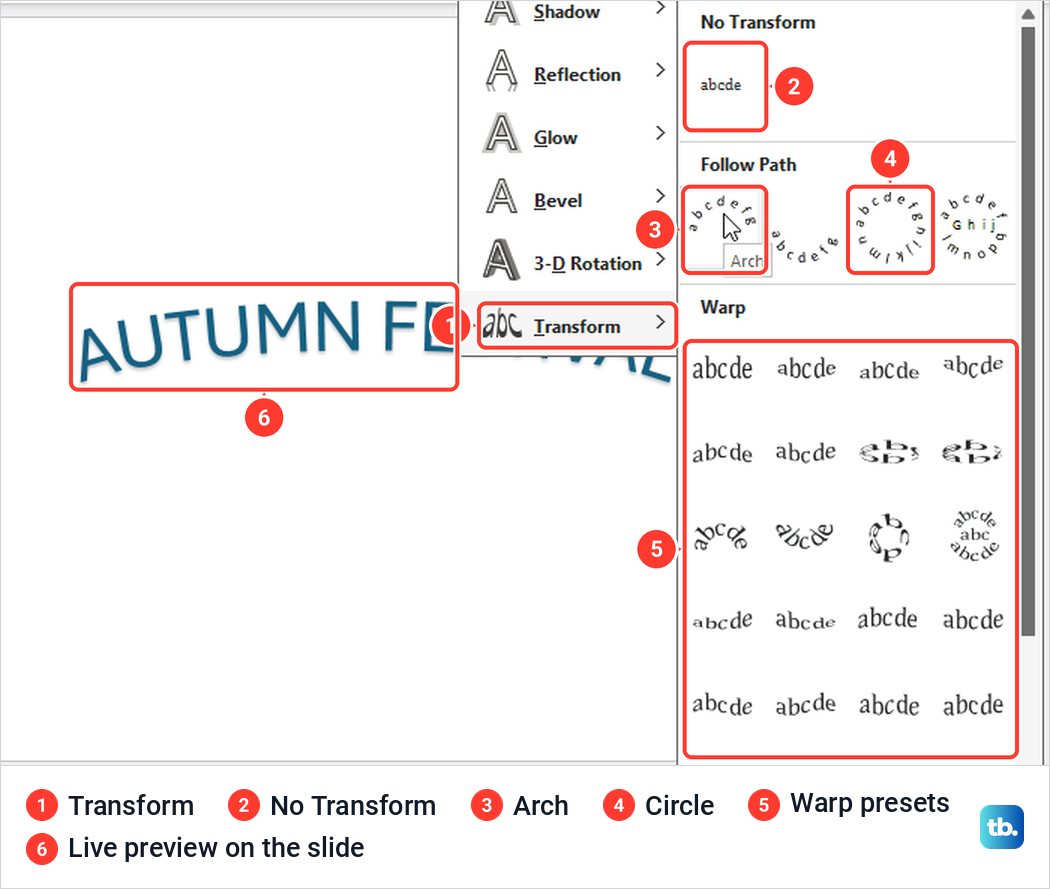
For a curved heading you want Follow Path. When we pointed at the first preset, its name appeared as Arch, and the WordArt on the slide bent upward as a live preview before we clicked anything. The second preset is Arch: Down, which curves the words the other way, and the third is Circle. Both previewed on the slide the same way when we pointed at them.
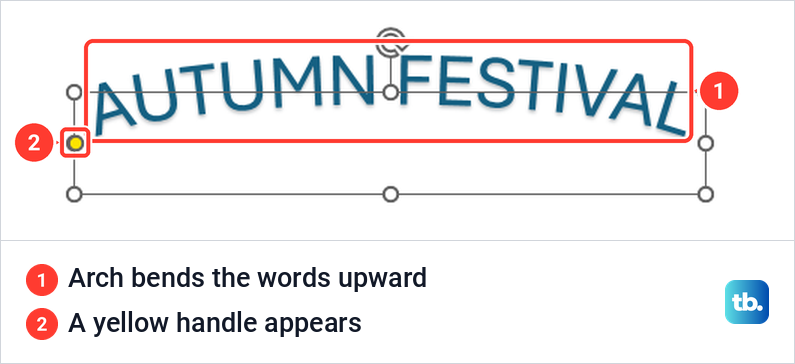
Click Arch and the effect is applied. Our title bent into an upward arc across the top of its box, and a small yellow handle appeared on the left edge of the selection. Click an empty part of the slide to see the result without the box around it.
Put text around a circle in PowerPoint
Select the WordArt, open Text Effects > Transform and choose Circle under Follow Path. This is the preset Microsoft points to for text that runs around a circle, and it uses the WordArt box itself as the outline, so you do not need to draw a circle shape first.
The first result is easy to mistake for a fault. Our WordArt box was about 1 inch tall and 6.35 inches wide, and Circle turned it into a small ring squeezed against the right end of that wide box. The fix is to resize the box with its sizing handles.
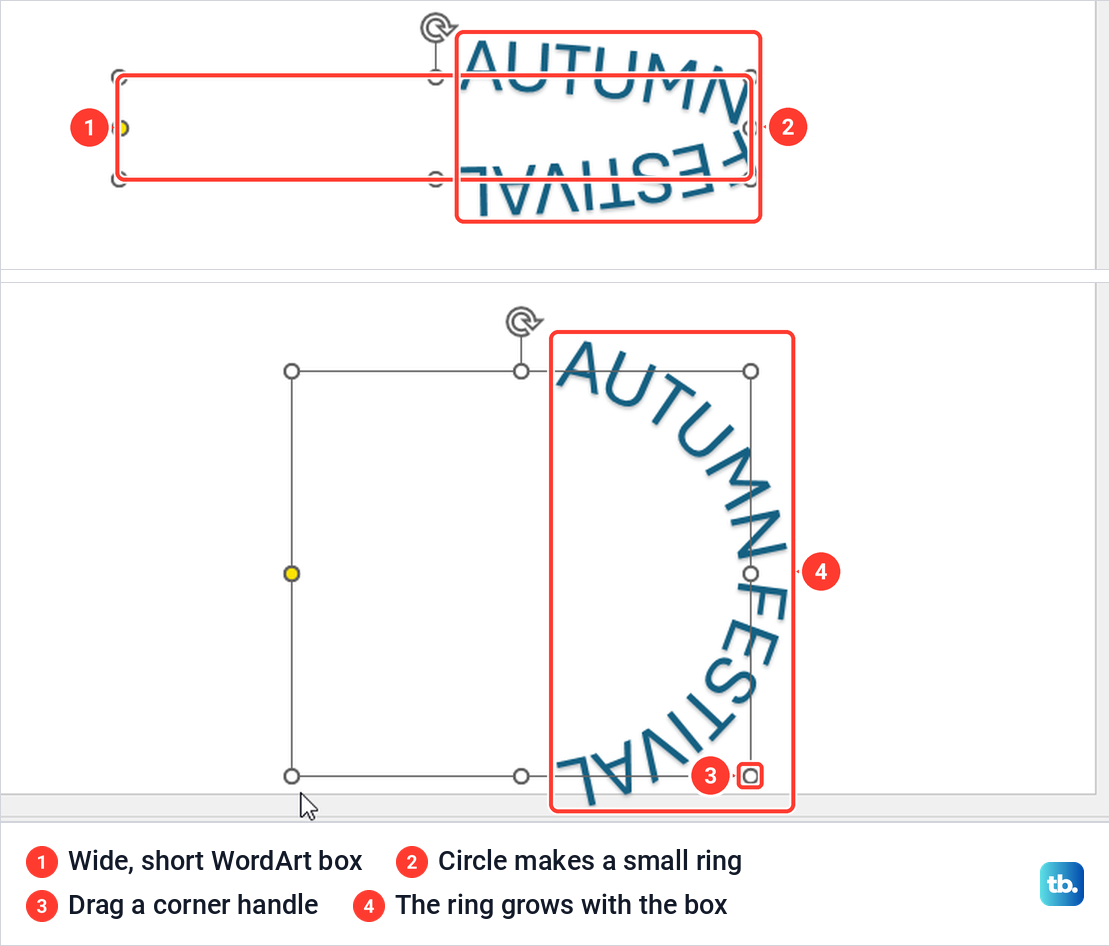
Drag a corner handle outward until the box is roughly as tall as it is wide. We dragged ours to 4.07 inches tall and 4.61 inches wide, as the Size group at the right end of the ribbon showed, and the ring grew with it. Microsoft's own instruction is the same: drag any sizing handle until the WordArt is the size and shape you want.
Text length is the other half. Two words at 54 points filled only about half of our circle, leaving the left side empty. A longer line, WELCOME TO THE AUTUMN COMMUNITY FESTIVAL, covered about three quarters of it, and when we dragged a corner handle outward, the circle and the letters grew together.
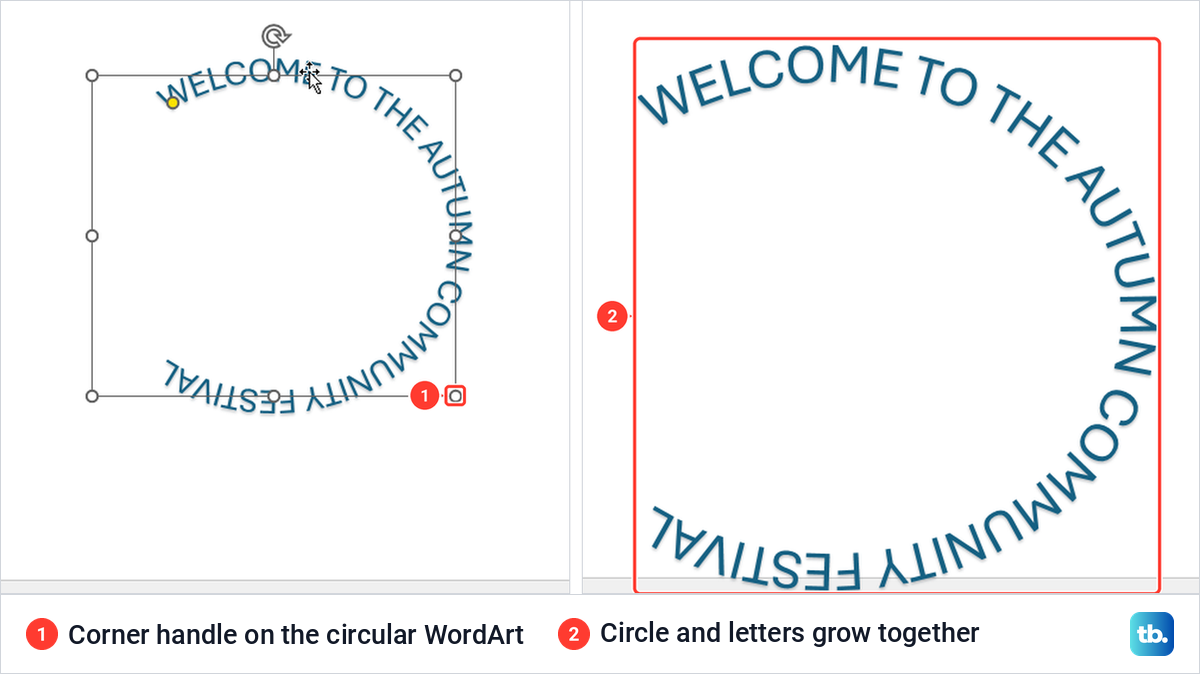
So if your ring looks lopsided, check two things: the box proportions and the number of words. For text around a square or another shape with straight sides, Microsoft's advice is to insert a separate WordArt object for each edge rather than trying to bend one line around the corners.
If the text should sit around a circle shape, logo or photo that is already on the slide, drag the WordArt over it and resize it until the ring matches. Microsoft suggests grouping WordArt objects so they move and copy as a single shape, and using the Rotate tool for precise control of the text's angle in relation to the shape.
For separate words along the top and bottom of a badge, use two WordArt objects. Arch gives the top line its upward curve, and Arch: Down gives the bottom line a bowl shape.
Curve text already in a text box
You can curve words that are already on the slide without retyping them as WordArt. Microsoft says Text Effects works with a regular text box as well as WordArt, and that matched what we saw.
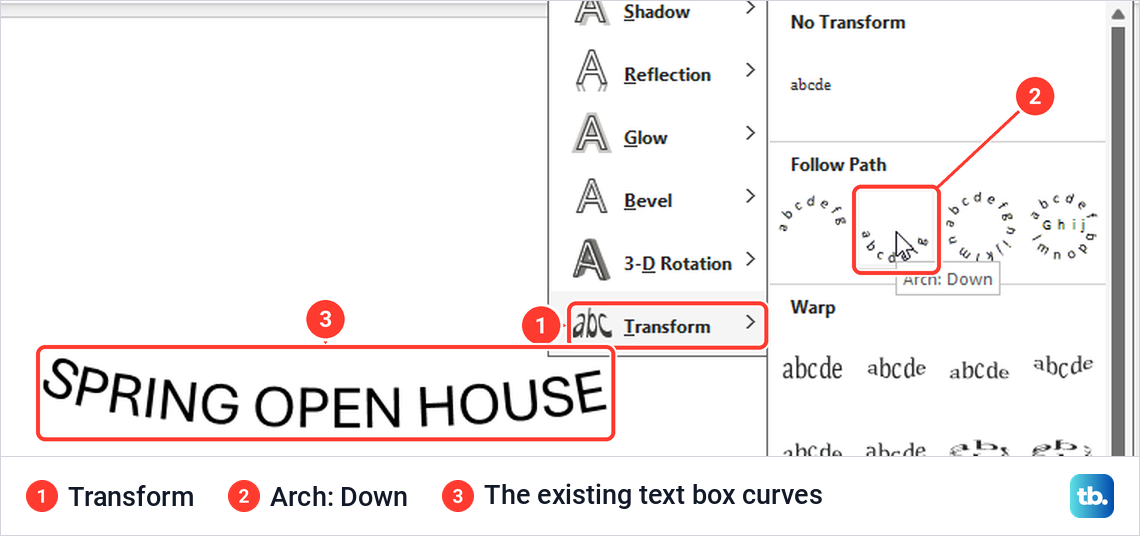
Click the border of the text box so the whole box is selected, open Shape Format > Text Effects > Transform and choose a preset. We picked Arch: Down on a plain text box that read SPRING OPEN HOUSE, and its existing words sagged into a bowl shape in place, the opposite of Arch. No WordArt was created, and the box kept its words and its size.
If what you really want is to lift one character, such as the 2 in a formula or a footnote mark, curving the whole line is the wrong tool. In that case, make text superscript in PowerPoint instead.
Curve a slide title
The title placeholder at the top of a slide also offers Text Effects > Transform. Select the title by its border, open the Transform gallery and choose Arch, and the title bends without you adding another object.
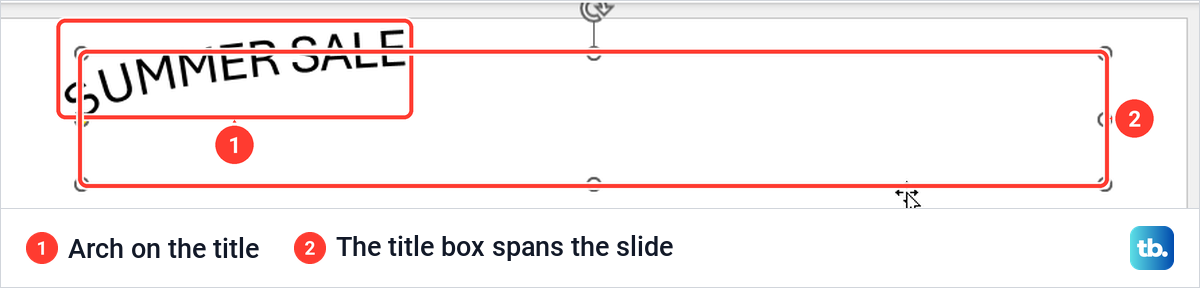
One thing caught us out. Our title, SUMMER SALE, was left-aligned in a placeholder that spans most of the slide, and the curve appeared only at the left end of that wide box rather than across the middle. If you want the arc across the whole title, curve a WordArt title instead, as in the first section: its box fits the words, and our arch ran across all of them.
A curved title suits a cover or section slide better than a content slide, where readers scan straight headings. Slide numbers live in their own footer box, so to add slide numbers in PowerPoint you go through Insert > Header & Footer, not the title.
Change or remove the curve
To switch to a different curve, select the text, open the Transform gallery again and click another preset. The new one replaces the old one. The gallery did not highlight the preset already in use on our screen, so judge by the slide rather than the menu.
To make the text straight again, choose Text Effects > Transform > No Transform, the first thumbnail, whose tooltip reads None. Microsoft describes this as the way to delete a path or warp from text, and when we chose it, the same words returned to a straight line in the same box.
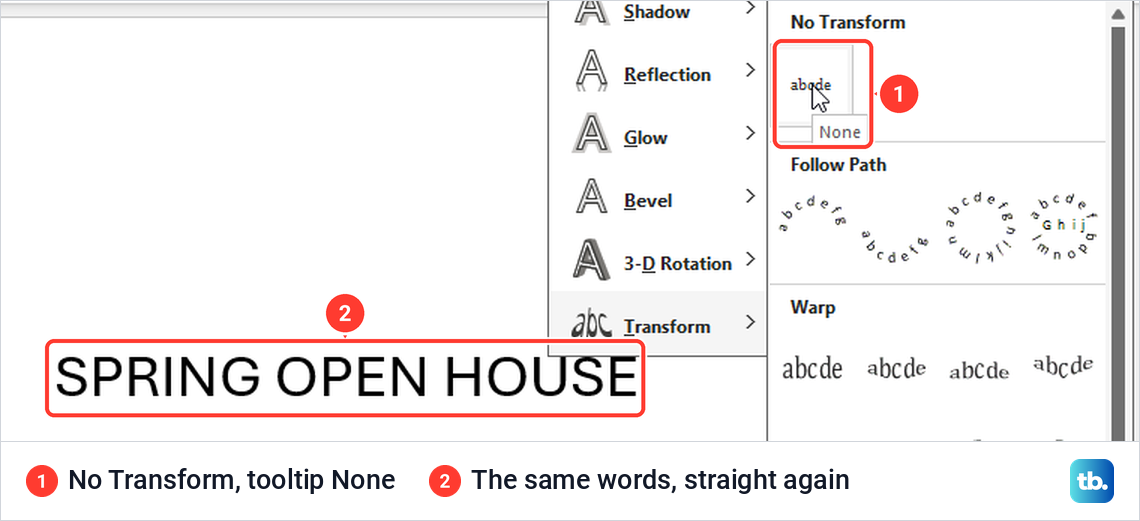
Some guides describe No Transform as a way to leave the menu without curving anything, but it does more than that: it removes a curve that is already there. If you want the words gone too, not just the curve, remove a text box in PowerPoint instead.
When Transform is missing from the menu
Two things hide it. First, the Shape Format tab only exists while a shape or text object is selected. With nothing selected our ribbon had no Shape Format tab at all, and clicking the WordArt brought it straight back.
Second, there are two effects menus on that tab. Shape Effects, in the Shape Styles group, lists Preset, Shadow, Reflection, Glow, Soft Edges, Bevel and 3-D Rotation, with no Transform. Text Effects, in the WordArt Styles group, is the one that ends in Transform.
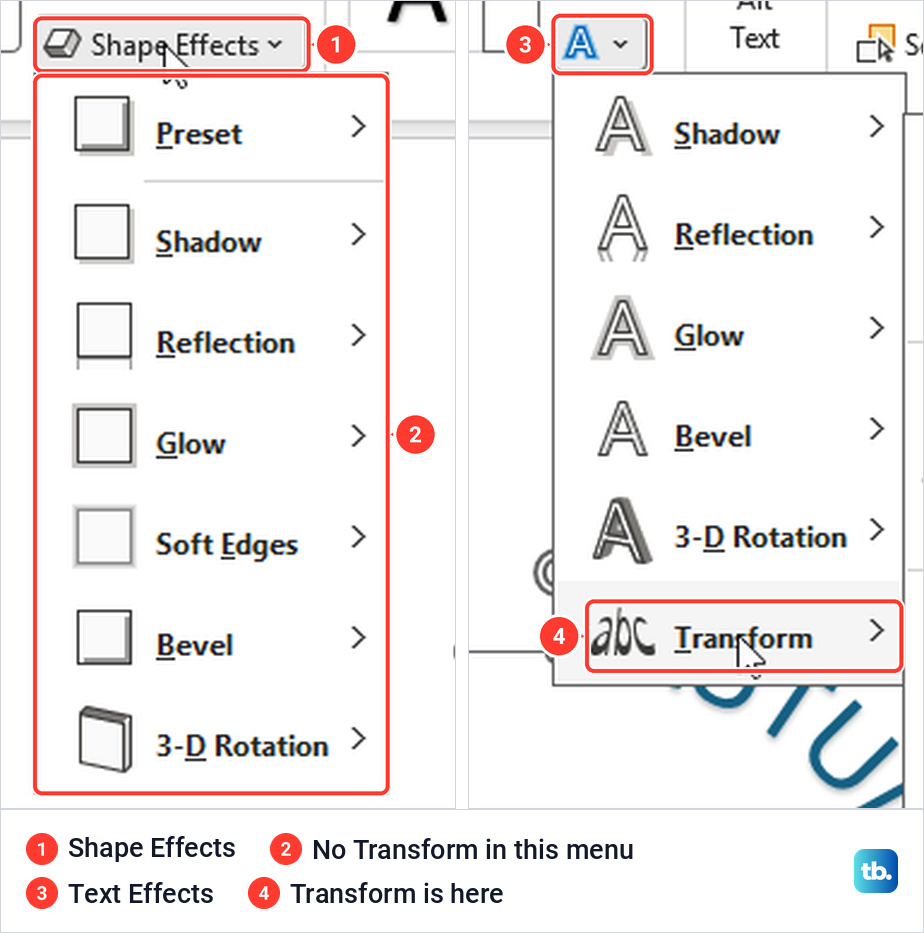
Microsoft's own fix for a missing Transform is the same: make sure you opened Text Effects. In the Text Effects menus we opened, Transform was the last item, below 3-D Rotation.
Bring back curved text that disappeared
If your WordArt suddenly shows only an empty selection box, check its fill. Next to Text Effects, the Text Fill button has a menu with No Fill. When we chose it on WordArt without an outline, the letters vanished and only the box with its handles was left.
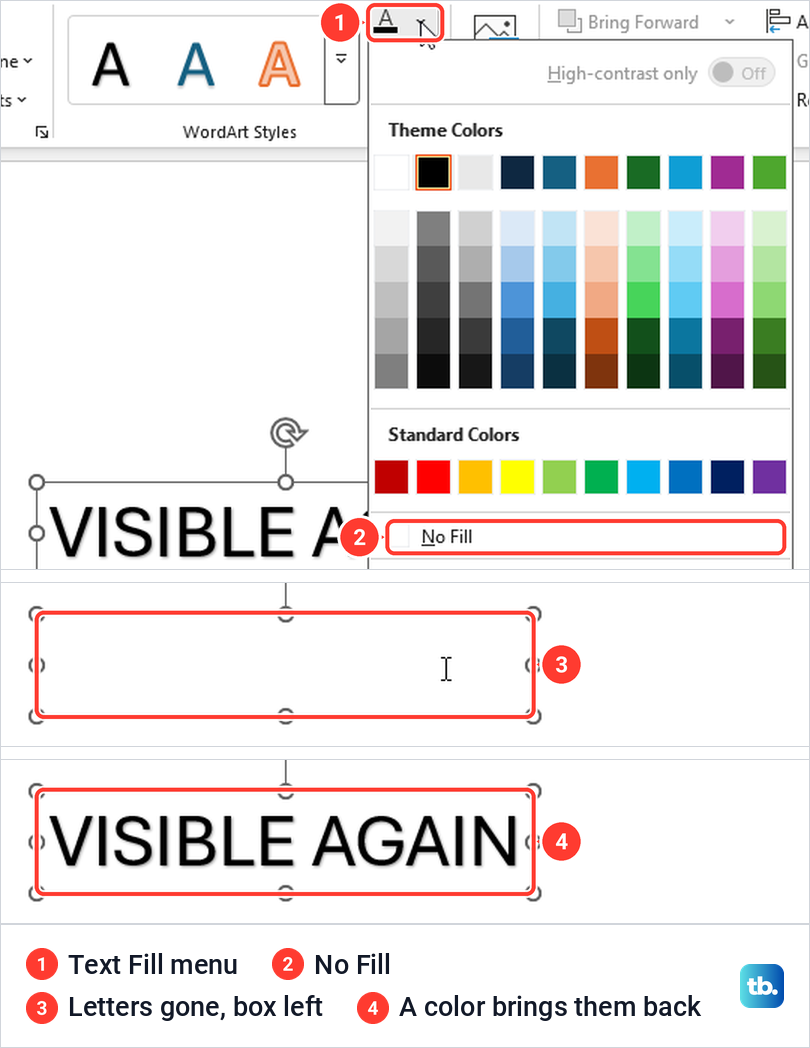
Microsoft warns about exactly this: with No Fill, the text is not visible unless you added an outline first. To get the letters back, select the box, open Text Fill again and pick any color. Ours came back at once.
No Fill on text is not the same as making part of a picture transparent. To remove a picture background in PowerPoint, you need the separate picture tool on the Picture Format tab.
Curved text in PowerPoint for the web
PowerPoint for the web can show curved text, but it cannot make it. When we opened our presentation in Microsoft Edge, the circular WordArt from the desktop app looked exactly as it did there.
Clicking into that WordArt to edit its words is where it gets confusing. While the cursor was inside it, the text lay flat in a straight line, as if the curve were gone. As soon as we clicked an empty part of the slide, the circle came back, so the effect is not lost when you edit there.
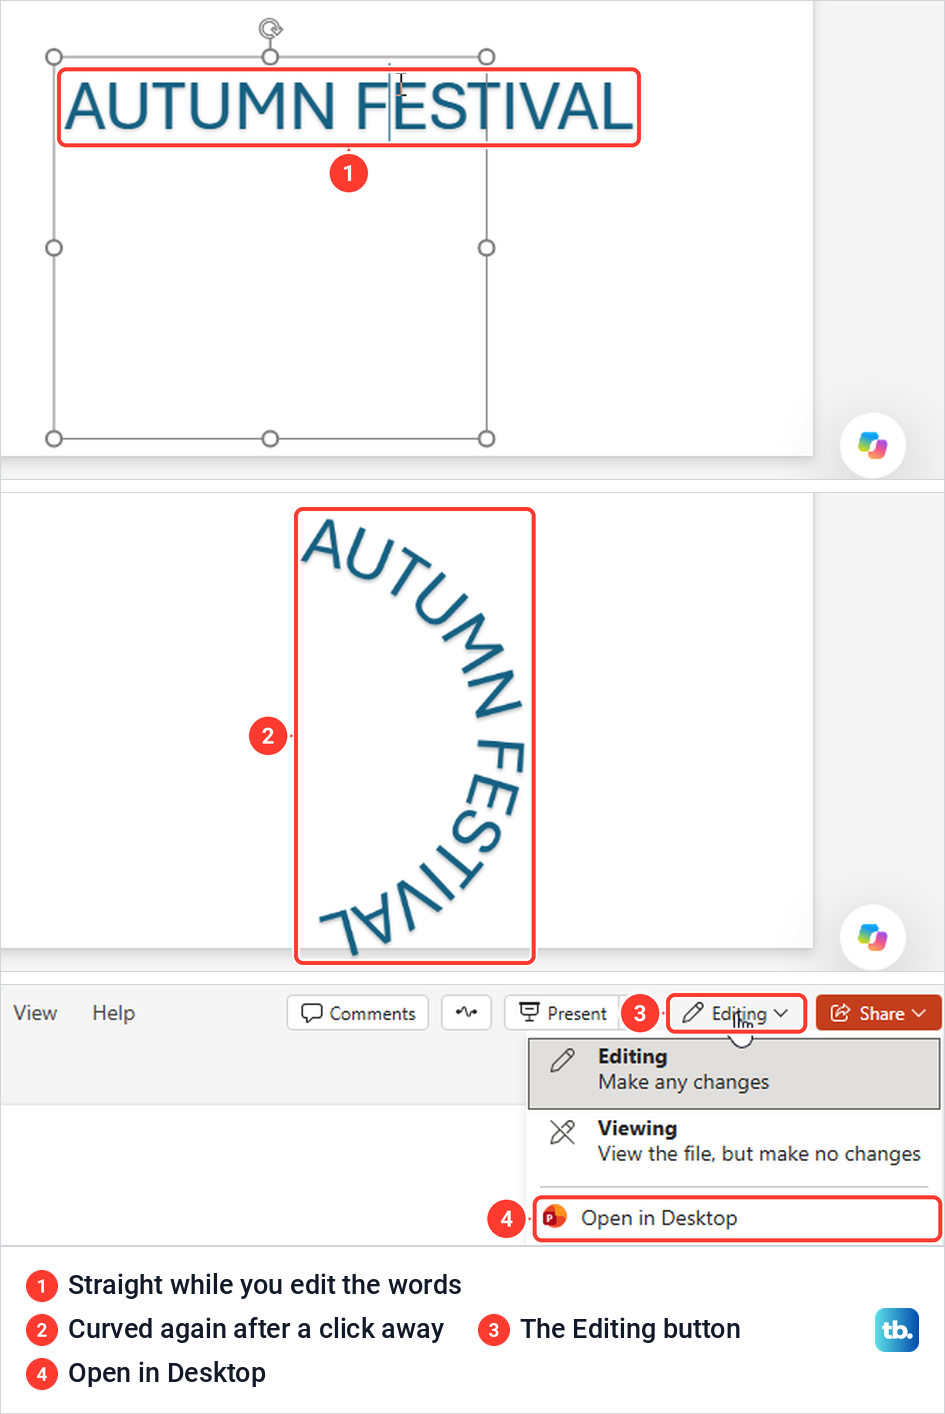
To add a new curve you need the desktop app. The Insert tab in the browser had no WordArt button, and its overflow menu offered only Link and Symbol. The Shape tab that appeared for the selected WordArt had no Text Effects or Transform either, which matches Microsoft's note that WordArt is not available in PowerPoint for the web.
The way across is the mode button near the top right, labeled Editing. Its menu holds Editing, Viewing and Open in Desktop. Microsoft's help page calls the command Edit in PowerPoint and points to it for WordArt effects, but Open in Desktop is the label the browser showed us.
Curve text in PowerPoint for Mac
Microsoft lists PowerPoint for Microsoft 365 for Mac on its curved text instructions, and the route is the same. Select Insert > WordArt, pick a style and type over the placeholder text, then select the WordArt and choose Shape Format > Text Effects > Transform.
For a ring, Microsoft's steps are to select Circle under Follow Path and drag any sizing handle until the WordArt is the size and shape you want. Its advice for shapes with straight edges, one WordArt object per side, is the same on a Mac.
Keep the curve when you save or share
The normal PowerPoint format keeps the effect. We saved our presentation as a .pptx, closed PowerPoint and reopened the file, and the circle was still in place.
OpenDocument is a different story. When we saved a copy as an OpenDocument Presentation, PowerPoint warned that the file may contain features that are not compatible with the format, without naming WordArt. After we reopened the .odp copy, every curve in the deck was straight, both circles and the arched title included.
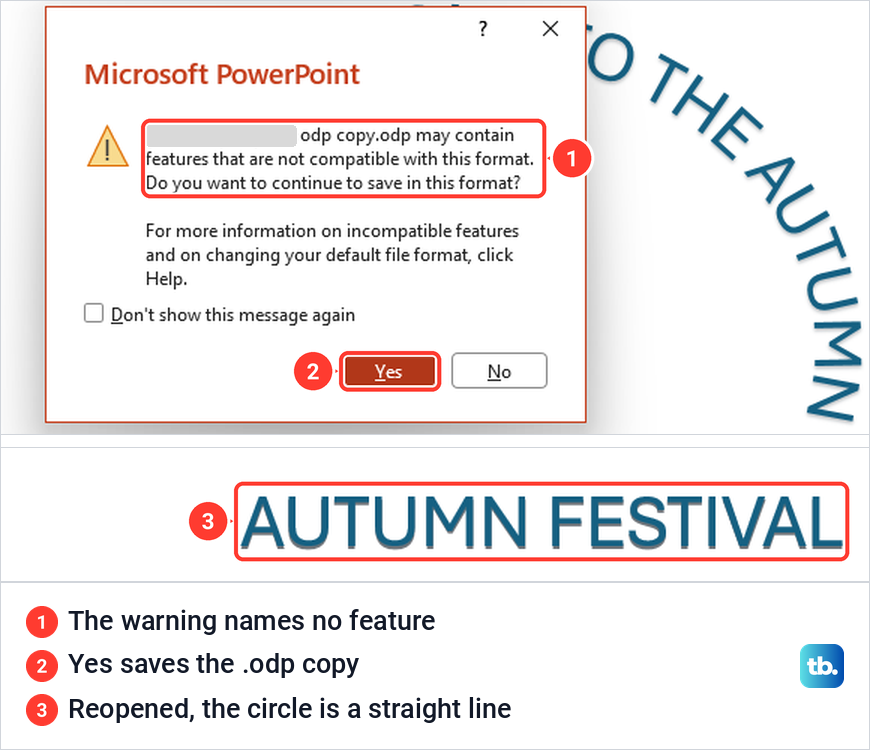
That matches Microsoft's description of the format: WordArt is converted to a text box on save, the text and its base color are kept, and WordArt effects and formatting are lost. Keep a .pptx copy as your working file if you need the curve later. If the deck is moving to another app, for example when you convert PowerPoint to Google Slides, open the copy and check each curved title before you share it.
If the person you are sending it to only needs to see the finished slide, save a PowerPoint presentation as PDF. Microsoft says a PDF freezes the formatting and layout, so people can view the slides without PowerPoint but cannot change them.
How we tested this guide
We tested this in PowerPoint for Microsoft 365 on Windows 11, version 25H2, curving WordArt, a text box and a slide title into arches and a circle.
Frequently Asked Questions
Can I curve text that is already on a PowerPoint slide?
Yes. Select the text box or the slide title by its border, then choose Shape Format > Text Effects > Transform and pick a preset. The words curve in place, and you do not need to convert them to WordArt first.
How do I curve text around a circle in PowerPoint?
Choose Circle under Follow Path in the Transform gallery, then drag a corner handle until the box is roughly square. In our deck two words covered about half the ring and a longer line about three quarters, so longer text fills more of it.
Where is Transform in PowerPoint?
Select the text object first, so the Shape Format tab appears. Transform is the last item in Text Effects, in the WordArt Styles group, and it is not in Shape Effects.
How do I remove the curve without deleting my words?
Select the text and choose Text Effects > Transform > No Transform. The words go back to a straight line and stay in the same box.
Can I curve text in PowerPoint for the web?
The browser version shows curved text made on the desktop, but it has no WordArt or Transform controls to make a new curve. Select Editing > Open in Desktop and add the effect in the desktop app.
Why did my curved text turn straight?
In PowerPoint for the web, curved WordArt looks straight while you edit its words and curves again when you click away. If the file was saved as an OpenDocument Presentation, the saved .odp copy loses the curve, so reopen your .pptx copy instead.
Can I curve text around a square or another shape?
For a shape with straight edges, such as a square, Microsoft's advice is to insert one WordArt object for each side and line them up along the edges. For a round shape, start with Circle under Follow Path and resize the WordArt to fit the shape, and remember that longer text covers more of the ring.