


192.168.0.1 is supposed to open your router settings, but it fails when your device is on the wrong network or the router uses a different gateway. Start with the browser address bar, confirm the real router address, then sign in with the correct admin password. Here is the clean path that matches current router-maker guidance.
Connect to the router's Wi-Fi or plug into one of its LAN ports, then type http://192.168.0.1 into the browser's address bar and press Enter. If no sign-in page appears, look up the router's real address in your device's network details and type that instead. If the page opens but refuses your password, check that you are using the router's admin password, which is not the Wi-Fi password.
The short version
- Get on its network: join the router's Wi-Fi or plug a cable into one of its LAN ports. The page does not need working internet.
- Use the address bar: type http://192.168.0.1 and press Enter, with zeros, not the letter O.
- No page: on Windows 11, press Windows + X, choose Terminal, type ipconfig and use the Default Gateway address.
- Password refused: check the user name and use the router's admin password, not the Wi-Fi password.
- Locked out: try the maker's password recovery first. A factory reset erases every setting.
Open 192.168.0.1 from the router's own network
The settings page lives inside the router, so it only answers devices that are connected to it. Join the router's Wi-Fi, or connect a computer to one of its LAN ports with an Ethernet cable. The page does not need a working internet connection, so it still opens when the internet is down.
A phone that is using mobile data is not on the router's network, and an active VPN or proxy can stop the browser from reaching a local address. Switch the phone to the router's Wi-Fi and turn the VPN or proxy off before you try. When you plan to change the wireless settings or update the firmware, a cable is the safer choice.
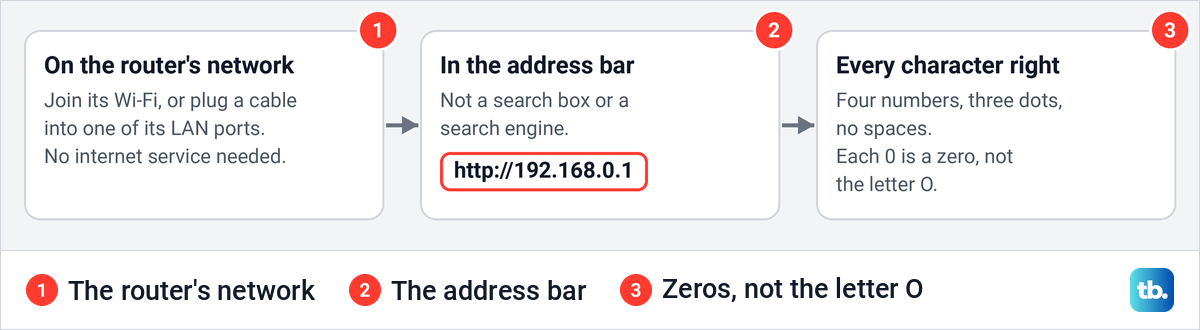
Open your browser and click the address bar at the top of the window, not a search box on a web page. Type http://192.168.0.1 and press Enter. Typed into a search engine, the address only brings back a list of web results.
Check the address as you type it. It has four numbers and three dots, so 192.168.01 is missing one; each 0 is a zero and not the letter O, and there are no spaces. Older browsers can also fail on router sign-in pages, so if Chrome is your browser, check Chrome for updates first.
Check whether 192.168.0.1 is your router's address
192.168.0.1 is only a default, and only some makers and models use it. Others start at 192.168.1.1 or another address, and whoever set up the network may have changed it. Your phone or computer already knows the main router's address, because it is the gateway its connection uses. A range extender or access point has an address of its own, so check its label or its maker's instructions for that one.
So when the page does not load, do not work through a list of guessed addresses. Read the gateway in your device's network details, then type exactly that address. If it is 192.168.0.1 and the page still will not open, the address is right and the problem lies elsewhere, so go to the fixes further down.
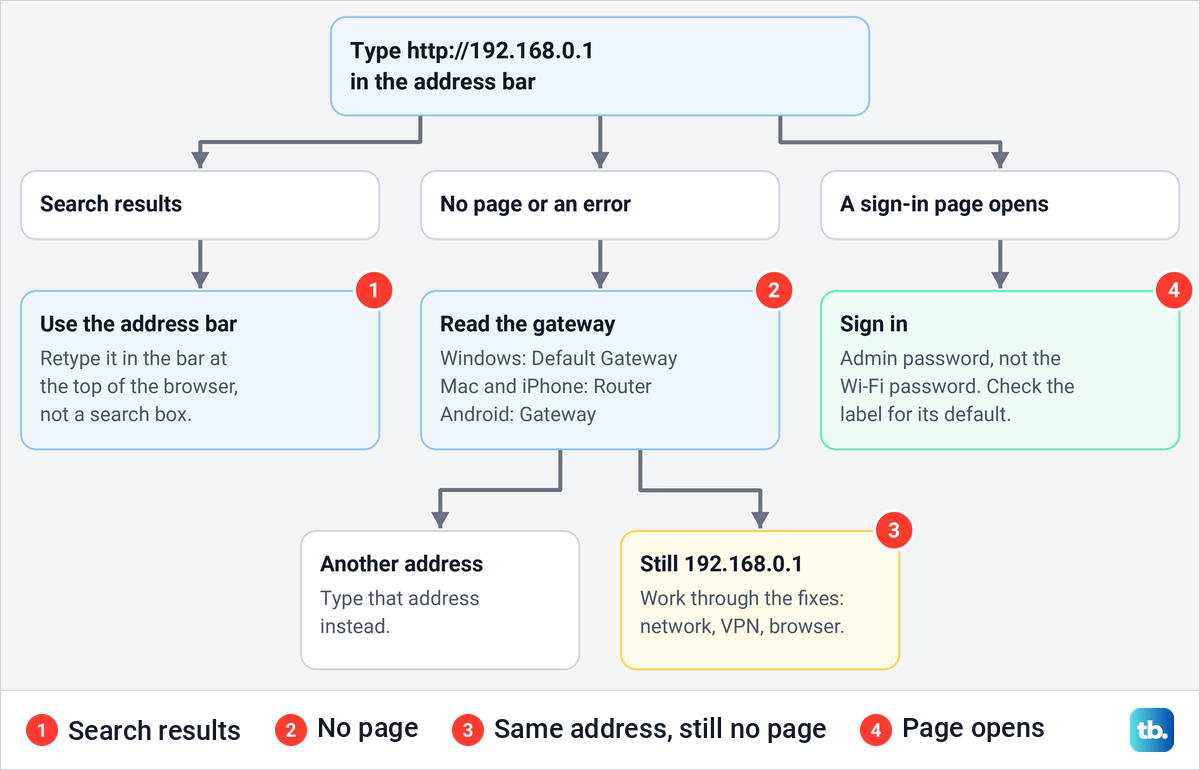
When a sign-in page opens but refuses you, check that it is your own router's page, then the user name, the admin password and any lockout. The admin details for each maker are further down.
Find your router's address on Windows 11
Windows 11 shows the router's address in two places, and we checked both on a PC running Windows 11, version 25H2. Settings is the easier one to read. The command is quicker if you are happy to type one word.
Our PC was connected by cable, so we opened Settings > Network & internet > Ethernet. Near the foot of that page is a list of the connection's properties: Aggregated link speed, Link-local IPv6 address, IPv4 address, IPv4 default gateway and IPv4 DNS servers, followed by the adapter's details. The row to read is IPv4 default gateway, and its value is the address to type in the browser.
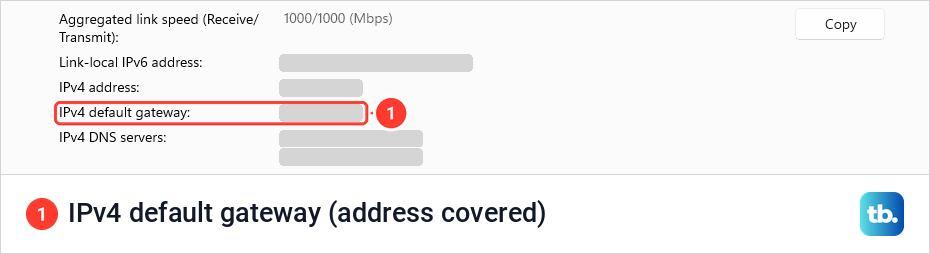
Read that row and not IPv4 DNS servers directly under it, which can hold other addresses. On Wi-Fi, open Settings > Network & internet, select Wi-Fi, then select the network you are connected to and read the IPv4 default gateway in its properties.
For the command, we pressed Windows + X and chose Terminal, which opened a Windows PowerShell tab without administrator rights. We typed ipconfig and pressed Enter. Windows printed Windows IP Configuration, a heading for the connection, Ethernet adapter Ethernet on our PC, and a short list of lines that ends with Default Gateway.
ipconfig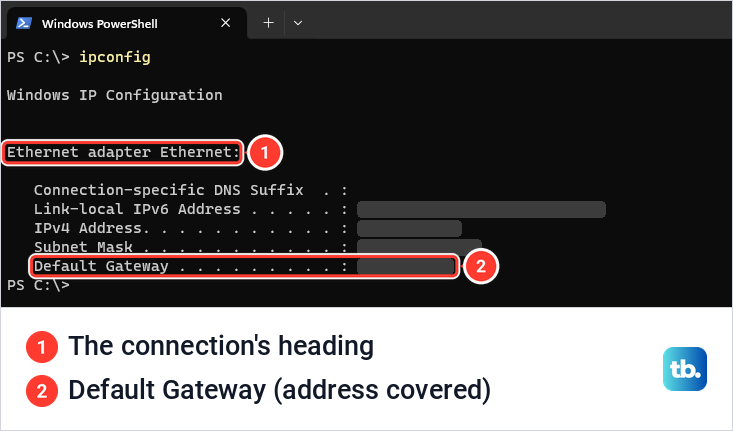
The Default Gateway line showed the same address as the Settings row. You do not need to run Terminal as administrator for this, and ipconfig works the same way in Command Prompt. A PC with both Wi-Fi and a cable lists each connection under its own heading, so read the Default Gateway under the one you are using.
Find the router address on a Mac, iPhone or Android phone
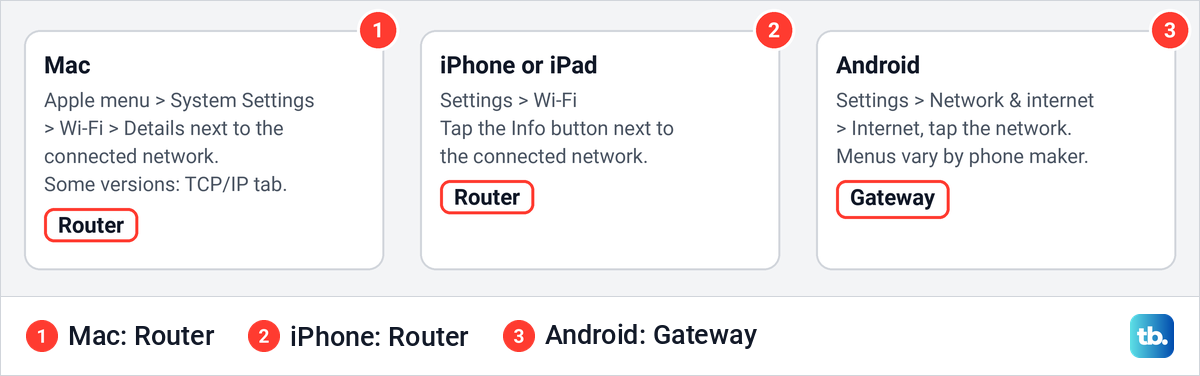
Apple and Android give the field different names, but each one shows the router's address. The Mac or phone has to be on the router's Wi-Fi when you look, or you will be reading the details of a different network.
On a Mac, choose Apple menu > System Settings, click Wi-Fi, then click Details next to the connected network. The Router field holds the address, and on some versions of macOS it sits under the TCP/IP tab. The IP address field near it is the Mac's own address, not the router's.
On an iPhone or iPad, open Settings, tap Wi-Fi, then tap the Info button next to the connected network. The address is in the Router field.
On Android, open Settings, tap Network & internet, then Internet, and tap the connected network. The address appears as Gateway. Menus differ between phone makers, so on some phones the path starts at Wi-Fi or WLAN and the details sit behind a gear or details icon.
On a Chromebook, select the status area at the bottom right, select the connected network, then Network, and read Gateway. On Linux, the connection information calls it Default Router.
Use the login address for your router maker
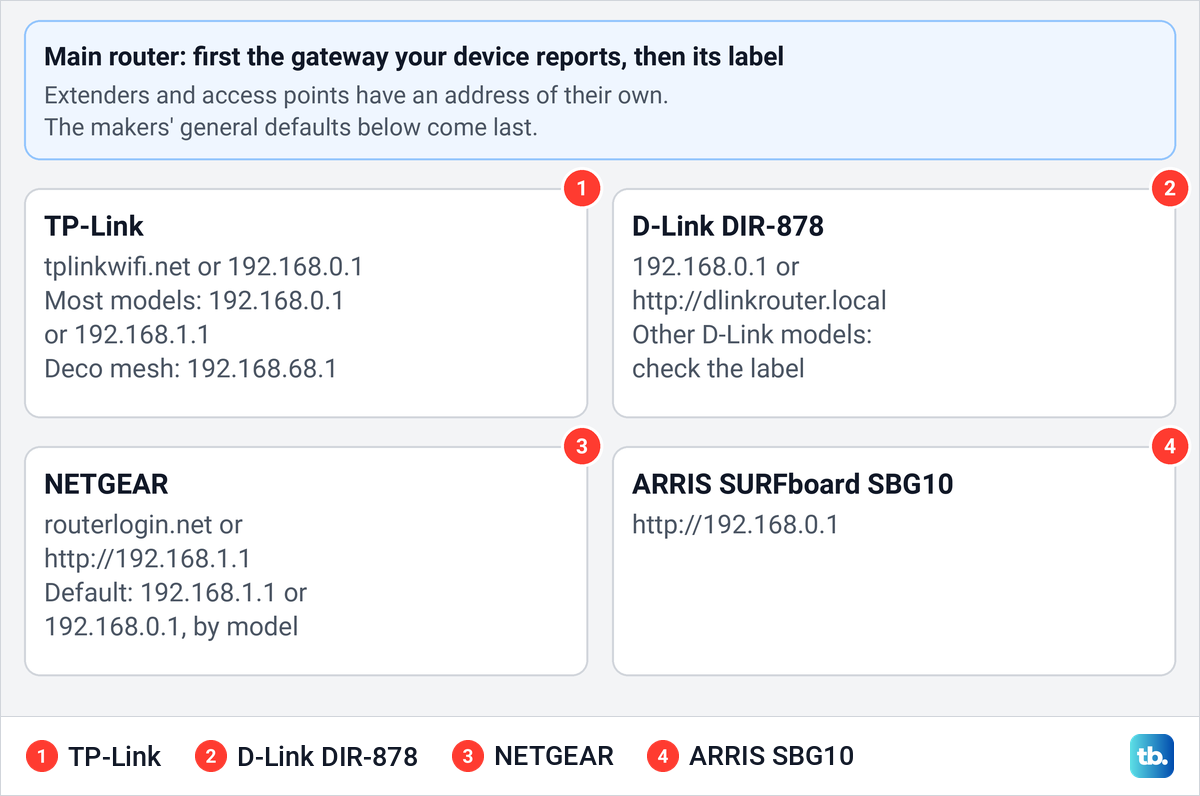
For the main router, the gateway your device reports comes first, and the label on the router comes next, because it is written for that exact unit. The addresses below are the makers' general defaults.
TP-Link routers open at tplinkwifi.net or 192.168.0.1. Most TP-Link routers use 192.168.0.1 or 192.168.1.1 by default, and Deco mesh systems use 192.168.68.1 or tplinkdeco.net instead.
NETGEAR's home routers open at routerlogin.net or http://192.168.1.1, and NETGEAR gives either 192.168.1.1 or 192.168.0.1 as the default depending on the model. If routerlogin.net does not open, use the gateway your device reports rather than trying both numbers.
D-Link's DIR-878 opens at 192.168.0.1 or http://dlinkrouter.local by default, and for any other D-Link model the label is the place to check. The ARRIS SURFboard SBG10 opens at http://192.168.0.1.
Sign in with the right admin details
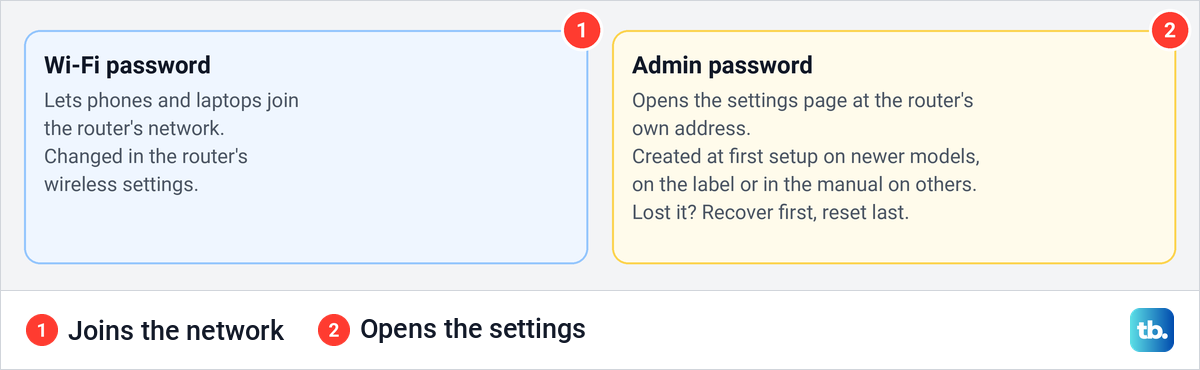
The sign-in page asks for the router's admin password, which guards its settings. It is a different password from the Wi-Fi password your devices use to join the network. If you never set an admin password yourself, what to type depends on the model and its age.
On TP-Link, newer models make you create an admin password the first time you sign in, and older ones use admin as both the username and the password. After setup, you enter the password you created. If the router is linked to a TP-Link ID, you can sign in with that account instead.
On NETGEAR home routers the user name is admin and the password is the one set during setup. Both are case-sensitive, so check Caps Lock before you try again.
D-Link routers bought after 2017 are secure by default, with the password printed on the bottom of the unit near the serial number. D-Link's own page for the DIR-878 gives admin as the username with no password, and if that is refused, use the password on the unit's label. For the DIR-X1550, D-Link's quick guide and its manual give different defaults, so use the password on the unit's label or in the Quick Install Guide that came with it.
The ARRIS SBG10 uses admin and password for the very first sign-in and then makes you choose a new password. After several wrong tries, it says your access has been locked due to multiple login attempts. Select OK and enter the correct password, and if the attempts keep failing, the SBG10's way back in is a factory reset.
Avoid default password lists that cover a whole brand. Makers have changed their defaults over the years, and a password that worked on an older model may be refused by a newer one.
Once you are in, change the admin password if it is still a default, and keep it somewhere safe. On TP-Link it is under Advanced > System > Administration. The Wi-Fi password your devices use is a separate setting in the router's wireless settings, and you can change the Wi-Fi password there once you are signed in.
Fix a page that will not open
The browser's message tells you how far you got, but not why. Start with the connection and the address, then move on to the browser and the device.
| What you see | What it tells you | What to try next |
|---|---|---|
| A page of search results | The address went into a search box | Type http://192.168.0.1 in the address bar |
| This site can't be reached, or the connection was refused | The browser could not open a page at that address from this device | Check the router's Wi-Fi or cable, then read the gateway address |
| The page times out or stays blank | The same, and the message alone does not say why | Turn off a VPN or proxy, try another browser, then a cable |
| Your connection isn't private | The page uses a certificate the browser does not trust, as some routers' own pages do | Continue only on your router's network, at the address that matches your gateway |
| The sign-in page refuses your password | A page answered, but the sign-in failed | Check it is your router's page, then the user name, the admin password and any lockout |
| Access locked after several attempts | Too many wrong passwords, on the ARRIS SBG10 for example | Select OK and enter the correct admin password, or recover it first |
First make sure the device is on the router's network, and that the link to the router is its only active connection. A cable, a Wi-Fi connection and a VPN running at the same time can stop the page from loading, so disconnect everything except the link to the router. If you are on Wi-Fi and still get nothing, plug into a LAN port with a cable, which also rules out a weak Wi-Fi signal dropping you.
If you typed the maker's web name, such as tplinkwifi.net, and got an error, type the gateway numbers instead. A browser can save a wrong address for that name, and clearing its cache, cookies and history may fix it. On a phone, you can clear cookies on iPhone or clear the cache on Android and then try again.
Next, try another browser, because an extension in your usual one can get in the way, and then another device on the same network. If Safari will not open the router page while other browsers do, see our fixes for Safari when pages will not load.
If none of that helps, restart the router by unplugging its power and plugging it back in, and restart your phone or computer at the same time. Security software on the computer can also block the page. As a last check, pause the firewall or antivirus, reload the page and switch the protection back on straight after.
Continue past a privacy warning only on your own router
Some routers serve their settings page over a secure connection with a certificate the router issued itself, which browsers do not trust. The browser may then show Your connection isn't private, or a privacy error, before the sign-in page. On TP-Link routers and the ARRIS SBG10, this warning can appear on the local page and is no cause for alarm there.
Before you continue, check two things: you are on your own router's Wi-Fi or cable, and the address in the bar is the gateway your device reported. Only then select Advanced and follow the link to go on, and only if it names your router's address. On a TP-Link router at 192.168.0.1, that link reads Proceed to 192.168.0.1 (unsafe) in Chrome. Never click through the same warning on an address you do not recognize, or on a website out on the internet.
Manage the router from the maker's app
Several makers also let you manage the router from a phone app instead of the browser. TP-Link's app is Tether, NETGEAR's Nighthawk app signs in with a NETGEAR account, and ARRIS recommends SURFboard Central for setting up the SBG10. Not every model works with its maker's app, so check the app's list of supported models first.
To use one, connect the phone to the router's Wi-Fi, install the maker's app from the App Store or Google Play, open it and sign in as it asks. In Tether, you can also change the admin password under More > System > Manage Password, or Tools > System > Login Account on some models.
Get back in after losing the admin password
A restart and a factory reset are not the same thing. Unplugging the router and plugging it back in keeps every setting, while a factory reset puts the router back the way it left the factory. Try every way of recovering the password before you reset.
On TP-Link, a router linked to a TP-Link ID can recover its password through that account. On NETGEAR Nighthawk routers with password recovery turned on, open routerlogin.net, or orbilogin.local or orbilogin.com on an Orbi WiFi System, and enter wrong details three times to reach the Router Password Reset screen. Enter the router's serial number, answer the two security questions you chose at setup and set a new password.
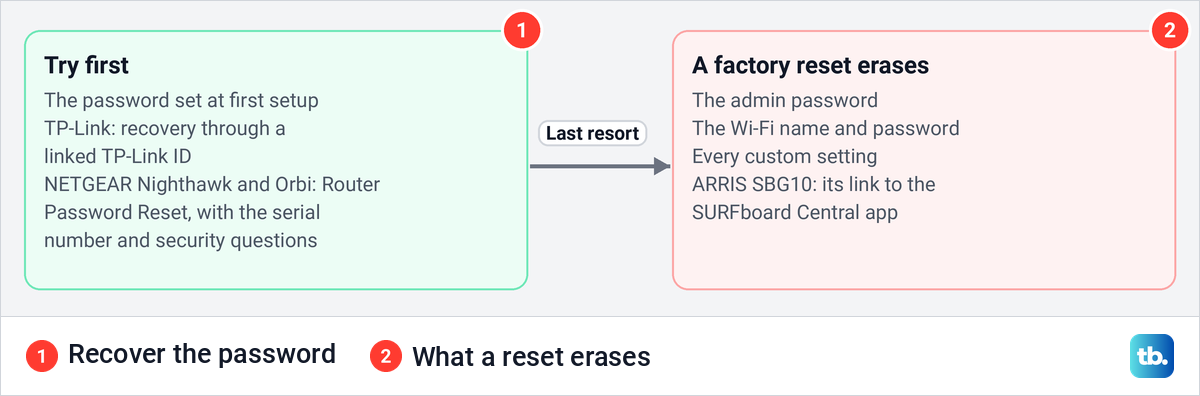
If recovery is not possible, a factory reset is the last resort. It erases the admin password, the Wi-Fi name and password and every custom setting, and on the ARRIS SBG10 it also removes the gateway from the SURFboard Central app. Afterwards you go through the first setup again and reconnect every device.
The Reset button is usually a small hole on the back or side, pressed with a straightened paper clip. Hold it for the time your model's manual gives. NETGEAR gives 15 seconds for its Nighthawk and Orbi models, D-Link's general sign-in page gives 10 seconds, and the ARRIS SBG10 takes 10 seconds. If the reset does not bring the sign-in page back, contact the router's maker.
How we tested this guide
We tested this on a PC running Windows 11, version 25H2, where we found the router's address in the connection's properties in Settings and again with ipconfig in Terminal.
Frequently Asked Questions
Why does 192.168.0.1 open search results instead of my router?
The address went into a search box rather than the browser's address bar. Click the bar at the top of the browser, type http://192.168.0.1 and press Enter while you are connected to the router.
Does every router use 192.168.0.1?
No. Many TP-Link and D-Link routers do, NETGEAR uses 192.168.1.1 or 192.168.0.1 depending on the model, and TP-Link's Deco systems use 192.168.68.1. Your device's network details show the main router's address as the gateway or router.
What is the default username and password for 192.168.0.1?
There is no single one, because the router decides it, not the address. Newer TP-Link models make you create a password, older ones use admin and admin, NETGEAR uses admin with the password set during setup, and D-Link routers bought after 2017 have theirs on the label. Check the label on your own router first.
Is the Wi-Fi password the same as the router admin password?
No. The Wi-Fi password lets a phone or laptop join the network, and the admin password opens the router's settings page. Each one is changed separately from inside the settings.
Can I open 192.168.0.1 without an internet connection?
Yes. The settings page is inside the router, so it opens as long as your device is connected to the router by Wi-Fi or cable, even when the internet is down.
What does a refused or timed-out connection mean?
Only that the browser could not open a page at that address from your device. It does not name a cause on its own, so check that you are on the router's network, read the gateway address, turn off any VPN or proxy and try another browser.
Will a factory reset erase my Wi-Fi settings?
Yes. A factory reset erases the Wi-Fi name and password, the admin password and every custom setting, so every device has to join the network again afterwards. A restart, unplugging the router and plugging it back in, keeps all of them.
Can I log in to 192.168.0.1 from outside my home?
Not at that address. 192.168.0.1 only answers devices on the router's own network, because the page is built into the router and is not a website on the internet. To manage the router while you are away, check whether your model's app offers remote access.