

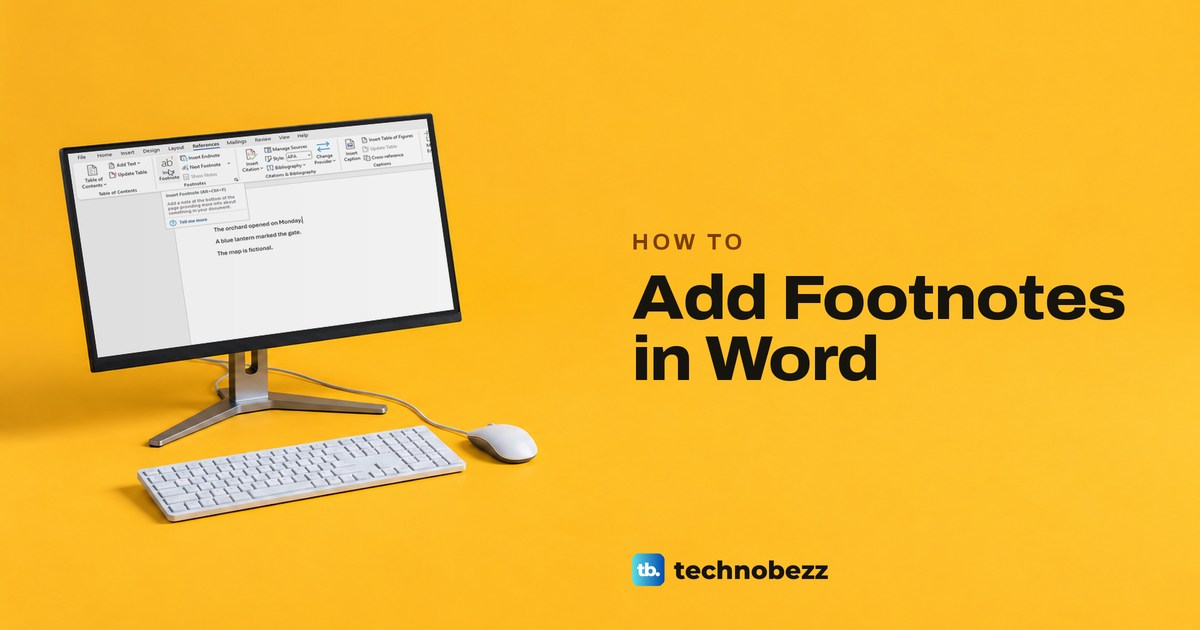
To add a footnote in Word, click right after the word or sentence you want to explain, open the References tab and select Insert Footnote. Word puts a small superscript number at that spot and moves the cursor to the bottom of the page, where you type the note. On Windows, Ctrl + Alt + F does the same in one step.
Word numbers the notes for you and renumbers them when you add or delete one. An endnote works the same way, but its text collects at the end of the document instead of the foot of each page. Word for the web is the odd one out: while you edit, the note opens in a panel at the bottom of the window, and the page only shows it at its foot in Viewing mode.
The short version
- Click after the text, then select References > Insert Footnote or press Ctrl + Alt + F.
- Type the note at the bottom of the page, then double-click its number to jump back.
- Change numbering and placement in the Footnote and Endnote box, opened with Alt, S, Q.
- Restyle your notes through the Footnote Text style.
- To delete a note, delete its number in the body text, not the note text.
- In Word for the web, click a number in the text to open its note in the panel below.
Add a footnote in Word on Windows
Work in Print Layout, the normal page view, and click immediately after the word or figure the note belongs to. If the note covers a whole sentence, click after its full stop so the number sits outside the sentence.
Open the References tab and select Insert Footnote in the Footnotes group. Its tooltip reads Insert Footnote (Alt+Ctrl+F) and Add a note at the bottom of the page providing more info about something in your document. If the ribbon is new to you, our guide to the basic Word ribbon and tabs shows where each tab sits.
When we selected it, Word put a superscript 1 right after the word and moved the cursor to the bottom of the page, under a short separator line, beside a matching 1. We typed the note there. Word links the two numbers, so there is nothing else to set.
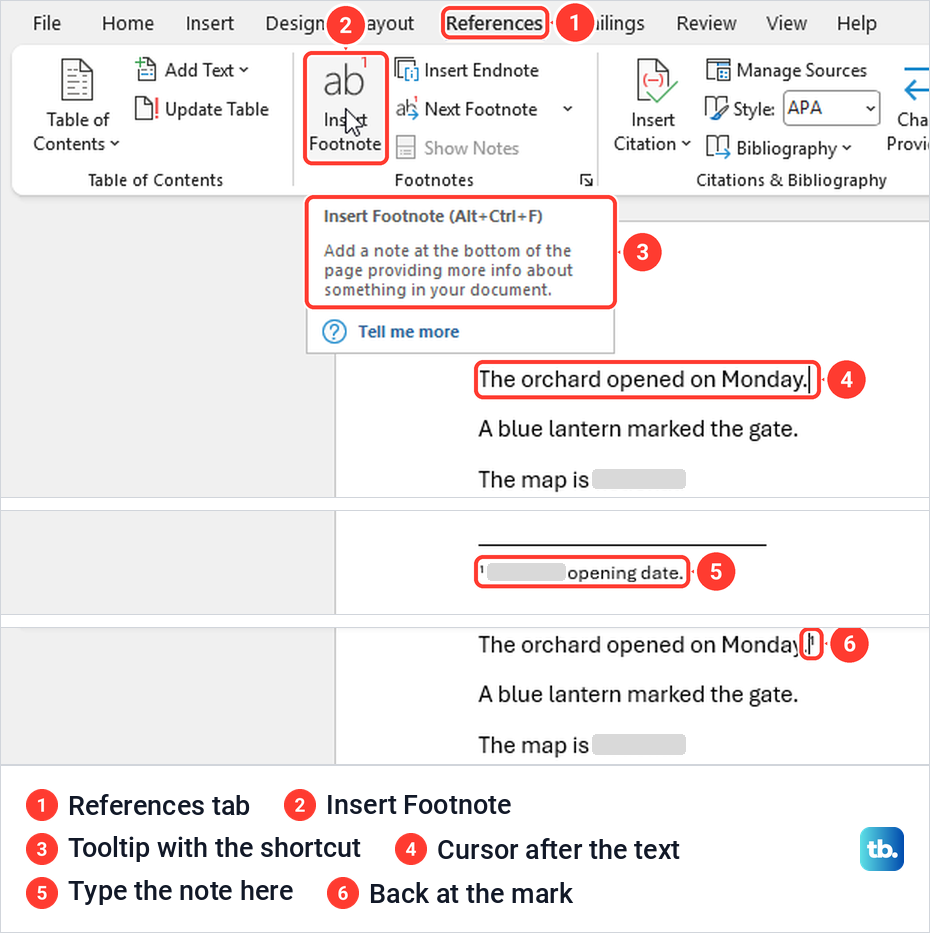
To get back to your place, double-click the number in front of the note. On our PC that jumped straight back to the superscript 1 in the body text, ready for the next sentence. To change a note later, click into its text at the bottom of the page and edit it like any other text.
Where to insert a footnote in each version of Word
The command is easy to find in each version of Word, but its label and the place where you type the note can differ. Here is where to find it and where to type.
| Where you work | How to insert a footnote | Where you type the note |
|---|---|---|
| Word on Windows | References > Insert Footnote | At the bottom of the page, under a short line |
| Word on Windows, keyboard | Ctrl + Alt + F, or Alt, S, F | At the bottom of the page |
| Word for the web | References > Insert Footnote | In a panel at the bottom of the window |
| Word for the web, keyboard | Alt + Windows logo key, then S, R, F | In the same panel |
| Word for Mac | References > Insert Footnote | At the bottom of the page, per Microsoft |
| Word on a phone or tablet | Insert > Footnote | In the note Word adds, per Microsoft |
Insert a footnote with a keyboard shortcut
Ctrl + Alt + F inserts a footnote at the cursor without touching the ribbon. We pressed it after the second line of our document, and Word added note 2 at the bottom of the same page, numbered after the first one.
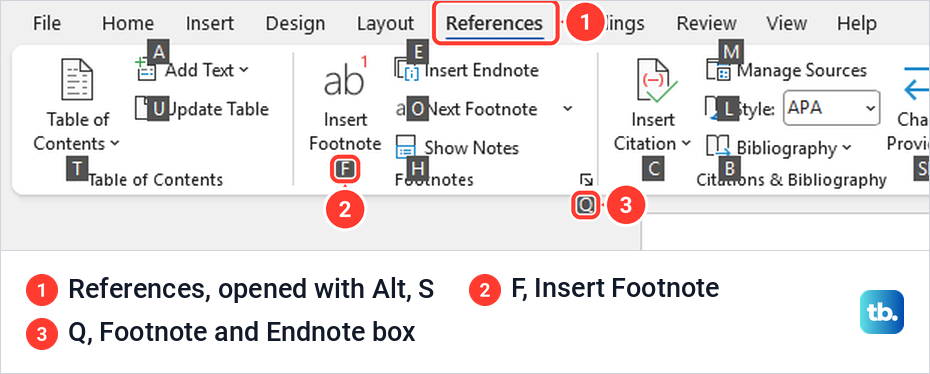
Word's KeyTips work too. Press Alt, then S to open the References tab, and Word labels each command with a letter: F for Insert Footnote, E for Insert Endnote, O for Next Footnote, H for Show Notes and Q for the Footnote and Endnote box. Pressing F added our third note, numbered 3 below the other two.
Endnotes have a shortcut of their own, Ctrl + Alt + D, which the Insert Endnote tooltip shows. In a long document, Next Footnote on the same tab moves you from one note mark to the next, and Microsoft lists Alt + Shift + > for the same job.
Change footnote numbers and placement
Numbering, position and the style of the mark all live in one box. Select the small arrow in the bottom right corner of the Footnotes group on the References tab, or press Alt, S, Q.
In our document the Footnote and Endnote box opened with Footnotes set to Bottom of page, Number format set to 1, 2, 3, Start at 1, Numbering set to Continuous, and Apply changes to set to Whole document. These were the values in our new document, and an existing file may show different ones. The Apply button stayed greyed out until we changed a setting.
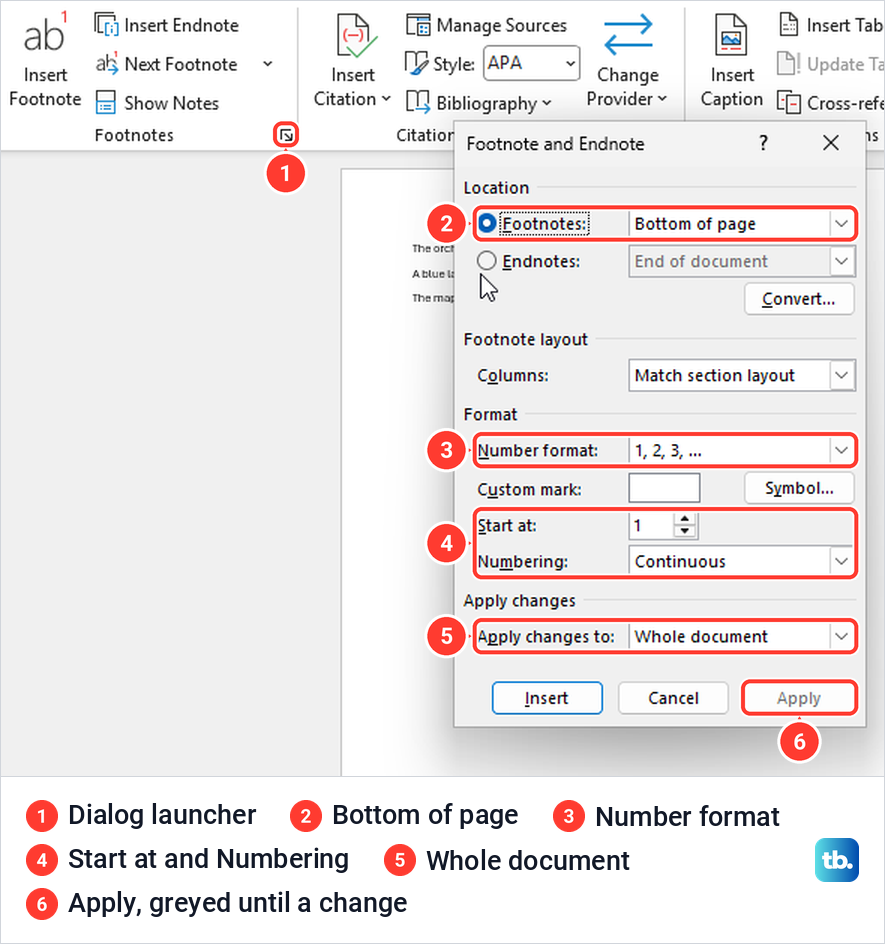
Number format offers ordinary numbers, lowercase letters, capital letters, lowercase and capital Roman numerals, and a run of symbols that starts with an asterisk. We picked a, b, c and selected Apply, and every mark and note in the document switched to letters at once. Choosing 1, 2, 3 and Apply again put the numbers back.
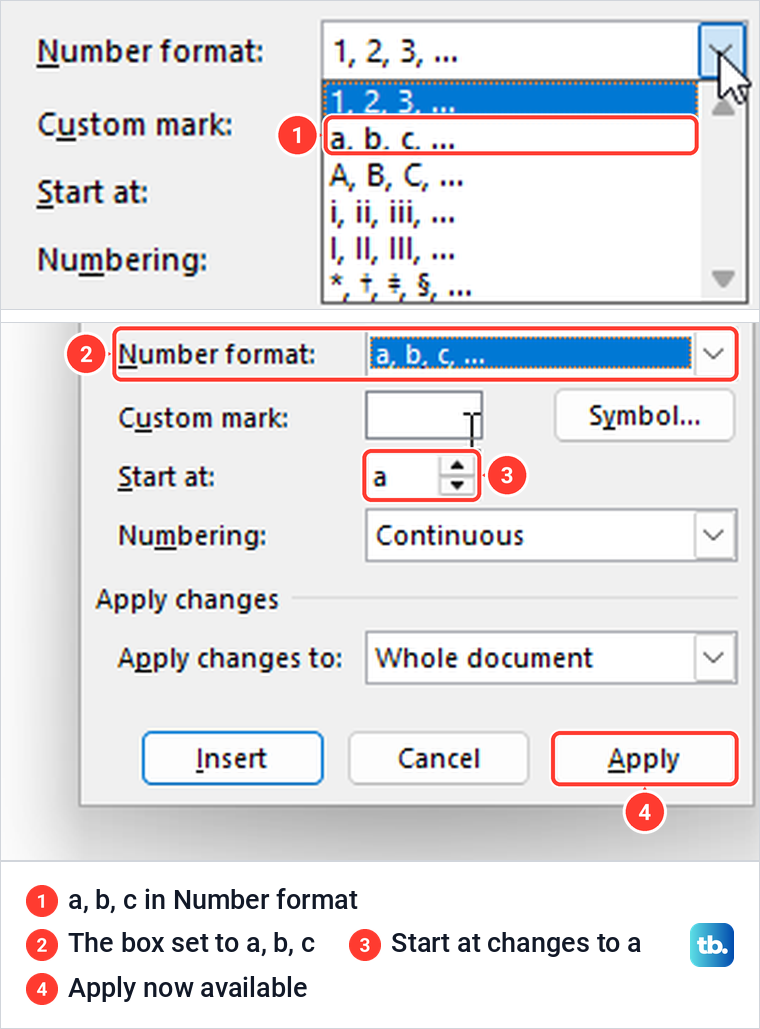
Start at sets the first number, and Numbering decides whether the count runs on through the whole document. Custom mark takes a symbol of your own instead of a number, and the Symbol button next to it opens a picker. In this box, Insert adds a new note with the settings shown, while Apply changes the notes you already have.
Footnote numbers have nothing to do with page numbers. If you need numbers on the pages themselves, that is a header or footer job, and our guide shows how to add page numbers in Word, including starting them on a later page.
Restart footnote numbering in each chapter
Word can start footnotes at 1 again in each chapter, but only when each chapter is its own section. Microsoft's instructions are to insert a section break where each chapter starts, from Layout > Breaks, then open the Footnote and Endnote box and set Numbering to Restart each section.
If your numbers restart where you do not expect them to, a section break you did not mean to add may be the reason. Check the document's sections, then find and remove a stray section break before you go back to Continuous numbering.
If the very first footnote shows 2, check Start at in the same box first. An earlier footnote mark that is easy to miss also counts, so search the document for one before you change the settings.
Change the font and size of all footnotes
Footnotes normally use a style called Footnote Text, and Microsoft's way to change how they look is to edit that style. Modifying it updates every note that uses it. Right-click the text of any note and choose Style.
On our PC the right-click menu offered Font, Paragraph, Style, Go to Footnote, Note Options and Convert to Endnote. Style opened with Footnote Text already selected, described as 10 pt and based on Normal. Select Modify there to change the style itself.
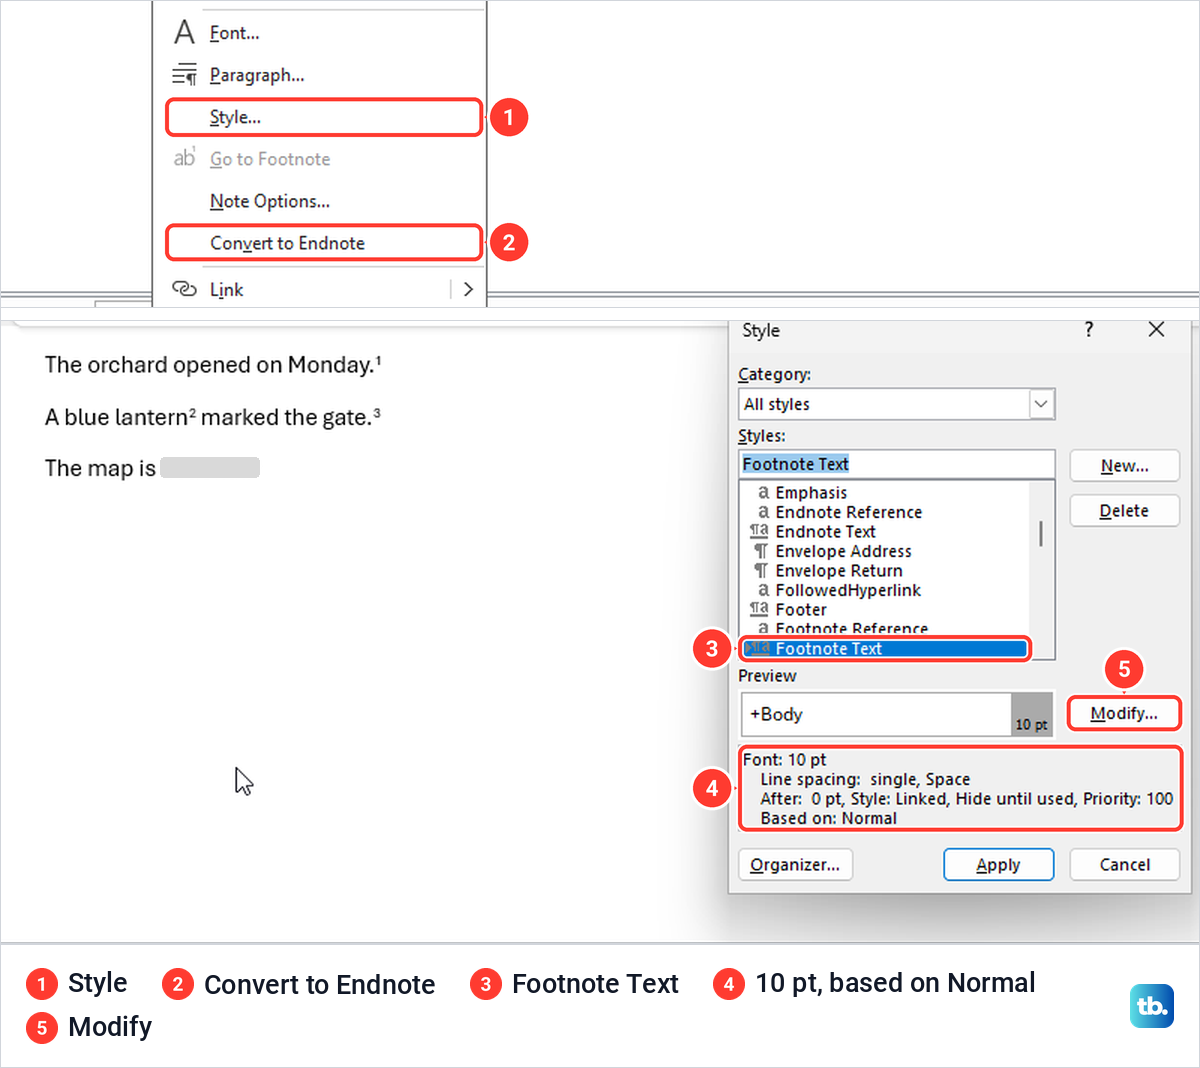
For a one-off change to a single note, select its text and use Font or Paragraph on the same menu instead. If a note does not change with the style, it may carry its own direct formatting, so clear unwanted formatting in Word on that note and it follows the style again. For the gaps between note lines, select the note text first, then use the controls in our guide to change line spacing in Word, which work on selected paragraphs.
Add a footnote in Word for the web
Word for the web has the same command on a tab called References. Open the document, make sure the mode button at the top right says Editing, click after the word, then select References > Insert Footnote.
On our screen the tab held Table of Contents, Insert Footnote, Insert Endnote and Citations, and the Insert Footnote tooltip showed Ctrl+Alt+F. There was no Show Footnotes button, even though Microsoft's help page for the web still names one.
Instead of jumping to the page bottom, Word for the web opened a panel along the bottom of the window with the note number, a Format Footnotes button and a counter reading 1 / 1. We typed the note in that panel and pressed Esc to go back to the text.
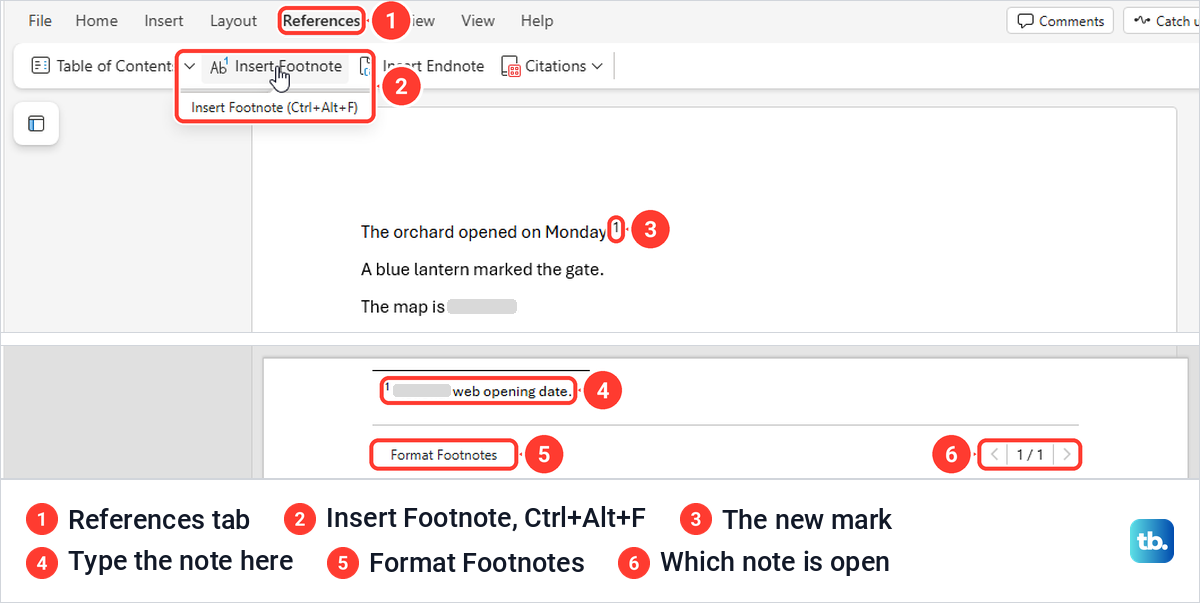
KeyTips work in the browser as well. Pressing Alt and the Windows logo key together put letters on the tabs, and then S, R, F inserted our second web footnote without Edge taking over the keys.
Find and format footnotes in Word for the web
While you edit, the bottom of the page in Word for the web stays empty. When we scrolled to the foot of the page in Editing mode, no note text was there, which is why web footnotes can look as if they were never saved.
To see or change a note, click its number in the body text. That reopened the note panel on our PC, and the counter read 1 / 2 once the document had two notes.
Select Format Footnotes to open Format Options, with the font (Aptos in our document), the size (10), two indentation layouts, and Apply, Apply To All and Cancel. We set the size to 16 and selected Apply, and only the open note changed. Microsoft says the same box changes one or all of your footnotes, and Apply To All is the button for all of them.
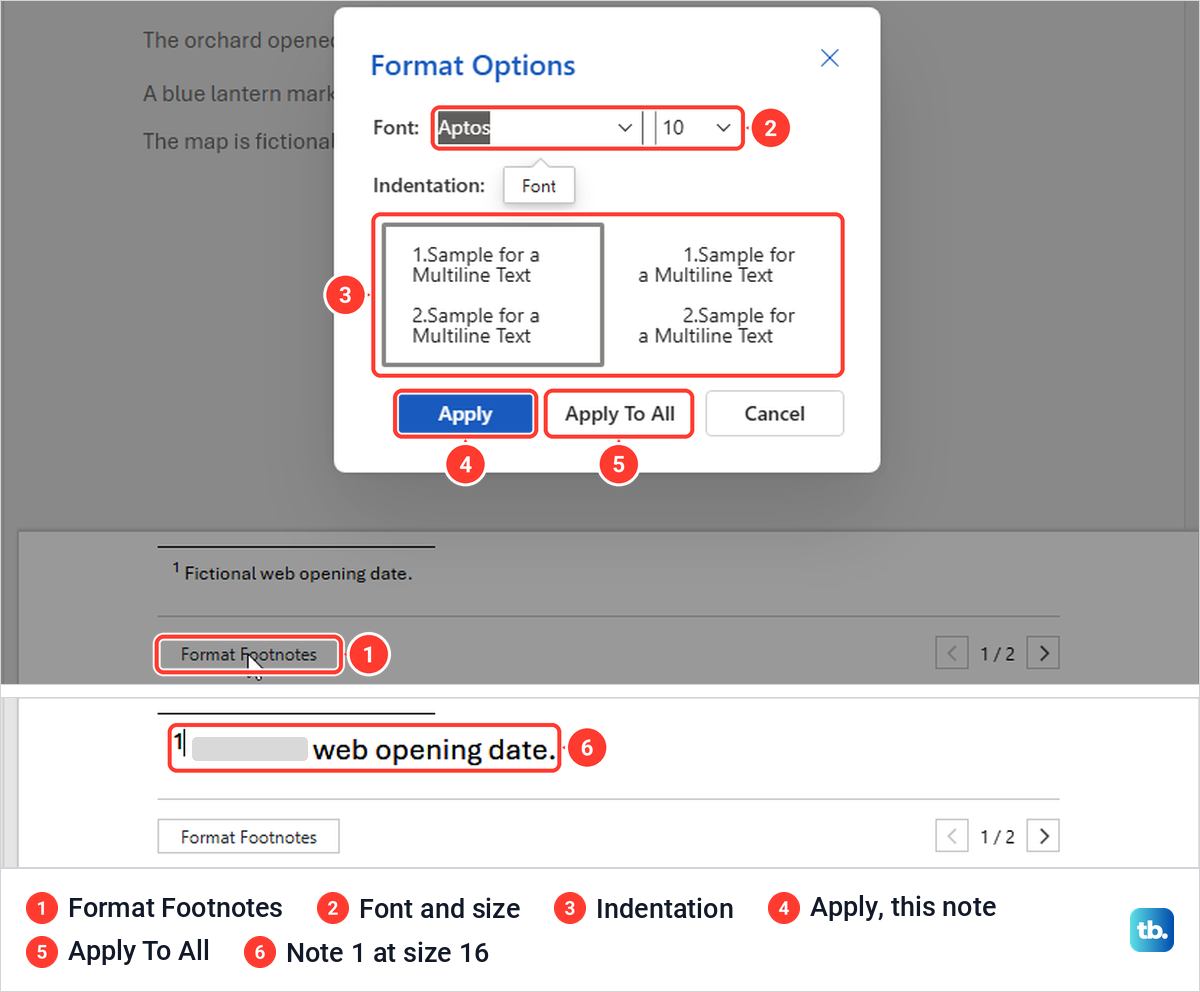
To read the notes on the page, switch the mode button from Editing to Viewing. Viewing is a reading layout without the ribbon, and there our notes sat at the bottom of the page under a short line, as they would in print.
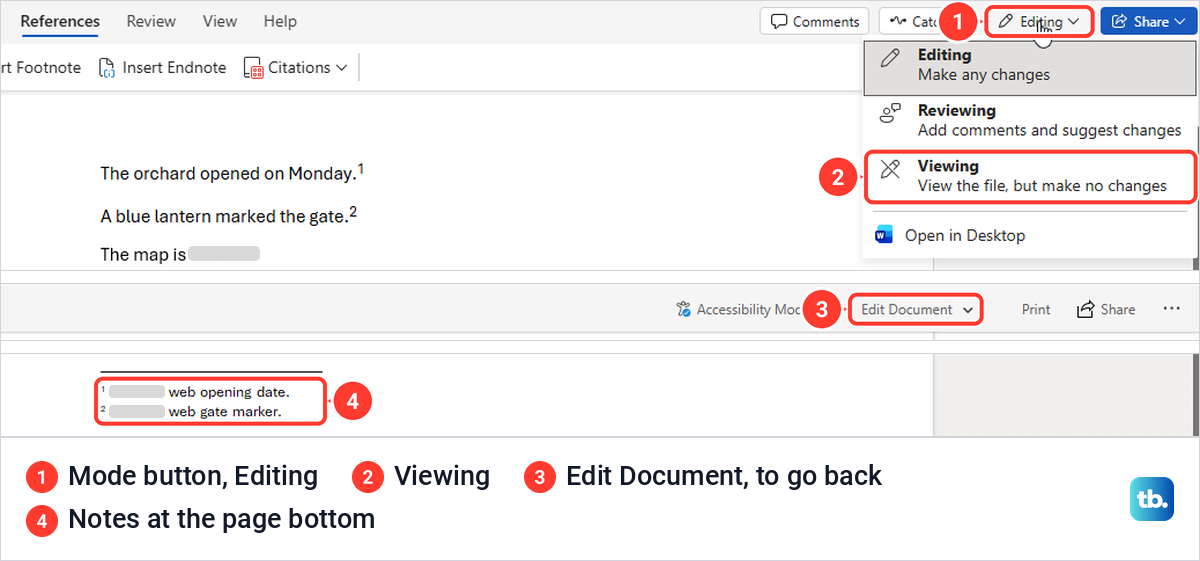
To get back, select Edit Document at the top and choose Edit, or choose Open in Desktop for the full desktop app. Back in Editing mode we added a third note straight away.
Add footnotes in Word for Mac or on a phone
In Word for Mac, Microsoft's steps match Windows. Click where the note belongs, select References > Insert Footnote, type the note at the bottom of the page, and double-click the footnote mark to return to your place. The small arrow in the corner of the Footnotes group opens the same options, and Microsoft's Mac steps confirm them with Insert. In the Windows box that button also adds a new note at the cursor, so look for an extra note afterwards.
On a phone or tablet, Microsoft says to go to where the note belongs, open the Insert tab and choose Footnote, then type the note. Double-tap the reference number to jump between the note and its place in the text. Microsoft adds that Word numbers footnotes with ordinary numbers and endnotes with lowercase Roman numerals.
Insert an endnote or convert footnotes to endnotes
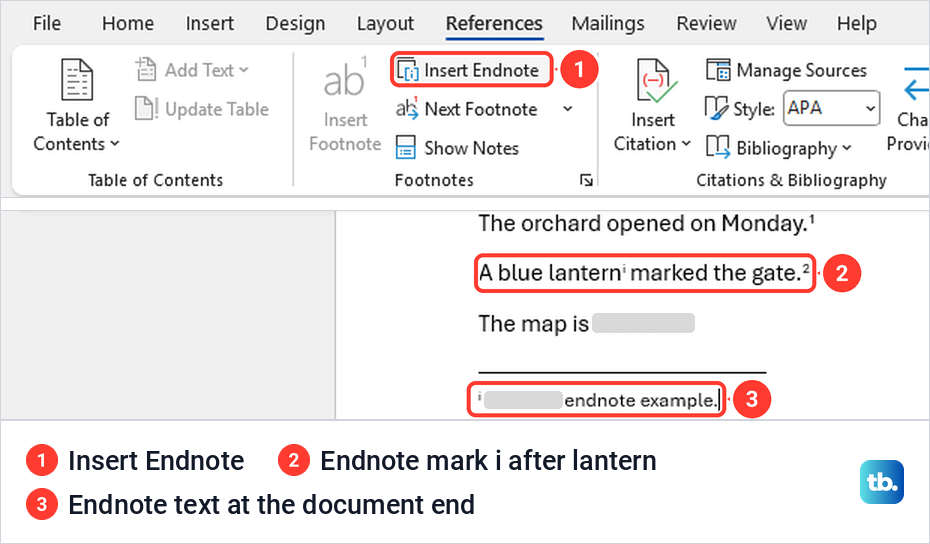
An endnote is the same kind of note, collected at the end of the document instead of the foot of each page. Select References > Insert Endnote or press Ctrl + Alt + D. In our document Word marked the endnote with a lowercase i and placed its text after the last line of the document, while the footnotes stayed at the bottom of the page.
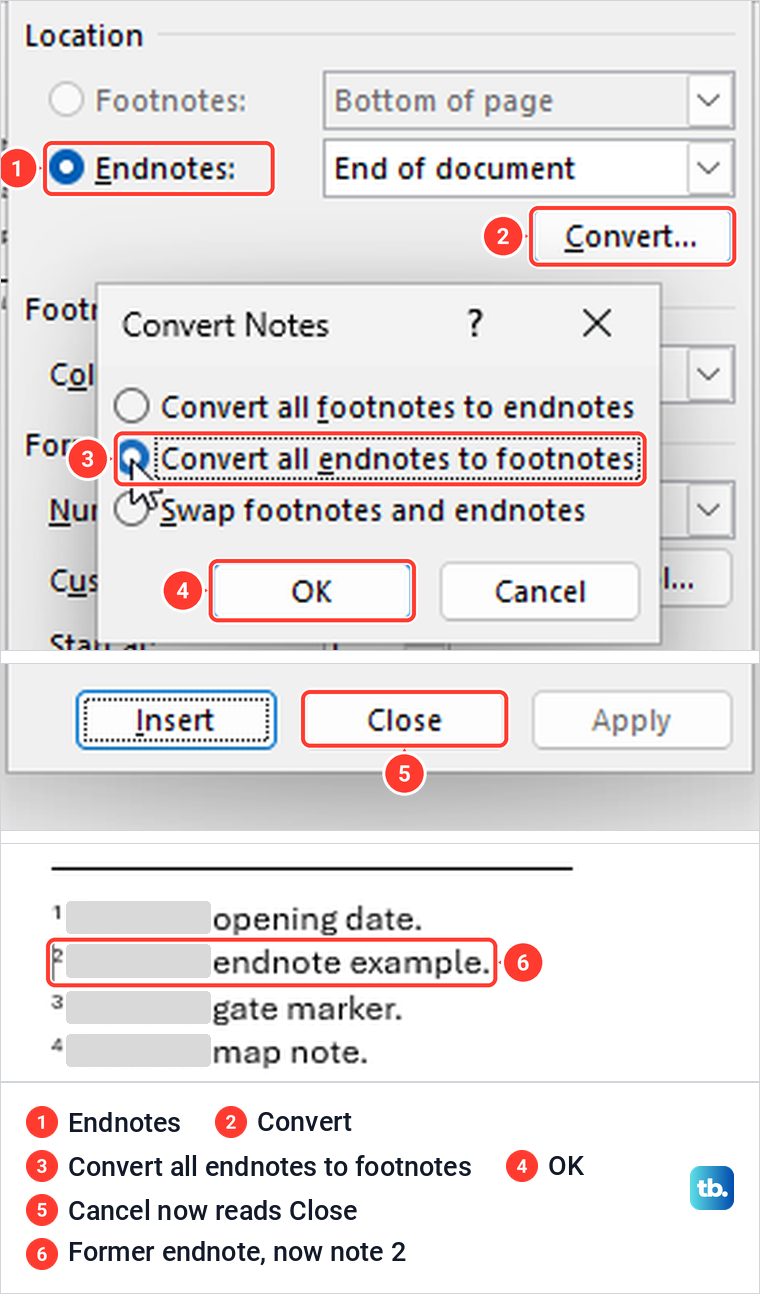
To switch types, open the Footnote and Endnote box and select Convert. Convert Notes offers three choices: Convert all footnotes to endnotes, Convert all endnotes to footnotes, and Swap footnotes and endnotes.
We chose Convert all endnotes to footnotes and selected OK. The endnote became footnote 2 at the bottom of the page, and the two notes after it were renumbered 3 and 4. The conversion happens as soon as you select OK, and the box's Cancel button then reads Close, so select Close to finish.
To convert a single note, right-click its text and choose Convert to Endnote, which sits on the same menu as Style. Word for the web had no convert command on its References tab or on the note's right-click menu. Choose Open in Desktop from the mode menu, select Open when Edge asks to open Word, convert the notes there and save; Microsoft says the file is saved back where it was.
Converting notes moves text between the page bottoms and the end of the document. If you send the finished file as a PDF, save the finished Word document as a PDF and check that each note sits on the same page as its number.
Delete a footnote without leaving an empty note
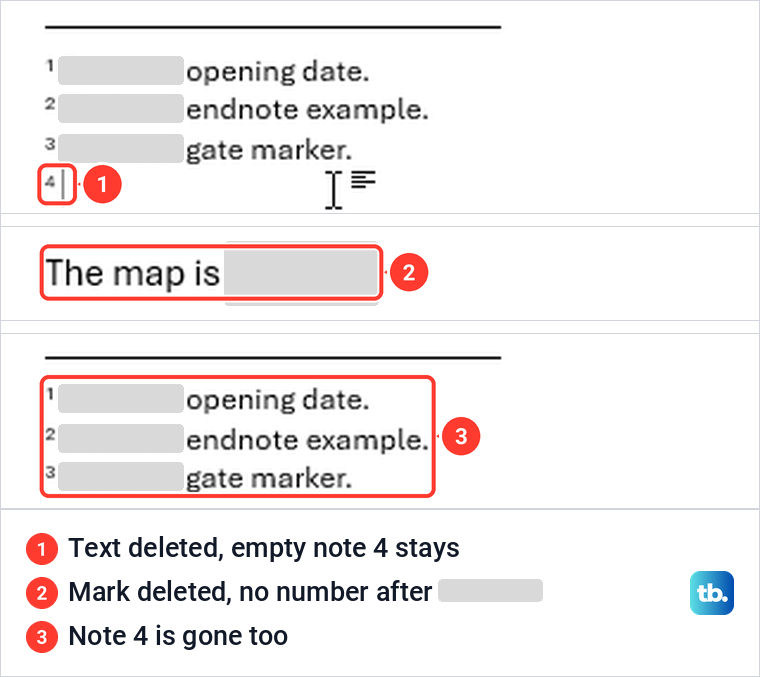
Delete the number in the body text, not the note at the bottom. When we removed only a note's text, Word left an empty note 4 at the foot of the page and the superscript 4 still in the body.
Selecting that superscript 4 in the body and pressing Delete removed the mark and the note together. When we removed a mark in the middle of the document, the mark and note after it moved up from 3 to 2.
Word for the web works the same way. We selected a footnote number in the body text and deleted it, and the next number changed from 3 to 2. Microsoft says the note text disappears with the number.
To remove every footnote at once in desktop Word, make a copy of your Word document first. Then press Ctrl + H, type ^f in Find what, leave Replace with empty and select Replace All, as Microsoft's instructions describe, or type ^e for endnotes. Our guide on how to use Find and Replace in Word covers the rest of that box.
Remove or change the line above footnotes
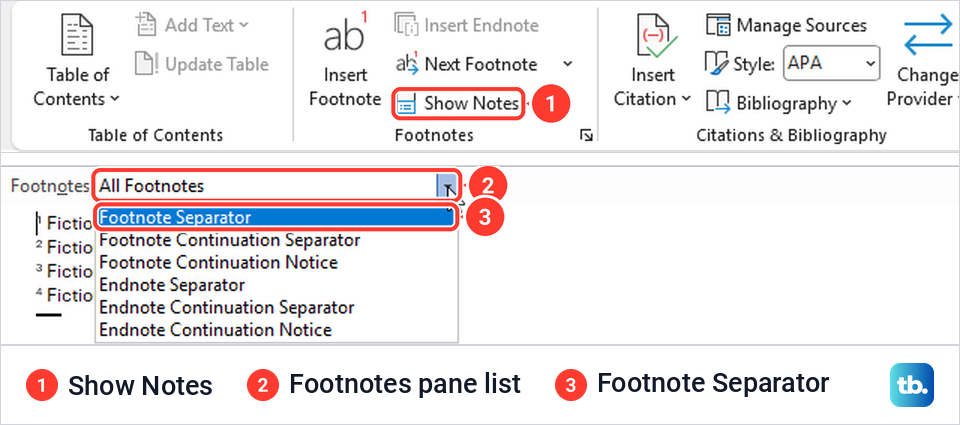
The short line above the notes is the footnote separator, and Word edits it in Draft view rather than on the page. Select References > Show Notes. On our PC the document was then in Draft view with a Footnotes pane at the bottom of the window, set to All Footnotes. Microsoft's own route is View > Draft, then double-click any footnote mark in the text to open the same pane.
Open the list in that pane and choose Footnote Separator. The list also holds Footnote Continuation Separator, Footnote Continuation Notice and the same three items for endnotes. Microsoft's instructions are to select the line that appears and delete it, or restyle it from the Home tab, then return to Print Layout from the View tab.
Why Insert Footnote is greyed out
One reason for a greyed Insert Footnote button is where the cursor sits. On our PC, Insert Footnote was greyed while the cursor was in an endnote's text, and Insert Endnote was greyed while it was in a footnote, until we clicked back into the body text. The other reason is that the document is not open for editing, so check the mode button at the top right of the window.
To see what that looks like, we set a document to Always Open Read-Only under File > Info > Protect Document, then closed and reopened it. Word opened it in Viewing mode with the message To prevent accidental changes, the author has set this file to open as view-only. Insert Footnote and Insert Endnote were greyed out and Ctrl + Alt + F did nothing, while Next Footnote and Show Notes stayed available.
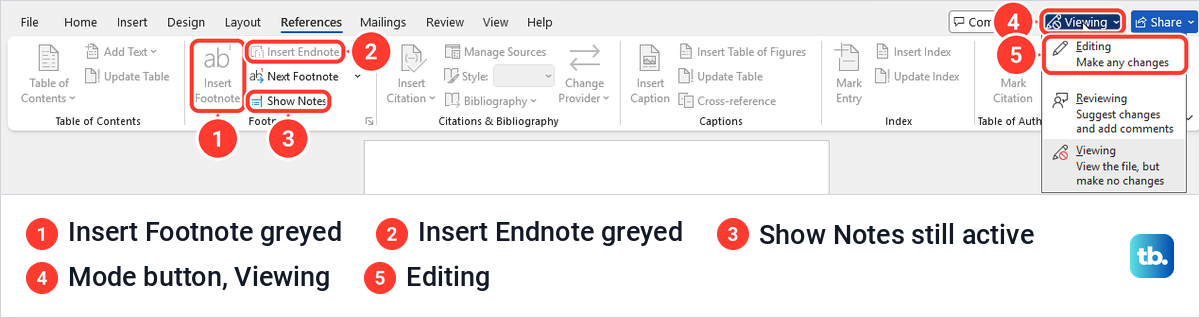
Select the Viewing button and choose Editing, described as Make any changes, and the footnote commands come back. That worked on our file, and selecting Always Open Read-Only again under Protect Document cleared the setting. Microsoft notes that some editing restrictions are controlled by the document owner or your organization and cannot be changed locally.
How we tested this guide
We tested this in Word for Microsoft 365 on Windows 11, version 25H2, and in Word for the web in Microsoft Edge, adding footnotes to a three-line practice document.
Frequently Asked Questions
How do I add a footnote without the ribbon?
In Word for Windows, put the cursor where the note belongs and press Ctrl + Alt + F. Alt, S, F does the same through the KeyTips, and in Word for the web Alt + Windows logo key, then S, R, F worked in Edge.
Why does my first footnote start at 2?
Open the Footnote and Endnote box and check Start at and Numbering, which read 1 and Continuous in our new document. If those are right, look for an earlier footnote mark that is easy to miss, because every mark counts.
Where did my footnote go in Word for the web?
In Editing mode the note is not drawn at the bottom of the page. Click its number in the text to open it in the panel at the bottom of the window, or switch to Viewing to see it on the page.
How do I restart footnote numbers for each chapter?
Put a section break at the start of each chapter, then set Numbering to Restart each section in the Footnote and Endnote box. Microsoft's instructions say the section break is needed for the restart to work.
How do I delete a footnote without leaving its number?
Select the footnote number in the body text and press Delete. Deleting only the note text leaves an empty note and its number behind.
How do I remove the line above footnotes?
In desktop Word, select References > Show Notes, or View > Draft and double-click a footnote mark, then choose Footnote Separator from the list in the Footnotes pane. Then select the line and delete it, as Microsoft's instructions describe.
What is the difference between a footnote and an endnote?
A footnote sits at the bottom of the page its number is on, and an endnote collects at the end of the document. The Convert button in the Footnote and Endnote box switches all notes of one type to the other.