

To change your TP-Link Wi-Fi password on a router with the standard Archer interface, sign in at tplinkwifi.net, open Advanced > Wireless > Wireless Settings, edit Password, and click Save. Change the separate administrator password under Advanced > System > Administration on routers with that menu. You can also use Tether on compatible routers.
Your Wi-Fi password, local administrator password, and TP-Link ID password are separate credentials. Choose the one you want to update, since changing your cloud-account password does not change your Wi-Fi password. Sign in only through TP-Link’s own app or website, and never share a code, password, or remote access with someone who contacts you.
The short version
- Wi-Fi access: Change the wireless password, then reconnect your devices with the new credentials.
- Router administration: Update the local admin password separately in the router’s administration settings.
- App access: Use Tether for compatible routers and the Deco app for Deco Wi-Fi settings.
- Forgotten passwords: Try previously configured recovery before considering a factory reset that erases custom settings.
| Method | Where to start | Applies to |
|---|---|---|
| Main Wi-Fi in the standard browser interface | Advanced > Wireless > Wireless Settings | Archer routers with this menu |
| Main Wi-Fi in alternative browser menus | Basic > Wireless or Wireless > Wireless Settings | Models retaining these interfaces |
| Main Wi-Fi in the newer browser interface | Wi-Fi > Main Network | The interface TP-Link labels for Wi-Fi 8 routers |
| Main Wi-Fi through Tether | More > Wi-Fi Settings | Tether-compatible routers |
| Local admin password through a browser | Advanced > System > Administration | Wi-Fi routers with this menu |
| Local admin password through Tether | More > System > Manage Password | Compatible routers, with an alternative app layout below |
| DSL or fixed cellular admin password | Advanced > System Tools > Administration | DSL models with this menu; cellular models use Account Management |
| Guest Wi-Fi through a browser | Advanced > Guest Network | Routers exposing this menu |
| Guest Wi-Fi through Tether | Guest Network or More > Guest Network | Compatible routers with guest support |
| IoT Wi-Fi through a browser | Advanced > Wireless > IoT Network | Supported Archer hardware and firmware |
| IoT Wi-Fi through Tether | More > IoT Network | Compatible routers with IoT support |
| Deco main Wi-Fi | More > Wi-Fi Settings | Deco app |
| Deco guest Wi-Fi | More > Guest Network | Deco guest networks |
| TP-Link ID password change | Deco account settings, then select Change Password | Deco account management |
| TP-Link ID password recovery | TP-Link ID password recovery page | Accounts with access to the registered inbox |
| Local admin recovery by email | Select Forgot Password? at router sign-in | Supported routers with email recovery already configured |
| Local admin recovery by security questions | Select Forgot Password? at router sign-in | Supported models with questions already configured |
| Router hardware reset | Reset or WPS/Reset button | Conventional routers using the model-specific reset procedure |
| Router browser reset | Backup and Restore | Supported routers with working admin access |
| Deco hardware reset | Reset button on the unit | Deco units |
| Deco app reset | Network, then the network map | Deco units managed in the app |
Connect to your router and sign in
Connect your computer or phone to the router using Ethernet or Wi-Fi, then open tplinkwifi.net in a browser. Sign in with the credentials you use to manage the router. The password that joins your wireless network is separate from the password that opens its settings.
For models using 192.168.0.1, you can log in to router settings at that address instead. DSL and fixed cellular models with the administration menus below use tplinkmodem.net or 192.168.1.1; follow the steps to log in to 192.168.1.1 admin when that is your device’s management address.
Menu names depend on your router and firmware, so match the paths below to your interface. When the menus differ, find your model in the TP-Link Download Center and select its exact hardware version to obtain the corresponding manual.
Change the main WiFi name and password
On Archer routers with the standard interface, open Advanced > Wireless > Wireless Settings. Edit Network Name (SSID) to rename your network and Password to replace its Wi-Fi password for the relevant bands. Available bands depend on your router’s hardware.
Changing these credentials means wireless devices need to reconnect using the new details. Click Save, then reconnect each device using the updated network name and password. You also need to reconnect after you change your WiFi router password through a supported app.
If your router retains the alternative interface, open Basic > Wireless or Wireless > Wireless Settings. Edit the SSID and password there, then save your changes.
In the interface TP-Link labels for Wi-Fi 8 routers, open Wi-Fi > Main Network. Edit SSID and Password, then click Save.
Use Tether to update WiFi from your phone
For a compatible router, check compatibility and get the app through the official TP-Link Tether page. Local access requires your phone to be connected to the router. Remote access requires an already-bound TP-Link ID.
Open Tether, select the router under Devices, and authenticate. Open More > Wi-Fi Settings, select the relevant band or MLO Network, and edit the network name and password. The 6 GHz and MLO options require corresponding hardware and firmware.
Tap Save, then reconnect your wireless devices using the updated credentials. If your conventional router has a browser interface but is not Tether-compatible, use the menu path in its model-specific manual; if you have a Deco system, follow the Deco section below.
Update the separate administrator password
To change the local password that protects your router’s settings, sign in at tplinkwifi.net or 192.168.0.1. On Wi-Fi routers with this interface, open Advanced > System > Administration, supply the existing password and its replacement, and click Save.
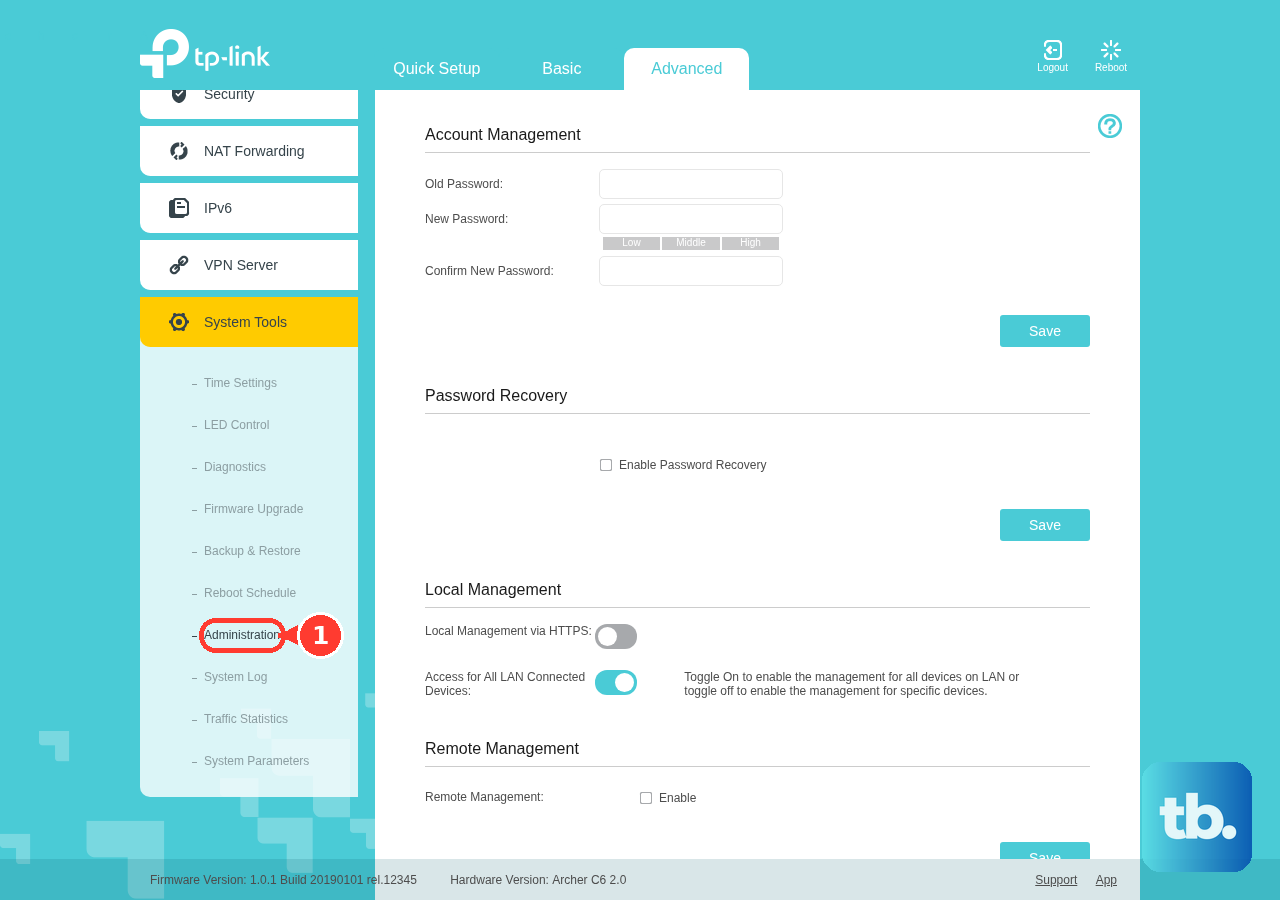
For a compatible router in Tether, connect locally and authenticate in the app. Open More > System > Manage Password, or Tools > System > Login Account in the alternative layout. Supply the existing and replacement passwords, then tap Save or Done, matching your screen.
For DSL and fixed 4G/5G routers with these browser menus, sign in at tplinkmodem.net or 192.168.1.1. Open Advanced > System Tools > Administration; cellular models use Account Management. Enter the existing and replacement passwords and click Save. If you have forgotten the existing password, use the recovery options below.
Change guest and IoT network credentials separately
Your router’s guest network has credentials separate from the main network. On routers exposing the browser menu, open Advanced > Guest Network, locate Wireless, and select the band. When creating a guest network, check Enable Guest Network. Edit the SSID and the password under Security, then click Save.
To edit a supported guest network in Tether, connect to the router’s main Wi-Fi network and open the app. Select the router under My Devices and authenticate if prompted. Tap Guest Network, or open More > Guest Network, to edit its settings.
For an Archer router with IoT-network support, sign in and open Advanced > Wireless > IoT Network. Check Enable when creating the network. Edit the SSID, choose a password-based Security option, enter the password, and click SAVE. Supported models include AX55, BE550, BE800, BE805, BE900, and GE800 with the required hardware and firmware.
In Tether, select your compatible router and open More > IoT Network, then select the relevant IoT network. Enable its toggle if necessary, then edit Network Name, Password, and Security. Available bands depend on your router.
Change WiFi credentials on a Deco system
Connect your phone to the Deco Wi-Fi network and open the Deco app. Open More > Wi-Fi Settings, edit the Wi-Fi name and password, and tap Save. Reconnect your wireless devices using the updated details. These main-network steps apply to all Deco models, although individual options depend on firmware.
To update Deco guest Wi-Fi, open More > Guest Network. When creating a new guest network, tap Turn On Guest Network, enter a password, and tap Done. Edit the guest SSID and password on its settings page, then tap Save. Available guest-network bands and options vary by model and software.
Change or recover your TP Link ID password
To change your TP-Link ID password in the Deco app, open the menu and tap the account or profile area, or tap View Account. Select Change Password and complete the password fields presented by the app. This changes your cloud-account credential.
If you have forgotten that password, open the official TP-Link ID password recovery page, enter your registered email address, and click OK. In the resulting email, click Click to Reset Password. Enter and repeat the replacement password, then click Save.
Recover a forgotten local admin password
If email recovery was already configured on a router supporting it, select Forgot Password? at tplinkwifi.net. Complete email verification to set a replacement password. Email recovery is disabled when you use TP-Link ID login.
If you previously configured security questions on a supported model, select Forgot Password? and follow the recovery prompts. Both recovery methods require preparation before lockout. If neither was configured and you cannot reach the management page with a previously linked TP-Link ID, use the model-specific factory-reset procedure below.
To prepare email recovery while you still have access, open Advanced > System > Administration, or Advanced > System Tools > Administration. Under Password Recovery, check Enable Password Recovery and configure From, To, and SMTP Server. If required, select Enable Authentication and supply the mail credentials. Click Test Email, then save the configuration.
For security questions, open the same administration path while you still have access. Under Password Recovery, select Question Settings, authenticate, choose two questions, enter the answers, and click Save. Use this option only on models that expose Question Settings.
Use a factory reset only when recovery cannot help
A factory reset erases the router’s Internet settings and other custom settings. For conventional TP-Link routers using this procedure, confirm your model’s button instructions, then leave the router powered on and hold Reset or WPS/Reset for more than 10 seconds, following its LED indication. Let it reboot, reconnect using its defaults, and run setup to create new credentials.
If you still have admin access and need to reset the router through its browser interface, sign in at tplinkwifi.net or 192.168.0.1. Open Advanced > System > Backup and Restore, or Advanced > System Tools > Backup and Restore.
This browser reset also erases your custom configuration. Under Factory Default Restore, click Factory Restore, then run setup again after the router reboots.
Resetting a Deco erases its device configuration but does not change your TP-Link ID password. To reset a Deco unit using its hardware button, press the unit’s reset button for one second. Set up the erased system again with the desired Wi-Fi credentials.
Removing a Deco through the app also resets it and erases its device configuration. Open Network, tap the network map, select the Deco, open its top-right menu, and tap Remove. For a whole-system reset, remove the satellites before the main unit, then set up the system again.
Frequently Asked Questions
How do you change the Wi-Fi password on a TP-Link mobile hotspot?
On supported 3G/4G Mobile Wi-Fi devices, connect to the hotspot, open tpMiFi, open My Devices, and select the hotspot. Open Tools > Wireless Settings, edit SSID or Password, and tap Save. For browser access, connect to the hotspot and sign in at tplinkmifi.net; supported 3G/4G interfaces use Advanced > Wireless > Basic Settings, while supported 5G interfaces use Advanced > Wireless > Wireless Settings. Edit the SSID and password, then click Save.
Can you change a TP-Link hotspot password on its screen or through Tether?
On 5G Mobile Wi-Fi models with the editable screen interface, select Settings, edit Wireless SSID (Network Name) and Password, and select Save. For a Tether-compatible 5G hotspot, connect to it, open Tether, and select the hotspot under My Devices. Open More > Wi-Fi Settings and edit its Wi-Fi credentials.
What if your provider supplied a router that uses Aginet?
For supported ISP-customized Aginet routers, select the router in Aginet and open More > Wi-Fi Settings to edit the Wi-Fi credentials. The browser alternative is to connect, sign in at the router’s model-specific management address, and open Basic > Wireless to edit the SSID and password. Available controls depend on the provider’s firmware.
How do you change the administrator password on a supported ISP router?
On supported hardware such as HB810 V1, HB710 V1, HX510 V1, EX520 V1, and Archer VR1200v V2, sign in to the browser interface and open Advanced > System > Administration > Account Management. Fill Old Password and New Password, then click Save. For an Aginet-compatible model supporting this procedure, connect to its Wi-Fi, open Aginet, tap Manage This Network > More > System > Change Password, and complete the password-change screen.
Can Tapo or Kasa change the TP-Link ID used for your router?
Yes, when you use the same TP-Link ID in Tapo or Kasa, open that app and select Me. Open View Account > Change Password and set the replacement password. This changes the shared cloud-account credential, while your router’s local admin and Wi-Fi passwords remain separate.
Where do you change a Deco IoT or MLO network password?
For Deco models and firmware supporting IoT Network, the iOS procedure is to open More > IoT Network, enable IoT Network if necessary, and edit its Wi-Fi name and password. Under Security, choose a password-based protocol, then select the desired Bands. On an MLO-capable Wi-Fi 7 Deco system, open Wi-Fi Settings, enable MLO Network if necessary, and set its SSID and Password. Available MLO bands depend on the model.