

To uninstall a Windows update on Windows 11, open Settings > Windows Update > Update history > Uninstall updates to find the update you want to remove. Uninstalling removes the selected update from Windows. Select its Uninstall button.
Some updates cannot be removed. Windows 10 also provides an uninstall option in update history, and recovery tools can remove the latest quality update when Windows cannot start.
The short version
- Start with Settings: Use update history to find a removable installed update.
- Windows will not start: Windows Recovery Environment provides the Uninstall latest quality update option.
- Version upgrade: Go back reverses an eligible Windows 11 upgrade, usually within 10 days.
- Other changes: System Restore and display driver rollback address different kinds of update-related changes.
| Method or option | Use it for | Requirement or limit |
|---|---|---|
| Windows 11 Settings | Removing a selected update | A removable update |
| Windows 10 Settings | Removing a selected update | A removable update |
| Recovery uninstall | Removing the latest quality update | Working recovery tools and an uninstallable update |
| Recovery through Settings | Opening recovery from Windows | Accessible Settings |
| Shift with Restart | Opening recovery with a shortcut | Access to Power > Restart |
| Startup failures or power button | Opening recovery when startup fails | A functioning recovery environment |
| Manufacturer recovery controls | Opening recovery with hardware controls | A model with a documented recovery shortcut |
| Recovery USB or repair disc | Booting into recovery | Compatible existing media and boot hardware |
| Windows installation media | Accessing recovery tools | Media matching the PC architecture |
| Go back | Reversing a Windows 11 version upgrade | Eligible upgrade and retained rollback files |
| WUSA | Removing an eligible update by KB number or package file | Excludes combined SSU and LCU packages |
| Online DISM package removal | Removing a package from running Windows | Exact identity of a removable package |
| Offline DISM package removal | Removing a package without starting Windows | Correct offline Windows volume |
| DISM pending action recovery | Reversing pending servicing operations | An offline Windows installation that cannot boot |
| PowerShell package removal | Removing an online or offline package | Built-in DISM module and an eligible package |
| DISM version rollback | Reversing an eligible Windows upgrade | Retained rollback data |
| PowerShell version rollback | Reversing an eligible Windows 11 upgrade | DISM module and retained rollback data |
| System Restore | Reversing system changes | A suitable existing restore point |
| Point-in-time restore | Restoring a Windows drive snapshot | Eligible Windows 11 build, installed feature and snapshot |
| Display driver rollback | Restoring a previous display driver | Administrator privileges and a retained driver |
| Display driver uninstall | Removing the updated display driver | Administrator privileges; an older replacement is not guaranteed |
| Intune uninstall | Administrator removal through an update ring | Eligible managed devices and Intune Plan 1 |
| MDM Update CSP | Administrator rollback through device management | Paused devices connected to Windows Update for Business |
| Windows 11 x64 download | Creating compatible installation media | An x64 PC |
| Windows 11 Arm64 download | Preparing compatible installation media | A compatible Arm-based PC |
Uninstall an update in Settings
On Windows 11, open Start > Settings > Windows Update. Under More options, select Update history, then find Related settings and select Uninstall updates.
Locate the update you want to remove. Uninstalling removes that selected update from Windows. Select Uninstall.
On Windows 10, open Start > Settings > Update & Security > Windows Update, then select View your update history > Uninstall updates. Choose the update you want to remove. Uninstalling removes that selected update from Windows. Select Uninstall.
Some updates are not removable, so another uninstall tool cannot guarantee removal. If you have a suitable restore point, System Restore may reverse the related system changes.
Remove the latest update through recovery
On Windows 11 and Windows 10, you can access the Windows Recovery Environment by holding Shift while selecting Power > Restart. Recovery also provides an uninstall option when Windows cannot start normally.
On Windows 11, another route is Settings > System > Recovery; beside Advanced startup, select Restart now. On Windows 10, open Settings > Update & Security > Recovery and use Advanced startup.
Repeated startup failures can open recovery automatically. To trigger it manually, start the PC and hold its power button at the Windows or manufacturer logo until it shuts down, then repeat once. Start the PC a third time and select Advanced options on the Automatic Repair screen.
If your PC has a manufacturer-configured recovery button or button combination, use the manufacturer's instructions for that model. The combination depends on your PC, so follow its documented recovery controls.
Inside recovery, select Troubleshoot > Advanced options > Uninstall Updates. The next action removes the latest quality update, provided that update is uninstallable. Select Uninstall latest quality update.
This option targets the latest quality update. If removal fails, a suitable existing restore point gives you another way to reverse system changes through System Restore.
Open recovery from a USB drive
An existing compatible USB recovery drive or Windows Repair Disc can provide another route into recovery on Windows 11 or Windows 10. To recover Windows using a USB drive or repair disc, boot the affected PC from that media, then use the recovery uninstall steps above. Your PC must support booting from the chosen media.
Compatible Windows installation media also provides access to recovery tools. Create the media on a working computer, matching the affected PC's architecture, then boot the affected PC from it. Boot-selection controls vary by manufacturer.
For a Windows 11 x64 PC, open the official Windows 11 download page, find Create Windows 11 Installation Media, then select Download Now. For an Arm-based Windows 11 PC, use the official Arm64 ISO download page and follow its device-specific media instructions. The x64 media creation tool does not create Arm64 media.
After booting from compatible installation media, choose your language and preferences, then select Next. Select Repair my PC, then select Next. Continue with the recovery uninstall steps above.
Go back after a Windows version upgrade
For an eligible Windows 11 upgrade, you can revert to a previous Windows version with Go back. The option is usually available within 10 days and requires retained rollback files. Preserve the windows.old and $windows.~bt folders beforehand.
On Windows 11, open Settings > System > Recovery. Going back reverses the version upgrade and restores the previous Windows version. Select Go back when available.
For eligible Windows 11 and applicable Windows 10 upgrades, DISM provides another rollback route. In an administrator Command Prompt, inspect the allowed rollback period with:
DISM /Online /Get-OSUninstallWindowWhile rollback remains available, you can change the allowed period to 30 days with the command below. Microsoft supports values from 2 to 60 days:
DISM /Online /Set-OSUninstallWindow /Value:30The following command initiates rollback without restarting immediately; /NoRestart requires Windows 10 version 2004 or later. This rollback reverses the version upgrade and restores the previous Windows version.
DISM /Online /Initiate-OSUninstall /NoRestartRestart manually to proceed with the rollback. If rollback is unavailable, this command still requires an eligible upgrade and retained rollback data.
For an eligible Windows 11 upgrade with the DISM module, you can instead run the following command in elevated Windows PowerShell; Microsoft supports this cmdlet on the Windows 11 client operating system only. This also reverses the version upgrade and restores the previous Windows version.
Start-OSUninstall -Online -NoRestartRestart manually to continue the rollback. PowerShell has the same eligibility and retained-data requirements as operating-system rollback.
Restore system changes from before the update
System Restore can reverse system changes, potentially including updates, while preserving personal files. On Windows 11 or Windows 10, open Control Panel > Recovery > Open System Restore. Alternatively, press Windows + R, enter rstrui.exe and press Enter.
Select Next and choose a restore point from before the update. If needed, select Show more restore points. You can select Scan for affected programs to review the programs affected by that restore point.
Restoring reverts system changes to the selected restore point while preserving personal files. Select Next, then select Finish. If Windows cannot start, enter recovery and select Troubleshoot > Advanced options > System Restore, then choose the restore point there.
Point-in-time restore is another option on Windows 11 version 24H2 or later when the feature is installed and a snapshot exists; availability depends on the build. On Windows 11, a local administrator can check snapshots under Settings > System > Recovery > Point-in-time restore > View or edit.
Enter recovery and select Troubleshoot > Point-in-time restore. Enter the BitLocker recovery key if requested, then choose a snapshot predating the update. Review the risk information and select Continue.
Check that you have selected the intended snapshot. Point-in-time restore also reverts personal files and other changes on the Windows drive. Select Restore.
Roll back an updated display driver
For a display driver delivered through Windows Update, use the driver controls with administrator privileges. On Windows 11 or Windows 10, open Device Manager > Display adapters. Right-click the adapter, open Properties, then select the Driver tab.
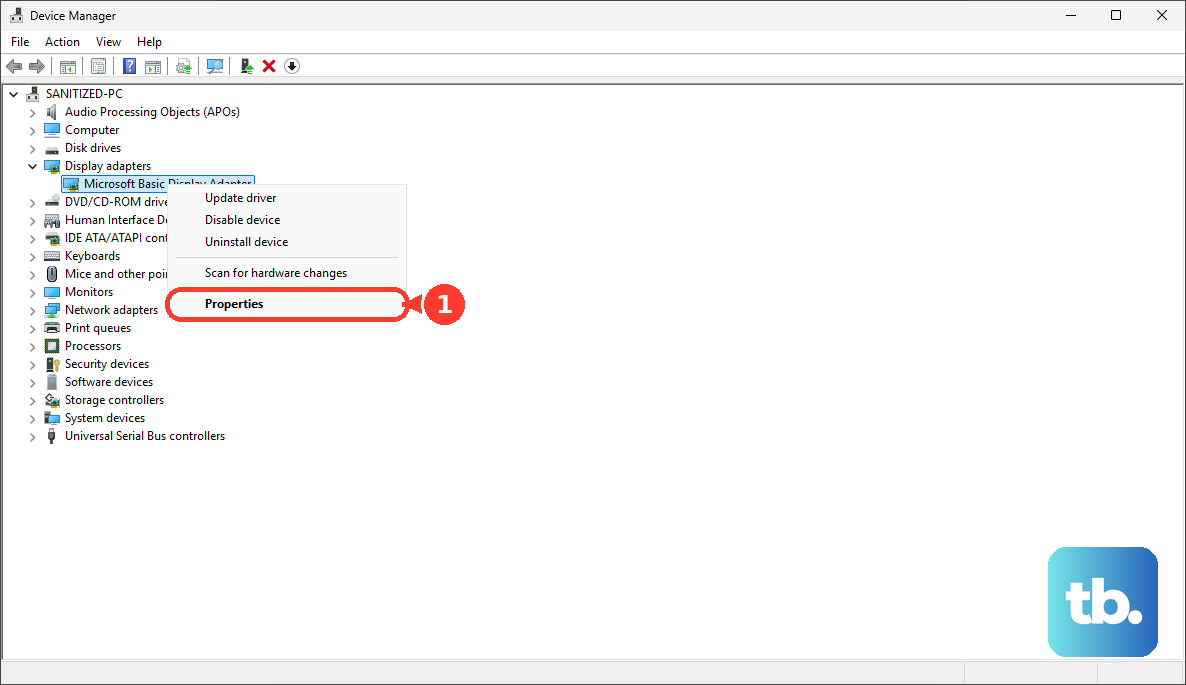
Rolling back removes the display driver change and restores the retained previous driver. Select Roll Back Driver, select Yes, then restart. If the rollback control is unavailable, Windows has no retained previous driver.
You can instead uninstall the updated display driver, after which Windows attempts to reinstall a driver. That replacement is not guaranteed to be an older driver. On Windows 11 or Windows 10, open Device Manager > Display adapters, then open the adapter's Properties > Driver.
The next steps remove the selected display driver. Select Uninstall Device. On Windows 11, select Attempt to remove the driver for this device; on Windows 10, select Delete the driver software for this device. Select OK, then restart.
If the Windows 11 checkbox is absent, Microsoft advises using Safe Mode for this procedure. After removal and restart, Windows attempts to reinstall a driver.
Use commands for an eligible update package
WUSA can uninstall eligible update packages by their numeric KB identifier or package file. It cannot uninstall combined servicing-stack and latest-cumulative-update packages. In an administrator Command Prompt, check its supported switches with:
wusa.exe /?Replace <number> with the numeric KB identifier and run the following command. This removes the eligible update you specify.
wusa /uninstall /kb:<number>Alternatively, replace <update> with the eligible update package file in the command below. This removes the update specified by that package file.
wusa /uninstall <update>For removable servicing packages on Windows 11 or supported Windows 10 installations, DISM provides a package-based removal method. In an administrator Command Prompt, list the installed packages with:
DISM /Online /Get-PackagesIdentify the intended removable package and replace <exact-package-name> with its exact identity, not a KB number or an MSU filename. The following command removes that servicing package from the running Windows installation.
DISM /Online /Remove-Package /PackageName:<exact-package-name>On installations with Microsoft's built-in DISM PowerShell module, you can instead use elevated Windows PowerShell with the same exact package identity. The following command removes the specified package from running Windows.
Remove-WindowsPackage -Online -PackageName "<exact-package-name>"Each command remains subject to package eligibility. If a package cannot be removed, a suitable existing System Restore point may let you reverse the associated system changes.
Repair an offline Windows installation
For an offline Windows 11 or Windows 10 installation, use a suitable recovery or servicing command prompt. Identify the installed Windows volume before running commands because drive letters can differ in recovery. Replace <Windows-volume-root> with that volume's root and list its packages:
DISM /Image:<Windows-volume-root> /Get-PackagesIdentify the intended removable package and substitute its exact identity in the next command. This removes the selected package from the offline Windows installation.
DISM /Image:<Windows-volume-root> /Remove-Package /PackageName:<exact-package-name>Where the built-in DISM module is available, elevated Windows PowerShell also supports offline package removal. Replace both placeholders with the offline Windows root and exact package identity. This removes the specified package from that offline installation.
Remove-WindowsPackage -Path "<offline-Windows-root>" -PackageName "<exact-package-name>"If Windows fails to boot because of pending servicing operations, Microsoft provides a separate recovery command. Target the offline installed Windows volume, never the running operating system or the recovery environment's own image. This reverses pending servicing operations rather than removing a selected installed KB.
DISM /Image:<Windows-volume-root> /Cleanup-Image /RevertPendingActionsRemove updates on managed PCs
If you administer eligible Intune-managed devices, open Microsoft Intune admin center and select Devices > By platform > Windows > Manage updates > Windows updates. Open Update rings, select the policy and open its overview page. This action requires Intune Plan 1 and an eligible managed edition, including Pro, Pro Education, Enterprise or Education.
The uninstall action rolls back the latest update of the selected type, pauses that update type and can trigger an immediate restart. Select Uninstall, choose Feature or Quality, then select OK.
As an MDM administrator, you can also request rollback through the Update CSP on applicable Windows 11 and Windows 10 devices. The device must be connected to Windows Update for Business, paused and running the latest update of the selected type. Feature rollback also requires an unexpired uninstall window and works only on General Availability Channel targeted devices.
Use the applicable management node shown below for a quality update or a feature update. The rollback removes the latest update of that type.
./Vendor/MSFT/Update/Rollback/QualityUpdate./Vendor/MSFT/Update/Rollback/FeatureUpdateFrequently Asked Questions
Can you go back to an older Windows version on a PC that shipped with its current version?
A factory-installed Windows version has no previous installation to restore with Go back. That rollback method applies after an eligible version upgrade with retained rollback files.
How long are point-in-time restore snapshots retained?
Microsoft documents a default snapshot retention period of 72 hours. Your recovery depends on an existing snapshot, so a snapshot from before the update must still be available.
Can PowerShell remove a package using an MSU file?
The Remove-WindowsPackage cmdlet supports CAB packages for package-file input, not MSU files. You can use the exact package-name form shown above for an eligible installed package.
Does the Windows 10 path mean ordinary Windows 10 support is still active?
No, ordinary Windows 10 support has ended. The uninstall instructions also apply to ESU-enrolled Windows 10 22H2 and supported LTSC installations.
Can Intune remove every feature update?
No, feature updates installed through enablement packages cannot be removed using the Intune uninstall action. LTSC supports quality-update management through this route, not feature-update rollback.