


To access the Windows Recovery Environment, open Settings > System > Recovery and select Restart now beside Advanced startup. Confirm the restart if prompted, then select Troubleshoot > Advanced options. You can also hold Shift while selecting Restart from the desktop or sign-in screen.
Opening recovery does not require resetting or reinstalling Windows. Use Settings when Windows responds, the sign-in screen when you cannot sign in, or startup recovery and compatible bootable media when Windows will not load.
The short version
- From Settings: Open System > Recovery and select Restart now beside Advanced startup.
- Without signing in: Hold Shift while selecting Power > Restart on the sign-in screen.
- When startup fails: Allow automatic recovery to open, then select Advanced options.
- When local recovery fails: Boot a compatible recovery drive or Windows installation USB to reach recovery.
| Method or option | When to use it | Requirement or limitation |
|---|---|---|
| Windows 11 Settings | Windows opens normally | Enabled, working local recovery |
| Windows Search | Find Advanced startup | Responsive desktop |
| Recovery settings shortcut | Open recovery settings through Run | Restart from Settings afterward |
| Desktop restart shortcut | Hold Shift while selecting Restart | Responsive desktop and local recovery |
| Sign-in screen restart shortcut | Enter recovery without signing in | Responsive sign-in screen and local recovery |
| Automatic recovery | Windows repeatedly fails to start | Working automatic recovery |
| Interrupt startup twice | Normal entry is unavailable | Working on-disk recovery |
| Restart command | Restart immediately into recovery | Permission to restart |
| REAgentC startup request | Enter recovery on the next startup | Administrator access and configured recovery |
| Enable Windows RE | Local recovery is disabled | Usable recovery image |
| Recovery USB | Boot recovery from external media | Drive intended for your device |
| System repair disc | Boot recovery from CD or DVD | Compatible optical hardware |
| Windows installation media | Open the installer's repair route | Compatible bootable USB or DVD |
| Windows 11 x64 download | Create installation media | x64 PC |
| Windows 11 Arm64 download | Prepare Arm installation media | Compatible Arm64 PC and any required drivers |
| Dell F12 | Open recovery through SupportAssist | Supported configuration, excluding BIOSConnect sessions |
| HP F11 | Enter recovery during startup | Supported model and recovery configuration |
| ASUS F9 or F12 | Enter recovery during power-on | Model-specific shortcut |
| Acer Alt + F10 | Enter recovery at the Acer logo | Supported recovery configuration |
| Lenovo Novo button or Fn + Power | Open startup options while powered off | Model documenting these controls |
| Lenovo F9 | Open the Novo menu during startup | Model documenting this shortcut |
| ThinkPad F11 | Enter recovery at the logo | Model documenting this shortcut |
| MSI F3 | Enter recovery at the MSI logo | Factory system and intact recovery configuration |
| Surface USB button shortcut | Boot a connected recovery USB | Compatible Surface and matching media |
| Surface UEFI USB controls | Select USB boot through firmware | Supported Surface model |
| Surface factory recovery USB | Build media from a recovery image | Matching image and empty USB |
| Surface image download portal | Get the device's recovery image | Microsoft account and supported Surface |
| Quick machine recovery settings | Configure automatic connected recovery | Available feature; does not open recovery immediately |
| Quick machine recovery test mode | Enter a simulated recovery workflow | Windows Insider Experimental channel only |
Open recovery from Windows Settings
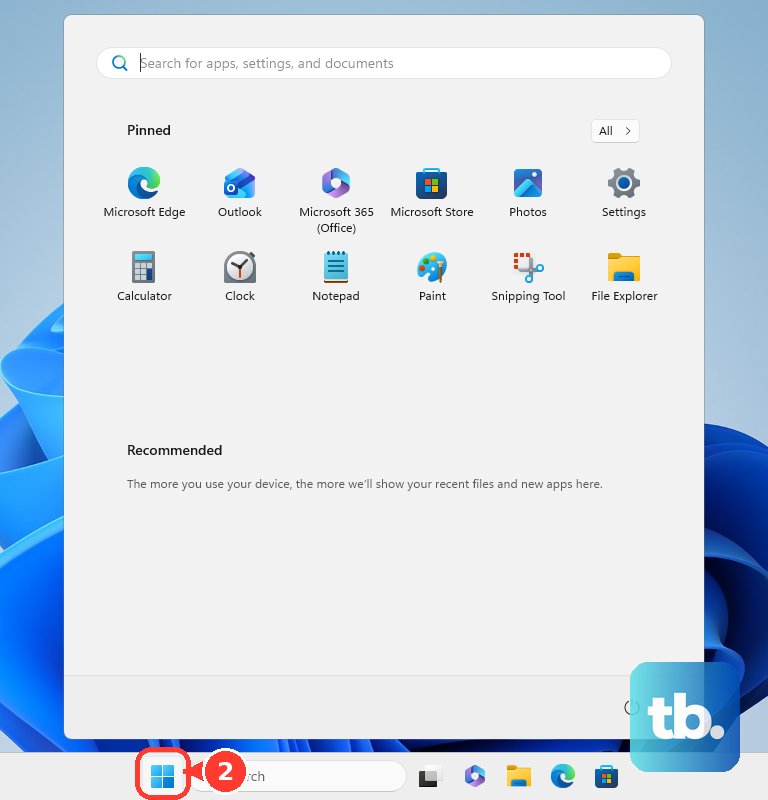
On Windows 11, open Start > Settings > System > Recovery. Under Recovery options, find Advanced startup and select Restart now. Select Restart now again if Windows asks you to confirm.
After restarting, choose Troubleshoot, then select Advanced options. If your eventual goal is to factory reset a laptop, treat that as a separate decision after entering recovery.
Windows Search offers another route to the same setting. Search for Change advanced startup options, select Open, then select Restart now beside Advanced startup. Select Restart now again if prompted.
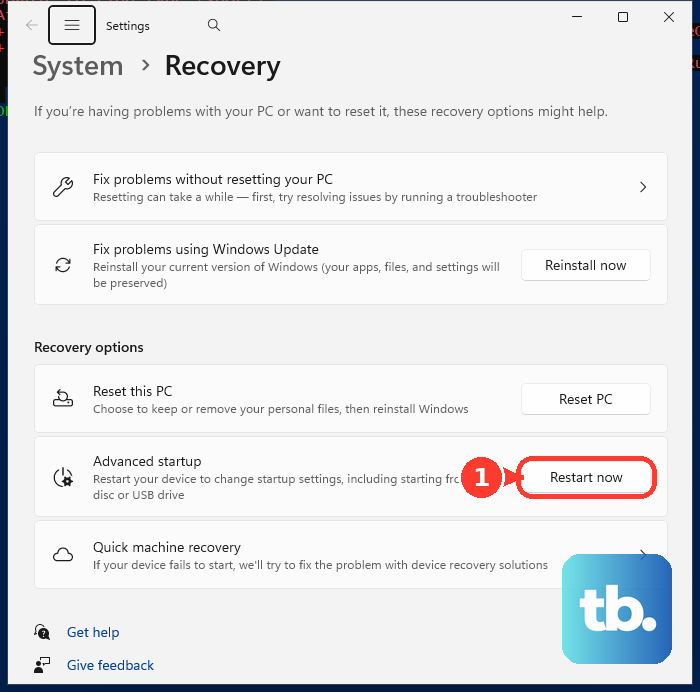
You can also open the recovery settings page through Run. Press Windows + R, enter the following command, and press Enter.
ms-settings:recoveryThe command opens Settings without restarting your computer. Beside Advanced startup, select Restart now, then select Restart now again if prompted.
Use the restart shortcut on either screen
From the desktop, open Start > Power. Hold Shift while selecting Restart, then let the computer restart. Choose Troubleshoot > Advanced options when the recovery menu opens.
At the sign-in screen, select Power, hold Shift, and select Restart. Afterward, choose Troubleshoot > Advanced options. If you are already signed in, press Windows + L and dismiss the lock screen to reach the sign-in screen first.
These routes require Windows to respond to the restart action and have working local recovery. If the computer is frozen, follow the steps to restart an unresponsive computer before trying again. If it cannot reach the desktop or sign-in screen afterward, use startup recovery.
Enter recovery when Windows will not start
Windows can open recovery automatically after repeated startup failures, including two failed starts. Allow that process to run when it begins. At the Automatic Repair screen, select Advanced options to continue into recovery.
When normal entry is unavailable, Microsoft also supports deliberately interrupting startup twice. Turn on the computer, wait for the Windows or manufacturer logo, then hold the Power button until it shuts down. Repeat that sequence once more.
Turn on the computer a third time and let startup continue without interruption. At Automatic Repair, select Advanced options, then choose Troubleshoot > Advanced options as needed to reach the tools. This route requires working on-disk recovery; use compatible bootable media if it does not open.
Restart into recovery with a command
Save your work because this command restarts the computer immediately. Open Command Prompt, PowerShell, or Terminal, enter the following command, and press Enter.
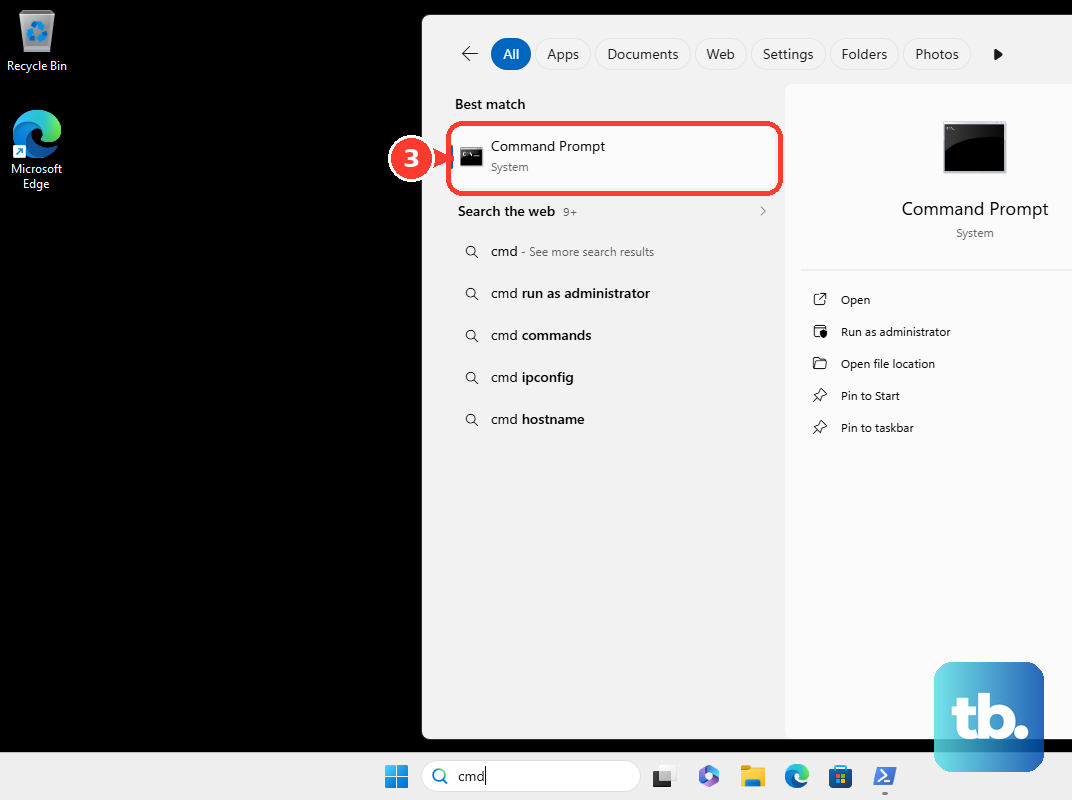
shutdown.exe /r /o /t 0After the restart, select Troubleshoot > Advanced options. You need permission to restart the computer, and you can invoke the same command through Run or a shortcut. If local recovery is disabled, check its status before trying again.
Enable recovery or request it for the next startup
When normal restart routes fail to open recovery, open Command Prompt using Run as administrator. Select Yes if User Account Control prompts you. Enter the following command and press Enter to check the Windows RE status.
reagentc /infoIf Windows RE is disabled, enter the following command and press Enter. Enabling recovery requires a usable recovery image, so this command cannot replace missing or damaged recovery files.
reagentc /enableEnabling Windows RE does not open it immediately. To request recovery on the next startup, enter the following command in the administrator Command Prompt and press Enter.
reagentc /boottoreRestart the computer afterward to enter Windows RE. You can use this startup request whenever recovery is configured, without running the enable command again.
Use a recovery shortcut for your PC
Manufacturer shortcuts depend on your exact model and recovery configuration. Use the control documented for your computer; if it fails, try a Windows restart method or compatible recovery media.
On supported HP computers, restart and immediately press F11 repeatedly. At Choose an option, select Troubleshoot. On business models, HP Sure Recover can change what the shortcut launches, so check your model's recovery configuration.
On supported Acer computers, start with the computer fully off. Turn it on and press Alt + F10 together when the Acer logo appears. Wait for Choose an option, then select Troubleshoot.
For supported ASUS computers, start with the computer off, hold F9, and press Power. Release F9 when Windows RE appears. On models assigned F12, repeat with F12 instead.
If firmware Fast Boot blocks the ASUS shortcut, models using MyASUS in UEFI have a documented adjustment. Hold F2 while powering on, then press F7 for Advanced Settings. Open Boot > Fast Boot and select Disabled. Press F10, select Confirm, and retry the recovery shortcut.
On MSI laptops with the factory system and intact recovery configuration, connect power and turn on the laptop. Press F3 repeatedly at the MSI logo, then select Troubleshoot. MSI excludes configurations where reinstallation or partition changes have cleared or damaged recovery.
On supported Dell and Alienware computers, turn on the computer, press F12, and select SupportAssist OS Recovery. On its Home screen, open the three-dot menu in the upper-right corner and select Windows recovery. The computer restarts into Windows RE; Dell excludes SupportAssist sessions started through BIOSConnect.
On Lenovo models documenting a physical Novo button, turn off the computer, open the display, and press that button. Alternatively, on models supporting it, press Fn + Power while the computer is off. In the Novo menu, choose the entry for Windows startup options; its wording varies by model.
Other Lenovo models document F9 for the Novo menu. Turn on or restart the computer, press F9 repeatedly, then choose the entry for Windows startup options. On ThinkPad models whose manuals specify F11, restart and press F11 when the logo appears to enter Windows RE.
Boot recovery media when local recovery fails
Connect an existing recovery USB and select it from your computer's boot menu. Boot-menu keys vary by model; if you need to open your PC's BIOS settings to reach its boot controls, follow the instructions for your hardware. Microsoft describes recovery-drive media as intended for the device on which you created it.
To prepare a recovery drive beforehand, search Start for Recovery Drive and open it. Select Back up system files to the recovery drive, then select Next. Connect and select an empty USB drive, select Next, then select Create. Creation erases the USB; booting the finished drive loads Windows RE.
You can also create a system repair disc with a blank CD or DVD and a compatible writer. Open Control Panel > Backup and Restore (Windows 7) > Create a system repair disc and create the disc. Boot it through the computer's boot menu to access recovery options; your hardware must support optical boot.
Windows installation media offers another repair route. For an x64 Windows 11 PC, open the Windows 11 download page and select Download Now under Create Windows 11 Installation Media. Run the tool, select Accept, and follow its choices to create a bootable USB or DVD. The same page also offers Download Windows 11 Disk Image (ISO) for x64 devices.
For an Arm-based PC, open the Windows 11 Arm download page, choose an edition, and select Download Now. Choose the language, select Confirm, download the ISO, and follow Microsoft's linked Arm media instructions. The Media Creation Tool does not create Arm64 media, and your bootable media may need manufacturer drivers.
Boot compatible installation media, choose the language and other preferences, and select Next. Select Repair my PC, then select Next to enter Windows RE. Older installers can use different wording for the repair option.
Create and boot a Surface recovery USB
For a matching factory image, open Surface Recovery Image Download and select Sign In. Sign in with your Microsoft account, select the applicable Surface, and download its recovery image ZIP. Microsoft recommends the most recent available image.
Extract the ZIP, insert an empty USB drive, and open Recovery Drive. Select Yes when prompted, uncheck Back up system files to the recovery drive, and select Next. Select the USB, then select Next > Create; this erases its existing contents.
Select Finish, then copy the extracted image contents onto the USB. Select Replace the files in the destination when prompted. The recovery image must match your Surface.
To boot the recovery USB, shut down the Surface and connect the drive. Hold Volume down while pressing and releasing Power. Keep holding Volume down until the Microsoft or Surface logo appears, then release it. Choose the language and keyboard layout if prompted.
On supported Surface models, you can also select USB boot through UEFI. With the Surface off and compatible recovery media connected, hold Volume up, press and release Power, and keep holding Volume up until UEFI appears. Select Boot configuration, then swipe left on USB Storage to boot it immediately. Alternatively, drag USB Storage to the top, select Exit, and select Restart Now.
Configure automatic recovery for future startup failures
Quick machine recovery configures an automatic connected recovery workflow rather than immediately opening Windows RE. When the feature is available, open Settings > System > Recovery > Quick machine recovery. Turn on Quick machine recovery, optionally turn on Automatically check for solutions, and configure Look for solutions. Windows uses the workflow when a qualifying boot failure occurs.
Microsoft restricts Quick machine recovery test mode to Windows client devices enrolled in the Windows Insider Program's Experimental channel. Only on those devices, open Command Prompt using Run as administrator and run the following commands in order.
reagentc.exe /SetRecoveryTestmode
reagentc.exe /BootToRe
Restart the computer to enter the simulated recovery workflow, which subsequently returns you to Windows. For ordinary access to recovery tools, use one of the general entry methods above.
Frequently Asked Questions
Will recovery tools ask for a BitLocker recovery key?
Particular recovery tools can require the BitLocker recovery key when your drive is encrypted. Reaching the recovery menu does not mean every tool can access that drive without the key.
Does pressing F8 open Windows Recovery Environment?
Repeated presses of F8 are not a universal shortcut on current Windows installations. Microsoft documents that the Standard boot-menu policy ignores F8; older or administrator-modified boot configurations can behave differently.
Why do older instructions mention Update & Security?
The Update & Security settings category belongs to Windows 10. Windows 11 places Recovery under System, so those older directions do not match its Settings layout.
Does Samsung F4 open the standard Windows recovery menu?
Samsung's F4 shortcut opens Samsung Recovery, the manufacturer's recovery application. It is not an established shortcut to the standard Windows RE menu.
Can Microsoft Defender Offline open the recovery tools?
Microsoft Defender Offline runs its scan inside Windows RE and then returns to Windows. It does not provide the general recovery menu.
Which Windows editions include Windows RE?
Home, Pro, Enterprise, and Education include Windows RE by default. Manufacturer installations and organizational management can change its availability on your computer.