

Recover from a MacBook Pro crash by quitting the frozen app, or restarting the Mac if the whole computer is unresponsive. If crashes return, update your software, disconnect accessories, and test safe mode before repairing the startup disk or reinstalling macOS.
If the Apple logo or progress bar appears during a macOS installation, keep the Mac powered and allow more time before treating it as frozen. Apple advises letting an installation run overnight when necessary.
The short version
- One frozen app: Force quitting can lose unsaved changes, so try Command + Q before opening Force Quit with Option + Command + Esc.
- A frozen Mac: A forced shutdown can lose unsaved work, so restart through the menu when possible or hold the power button for about 10 seconds if the Mac is unresponsive.
- Repeated crashes: Update macOS and apps, disconnect peripherals, and test safe mode.
- Startup failure: Use macOS Recovery to repair the disk and reinstall macOS without erasing personal data.
| Fix or recovery option | When to use it | Main consideration |
|---|---|---|
| Quit a frozen app | One app stops responding | Force quitting can lose unsaved changes |
| Relaunch Finder | Finder stops responding | Select Finder in the force quit window |
| Activity Monitor | An app or background process hangs | The desktop must still respond |
| Normal restart | Menus still work | Prevent the previous windows from reopening |
| Forced shutdown | The whole Mac is unresponsive | Unsaved work can be lost |
| Power checks | The Mac will not turn on | Check the charger, cable, and outlet |
| Document versions | A document lost changes | The app must support versioning |
| Time Machine | A file is missing | A backup must contain the file |
| Share Disk | You need files from an Apple silicon Mac | Recovery must access its data volume |
| Target disk mode | You need files from an Intel Mac | Connect another Mac with Thunderbolt |
| macOS updates | Crashes return after startup | Install the compatible update offered |
| App updates | An app needs fixes | Use the App Store or developer’s updater |
| App and document checks | Only one app crashes | Check compatibility and another document |
| Prevent window restoration | An app reopens a troublesome session | Use the Ventura 13 or later controls below |
| Uninstall an app | A removable third-party app remains the problem | Prefer its supplied uninstaller |
| Accessory isolation | Unexpected restarts repeat | Reconnect devices individually |
| Apple silicon safe mode | You need to test startup behavior | Begin with startup options |
| Intel safe mode | You need to test startup behavior | Hold Shift at startup |
| Recovery Assistant | It opens after startup fails | Requires a supported internet connection |
| Apple silicon Recovery | You need startup repair tools | Hold the power button for startup options |
| Intel Recovery | You need startup repair tools | Start with Command + R |
| Disk Utility First Aid | The startup disk needs repair | Run it from Recovery |
| Reinstall macOS | Disk repair does not resolve startup failure | Back up accessible files first if possible |
| Apple Diagnostics | A hardware problem is suspected | Record reference codes |
| Hardware service | The Mac still cannot power on | Provide any diagnostic reference codes |
Quit the app that stopped responding
For a single frozen app, try pressing Command + Q first. If it stays unresponsive, you can force quit apps on a Mac.
Force quitting can discard unsaved changes. Press Option + Command + Esc, or choose Apple menu > Force Quit, select the affected app, then click Force Quit. Reopen the app afterward.
Finder has a different button in the same window. Press Option + Command + Esc, select Finder, then click Relaunch.
When the desktop responds but an app or background process is stuck, open Activity Monitor. Select the affected item under Process Name, click Stop, then click Quit. You may need administrator authentication for another user’s process.
Force quitting can discard unsaved work. If the normal quit does not work, click Force Quit.
Restart a frozen MacBook Pro
If menus still respond, restart your Mac through Apple menu > Restart. Uncheck Reopen windows when logging back in to avoid restoring the same problematic session, then click Restart.
A forced shutdown can lose unsaved work. When the Mac will not respond, hold the power button for about 10 seconds until it turns off; on a model with Touch ID, hold the Touch ID button. Press and release the power button to start it again.
If it will not power on, check that the charging cable is undamaged and firmly connected to both the Mac and a working outlet. Try another compatible charger or cable if you have one. Disconnect accessories and try starting the Mac again.
Recover accessible files and document versions
Back up accessible files before reinstallation or destructive recovery. If a document lost changes, an earlier saved version or an existing Time Machine backup may help. Document versioning cannot guarantee recovery of changes that were never saved or autosaved.
In an app that supports document versions, open the document and choose File > Revert To > Browse All Versions. Find the version you need, then hold Option and click Restore a Copy to preserve the current document separately.
For a missing file stored in a Time Machine backup, open the folder where it belongs and open Time Machine through Spotlight. Browse backup dates with the arrows or timeline, select the file, then click Restore.
If your Apple silicon Mac can enter Recovery and access its data volume, you can copy files to another Mac. Connect the Macs with a suitable USB, USB-C, or Thunderbolt cable, enter Recovery using the steps below, then choose Utilities > Share Disk. Select the volume and click Start Sharing.
On the other Mac, open Finder > Network, open the affected Mac, and click Connect As. Select Guest, click Connect, and copy your files. Eject the shared volume and click Stop Sharing when finished.
For an Intel MacBook Pro, connect it to another Mac with a Thunderbolt cable and start the affected Mac while holding T. Open its disk in Finder on the other Mac and copy the files. Eject the disk before powering off and disconnecting the affected Mac.
Update software and check the crashing app
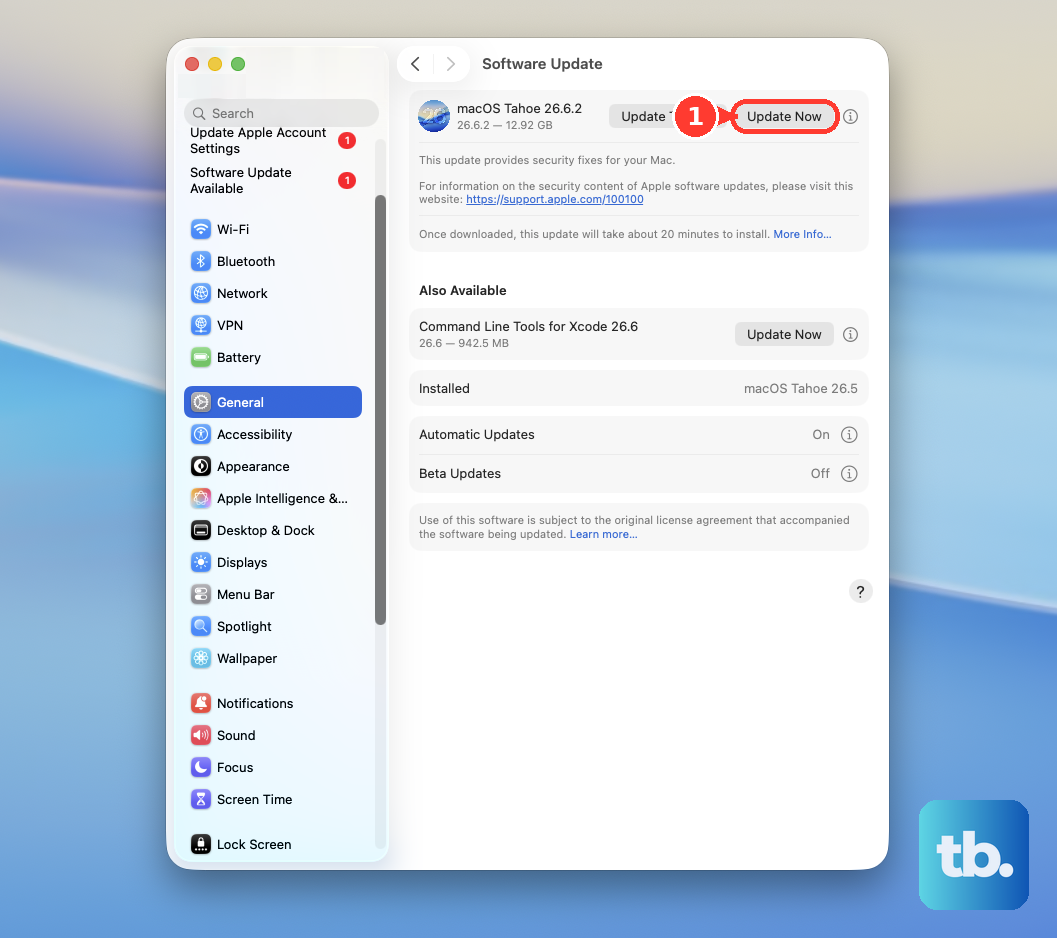
With a responsive desktop, open Apple menu > System Settings > General > Software Update. Install the compatible update offered and enter the administrator password when requested. Keep the lid open throughout installation.
For apps downloaded through the Mac App Store, open App Store > Updates. Click Update beside the affected app or Update All. Apps obtained elsewhere use their developer’s updater.
If only one app crashes, click Reopen if the crash dialog offers it. Try opening a different document in the app, and check its macOS compatibility and available updates.
On macOS Ventura 13 and later, hold Shift while opening the app to prevent its previous windows from returning. For a persistent setting on those versions, open Apple menu > System Settings > Desktop & Dock and turn on Close windows when quitting an application.
Uninstalling removes the app, and its supplied uninstaller can also remove associated extensions and login items. If a removable third-party app remains the problem, uninstall the problematic Mac app by quitting it and locating it in Finder > Applications. Prefer its supplied Uninstall or Uninstaller utility, or its documented in-app removal feature; otherwise select the app and choose File > Move to Trash. Authenticate if requested, and reinstall only a compatible version from its official source.
Disconnect accessories and test safe mode
For repeated unexpected restarts, check connected devices. Shut down and disconnect peripherals, including hubs, drives, and printers, then restart and test for the period in which crashes normally occur. Reconnect devices individually, testing after each connection to identify a trigger.
Next, test safe mode using the procedure for your processor. On an Apple silicon MacBook Pro, shut down, then hold the power button until startup options appear. Select the startup volume, hold Shift, and click Continue in Safe Mode. Log in and test the Mac.
On an Intel MacBook Pro, turn on or restart the Mac and immediately hold Shift until the login window appears. Log in, completing a second login if requested, and look for Safe Boot in the menu bar. Restart normally to leave safe mode on either type of Mac.
Use Recovery when startup fails
On macOS Tahoe 26 and later, Recovery Assistant may open automatically after a startup failure. It requires internet access and does not support captive portals or 802.1X networks.
Click Continue and complete the diagnostic-data preference screen. If requested, enter the administrator password and click Unlock. Connect to Wi-Fi when requested, then click Restart Mac after recovery finishes.
To enter macOS Recovery manually on an Apple silicon MacBook Pro, turn it off and hold the power button until startup options appear. Click Options, then Continue. Select the startup volume and click Next if requested, then select an authorized user and enter the login password.
On an Intel MacBook Pro, turn it on and immediately hold Command + R until the Apple logo or globe appears. Join a network and authenticate when requested. For Internet Recovery, use Option + Command + R or Shift + Option + Command + R instead.
If Intel Internet Recovery fails, try Ethernet, another network, or another of those Recovery key combinations. On Apple silicon, use the startup-options procedure above.
Repair the disk and reinstall macOS if needed
For startup-disk repair, run Disk Utility from macOS Recovery. Select Disk Utility, click Continue, then choose View > Show All Devices.
Starting with the lowest volume in the sidebar, select it, click First Aid, then click Run. Repeat upward through every volume, volume group, container, and finally the physical device, unlocking with the administrator password if requested. Quit Disk Utility and choose Apple menu > Restart.
If repair does not resolve the startup failure, back up accessible files if possible before reinstalling macOS. Recovery offers a reinstallation without erasing personal data. Enter Recovery again, select Reinstall macOS, and click Continue.
When asked to choose between Macintosh HD and Macintosh HD - Data, choose Macintosh HD. Supply the login password if the disk needs unlocking, and keep the lid open until installation finishes.
Run hardware diagnostics and arrange service
When crashes persist or software recovery does not resolve the failure, run Apple Diagnostics. Shut down, connect power, disconnect unnecessary peripherals, and place the Mac on a ventilated solid surface.
On Apple silicon, hold the power button until Options appears, then hold Command + D until the Mac restarts. On Intel, hold D at startup, or use Option + D if that fails. If offered an offline test, click Run Offline.
Follow the available hardware tests and record any reference codes. If the Mac still cannot power on, begin Apple support through its Get service option and provide those codes. Hardware repair may be necessary when software recovery cannot resolve the failure.
Frequently Asked Questions
Can you stop login apps from opening for one startup?
At the login window, hold Shift while clicking Log In, then release it when the Dock appears. If login is automatic, hold Shift when the startup progress bar appears and release it after the desktop appears.
Should you reset the SMC on an Apple silicon MacBook Pro?
An Apple silicon MacBook Pro does not need an SMC key combination. Connect it to power and choose Apple menu > Restart, or shut it down and power it on again. Apple says power management resets automatically.
Which macOS version will Recovery reinstall?
Recovery normally reinstalls the current version of the most recently installed macOS. On Intel, Option + Command + R may offer the newest compatible release, while Shift + Option + Command + R may offer the original or nearest available release.
Should you follow an old single-user recovery tutorial?
Apple says the old Command + S single-user startup mode is disabled in macOS Mojave and later. Use macOS Recovery and Disk Utility instead.
Does firmware recovery always erase a MacBook Pro?
A firmware revive does not erase an Apple silicon or T2 MacBook Pro. If revival fails, a firmware restore is the next option, but it erases the Mac’s data. Both procedures require another Mac running macOS 14 or later with internet access and a USB-C data-and-charging cable, not a Thunderbolt 3 cable.