


To enter BIOS on Windows 11, open Settings > System > Recovery, select Restart now under Advanced startup, then choose Troubleshoot > Advanced options > UEFI Firmware Settings > Restart. Save your open files before starting, because this route restarts your PC.
The short version
- Use Settings > System > Recovery when Windows 11 opens normally.
- Hold Shift while selecting Restart to reach recovery from the desktop or sign-in screen.
- Use your PC maker's startup key when Windows cannot load.
- On Surface, hold Volume Up while pressing and releasing Power.
- Look for UEFI Firmware Settings in recovery, even if you call it BIOS.
| Method | What it does | Time | Use it when |
|---|---|---|---|
| Windows Settings | Opens firmware through recovery | A few minutes | Windows opens normally |
| Advanced startup search | Finds the Recovery page | A few minutes | You prefer Windows search |
| Shift and Restart | Opens recovery without Settings | A few minutes | You can reach the sign-in screen |
| Startup key | Opens firmware during startup | Under a minute | Windows will not load |
| Surface buttons | Opens Surface UEFI | Under a minute | You use a Surface device |
| Shutdown command | Requests a firmware restart | A few minutes | You prefer Command Prompt |
| Automatic Repair | Reaches recovery after interrupted starts | A few minutes | Normal recovery routes are unavailable |
| Installation media | Opens recovery from USB or DVD | A few minutes with media ready | Built-in recovery will not open |
Open BIOS from Windows Settings
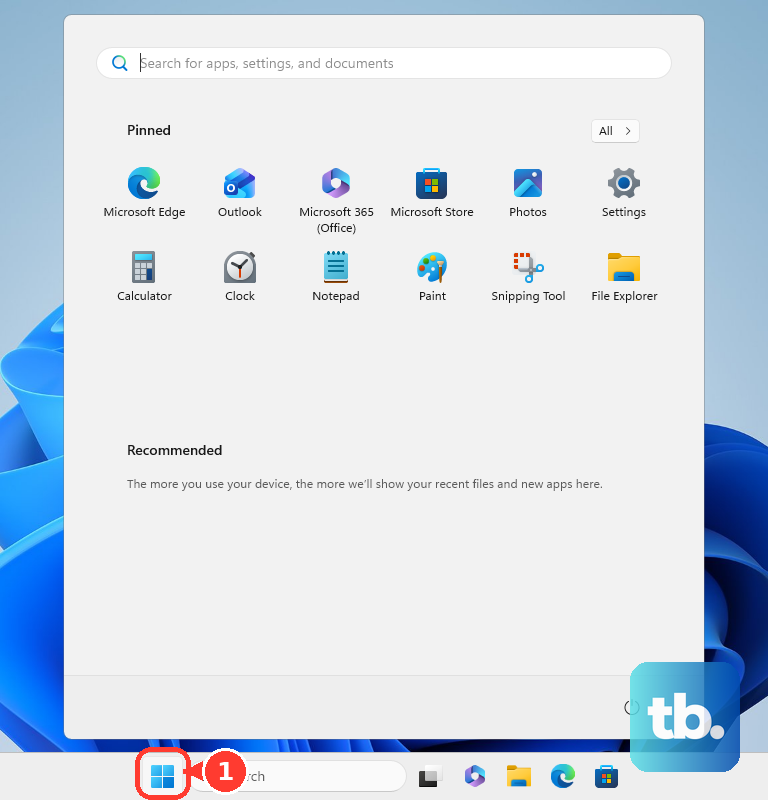
Start here when Windows 11 loads normally and you can open the desktop. Select Start, then open Settings to begin the restart route.
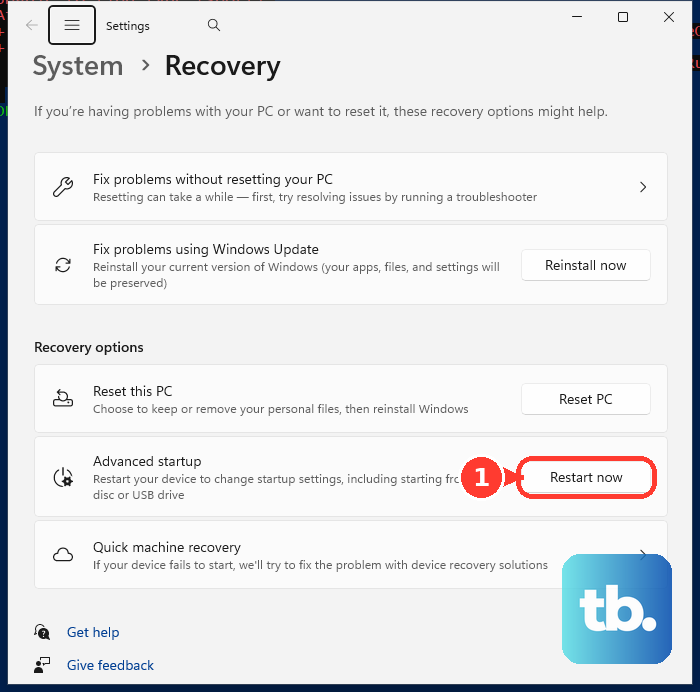
Select System, then Recovery. Under Recovery options, find Advanced startup and select Restart now. If Windows asks you to save your work, save it before confirming Restart now.
At Choose an option, select Troubleshoot, then Advanced options. Choose UEFI Firmware Settings and select Restart. Your PC restarts again and opens its firmware settings.
On Windows 10, open Settings > Update & Security > Recovery, then select Restart now under Advanced startup. Continue through the same recovery options described above.
Find Advanced startup with Windows search
In Windows search, type Change advanced startup options, then select Open. On the Recovery page, select Restart now in the Advanced startup section. On Windows 11, confirm Restart now if the save-work prompt appears.
This reaches the same recovery screen as the Settings method. Follow the Troubleshoot route above to UEFI Firmware Settings, then select Restart.
Use Shift and Restart
From the desktop, open Start > Power. Hold Shift while you select Restart. If you cannot sign in, use the Power menu on the sign-in screen and perform the same action.
Once recovery appears, follow the firmware route in the Settings section. Choose UEFI Firmware Settings and then Restart to enter BIOS. This avoids opening Settings and also gives you an option when the desktop is out of reach.
Press your PC maker's startup key
A startup key opens firmware before Windows loads. Use the instructions for your brand and product family below, because the key and its timing differ. If Windows opens before you reach BIOS, try again or use the Windows Settings route.
Dell and HP
On Dell, turn on or restart the computer and repeatedly press F2 when the Dell logo appears. Alternatively, press F12 at the logo and select BIOS Setup or System Setup. If F2 does not respond, try Fn + F2.
On an HP notebook, turn on or restart the computer and quickly press Esc. When the Startup Menu appears, press F10 to open the BIOS setup utility. On an HP desktop, press F10 repeatedly as soon as you turn it on until Computer Setup opens.
Lenovo
For ThinkPad, ThinkCentre desktops and all-in-ones, and ThinkStation, power on or restart and press F1 at the Lenovo or Think product logo. On ThinkPads that display a prompt to interrupt startup, press Enter at that prompt, then press F1 at the Startup Interrupt Menu.
For IdeaPad, turn the PC on or restart it, then press F2 repeatedly immediately after it turns on. Use Fn + F2 if hotkey mode is enabled. On models with a Novo button, shut down, press that button, and select BIOS Setup from the Novo menu.
ASUS, Acer, MSI and GIGABYTE
For ASUS notebooks, desktops, all-in-one PCs and Mini PCs, start with the device completely shut down. Hold F2, press Power, and release F2 when BIOS appears. Some older ASUS desktops use Del instead, so check the model's instructions if F2 fails.
On Acer, shut down and power on, then press F2 for a notebook or Delete for a desktop as soon as the first logo appears. Check your model's manual if its usual startup key does nothing.
On an MSI motherboard, repeatedly press Delete during startup; on an MSI notebook, press it as soon as the MSI logo appears. For a GIGABYTE motherboard, press Delete during the initial power-on self-test to open BIOS Setup.
Open Surface UEFI with its buttons
Shut down your Surface and wait about 10 seconds to make sure it is off. Hold Volume Up, then press and release Power. Continue holding Volume Up while the Microsoft or Surface logo appears, and release it when the UEFI screen opens.
You can also use the Windows Settings route on Surface if Windows is working. Both methods open the firmware settings, though the available options depend on your Surface model and whether it is a home or commercial device. Choose the button method when you cannot reach Windows.
Restart into firmware with Command Prompt
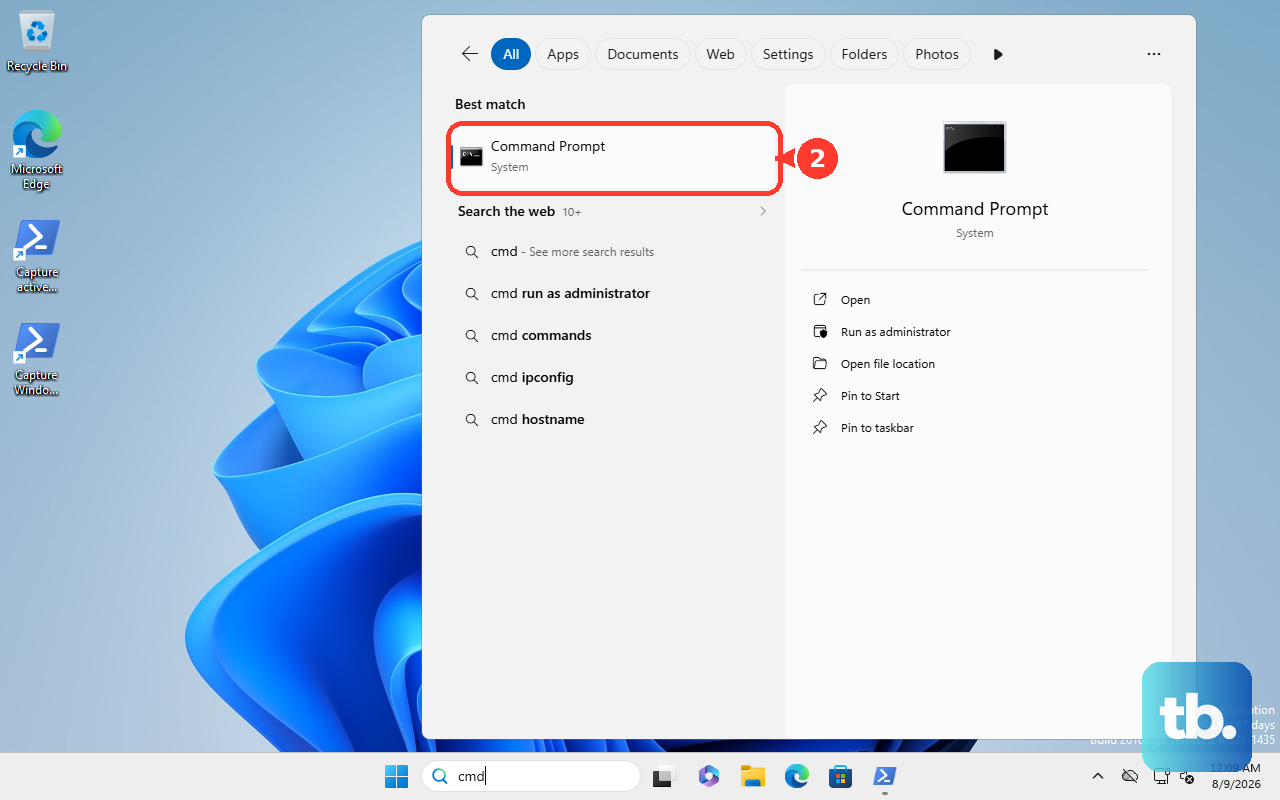
Save your work, then type cmd in Windows search. Right-click Command Prompt and choose Run as administrator, completing any confirmation or administrator password prompt. If you need help finding it, follow the steps to open Command Prompt in Windows.
Type shutdown /r /fw /t 0 and press Enter. The /r switch requests a restart, /fw sends the next restart to firmware, and /t 0 sets the delay to zero seconds. If Windows refuses the request, use the Settings route or your maker's startup key.
Reach firmware through Automatic Repair
If Windows will not start, try your maker's startup key first. To reach recovery instead, start the PC and wait for the Windows or manufacturer logo. Hold Power until the device shuts down, then turn it on and repeat that interruption once.
Turn the PC on a third time and let startup continue. Windows should show Automatic Repair; select Advanced options. Follow the recovery route in the Settings section to UEFI Firmware Settings and select Restart.
If your aim is to fix Windows failing to start, recovery also provides Startup Repair. Follow the steps to use Startup Repair for Windows boot problems when you need that repair tool.
Use Windows installation media for recovery
If built-in recovery will not open, boot the PC from Windows installation media on a USB drive or DVD. On the initial setup screen, enter your language and other preferences, then select Next. If current Windows 11 media shows a separate Select keyboard settings screen, choose your keyboard settings and select Next. Choose Repair my PC and select Next to enter recovery.
Follow the firmware route from Troubleshoot described earlier. If the PC skips the media and starts from its internal drive, consult the maker's instructions for selecting a boot device or changing boot order. You need to reach the setup screen before the media's recovery option becomes available.
What to do when BIOS will not open
If UEFI Firmware Settings is missing, use the maker's startup key or its hardware button method. The Windows firmware route is not available on every computer. Do not use F8 as a BIOS shortcut on Windows 11 or 10; use your maker's key or UEFI Firmware Settings instead.
Wireless and Bluetooth keyboards may not work before Windows loads, so connect a wired USB keyboard and try another USB port. If Windows is reachable, the Settings route also avoids the need to catch a startup key at the right moment.
If you change firmware settings on an encrypted PC, Windows may ask for your BitLocker recovery key at the next start. Have it ready. Use Microsoft's Find your BitLocker recovery key page to locate it before continuing.
On a work or school PC, contact IT if firmware asks for a password or settings are locked. On eligible managed Surface devices, IT administrators can block changes to UEFI settings. Opening firmware is a separate task from changing it, so change only the setting you came for.
In recovery, choose UEFI Firmware Settings for firmware access. Startup Settings controls Windows startup behavior, including Safe Mode. The BIOS screen itself can also look different between PC models, so use the labels and instructions for your own machine.
Frequently Asked Questions
What menu name should I look for in Windows?
Look for UEFI Firmware Settings under Troubleshoot > Advanced options. Your PC may call the firmware BIOS once you enter it.
Can I enter BIOS without pressing a startup key?
Yes, use Windows 11's Settings > System > Recovery > Advanced startup > Restart now. Then choose Troubleshoot > Advanced options > UEFI Firmware Settings > Restart.
What should I do if the BIOS key does nothing?
Check the maker's key and press it at the documented point during startup. Wireless and Bluetooth keyboards may not work before Windows loads, so connect a wired USB keyboard and try another USB port.
Can I open BIOS when Windows will not start?
Yes, use your maker's startup key or the Surface button shortcut. You can also reach recovery through Automatic Repair or installation media, then choose UEFI Firmware Settings if available.
Can an administrator block BIOS settings?
Yes, on eligible managed Surface devices, IT administrators can block changes to UEFI settings. Contact your organization's IT administrator when firmware access or settings are locked.
Does entering BIOS reset Windows?
Selecting UEFI Firmware Settings restarts into the firmware configuration screen. Reset this PC is a separate recovery option, so leave it alone when your only goal is to enter BIOS.