Seeing "No Service" or "Searching..." in the corner of your iPad mini (7th generation) is a real headache, especially when you need to use cellular data on the go. This usually means your iPad can't find or connect to your carrier's network. The good news is that most of the time, this is a temporary glitch you can fix yourself in a few minutes.
I'd start with the simplest fix first, which often does the trick. Just toggle Airplane Mode on and off. Swipe down from the top-right corner to open Control Center and tap the airplane icon to turn it on, wait about 10 seconds, then tap it again to turn it off. This forces the cellular modem to restart and reconnect to the network.
Restart Your iPad mini
If toggling Airplane Mode didn't work, the next step is to restart your device. A simple restart clears out temporary software bugs that can interfere with the cellular radio. Just hold the top button and either volume button until the power slider appears, slide to power off, wait 30 seconds, then press the top button again to turn it back on.
For more stubborn issues, you might need to perform a force restart. This is a bit different on the iPad mini. Press and quickly release the Volume Up button, then press and quickly release the Volume Down button. Immediately after, press and hold the Top button until you see the Apple logo appear on the screen, then release it.
Check for a Carrier Settings Update
Your carrier occasionally sends small updates that help your iPad connect to their network more reliably. These are separate from iPadOS updates. To check, make sure you're connected to Wi-Fi first, then go to Settings > General > About.
If an update is available, a prompt will appear on this screen. Just follow the on-screen instructions to install it. This process only takes a moment and doesn't require a restart.
Reinsert Your SIM Card or Check eSIM
A loose or dirty SIM card is a common culprit for signal problems. If your iPad mini uses a physical nano-SIM, you'll need the SIM eject tool that came in the box or a small paperclip. Gently push it into the small hole on the SIM tray, pop the tray out, and remove the SIM card.
Inspect the gold contacts on the SIM card for any dirt or damage. Give it a gentle wipe with a soft, dry cloth and then carefully reinsert it into the tray, making sure it's seated correctly. Push the tray back into the iPad until it clicks. If you're using an eSIM, you can try turning it off and on in Settings > Cellular > tap your eSIM plan > toggle it off, wait, then toggle it back on.
Update Your iPadOS Software
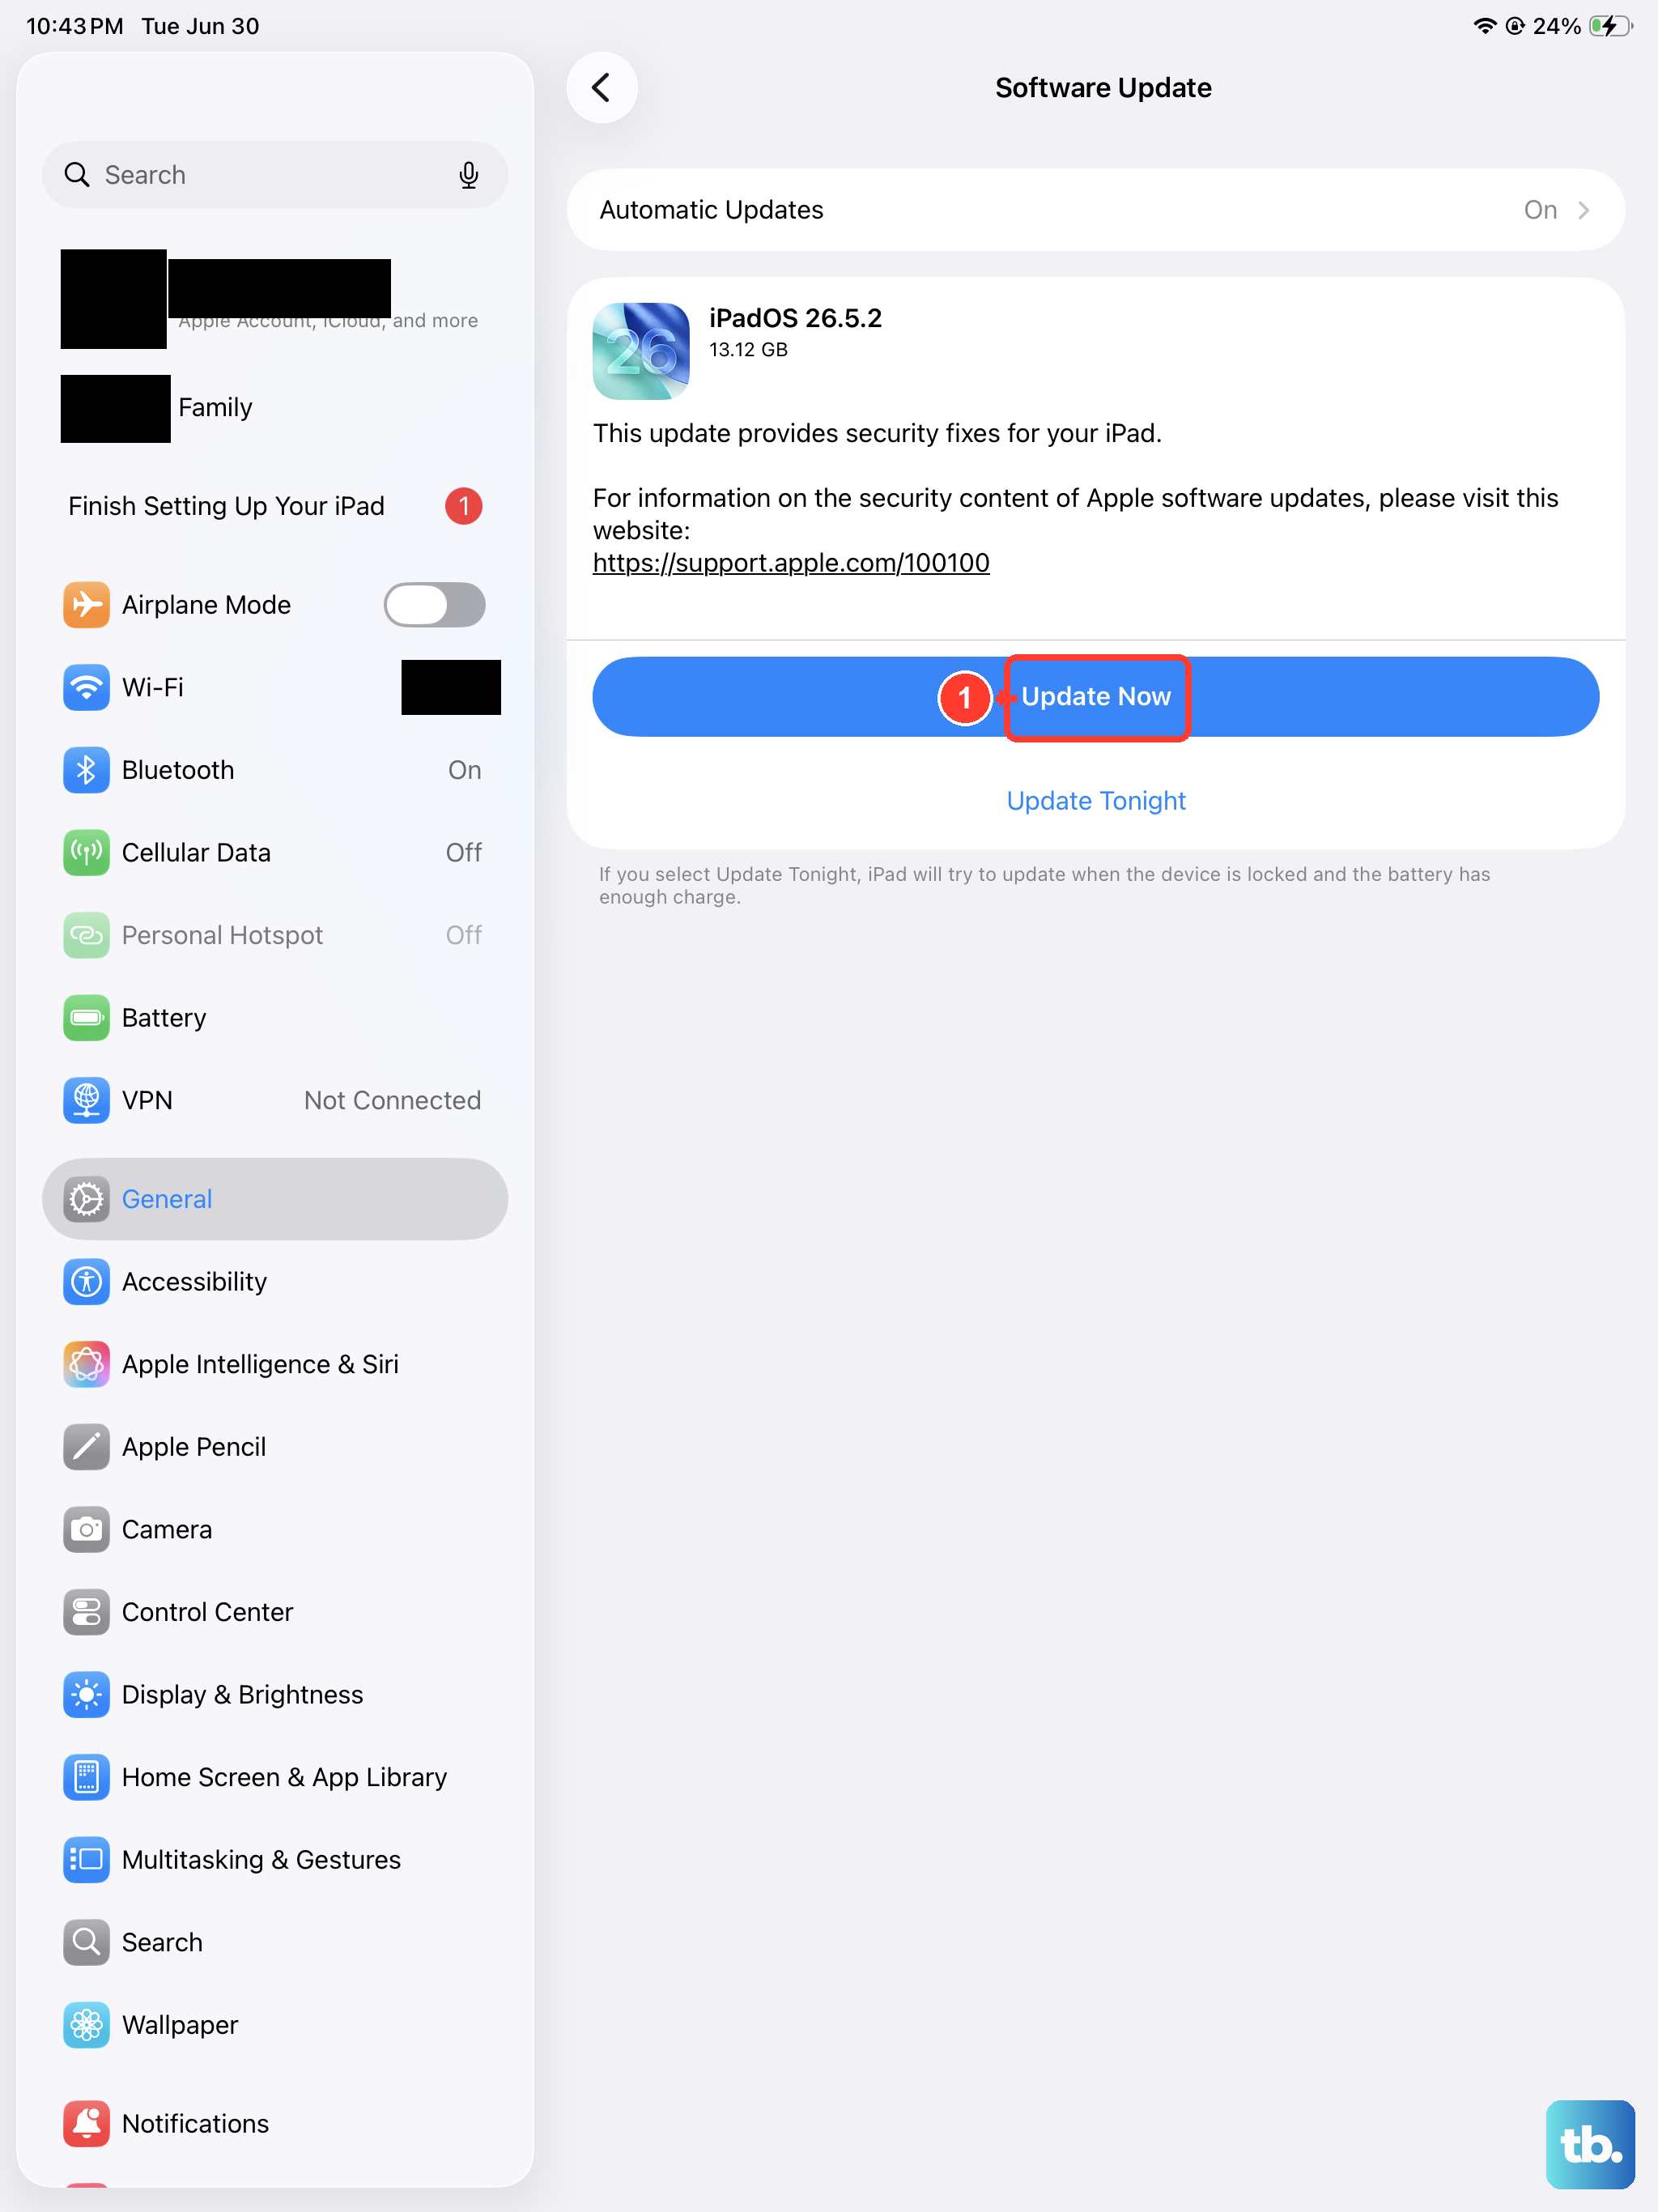
Apple frequently releases iPadOS updates that include fixes for connectivity issues. It's always a good idea to make sure you're running the latest version. Go to Settings > General > Software Update.
Your iPad will check for updates. If one is available, tap "Download and Install." Make sure your iPad is connected to power and Wi-Fi during this process, as it can take a little while. I've seen updates resolve persistent "No Service" problems on older iPad models, so this is a step worth taking.
Reset Your Network Settings
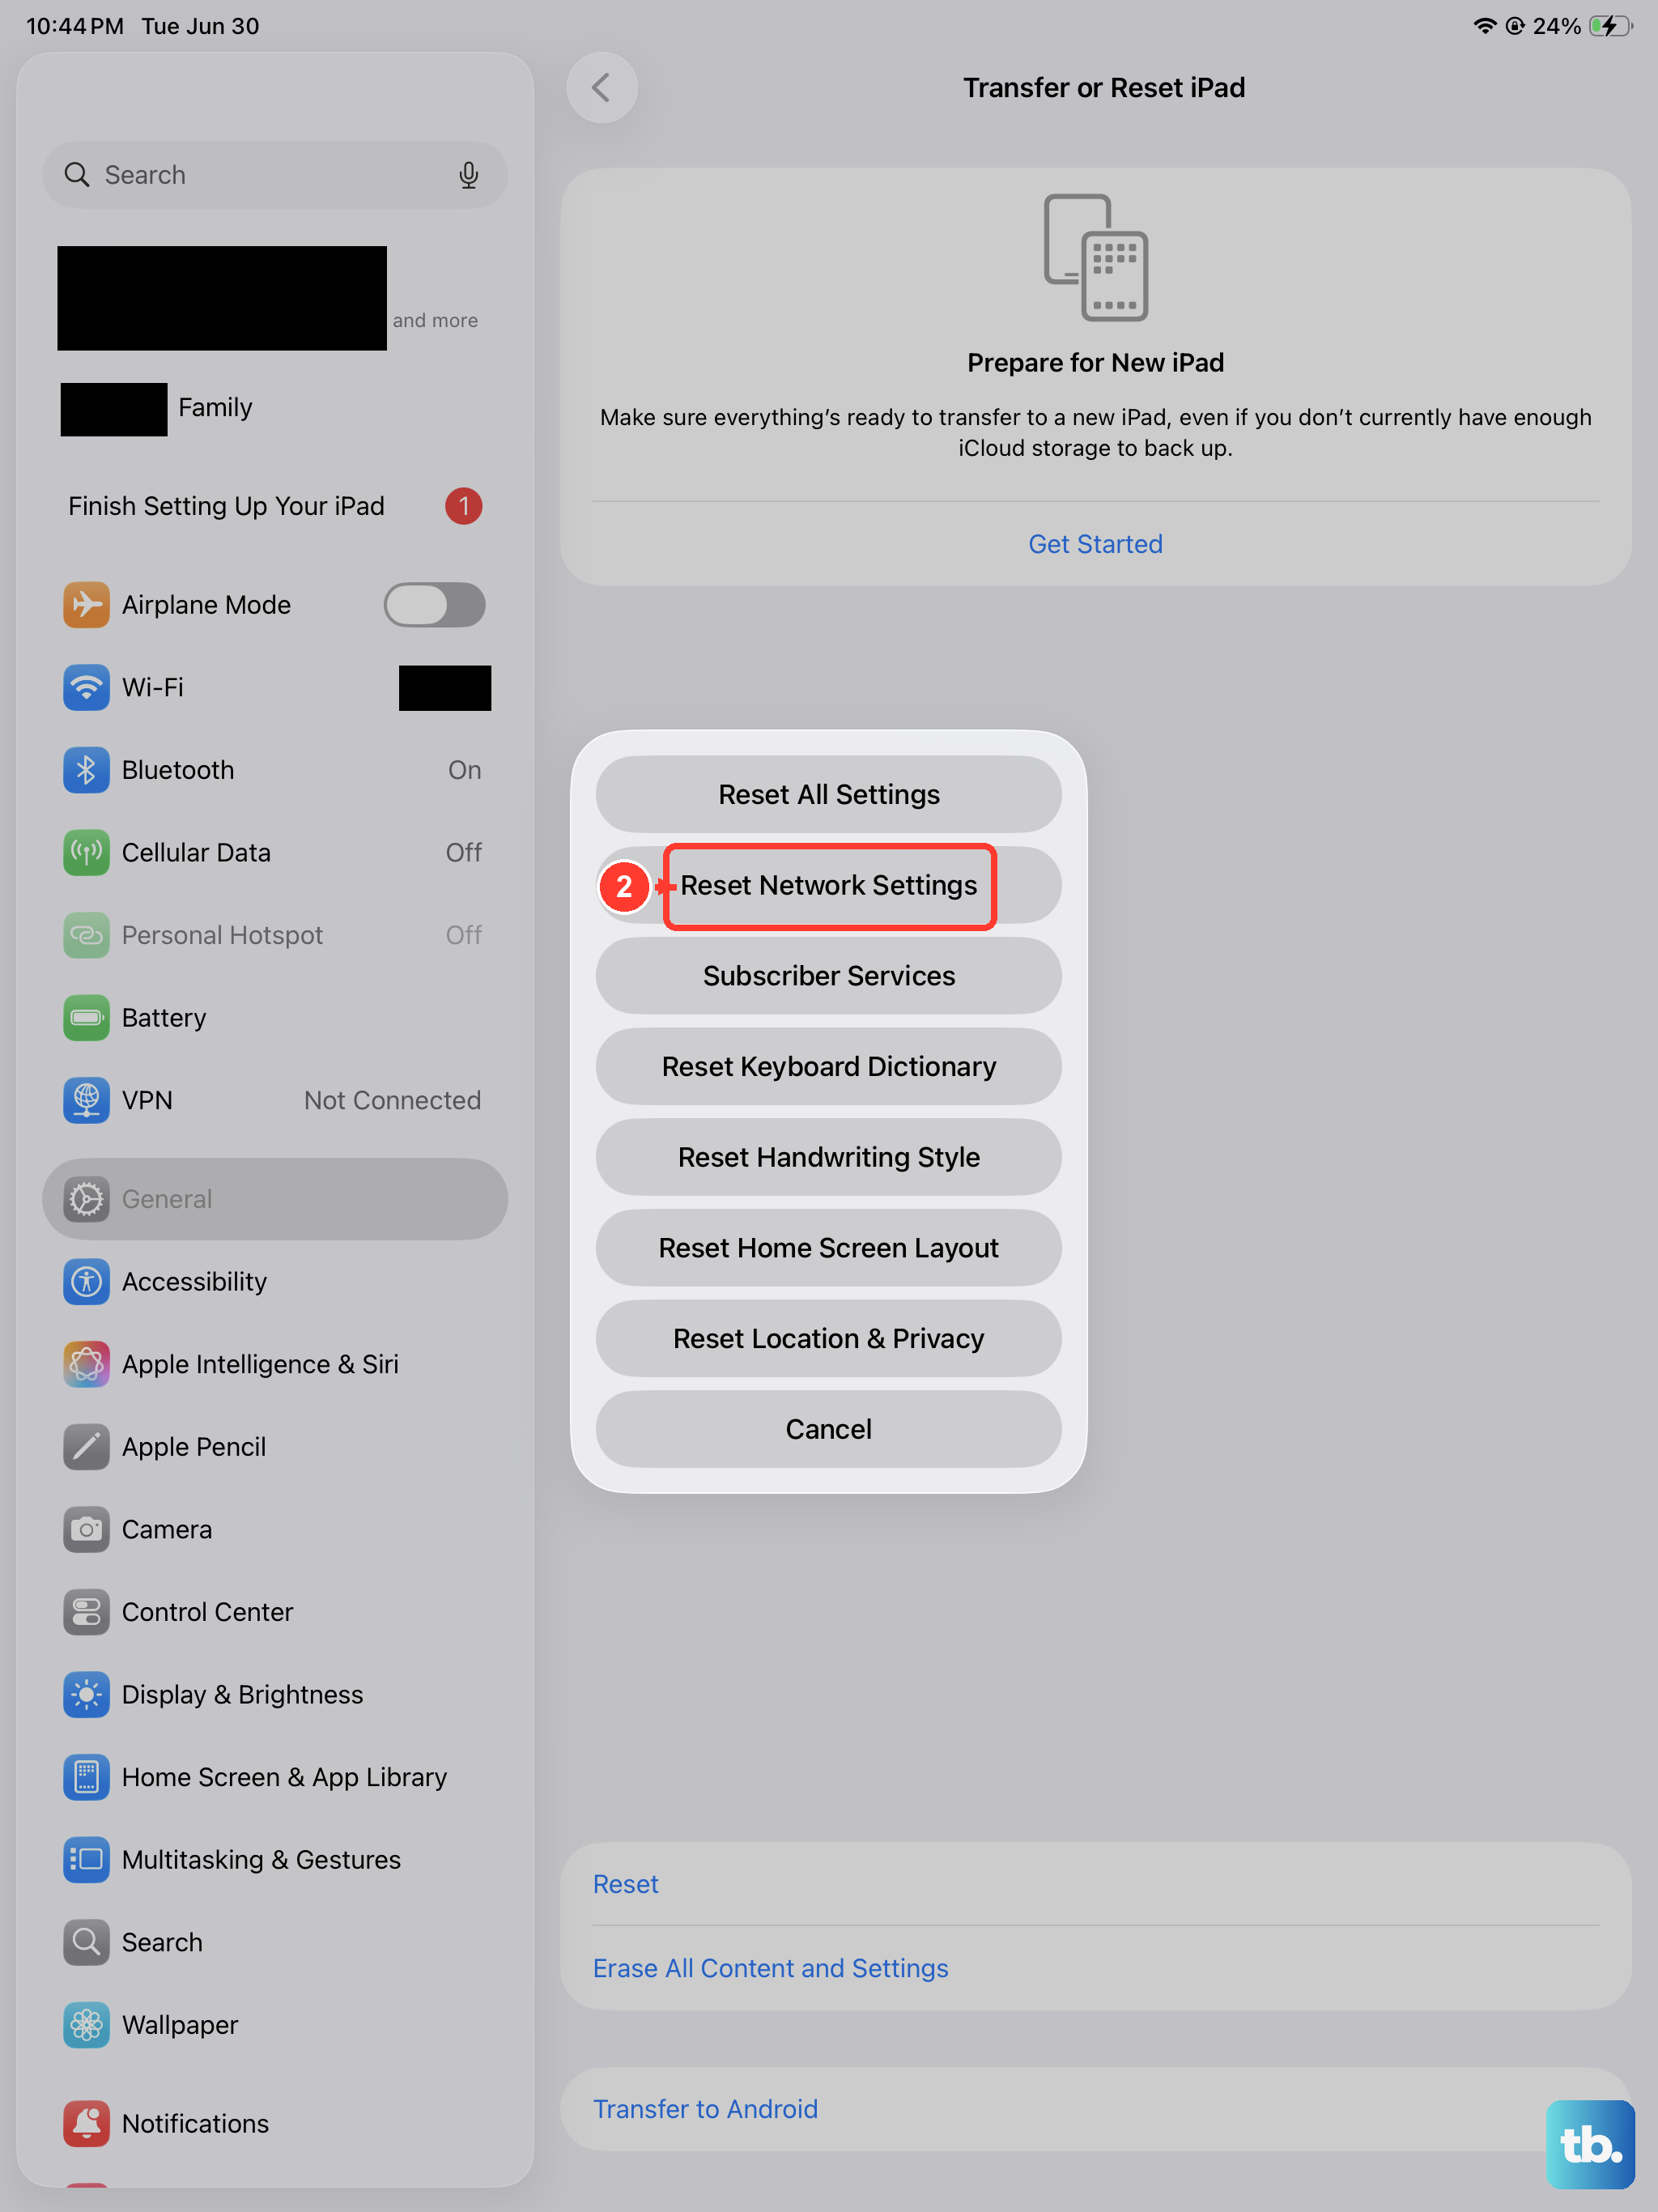
This step clears all your current network configurations, which can get corrupted. It will erase saved Wi-Fi passwords, Bluetooth pairings, and any custom VPN or APN settings, so you'll need to re-enter those later. To do this, open Settings > General > Transfer or Reset iPad.
Tap "Reset" at the bottom, then choose "Reset Network Settings." You'll need to enter your passcode to confirm. Your iPad will restart, and when it comes back on, you'll need to reconnect to Wi-Fi and try your cellular connection again.
Manually Select Your Network Carrier
Sometimes your iPad might be trying to latch onto a weak or unavailable network. You can force it to search for and connect to your specific carrier. Go to Settings > Cellular > Network Selection.
Turn off "Automatic." Your iPad will search for all available networks in your area. After a moment, a list will appear. Select your carrier's name from the list. If you don't see it, there might be a broader service outage in your location.
Check for Physical Damage or Interference
While less common, physical issues can cause signal problems. If your iPad mini has been dropped or exposed to liquids, there could be internal damage to the cellular antenna. Also, certain cases, particularly those with metal parts or magnetic closures, can interfere with the antenna's ability to receive a signal.
Try removing your iPad from its case and see if the service indicator changes. If you're in a building with thick walls or underground, try moving near a window or going outside to see if the signal improves, as your location is the most likely factor.
Verify Your Account and Plan with Your Carrier
The problem might not be with your iPad at all. It's worth contacting your cellular provider to make sure your account is in good standing and that your data plan is active and properly provisioned for your iPad. You can usually do this through your carrier's app or website.
Ask them if there are any known service outages in your zip code. They can also run a diagnostic check on your line and, if you're using a physical SIM, they might suggest getting a replacement SIM card sent to you, as they can wear out over time.
Review and Update APN Settings
The Access Point Name (APN) tells your iPad how to connect to your carrier's mobile data network. Usually, these settings are applied automatically, but sometimes they can be missing or incorrect. You'll need to get the correct APN details directly from your carrier's support website.
To enter them, go to Settings > Cellular > Cellular Data Network. You'll see fields for APN, username, and password. Carefully enter the information provided by your carrier. For most users, simply leaving this alone or tapping "Reset Settings" at the bottom is the best approach unless your carrier specifically instructs you otherwise.


