

To update your MacBook Pro running macOS Ventura 13 or later, open the Apple menu > System Settings > General > Software Update, then install the offered update. Back up your Mac before starting, enter your administrator password when requested, and keep the lid open until installation finishes.
Software Update offers releases compatible with your MacBook Pro. Your model determines which releases you can install, so use the update offered on your Mac.
The short version
- Start here: Back up your Mac, then open Software Update in System Settings.
- Choose a time: Click Update Now to install immediately or Update Tonight for a downloaded update.
- Keep it ready: Leave the lid open during installation and keep the Mac on, connected to power and the internet for an overnight update.
- Check again: Press Command + R in Software Update to refresh the update check.
- If installation fails: Retry in safe mode before moving to a full installer or Recovery.
| Option | When to use it and what to expect |
|---|---|
| Software Update | Routine updates on Ventura 13 or later, with compatible releases offered |
| Spotlight or Siri AI | Search for the update controls; Siri AI requires a supported configuration |
| Refresh the update check | Check again after an up-to-date result |
| Immediate or overnight installation | Install now or schedule a downloaded update for tonight |
| Individual update selection | Review entries when multiple selectable updates appear |
| Update notification | Start an installation immediately or later that night |
| Automatic macOS updates | Automate downloads and installation; connect power for automatic downloads |
| System data and security updates | Install background components alongside full macOS updates |
| Background Security Improvements | Enable automatic fixes on macOS 26.1 or later using built-in storage |
| Apple’s download page | Choose an installation route for your Mac and desired release |
| Terminal full installer | Download an available compatible installer on Catalina 10.15 or later |
| Bootable USB installer | Start a compatible Mac from installation media; creation erases the USB volume |
| Apple silicon Recovery | Reinstall macOS through startup options |
| Intel Internet Recovery | May offer the latest compatible macOS |
| Existing or original macOS recovery | Reinstall a release determined by your Mac and startup method |
| Safe mode | Retry an installation that failed during ordinary startup |
| Replace a damaged installer | Repair the startup disk, then delete and download the installer again |
| Beta update channel | Choose prerelease updates on an eligible enrolled Mac |
| Stop beta updates | Wait for the next public release without immediately downgrading |
| Managed updates | Install under your organization’s authorization and scheduling rules |
| Firmware revival or restoration | Use another Mac after an exceptional failure; restoration erases the affected Mac |
Back up and open Software Update
Make a backup before installing macOS. On macOS Ventura 13 or later, choose the Apple menu, open System Settings, and select General. Click Software Update to check for a compatible release.
On current macOS, you can also search for Software Update using Spotlight and open the result. If your Mac and configuration support Siri AI, you can use its menu bar entry point to search for the same controls. Open the result and install the offered update.
If your Mac reports that it is up to date and you want to check again, click Check for Updates or press Command + R. Closing and reopening Software Update also refreshes the check. On macOS versions earlier than Ventura 13, choose Apple menu > System Preferences > Software Update. If your older Mac does not have Software Update, use Apple’s download page described below to choose an appropriate installation route.
Install now or schedule overnight
To install an available update, click the button Software Update offers to update, upgrade, or restart now. Follow the installation prompts and enter your administrator password when requested. Keep your MacBook Pro’s lid open until installation finishes.
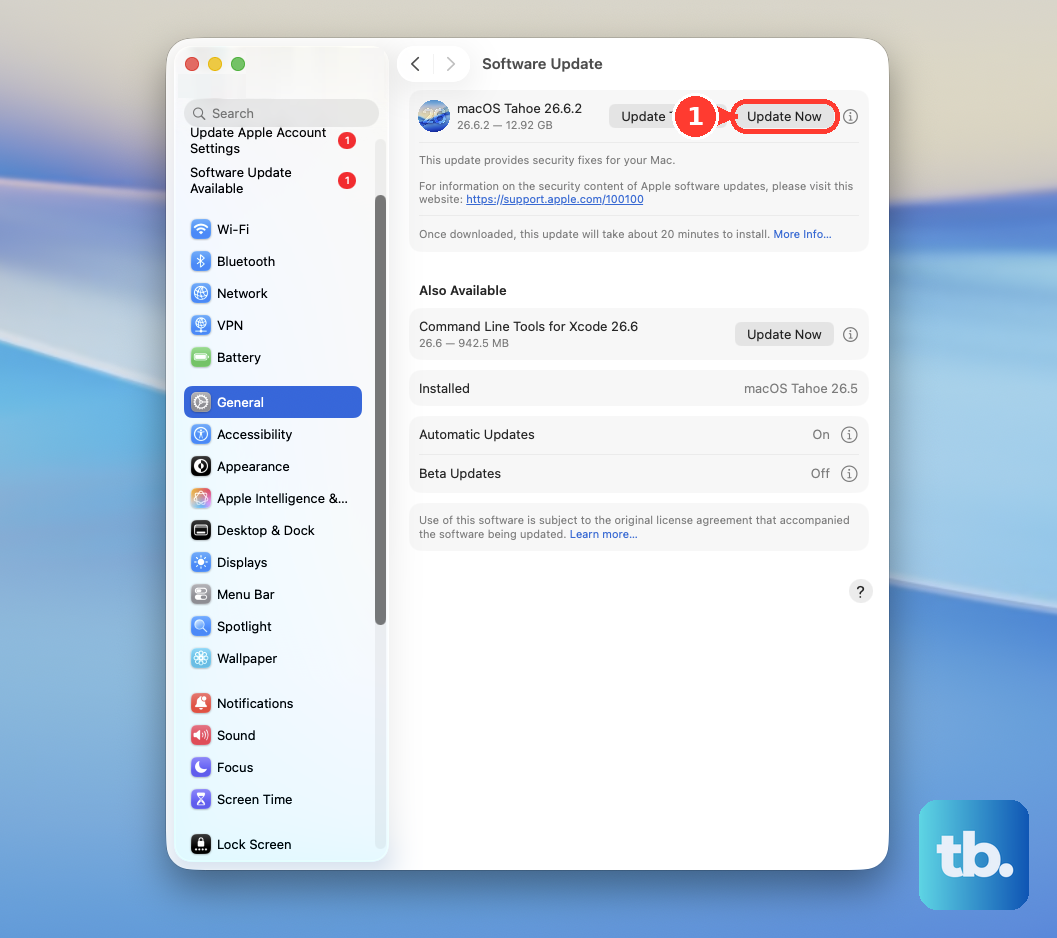
When multiple selectable updates appear, click the Info button beside Available Updates. Review the entries, select the updates you want, then click Update Now. The entry names depend on the updates offered to your Mac.
For a downloaded update you want to install later, click Update Tonight. Leave the Mac on and connected to its power adapter and the internet, with the lid open during installation. When an update notification appears, you can also use its installation option to install immediately or later that night.
Set up automatic updates
Open System Settings > General > Software Update. Click the Info button beside Automatic Updates, turn on Download new updates when available and Install macOS updates, then click Done. Connect your MacBook Pro to its power adapter for automatic downloads.
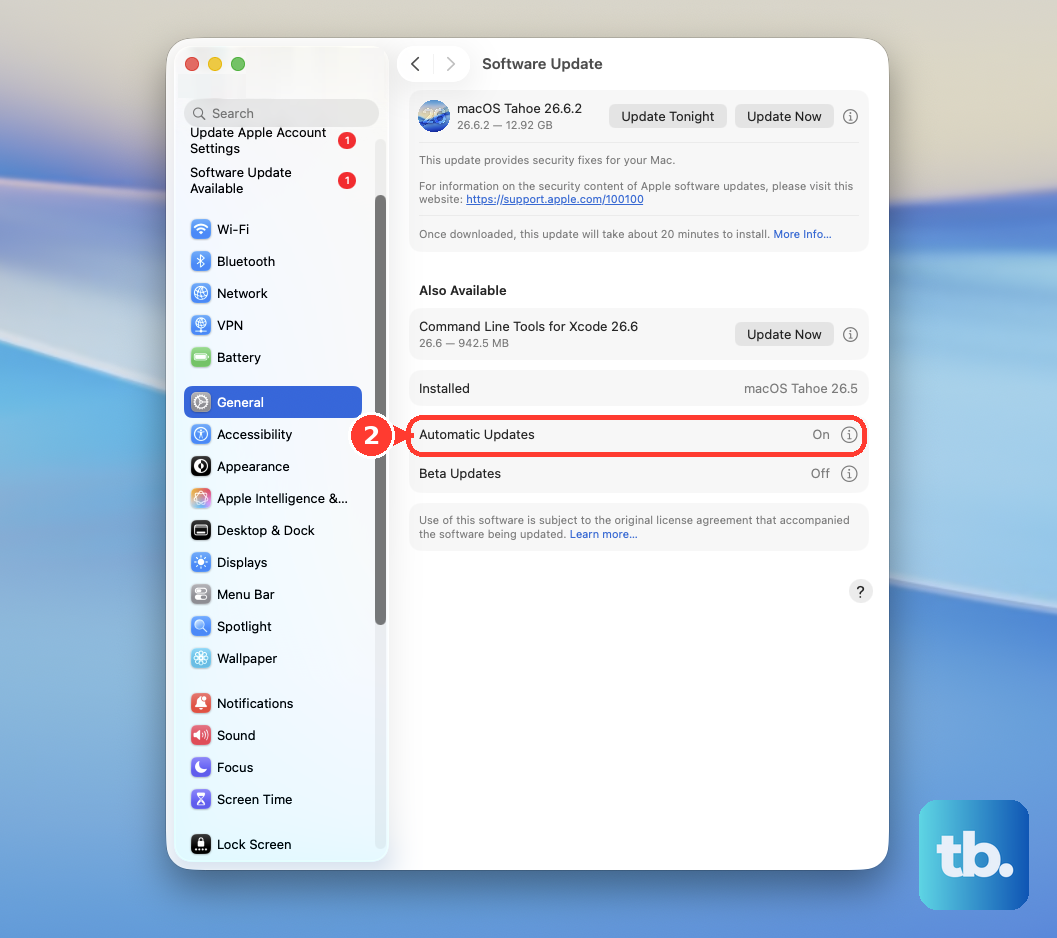
For background system components, return to the Automatic Updates options in Software Update and turn on the setting that installs security updates and system files. Continue installing full macOS updates because these background components do not replace them.
On macOS 26.1 or later, when your Mac starts from built-in storage, open System Settings > Privacy & Security > Background Security Improvements. Turn on Automatically Install. This control is separate from automatic macOS installation.
Choose beta updates or install managed updates
If your eligible Mac is enrolled in the Apple Beta Software Program, open System Settings > General > Software Update > Beta Updates. Choose the offered beta type, then install available updates through Software Update. These are prerelease versions of macOS.
To stop beta updates on macOS Ventura 13.4 or later, open System Settings > General > Software Update. Click the Info button beside Beta updates, then choose Off. Turning this off does not immediately downgrade an installed beta. Install the next public macOS release when it is offered.
On an enrolled work or school Mac, start an offered update from its notification or System Settings and supply the requested password. On managed Macs running macOS 14 or later, administrators can configure automatic installation, require administrator authorization, or enforce an installation deadline. Automated Device Enrollment can also require an update before Setup Assistant completes.
Fix a failed installation
If ordinary installation fails, start your MacBook Pro in safe mode and retry Software Update. The startup procedure depends on whether you have Apple silicon or Intel. For help with shutting down or restarting, follow the steps to restart your MacBook or Mac, then use the appropriate sequence below.
On an Apple silicon MacBook Pro, shut down, then hold the Power button until startup options appear. Select your startup volume, hold Shift, and click Continue in Safe Mode. Log in and try the update again.
On an Intel MacBook Pro, start or restart while holding Shift until the login window appears. Log in, open Software Update, and retry installation.
If a downloaded installer is reported as damaged or cannot be verified, start in macOS Recovery using the steps below. Repair the startup disk using Disk Utility before replacing the installer.
Deleting the damaged installer removes that downloaded installer file. After repairing the startup disk, delete the damaged installer and download a fresh copy from Apple using the download route below. This removes the installer file rather than uninstalling macOS.
Download a full macOS installer
For a release-specific download or another installation route, open Apple’s macOS download and installation page. Choose the route appropriate to your Mac and the release you need. Hardware compatibility and installer availability determine what you can install.
On macOS Catalina 10.15 or later, you can use Terminal to list and download compatible full installers. Open Applications > Utilities > Terminal. Enter this command to see the available full installers:
softwareupdate --list-full-installersChoose a version from the results, then replace [number] in the following command with that version number. Run the completed command to download its full installer:
softwareupdate --fetch-full-installer --full-installer-version [number]After the download finishes, open Applications and launch the installer named Install [Version Name], using the actual release name shown. Complete its installation prompts. This route provides compatible installers no older than your Mac’s original system or the closest available version.
Start from a bootable installer
For a bootable USB installation, first download the full macOS installer into Applications. Use the bootable installer route from Apple’s download page to obtain the createinstallmedia command for that installer.
Creating the installer erases the USB volume and its contents. Connect a disposable USB volume named MyVolume, open Terminal, and run Apple’s command for your downloaded installer. Enter your administrator password, then type Y when prompted and press Return. If requested, click OK.
Connect the completed installer to the compatible target Mac and connect the Mac to the internet. On an Apple silicon MacBook Pro, shut down and hold Power until startup options appear. Select the installer and click Continue.
On an Intel MacBook Pro, start while holding Option, select the installer, and press Return. A Mac with the T2 chip may require permission to boot external media in Startup Security Utility. Choose Install macOS if shown, then click Continue.
Reinstall macOS with Recovery
Use macOS Recovery when installation needs a repair or reinstallation fallback. Recovery does not guarantee an upgrade to the newest major release. Back up your Mac before proceeding with installation.
On an Apple silicon MacBook Pro, shut down and hold the Power or Touch ID button until startup options load. Click Options, then Continue. Select the startup volume and user when requested, click Next, and enter that user’s password.
Open Reinstall macOS and proceed through the installer. On Apple silicon, Recovery installs the current version of the most recently installed macOS. If you installed a macOS upgrade and then erased the disk with Disk Utility, Recovery might offer the macOS you used before upgrading. You can also use this Recovery startup sequence to reach Disk Utility when repairing the startup disk after a damaged-installer error.
On an Intel MacBook Pro, start while holding Option + Command + R to enter Internet Recovery. Apple says this combination might offer the latest compatible macOS. Select the macOS installation option and click Continue.
To reinstall the current version of the most recently installed macOS on Intel, start while holding Command + R. Holding Shift + Option + Command + R may instead offer the original macOS or the closest available version. Select the reinstall option, then click Continue.
If the installer offers both Macintosh HD and Macintosh HD - Data, choose Macintosh HD. Complete the installation prompts for the offered release.
Revive a Mac after installation fails
For an exceptional installation failure on an Apple silicon or T2 MacBook Pro, you can use another Mac to revive its firmware. The host Mac must run macOS 14 or later. Connect power and a data-capable USB-C cable between the affected Mac’s DFU port and the host Mac, then shut down the affected Mac.
On the affected Mac, press and release Power, then hold left Control, left Option, right Shift, and Power together. On Apple silicon, release everything except Power after 10 seconds, then keep holding Power for up to 10 more seconds. On a T2 MacBook Pro, hold all four for about 3 seconds.
In the host Mac’s Finder DFU window, click Revive Mac, then click Continue. If revival fails, restoration is the next alternative described by Apple.
Restoring erases the affected Mac. To proceed, choose Restore Mac, then click Restore and Update. Complete setup or the Recovery installation afterward.
Frequently Asked Questions
Can an Intel MacBook Pro install macOS 27 Golden Gate?
macOS 27 Golden Gate is limited to Apple silicon Macs. If you have an Intel MacBook Pro, install its latest compatible release.
Do App Store app updates also update macOS?
App Store app updates and individual app settings do not substitute for macOS Software Update. Updating an app is separate from updating your Mac’s operating system.
How do I receive Background Security Improvements when starting from an external drive?
Your Mac receives those fixes in subsequent software updates when it starts from external storage. Continue installing the macOS updates offered to your Mac.
Why might my work Mac receive an update later than another Mac?
On a managed MacBook Pro running macOS 14 or later, your administrator can defer update availability for 1 to 90 days. That policy can affect when an update becomes available on your Mac.