


IMAP is already enabled for personal Gmail accounts, so open your email app and choose Sign in with Google to connect it. Complete Google’s authentication prompts to finish adding your account. Google removed the old Enable IMAP and Disable IMAP choices for personal accounts.
Follow the setup path for your email app below, or enter the manual server settings if your app requires them. Sign in only through Google’s own app or website, and never share a code, password, or remote access with someone who contacts you.
The short version
- Already enabled: Personal Gmail accounts have IMAP turned on automatically.
- Preferred connection: Choose Sign in with Google and complete Google’s authentication prompts.
- Manual settings: Incoming mail uses imap.gmail.com on port 993 with SSL/TLS.
- Password fallback: An eligible app password requires 2-Step Verification and is for apps without Sign in with Google.
| Setup route or control | Where to start |
|---|---|
| Personal Gmail | Select Sign in with Google in your mail app |
| Apple Mail on iPhone or iPad | Settings > Apps > Mail |
| Apple Mail on Mac | Mail > Add Account |
| Mac system account setup | System Settings > Internet Accounts |
| Reactivate Mac Mail | Mail > Settings > Accounts |
| New Outlook for Windows | View > View settings |
| Classic Outlook for Windows | File > Add Account |
| Outlook for Mac | Outlook > Settings > Accounts |
| Outlook for Android | Add Account on first launch |
| Outlook for iPhone or iPad | Add Account on first launch |
| Get Outlook | Microsoft’s Outlook product page |
| Thunderbird desktop | App menu > Add Account > Email |
| Thunderbird for Android | App menu > Settings > Add account |
| Thunderbird QR import | Desktop app menu > Tools > Export for Mobile |
| Thunderbird app or file import | Android app menu > Settings > Import settings |
| Get Thunderbird | Thunderbird’s official product page |
| Samsung Email | Open the app and select your provider |
| Manual server setup | Choose IMAP in manual account setup |
| App password | Google’s app password portal |
| Enable verification for app passwords | Google Account > Security & sign-in |
| Workspace administrator controls | Admin console > Apps > Google Workspace > Gmail |
| Replace a password-only connection | Preserve local-only mail before reconnecting |
| Show missing labels | Gmail settings > Labels |
| Show all folder messages | Gmail settings > Forwarding and POP/IMAP |
Set up Gmail in Apple Mail
On the current iPhone and iPad Mail interface, open Settings > Apps > Mail > Mail Accounts > Add Account. Enter your Gmail address, choosing Google if a provider list appears. Complete Google sign-in, then tap Next if displayed and Save if displayed.
On a Mac, open Mail > Add Account and enter your Gmail address. Alternatively, click choose from a list and choose Google. Click Continue, complete Google authentication, and enable Mail when choosing which apps use the account.
You can also open System Settings > Internet Accounts > Add Account on a Mac. Enter your Gmail address, or click choose from a list and choose Google, then authenticate and enable Mail. If your Google account is already listed under Internet Accounts, open it and turn on Mail.
Add Gmail to Outlook on your computer
If you need Outlook, open Microsoft’s official Outlook product page and use its Download options for your device. Availability and licensing vary by edition, so follow the account setup path for the edition you use.
In new Outlook for Windows, open View > View settings, or File > Account info. Go to Accounts > Your accounts > Add Account. Enter or select your Gmail address, select Continue, and complete Google sign-in. Select Allow, then Done.
In classic Outlook for Microsoft 365 or Outlook 2024 on Windows, open File > Add Account. Enter your Gmail address and select Connect. Check the displayed address in Google’s sign-in window, select Next, and complete authentication. Finish by selecting Allow, then Done.
In the current interface of Outlook for Microsoft 365 for Mac or Outlook 2024 for Mac, open Outlook > Settings > Accounts > + Add Account. In Legacy Outlook for Mac, open Outlook > Settings > Accounts, select the plus (+) button, then Add an account. Enter your Gmail address and select Continue. Complete Google’s sign-in prompts and select Allow.
Connect Gmail to Outlook on your phone
When opening Outlook for Android for the first time, select Add Account and enter your Gmail address. To add another account, open Menu > Settings > Account > Add Account > Add an email account. Enter your Gmail address or choose Add Google Account, then complete Google’s authentication prompts, including any required second factor.
In Outlook for iPhone or iPad, select Add Account on first launch and enter your Gmail address. For an additional account, tap Inbox > Settings > Account > Add Account > Email Account. Enter your Gmail address and complete Google’s authentication prompts.
Use Gmail in Thunderbird
If you need Thunderbird, open its official product page and use the Downloads or Download and languages options links for your platform. The page also links to the Android distribution.
In Thunderbird ESR 153 or monthly version 153 and newer on Windows, macOS, or Linux, open the app menu, then select Add Account > Email. Enter your name and Gmail address, then click Continue. In the system browser, complete Google sign-in and any required second factor. On Google’s access screen, click Continue to finish and return to Thunderbird.
If you see New Account and a Google dialog inside Thunderbird, those belong to the older interface in version 152 and earlier. Get the current version from Thunderbird’s official product page to follow the Add Account > Email steps above.
For Thunderbird on Android, open the app menu, then Settings > Add account. Enter your Gmail address and tap Next. Use the detected account settings, complete Google authentication in your default browser, and finish the remaining account prompts. If a managed account blocks authorization, ask your administrator to check its access policy.
Add Gmail to Samsung Email
On a Galaxy phone or tablet with Samsung Email, open Settings > Accounts and backup > Manage accounts > Add account. Select your email provider and complete Google’s authentication flow for Gmail. Samsung says screens vary by model, software, and carrier, so the provider label can differ.
You can also start from Samsung Email itself. Open the app, select your email provider, and complete Google sign-in.
Enter the Gmail server settings manually
Use manual setup when your mail client requires server details and supports Google OAuth or an eligible app password. In the app’s manual account setup, choose IMAP. Enter imap.gmail.com for incoming mail, set the port to 993, and choose SSL/TLS.
For outgoing mail, enter smtp.gmail.com. Use port 587 with STARTTLS/TLS, or port 465 with SSL/TLS. Require outgoing-server authentication and use your complete Gmail address as the username.
Authenticate with Google OAuth when the client supports it. If the app lacks Sign in with Google, use an eligible app password. Ordinary password-only IMAP access and the old Allow less secure apps method are no longer supported, so your ordinary Google password is not a substitute in a legacy IMAP password field.
Create an app password when needed
An app password requires 2-Step Verification on an eligible Google Account. To enable it, open your Google Account and select Security & sign-in. Under How you sign in to Google, select Turn on 2-Step Verification and complete the account-specific prompts.
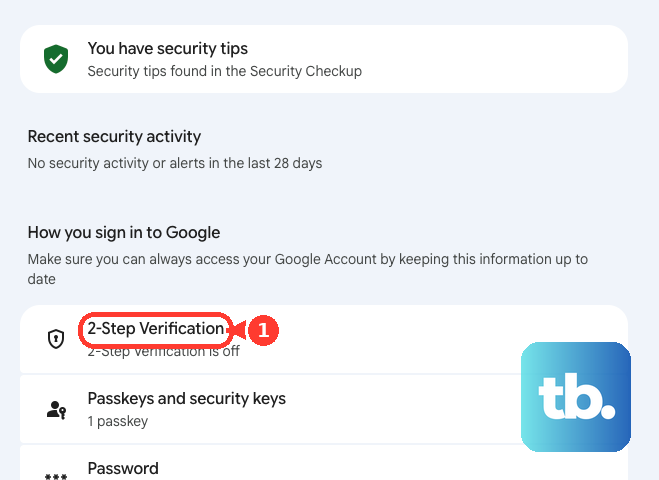
Next, open Google’s app password portal and sign in. Generate an app password there, then enter it into the mail client’s password field instead of your ordinary Google password.
App password availability can be restricted for organizational accounts, accounts using Advanced Protection, or accounts with 2-Step Verification configured only with security keys. If your account cannot create one, use a mail client that offers Sign in with Google. For a work or school account, your administrator must also permit the connection.
Enable IMAP for a managed Workspace account
Your work or school Gmail account is subject to your organization’s IMAP and mail-client policies. If access is blocked, ask your administrator to check these controls. Changing them requires the Gmail Settings administrator privilege.
If you have that privilege, open the Admin console and go to Menu > Apps > Google Workspace > Gmail > End User Access. Select the relevant organizational unit. Under POP and IMAP access, check Enable IMAP access for all users.
Choose Allow any mail client, or choose Restrict which mail clients users can use (OAuth mail clients only) and enter the permitted OAuth client IDs. Click Save, or Override for an organizational unit. Google says changes can take up to 24 hours.
Fix old connections and missing messages
If you are replacing an old password-only connection, preserve local-only mail before removing it because that mail can be lost. Remove the old Google account connection from the email client, then add it again using Sign in with Google. In Thunderbird, configure the replacement connection as IMAP with OAuth. Removing the client connection does not delete your Google Account.
If your account connects but a Gmail label is missing, check its IMAP visibility when your Gmail web settings provide that control. Open Gmail, then Settings > See all settings > Labels. Beside each label whose messages you want available in the client, check Show in IMAP. This controls folder visibility rather than enabling IMAP for the account.
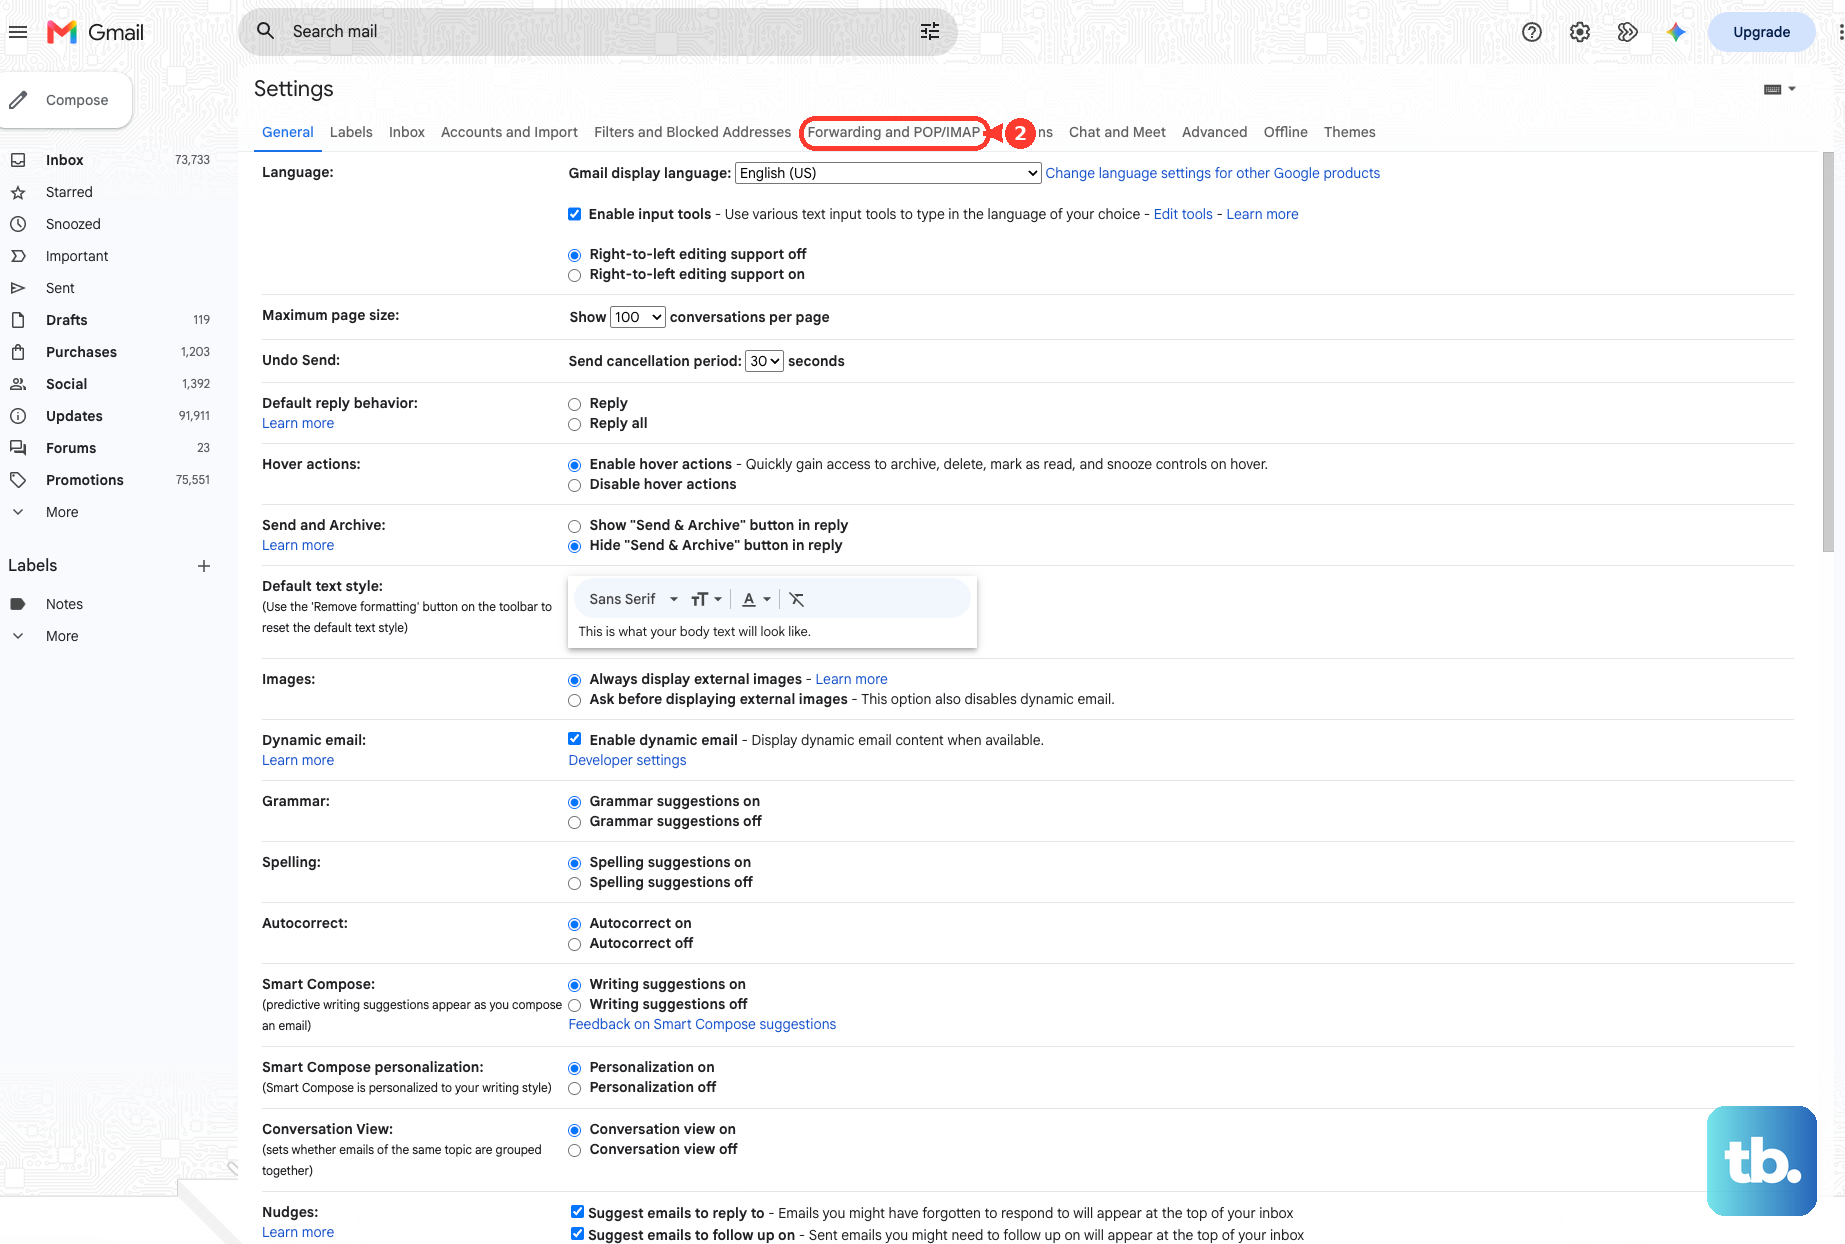
For accounts displaying Folder size limits, you can allow the client to access all messages in an IMAP folder. Open Gmail’s Settings > See all settings > Forwarding and POP/IMAP. Under Folder size limits, select Do not limit the number of messages in an IMAP folder (default), then click Save Changes. This control is separate from the removed Enable IMAP choice.
Frequently Asked Questions
Why did my Gmail app password stop working after I changed my Google password?
Changing your Google password revokes existing app passwords. If your account remains eligible and your mail app still needs one, generate a new app password in Google’s app password portal and enter it in the client’s password field.
Can I transfer my desktop Thunderbird Gmail setup to Android?
Yes, Mozilla recommends desktop Thunderbird 153 or newer for this transfer. On desktop, open the app menu > Tools > Export for Mobile, select Gmail, and click Export. On Android, tap Get started > Import settings on first launch, or open the app menu > Settings > Import settings > Scan QR code after an account is set up, then scan the displayed code or codes, select Gmail, and tap Import. Complete Google authentication afterward because OAuth authorization is not transferred.
Can Thunderbird for Android import Gmail settings from K-9 Mail or a settings file?
Yes, direct K-9 Mail import requires version 8.0 or later. In Thunderbird for Android, tap Import your account settings now on first launch, or open the app menu > Settings > Import settings after an account is set up. Choose Import from app and select K-9 Mail or another Thunderbird installation. For file import, first create an export in Thunderbird for Android or K-9 Mail through Settings > Export settings > Export > Save, then choose Select file on the same import screen in the destination app and open that file. Select your Gmail account, tap Import, and complete authentication.
How do I turn an existing Gmail account back on in Mac Mail?
For an account that was disabled locally, open Mail > Settings > Accounts and select the Gmail account. Select Enable this account to reactivate it. Alternatively, choose Mail > Accounts, open the Google account in Internet Accounts, and enable Mail.