


To reset DNS settings in Windows, restore automatic DNS server assignment; to clear the DNS cache, run ipconfig /flushdns in an administrator Command Prompt. Changing server assignment changes which DNS servers your connection uses, while flushing removes cached answers. The cache commands work on Windows 11 and Windows 10, and you can restore automatic DNS through Windows 11 Settings or administrator PowerShell on either version.
The short version
- Clear cached answers: Run
ipconfig /flushdnsin an administrator Command Prompt. - Restore automatic DNS: On Windows 11, change DNS server assignment to Automatic (DHCP) for the affected connection.
- Windows 10 option: Use administrator PowerShell to remove a manual DNS server override.
- Browser settings: Chrome and Firefox have separate DNS caches, and browser encrypted DNS settings need separate attention.
- Last resort: A full network reset returns adapter settings to defaults and may require VPN software or virtual switches to be reconfigured.
| Method | What it changes | When to use it |
|---|---|---|
| Command Prompt cache flush | Windows cached DNS answers | Clear cached answers, including failed lookups |
| PowerShell cache flush | The same Windows DNS cache | Clear cached answers from PowerShell |
| Automatic DNS in Windows 11 Settings | Connection DNS server assignment | Remove a manual DNS selection |
| Automatic DNS in PowerShell | Connection DNS server assignment | Reset DNS on Windows 11 or Windows 10 |
| Manual DNS in Windows 11 Settings | Selected DNS server addresses | Replace incorrect server addresses |
| Windows DNS over HTTPS settings | System encrypted DNS transport | Correct an encrypted DNS configuration |
| Chrome host cache clearing | Chrome resolver state | Clear Chrome's DNS cache separately |
| Firefox DNS cache clearing | Firefox cached DNS entries | Clear Firefox's DNS cache separately |
| Chrome Secure DNS settings | Chrome's DNS provider behavior | Remove a custom browser provider |
| Edge Secure DNS settings | Edge's encrypted DNS behavior | Turn off Edge's encrypted DNS setting |
| Firefox protection settings | Firefox's DNS resolver behavior | Restore automatic or system DNS behavior |
| Full network reset | All network adapters and their settings | Address broader connectivity trouble last |
Clear the Windows DNS cache
Flushing the cache removes saved DNS answers, including failed lookups, without changing your DNS servers. You can do this by using Command Prompt in Windows. Search for Command Prompt, select Run as administrator, then select Yes. Enter the following command and press Enter:
ipconfig /flushdnsThe same command works in a Command Prompt or PowerShell session inside Windows Terminal. If you want to remove a manually configured DNS server, reset server assignment separately using one of the methods below.
Microsoft says the PowerShell command below clears the same cached DNS answers as ipconfig /flushdns. To use that alternative, open Windows PowerShell as administrator and run:
Clear-DnsClientCacheRestore automatic DNS in Windows 11
Restoring automatic assignment removes your connection's manual DNS selection. On Windows 11, open Settings > Network & internet, then open Ethernet for a wired connection. For a wireless connection, open Wi-Fi and the connected network's properties.
Beside DNS server assignment, select Edit. Choose Automatic (DHCP), then select Save. Repeat for other connections with unwanted manual DNS settings.
This changes DNS configuration, so flush the Windows DNS cache separately if you also want to remove cached answers. Use the separate DNS server assignment control when only DNS needs changing, because automatic IP assignment configures both IP and DNS addresses.
Reset DNS server assignment with PowerShell
On Windows 10, use administrator Windows PowerShell to restore automatic DNS server assignment. This method also works on Windows 11 with the built-in DnsClient module.
The reset removes the selected connection's manual DNS server override and restores the default addresses supplied through DHCP. Open Windows PowerShell as administrator, replace Wi-Fi with your connection's actual interface alias, and run:
Set-DnsClientServerAddress -InterfaceAlias "Wi-Fi" -ResetServerAddressesRepeat the command for Ethernet or another affected interface, substituting its actual alias each time. This changes server assignment, so run the cache flush separately if you also need to clear saved DNS answers.
Replace incorrect DNS server addresses
If you want to use specific DNS servers, you can enter their addresses instead of restoring automatic assignment. Saving a manual configuration replaces the connection's existing DNS server selection. On Windows 11, open Settings > Network & internet, open the active connection, and select Edit beside DNS server assignment.
Choose Manual, turn on IPv4, and enter your intended Preferred DNS and Alternate DNS addresses. Configure IPv6 addresses too if applicable, then select Save. This changes your DNS provider configuration; use the Windows cache flush separately to remove cached answers.
Correct Windows encrypted DNS settings
On Windows 11, the connection's manual DNS editor also contains DNS over HTTPS settings. These control encrypted DNS transport separately from server assignment and cached answers. Microsoft says this Settings feature is unavailable in Windows 10, where you can use the command methods above for cache clearing and server assignment.
On Windows 11, open Settings > Network & internet and open the connection's settings. Where its manual settings list your Preferred DNS and Alternate DNS addresses, find DNS over HTTPS and choose Off to send queries to that server unencrypted, or choose On (automatic template) or On (manual template) to correct its configuration. Select Save; this does not clear the cache or restore automatic DNS server assignment.
Clear a browser DNS cache separately
Desktop Chrome on Windows has its own host cache, and clearing it removes browser resolver state separately from the Windows cache. Enter the following address in Chrome's address bar and press Enter:
chrome://net-internals/#dnsSelect Clear host cache. Use the Windows cache command as well if you want to clear both caches.
Desktop Firefox on Windows has a separate DNS cache, and clearing it removes Firefox's cached DNS entries. Enter the following address in Firefox's address bar and press Enter:
about:networking#dnsSelect Clear DNS Cache. This handles Firefox's cached entries; changing its encrypted DNS behavior requires the separate browser settings below.
Fix browser DNS overrides
A browser's encrypted DNS settings control its DNS behavior separately from Windows server assignment. If you want to remove a custom browser provider, change that setting as well as clearing cached answers.
In Chrome, open More > Settings > Privacy and security > Security. Under Advanced, turn off Use secure DNS to stop using Chrome's encrypted DNS override. Alternatively, leave it enabled and select your current service provider instead of a custom provider.
Google says Chrome's Secure DNS control is unavailable when the device is managed or parental controls are enabled. If that applies to you, use the Windows methods for Windows DNS changes; those changes remain separate from Chrome's DNS controls.
In Microsoft Edge, open Settings and more > Settings > Privacy, search, and services > Security. Turn off Use secure DNS to specify how to lookup the network address for websites to stop using that encrypted DNS setting. This does not flush the Windows resolver cache.
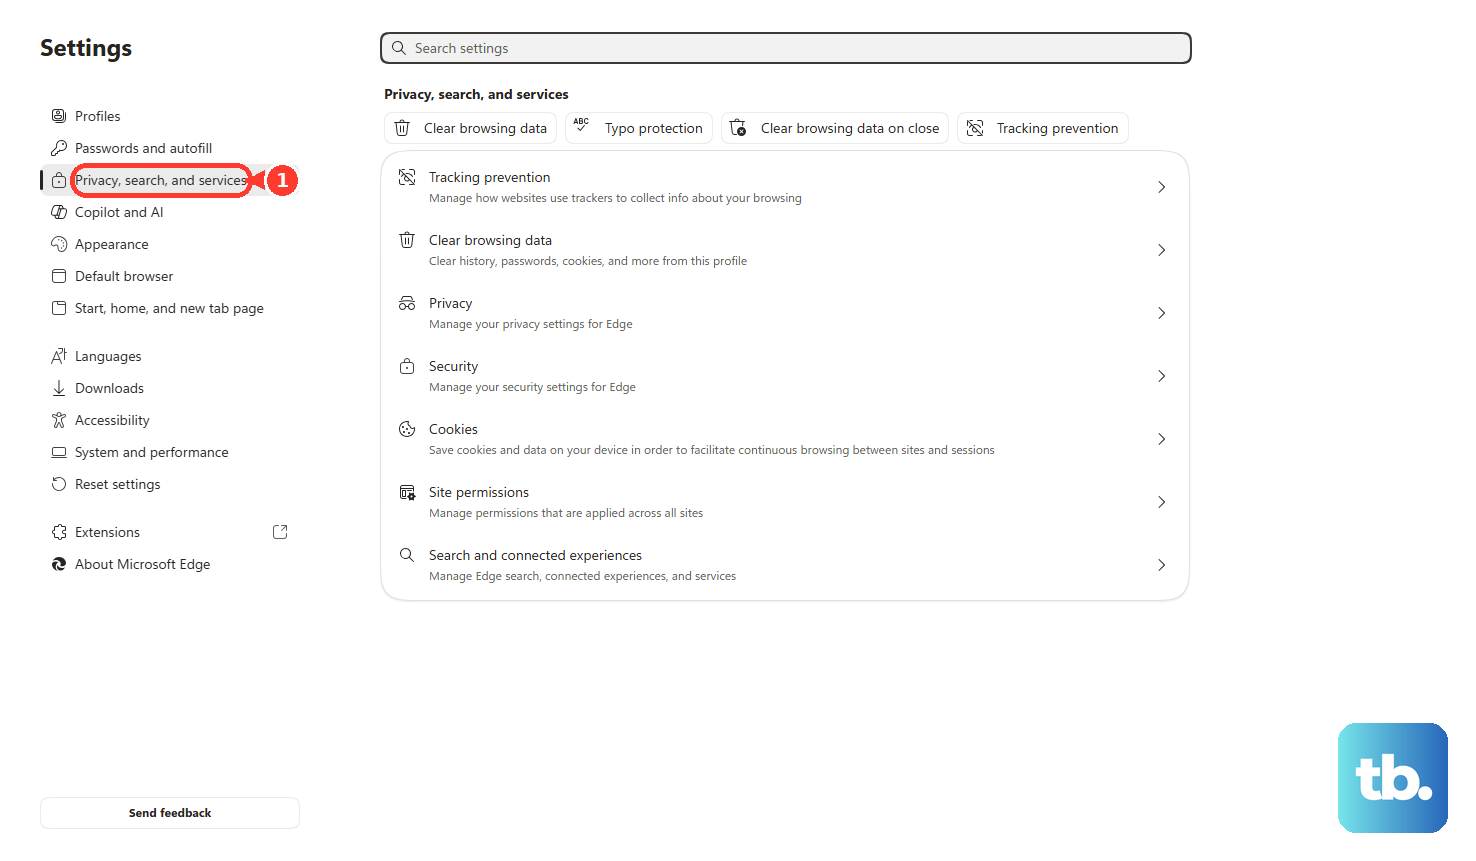
If organizational policy controls Edge's setting, an administrator must address the browser policy. In the applicable Group Policy, open Administrative Templates > Microsoft Edge > Control the mode of DNS-over-HTTPS. Configure Disable DNS-over-HTTPS to prohibit encrypted DNS in Edge.
In Firefox, open the menu, select Settings, then select Privacy and security. Some releases label that page Privacy & Security. Find DNS over HTTPS and open Advanced settings where shown.
Select Default Protection to restore Firefox's automatic behavior. Choose Off instead when you want Firefox to use the default system resolver.
Reset all networking for broader connection problems
A full network reset affects all network adapters and their settings, so reserve it for broader connectivity trouble after the targeted DNS changes. It returns adapter settings to defaults, and VPN software or virtual switches may need reconfiguration. On Windows 11, open Settings > Network & internet > Advanced network settings > Network reset. Select Reset now, select Yes, and wait for Windows to restart.
On Windows 10, the reset also returns adapter settings to defaults and may require VPN software or virtual switches to be reconfigured. Open the Status page in network settings and select Network reset. Select Reset now, confirm with Yes, and wait for Windows to restart.
Frequently Asked Questions
Does releasing and renewing your IP address reset manual DNS servers?
Releasing and renewing refreshes DHCP configuration on automatically configured adapters and temporarily interrupts connectivity. It does not remove a manually configured DNS override or clear cached DNS answers.
Why can a hostname override remain after flushing DNS?
A persistent Hosts-file override remains because cache flushing does not remove it. Restoring the default Hosts file removes those persistent hostname overrides, which is a separate operation from clearing the DNS cache.
What if your organization enforces Windows DNS servers?
On managed Windows configurations, a DNS server policy can control server selection. An administrator must change a domain or MDM policy at its managing source. Microsoft says an unconfigured or disabled DNS servers policy permits locally configured or DHCP-provided DNS servers.
How do you restore automatic IP and DNS configuration together?
Choosing automatic IP assignment changes both IP and DNS configuration. On Windows 11, open Settings > Network & internet, then choose Wi-Fi > Manage known networks and your network, or Ethernet and the connected network. Beside IP assignment, select Edit, then under Edit IP settings, choose Automatic (DHCP) and select Save.