

Connect your Mac and wireless printer to the same network, check that the printer is ready, then add it in Printers & Scanners. If it still does not appear, add the printer using its IP address. Save a printing system reset for after the connection and software checks.
The short version
- Start with the connection: Turn on the printer and connect it to the same network as your Mac.
- Add it in macOS: Open Printers & Scanners and select Add Printer, Scanner, or Fax.
- Bypass discovery: Add a compatible network printer using its IP address when it does not appear automatically.
- Reset last: Resetting the printing system removes printers, completed jobs, and presets.
| Fix | When to use it | Main consideration |
|---|---|---|
| Check power and network | Printer is missing or unreachable | Start by checking whether both devices use the same network |
| Reconnect printer Wi-Fi | Printer is on the wrong network | Setup controls depend on the model |
| Add through macOS | Printer is connected but not added | Select the intended printer |
| Check app permissions | Printer utility cannot discover devices | Review local network access and blocking rules |
| Add by IP address | Automatic discovery fails | Use the printer’s connection details |
| Update software or run diagnostics | Connection checks have not helped | Match software to the printer and Mac |
| Repair an existing queue | Printer is already listed | Check paused jobs and application problems |
| Use a direct connection | You need another way to print | Printer must support the connection |
| Reset printing system | Earlier fixes have failed | Printers, completed jobs, and presets are removed |
Check the printer and the Mac’s network
Turn on the printer and check its display or indicators for errors. Check paper, ink or toner, paper jams, and cables before changing settings on the Mac. Confirm that you are selecting the intended printer when you try to print.
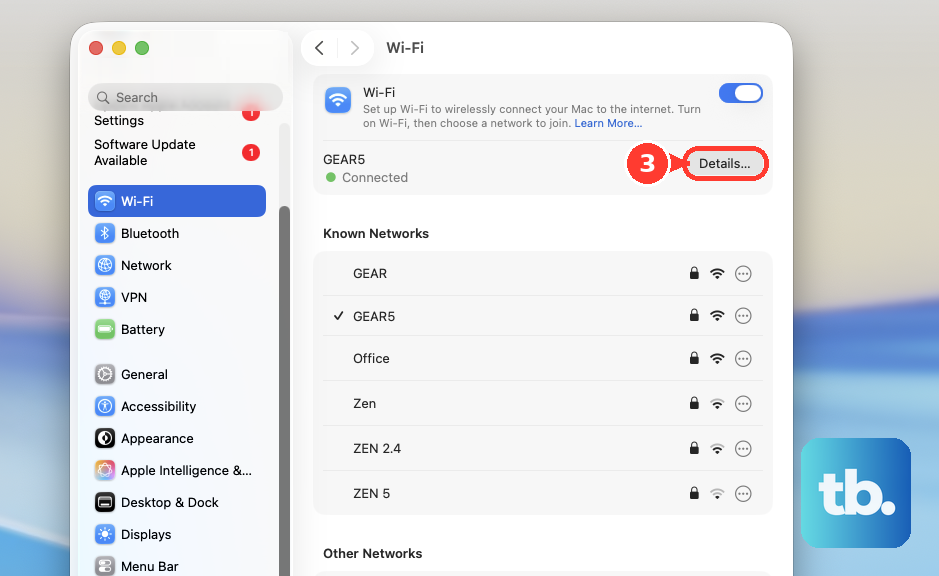
On your Mac, open the Apple menu > System Settings > Network > Wi-Fi. Turn on Wi-Fi and connect to the network used by the printer. The network must allow devices to communicate with each other.
For an HP wireless printer, restart the printer and restart your Mac, then try discovery again. Move the printer within 8 m (26 ft) of the router or extender to help improve a weak wireless signal. Check the wireless indicator against your model’s instructions, because its meaning varies by printer.
Reconnect the printer to your wireless network
If the printer is connected to a different network, reconnect it before trying to add it on the Mac. Use the connection procedure for your exact model, since the settings below apply only to the printers named.
On an HP touchscreen printer with a wireless setup wizard, open Setup, Network, or Wireless settings, then choose Wireless Setup Wizard. Select your home network and enter its password. Once the printer joins that network, return to the Mac and try adding it again.
For a Canon GX6500 series printer, open Setup > Device settings > LAN settings > Wi-Fi > Wi-Fi setting list to inspect its network name and IP address. To reconnect it, return to Wi-Fi, open Wi-Fi setup, and choose Manual connect. Follow the printer’s prompts to complete the connection.
During HP app wireless setup, temporarily disconnect your VPN and use a private network that allows device communication instead of an isolated guest or public network. Enable Wi-Fi and Bluetooth, and grant the HP app the network, Bluetooth, and location permissions it requests for your platform. These checks apply specifically to HP app setup.
Add the printer in macOS
Open System Settings > Printers & Scanners, then select Add Printer, Scanner, or Fax. Select your printer and click Add. If the printer remains missing from the selection window, continue with the IP address checks below.
For an AirPrint printer, you can also start inside the application you want to print from. Choose File > Print, open the Printer menu, and select the printer or choose Add Printer. Confirm that the intended printer is selected before sending the document.
Allow the printing app onto the local network
If your printer utility or printing app cannot find the printer, open the Apple menu > System Settings > Privacy & Security > Local Network. Turn on access for the affected app listed there. This applies to macOS versions with local network privacy controls; if the app is not listed, continue to the IP address method.
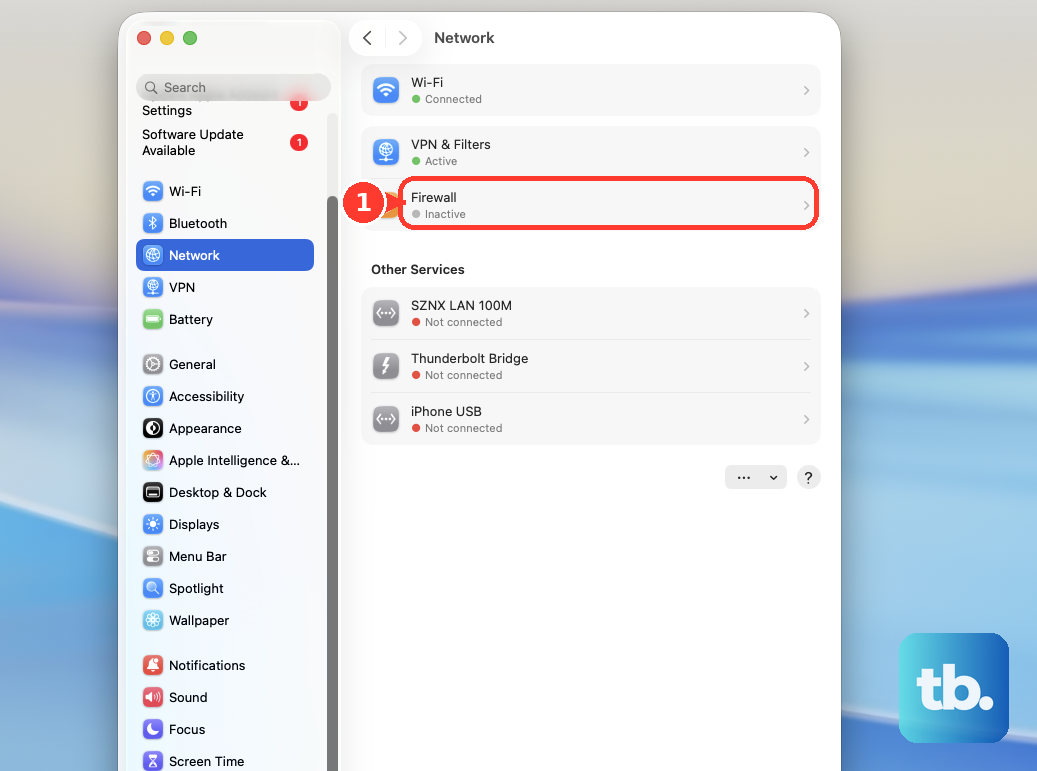
When a firewall rule blocks the app or service’s required communication, open the Apple menu > System Settings > Network > Firewall > Options. Review the affected app or service, using Add if you need to add it, then use its connection menu to permit access. Keep the change specific to the app or service that needs access.
Add the printer using its IP address
You can bypass automatic discovery by adding a printer’s address if it supports AirPrint, IPP, LPD, or HP Jetdirect. Obtain its IP address and connection details from the printer or your administrator. For a Canon GX6500 series model, the Wi-Fi setting list described above displays the IP address.
Open System Settings > Printers & Scanners > Add Printer, Scanner, or Fax, then select IP. Enter the printer’s address in Address and choose the appropriate Protocol. Complete Queue when the printer requires it, choose the appropriate software under Use, and click Add.
Match those fields to the printer’s connection details rather than guessing the protocol or queue. Choose AirPrint under Use when the printer supports it. If adding by address does not resolve the problem, check compatible software next.
Update compatible software and run HP diagnostics
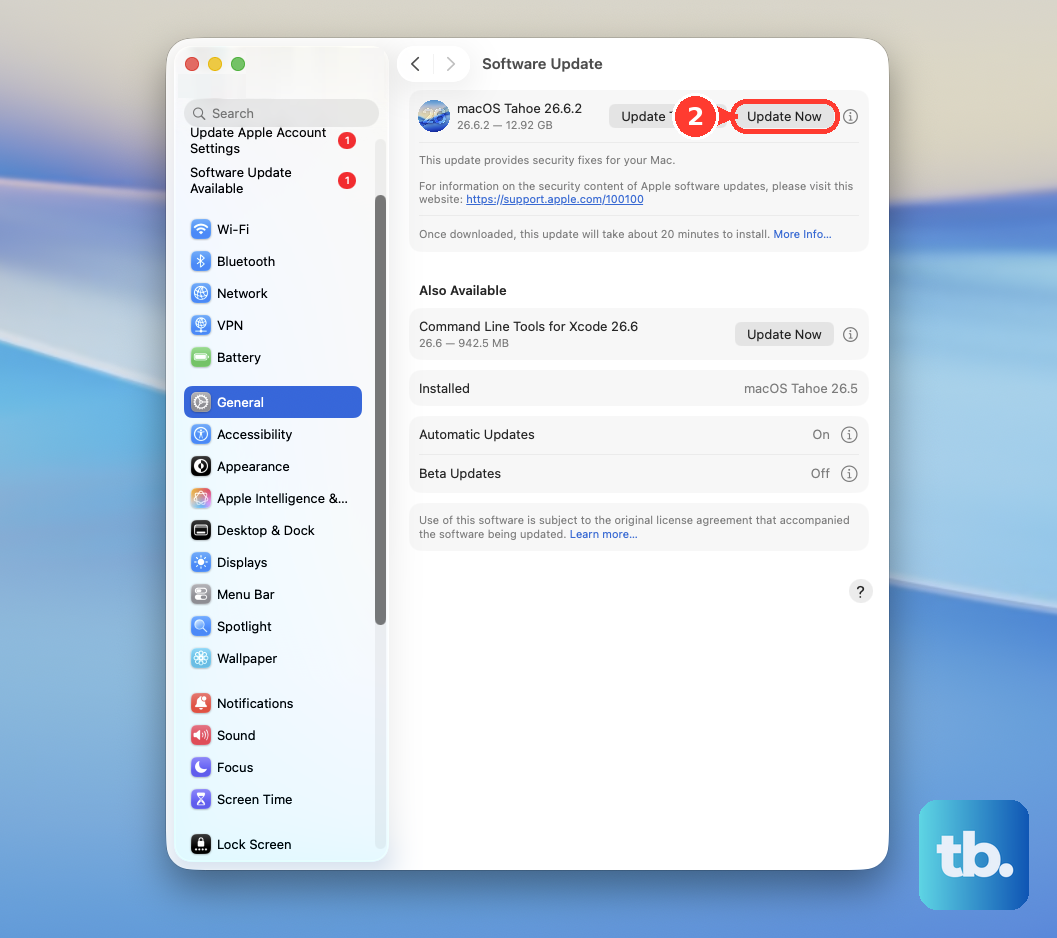
To install compatible macOS updates, open the Apple menu > System Settings > General > Software Update. Install the updates offered for your Mac. Printer software also needs to match both the exact printer and your macOS version.
For an HP printer, open the official printer software download page and enter its serial number, product number, or product name. Select software offered for your model and macOS version. For Epson, find your exact model on the official printer support page and obtain the downloads offered for your Mac’s operating system.
On macOS 12 or later with a compatible HP printer, run the diagnostic tool in the HP app or HP Smart 5.5.2 or later. Select the printer and choose Diagnose & Fix; depending on your app’s layout, choose Printers > Diagnose & Fix or Diagnostics > Diagnose and Fix. Click Start, keep the app open, and follow its results.
HP directs you to Diagnose & Fix for this problem; its retired Print and Scan Doctor was Windows-only. If you need the current app or setup software, obtain it from HP’s official setup page.
Repair a printer that is already listed
If the printer is already added to macOS, check whether the problem is a paused queue or one application. Open Applications > Utilities > Print Center, select the printer, and click Resume for a paused printer or select a job and click Resume Job. These actions address existing queues and do not repair missing network discovery.
Deleting an obstructing failed job removes that job from the queue. To clear it, select the failed job in Print Center and click Delete Job.
To check printing outside the original application, select the printer in Print Center and choose Printer > Print Test Page. You can also try printing from TextEdit. If TextEdit prints successfully, investigate the original application’s printing settings and instructions.
If the installed printer’s software uses Print Dialog Extensions and those are causing trouble, open System Settings > Printers & Scanners, select the printer, and open Options & Supplies. Select Use Generic Printer Features, then click OK.
Removing the printer deletes its existing printer entry from the Mac. To rebuild that entry, open System Settings > Printers & Scanners, hold Control while clicking the printer, choose Remove Printer, and click Remove Printer again. Add it again, choosing AirPrint under Use when supported, Select Software for an installed driver, or Other for a driver file.
Use a direct connection when you need to print
If your printer supports USB, connect it directly to the Mac as an alternative connection. You can use this connection while working through wireless setup.
For an HP Wi-Fi Direct printer already configured with the HP app or the macOS built-in driver, obtain its Wi-Fi Direct credentials from its display or information report. Select the printer’s DIRECT network on your Mac, enter its password, and click Join. Choose File > Print, select the printer, and click Print, then rejoin your normal Wi-Fi network afterward.
Reset the printing system as a last resort
Resetting the printing system removes printers, completed jobs, and presets. After the earlier fixes have failed, open System Settings > Printers & Scanners. Hold Control while clicking the Printers list, then choose Reset Printing System.
Add your printers again after the reset. Return to Add Printer, Scanner, or Fax and select the wireless printer, or use the IP method with its connection details. For an added printer, use Print Center to print a test page.
Frequently Asked Questions
Can a USB cable help set up wireless printing?
Yes, if the printer maker provides a compatible USB-assisted wireless setup utility. Connect the printer to your Mac by USB, install its compatible setup software, and run the printer setup assistant to enter the Wi-Fi details. Disconnect USB after setup.
Does Bluetooth support mean the printer can print over Bluetooth?
Bluetooth used for setup discovery does not necessarily mean the printer supports Bluetooth printing. For a printer that supports Bluetooth printing, prepare it using its manual, select it in Add Printer, Scanner, or Fax, and click Add.
Do all wireless printers need a 2.4 GHz network?
No, wireless band requirements depend on your printer model. For an Epson WF-2830 connection problem, print its network status or connection report and check the network name, signal, and IP address. Make sure your router has a compatible band enabled, and restart the router using its instructions.
Do you need Printer Sharing for a wireless printer?
Ordinary network and AirPrint printers do not require your Mac’s Printer Sharing switch. If the printer is attached directly to another Mac, keep that host Mac awake and open System Settings > General > Sharing on it. Open the Printer Sharing information button, turn on Printer Sharing, select the printer, grant the intended users access, and click Done.
What printer setting can you check if a Canon GX6500 stays missing?
On a Canon GX6500 series printer, check that Bonjour is enabled. Open Setup > Device settings > LAN settings > Wi-Fi > Advanced > Bonjour settings > Enable/disable Bonjour, then select Enable. These labels apply to the GX6500 series.